ECMP

This chapter describes the procedure to configure Equal Cost Multi-Path (ECMP) routing that routing protocols use to load balance the network traffic.

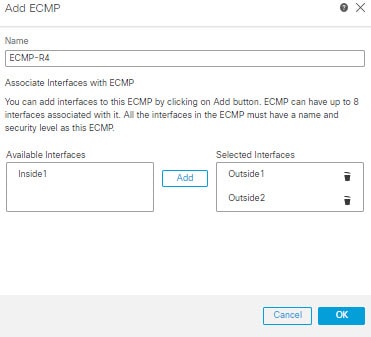
ECMP routing methods

ECMP is a routing method that

  • enables traffic distribution across multiple equal-cost paths,

  • supports up to 8 equal cost static or dynamic routes across up to 8 interfaces within each zone, and

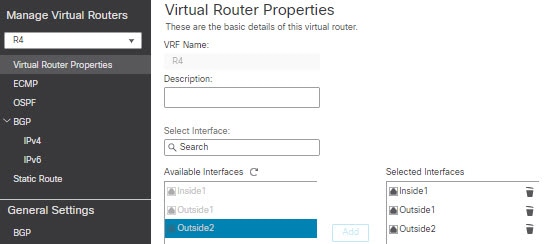
  • uses traffic zones per virtual router to contain a group of interfaces.

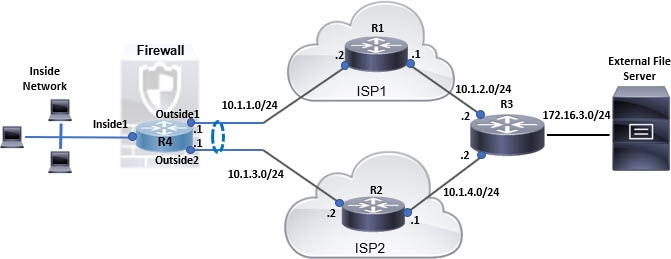
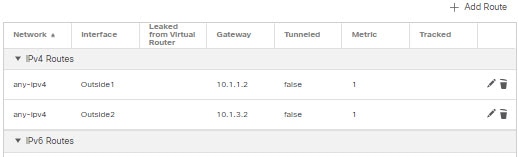
Multiple default routes configuration

This example shows multiple default routes configured across three interfaces in the zone:

route for 0.0.0.0 0.0.0.0 through outside1 to 10.1.1.2

route for 0.0.0.0 0.0.0.0 through outside2 to 10.2.1.2

route for 0.0.0.0 0.0.0.0 through outside3 to 10.3.1.2

Guidelines and limitations for ECMP

Follow these principles for effective ECMP zones configuration:

Firewall mode limitations

Use ECMP zones only in routed firewall mode.

Interface restrictions

Do not use dVTI or Loopback interfaces with ECMP zones.

ECMP zone configuration limits

Follow these limits when configuring ECMP zones:

  • Devices can have a maximum of 256 ECMP zones.

  • You can associate only 8 interfaces per ECMP zone.

  • An interface can be a member of only one ECMP zone.

Interface management limitations

Do not remove interfaces or delete zones actively used for routing:

  • You cannot remove an interface that is associated with an equal cost static route from the ECMP zone.

  • You cannot delete an ECMP zone if its interface has equal cost static routes associated with it.

Supported interface types

Use only routed interfaces for ECMP zones. Do not associate these interface types with an ECMP zone:

  • BVI interface.

  • Member interfaces in an EtherChannel.

  • Failover or state link interface.

  • Management-only or management-access interfaces.

  • Cluster control link interface.

  • VNIs.

  • VLAN interfaces.

  • Interfaces in a remote access VPN configuration with SSL enabled.

Feature compatibility limitations

Consider these feature limitations when using ECMP zones:

  • DHCP Relay is not supported on interfaces in an ECMP zone.

  • Dual ISP/WAN Firewall Threat Defense Deployment—Create a single ECMP zone for the primary and secondary data interfaces, enabling static routes with identical metric values.

  • The Firewall Threat Defense does not support ECMP with NAT in IPsec sessions—a standard IPsec virtual private network (VPN) tunnel does not work with NAT points in the delivery path of IPsec packets.

Manage ECMP zones for virtual routers

The ECMP page provides functionalities to manage existing ECMP zones linked with virtual routers. When you click ECMP on the Routing pane, the ECMP page displays the current ECMP zones, including the associated interfaces, for the virtual routers. On this page, you have functionalities to add new ECMP zones to the virtual router. You can also Edit (edit icon) and Delete (delete icon) ECMP.

You can perform these actions:

Create an ECMP zone

Create an ECMP zone to enable load balancing across multiple equal-cost paths in a virtual router configuration.

ECMP zones are created per virtual router. Only interfaces that belong to the virtual router where the ECMP is being created can be associated with the ECMP.

Procedure


Step 1

Navigate to the Devices > Device Management, and edit the Firewall Threat Defense device.

Step 2

Click Routing.

Step 3

From the virtual router drop-down, select the virtual router in which you want to create the ECMP zone.

You can create ECMP zones in global virtual router and user-defined virtual routers. For information on creating virtual routers, see Create a Virtual Router.

Step 4

Click ECMP.

Step 5

Click Add.

Step 6

In the Add ECMP box, enter a name for the ECMP zone.

Note


The ECMP name must be unique for the routed device.

Step 7

Under the Available Interfaces box, select the interface and click Add.

  • Only interfaces belonging to the virtual router where you are creating the ECMP can be associated with it. Interfaces must have a logical name to be displayed; edit the interface and save to set a logical name.

  • From Version 10.0, ECMP is supported on dynamic VTIs (DVTIs) of hub devices in SD-WAN VPN topologies. When enabled on a DVTI, it is automatically added to a system-generated ECMP zone, so DVTIs do not appear under Available Interfaces.

Step 8

Click OK.

The ECMP page displays your newly created ECMP zone.

Step 9

Click Save and Deploy the configuration.


You can associate the ECMP zone interfaces with equal cost static route by defining them with the same destination and metric value but with a different gateway.

What to do next

Configure an equal cost static route

Configure equal cost static routes to enable load balancing across multiple interfaces with the same destination and metric value within an ECMP zone.

Smart License Classic License Supported Devices Supported Domains

Access

Any

N/A

Firewall Threat Defense and Firewall Threat Defense Virtual

Any

Admin/Network Admin/Security Approver

You can assign interfaces of a virtual router, both global and user-defined, to an ECMP zone for the device.

Before you begin

  • To configure an equal cost static route for an interface, ensure to associate it with an ECMP zone. See Create an ECMP zone.

  • All routing configuration settings of a non-VRF capable device are also available for a global virtual router.

  • You cannot define a static route for interfaces with same destination and metric without associating the interfaces with an ECMP zone.

Procedure


Step 1

From the Devices > Device Management page, edit the Firewall Threat Defense device. Click the Routing tab.

Step 2

From the drop-down list, select the virtual router whose interfaces are associated with an ECMP zone.

Step 3

To configure the equal cost static route for the interfaces, click Static Route.

Step 4

Either click Add Route to add a new route, or click Edit (edit icon) for an existing route.

Step 5

From the Interface drop-down, select the interface belonging to the virtual router and an ECMP zone.

Step 6

Select the destination network from the Available Networks box and click Add.

Step 7

Enter a gateway for the network.

Step 8

Enter a metric value. It can be a number that ranges between 1 and 254.

Step 9

To save the settings, click Save.

Step 10

To configure equal cost static routing, repeat these steps to configure the static route for another interface in the same ECMP zone with the same destination network and metric value. Remember to provide a different gateway.


The equal cost static routes are configured for the interfaces associated with the ECMP zone, enabling load balancing across multiple paths.

What to do next

Modify an ECMP zone

Use this procedure when you need to make changes to an existing ECMP zone configuration on your device.

Follow these steps to modify an ECMP zone:

Procedure


Step 1

Choose Devices > Device Management, and edit the Firewall Threat Defense device.

Step 2

Click Routing.

Step 3

Click ECMP.

ECMP zones with their associated interfaces appear.

Step 4

To modify an ECMP, click Edit (edit icon) next to the desired ECMP zone. In the Edit ECMP box, you can do the following:

  • ECMP Name—Make sure your changes are unique.

  • Interfaces— Add or remove interfaces.

    Note

     
    An interface must not belong to more than one ECMP zones, nor should it be linked to an equal-cost static route.

Step 5

Click OK.

Step 6

Click Save to save the changes.


The ECMP zone reflects your updated settings.

What to do next

Remove an ECMP zone

ECMP zones group interfaces for equal-cost multipath routing. You may need to remove an ECMP zone when reconfiguring your network topology or when the zone is no longer required.

Procedure


Step 1

Choose Devices > Device Management, and edit the Firewall Threat Defense device.

Step 2

Click Routing.

Step 3

Click ECMP.

The ECMP zones with associated interfaces appear.

Step 4

To remove an ECMP zone, click Delete (delete icon) next to the ECMP zone.

Note


You cannot delete the ECMP zone if it has interfaces associated with equal-cost static routes.

Step 5

Click Delete in the confirmation message.

Step 6

Click Save to apply changes.


The ECMP zone is removed from the device configuration and is no longer available for routing operations.

Configure ECMP

Configure ECMP to enable efficient traffic handling through the device with support for asymmetric routing, load balancing, and seamless handling of lost traffic.

This example demonstrates how to use Cloud-Delivered Firewall Management Center to configure ECMP zones on Firewall Threat Defense such that the traffic flowing through the device is handled efficiently. With ECMP configured, Firewall Threat Defense maintains the routing table on a per-zone basis, enabling efficient packet re-routing. Thus, ECMP supports asymmetric routing, load balancing, and seemleess handling of lost traffic. In this example, R4 records the two paths to reach the external file server.

Figure 1. Configuration example for ECMP
Configuration example for ECMP

Follow these steps to configure ECMP on your device:

Procedure


Step 1

Create a virtual router.

Set up a new router on R4 with interfaces: Inside1, Outside1, and Outside2. For more information, refer to Create virtual router.

Figure 2. Configuring R4 virtual router
Configuring R4 virtual router

Step 2

Create ECMP zones:

  1. In the Routing tab, choose R4 user defined virtual router, and then click ECMP.

  2. Click Add.

  3. Enter the ECMP name and from the Available Interfaces list, choose Outside1 and Outside2:

    Figure 3. Creating ECMP zone
    Creating ECMP zone
  4. Click Ok, and then Save.

Step 3

Create static routes for the zone interfaces:

  1. In the Routing tab, click Static Route.

  2. From the Interface drop-down list, select Outside1.

  3. Under Available Network, choose any-ipv4 and click Add.

  4. Specify the next-hop address in the Gateway field, 10.1.1.2.

    Figure 4. Configuring static route for Outside1
    Static route for outside1
  5. Configure the static route for Outside2 by repeating steps Step 3b through Step 3d.

Ensure to specify the same metric but different gateways for the static routes:

Figure 5. Configured static routes of ECMP zone interfaces
Static routes of ECMP zone interfaces

Step 4

Save the configuration and proceed to deploy it onto the network.


Network packets will now utilize efficient routes to reach their destination R3, either through R4>R1>R3 or R4>R2>R3, following the ECMP algorithm configuration. If the R1>R3 route becomes unavailable, the traffic will flow through R2 without dropping any packets. Additionally, the response from R3 can be received by Outside2 though the packet was sent from Outside1. When network traffic is heavy, R4 distributes the network load between two specified routes to maintain balanced traffic.