Users

The Cloud-Delivered Firewall Management Center includes default admin accounts for web and CLI access. This chapter discusses how to create custom user accounts.

CLI users

A CLI user is a user account that

  • can be added as internal users or as external users on a LDAP or RADIUS server

  • is maintained separately on each managed device, and

  • requires separate configuration for access to the Cloud-Delivered Firewall Management Center versus managed devices.

User account separation

When you add a user to the Cloud-Delivered Firewall Management Center, that user only has access to the Cloud-Delivered Firewall Management Center; you cannot then use that username to log directly into a managed device. You must separately add a user on the managed device.

Internal and external users

Internal and external users are authentication categories that managed devices support for user access control.

  • Internal users authenticate through a local database on the device

  • External users authenticate through external LDAP or RADIUS authentication servers when not present in the local database, and

  • both user types enable secure access management to network devices.

User authentication types

Managed devices support these user authentication methods:

  • Internal user—The device checks a local database for user authentication.

  • External user—If the user is not present in the local database, the system queries an external LDAP or RADIUS authentication server.

User roles

Web Interface User Roles

There are a variety of user roles in Security Cloud Control (Security Cloud Control): Read-Only, Edit-Only, Deploy-only, Admin, and Super Admin. User roles are configured for each user on each tenant. If a Security Cloud Control user has access to more than one tenant, they may have the same user ID but different roles on different tenants. A user may have a read-only role on one tenant and a Super Admin role on another. When the interface or the documentation refers to a Read-only user, Deploy Only, Edit Only, an Admin user, or a Super Admin user we are describing that user's permission level on a particular tenant. Note that you cannot create user roles in the Cloud-Delivered Firewall Management Center because it uses Security Cloud Control user roles.

Read Only

Read Only users can view all device configurations but cannot change them.

Deploy Only

Deploy Only users can audit queued changes made to device configurations and deploy them but cannot change them.

Edit Only

Edit Only users can make changes to all device configurations but cannot deploy them to devices.

Super Admin and Admin

Super Admin and Admin users can access everything in the product. As a Super Admin, you can create accounts for other users on a tenant and modify existing user roles. As an Admin, you cannot create accounts or modify user roles.

For more information about user roles in Security Cloud Control, refer to User Roles.

This table shows the mapping of user roles in On-Premises Firewall Management Center to their equivalent roles in the cloud-delivered Firewall Management Center in Security Cloud Control.

Tip


We recommend that you read through the table only if you are familiar with the user roles in On-Premises Firewall Management Center.


Table 1. Secure Firewall Management Center and Cloud-Delivered Firewall Management Center User Role Mapping

On-Premises Firewall Management Center User Role

Equivalent Cloud-Delivered Firewall Management Center User Role

Capabilities

Access Admin, Discovery Admin, Intrusion Admin, Maintenance User

Edit Only

You can search, filter, or view these:

  • Access control policies and associated features

  • Intrusion policies

  • Intrusion rules

  • Network discovery rules

  • Custom detectors

  • Correlation policies

  • Objects

  • Rulesets

  • Interfaces

  • VPN configurations

  • Monitoring- and maintenance-related settings

You can back up or restore a device but cannot deploy policies to the devices.

Administrator

Super Admin

You can access all features of the Cloud-Delivered Firewall Management Center and perform tasks, including create, read, modify, or delete policies or objects and deploy those changes to the devices. You can also edit user roles or create user records in Security Cloud Control.

Network Admin

Admin

You can access all features of the cloud-delivered Firewall Management Center and perform tasks, including create, read, modify, or delete policies or objects and deploy those changes to the devices. However, you cannot edit user roles or create user records in Security Cloud Control.

Security Analyst, Security Analyst (Read Only)

Read Only

You can view device information, policies, objects, and their related settings but cannot do these:

  • Create or edit objects

  • Create or edit policies

  • Modify device configurations

  • Backup or restore devices

Security Approver

Deploy Only

You can view most settings and deploy staged changes to devices but cannot create or modify objects or policies.

Create a User Record with Your Security Cloud Control Username

Only a Security Cloud Control user with Super Admin privileges can create the Security Cloud Control user record. The Super Admin must create the user record with the same email address that was specified in the Create Your Security Cloud Control Username task above.

Use the following procedure to create a user record with an appropriate user role:

Procedure


Step 1

Login to Security Cloud Control.

Step 2

In the left pane, choose Settings > User Management.

Step 3

Click to add a new user to your tenant.
Step 4

Provide the email address of the user.

Note


The user's email address must correspond to the email address of the Cisco Secure Log-On account.

Step 5

From the Role drop-down list, select the user's role.

Step 6

Click OK.


external authentication configuration for Cloud-Delivered Firewall Management Center

An external authentication configuration is a security setup that

  • adds one or more external authentication objects

  • enables users to authenticate through external identity providers, and

  • replaces local credential authentication with external authentication.

External authentication objects for Cloud-Delivered Firewall Management Center

An external authentication object is a security configuration element that

  • enables the Cloud-Delivered Firewall Management Center to verify user credentials with LDAP or RADIUS servers

  • supports multiple objects for web interface access, allowing users from any configured object to authenticate, and

  • restricts CLI access to a single external authentication object, permitting authentication only through the first object in the list.

External authentication object usage and configuration

External authentication objects can be used by the Cloud-Delivered Firewall Management Center and Firewall Threat Defense devices. You can either share the same object across different devices or create distinct objects for each device type.

For the Cloud-Delivered Firewall Management Center, enable the external authentication objects directly on the System (system gear icon) > Users > External Authentication tab. This setting affects only Cloud-Delivered Firewall Management Center usage. You do not need to enable it on this tab for managed device usage. For Firewall Threat Defense devices, enable the external authentication object in the platform settings that you deploy to the devices.

Define web interface users and CLI users separately in the external authentication object. For RADIUS, pre-configure the list of CLI usernames in the object. For LDAP, set up a filter on the LDAP server to match CLI users.


Note


Users with CLI access can gain Linux shell access with the expert command. Linux shell users can obtain root privileges. This access creates a security risk. Make sure you:

  • Restrict the list of users with CLI or Linux shell access.

  • Do not create Linux shell users.


External authentication object configuration example

If you have five external authentication objects configured for web interface access, users from any of them can be authenticated to access the web interface. For CLI access, only the first external authentication object in the list is used for authentication.

Unsupported external authentication object scenario

You cannot use an LDAP object for CLI access if it is also configured for CAC authentication.

External authentication object analogy

An external authentication object functions as a control point, permitting access only to users with valid credentials from specified sources.

LDAP

The Lightweight Directory Access Protocol (LDAP) is a directory service protocol that allows you to set up a directory on your network that organizes objects, such as user credentials, in a centralized location. Multiple applications can then access those credentials and the information used to describe them. If you ever need to change a user's credentials, you can change them in one place.

LDAP binding information

Microsoft has announced that Active Directory servers will start enforcing LDAP binding and LDAP signing in 2020. Microsoft is making these a requirement because when using default settings, an elevation of privilege vulnerability exists in Microsoft Windows that could allow a man-in-the-middle attacker to successfully forward an authentication request to a Windows LDAP server. For more information, see 2020 LDAP channel binding and LDAP signing requirement for Windows on the Microsoft support site.

If you have not done so already, we recommend you start using TLS/SSL encryption to authenticate with an Active Directory server.

RADIUS

RADIUS is a network authentication protocol that

  • provides centralized authentication and authorization for network access

  • operates using client-server architecture for user credential verification, and

  • supports accounting functions to track user sessions and network usage.

Guidelines

Remote Authentication Dial In User Service (RADIUS) is an authentication protocol used to authenticate, authorize, and account for user access to network resources. You can create an authentication object for any RADIUS server that conforms to RFC 2865.

Secure Firewall devices support the use of SecurID tokens. When you configure authentication by a server using SecurID, users authenticated against that server append the SecurID token to the end of their SecurID PIN and use that as their password when they log in. You do not need to configure anything extra on the Secure Firewall device to support SecurID.

  • The default RADIUS authentication port is 1812.

  • The default RADIUS accounting port is 1813 (one number more than the RADIUS authentication port).

If you change the RADIUS authentication port, the RADIUS accounting port changes accordingly. Ensure that the Cloud-Delivered Firewall Management Center can connect to the RADIUS server on the new accounting port; otherwise, authentication delays may occur.

Although you cannot configure RADIUS accounting parameters, the Firewall Threat Defense uses port 1813 for RADIUS accounting on the same server used for authentication. If the RADIUS server is unreachable on port 1813, it can cause delays in logging in.

Add an LDAP external authentication object for the Security Cloud Control

Add an LDAP server to support external users for device management.

Before you begin

  • You must specify DNS server(s) for domain name lookup on your device. Even if you specify an IP address for the LDAP server during this procedure, the server may return a URI for authentication that includes a hostname. A DNS lookup is required to resolve the hostname.

  • If you are configuring an LDAP authentication object for use with CAC authentication, do not remove the CAC from your computer. You must have a CAC inserted at all times after enabling user certificates.

Procedure


Step 1

Choose a Server Type from the drop-down list.

Tip


If you click Set Defaults , the device populates the User Name Template , UI Access Attribute , CLI Access Attribute , Group Member Attribute , and Group Member URL Attribute fields with default values for the server type.

Step 2

For the Primary Server, enter a Host Name/IP Address. If you are using a certificate to connect via TLS or SSL, the host name in the certificate must match the host name used in this field. In addition, IPv6 addresses are not supported for encrypted connections. Now, change the Port from the default and enter the Backup Server parameters and LDAP-Specific Parameters.

  1. Enter the Base DN for the LDAP directory you want to access. For example, to authenticate names in the Security organization at the Example company, enter ou=security,dc=example,dc=com . Alternatively click Fetch DNs , and choose the appropriate base distinguished name from the drop-down list.

  2. (Optional) Enter the Base Filter . For example, if the user objects in a directory tree have a physicalDeliveryOfficeName attribute and users in the New York office have an attribute value of NewYork for that attribute, to retrieve only users in the New York office, enter (physicalDeliveryOfficeName=NewYork) .

    If you are using CAC authentication, to filter only active user accounts (excluding the disabled user accounts), enter (!(userAccountControl:1.2.840.113556.1.4.803:=2)) . This criteria retrieves user accounts within AD belonging to ldpgrp group and with userAccountControl attribute value that is not 2 (disabled).

  3. Enter a User Name for a user who has sufficient credentials to browse the LDAP server. For example, if you are connecting to an OpenLDAP server where user objects have a uid attribute, and the object for the administrator in the Security division at your example company has a uid value of NetworkAdmin , you might enter uid=NetworkAdmin,ou=security,dc=example,dc=com.

  4. Enter the user password in the Password and the Confirm Password fields.

  5. (Optional) Click Show Advanced Options to configure these advanced options.

    • Encryption —Click None , TLS , or SSL .

      If you change the encryption method after specifying a port, you reset the port to the default value for that method. For None or TLS , the port resets to the default value of 389

      • None — LDAP communication is unencrypted.

      • TLS — LDAP communication is upgraded to TLS using the STARTTLS operation on default port 389

      • SSL — LDAP communication is encrypted using TLS immediately upon connection (LDAPS) on default port 636.

    • SSL Certificate Upload Path —For SSL or TLS encryption, click Choose File and choose the complete CA chain certificate.

      Note


      Do not choose a binary certificate (PKCS12, DER, and alike) file because Firewall Threat Defense does not support them.

      To remove the uploaded certificate, check the Clear loaded certificate check box. This option only appears when you have uploaded a certificate, and when you are in the Edit mode of the external authentication object.

      If you had previously uploaded a certificate and want to replace it, reupload the new certificate (complete CA chain), and redeploy the configuration to your devices to copy over the new certificate.

      Note


      TLS encryption requires a certificate on all platforms. We recommend that you always upload a certificate for SSL to prevent adversary-in-the-middle attacks.

    • User Name Template —Provide a template that corresponds with your UI Access Attribute . For example, to authenticate all users who work in the Security organization of the Example company by connecting to an OpenLDAP server where the UI access attribute is uid , you might enter uid=%s,ou=security,dc=example,dc=com in the User Name Template field. For a Microsoft Active Directory server, you could enter %s@security.example.com .

      This field is required for CAC authentication.

    • Shell User Name Template —Provide a template that corresponds with your CLI Access Attribute to authenticate CLI users. For example, to authenticate all users who work in the Security organization by connecting to an OpenLDAP server where the CLI access attribute is sAMAccountName , you might enter %s in the Shell User Name Template field.

    • Timeout (Seconds) —Enter the number of seconds before rolling over to the backup connection, between 1 and 1024. The default is 30.

      Note


      The timeout range is different for Firewall Threat Defense and the Cloud-Delivered Firewall Management Center , so if you share an object, be sure not to exceed the Firewall Threat Defense 's smaller timeout range (1-30 seconds). If you set the timeout to a higher value, the Firewall Threat Defense LDAP configuration will not work.

Step 3

Configure Attribute Mapping to retrieve users based on an attribute.

  • Enter a UI Access Attribute , or click Fetch Attrs to retrieve a list of available attributes. For example, on a Microsoft Active Directory Server, you may want to use the UI access attribute to retrieve users, because there may not be a uid attribute on Active Directory Server user objects. Instead, you can search the userPrincipalName attribute by typing userPrincipalName in the UI Access Attribute field.

  • Set the CLI Access Attribute if you want to use a shell access attribute other than the user distinguished type. For example, on a Microsoft Active Directory Server, use the sAMAccountName CLI access attribute to retrieve CLI access users by typing sAMAccountName .

Step 4

(Optional) Configure Group Controlled Access Roles.

If you do not configure a user’s privileges using group-controlled access roles, a user has only the privileges granted by default in the external authentication policy.

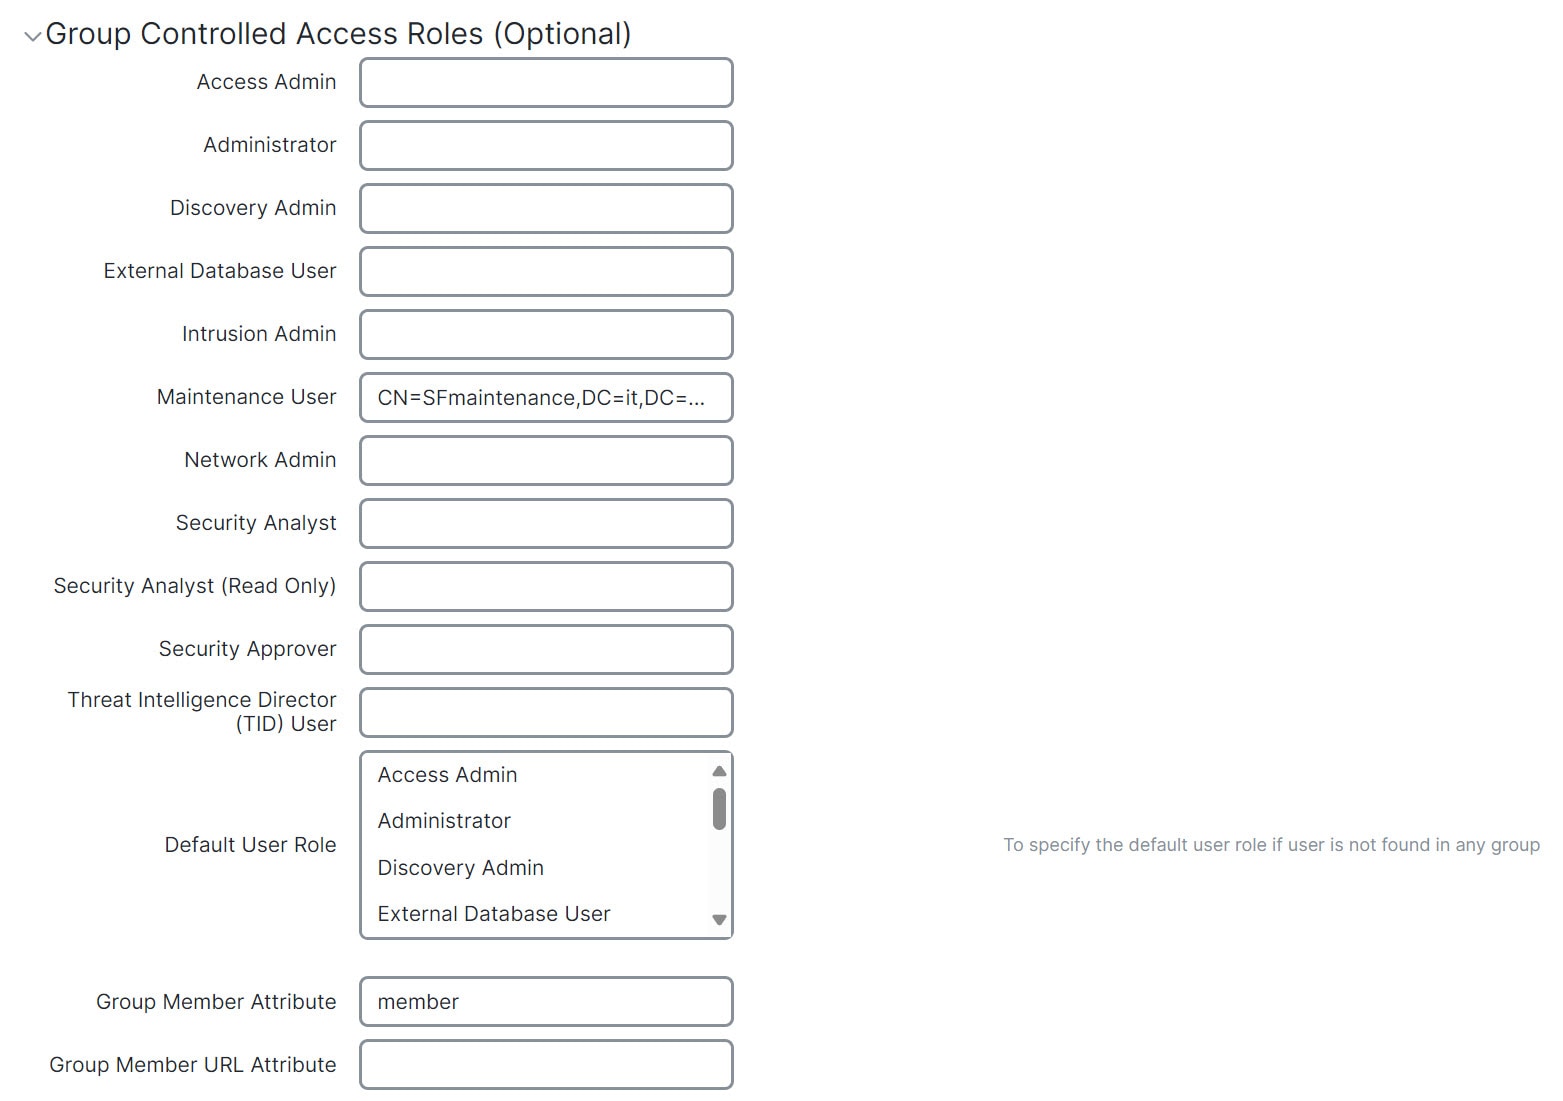
  1. (Optional) In the fields that correspond to user roles, enter the distinguished name for the LDAP groups that contain users who should be assigned to those roles.

    Any group you reference must exist on the LDAP server. You can reference static LDAP groups or dynamic LDAP groups. Static LDAP groups are groups where membership is determined by group object attributes that point to specific users, and dynamic LDAP groups are groups where membership is determined by creating an LDAP search that retrieves group users based on user object attributes. Group access rights for a role only affect users who are members of the group.

    If you use a dynamic group, the LDAP query runs exactly as it is configured on the LDAP server. To prevent infinite loops caused by search syntax errors, the device limits recursions of a search to four.

    Example:

    Enter this in the Administrator field to authenticate names in the information technology organization at the Example company:

    
    cn=itgroup,ou=groups, dc=example,dc=com
    
  2. Choose a Default User Role for users that do not belong to any of the specified groups.

  3. If you use static groups, enter a Group Member Attribute .

    Example:

    If the member attribute is used to indicate membership in the static group for default Security Analyst access, enter member .

  4. If you use dynamic groups, enter a Group Member URL Attribute .

    Example:

    If the memberURL attribute contains the LDAP search that retrieves members for the dynamic group you specified for default Admin access, enter memberURL .

Step 5

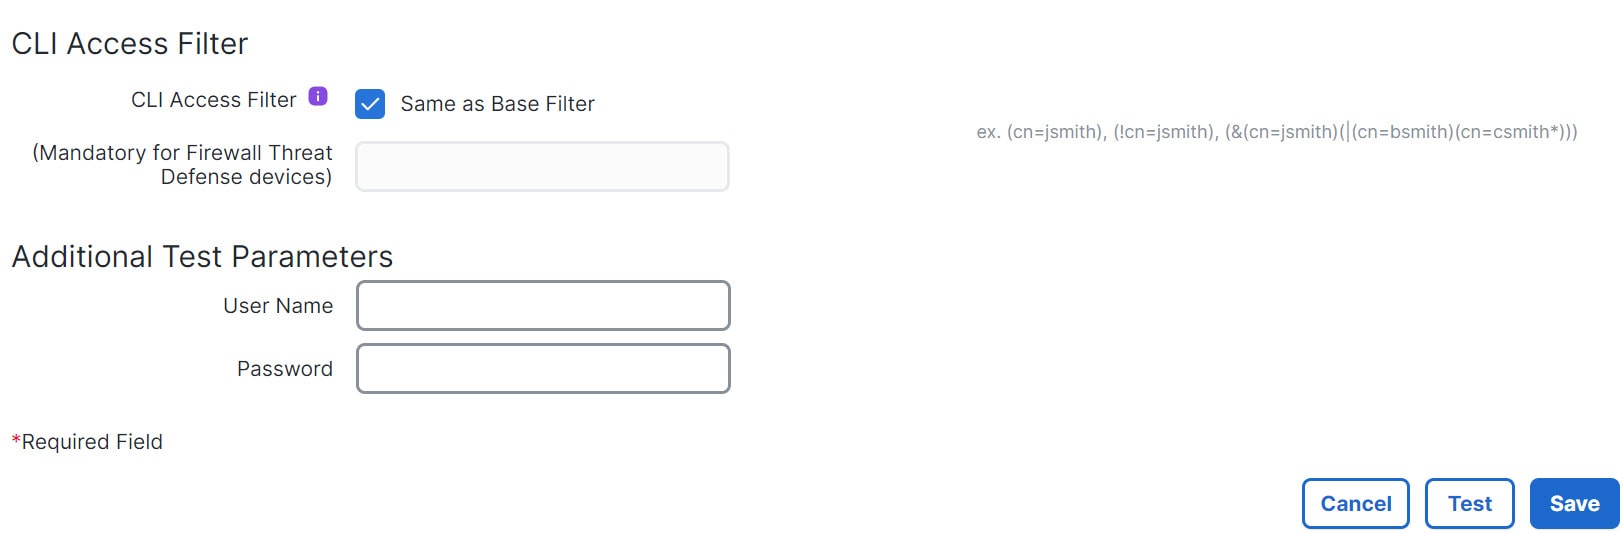
(Optional) Set the CLI Access Filter to allow CLI users.

To prevent LDAP authentication of CLI access, leave this field blank. To specify CLI users, choose one of these methods:

  • To use the same filter you specified when configuring authentication settings, check the check box of Same as Base Filter .

  • To retrieve administrative user entries based on attribute value, enter the attribute name, a comparison operator, and the attribute value you want to use as a filter, enclosed in parentheses. For example, if all network administrators have a manager attribute which has an attribute value of shell , you can set a base filter of (manager=shell) .

The usernames must be Linux-valid:

  • Maximum 32 alphanumeric characters, plus period (.), hyphen (-), and underscore (_)

  • All lowercase

  • Cannot start with hyphen (-); cannot be all numbers; cannot include at sign (@) or slash (/)

Note


Users with CLI access can gain Linux shell access with the expert command. "Linux shell users can obtain root privileges, which presents a security risk. Make sure that you restrict the list of users with CLI or Linux shell access.

Note


Do not create any internal users that have the same user name as users included in the CLI Access Filter. The only internal Cloud-Delivered Firewall Management Center user should be admin ; do not include an admin user in the CLI Access Filter.

Step 6

(Optional) Click Test to test connectivity to the LDAP server.

The test output lists valid and invalid user names. Valid user names are unique, and can include underscores ( _ ), periods ( . ), hyphens ( - ), and alphanumeric characters. Note that testing the connection to servers with more than 1000 users only returns 1000 users because of UI page size limitations. If the test fails, refer to Troubleshoot LDAP authentication connections .

Step 7

(Optional) You can also enter Additional Test Parameters to test user credentials for a user who should be able to authenticate: enter a User Name uid and Password , and then click Test. Click Save. Enable use of this server. Refer to Enable external authentication for users on the CDO.

If you are connecting to a Microsoft Active Directory Server and supplied a UI access attribute in place of uid , use the value for that attribute as the user name. You can also specify a fully qualified distinguished name for the user.

Tip


If you mistype the name or password of the test user, the test fails even if the server configuration is correct. To verify that the server configuration is correct, click Test without entering user information in the Additional Test Parameters field first. If that succeeds, supply a user name and password to test with the specific user.

Example:

To test if you can retrieve the JSmith user credentials at the Example company, enter JSmith and the correct password.


Examples

Basic Example

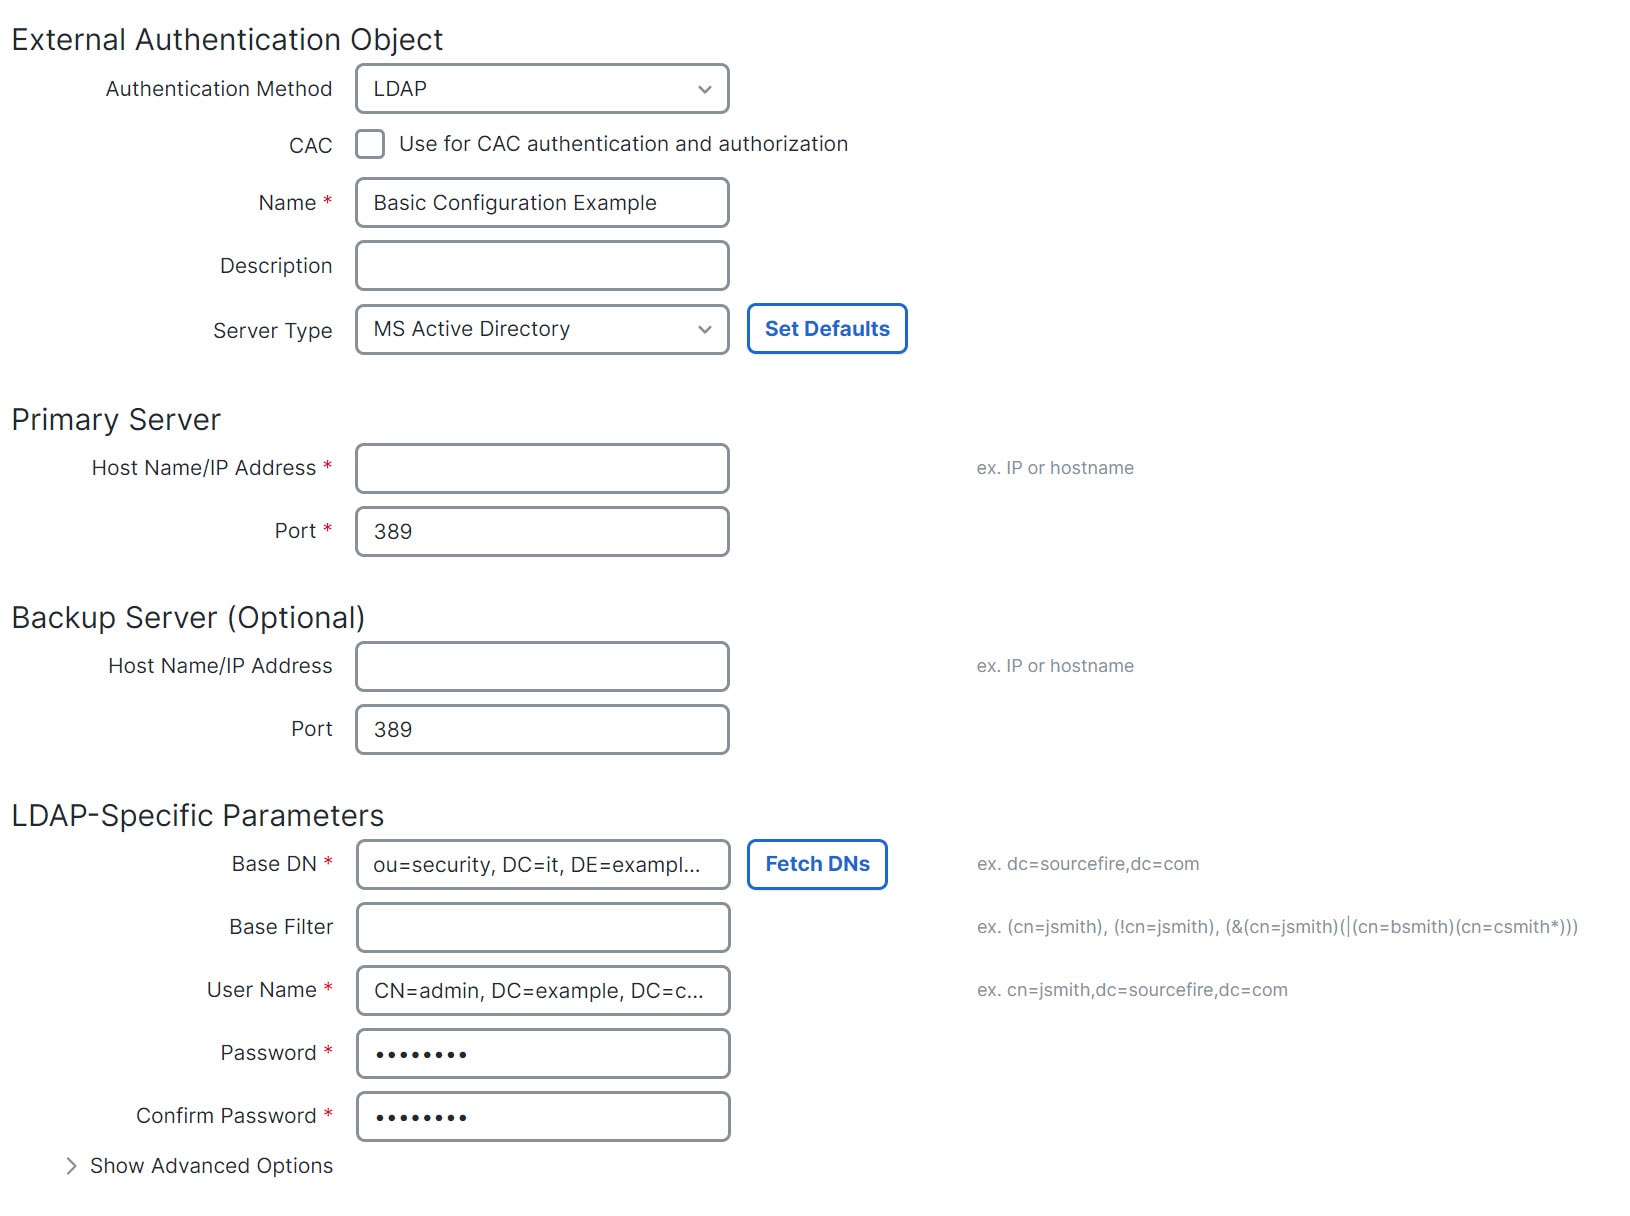
This figures illustrate a basic configuration of an LDAP login authentication object for a Microsoft Active Directory Server. The LDAP server in this example has an IP address of 10.11.3.4. The connection uses port 389 for access.

This example shows a connection using a base distinguished name of OU=security,DC=it,DC=example,DC=com for the security organization in the information technology domain of the Example company.

The diagram illustrates the steps to add an LDAP external authentication object, highlighting the necessary configuration fields and their relationships within the system.

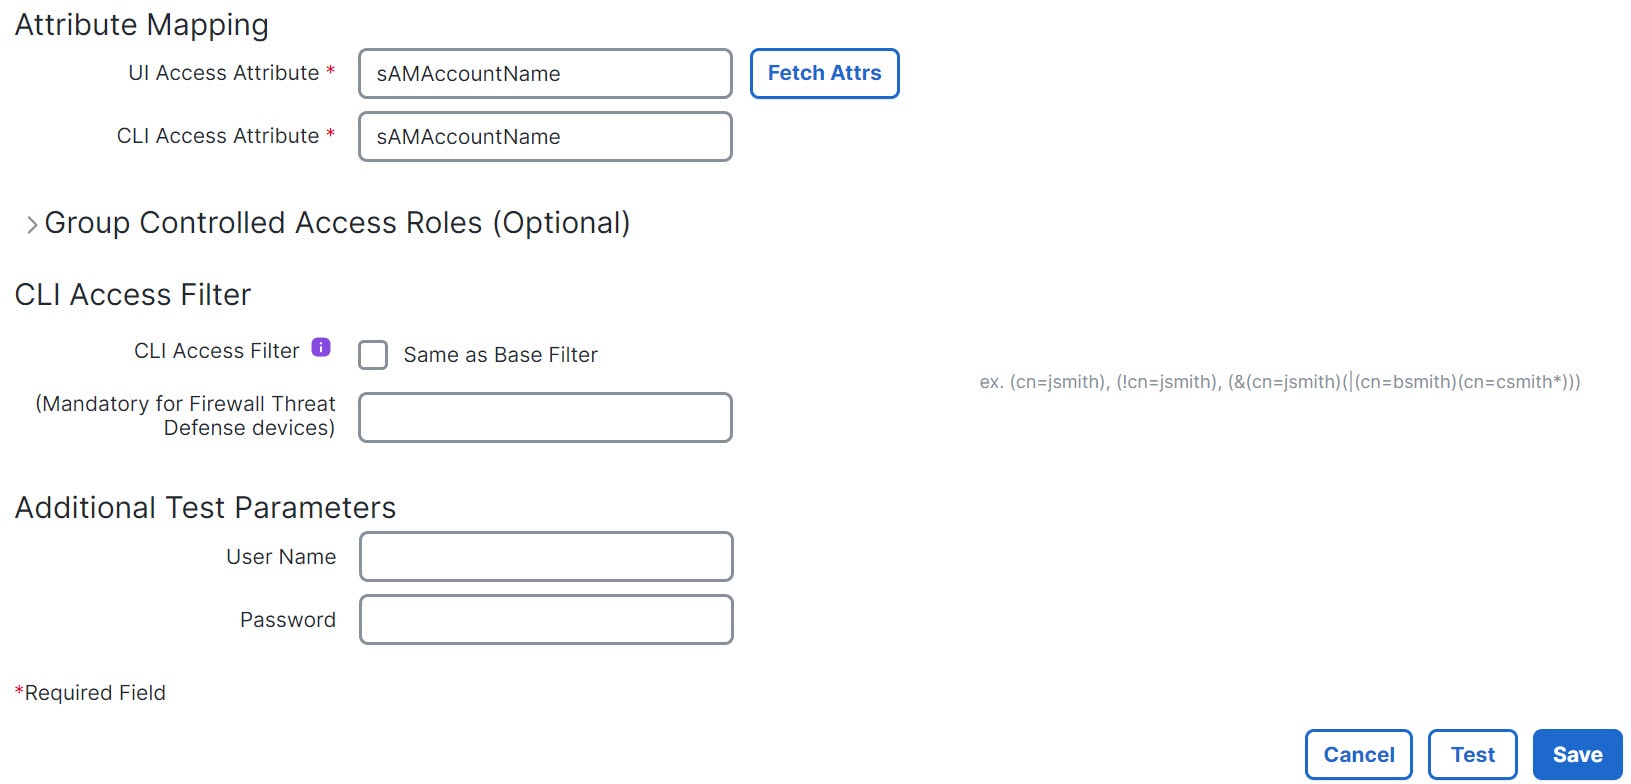
However, because this server is a Microsoft Active Directory server, it uses the sAMAccountName attribute to store user names rather than the uid attribute. Choosing the MS Active Directory server type and clicking Set Defaults sets the UI Access Attribute to sAMAccountName . As a result, the system checks the sAMAccountName attribute for each object for matching user names when a user attempts to log into the system.

In addition, a CLI Access Attribute of sAMAccountName causes each sAMAccountName attribute to be checked for all objects in the directory for matches when a user logs into a CLI account on the appliance.

Note that because no base filter is applied to this server, the system checks attributes for all objects in the directory indicated by the base distinguished name. Connections to the server time out after the default time period (or the timeout period set on the LDAP server).

Advanced Example

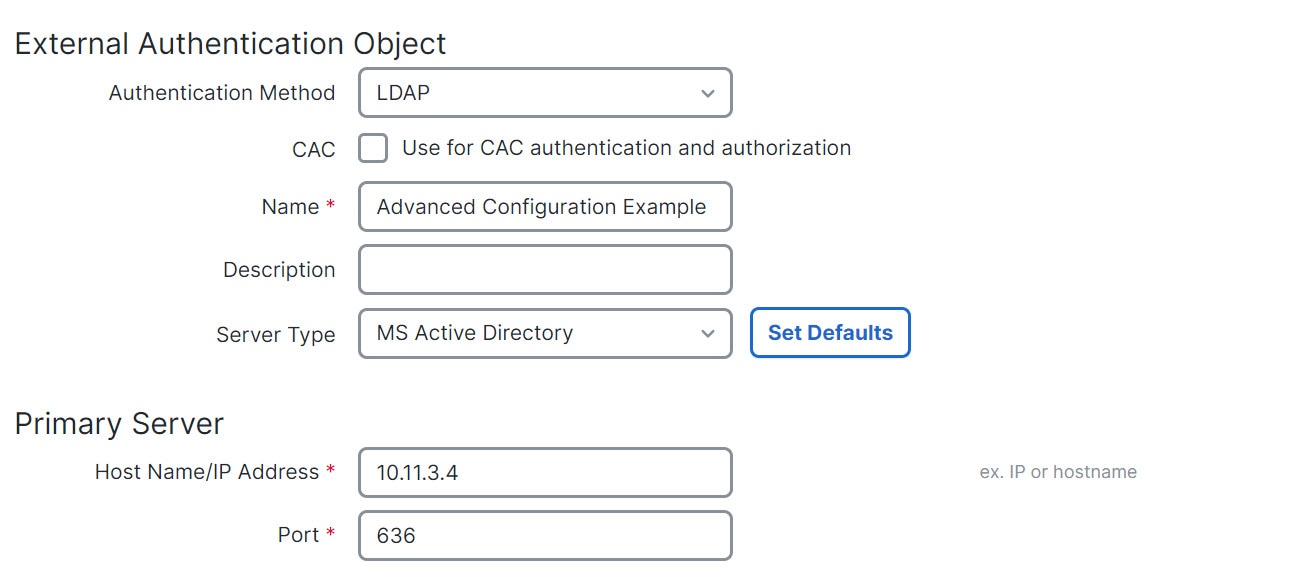
This example illustrates an advanced configuration of an LDAP login authentication object for a Microsoft Active Directory Server. The LDAP server in this example has an IP address of 10.11.3.4. The connection uses port 636 for access.

The diagram illustrates the process of adding an LDAP external authentication object, highlighting the necessary configuration steps and components involved in the setup.

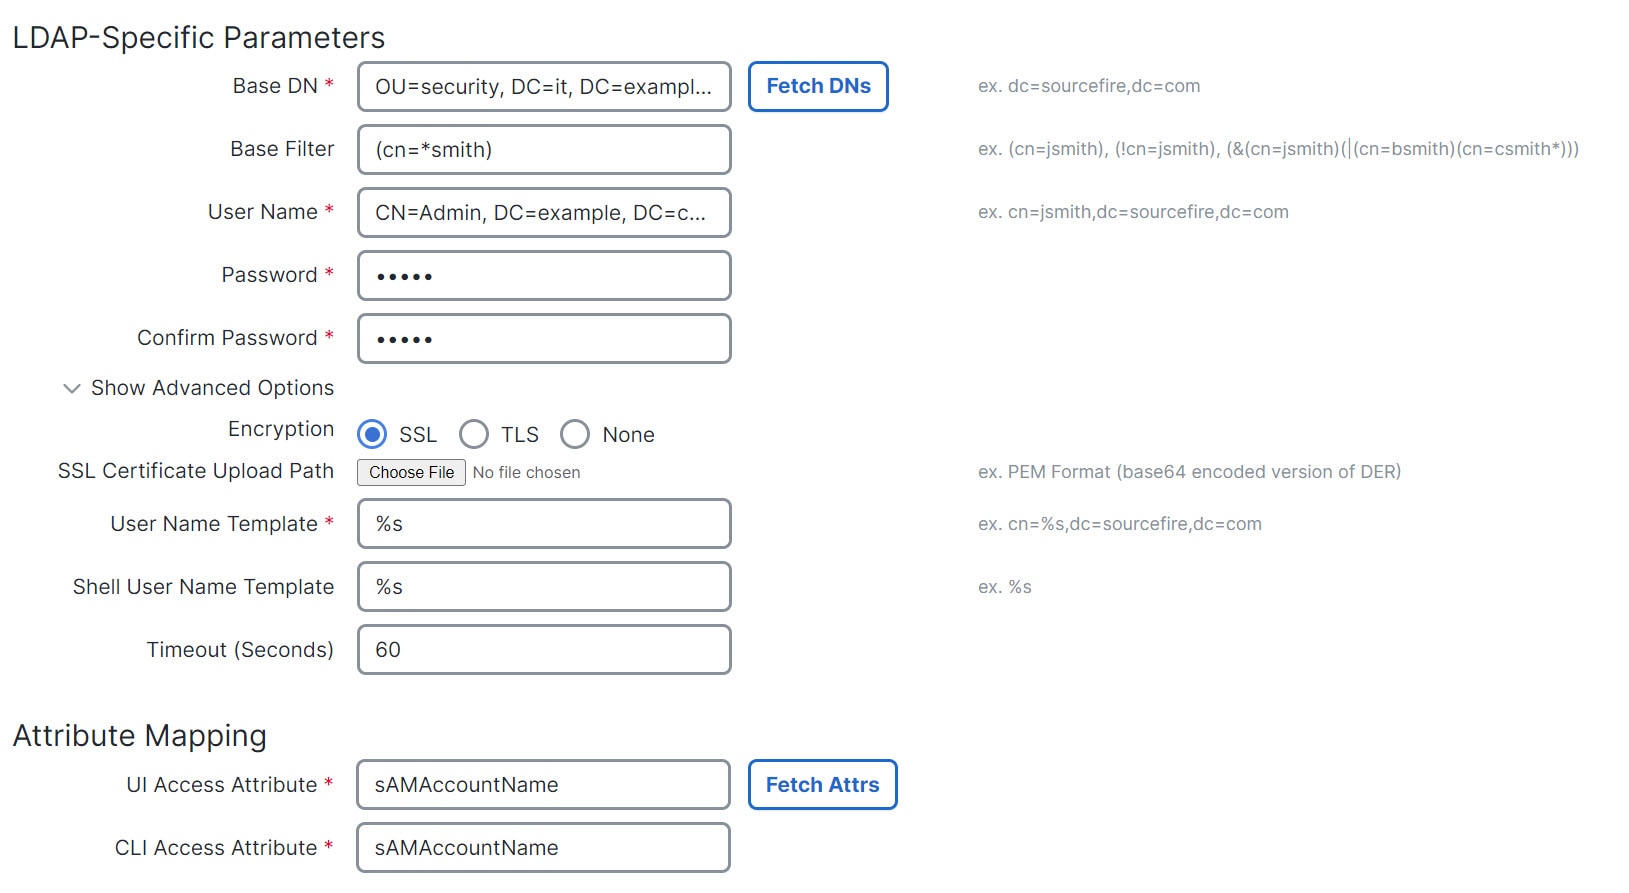
This example shows a connection using a base distinguished name of OU=security,DC=it,DC=example,DC=com for the security organization in the information technology domain of the Example company. However, note that this server has a base filter of (cn=*smith) . The filter restricts the users retrieved from the server to those with a common name ending in smith .

The diagram illustrates the process of adding an LDAP external authentication object, highlighting the necessary configuration steps and components involved in the setup.

The connection to the server is encrypted using SSL and a certificate named certificate.pem is used for the connection. In addition, connections to the server time out after 60 seconds because of the Timeout (Seconds) setting.

Because this server is a Microsoft Active Directory server, it uses the sAMAccountName attribute to store user names rather than the uid attribute. Note that the configuration includes a UI Access Attribute of sAMAccountName . As a result, the system checks the sAMAccountName attribute for each object for matching user names when a user attempts to log into the system.

In addition, a CLI Access Attribute of sAMAccountName causes each sAMAccountName attribute to be checked for all objects in the directory for matches when a user logs into a CLI account on the appliance.

This example also has group settings in place. The Maintenance User role is automatically assigned to all members of the group with a member group attribute and the base domain name of CN=SFmaintenance,DC=it,DC=example,DC=com .

The diagram illustrates the process of adding an LDAP external authentication object, highlighting the necessary configuration steps and components involved in the setup.

The CLI Access Filter is set to be the same as the base filter, so the same users can access the appliance through the CLI as through the web interface.

The diagram illustrates the process of adding an LDAP external authentication object to support external users for device management. It highlights the necessary configuration steps and connections involved in the setup.

Add a RADIUS external authentication object for Security Cloud Control

Add a RADIUS server to support external users for device management.

Note that supports only these six attributes in the access request of the RADIUS authentication:

  • NAS-IP-Address : Used in UI and CLI authentication

  • NAS-Identifier : Used in CLI authentication

  • NAS-Port : Used in UI and CLI authentication

  • NAS-Port-Type : Used in CLI authentication

  • Service-Type : Used in UI and CLI authentication

  • Calling-Station-Id : Used in CLI authentication


Note


  • NAS-Port attribute: The attribute value is dynamically generated and cannot be configured.

  • NAS-Port-Type attribute: The server always sets the attribute value to Virtual, regardless of whether the device is virtual or physical. of whether the is virtual or physical.

  • NAS-Identifier attribute: The attribute value is always sshd.

  • Service-Type attribute: supports only Login and Authenticate Only service types


Before you begin

Procedure


Step 1

Choose System (system gear icon) > Users. Click External Authentication.

Step 2

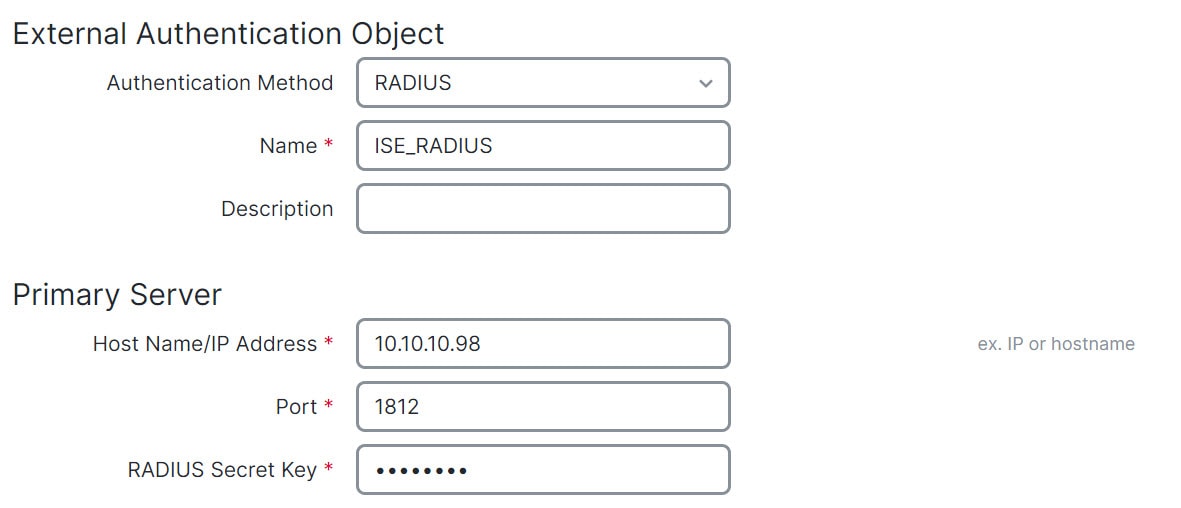
Click Add icon (add icon) Add External Authentication Object and set the Authentication Method to RADIUS. Enter a Name and optional Description.

Step 3

Check the RADIUS Server-Enabled Message Authenticator check box. This requires the Message-Authenticator attribute in all RADIUS responses and ensures that every response from the RADIUS server is securely verified by the Firewall Threat Defense .

The feature is enabled by default for new RADIUS servers. Enable it for existing servers after the upgrade. Enable message authenticators to protect your firewalls from potential attacks. Ensure that your RADIUS server has the Message-Authenticator configuration.

Note


The Message-Authenticator attribute persists whether the feature is enabled or disabled. The server always requires this attribute. When the check box is enabled in the configuration, it also becomes a requirement from the Cloud-Delivered Firewall Management Center .

Step 4

For the Primary Server, enter a Host Name/IP Address. Then, change the Port from the default and then enter the RADIUS Secret Key.

Step 5

(Optional) Enter the Backup Server parameters, then provide the RADIUS-Specific Parameters.

  1. Enter the Timeout in seconds before retrying the primary server, between 1 and 1024. The default is 30.

  2. Enter the Retries before rolling over to the backup server. The default is 3.

  3. In the fields that correspond to user roles, enter the name of each user or identifying attribute-value pair that should be assigned to those roles.

    Separate usernames and attribute-value pairs with commas.

    Example:

    If you know all users who should be Security Analysts have the value Analyst for their User-Category attribute, you can enter User-Category=Analyst in the Security Analyst field to grant that role to those users.

    Example:

    To grant the Administrator role to the users jsmith and jdoe , enter jsmith, jdoe in the Administrator field.

    Example:

    To grant the Maintenance User role to all users with a User-Category value of Maintenance , enter User-Category=Maintenance in the Maintenance User field.

  4. Select the Default User Role for users that do not belong to any of the specified groups.

After you change a user's role, save and deploy the updated external authentication object. Remove the user from the Users screen. The system adds the user when they log in again.

Step 6

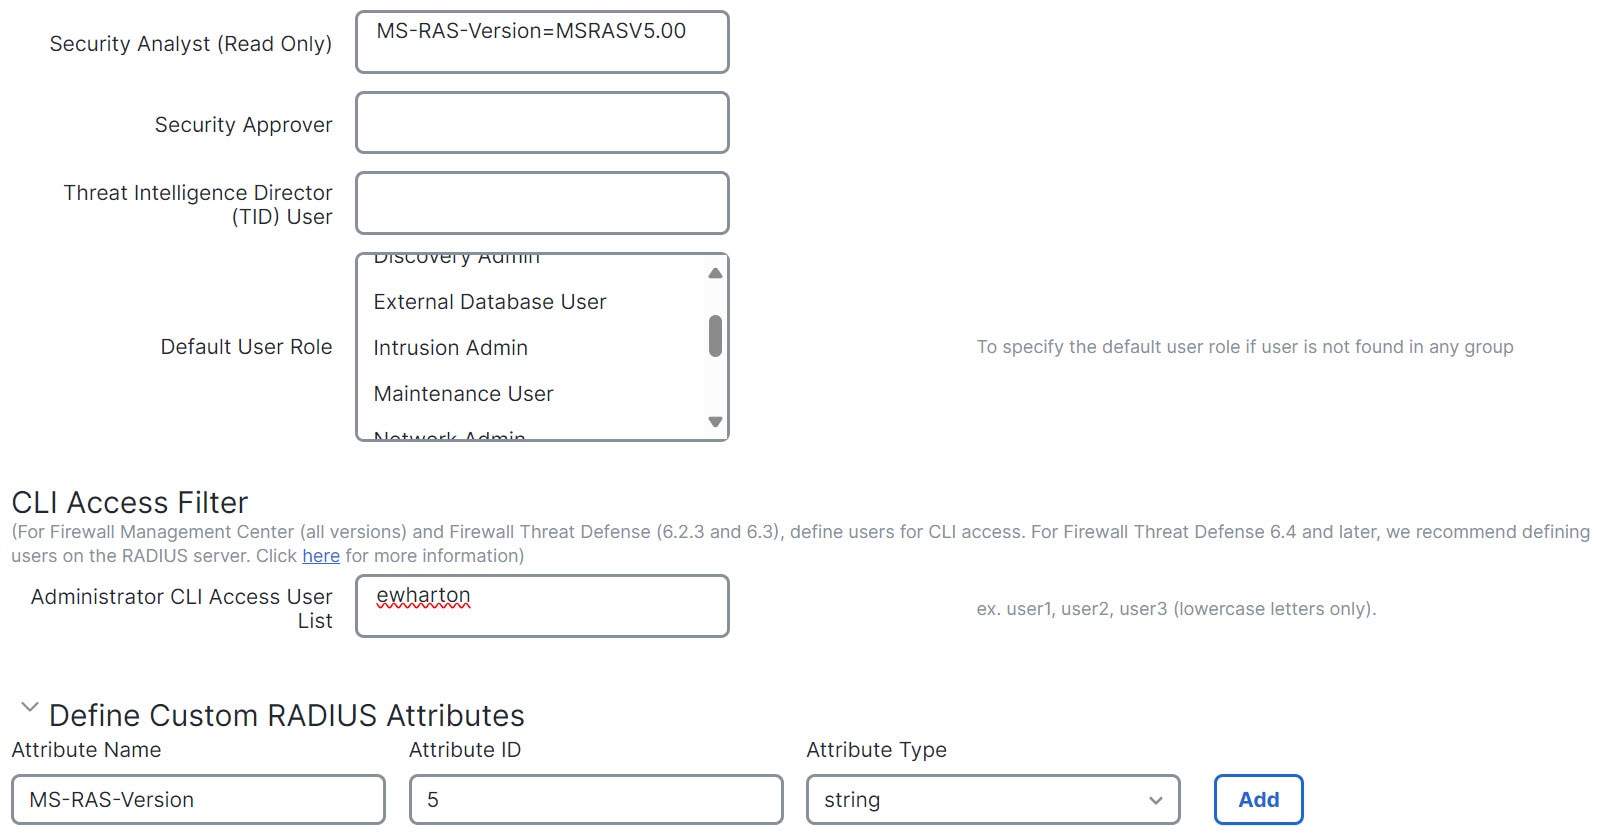
(Optional) Define Custom RADIUS Attributes.

If your RADIUS server returns values for attributes not included in the dictionary file in /etc/radiusclient/, define those attributes. You must define them if you plan to use the attributes to set roles for users.You can locate the attributes returned for a user by looking at the user’s profile on your RADIUS server.

Note


Before you configure custom RADIUS attributes, obtain the Attribute ID and Type from the RADIUS server administrator. If there is a mismatch, the RADIUS packet capture displays the custom RADIUS attribute as Unassigned Attribute.

  1. Enter an Attribute Name.

    Enter an attribute name using alphanumeric characters. Separate words in an attribute name with dashes instead of spaces.

  2. Enter the Attribute ID as an integer.

    Enter an integer for the attribute ID. Make sure the attribute ID does not conflict with any existing IDs in the etc/radiusclient/dictionary file.

  3. Choose the Attribute Type from the drop-down list.

    You also specify the type of attribute: string, IP address, integer, or date.

  4. Click Add to add the custom attribute.

When you create a RADIUS authentication object, a new dictionary file for that object is created on the device in the /var/sf/userauth directory. Any custom attributes you add are added to the dictionary file.

Example:

If a RADIUS server is used on a network with a Cisco router, you might want to use the Ascend-Assign-IP-Pool attribute to grant a specific role to all users logging in from a specific IP address pool. Ascend-Assign-IP-Pool is an integer attribute that defines the address pool where the user is allowed to log in, with the integer indicating the number of the assigned IP address pool.

To declare that custom attribute, you create a custom attribute with an attribute name of Ascend-IP-Pool-Definition , an attribute ID of 218 , and an attribute type of integer .

You could then enter Ascend-Assign-IP-Pool=2 in the Security Analyst (Read Only) field to grant read-only security analyst rights to all users with an Ascend-IP-Pool-Definition attribute value of 2.

Step 7

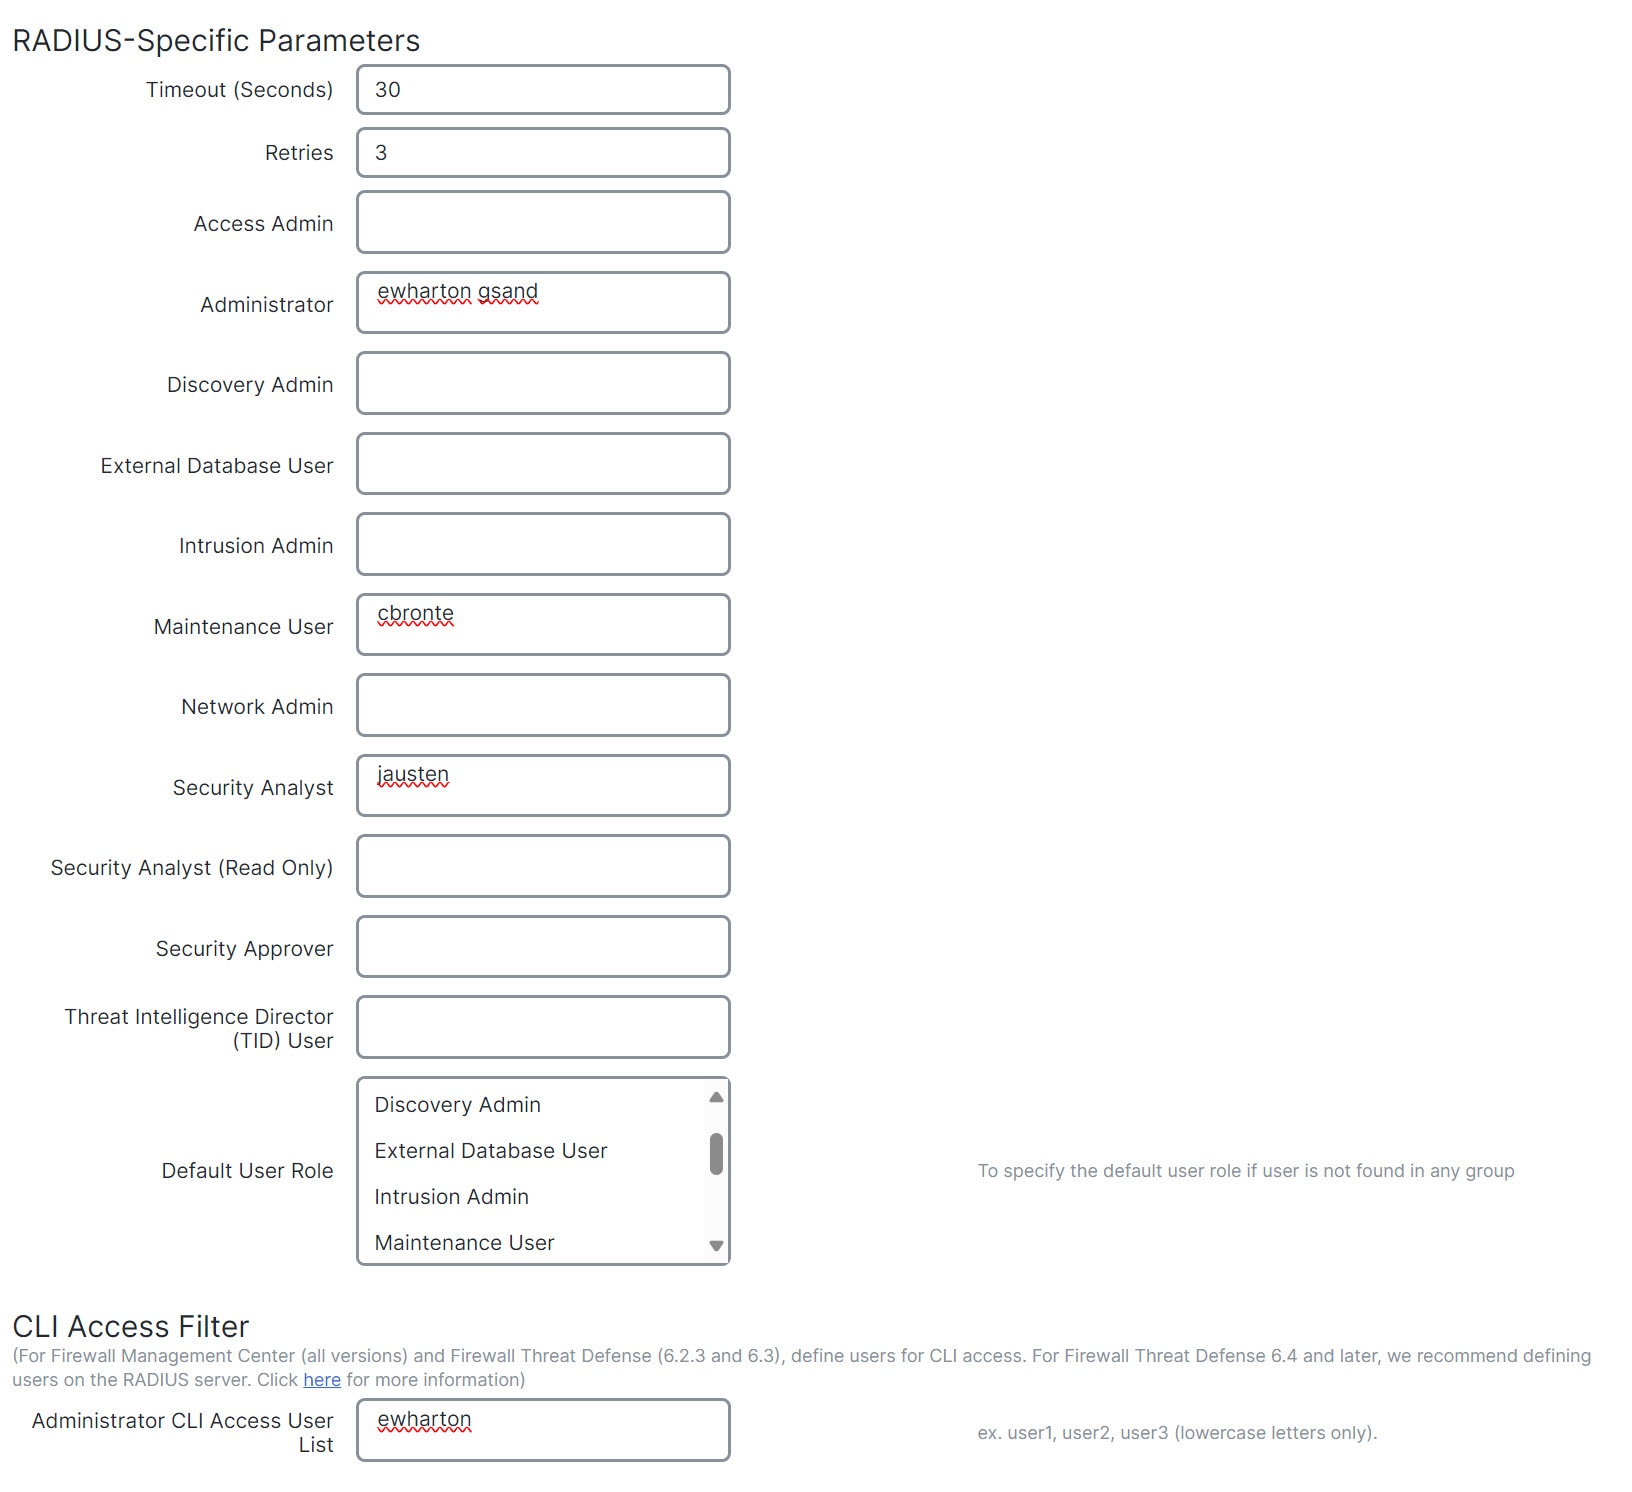
(Optional) In the CLI Access Filter area Administrator CLI Access User List field, enter the usernames that should have CLI access, separated by commas.

Enter usernames that match those on the RADIUS server. Usernames must be valid Linux usernames:

  • Maximum of 32 alphanumeric characters, plus period (.), hyphen (-), and underscore (_).

    (_)

  • All letters must be lowercase.

  • "The username cannot start with a hyphen (-), cannot be composed entirely of numbers, and cannot include an at sign (@) or a slash (/).

Leave the field blank to disable RADIUS authentication for CLI access.

Note


Users with CLI access can gain Linux shell access with the expert command. Linux shell users can obtain root privileges, which can present a security risk. Make sure that you restrict the list of users with CLI or Linux shell access.

Note


Remove any internal users that have the same user name as users included in the shell access filter. For the Cloud-Delivered Firewall Management Center , the only internal CLI user is admin, so do not also create an admin external user.

Step 8

(Optional) Click Test to test Cloud-Delivered Firewall Management Center connectivity to the RADIUS server.

Step 9

(Optional) You can also enter Additional Test Parameters to test user credentials for a user who should be able to authenticate: enter a User Name and Password, and then click Test. Click Save. For more information, refer to Enable external authentication for users on the CDO.

Tip


If you mistype the name or password of the test user, the test fails even if the server configuration is correct. To verify that the server configuration is correct, click Test without entering user information in the Additional Test Parameters field first. If that succeeds, supply a user name and password to test with the specific user.

Example:

To test if you can retrieve the JSmith user credentials at the Example company, enter JSmith and the correct password.


Simple user role assignments

This figure illustrates a sample RADIUS login authentication object for a server running Cisco Identity Services Engine (ISE) with an IP address of 10.10.10.98 on port 1812. No backup server is defined.

The figure illustrates a sample RADIUS login authentication object for a Cisco Identity Services Engine (ISE) server, detailing parameters such as the server's IP address, port, timeout, and retry settings.

This example shows RADIUS-specific parameters, including the timeout (30 seconds) and number of failed retries before the Secure Firewall System attempts to contact the backup server, if any.

This example illustrates important aspects of RADIUS user role configuration:

Users ewharton and gsand are granted web interface Administrative access.

The user cbronte is granted web interface Maintenance User access.

The user jausten is granted web interface Security Analyst access.

The user ewharton can log into the device using a CLI account.

This graphic depicts the role configuration for the example:

The figure illustrates the role configuration for users matching an attribute-value pair in a RADIUS external authentication setup, highlighting how specific attributes can determine user roles.

Roles for users matching an attribute-value pair

You can use an attribute-value pair to identify users who should receive a particular user role. If the attribute you use is a custom attribute, you must define the custom attribute.

This figure illustrates the role configuration and custom attribute definition in a sample RADIUS login authentication object for the same ISE server as in the previous example.

In this example, however, the MS-RAS-Version custom attribute is returned for one or more of the users because a Microsoft remote access server is in use. Note the MS-RAS-Version custom attribute is a string. In this example, all users logging in to RADIUS through a Microsoft version 5.00 remote access server should receive the Security Analyst (Read Only) role, so you enter the attribute-value pair of MS-RAS-Version=MSRASV5.00 in the Security Analyst (Read Only) field.

The diagram illustrates the process of adding a RADIUS external authentication object, highlighting the necessary configuration steps and connections for integrating the RADIUS server into the device management system.

Troubleshoot LDAP authentication connections

This reference explains how to troubleshoot LDAP authentication connection issues, identify common failure causes, and apply solutions to restore communication between Cisco devices and LDAP servers.

Configure User Preferences

Depending on your user role, you can specify certain preferences for your user account.

Change the web interface appearance

Change the web interface appearance by choosing from available themes or enable new design options for the light theme variant.

You can change the way the web interface appears when you are using the light theme. Theme options and design toggles may vary based on your system version and available features.

Before you begin

Follow these steps to change the web interface appearance:

Procedure


Step 1

From the drop-down list under your username, choose User Preference.

Step 2

Under Light theme variant, click the Use new design toggle button to enable or disable the new design.

Enable the toggle to use the left navigation menu and disable it to use the top navigation menu.

Note


This toggle works only if you are using the light theme. If you want to switch between dark theme and light theme, you must do this from the General Preference page in Security Cloud Control. For more information, refer to Change the Security Cloud Control Web Interface Appearance.


The web interface appearance changes according to your selected theme or design preference, providing a personalized and comfortable user experience.

Set your default time zone

Set your default time zone so that all times shown in the web interface for your user account reflect your local time preferences. This helps you view scheduled tasks and dashboards in your preferred time zone.

This setting determines the times displayed in the web interface for your user account, such as for task scheduling and dashboard viewing. It does not change the system time, affect other users, or modify data stored in the system, which generally uses UTC.

  • The Time Zone function in User Preferences assumes that the system clock is set to UTC. Do not change the system time. Changing the system time from UTC is not supported and will require reimaging the device to recover from an unsupported state.

  • This feature does not affect the time zone used for time-based policy application. Set the time zone for a device in Devices > Platform Settings.

Before you begin

Follow these steps to set your default time zone:

Procedure


Step 1

From the drop-down list under your user name, choose User Preferences.

Step 2

Click the TIME Zone drop-down list.

Step 3

Choose the continent or country and the state name that corresponds with the time zone you want to use.


After completing these steps, your user account will display times in the web interface according to your selected time zone. System time and other users are not affected.