Cisco APIC Security Configuration Guide, Release 6.2(x)

PDF

Cisco APIC Security Configuration Guide, Release 6.2(x)

OAuth 2 / OIDC authentication

Want to summarize with AI?

Log in

Explains an open-standard authorization protocol that allows access to applications through trusted identity providers using authorization tokens.


OAuth 2 / OIDC Authentication is an open-standard authorization protocol that

  • allows you to access an application (Service Provider or SP) that is trusted or approved by an Identity Provider (IdP)

  • uses authorization tokens to provide identity and authorization claims to the consumer application, and

  • has been designed to support a variety of different client types, which consume REST APIs from service provider applications.

OAuth 2.0 protocol details

For more details about OAuth 2.0, see RFC 6749.

This includes both browser applications accessing web services within the enterprise, and applications running on customer mobile devices. OAuth protocol defines multiple mechanisms for getting an authorization token where different mechanisms acknowledge the client type constraints. A simple OAuth example is - when you are trying to login to a website, say "https://service.example.com", you could be asked to identify yourself using a social media platform login or your email login. If you are logged in to these identity providers, you need not login over and over again. You are authorized (using OAuth) to login to "https://service.example.com", as soon as you choose one of the options.

Beginning in the Cisco APIC release 6.2(3), the OAuth Single Sign-On URL uses a path-based format and must be updated in the OAuth Identity Provider.

  • Single Sign-On URL used before release 6.2(3): https://<APIC-hostname>/api/aaaLoginSSO.json?name=<oauth-domain-name>.

  • Single Sign-On URL used in release 6.2(3) and later: https://<APIC-hostname>/api/oauth/ssologin/<oauth-domain-name>.
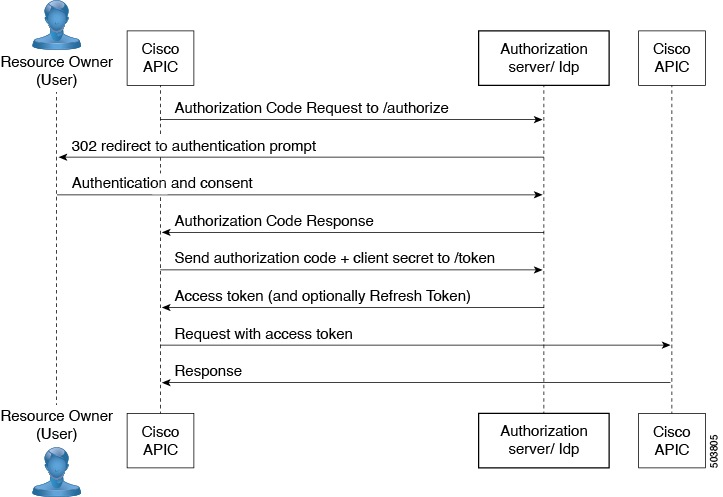

OAuth 2.0 authentication in Cisco ACI

OAuth 2.0 authentication in Cisco ACI uses the authorization grant flow to enable secure access to resources by delegating user authentication and authorization.

  • Resource owner (user): The data owner who grants access.

  • Web application: APIC or Cloud APIC acts as the client requesting access.

  • Authorization server (AS) or Identity Provider (IdP): Authenticates and authorizes the user.

  • Resource server: APIC hosts the protected resources.

OAuth 2.0 Authorization Grant Flow in Cisco ACI

OAuth 2.0 in Cisco ACI uses the authorization grant flow, where APIC requests an authorization grant from an authenticated user and then exchanges it for an access token containing authorization information.

The main elements of OAuth in Cisco ACI include:

  • Resource owner (user): Data owner

  • Web application: APIC or Cloud APIC

  • Authorization server (AS) or Identity Provider (IdP): Authenticates and authorizes the user

  • Resource server: APIC

Note

When the authorization server provides both ID Token and access token, the ID token is preferred for username and CiscoAvpair claims. If CiscoAvpair is not available in the ID token, both username and CiscoAvpair claims are taken from the access token, if available. APIC does not combine claims from both tokens. If neither token has CiscoAvpair, the username from the ID token is used for default authorization if configured.

The following diagram illustrates the OAuth 2.0 authorization grant flow in Cisco ACI:

Figure 1. OAuth 2.0 Authorization Grant Flow Diagram

Configure OAuth in Cisco APIC

Configure OAuth in Cisco Application Policy Infrastructure Controller (APIC) to enable secure authentication through an external authorization server.

OAuth integration allows users to authenticate to Cisco APIC using their existing credentials from a configured authorization server, providing centralized authentication management.

Before you begin

Perform the following actions in an authorization server:

  • Create an OAuth application for Cisco APIC. Note the client ID and secret.

  • Ensure that authorization policies are setup to allow access to Cisco APIC.

  • Note the authorize and token endpoints that would be used by Cisco Application Centric Infrastructure (ACI).

  • Assign users to the application who would be using Cisco APIC.

  • Ensure that the CiscoAvpair is set correctly for the users for authorization in Cisco ACI.

  • Save the certificate chain for the Token URL.

For details about configuring OAuth 2.0 applications on Identity Providers, see the relevant documentation.

Procedure

Use this procedure to configure OAuth in Cisco Application Policy Infrastructure Controller (APIC).

OAuth authentication is configured for Cisco APIC, enabling users to authenticate using their authorization server credentials.


Configure APIC for OAuth 2 access

This task enables OAuth 2 authentication in APIC to provide secure, token-based access control for users and applications.

Use this procedure to create an OAuth 2 provider and associate a login domain.

Procedure

  1. In the APIC, create an OAuth 2 provider.

    For configuring an OAuth 2 provider, see Create a provider.

  2. Create the Login Domain for OAuth 2.

    For the detailed procedure, see Create login domain using the GUI.

The OAuth 2 provider and login domain are created and ready for authentication.


Create a certificate authority

This procedure enables you to create certificate authorities that validate SSL certificates from authorization servers in your authentication infrastructure.

Use this procedure for creating certificate authorities using the certificate chain used for the token URL.

Procedure

  1. On the menu bar, choose Admin > AAA.

  2. In the Navigation pane, choose Security.

  3. In the Work pane, choose Certificate Authorities.

  4. Click Actions > Create Certificate Authority.

  5. Enter Name, Description, and Certificate Chain.

    For obtaining the Certificate Chain, follow the procedure shown below.

    1. Choose the Token URL from the authorization server.
    2. In a browser window, enter the Token URL.
    3. Right-click, and select More Information.
    4. From the displayed pop-up window, click the New Certificate button.
    5. From the Certificate screen, download the PEM (chain) certificate.
    6. Choose a suitable program to open the file.
    7. Choose the required certificate from the displayed chain of certificates.
    Note

    You can create a maximum of eight certificate authorities.

  6. Click Save.

The certificate authority is created and appears in the Certificate Authorities list, ready for use in authentication server configurations.


User login using OAuth

Summary

The key components involved in the user login using OAuth process are:

  • User: Attempts to login to APIC using the OAuth login domain

  • APIC: Redirects user to authorization server and exchanges authorization code for access token

  • Authorization server: Authenticates user and provides authorization code

  • Web browser: Facilitates communication between APIC and authorization server

  • Access token: Contains username and authorization details in CiscoAvpair

Workflow

These are the stages of user login using OAuth:

  1. User attempts to login to APIC using the created login domain for OAuth, triggering redirection to the authorization server login page if not already authenticated.

  2. After user authentication, the authorization server sends an authorization code to APIC via the web browser.

  3. APIC exchanges the authorization code for an access token from the IdP using the client ID and secret for the APIC application.

  4. The access token contains the username and authorization details in the CiscoAvpair, allowing the user to be logged into APIC with appropriate indication of the logged-in user status.


Configure OAuth in APIC using REST API

This task configures OAuth authentication in APIC to integrate with external OAuth providers and enable secure user authentication through REST API calls.

Use this procedure to configure OAuth in APIC using REST API.

Procedure

  1. Create OAuth Provider.

    <aaaOauthProvider name="auth.pingone.asia"
      dn="uni/userext/oauthext/oauthprovider-auth.pingone.asia"
      status="created,modified"
      timeout="5"
      key="vCnIq1EGCTPfqMU"
      oidcEnabled="no"
      verifyEnabled="yes"
      baseUrl="https://auth.pingone.asia/oauth2/default"
      clientId="0oa9g25h1cE7yZZ0t696"
      usernameAttribute="EmailId"
      scope="openid groups"
    tp="pingonecert"/>
  2. Create OAuth Login Domain; authentication can be either using the CiscoAVPair or Group Map.

    Authentication using CiscoAVPair:

    <aaaUserEp dn="uni/userext" status="created,modified">
        <aaaLoginDomain dn="uni/userext/logindomain-TOAUTH" name="TOAUTH"
          status="created,modified">
            <aaaDomainAuth dn="uni/userext/logindomain-TOAUTH/domainauth"
              providerGroup="TOAUTH" realm="oauth" realmSubType="default"
              status="created,modified"/>
        </aaaLoginDomain>
        <aaaOauthEp rn="oauthext" status="modified">
            <aaaOauthProviderGroup dn="uni/userext/oauthext/oauthprovidergroup-TOAUTH"
              name="TOAUTH" authChoice="CiscoAVPair" status="created,modified">
                <aaaProviderRef
                  dn="uni/userext/oauthext/oauthprovidergroup-TOAUTH/
                    providerref-auth.pingone.asia"
                  name="auth.pingone.asia" order="1" status="created,modified"/>
            </aaaOauthProviderGroup>
        </aaaOauthEp>
    </aaaUserEp>
    Note

    The aaaProviderRef dn value has a line break for readability. However, do not include a line break in the actual value.

    Authentication using Group Map:

    <aaaUserEp dn="uni/userext" status="created,modified">
        <aaaLoginDomain dn="uni/userext/logindomain-TOAUTH" name="TOAUTH"
          status="created,modified">
            <aaaDomainAuth dn="uni/userext/logindomain-TOAUTH/domainauth"
              providerGroup="TOAUTH" realm="oauth" realmSubType="default"
              status="created,modified"/>
        </aaaLoginDomain>
        <aaaOauthEp rn="oauthext" status="modified">
            <aaaOauthProviderGroup dn="uni/userext/oauthext/oauthprovidergroup-TOAUTH"
              name="TOAUTH" authChoice="LdapGroupMap" groupAttribute="memberOf"
              status="created,modified">
                <aaaUserGroupMapRule name="AdminRule" userGroup="Domain Admins"
                  status="created,modified">
                    <aaaUserDomain name="all" rn="userdomain-all" status="created,modified">
                        <aaaUserRole name="fabric-admin" privType="writePriv"
                          rn="role-fabric-admin" status="created,modified"/>
                    </aaaUserDomain>
                    <aaaUserDomain name="mgmt" rn="userdomain-mgmt" status="created,modified">
                        <aaaUserRole name="access-admin" privType="writePriv"
                          rn="role-access-admin" status="created,modified"/>
                        <aaaUserRole name="nw-svc-policy" privType="writePriv"
                          rn="role-nw-svc-policy" status="created,modified"/>
                    </aaaUserDomain>
                </aaaUserGroupMapRule>
                <aaaUserGroupMapRule name="EmpRule" userGroup="Employee"
                  status="created,modified">
                    <aaaUserDomain name="mgmt" rn="userdomain-mgmt"
                      status="created,modified">
                        <aaaUserRole name="ops" privType="writePriv" rn="role-ops"
                          status="created,modified"/>
                    </aaaUserDomain>
                </aaaUserGroupMapRule>
                <aaaProviderRef
                  dn="uni/userext/oauthext/oauthprovidergroup-TOAUTH/
                    providerref-auth.pingone.asia"
                  name="auth.pingone.asia" order="1" status="created,modified"/>
            </aaaOauthProviderGroup>
        </aaaOauthEp>
    </aaaUserEp>
    Note

    The aaaProviderRef dn value has a line break for readability. However, do not include a line break in the actual value.

OAuth is configured in APIC with the specified provider and login domain, enabling external authentication through the REST API.