Cisco APIC Security Configuration Guide, Release 6.2(x)

PDF

Cisco APIC Security Configuration Guide, Release 6.2(x)

User access, authorization, and accounting

Want to summarize with AI?

Log in

Explains the authentication, authorization, and accounting functions managed by APIC policies in the ACI fabric.


User access, authorization, and accounting is a security framework that

  • manages the authentication, authorization, and accounting (AAA) functions of the Cisco Application Centric Infrastructure (ACI) fabric through Application Policy Infrastructure Controller (APIC) policies

  • combines user privileges, roles, and domains with access rights inheritance to enable administrators to configure AAA functions at the managed object level in a granular fashion, and

  • supports implementation using the REST API, the CLI, or the GUI.

Login domain limitations

Note

There is a known limitation where you cannot have more than 32 characters for the login domain name. In addition, the combined number of characters for the login domain name and the user name cannot exceed 64 characters.


Cisco APIC GUI enhancements

Cisco APIC GUI enhancements are interface improvements that

  • modify the APIC GUI path Admin > AAA beginning with Cisco APIC Release 6.0(1)

  • enhance the work panes of Authentication, Security, and Users for better functionality, and

  • provide improved ease of use through reorganized tabs and streamlined provider creation processes.

Authentication work pane enhancements

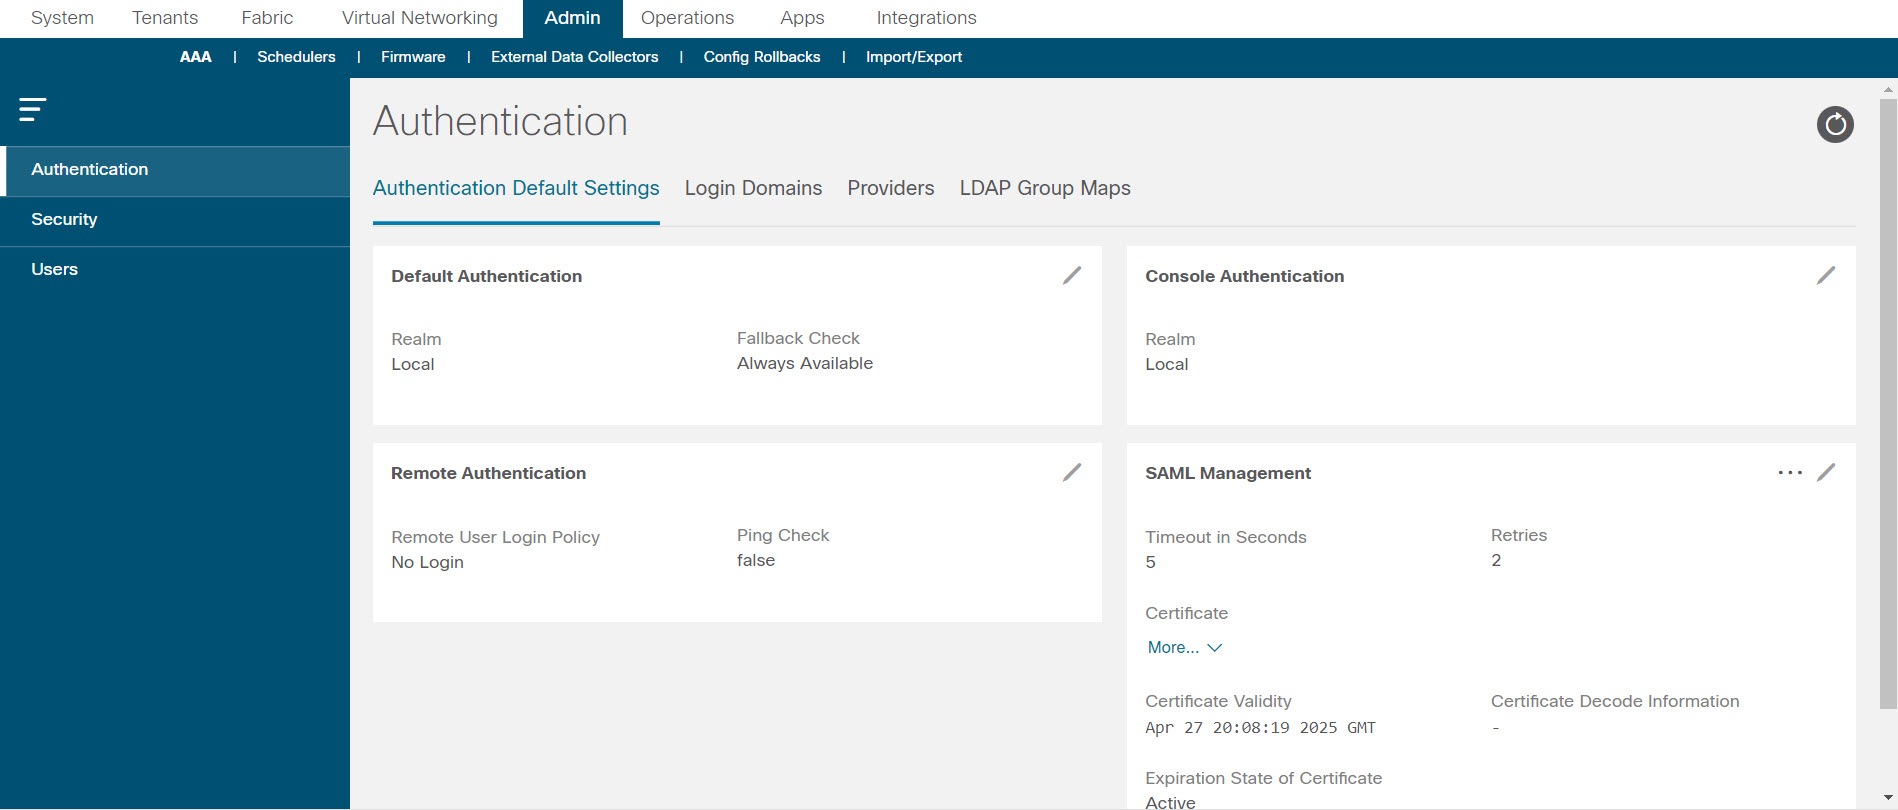
The work pane for Authentication has four tabs:

  • Authentication Default Settings—contains four dashlets, namely, Default Authentication, Remote Authentication, Console Athentication, SAML Management. If you need to make changes to any of these configurations, click the Edit icon, The Authentication work pane in the Cisco APIC GUI shows four tabs for managing authentication settings, including Default Settings, Login Domains, Providers, and LDAP Groups, enhancing user experience through improved organization..

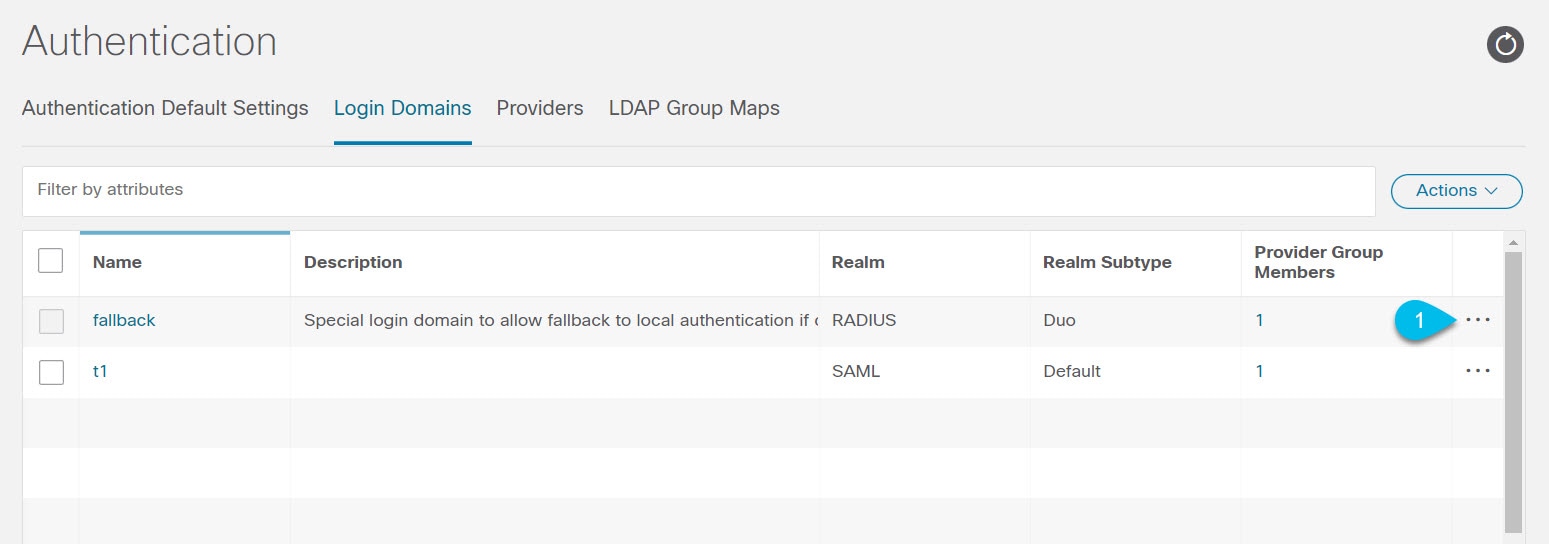
  • Login Domains—displays the list of configured login domains.

  • Providers— displays the list of configured providers.

  • LDAP Groups—contains two sub-tabs, LDAP Group Maps and LDAP Group Map Rules. Each sub-tab displays the list of group maps and group map rules, respectively.

The Login Domains section in the Cisco APIC GUI shows the configured login domains, while the Providers section lists the configured providers. The LDAP Groups section includes sub-tabs for LDAP Group Maps and LDAP Group Map Rules, displaying their respective lists.

Prior to Release 6.0(1), the authentication/authorization protocols (such as, TACACS, SAML, etc) were separately appearing as tabs and for creating a provider for these protocols, you had to navigate to the respective individual tabs. Now, you can directly create a provider for any authentication/authorization protocol using the Actions button in the Providers tab, and selecting the required Realm. For the detailed procedure, see Create a provider.

The work pane for Security has these tabs:

  • Security Default Settings—displays the default security settings. Click the Edit icon, The Security work pane in the Cisco APIC GUI shows tabs for managing security settings, domains, roles, RBAC rules, and certificate authorities. Each tab provides access to specific configuration details and options for editing., for modifying any of the displayed details.

  • Security Domains—displays the list of configured security domains.

  • Roles—displays the list of configured roles.

  • RBAC Rules—contains two sub-tabs, RBAC Rules, Node Rules. Each sub-tab displays the list of RBAC rules and node rules, respectively.

  • Certificate Authorities—displays the list of configured certificate authorities.

  • Key Rings—displays the list of configured key rings.

  • JWT Keys— displays the list of configured JWT keys.

  • User Activity—contains two sub-tabs which the session records and user logs information.

The work pane for Users has these tabs:

  • Local—displays the list of local users. Click the Actions icon,The Cisco APIC GUI enhancements show the interface elements for managing certificate authorities, key rings, JWT keys, and user activity, including local user management options., to:

    • Add SSH Authorization

    • Add User Domain

    • Add X509 certificate

    • Change Password

    • Clear Password History

  • Remote—displays the list of remote users.

Some of the salient changes applicable across panes/screens are:

  • To create an element—When you are on the main work pane which has the various tabs displayed, use the Actions button to create a relevant element. For example, if you are on the Login Domains tab, select Actions > Create Login Domain to create a login domain.

  • To view detailed information of an element—Click the element (such as, login domain, provider, user, role, etc), and a new pane which has details of the element is displayed on the right. If you want more details about the element, click the Details icon, The Cisco APIC GUI displays enhancements across various panes, including the Actions button for creating elements and the Details icon for viewing detailed information about selected elements., to get a completely new screen with detailed information about the element.

  • To edit an element—When you are on a screen which displays details of the selected element (such as, login domain, provider, user, role, etc), click the Edit icon, The Cisco APIC GUI displays enhancements for viewing and editing element details, including icons for accessing detailed information and editing parameters., to modify/update the displayed parameters.

  • To view Event Analytics for an element—When you are on a screen which displays the details of an element, click the Event Analytics tab to see the Faults, Events and Audit Logs. This can be used for debugging and troubleshooting.

  • To view Object Store details for an element (such as, login domain, user, role, etc) —Click the Actions button > Open in Object Store Browser. A new screen with a list of the elements in object store is displayed. Alternatively, you can also click the Actions icon, The Cisco APIC GUI displays the Event Analytics tab, showing Faults, Events, and Audit Logs for an element, aiding in debugging and troubleshooting., which is available in the element rows, and choose Open in Object Store Browser. The Object Store screen for the selected element is displayed.

    The Object Store screen displays a list of elements related to the selected item, including options for managing roles, users, and login domains.
    Note

    For the RBAC and Providers tabs, you can not access Object Store details by clicking the Actions button.


Multiple tenant support

Multiple tenant support is a data access control system that

  • provides multitenant isolation through a core Application Policy Infrastructure Controller (APIC) internal data access control system

  • prevents information privacy from being compromised across tenants through read/write restrictions, and

  • restricts tenants from accessing other tenants' configuration, statistics, faults, or event data unless administrators assign specific permissions.


User access roles, privileges, and security domains

User access roles, privileges, and security domains are access control mechanisms that

  • associate Cisco Application Centric Infrastructure (ACI) fabric users with predefined or custom roles containing one or more privileges

  • determine the managed objects (MOs) to which the user has access through a set of privileges

  • provide privilege types for each role: no access, read-only, or read-write, and

  • use one or more security domain tags that identify the portions of the management information tree (MIT) that a user can access.

Roles and privileges

A privilege controls access to a particular function within the system. The ACI fabric manages access privileges at the managed object (MO) level. Every object holds a list of the privileges that can read from it and a list of the privileges that can write to it. All objects that correspond to a particular function will have the privilege for that function in its read or write list. Because an object might correspond to additional functions, its lists might contain multiple privileges. When a user is assigned a role that contains a privilege, the user is given read access to the associated objects whose read list specifies read access, and write access to those whose write list specifies write access.

As an example, 'fabric-equipment' is a privilege that controls access to all objects that correspond to equipment in the physical fabric. An object corresponding to equipment in the physical fabric, such as 'eqptBoard,' will have 'fabric-equipment' in its list of privileges. The 'eqptBoard' object allows read-only access for the 'fabric-equipment' privilege. When a user is assigned a role such as 'fabric-admin' that contains the privilege 'fabric-equipment,' the user will have access to those equipment objects, including read-only access to the 'eqptBoard' object.

Note

Some roles contain other roles. For example, '-admin' roles such as tenant-admin, fabric-admin, access-admin are groupings of roles with the same base name. For example, 'access-admin' is a grouping of 'access-connectivity', 'access-equipment', 'access-protocol', and 'access-qos.' Similarly, tenant-admin is a grouping of roles with a 'tenant' base, and fabric-admin is a grouping of roles with a 'fabric' base.

The 'admin' role contains all privileges. The 'admin' user cannot be deleted from APIC.

For more details about roles and privileges see APIC Roles and Privileges Matrix.

A security domain is a tag associated with a certain subtree in the ACI MIT object hierarchy. For example, the default tenant "common" has a domain tag common. Similarly, the special domain tag all includes the entire MIT object tree. An administrator can assign custom domain tags to the MIT object hierarchy. For example, an administrator could assign the "solar" domain tag to the tenant named "solar." Within the MIT, only certain objects can be tagged as security domains. For example, a tenant can be tagged as a security domain, but objects within a tenant cannot.

Note

(Until R6.1.2) Password strength parameters can be configured by either creating Custom Conditions or by selecting Any Three Conditions that are provided.

Note

(From R6.1.3) Password strength parameters can be configured by either creating Custom Conditions or by selecting the Default Three Conditions, which include lowercase letters, digits, and special characters.

Creating a user and assigning a role to that user does not enable access rights. It is necessary to also assign the user to one or more security domains. By default, the ACI fabric includes these special pre-created domains:

  • All—allows access to the entire MIT

  • Common—allows access to fabric common objects/subtrees

  • Mgmt—allows access to fabric management objects/subtrees

Note

For read operations to the managed objects that a user's credentials do not allow, a "DN/Class Not Found" error is returned, not "DN/Class Unauthorized to read." For write operations to a managed object that a user's credentials do not allow, an HTTP 401 Unauthorized error is returned. In the GUI, actions that a user's credentials do not allow, either they are not presented, or they are grayed out.

A set of predefined managed object classes can be associated with domains. These classes should not have overlapping containment. Examples of classes that support domain association are:

  • Layer 2 and Layer 3 network managed objects

  • Network profiles (such as physical, Layer 2, Layer 3, management)

  • QoS policies

When an object that can be associated with a domain is created, the user must assign domains to the object within the limits of the user's access rights. Domain assignment can be modified at any time.

If a virtual machine management (VMM) domain is tagged as a security domain, the users contained in the security domain can access the correspondingly tagged VMM domain. For example, if a tenant named solar is tagged with the security domain called sun and a VMM domain is also tagged with the security domain called sun, then users in the solar tenant can access the VMM domain according to their access rights.


User lockout after continuous failed attempts to log in

User lockout after continuous failed attempts to log in is a security feature that

  • blocks a user from being able to log in after the user fails a configured number of login attempts,

  • allows you to specify how many failed login attempts the user can have within a specific time period, and

  • makes that user unable to log in for a specified period of time if the user fails to log in too many times.

User lockout feature details

Starting in the 4.2(4) release, this feature is available for blocking users after failed login attempts.

This feature counts the failed login attempts both for local users that are in the Cisco Application Centric Infrastructure (ACI) database and for remote users who get authenticated with external authentication servers, such as RADIUS, LDAP, TACACS+, DUO Proxy, SAML, or RSA. A remote user who is locked out due to consecutive authentication failures using one external authentication server type will be locked out from all external authentication server types. For example, a user who is locked out after failing to log in using a RADIUS server will also be locked out when using an LDAP server. Authentications failing due to a AAA server being unreachable or down, or due to a bad SSH key, is not counted toward locking out a user; this feature only takes into account incorrect password entries.

A user who gets locked out from one Cisco Application Policy Infrastructure Controller (APIC) node in the cluster will be locked out from all nodes in the cluster, including the leaf switches and spine switches. A local user that does not exist in the Cisco ACI database cannot be locked out due to this feature.

Note

You cannot configure this feature using the CLI.