System settings
System settings are administrator-configurable settings in Crosswork that control notification destinations, interface data collection, pre-login disclaimers, and file server services.
Administrator users can configure the system settings in this chapter.
Configure a syslog server
Before you begin
Ensure that you have uploaded the Syslog TLS server certificate.
 Note |
After the Syslog TLS server certificate is added, wait for 5-10 minutes before configuring the syslog server. |
Crosswork allows external syslog consumers to:
-
Register on Crosswork to receive system events, audit events, and internal collection jobs from the Syslog and Trap servers.
-
Define and filter which kind of events should be forwarded as a syslog, per consumer.
-
Define the rate at which syslogs are forwarded to the consumer.
Attention |
The APIs to configure a syslog server are deprecated in the Crosswork 6.0 release. |
Procedure
|
Step 1 |
From the main menu, choose tab. |
|
Step 2 |
Under Alarms and events settings, click the Notification destination option. |
|
Step 3 |
Click |
|
Step 4 |
In the Add Destination pane, from the Destination drop-down list, select Syslog receiver. |
|
Step 5 |
Enter the Syslog destination details. For more information, click |
|
Step 6 |
If you selected TLS for Protocol, select the certificate from the Syslog certificate drop-down list. |
|
Step 7 |
Click Save. |
Syslog event fields
After the Syslog destination is configured, Crosswork generates events in the form of syslogs and sends them to the Syslog destination.
The events have this format:
<pri><v> <stamp> <vip> <app> <PID> <Message ID> <Structure Data> <Message>
|
Field |
Description |
Example |
|---|---|---|
|
|
The priority of the event generated: Where The category of the event generated is represented using an integer value: The alarm severity indicates the severity of the event using an integer value: |
Event with the Category as System and Severity as Major, the Pri = 8 * 3 + 3 = 27. |
|
|
The version of the Syslog server. |
NA |
|
|
The timestamp at which the event is created. |
|
|
|
The Crosswork VIP address. |
|
|
|
The event OriginServiceId and OriginAppId. |
|
|
|
The process ID. |
NA |
|
|
The event ID. |
|
|
|
The event ObjectId and event type. |
|
|
|
The description of the event. |
|
Configure a trap server
Cisco Crosswork allows external trap consumers to:
-
Register on Crosswork and receive system events and audit log as traps.
-
Define and filter which kind of events should be forwarded as traps, per consumer.
-
Define the rate at which traps are forwarded to the consumer.
Attention |
The APIs to configure a trap server are deprecated in the Crosswork 6.0 release. |
Procedure
|
Step 1 |
From the main menu, choose tab. |
|
Step 2 |
Under Alarms and events settings, click the Notification destination option. |
|
Step 3 |
Click |
|
Step 4 |
In the Add Destination pane, from the Destination drop-down list, select Trap receiver. |
|
Step 5 |
Enter Trap destination details. For more information, click |
|
Step 6 |
After entering all relevant information, click Add. |
Create a notification policy for system events
Create a notification policy when you need to define policy attributes, criteria, and destinations for a system event.
For information on notification policies for network or device events, refer to the Set Up and Monitor Alarms and Events section in the Cisco Crosswork Network Controller 7.2 Device Lifecycle Management Guide.
Procedure
|
Step 1 |
From the main menu, choose . The Notification Policies window is displayed. |
||
|
Step 2 |
Click Create and select System/Network events. The Create window is displayed. |
||
|
Step 3 |
Under Policy Attributes, enter relevant values for the policy fields. The policy fields are:
|
||
|
Step 4 |
Click Next. Under Destination, select the destinations for the notification policy. The destination can be a trap receiver, syslog receiver, or an external kafka. If there are no destinations available, click |
||
|
Step 5 |
Click Next, review the summary details, and click Save to confirm the policy details. |
Configure interface data collection
Before you begin
Create a tag and assign it to the device for which Crosswork collects the interface data.
Crosswork Data Gateway collects interface state and stats data, such as name, type, and traffic counters, from devices through the SNMP or gNMI protocol. Crosswork Data Gateway starts the data collection when a device is onboarded and attached to the data gateway.
Procedure
|
Step 1 |
From the main menu, choose tab. |
|
Step 2 |
Under Data Collection, select Interfaces. 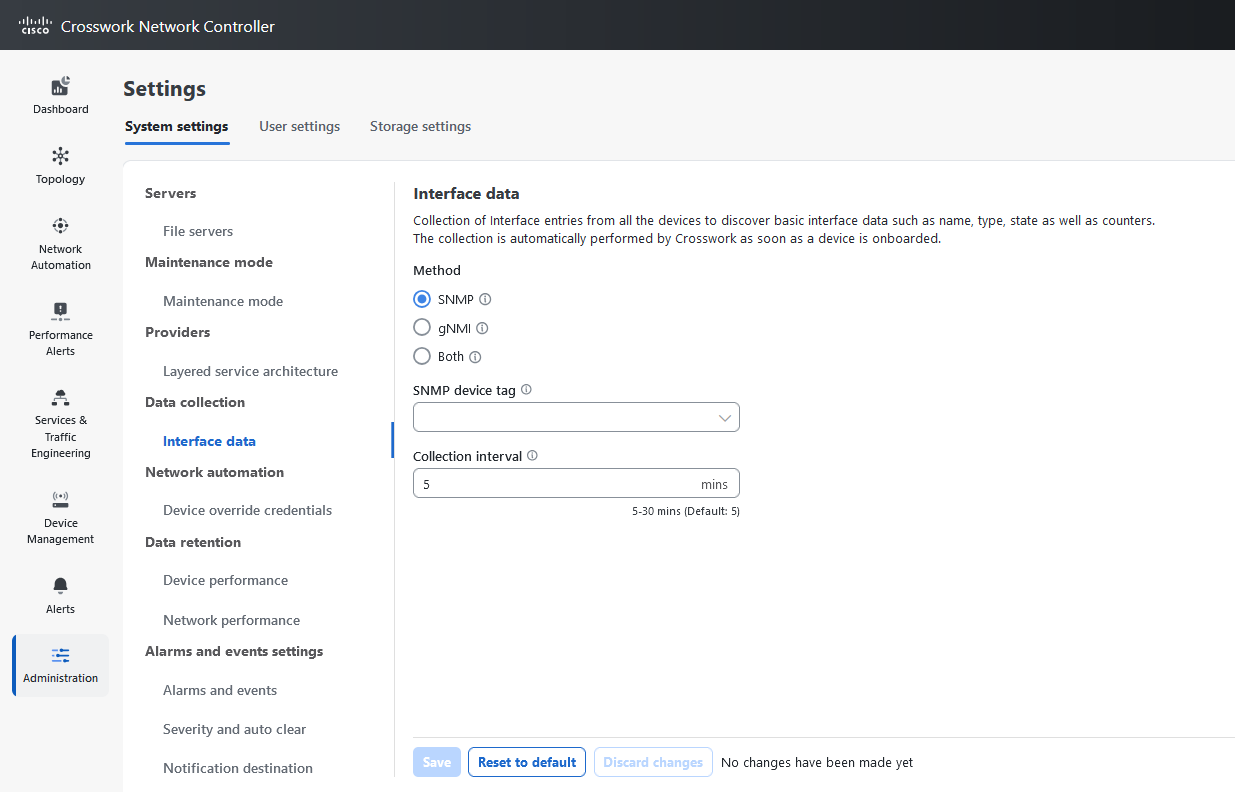
|
|
Step 3 |
In the Interface data pane, select the appropriate method.
If you choose Both as the method, you must select the appropriate SNMP and gNMI device tags. If you choose SNMP or gNMI method, the device tags become optional. |
|
Step 4 |
From the Select {SNMP or gNMI} Device Tag drop-down list, select unique tags for SNMP and gNMI protocols. The precreated tags associated to the device are listed. If you select the No Tag Selected option, Crosswork starts the data collection for devices with system SNMP or gNMI tags. |
|
Step 5 |
In the Interface Collection Interval field, specify the duration between the data collection requests. The default duration is 5 minutes. |
|
Step 6 |
Click Save. |
Enable the pre-login disclaimer
Many organizations require their systems to display a disclaimer message in a banner before users log in. The banner reminds authorized users of their obligations when using the system, or provides warnings to unauthorized users. You can enable such a banner for Crosswork users and customize the disclaimer message as needed.
Procedure
|
Step 1 |
From the main menu, choose tab. |
|
Step 2 |
Under Notifications, click the Pre-Login Disclaimer option. |
|
Step 3 |
Check the Enabled check box. |
|
Step 4 |
Customize the banner Title, Icon, and Disclaimer Text as needed. |
|
Step 5 |
Optional: While editing the disclaimer, preview, discard, or reset your changes.
|
|
Step 6 |
When you are satisfied with your changes, click Save. The custom disclaimer is enabled for all users. |
Turn off the pre-login disclaimer
Turn off the pre-login disclaimer when you no longer want Crosswork to display the banner before users log in.
Procedure
|
Select , then uncheck the Enabled check box. |
File server settings
File server settings control the secure file transfer services that Cisco Crosswork provides for Crosswork applications that need them.
Cisco Crosswork provides secure file transfer services, FTP and SFTP, for Crosswork applications that need them. They are disabled by default.
Enable an FTP server
Cisco Crosswork provides FTP services for Crosswork applications that need them. FTP is disabled by default.
Procedure
|
Step 1 |
From the main menu, choose . |
|
Step 2 |
Under FTP, select the Enable FTP (Port TCP 30621) check box. |
|
Step 3 |
Click Save to save your settings. |
Enable an SFTP server
Cisco Crosswork provides SFTP services for Crosswork applications that need them. SFTP is disabled by default.
Procedure
|
Step 1 |
From the main menu, choose . |
||
|
Step 2 |
Select the Enable SFTP server upload Upload (Port TCP 30622) check box.
|
||
|
Step 3 |
Click Save to save your settings. |
 Feedback