Software Upgrade Qualification

Introduction

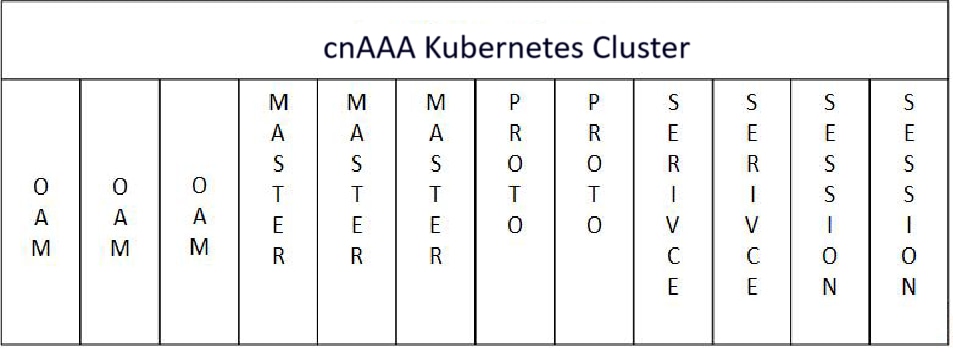
Cisco cnAAA has a three-tier architecture which consists of Protocol, Service, and Session tiers. Each tier includes a set of microservices (pods) for a specific functionality. Within these tiers, there exists a Kubernetes Cluster comprising of Kubernetes (K8s) master, and worker nodes (including Operation and Management nodes).

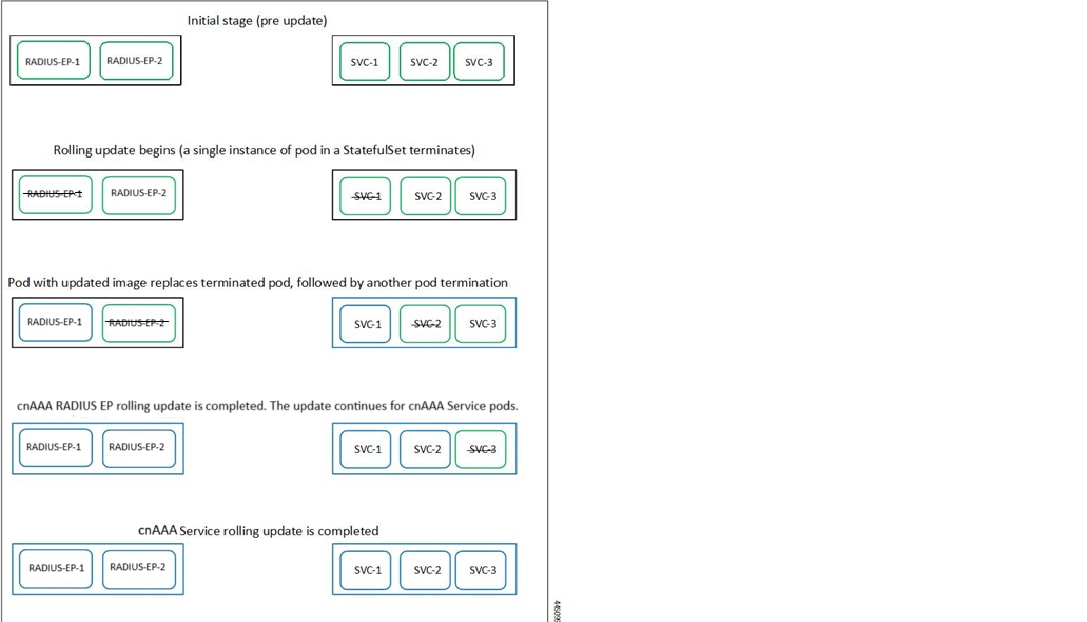
For high availability and fault tolerance, a minimum of two K8s worker nodes are required for each tier. You can have multiple replicas for each worker node. Kubernetes orchestrates the pods using the StatefulSets controller. The pods require a minimum of two replicas for fault tolerance.

The following figure depicts a cnAAA K8s Cluster – Master nodes, Operations, and Management (OAM) worker nodes, Protocol worker nodes, Service worker nodes, Session (data store) worker nodes.

Figure 1. cnAAA Kubernetes Cluster

Note


  • OAM worker nodes - These nodes host the Ops Center pods for configuration management and metrics pods for statistics and Key Performance Indicators (KPIs).

  • Protocol worker nodes - These nodes host the cnAAA protocol-related pods for RADIUS Endpoint.

  • Service worker nodes - These nodes host the cnAAA application-related pods that perform session management processing.

  • Session worker nodes - These nodes host the database-related pods that store subscriber session data.


Deploy and validate cnAAA software

This section describe different stages in deploying the cnAAA Software.

  • Run the SMI Cluster Manager

  • Deploy the cnAAA Software

  • Validate the Deployment

Run the SMI cluster manager

The cnAAA software deploy or in-service procedure utilizes the K8s rolling strategy to update the pod images. In K8s rolling update strategy, the pods of a StatefulSet updates sequentially to ensure that the ongoing process remains unaffected. Initially, a rolling update on a StatefulSet causes a single pod instance to terminate. This process continues until all the replicas of the StatefulSet are updated. The terminating pods exit gracefully after completing all the ongoing processes.


Note


Run the SMI sync operation for the cnAAA Ops Center and Cloud Native Common Execution Environment (CN-CEE).

For more information, see the SMI Cluster Manager - Deployment guide.


The following figure illustrates a cnAAA rolling update for cnAAA RADIUS endpoint pods (two replicas) on Protocol worker nodes along with cnAAA Service pods (three replicas) on Service worker nodes.

Prerequisites

The prerequisites for upgrading cnAAA are:

  • All the nodes – including all the pods in the node – are up and running.

  • A patch version of the cnAAA software.

Note


Currently, major versions do not support the rolling upgrade. The major version represents the release year, release number, and maintenance number. Cisco follows the versioning format as YYYY.RN.MN such as 2025.02.0.

Important


Trigger rolling upgrade only when the CPU usage of the nodes is less than 50%.

cnAAA Health Check

Perform a health check to ensure that all the services are running and nodes are in ready state. To perform a health check:

  1. Log in to master node.

  2. Use these commands to view pod and node configurations:

    • View pods in the SMI namespace:

      kubectl get pods -n smi
    • View Kubernetes nodes:

      kubectl get nodes
    • View pods in all namespaces with wide output:

      kubectl get pod --all-namespaces -o wide
    • View pods in the CPC namespace with wide output:

      kubectl get pods -n <cpc namespace> -o wide
    • View pods in the CEE namespace with wide output:

      kubectl get pods -n <cpc namespace> -o wide
    • List helm releases:

      helm list
    • Count all pods across all namespaces:

      kubectl get pods -A | wc -l

      Note


      • If any pod is not in a running state, verify the status of the nodes using this command:

        kubectl get nodes --show-labels
      • Start the cnAAA Ops-Center with 100% functionality before starting traffic on it.


Important


Ensure that all the nodes are in the ready state before you proceed further. Use the kubectl get nodes command to display the node states.


Check cnAAA Ops-Center Status

Use this command to view the status of the cnAAA Ops-Center:

  • Use this command to view the system status:

    [m13-cnaaa/m13] cpc# show system

Sample output:

Tue Apr  15 13:13:03.130 UTC+00:00
system uuid 6301d096-a1d7-442d-8b6b-9577143dd47f
system status deployed true
system status percent-ready 100.0
system ops-center repository https://charts.<Master_VIP>.nip.io/cpc.2025.02.0.i64
system ops-center-debug status true
system synch running true
system synch pending false

Verify non-running Pods

Use this command to list all pods and filter for those not in a running status.

kubectl get pods -A | grep -iv running

Sample output:

NAMESPACE         NAME                                                              READY   STATUS             RESTARTS         AGE
<namespace>           crd-api-<namespace>-engine-app-production-rjio-7689c94786-kvd26   1/2     CrashLoopBackOff   17 (4m28s ago)   76m

Prepare for upgrade

This section describes the procedure involved creating a backup configuration, logs, and deployment files. To back up the files:

Table 1. Mandatory options for backup configuration

Option

Description

backup-type

Specifies the type of backup to perform (all, PB, CRD, Ops-center).

password

Password for authentication of PB or CRD.

scp-server-dest-backup-path

Destination path for backup files on the SCP server.

scp-server-user-ip

Host IP address of the SCP server.

scp-server-user-name

Username for the SCP server.

scp-server-user-password

Password for the SCP server user.

svn-url

SVN URL for Policy Builder export (e.g., http://svn/repos//configuration).

username

Username for authentication of PB or CRD.

schedule-backup-daily

Specifies the hour of the day when the backup operation should be executed (Values range from 00 to 23).

schedule-backup-weekly

Indicates the day of the week when the backup should occur (Values range from 1-7 and start with 1-Monday).

  1. Log in to the SMI Cluster Manager Node as an ubuntu user.

  2. Create a new directory for deployment.

    Example:

    test@smicpc-cm01:~$ mkdir -p "temp_$(date +'%m%d%Y_T%H%M')" && cd "$_"
  3. Move all the cnAAA deployment file into the newly created deployment directory.

  4. Untar the cnAAA deployment file.

    Example:
    test@smi1cpc01-cm01:~/temp_08072019_T1651$ tar -xzvf cpc.2025.01.SPA.tgZ
    ./
    ./cpc_REL_KEY-CCO_RELEASE.cer
    ./cisco_x509_verify_release.py
    ./cpc.2020.01.0-1.tar
    ./cpc.2020.01.0-1.tar.signature.SPA
    ./cpc.2020.01.0-1.tar.SPA.README
    
  5. Verify the downloaded image.

    Example:

    test@smi1cnAAA01-cm01:~/temp_08072019_T1651$ cat cpc.2025.01.SPA.tgZ

    Important


    Follow the procedure mentioned in the SPA.README file to verify the build before proceeding to the next step.


Backup SVN, Policy, and CRD data

This section describes the procedure involved in creating a backup of SVN, Policy, and CRD data. To perform a backup of SVN and Policy files:

  1. Log in to the master node as an ubuntu user.

  2. Use the following command to retrieve the Policy Builder URL.

    kubectl get ing -n $( kubectl get namespaces | grep -oP 'cnAAA-(\d+|\w+)' | cut -d\  -f1) | grep policy-builder | awk '{ print $2 }'
    pb.cnAAA-02-cnAAA-engine-app-blv02.ipv4address.nip.io 
    

    Example:

    cloud-user@m13-cnaaa-master-2:~$ kubectl get ing -n $( kubectl get namespaces | grep -oP 'pcf-(\d+|\w+)') |grep policy-builder | awk '{ print $3 }'
    pb.pcf-m13-pcf-engine-app-production-rjio.10.84.16.218.nip.io
    cloud-user@m13-cnaaa-master-2:~$


    Sample output:

    pb.cnAAA-02-cnAAA-engine-app-blv02.ipv4address.nip.io
    
  3. Navigate to the Policy Builder home page.

  4. Click Import/Export.

  5. Click All Data.

    • Export URL—Specify the export URL.

    • Export File Prefix—Specify an appropriate name for the export file.

  6. Click Export.


    Important


    You can find the exported file in your local Downloads directory.


To perform a backup of CRD data:

  1. Navigate to the Policy Builder Home page.

  2. Click Custom Reference Data.

  3. Click Import/Export CRD data.

  4. Click Export.


    Important


    You can find the CRD data in your Web browser's Downloads directory.


Auto-backup of PB,CRD and Ops Center configurations

Feature History

Feature Name

Release Information

Description

Auto-backup of PB,CRD and Ops Center configurations

2025.03.0

This feature allows for automated backups of PB, CRD, and Ops-center configurations through customizable schedules and on-demand triggers. It consolidates backup processes, replacing manual tasks with automation, thereby enhancing operational efficiency.

Overview

A new Ops Center command-line utility simplifies the backup of critical configurations within the CPC system. This utility provides single-command backups by consolidating Ops Center, Policy Builder, and Customer Reference Data backups, which previously required separate API commands to trigger the backup for individual configurations. It also supports remote storage through Secure Copy Protocol (SCP) and allows scheduling of automated backups for better management and avoiding data loss. The utility improves backup management, helps prevent data loss, and enables restoring critical configuration.

Auto-backup procedure

Follow these steps to configure the backup settings from Ops Center:

Procedure

Step 1

Enter to config mode and configure parameters under debug backup-config.

This table lists the mandatory options for backup-config:

Option

Description

backup-type

Specifies the type of backup to perform (all, PB, CRD, Ops-center).

password

Password for authentication of PB or CRD.

scp-server-dest-backup-path

Destination path for backup files on the SCP server.

scp-server-user-ip

Host IP address of the SCP server.

scp-server-user-name

Username for the SCP server.

scp-server-user-password

Password for the SCP server user.

svn-url

SVN URL for Policy Builder export (e.g., http://svn/repos//configuration).

username

Username for authentication of PB or CRD.

schedule-backup-daily

Specifies the hour of the day when the backup operation should be executed (Values range from 00 to 23).

schedule-backup-weekly

Indicates the day of the week when the backup should occur (Values range from 1-7 and start with 1-Monday).

Step 2

Verify the configuration by using the show running-config debug backup-config command.

Example:

This sample configuration shows backup settings for the Ops Center:

[unknown] pcf# show running-config debug backup-config
debug backup-config backup-type all
debug backup-config username admin
debug backup-config password $8$pjU5UYsnL9kn5Lg5A1ckCB0fZx6qL5/fLWxNSMCk4/4=
debug backup-config svn-url http://svn/repos//configuration
debug backup-config scp-server-user-name cloud-user
debug backup-config scp-server-user-ip 10.84.117.99
debug backup-config scp-server-dest-backup-path /home/cloud-user/aellendu
debug backup-config scp-server-user-password $8$mEE8Kc5kW+5bIf4vYK1zpTaHYqUhYCUT05snEYl8c4Y=

Example

Note


To trigger a backup manually, execute this command from Ops Center CLI:

pcf# pcf-system periodic-backup backup-type all
  • backup-type all: Initiates a backup of PB, CRD and Ops Center configurations.


Manual backup CEE and cnAAA Ops-Center configuration

This section describes the procedure involved in creating a backup of CEE and Ops Center configuration from the master node.

Procedure

Step 1

Log in to the master node as an ubuntu user.

Step 2

Create a directory to backup the configuration files.

mkdir backups_$(date +'%m%d%Y_T%H%M') && cd "$_"

Step 3

Back up the cnAAA Ops-Center configuration and verify the line count of the backup files.

ssh -p <port_number> admin@$(kubectl get svc -n $(kubectl get namespaces|
 grep -oP 'cnAAA-(\d+|\w+)') | grep <port_number> | awk '{ print $3 }') "show run |
nomore" > cnAAAops.backup_$(date +'%m%d%Y_T%H%M') && wc-l cnAAAops.backup_$(date +'%m%d%Y_T%H%M')
Example:
ssh -p 2024 admin@$(kubectl get svc -n $(kubectl get namespaces| grep -oP 'pcf-(\d+|\w+)')
| grep 2024 | awk '{ print $3}') "show run | nomore" > cnAAAops.backup_$(date
+'%m%d%Y_T%H%M') && wc -l cnAAAops.backup_$(date +'%m%d%Y_T%H%M')

Step 4

Back up the CEE Ops Center configuration and verify the line count of the backup files.

ssh -p <port_number> admin@$(kubectl get svc -n $(kubectl get namespaces
| grep -oP 'cee-(\d+|\w+)') | grep <port_number> | awk '{ print $3 }') "show run | nomore" > ceeops.backup_$(date +'%m%d%Y_T%H%M') && wc
-l ceeops.backup_$(date +'%m%d%Y_T%H%M')
Example:
ubuntu@pocnAAA-mas01:~/backups_09182019_T2141$ ssh -p <port_number>
admin@$(kubectl get svc -n $(kubectl get namespaces | grep -oP 'cee-(\d+|\w+)') | 
grep <port_number> | awk'{ print $3 }') "show run | nomore" > ceeops.backup_$
(date +'%m%d%Y_T%H%M') && wc -l ceeops.backup_$(date +'%m%d%Y_T%H%M')
admin@<admin_ip_address> password: CEE-OPS-PASSWORD 233 ceeops.backup

Step 5

Move the SMI Ops Center backup file (from the SMI Cluster Manager) to the backup directory.

scp $(grep cm01 /etc/hosts | awk '{ print $1
}'):/home/ubuntu/smiops.backup_$(date +'%m%d%Y_T%H%M')
Example:
ubuntu@pocnAAA-mas01:~/backups_09182019_T2141$ scp $(grep cm01 /etc/hosts | awk '{ print
$1 }'):/home/ubuntu/smiops.backup_$(date +'%m%d%Y_T%H%M'). ubuntu@<admin_ip_address>
password: SMI-CM-PASSWORD smiops.backup 100% 9346 22.3MB/s 00:00

Step 6

Verify the line count of the backup files.

Example:
ubuntu@pocnAAA-mas01:~/backups_09182019_T2141$ wc -l *
233 ceeops.backup
334 cnAAAops.backup
361 smiops.backup
928 total

Upgrade the cnAAA

This section describes the procedures involved in upgrading cnAAA.

Stage a new cnAAA image

This section describes the procedure involved in staging a new cnAAA image before initiating the upgrade.

To stage the new cnAAA image:

  1. Download and verify the new cnAAA image.

    url: http://<Repo_Server_IP>/releases/cpc/cpc.2026.01.0.x<Repo_Server_IP>.tar sha256: 6817692f1703a657a1867b0ccaf4483fadd7a908d68094a7deb5d16ce234c0e7
  2. Log in to the SMI Cluster Manager node as an ubuntu user.

  3. Copy the images to Uploads directory.

    sudo mv <cnAAA_new_image.tar> /data/software/uploads 

    Note


    The SMI uses the new image present in the Uploads directory to upgrade.


  4. Verify whether the image is picked up by the SMI for processing from the Uploads directory.

    sleep 30; ls /data/software/uploads 

    Example:

    ubuntu@pocnAAA-cm01:~/temp_08072019_T1651$ sleep 30; ls /data/software/uploads
    ubuntu@pocnAAA-cm01:~/temp_08072019_T1651$
    
  5. Verify whether the images were successfully picked up and processed.

    Example:

    auser@unknown:$ sudo du -sh /data/software/packages/*
    1.6G	/data/software/packages/cee.2019.07
    5.3G	/data/software/packages/cnAAA.2019.08-04
    16K	/data/software/packages/sample
    

    The SMI unpacks the images into the packages directory successfully to complete the staging.

    For more information, refer the SMI Cluster Manager - Deployment


    Note


    The SMI must unpack the images into the packages directory successfully to complete the staging.


Trigger the rolling software upgrade

The cnAAA is triggered using the SMI cluster manager. To trigger cnAAA using SMI cluster manager, follow these configurations:

  1. Log in to the SMI cluster manager console.

  2. Run the following command to log in to the SMI Ops Center.

    ssh -p <port_number> admin@$(kubectl get svc -n smi | grep
    '.*netconf.*<port_number>' | awk '{ print $4 }') 

    Example:

    cloud-user@m13-cm:~$ ssh -p 2024 admin@$(kubectl get svc -n smi-cm | grep '2024' | awk '{ print $3 }')
    admin@10.101.154.93's password:
    
          Welcome to the Cisco SMI Cluster Deployer on m13-cm
          Copyright © 2016-2020, Cisco Systems, Inc.
          All rights reserved.
    
    admin connected from 10.192.1.11 using ssh on ops-center-smi-cluster-deployer-6685dd9dd9-52wk2
    [m13-cm] SMI Cluster Deployer#
  3. Download the latest .tar from the URL.

    software-packages download URL 

    Example:

    [m13-cm] SMI Cluster Deployer(config)# software cnf cpc.2025.02.0.i64
    [m13-cm] SMI Cluster Deployer(config-cnf-cpc.2025.02.0.i64)#  url http://10.84.16.209/releases/cpc/cpc.2025.02.0.i64.tar

    NOTES:

    • software-packages download url —Specify the software packages to be downloaded through HTTP/HTTPS.

  4. Verify whether the TAR balls are loaded.

    software-packages list 

    Example:

    [m13-cm] SMI Cluster Deployer# show running-config software cnf cpc.2025.02.0.i64

    NOTES:

    • software-packages list —Specify the list of available software packages.

  5. Update the product repository URL with the latest version of the product chart.

    config
      cluster cluster_name
       ops-centers app_name cnAAA_instance_name
            repository-local local repository name
             exit
           exit 

    Example:

    SMI Cluster Manager# config 
    SMI Cluster Manager(config)# clusters m13-cnaaa 
    SMI Cluster Manager(config-clusters-test2)# ops-centers pcf m13 
    SMI Cluster Manager(config-ops-centers-cnAAA/data)# repository-local cpc.2025.02.0.i64 
    SMI Cluster Manager(config-ops-centers-cnAAA/data)# exit 
    SMI Cluster Manager(config-clusters-test2)# exit 
    

    NOTES:

    • cluster —Specify the K8s cluster.

    • cluster_name —Specify the name of the cluster.

    • ops-centers app_name instance_name —Specify the product Ops Center and instance. app_name is the application name. instance_name is the name of the instance.

    • repository url —Specify the local registry URL for downloading the charts.

  6. Run the cluster sync command to update to the latest version of the product chart. For more information on cluster sync command, see the section.

    clusters cluster_name actions sync run 

    Example:

    clusters m13-cnaaa actions sync run sync-phase opscenter debug true   <<<<<<<<<<<<< (For Cluster Sync)
    This will run sync.  Are you sure? [no,yes] yes
    message accepted
    warning "k8s node-type master" for node master-1 is deprecated. Use "k8s node-type control-plane" instead
    warning "k8s node-type master" for node master-2 is deprecated. Use "k8s node-type control-plane" instead
    warning "k8s node-type master" for node master-3 is deprecated. Use "k8s node-type control-plane" instead
    [m13-cm] SMI Cluster Deployer# monitor sync-logs m13-cnaaa      <<<<<<<<<<<<< (To monitor the sync logs)

    Important


    The cluster synchronization configure the cnAAA Ops Center, which in turn upgrade the application pods (through helm sync command) one at a time automatically.


    NOTES:

    • cluster —Specify the K8s cluster.

    • cluster_name —Specify the name of the cluster.

    • actions —Specify the actions performed on the cluster.

    • sync run —Triggers the cluster synchronization.

Monitor the cnAAA Upgrade

Monitor the status of the upgrade through SMI Cluster Manager Ops-Center configurations:

config 
  clusters cluster_name actions sync run upgrade-strategy concurrent debug true 
  clusters cluster_name actions sync logs 
  monitor sync-logs cluster_name 
  clusters cluster_name actions sync status 
  end 
Example:
SMI Cluster Manager# clusters test1 actions sync run
SMI Cluster Manager# clusters test1 actions sync run upgrade-strategy concurrent debug true
SMI Cluster Manager# clusters test1 actions sync logs
SMI Cluster Manager# monitor sync-logs test1
SMI Cluster Manager# clusters test1 actions sync status

Once cluster sync is successful, verify the cluster sync log.

Sample output:

Monday 27 October 2025 10:20:53 +0000 (0:00:01.467) 0:24:13.515 ********

2025-10-27 10:20:53.862 DEBUG cluster_sync.m13-cnaaa: Cluster sync successful
2025-10-27 10:20:53.864 DEBUG cluster_sync.m13-cnaaa: Ansible sync done
2025-10-27 10:20:53.864 INFO cluster_sync.m13-cnaaa: _sync finished. Opening lock
2025-10-27 10:20:53.864 INFO cluster_sync.m13-cnaaa: Aggregated sync time: 00:24:25.265

NOTES:

  • clusters cluster_name —Specify the information about the nodes to be deployed. cluster_name is the name of the cluster.

  • actions —Configures the actions performed on the cluster.

  • sync run —Triggers the cluster synchronization.

  • sync logs —Displays the current cluster synchronization logs.

  • sync status —Displays the current status of the cluster synchronization.

  • debug true —Enters the debug mode.

  • monitor sync logs – Monitors the cluster synchronization process.


Important


You can view the pod details after the upgrade through CEE Ops Center. For more information on pod details, see Viewing the Pod Details section.


Verify the Helm Status

This section describes the procedure involved in verifying the helm status. You need to determine whether the deployed helm chart is listed in the helm list successfully.

To determine the helm status:

  1. Run the following on the master node to view the list of deployed helm charts.

    helm list -A 

    Sample output:

    cloud-user@m13-cnaaa-master-3:~$ helm ls -A| grep cpc
    cpc-m13-cnat-cps-infrastructure         cpc-m13         1               2025-10-29 06:24:22.68282772 +0000 UTC  deployed        cnat-cps-infrastructure-0.6.10-dev-cpc-2025-03-0051-250811004416-4daacd0    BUILD_2025.03.1.i54
    cpc-m13-cps-radius-ep                   cpc-m13         1               2025-10-29 06:24:22.681193924 +0000 UTC deployed        cps-radius-ep-0.6.43-dev-cpc-2025-03-0317-250812071800-2db928a              BUILD_2025.03.1.i54
    cpc-m13-network-query                   cpc-m13         1               2025-10-29 06:24:22.681469304 +0000 UTC deployed        network-query-0.5.4-dev-cpc-2025-03-0095-250716052025-833caab               BUILD_2025.03.1.i54
    cpc-m13-ops-center                      cpc-m13         10              2025-10-29 06:18:10.184343814 +0000 UTC deployed        cpc-ops-center-0.6.32-dev-cpc-2025-03-0558-250716054741-99e44f1             BUILD_2025.03.1.i54
    cpc-m13-cpc-config                      cpc-m13         1               2025-10-29 06:24:22.68490608 +0000 UTC  deployed        cpc-config-0.6.3-dev-cpc-2025-03-0030-250716051310-045be1e                  BUILD_2025.03.1.i54
    cpc-m13-cpc-dashboard                   cpc-m13         1               2025-10-29 06:24:22.686188032 +0000 UTC deployed        cpc-dashboard-0.2.17-dev-cpc-2025-03-0196-250716051353-871e51f              BUILD_2025.03.1.i54
    cpc-m13-cpc-engine-app-production-rjio  cpc-m13         1               2025-10-29 06:24:22.681441532 +0000 UTC deployed        cpc-engine-app-0.9.2-dev-cpc-2025-03-0788-250811003555-7830316              BUILD_2025.03.1.i54 
    cpc-m13-cpc-oam-app                     cpc-m13         1               2025-10-29 06:24:22.681257099 +0000 UTC deployed        cpc-oam-app-0.6.2-dev-cpc-2025-03-0022-250716051638-582c2b0                 BUILD_2025.03.1.i54
    cpc-m13-cpc-services                    cpc-m13         1               2025-10-29 06:24:22.681354868 +0000 UTC deployed        cpc-services-0.6.17-dev-cpc-2025-03-0089-250716051336-a203202               BUILD_2025.03.1.i54
    cloud-user@m13-cnaaa-master-3:~$
    
  2. If the helm chart is not found, run the following in the operational mode to view the charts irrespective of their deployment status.

    show helm charts 

    Sample output:

    [m13-cnaaa/m13] cpc# show running-config helm
    Wed Oct  29 06:37:41.475 UTC+00:00
    helm default-repository base-repos
    helm repository base-repos
     url https://charts.2002-10-192-1--21.sslip.io/cpc.2025.03.1.i54
    exit
    [m13-cnaaa/m13] cpc#
    
    
    [m13-cnaaa/m13] cpc# show helm charts version
    Wed Oct  29 06:36:48.650 UTC+00:00
    CHART                    INSTANCE                                VERSION
    --------------------------------------------------------------------------------------
    cpc-ops-center           cpc-m13-ops-center                      BUILD_2025.03.1.i54
    cnat-cps-infrastructure  cpc-m13-cnat-cps-infrastructure         BUILD_2025.03.1.i54
    cps-radius-ep            cpc-m13-cps-radius-ep                   BUILD_2025.03.1.i54
    etcd-cluster             cpc-m13-etcd-cluster                    BUILD_2025.03.1.i54
    network-query            cpc-m13-network-query                   BUILD_2025.03.1.i54
    ngn-datastore            cpc-m13-ngn-datastore                   BUILD_2025.03.1.i54
    cpc-config               cpc-m13-cpc-config                      BUILD_2025.03.1.i54
    cpc-dashboard            cpc-m13-cpc-dashboard                   BUILD_2025.03.1.i54
    cpc-engine-app           cpc-m13-cpc-engine-app-production-rjio  BUILD_2025.03.1.i54
    cpc-oam-app              cpc-m13-cpc-oam-app                     BUILD_2025.03.1.i54
    cpc-services             cpc-m13-cpc-services                    BUILD_2025.03.1.i54
    
    [m13-cnaaa/m13] cpc# show helm charts status
    Wed Oct  29 06:36:54.252 UTC+00:00
    CHART                    INSTANCE                                STATUS
    ---------------------------------------------------------------------------
    cpc-ops-center           cpc-m13-ops-center                      deployed
    cnat-cps-infrastructure  cpc-m13-cnat-cps-infrastructure         deployed
    cps-radius-ep            cpc-m13-cps-radius-ep                   deployed
    etcd-cluster             cpc-m13-etcd-cluster                    deployed
    network-query            cpc-m13-network-query                   deployed
    ngn-datastore            cpc-m13-ngn-datastore                   deployed
    cpc-config               cpc-m13-cpc-config                      deployed
    cpc-dashboard            cpc-m13-cpc-dashboard                   deployed
    cpc-engine-app           cpc-m13-cpc-engine-app-production-rjio  deployed
    cpc-oam-app              cpc-m13-cpc-oam-app                     deployed
    cpc-services             cpc-m13-cpc-services                    deployed
    [m13-cnaaa/m13] cpc#

Verify the Pods

Follow these steps to determine the pod and container status after upgrading cnAAA. Ensure that all pods and containers are up and running.

  • Use this command to view the cnAAA pod logs:

    kubectl describe pod pod_name -n namespace 
  • Use this command to list all pods and filter for those not in a Running status.

    kubectl get pods -A | grep -v Running

Note


If the Status column displays the state as Running, and the Ready column has the same number of containers on both sides of the forward-slash (/), then the pod is healthy and operational.


Rollback the upgrade

The upgrade can be rolled back if issues are encountered during the upgrade process. This section describes the procedure for rolling back the upgrade..

Reload cnAAA Ops Center configuration

To reload the cnAAA Ops Center configuration from the backup file, follow these steps:

  1. Log in to the SMI console as an ubuntu user.

  2. Untar the backup file created on SMI and move it into a directory.

    Example:
    cd ~/backups && tar -zxf popcf-cfg-backup_110219-053530.tar.gz
  3. Move the backup configuration file into the newly created backups directory.

    Example:

    cd popcf-cfg-backup_110219-053530
    
  4. Convert the exported cnAAA Ops Center configuration into a clean file, which is ready for import.

    Example:

    cat pcfops*.cfg | perl -pe 's/vendor.*\[(.*)\]/vendor $1/g' | perl -pe 's/(^\s+ips).*\[(.*)\]/$1$2/g' | perl -pe 's/(\w)\s+(\w)/$1 $2/g' | perl -pe 's/^\s+//g' | grep -v "system mode run" > cpcops.txt

Update cnAAA Ops Center configuration

This section describes the procedure involved in updating the cnAAA Ops Center configuration after restoring it. To update the cnAAA Ops Center configuration:

  1. Log in to the master node as an ubuntu user.

  2. Run the following command to log in to the cnAAA Ops Center CLI.

    Example:
    ssh -p <port_number> admin@$(kubectl get svc -n $(kubectl get namespaces | grep -oP 'cnAAA-(\d+|\w+)') | grep <port_number> | awk '{ print $3 }')
    
  3. Paste the contents of the exported cnAAA configuration file (the cnAAAops.txt file mentioned in the cnAAA Ops Center.

    Example:
    product cnAAA# config
    Entering configuration mode terminal
    product cnAAA(config)# <PASTE CONTENTS OF cnAAAops.txt AND RETURN TO ‘config’ mode. Don’t Paste Default Configuration>
    product cnAAA(config)#
    

    Important


    Fix any sections in the configuration file that did not import properly.


  4. Ensure that the helm URLs are inline with the updated cnAAA image.

    Example:

    product cnAAA(config)# helm repository base-repos
    product cnAAA(config-repository-base-repos)# url <url>
    product cnAAA(config-repository-base-repos)# exit
    product cnAAA(config)# k8s registry <registry_url>
    product cnAAA(config)# commit
    Commit complete.
    product cnAAA(config)#
    

Restore the configuration from backup

This section describes the procedure involved in restoring all the Policy Builder and CRD configuration files from the backup.

Restore policy builder configuration

  1. Log in to the master node as an ubuntu user.

  2. Retrieve the Cisco Policy Suite Central URL.

    Example:

    kubectl get ing -n $(kubectl get namespaces | grep -oP 'pcf-(\d+|\w+)') | cut -d\ -f1 | grep policy-builder | awk '{ print $2 }'
    pb.pcf-02-pcf-engine-app-blv02.<ipv4address>.nip.io
  3. Navigate to the Cisco Policy Suite Central URL and log in with user credentials.

  4. Click Import/Export and select the Import tab.

  5. Select the exported policy backed up in the Back Up SVN, Policy, and CRD Data section.

  6. In Import URL, specify the following URL:

    http://svn/repos/configuration 
  7. Enter a brief description in Commit Message and click Importto commit the changes in Policy Suit Central.

  8. Log in to the master node again as an ubuntu user.

  9. Run the following command to retrieve the Cisco Policy Builder URL.

    Example:

    kubectl get ing -n $(kubectl get namespaces | grep -oP 'cnAAA-(\d+|\w+)' | cut -d\  -f1) | grep policy-builder | awk '{ print "https://"$2"/pb" }'
    https://pb.cnAAA-02-cnAAA-engine-app-blv02.<ipv4address>.nip.io/pb
    ubuntu@pocnAAA-mas01:~/backups_09182019_T2141$
    
  10. Navigate to the Cisco Policy Builder URL and click Build Policies using version controlled data .

  11. Choose Repository from the drop-down list and click OK.

  12. Click Publish to Runtime Environment and enter a brief description in Commit Message.

  13. Click OK.

Restoring CRD Data

  1. In CPS Central home page, click Custom Reference Data.

  2. Check the Export CRD to Golden Repository check-box.

  3. Specify the SVN host name in Please enter valid server Hostname or IP text-box.


    Note


    For cnAAA the SVN host name value is svn.


  4. Click +.

  5. Click Export.


    Note


    You receive a success message when the data is exported successfully.