Subscriber Profile Repository

Support for Mongo and CDL

Feature History

Feature Name

Release Information

Description

Subscriber migration to multiple SPR DB replica sets

2025.02.0

This feature migrates data from CPS 7.5 to CPC. distributing records across multiple SPR databases. It extracts data from CPS 7.5, restores it to SPR1 in CPC, and assigns hash values for subscriber distribution across SPR1, SPR2, and SPR3.

Mongo 7.0 Support for Subscriber Profile Repository (SPR)

2025.01.0

cnAAA provides support for storing Subscriber Profile Repository (SPR) information in Mongo 7.0. The Subscriber information can be created, updated, or deleted through SOAP unified API calls.

Mongo 7.0 is deployed as a replica set with replica set members deployed on local and remote sites. Mongo DB ensures that the data is replicated across sites, ensuring geo redundancy and availability in case of failure on any of the sites.

Overview

cnAAA provides support for storing Subscriber Profile Repository (SPR) information in Mongo 7.0. The subscriber information can be created, updated, or deleted through SOAP unified API calls.

Mongo 7.0 is deployed as a replica set with replica set members deployed on local and remote sites. Mongo DB ensures that the data is replicated across sites, ensuring geo redundancy and availability in case of failure on any of the sites.

Configure of the SPR MongoDB replica set

Install the SPR MongoDB replica set within the cnAAA Kubernetes cluster namespace. Configure the replica member hosts to have network reachability to the cnAAA Engine Pods, using node IPs of master nodes as replica member host IP addresses.

SPR DB replica set configurations

  • MongoDB replica set members utilize the host network to facilitate network connectivity across different sites.

  • Ensure that host network reachability is maintained across mated pair sites to prevent issues with database initialization and replication.

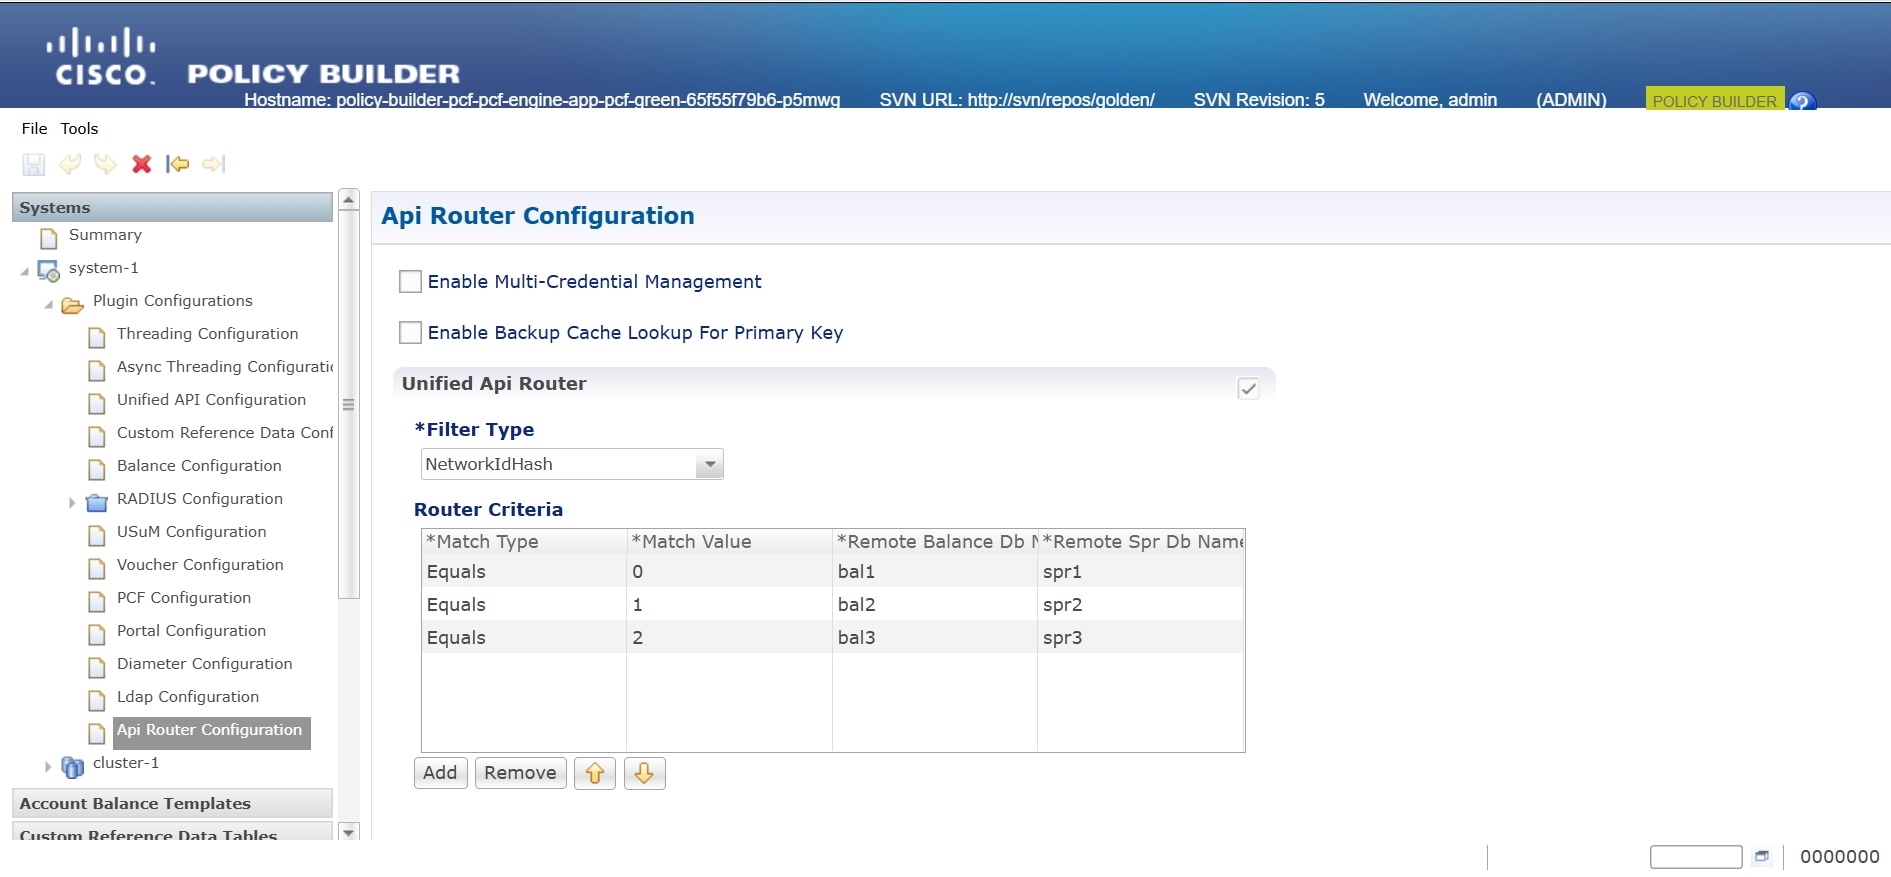
Configure Policy Builder and remote database with USuM configuration

To set up the Policy Builder and configure the remote Subscriber Profile Repository (SPR) database using the USuM configuration tab, follow these steps:

Configure Policy Builder

Set up the Policy Builder with primary and secondary replica members, including their port numbers, under Plugin Configurations > USuM Configuration.

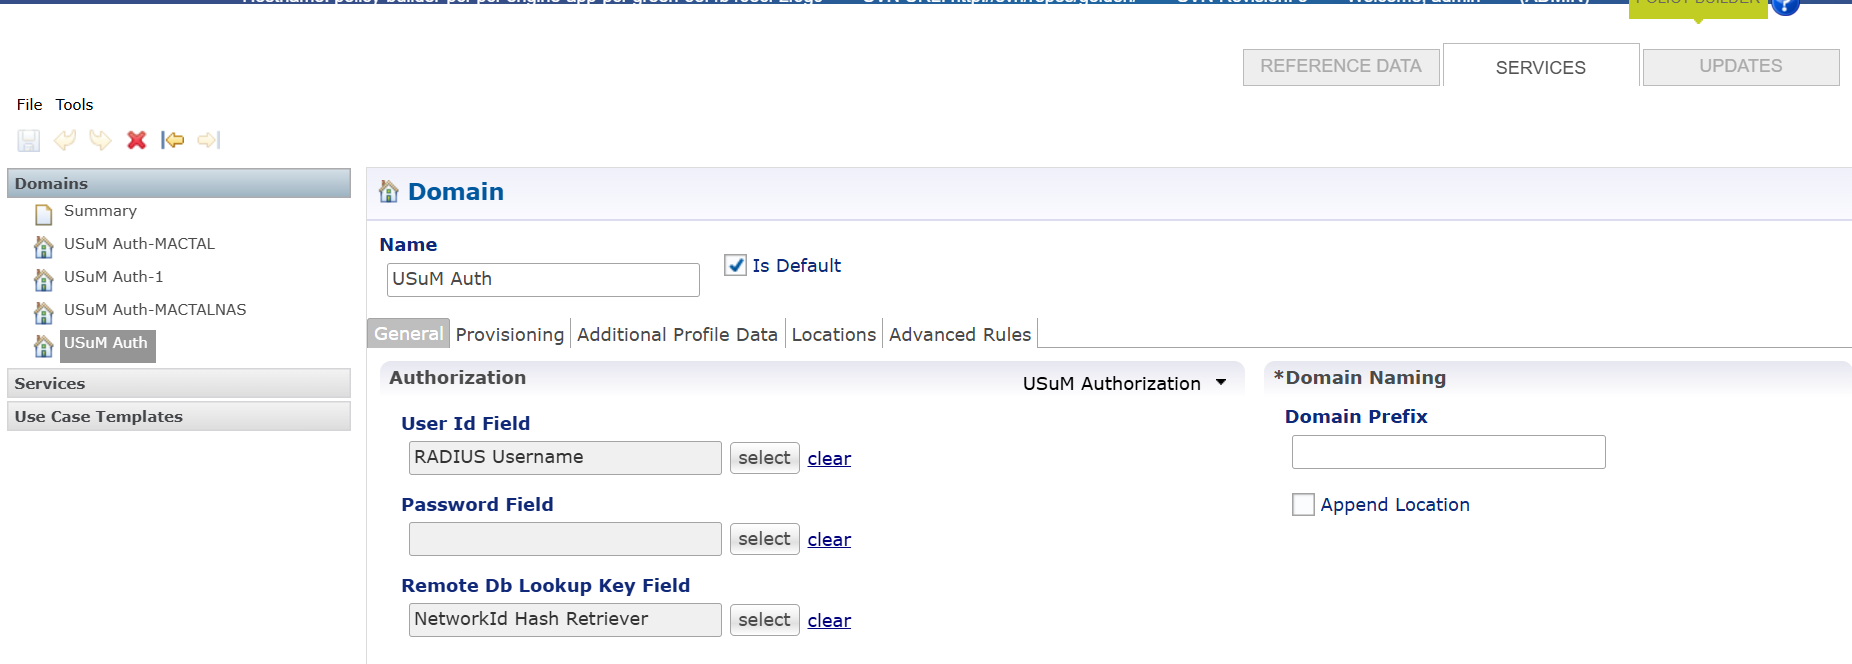
Configure Remote Database with USuM Configuration

Procedure


Step 1

Access Plugin Configurations: In the left pane of the Policy Builder page, click on the Plugin Configurations option.

Step 2

Select USuM Configuration: Choose the USuM Configuration tab.

Step 3

Enter Database Values: Input the mandatory database values required for configuration.


Configure the MongoDB tuning

To optimize MongoDB performance for cnAAA, configure the these database tuning parameters with required values.


db
 global-settings
 db-tunings 
 oplog-size-mb 3072
 wired-tiger-cache-size-gb 3
 slowms 500
 concurrent-transactions-read 2
 concurrent-transactions-write 3

Notes:

oplog-size-mb - 3072 indicates 3GB space allocated for oplog.

wired-tiger-cache-size-gb - Defines the maximum size of the internal cache that WiredTiger uses for all data.

slowms - The slow operation time threshold, in milliseconds.

concurrent-transactions-read - Specify the maximum number of concurrent read transactions (read tickets) allowed into the storage engine.

concurrent-transactions-write - Specify the maximum number of concurrent write transactions (write tickets) allowed into the storage engine.


Note


Mongo authentication is currently not supported in this release.


Configure Mongo Replica Sets

Prerequisite: Before configuring the replica set, create the labels for the nodes.

To Configure Mongo replica set configurations using cnAAA, follow these steps:

  • Provision Mongo Replica Sets:Set up Mongo replica sets by configuring their settings and assigning database labels on Kubernetes nodes to ensure replica set members spawn on the appropriate master nodes.

  • Sample Configuration:This configuration sets up a database replica with an arbiter and two members, specifying their roles, priorities, and network settings.

    db scdb replica-name sdb-subscriber1
     port      65001
     interface vlan2400
     resource cpu limit 6000
     resource memory limit 112000
     replica-set-label key smi.cisco.com/node-type
     replica-set-label value oam
     member-configuration member sdb-rs1-arbiter
      host    10.192.1.24
      arbiter true
      site    local
     exit
     member-configuration member sdb-rs1-s1-m1
      host     10.192.1.22
      arbiter  false
      priority 102
      site     local
     exit
     member-configuration member sdb-rs1-s1-m2
      host     10.192.1.23
      arbiter  false
      priority 101
      site     local
     exit
    exit

For more information on replica sets, see Mobile Policy Common Commands in Ultra Cloud Core Policy and Charging, Release 2025.01.0- CLI Reference Guide.

Verification

You can verify the installation of SPR using the following command:
show db scdb replica-set-status
  • Verify Replica Set Status: Ensure the replica set initializes correctly, with each member assigned the correct role (primary, secondary, arbiter).

cloud-user@alpha-master-1:~$ kubectl get pods -A|grep db-scdb
<namespace>         db-scdb-sdb-subscriber1-0                                         1/1     Running   0              7d5h
<namespace>         db-scdb-sdb-subscriber1-1                                         1/1     Running   0              7d5h
<namespace>         db-scdb-sdb-subscriber1-2                                         1/1     Running   0              7d5h
cloud-user@alpha-master-1:~$

MongoDB authentication

Introduction to MongoDB authentication

The Converged Policy and Charging (CPC) uses MongoDB as its administrative database. MongoDB supports critical functionalities, such as Custom Reference Data (CRD), Subscriber Profile Repository (SPR), and Policy tracing. To ensure robust security, CPC uses the MongoDB authentication method. This approach provides end-to-end protection for these databases.

The key benefits are:

  • Security: Enabling authentication protects sensitive database information.

  • Configuration: Simple configuration options improve ease of use for MongoDB.

  • Encryption: Passwords are encrypted for secure storage and usage.

MongoDB authentication process

Perform MongoDB authentication process in three stages:

  • Authentication setup

  • Password Encryption

  • Database connection

Authentication setup

You can perform these authentication to:

  • Enable MongoDB authentication using the Ops-Center configuration commands

  • Configure the MongoDB username and passwords

Password encryption

To perform password encryption:

  • Use the CLI utility to encrypt the password.

  • Add the encrypted password as a JVM argument for the Engine, PB, and CRD processes.

Database connection

When you connect to the database:

  • Ensure reachability between MongoDB replica members and CPC Engine pods.

  • Access MongoDB using the mongo command with the actual username and password.

Enable database authentication

Before you begin

Enable MongoDB authentication to secure subscriber-specific, Session Control Database (SCDB), and administrative configuration data.

  • Enable MongoDB authentication only when the system is in a shutdown state.

  • If authentication is enabled in CPC but not enabled in CPS, the system may fail to integrate or migrate.

  • Configure the cdl-layer and protocol-layer labels in Ops-Center using the key properties.

    • label cdl-layer key smi.cisco.com/node-type-3 value session.

    • label protocol-layer key smi.cisco.com/node-type-2 value protocol.

  • Use the same MongoDB username and password across all sites.

Complete these steps to enable and verify database authentication:

Procedure


Step 1

Log in to the Ops-Center CLI and enter config mode.

Step 2

Configure the global database credentials.

db global-settings 
   db-user-name <MongoDB_username>
   password <PlainTextPassword>

Example:

db global-settings db-user-name admin password abcxy@123


Step 3

commit the changes to enable the MongoDB authentication.

Step 4

Log in to the Ops-Center configuration.

The engine name is displayed according to the deployment configurations.

Example:

engine name properties name value value  

Step 5

Enter the ops-center command to encrypt or decrypt the plain text password:

  1. Enter the db scdb execute password encrypt-password plain-textPlainTextPassword command.

    Example:

    [unknown] pcf# db scdb execute password encrypt-password plain-text abcxy@123
    Mon Jun  16 08:14:14.138 UTC+00:00
    output :
    3300901EA069E81CE29D4F77DE3C85FA
    

    Example:

    Note


    Use the password specified when enabling the MongoDB authentication parameter.

  2. Enter the db scdb execute password decrypt-password encrypted-text EncryptedPassword command to decrypt the password.

    Example:

    
    [unknown] pcf# db scdb execute password decrypt-password encrypted-text 3300901EA069E81CE29D4F77DE3C85FA
    Fri Jun 16 08:14:14.138 UTC+00:00
    output :
    abcxy@123
    

Step 6

Enter the properties required to set the database username and encrypted password for the engine using these commands:


        engine engine_name properties dbUsername value username 
         engine engine_name properties dbPassword value encryptedpassword 
         exit 

Example:

engine pcf-green properties dbUsername value admin
engine pcf-green properties dbPassword value 3300901EA069E81CE29D4F77DE3C85FA

Step 7

commit the changes.


What to do next

After you enable MongoDB authentication, complete these tasks:

  • Verify the connectivity to MongoDB replica members from CPC engine pods.

  • Access the MongoDB replica set by connecting to the primary host IP and port with the admin username and specified password.

    mongo primary_host_ip:mongo_port -u admin -p password

Sample output to verify the subscriber count without MongoDB authentication credentials:

cloud-user@alpha-master-1:~$ kubectl 
exec -it <pod name> -n <namespace>
-c mongo -- env HOME=/tmp mongo --host <host ip address>
--port <port number> --quiet --eval "db = db.getSiblingDB('spr'); db.subscriber.countDocuments()"
MongoServerError: Command aggregate requires authentication
command terminated with exit code 1

Sample output to verify the subscriber count with MongoDB authentication credentials:

cloud-user@alpha-master-1:~$ kubectl exec -it 
<pod name> -n <namespace> -c mongo -- env HOME=/tmp mongo --host <host ip address>
--port <port number> -u <user name> -p <password>
--quiet --eval "db = db.getSiblingDB('spr'); db.subscriber.countDocuments()"
1537280

Note


This feature cannot be enabled on the GR site. Enabling it requires a fresh installation with Mongo authentication.


MongoDB backup user privileges

This is a security feature that allows to create user accounts with limited permissions. These users can only perform database backup operations on the MongoDB database. They cannot perform any other administrative or operational tasks. This helps prevent unauthorized changes and accidental data loss by backup-only users.

Prerequisites for Configuring Backup-Only User Accounts

Before creating a backup-only user account, ensure that:

  • Service Control Database (SCDB) replicas are configured.

  • Persistent Volume is configured.

  • The Kubernetes setting "use-volume-claims" is enabled and set to true in the Ops-Center.

  • Remote server details for backup storage are configured.

Configure Backup-Only user accounts

Procedure

Follow these steps to configure a backup-only user account:


Follow these steps to configure a backup-only user account:

Step 1

Set up the remote server to store MongoDB backups and specify the host, port, username, password, and remote path for backup files.

Sample configuration:

db global-settings backup-settings scp-server host <remote server ip>
db global-settings backup-settings scp-server port 22
db global-settings backup-settings scp-server user-name <username>
db global-settings backup-settings scp-server password <password>
db global-settings backup-settings scp-server remote-backup-path <path for storing backup file>

Step 2

Create a backup user and assign to backup group:

smiuser add-user username <username> password <password>
smiuser add-group groupname <group_name>
smiuser assign-user-group username <username> groupname <group_name>
Example:
smiuser add-user username backup_user password Cisco@123
smiuser assign-user-group username backup_user groupname backup
smiuser list-users

Note


Use the smiuser list-users command to verify user and group assignment.

Step 3

Configure Network Access Control Model (NACM) Rules

  1. Apply deny rules to the backup group so that the user can only perform the backup operation.

    Deny rules:
    nacm rule-list crdread group <group_name> cmdrule denyaaa command aaa access-operations exec action deny
     nacm rule-list crdread group <group_name> cmdrule denycd command cd access-operations exec action deny
     nacm rule-list crdread group <group_name> cmdrule denyclear command clear access-operations exec action deny
     nacm rule-list crdread group <group_name> cmdrule denycommit command commit access-operations exec action deny
     nacm rule-list crdread group <group_name> cmdrule denycompare command compare access-operations exec action deny
     nacm rule-list crdread group <group_name> cmdrule denyconfig command config access-operations exec action deny
     nacm rule-list crdread group <group_name> cmdrule denydeployment command deployment access-operations exec action deny
     nacm rule-list crdread group <group_name> cmdrule denydescribe command describe access-operations exec action deny
     nacm rule-list crdread group <group_name> cmdrule denydiameter-peer command diameter-peer access-operations exec action deny
     nacm rule-list crdread group <group_name> cmdrule denyhelp command help access-operations exec action deny
     nacm rule-list crdread group  <group_name> cmdrule denyhistory command history access-operations exec action deny
     nacm rule-list crdread group <group_name> cmdrule denyid command id access-operations exec action deny
     nacm rule-list crdread group <group_name> cmdrule denyidle-timeout command idle-timeout access-operations exec action deny
     nacm rule-list crdread group <group_name> cmdrule denyignore-leading-space command ignore-leading-space access-operations exec action deny
     nacm rule-list crdread group <group_name> cmdrule denyjob command job access-operations exec action deny
     nacm rule-list crdread group <group_name> cmdrule denyleaf-prompting command leaf-prompting access-operations exec action deny
     nacm rule-list crdread group <group_name> cmdrule denylicense command license access-operations exec action deny
     nacm rule-list crdread group <group_name> cmdrule denyno command no access-operations exec action deny
     nacm rule-list crdread group <group_name> cmdrule denypaginate command paginate access-operations exec action deny
     nacm rule-list crdread group <group_name> cmdrule denypcf-system command pcf-system access-operations exec action deny
     nacm rule-list crdread group  <group_name> cmdrule denyscreen-length command screen-length access-operations exec action deny
     nacm rule-list crdread group <group_name> cmdrule denyscreen-width command screen-width access-operations exec action deny
     nacm rule-list crdread group <group_name> cmdrule denysend command send access-operations exec action deny
     nacm rule-list crdread group <group_name> cmdrule denyshow command show access-operations exec action deny
     nacm rule-list crdread group <group_name> cmdrule denyshow-defaults command show-defaults access-operations exec action deny
     nacm rule-list crdread group <group_name> cmdrule denysmildap command smildap access-operations exec action deny
     nacm rule-list crdread group <group_name> cmdrule denysmiuser command smiuser access-operations exec action deny
     nacm rule-list crdread group <group_name> cmdrule denysystem command system access-operations exec action deny
     nacm rule-list crdread group <group_name> cmdrule denyterminal command terminal access-operations exec action deny
     nacm rule-list crdread group <group_name> cmdrule denytimestamp command timestamp access-operations exec action deny
     nacm rule-list crdread group <group_name> cmdrule denywho command who access-operations exec action deny
     nacm rule-list crdread group <group_name> cmdrule denyconfigaddmem command "db scdb execute add-member" access-operations exec action deny
     nacm rule-list crdread group <group_name> cmdrule denyconfigdisablemon command "db scdb execute disable-mongo-flow-control" access-operations exec action deny
     nacm rule-list crdread group <group_name> cmdrule denyconfigenablemon command "db scdb execute enable-mongo-flow-control" access-operations exec action deny
     nacm rule-list crdread group <group_name> cmdrule denyconfigremovemem command "db scdb execute remove-member" access-operations exec action deny
     nacm rule-list crdread group <group_name> cmdrule denyconfigrestoredata command "db scdb execute restore-data" access-operations exec action deny
  2. These commands are denied for the backup group:

    aaa, cd, clear, commit, compare, config, deployment, describe, diameter-peer,
     help, history, id, idle-timeout, ignore-leading-space, job, leaf-prompting, license, no, 
    paginate, pcf-system, screen-length, screen-width, 
    send, show, show-defaults, smildap, smiuser, system, terminal, timestamp, who.
  3. These database commands are denied for backup user:

    db scdb execute add-member
    db scdb execute disable-mongo-flow-control
    db scdb execute enable-mongo-flow-control
    db scdb execute remove-member
    db scdb execute restore-data
    Example:
    [gamma/gamma-cncps] pcf# db scdb execute disable-mongo-flow-control
    Wed Apr 16 00:23:36.455 UTC+00:00 Aborted: permission denied 

    Note


    Permitted database command for the backup user is db scdb execute backup-data.


Verify Backup-Only user account

Procedure


Step 1

Use Secure Shell (SSH) to log in with the backup user's credentials.

Example:
ssh backup_user@10.103.125.143 -p 2024

Step 2

Run smiuser ? to view permitted commands.

Step 3

Execute the db scdb execute backup-data command in the Ops center to start a backup.

Example:
[gamma/gamma-cncps] pcf# db scdb execute backup-data
Wed Apr  16 00:21:01.291 UTC+00:00
output
Backup initiated

Step 4

Log in to the remote server and verify the backup file exists in the specified directory.

Example:
ls
mongodb_backup-2025-04-15-11-01-07.tar.gz

Subscriber migration to multiple SPR database replica sets

Overview

This feature migrates subscriber data from CPS 7.5 to CPC, distributing records across multiple Subscriber Profile Repository (SPR) databases to optimize the data management. Subscriber data is extracted from CPS 7.5 and restored to SPR1 within CPC. A custom tool assigns hash values to these records, and distributes to SPR2 and SPR3. Duplicate records are removed from each SPR database, based on their assigned hash value. This migration improves performance, scalability, and data management in the CPC.

Data Migration from CPS 7.5 to CPC

This process outlines the steps for migrating subscriber data across multiple SPR databases in cnAAA.

Procedure


Step 1

Extract Subscriber Data from CPS 7.5.

Perform a MongoDB dump to back up subscriber data from CPS 7.5.

mongodump --host sessionmgr02 --port 27720 --out /root/sprdump

Step 2

Restore Data to SPR1 in CPC.

Log in to SPR1 DB Pod and use MongoDB restore to import the subscriber dump into SPR1.

mongorestore --host <primary replica member IP> --port 65001 --db spr --verbose SPRDUMP-5M/dump/spr/

Step 3

Run the migration tool.

Log in to the engine pod and execute the following commands:

  • mkdir /tmp/1
    cd /tmp/1
    jar -xf /app/plugins/com.google.guava_*.jar
    jar -xf /app/plugins/org.mongodb.mongo-java-driver_*.jar
    jar -xf /app/plugins/com.broadhop.spr.migration.networkId.hashing_2025.2.1.r0bb3cc9f0.jar
    jar -cfm hashing_2025.2.1.r0bb3cc9f0.jar META-INF/MANIFEST.MF *
  • Use the tool.

    java -jar hashing_2025.2.1.r0bb3cc9f0.jar <primary replica member IP> <sdb-spr1 db port> <maxHash>

Note


Get the latest jar file name under /app/plugins path inside the engine pod.

Step 4

Export from SPR1 and import to SPR2 and SPR3.

Execute mongoexport command on SPR1 to collect mongo dump.

mongoexport --host <primary replica member IP> --port 65001 --db spr --collection subscriber --out subscriberMigration_allSub.json

Use mongoimport to import the exported dump on both SPR2 and SPR3.


mongoimport --host <primary replica member IP> --port 65002 --db spr --collection subscriber subscriberMigration_allSub.json
mongoimport --host <primary replica member IP> --port 65003 --db spr --collection subscriber subscriberMigration_allSub.json

Note


Execute the mongo export and mongo import commands under /data/db path inside the br-controller-scdb pod.

Step 5

Cleanup Duplicate Records.

  1. Connect to the spr01 DB and remove the records whose hash is not 0.

    mongo --host <primary replica member IP> --port 65001
    use spr
    db.subscriber.deleteMany({avps_key: {$elemMatch: {code_key: "_SprKeyHash",value_key: { $ne: "0" }}}})
  2. Connect to the spr02 DB and remove the records whose hash is not 1.

    mongo --host <primary replica member IP>  --port 65002
    use spr
    db.subscriber.deleteMany({avps_key: {$elemMatch: {code_key: "_SprKeyHash",value_key: { $ne: "1" }}}})
  3. Connect to the spr03 DB and remove the records whose hash is not 2.

    mongo --host <primary replica member IP>  --port 65003
    use spr
    db.subscriber.deleteMany({avps_key: {$elemMatch: {code_key: "_SprKeyHash",value_key: { $ne: "2" }}}})

Step 6

Verify subscriber count.

Verify that the total count of SPR1, SPR2, and SPR3 in CPC matches the original SPR1 count from CPS 7.5.

  1. Connect to the spr01 DB and get the subscriber count.

    mongo --host <primary replica member IP>  --port 65001
    use spr
    db.subscriber.count()
  2. Connect to the spr02 DB and get the subscriber count.

    mongo --host <primary replica member IP>  --port 65002
    use spr
    db.subscriber.count()
  3. Connect to the spr03 DB and get the subscriber count.
    mongo --host <primary replica member IP>  --port 65003
    use spr
    db.subscriber.count()

Replica set for admin DB similar to SPR for sharing across clusters

Feature History

Feature Name

Release Information

Description

Replicaset for admin DB similar to SPR for sharing across clusters

2025.03.0

This feature adds a dedicated admin DB replica set in the CPC namespace to manage Customer Reference Data (CRD) operations, isolating CRD traffic from other system processes and enhancing data consistency, access efficiency, and redundancy.

Overview

This feature adds a dedicated admin DB replica set in the CPC namespace. The admin DB replica set manages CRD operations, such as importing and exporting tables. This isolates CRD traffic from other system processes and prevents interference with existing configurations. Using a separate replica set with a unique port improves data consistency, access efficiency, and provides redundancy for continuous CRD availability.

Label nodes for the admin DB replica set configuration

Procedure


Step 1

Log in to a master node and enter this command to check the existing node labels:

kubectl get nodes --show-labels

Step 2

Login to the cluster manager and access Ops Center CLI.

Step 3

Enter configuration mode:

config

Step 4

Enter the cluster configuration:

cluster <cluster-name>

Step 5

Add the node label for each master node:

nodes master-1
k8s node-labels smi.cisco.com/node-type-5 admin-db
exit
nodes master-2
k8s node-labels smi.cisco.com/node-type-5 admin-db
exit
nodes master-3
k8s node-labels smi.cisco.com/node-type-5 admin-db
exit
exit

Note


Replace the <cluster-name> placeholder with the actual cluster name for each master node to be labeled.

Step 6

Sync the cluster configuration:

clusters <cluster-name> actions sync run upgrade-strategy concurrent debug true

Step 7

Monitor the synchronization logs:

monitor sync-logs <cluster-name>

Configure admin DB Replica Sets

To Configure admin DB replica set, follow these steps:

db scdb replica-name admin-db
 port      65005
 interface vlan2400
 resource cpu limit 3000
 resource memory limit 20000
 replica-set-label key smi.cisco.com/node-type-5
 replica-set-label value admin-db
 member-configuration member sdb-rs4-s1-arbiter1
  host    192.0.2.44
  arbiter true
  site    local
 exit
 member-configuration member sdb-rs4-s1-m0
  host    192.0.2.32
  arbiter false
  priority 104
  site    local
 exit
 member-configuration member sdb-rs4-s1-m1
  host     192.0.2.33
  arbiter  false
  priority 103
  site     local
 exit
exit

Configure CRD API properties in Ops Center

Configure the CRD API properties in Ops-Center to enable the engine and other components to connect with the admin DB replica set.

Procedure


Step 1

Login to Ops-Center and enter the config command.

Step 2

Enter the CRD API properties for admin DB:

engine <engine-name> crdapi admin-db primary <Primary-member-IP> secondary <Secondary-member-IP> port <DB-PORT>

Step 3

Repeat the configuration command on all remote sites.

Step 4

Verify the configuration by entering the show running-config engine command.

Note


Confirm that the crdapi admin-db entries for primary, secondary, and port are correct.

Step 5

Restart the engine and CRD API pods in all affected clusters.


Example

[unknown] pcf# show running-config 'engine.<user_configurable_term>' <user crdapi admin-db primary 192.0.2.32 secondary 192.0.2.33 port 65005

Policy Builder configuration

Follow these steps to update the admin DB connection settings in Policy Builder.

Procedure


Step 1

Navigate to Plugin Configuration > Custom Reference Data Configuration.

Step 2

Enter the Primary IP address of the admin DB replica set.

Step 3

Enter the Secondary IP address of the admin DB replica set.

Step 4

Enter the port number for the admin DB connection.

Step 5

Publish the Policy Builder and check the pod status.

Note


These fields will now use IP addresses and port numbers instead of hostnames to use the latest Policy Builder changes.

Note


After completing the configuration, restart all engine and CRD API pods in the Kubernetes cluster to reflect the latest Policy Builder changes.


Support for multiple SPR replica sets

Feature History

Feature Name

Release Information

Description

Support for Multiple SPR Replica Sets

2025.02.0

This feature distributes subscriber details evenly across SPR Mongo replica sets. An enhanced API Router uses a network ID-based hashing mechanism for Radius subscribers to manage record distribution.

Overview

Support for multiple SPR replica sets in cnAAA distributes subscriber records across Mongo replica sets to improve performance in handling subscriber data. The API Router has been enhanced with a network ID-based hashing mechanism to manage Radius subscribers.

Configure Subscriber Database Replica Sets

Configure the Scaling SPR Mongo replica sets to distribute subscriber details.

Procedure


Step 1

Replica Set Configuration

  1. Set Ports and Interface

    Configure the port for sdb-subscriber1 to 65001
    Configure the port for sdb-subscriber2 to 65002
    Configure the port for sdb-subscriber3 to 65003
    Set the interface to vlan2400
  2. Resource Limits

    Set CPU limit to 6000
    Set memory limit to 112000
  3. Replica Set Label

    Set key to smi.cisco.com/node-type.
    Set value to oam.

Step 2

Member Configuration for sdb-subscriber1

  1. Arbiter Configuration

    Add member sdb-rs1-arbiter with the following settings:
    Host: 10.192.1.24
    Arbiter: true
    Site: local
  2. Data Member Configuration

    Add member sdb-rs1-s1-m1 with the following settings:
    Host: <Primary database host ip>
    Arbiter: false
    Priority: 102
    Site: local
    Add member sdb-rs1-s1-m2 with the following settings:
    Host: <Secondary database host ip>
    Arbiter: false
    Priority: 101
    Site: local

Step 3

Member Configuration for sdb-subscriber2

  1. Arbiter Configuration

    Add member sdb-rs2-arbiter with the following settings:
    Host: 10.192.1.24
    Arbiter: true
    Site: local
  2. Data Member Configuration

    Add member sdb-rs2-s2-m1 with the following settings:
    Host: <Primary database host ip>
    Arbiter: false
    Priority: 102
    Site: local
    Add member sdb-rs2-s2-m2 with the following settings:
    Host: <Secondary database host ip>
    Arbiter: false
    Priority: 101
    Site: local

Step 4

Member Configuration for sdb-subscriber3

  1. Arbiter Configuration

    Add member sdb-rs1-arbiter with the following settings:
    Host: 10.192.1.24
    Arbiter: true
    Site: local
  2. Data Member Configuration

    Add member sdb-rs3-s3-m1 with the following settings:
    Host: <Primary database host ip>
    Arbiter: false
    Priority: 102
    Site: local
    Add member sdb-rs3-s3-m2 with the following settings:
    Host: <Secondary database host ip>
    Arbiter: false
    Priority: 101
    Site: local

MongoDB replica set auto-recovery

This feature resolves situations where a replica set member is stuck in the RECOVERING state which prevents the member from rejoining the replica set and impact database availability and consistency.

These stages describe how the auto-recovery mechanism detects and recovers a MongoDB replica set member in the RECOVERING state:

  1. The MongoDB health check script runs every ten seconds as part of the container's liveness and five seconds as part of readiness probes.

  2. The script monitors the status of replica set members.

  3. If a non-primary member is in the 'RECOVERING' state, the script increments a counter variable.

  4. If the counter reaches a predefined threshold (for example, five consecutive checks), the script initiates the recovery process.

  5. The recovery process deletes the contents of the /data/db directory on the affected member and restarts the pod.

  6. After the restart, the pod re-synchronizes its data from the primary node and rejoins the replica set.

Key components of the auto-recovery mechanism:

  • Supports both IPv4 and IPv6 environments.

  • Works with MongoDB deployments with or without authentication. If authentication is enabled, the script uses the provided credentials.

Configure auto-recovery timeout for MongoDB replica set

By default the recovery steps will be executed after 120 seconds. You can increase the time accordingly by following these steps:

Procedure

Step 1

Enter the global configuration mode.

Step 2

Run this command to set the timeout

db global-settings timers auto-recovery-timeout-secs <seconds>

This command sets the maximum time in seconds to wait before initiating recovery for a MongoDB member stuck in the 'RECOVERING' state.

Sample Configuration:

[unknown] pcf(config)# db global-settings timers auto-recovery-timeout-secs 200
Thu Jul  17 06:51:57.219 UTC+00:00
[unknown] pcf(config)#

Configure the Network ID in API Router

This section describes how to configure the Network ID in the API Router using the network ID hash.

Procedure


Step 1

Set Up the Router Filter for Network ID Hashing

  1. Log in to Policy Builder and navigate to Api Router Configuration.

  2. Choose Filter Type > NetworkIdHash.

    Note

     
    Select only NetworkIdHash for the filter type.
  3. Set Router Criteria with the these parameters.

    • Match Type

    • Match Value

    • Remote Balance DB

    • Remote SPR Db Name

    Note

     
    Select Equals for Router Criteria Match Type.
  4. Click Add.

Step 2

Add a New Remote Database Configuration

  1. Navigate to Plugin Configuration > UsUM Configuration.

  2. Select Set Remote Database Configuration.

  3. Enter these parameters.

    • Name

    • Match Type

    • Match Value

    • Connections Per Host

    • DB Read Preference

    • Primary Database

    • Secondary Database

  4. Click Add.

Note

 
After enabling the scaling SPR feature, use /apirouter for the SOAP API instead of the current /ua/soap.

Note

 
Select NetworkId Hash Retriever for Remote Db Lookup Key Field.

Configure Ops Center for multiple SPR replica sets

To set up multiple SPR replica sets in cnAAA Ops Center, follow these steps:

Procedure


Step 1

Login to Ops Center.

Step 2

Configure cnAAA Engine Properties

  • Set Balance Key Hash AVP Name

    Configure balanceKeyHashAvpName with SprKeyHash to specify the AVP name used for balance key hashing.

  • Set SOAP URL

    Configure cc.ua.soap.url with http://127.0.0.1<host>:8080<port>/apirouter to define the endpoint for SOAP API requests. Replace <host> and <port> with the appropriate values for your setup.

  • Define Maximum Hash Value

    Set maxHash to 2 to specify the maximum hash value allowed.

  • Enable Site Query for Subscriber Search

    Configure queryEachSiteForSearchSubscribers to true to enable site queries when searching for subscribers.

  • Configure Balance Return Option

    Set returnBalance to false to disable balance information return during operations.

  • Enable SPR Hash Support

    Set sprHashSupportEnabled to true to activate subscriber profile repository hash support

  • Set properties replaceFullNameInSearchSubscribers value true and enter exit to enable this configuration to search subscribers through control center based on network ID (optional).

Step 3

Enter exit to save changes and exit configuration mode.

Sample Configuration:

engine production-rjio
 properties balanceKeyHashAvpName
  value SprKeyHash
 exit
 properties cc.ua.soap.url
  value http://127.0.0.1:8080/apirouter
 exit
 properties maxHash
  value 3
 exit
 properties queryEachSiteForSearchSubscribers
  value true
 exit
properties returnBalance
  value false
 exit
 properties sprHashSupportEnabled
  value true
 exit
properties replaceFullNameInSearchSubscribers
  value true
 exit
exit

DB-SPR Configuration: 3 Replica Set

db scdb replica-name spr1
 port      65001
 interface vlan2400
 resource cpu limit 6000
 resource memory limit 60000
 replica-set-label key smi.cisco.com/node-type
 replica-set-label value oam
 member-configuration member sdb-rs1-arbiter
  host    192.0.2.1
  arbiter true
  site    local
 exit
 member-configuration member sdb-rs1-s1-m1
  host     192.0.2.1
  arbiter  false
  priority 102
  site     local
 exit
 member-configuration member sdb-rs1-s1-m2
  host     198.51.100.1
  arbiter  false
  priority 101
  site     local
 exit
exit
db scdb replica-name spr2
 port      65002
 interface vlan2400
 resource cpu limit 6000
 resource memory limit 60000
 replica-set-label key smi.cisco.com/node-type
 replica-set-label value oam
 member-configuration member sdb-rs2-arbiter
  host    10.192.1.24
  arbiter true
  site    local
 exit
 member-configuration member sdb-rs2-s1-m1
  host     192.0.2.1
  arbiter  false
  priority 102
  site     local
 exit
 member-configuration member sdb-rs2-s1-m2
  host     198.51.100.1
  arbiter  false
  priority 101
  site     local
 exit
exit
db scdb replica-name spr3
 port      65003
 interface vlan2400
 resource cpu limit 6000
 resource memory limit 60000
 replica-set-label key smi.cisco.com/node-type
 replica-set-label value oam
 member-configuration member sdb-rs3-arbiter
  host    10.192.1.24
  arbiter true
  site    local
 exit
 member-configuration member sdb-rs3-s1-m1
  host     192.0.2.1
  arbiter  false
  priority 102
  site     local
 exit
 member-configuration member sdb-rs3-s1-m2
  host     198.51.100.1
  arbiter  false
  priority 101
  site     local
 exit
exit

Note

 
The db scdb replica-name command reflects the number of SPR replicas (e.g., spr1, spr2, spr3). Specify the desired number of replicas as required.

Step 4

Validate the replica set status on cnAAA Ops Center using the show db scdb replica-set-status command.


Multiple arbiter qualification for SCDB

Feature History

Feature Name

Release Information

Description

Multiple Arbiter qualification for SCDB

2025.02.0

This feature enhances the high availability and strength of the Subscriber Configuration Database (SCDB) by configuring multiple arbiters within each replica set. It improves system reliability, ensuring uninterrupted operations in Geo-Redundant deployments.

Overview

This feature enhances the reliability of the SCDB by enabling the setup of multiple arbiters within each replica set. It improves stability, particularly in geographically distributed deployments. With multiple arbiters, the replica set can continue to function and elect a primary even if some arbiters are unavailable. As a result, the system experiences less downtime and provides consistent service.

Ops-Center Configuration for multiple arbiters in a Replica Set

To configure multiple arbiters within an SCDB replica set using the CPC Ops-Center, follow these steps:

Before you begin

Procedure


Step 1

Log in to the CPC Ops-Center.

Step 2

Specify the replica-name for the SCDB replica set. (example: sdb-spr01).

db scdb replica-name sdb-spr01

Step 3

Configure the replica set port using an available port from the range 65001 to 65010 and define the network interface.

port      <65007>
interface <vlan2400>

Step 4

Configure the CPU and memory resource limits for the replica set.

 resource cpu limit 3000
 resource memory limit 20000

Step 5

Set the replica set labels (key-value pairs).

Define db-spr labels for scdb and update
replica-set-label key smi.cisco.com/node-type-5
replica-set-label value db-spr

Note

 
Database key-value pair labels can be configured as per the deployments to determine which K8 nodes are selected for Database Pods.

Note

 
Create database (DB) key-value pair labels on the nodes during cluster deployment.

Step 6

Define each member of the replica set and set the host IP address

member-configuration member sdb-rs1-s1-arbiter1
 host    <10.192.2.34>

Step 7

Set Arbiter to true.

 arbiter true
db scdb replica-name sdb-spr03
 port      65009
 interface vlan2400
 resource cpu limit 3000
 resource memory limit 20000
 replica-set-label key smi.cisco.com/node-type
 replica-set-label value db-spr
 member-configuration member sdb-rs3-s1-arbiter1
  host    10.192.2.34
  arbiter true
  site    remote
 exit
 member-configuration member sdb-rs3-s1-arbiter2
  host    10.192.2.44
  arbiter true
  site    remote
 exit
 member-configuration member sdb-rs3-s3-arbiter3
  host    10.192.2.22
  arbiter true
  site    local
 exit
 member-configuration member sdb-rs3-s1-m1
  host     <Member_Host_IP>
  arbiter  false
  priority 104
  site     remote
 exit
 member-configuration member sdb-rs3-s1-m2
  host     10.192.2.33
  arbiter  false
  priority 103
  site     remote
 exit
 member-configuration member sdb-rs3-s2-m1
  host     10.192.2.42
  arbiter  false
  priority 102
  site     remote
 exit
 member-configuration member sdb-rs3-s2-m2
  host     10.192.2.43
  arbiter  false
  priority 101
  site     remote
 exit
exit

Note

 
Configure a node label on all the master nodes.

Step 8

Validate the replica set status on cnAAA Ops Center using the show db scdb replica-set-status command.


Consistent replica set routing in apiRouter under high TPS

Feature History

Feature name

Release information

Description

Consistent replica set routing in apiRouter under high TPS

2025.03.0

This feature enables bulk provisioning for subscriber management within CPC system. It allows multiple create, read, update, and delete (CRUD) operations on number of subscribers through a single API call. This optimizes performance and enhances scalability when managing high transaction loads.

Overview

This feature enables bulk provisioning within the CPC system, allowing users to perform multiple subscriber management operations such as create, retrive, update, and delete (CRUD) through a single SOAP API call through the apiRouter. It supports high transaction volumes, which improves efficiency and scalability by reducing the total number of API calls, lowering latency, and minimizing manual intervention.

How replica set routings in apiRouter under high TPS work

Perform bulk provisioning operations through the Api-Router in these stages:

  • Bulk API request initiation: A request containing multiple subscriber operations is submitted.

  • apiRouter request processing: The apiRouter receives and routes the bulk request.

  • Execution of bulk CRUD operations: The system processes create, read, update, and delete actions for all specified subscribers.

Sample Bulk provision SOAP requests

Bulk provisioning SOAP requests allow the management of multiple subscriber records in a single operation. The following examples shows how to create, retrieve, update, and delete subscribers using the SOAP API. Each request targets a specific bulk operation and can include multiple subscriber entries.

Create Bulk Subscribers Request

<soapenv:Envelope xmlns:soapenv="http://schemas.xmlsoap.org/soap/envelope
/" xmlns:typ="http://broadhop.com/unifiedapi/soap/types">
   <soapenv:Header/>
   <soapenv:Body>
      <typ:CreateBulkSubscribersRequest>
         <subscriber>
            <name><fullName>BNGUser1</fullName></name>
            <credential><networkId>0005.9A3C.7B1</networkId><password>abc123</password></credential>
            <service><code>A0F0100M100M000005MQ</code><enabled>true</enabled></service>
            <avp><code>CIRCLE_CODE</code><value>MU</value></avp>
            <status>ACTIVE</status>
         </subscriber>
         <subscriber>
            <name><fullName>BNGUser2</fullName></name>
            <credential><networkId>0005.9A3C.7B2</networkId><password>abc123</password></credential>
            <service><code>A0F0100M100M000005MQ</code><enabled>true</enabled></service>
            <avp><code>CIRCLE_CODE</code><value>MU</value></avp>
            <status>ACTIVE</status>
         </subscriber>
      </typ:CreateBulkSubscribersRequest>
   </soapenv:Body>
</soapenv:Envelope>

Note


Each <subscriber> element defines the details for one subscriber.


Get Subscribers Request

This request retrieves details for multiple subscribers by their network IDs.

<soapenv:Envelope xmlns:soapenv="http://schemas.xmlsoap.org/soap/envelope/" xmlns:typ=
"http://broadhop.com/unifiedapi/soap/types">
   <soapenv:Header/>
   <soapenv:Body>
      <typ:GetSubscribersRequest>
         <networkId>0005.9A3C.7B1</networkId>
         <networkId>0005.9A3C.7B2</networkId>
      </typ:GetSubscribersRequest>
   </soapenv:Body>
</soapenv:Envelope>

Update Subscribers Request

<soapenv:Envelope xmlns:soapenv="http://schemas.xmlsoap.org/soap/envelope
/" xmlns:typ="http://broadhop.com/unifiedapi/soap/types">
   <soapenv:Header/>
   <soapenv:Body>
      <typ:UpdateSubscribersRequest>
         <subscriber>
            <id>001000003e3ccd7f674d526e</id>
            <name><fullName>BNGUser1</fullName></name>
            <credential><networkId>0005.9A3C.7B1</networkId><password>
{SSHA}Z32udUfS0YsfTQj00KPjtZuJwPI/Pz9BSD8/Pw==</password></credential>
            <service><code>A0F0100M100M000030MQ</code><enabled>true</enabled>
</service>
            <status>ACTIVE</status>
            <avp><code>CIRCLE_CODE</code><value>MU</value></avp>
            <version>0</version>
         </subscriber>
         <subscriber>
            <id>002000003e3ccd7f674d52a4</id>
            <name><fullName>BNGUser2</fullName></name>
            <credential><networkId>0005.9A3C.7B2</networkId><password>
{SSHA}cnRbCtCz1RhaqQ+9JE+VPLheqt0
/P10/dz8/AQ==</password></credential>
            <service><code>A0F0100M100M000030MQ</code><enabled>true</enabled></service>
            <status>ACTIVE</status>
            <avp><code>CIRCLE_CODE</code><value>MU</value></avp>
            <version>0</version>
         </subscriber>
      </typ:UpdateSubscribersRequest>
   </soapenv:Body>
</soapenv:Envelope>

Note


A Bulk Change of Authorization (CoA) request is generated only when the subscriber has active sessions.


Delete Subscribers Request

<soapenv:Envelope xmlns:soapenv="http://schemas.xmlsoap.org/soap/envelope
/" xmlns:typ="http://broadhop.com/unifiedapi/soap/types">
   <soapenv:Header/>
   <soapenv:Body>
      <typ:DeleteSubscribersRequest>
         <networkId>0005.9A3C.7B1</networkId>
         <networkId>0005.9A3C.7B2</networkId>
         <hardDelete>true</hardDelete>
      </typ:DeleteSubscribersRequest>
   </soapenv:Body>
</soapenv:Envelope>

Note


If <hardDelete>false</hardDelete> is used or the tag is omitted, the subscriber record is not physically deleted from the database. Instead, the status is updated to 'deleted'.


Retrieve the KPIs for multiple subscriber CRUD operations

Procedure

To retrieve KPIs for multiple subscriber CRUD operations, follow these steps:


To retrieve KPIs for multiple subscriber CRUD operations, follow these steps:

Step 1

Log into the Engine pod with this command:

kubectl exec -it engine-pod-name <namespace> bash

Step 2

Enter the curl command to get the KPIs related to subscribers:

curl -G http://127.0.0.1:8080/metrics | grep subscriber

Step 3

Review the output, which includes KPIs for:

  1. Create multiple subscribers

    action_total{node_type="unknown",type="create-bulk-subscribers",status="success",} 4.0
    action_total{node_type="unknown",type="create-subscriber",status="error",} 1.0
    action_total{node_type="unknown",type="create-subscriber",status="success",} 8.0
    action_duration_seconds{node_type="unknown",type="create-bulk-subscribers",} 0.148
    
  2. Read multiple subscribers

    action_total{node_type="unknown",type="get-bulk-subscribers",status="success",} 3.0
    action_total{node_type="unknown",type="get-bulk-subscribers",status="error",} 1.0
          action_duration_seconds{node_type="unknown",type="get-bulk-subscribers",}        0.052
    
  3. Update multiple subscribers

    action_total{node_type="unknown",type="update-bulk-subscribers",status="success",} 1.0
    action_total{node_type="unknown",type="update-subscriber",status="error",} 1.0
    action_total{node_type="unknown",type="update-subscriber",status="success",} 7.0
    action_duration_seconds{node_type="unknown",type="update-subscriber",} 0.142
    action_duration_seconds{node_type="unknown",type="update-bulk-subscribers",} 0.18
    
  4. Delete multiple subscribers

    action_total{node_type="unknown",type="delete-bulk-subscribers",status="success",} 5.0
    action_total{node_type="unknown",type="delete-subscriber",status="success",} 8.0
    action_duration_seconds{node_type="unknown",type="delete-bulk-subscribers",} 0.311
    action_duration_seconds{node_type="unknown",type="delete-subscriber",} 0.12
    

Note


Each KPI entry shows metrics such as total actions, status (success or error), and action duration in seconds.