The documentation set for this product strives to use bias-free language. For the purposes of this documentation set, bias-free is defined as language that does not imply discrimination based on age, disability, gender, racial identity, ethnic identity, sexual orientation, socioeconomic status, and intersectionality. Exceptions may be present in the documentation due to language that is hardcoded in the user interfaces of the product software, language used based on RFP documentation, or language that is used by a referenced third-party product. Learn more about how Cisco is using Inclusive Language.
This chapter provides an overview of Cisco Spaces, its features, the process flow, license packages, and system requirements for Cisco Spaces.
This chapter contains the following sections:
Overview of Cisco Spaces
Cisco Spaces is a multichannel engagement platform that enables you to connect, know, and engage with visitors at their physical business
locations.
Cisco Spaces is the industry's most scalable end-to-end indoor location services cloud platform that empowers customers to achieve business
outcomes at scale. With its comprehensive suite of services, it offers a robust solution for all your location-based needs.
Cisco Spaces provides solutions for monitoring and managing the assets in your premises.
It covers various verticals of business such as
retail
manufacturing
hospitality
healthcare
education
financial services
enterprise workspaces, and so on.
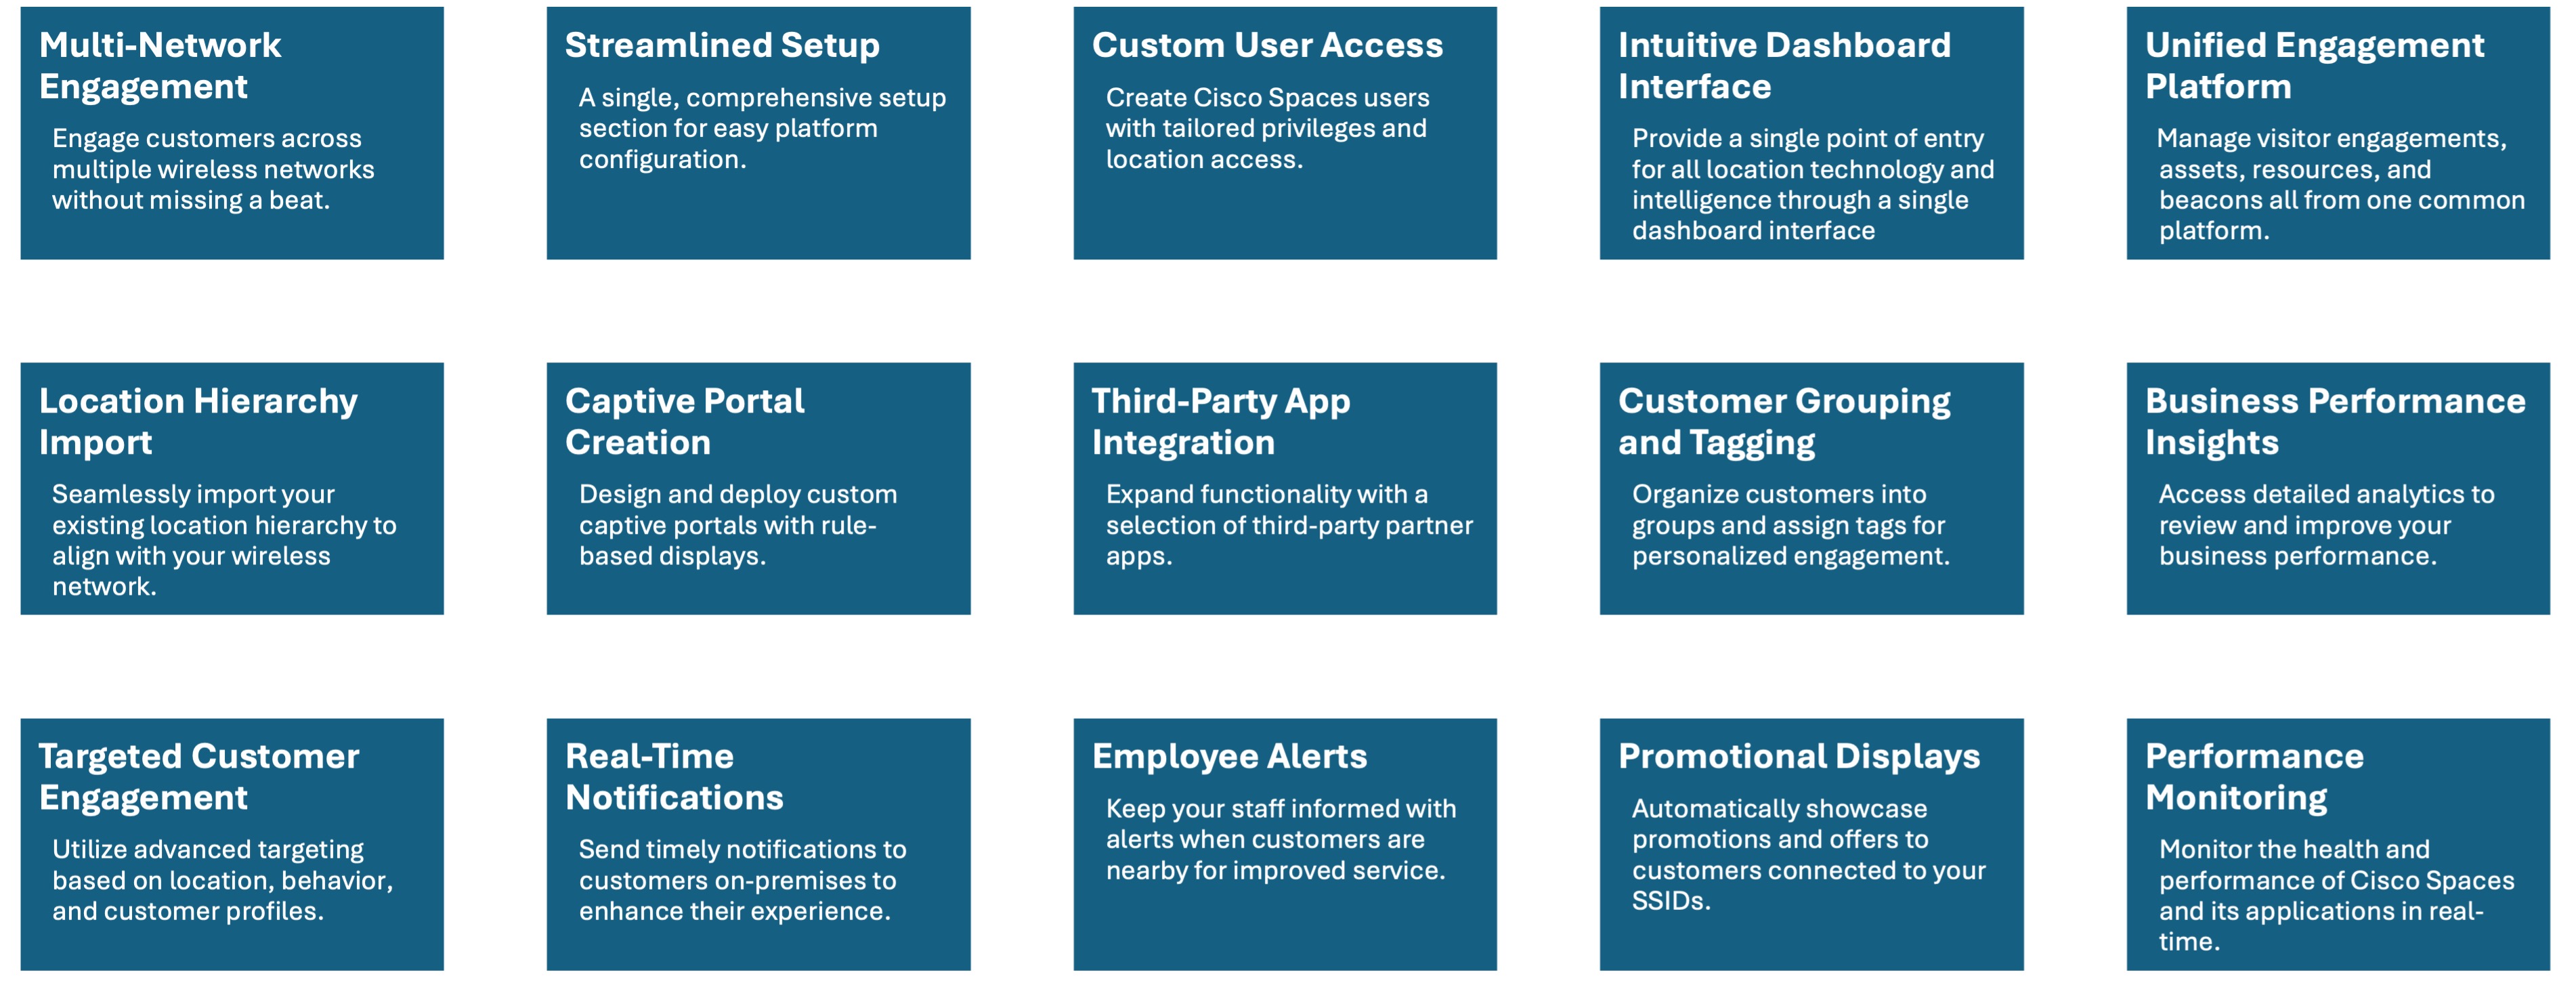
With Cisco Spaces, users gain centralized access to all location technology and intelligence via a unified dashboard interface. Designed for
compatibility with existing Cisco Aironet, Cisco Catalyst, and Cisco Meraki infrastructure, Cisco Spaces stands out as a versatile
solution for location-based service needs.
Figure 1. Feature Highlights
Use Case Scenario
In the ABC shopping mall, to get free Wi-Fi, the customers must connect to an SSID once they enter the mall. ABC wanted to
provide a personalized experience to each customer who connects to the Wi-Fi based on their purchase history and visit frequency.
After installing Cisco Spaces, ABC could collect the Wi-Fi user’s details through the captive portals, and utilize these details to send notifications
to the customers regarding the offers and services available to them. The customers once connected to the Wi-Fi are taken
to a captive portal, where they are provided with an option to register themselves by filling in details such as name, e-mail
address, telephone number, and so on. This information captured is stored in Cisco Spaces. When customers re-visit the mall, promotional offers are sent to the customers through SMS, or e-mail.
Cisco Spaces can also be configured to notify business users such as employees regarding customer activities. For example, you can identify
and tag repeat customers as platinum members on Cisco Spaces dashboard. When a platinum customer enters a restaurant and their device is detected by a wireless access point, the restaurant representatives
would receive alerts on their devices and can provide personalized services to the customer.
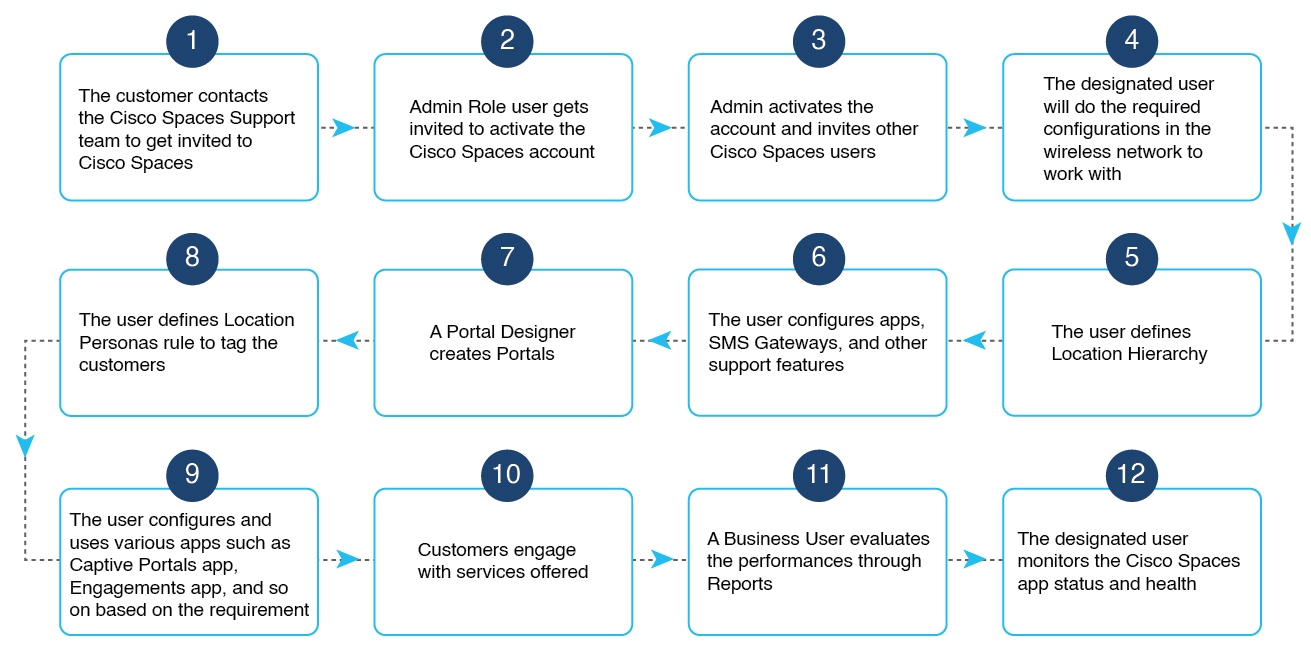
Process Flow for Cisco Spaces
The process flow for Cisco Spaces is as shown in the following figure:
Figure 2. Process Flow for Cisco Spaces
Cisco Spaces Subscriptions and Upgrade Options
Cisco Spaces is available in two license formats:
Spaces EXTEND bundled with Cisco DNA Advantage with an upgrade option to Spaces ACT or choose between Spaces Smart Operations
or Spaces Smart Venues.
Spaces A-la-carte that includes Spaces ACT (includes all Cisco Spaces features), Spaces Smart Operations, Spaces Smart Venues and Spaces UNLIMITED license.
You can purchase either Spaces ACT or Spaces Unlimited licenses, both of which offer full features. Alternatively, you can
choose Spaces Smart Operations and Spaces Smart Venues for specific use cases.
Note
Spaces EXTEND subscriptions are only included with Cisco DNA Advantage subscriptions that are paired with Catalyst Wireless
and Cisco Catalyst 9300 Series and Cisco Catalyst 9400 Series switches.
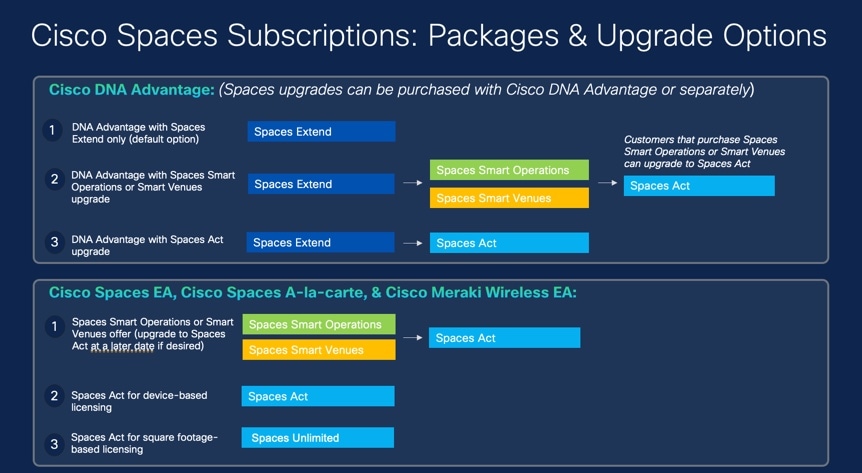
Figure 3. Package and Upgrade Options
Cisco DNA Advantage Package
The subscription options available are:
Cisco DNA Advantage with only Spaces EXTEND is the default subscription option.
Cisco DNA Advantage with Spaces EXTEND license and Spaces ACT license as the upgrade option.
Cisco DNA Advantage with Spaces Smart Operations or Spaces Smart Venues along with Spaces EXTEND license. In this subscription
option you can upgrade to Spaces ACT license.
Cisco Spaces A-la-carte
The subscription options available are:
Spaces Smart Operations or Spaces Smart Venues with an option to upgrade to Spaces ACT
Spaces ACT for device-based licensing
Spaces ACT Unlimited for square footage based licensing
Cisco Spaces License Packages
Overview of Cisco Spaces License Packages
Cisco Spaces supports multiple license packages to meet different user and deployment needs, enabling the right set of features based
on your selected subscription.
Cisco Spaces license packages feature helps administrators validate subscription entitlements, activate licenses, choose the appropriate
package, and ensure the correct features are enabled in Cisco Spaces.
The Cisco Spaces License package supports these licenses:
ESSENTIAL
ADVANTAGE
EXTEND
SMART_VENUES
SMART_OPERATIONS
SMART_OPERATIONS_BASE
UNLIMITED
PREMIER (W)
PREMIER (CW)
With the Cisco Spaces License package, you can choose the license option that best suits your needs and preferences.
As a Cisco Spaces user, you can purchase either ADVANTAGE or UNLIMITED licenses with full features or SMART_OPERATIONS and SMART_VENUES for specific use cases.
Cisco Spaces also supports Smart License actions such as registration, license detail retrieval, renewal, deregistration, license updates,
and license usage checks as part of the current feature workflow.
Depending on your account status, license expiration and registration-related guidance details are displayed during sign-in
and license management flows.
Licensing Options
The Cisco Spaces licensing options are:
ESSENTIAL: This license provides foundational capabilities within Cisco Spaces but with some restrictions.
ADVANTAGE: This license works based on the number of Access Point (AP) provisioned for the Cisco Spaces account.
The SPACES ADVANTAGE license is based on per device/year basis. This is also available as an add-on option on Cisco DNA Advantage
subscription (Transactional and EA) as well as offered separately.
The SPACES ADVANTAGE license is recommended for wireless customers who have Cisco DNA Advantage and who want to keep a device
licensing model (without significant expansions or increased device density planned).
EXTEND: Cisco Spaces Extend subscription is included with Cisco DNA Advantage subscriptions with Cisco Catalyst Wireless and Cisco Catalyst 9300
Series and 9400 Series Switches.
UNLIMITED: Cisco Spaces accounts with UNLIMITED license include all the entitlements similar to an existing ADVANTAGE license. It is available in the new Cisco Spaces Unlimited EA and standalone subscription.
Note
Cisco Spaces Unlimited license is not available at floor level.
The SPACES UNLIMITED license is available on a per square foot/square meter building unit/year basis and is generally suited
for customers planning broader workspace-focused deployments. The SPACES UNLIMITED license is recommended for users with:
Multiple technologies or have dense deployments with Cisco Smart Workspaces
Do not need other features besides Cisco Smart Workspaces
Hybrid work offers
Note
For a Cisco Smart License-enabled account with UNLIMITED license package, the license count is based on the total square foot area of all the floor locations calculated based on
the maps uploaded to the Cisco Spaces platform.
SMART_VENUES: This license works in the same way as the existing EXTEND license with some additional entitlements.
SMART_OPERATIONS_BASE: This license works in the same way as the current SMART_OPERATIONS license, excluding some entitlements and the following apps:
IoT Explorer,
Asset Locator, and
IoT Services.
SMART_OPERATIONS: This license works in the same way as the existing EXTEND license with some additional entitlements. The SMART_OPERATIONS license includes all the access privileges under the EXTEND license.
PREMIER (W): This license works as a top-tier package aligned to Cisco Spaces’ premium entitlements (including Smart Workspaces), with the “W” indicating a workspaces-aligned premier tier. It is described
as including everything in Cisco Spaces from all license types.
PREMIER (CW): This license works as another top-tier premier option; it is also described as including everything in Cisco Spaces from all license types, including Smart Workspaces. The “CW” denotes a specific premier tier variant used for certain commercial/workspaces
packaging.
To enable trial support following Cisco Smart License activation, as trial mode prevents the smart agent from updating license
usage to Cisco Smart License Management.
To enable administrative workflows for Smart License trial management and provisioning, depending on your specific deployment
and entitlement setup.
This table provides an overview of how licenses are consumed for Cisco Smart License enabled and Cisco Smart License non-enabled accounts, detailing the types of devices counted for each license type:
IoT Services (Wireless) + Advanced (Path Analytics, Zone level)
-
-
-
Available
Available
Available
Available
Available
Available
IoT Services (Wireless) +Advanced BLE Gateway
-
-
-
Available
-
Available
Available
Available
Available
Detect & Locate Advanced (History, Fast Locate, etc)
-
-
Available
Available
-
Available
Available
Available
Available
Captive Portals
-
-
-
-
Available
Available
Available
Available
Available
Spaces SDK
-
-
-
-
Available
Available
Available
Available
Available
Engagements
-
-
-
-
Available
Available
Available
Available
Available
Location Personas
-
-
-
-
Available
Available
Available
Available
Available
Density Rules
-
-
-
-
-
Available
Available
Available
Available
Proximity Reporting
-
-
-
-
-
Available
Available
Available
Available
Employee Experience
-
-
-
-
-
Available
Available
Available
Available
Smart Workspaces
-
-
-
-
-
Available
Available
Available
Available
Standard Rich Maps
Available
Available
-
Available
Available
Available
Available
Available
Available
Smart Workspaces Data Out
-
-
-
-
-
Available
Available
Available
Available
Space Utilization
-
-
-
-
-
Available
Available
Available
Available
Environment Analytics
-
-
-
-
-
Available
Available
Available
Available
Note
If your license status shows Out of Compliance, purchase new licenses or remove unlicensed devices to comply.
Log In
Cisco Spaces is now integrated with the Cisco Customer Identity (CCI) application for the login workflow. Cisco Spaces users are now redirected to the CCI application window for login authentication and then proceed to log in to the Cisco Spaces dashboard.
The new workflow is applicable to the following users:
Cisco domain users
Customer domain non-SSO users
With the introduction of CCI integration, you can now use the Switch Users option to switch between different email addresses in the Cisco Spaces login window.
Note
Customer domain SSO users can continue to use the existing login workflow.
The domain specific URLs to log in to Cisco Spaces:
During the login process, a pop-up window is displayed for Cisco Spaces users who were on board before April 2022 to update their country information. You can either provide the required information
or click Skip & Continue to skip and proceed to the Cisco SpacesHome window. Once you provide the information, the pop-up window is not prompted again during subsequent logins.
Step 2
In the Email field, enter your Cisco Spaces account email ID and click Continue.
You will be redirected to the CCI pop-up window.
Step 3
In the CCI pop-up window, enter your Cisco Spaces account email ID and click Next.
You can use the following options in the pop-up window as required:
Unlock account: Use to unlock the Cisco Spaces account if the account gets locked because of incorrect password attempts. Your account will be automatically locked if you
make four failed attempts.
Forgot email address: Use to retrieve your Cisco Spaces account email address.
Step 4
In the Password field, enter your password.
Use Forgot password to retrieve or reset your password.
Step 5
Click Log In.
Step 6
In the Cisco Spaces pop-up window, from the Select Customer drop-down list, select a customer.
Step 7
Click Proceed.
Cisco Spaces dashboard window is displayed.
Note
To log out, click the profile icon () and choose Logout.
Cisco Federation Process
The Cisco Federation Process enables Single Sign-On (SSO) integration with external partner organizations, allowing seamless
authentication while maintaining security boundaries. This system uses Cisco's CCI-Okta infrastructure to federate with external
Identity Providers (IdPs).
Key benefits
Enhanced Security: Passwords remain with the partner domain; Cisco never stores or accesses them
Seamless User Experience: Single sign-on across Cisco applications
Just-in-Time Provisioning: Automatic user provisioning with minimal required attributes
Flexible Authentication Flow: Multiple entry points for user authentication
Cisco Customer Identity integration
Cisco Customer Identity (CCI) is a unified authentication platform that enhances security and accessibility for users across
Cisco Spaces applications. It serves as a common authentication layer, replacing individual application-specific identity providers (IDPs)
to streamline user access and improve streamline user access and improve security management.
Legacy onboarding used separate IDPs for Cisco Spaces, which created challenges when enabling other applications. Cisco Customer
Identity (CCI) provides a common authentication interface that prevents future integration issues for non-CCI customers. To
ensure compatibility with the evolving Cisco product ecosystem, users are being transitioned to CCI integration.
CCI integration centralizes user authentication for all Cisco applications, ensuring consistent security policies and simplifying
user management. This approach supports future scalability, enabling seamless activation of additional Cisco products that
rely on CCI for authentication.
Key attributes:
Provides a single sign-on (SSO) experience across all Cisco URLs for users with authorized email domains (e.g., @abc.com).
Replaces legacy or individual application IDPs to avoid fragmentation and complexity.
Supports SAML-based authentication with metadata exchange between customer IDPs and Cisco.
Requires mandatory user attributes in SAML responses, such as firstName, lastName, email, company, and countryCode.
Facilitates both authentication-only and combined authentication and authorization workflows.
Figure 5. Authentication workflow
Set Up SSO with Cisco Customer Identity
Enable Single Sign-On (SSO) across all Cisco applications for users in specified domains by integrating your organization’s
identity provider with Cisco Customer Identity (CCI). This unified authentication enhances user experience and strengthens
application security.
Use this task when you need centralized authentication for Cisco applications. The SSO setup is performed at the Cisco domain
level, not at the individual application level, to provide consistent, secure access for all users in your organization. You
will work with Cisco's SSO enablement team to exchange required metadata and certificates, ensuring that SSO functions reliably and meets organizational security requirements.
As a user, provide these details or metadata file to enable SSO integration to Cisco Spaces SSO enablement team.
SubjectNameID: Key account linking attribute (usually the user’s email).
Remote IDP Issuer URI: SAML Metadata EntityID of the customer’s IdP.
Remote IDP Single Sign-On URL: Endpoint receiving SAML authentication requests from CCI.
Remote IDP Signature Certificate: Public key certificate (PEM or DER) to verify SAML signatures.
Step 2
In return, Cisco provides these details:
Assertion Consumer Service URI: Endpoint to receive SAML assertions after authentication.
Audience URI: Cisco’s entity descriptor for the IdP.
SP Signature Certificate: Public key certificate to verify authentication request signatures.
Step 3
In the response, provide these mandatory attributes with Cisco.
firstName
lastName
email
company (company name)
countryCode (two char codes e.g. US, UK, BE)
Standard Federation User Journey
Navigate to the Cisco application that requires authentication. The application is protected by CCI/Okta security layer.
To initiate login process, click Login. The system redirects to the authentication flow.
In the CCI Login window, enter the email address (format: username@PartnerDomain.com) that belongs to your partner organization domain. This email domain must be pre-configured in the federation setup.
Note
The system automatically detects your partner domain from the email and you will be redirected to your organization's federated
partner domain login page (home organization's identity provider (IdP).
In the organization's login page, enter your username and password. Ensure that you use the same credentials you normally
use for your organization's systems
Complete any additional authentication requirements (MFA, if configured).
Note
After successful authentication, you will be automatically redirected back to CCI. Your organization's IdP sends a secure
SAML assertion to CCI confirming your identity.
CCI processes the authentication and redirects back to the original Cisco application. The application receives confirmation
of your authenticated status.
Access is granted and your authentication is complete. You successfully land on the application front page. Full access to
the application is now available based on your permission settings.
Single Sign-On for Cisco Spaces
Cisco Spaces supports Single Sign-On (SSO) so that users can login to Cisco Spaces using their SSO credentials. For example, if the Cisco domain is SSO-enabled, Cisco employees, who have a Cisco Spaces account, can access Cisco Spaces using their Cisco e-mail address and password. Additionally, if a Cisco employee is already logged in to the Cisco domain
through any other Cisco website or application, that Cisco employee can access Cisco Spaces by simply specifying the Cisco e-mail address.
When you click the Login button, only the e-mail ID field will appear in the Login window along with a Continue button. If the user is already logged into the SSO-enabled domain, then the user will be directly taken to the Cisco Spaces Dashboard after clicking the Continue button. If the Cisco Spaces account supports multiple customer names, then the Select Customer window will be displayed. If the user has not logged into the domain, then the user will be redirected to the IDP page for
login authentication, and user can login by specifying the SSO credentials.
To enable SSO for your Cisco Spaces account, contact the Cisco Spaces support team and provide the following information:
Account name
Domain name (for which SSO needs to be enabled)
Application Name
SSO type: Currently, only SAML is supported.
If only authentication is needed or both authentication and authorization needs to be enabled. This is done by setting the
authenticateOnly flag to True or False.
True: Only authentication is enabled for the user.
False: Both authentication and authorization is enabled for the user.
Note
If you set authenticateOnly to False:
You need to pass additional information from the IDP while sending the user details. For example, role=dnaspaces:174923535949:Dashboard_Admin.
The value for role is mandatory and must be available in the IDP while sending the user details.
You need not invite individual users from the Cisco Spaces dashboard > Admin Management. User invitation and activation is based on both authentication and authorization process by the specific customer IDP &
Cisco Spaces.
You can use the Cisco Spaces dashboard existing default roles or create a new role in the Cisco Spaces dashboard and use that specific role name.
The Cisco Spaces dashboard default roles are:
Dashboard Admin Role: Provides full admin permission to the user for the selected account
Dashboard Admin Read: Provides read permission to the user for the selected account
If you use the Cisco Spaces dashboard default roles, you must pass the role string value in the specified format:
If you use custom roles, create these custom roles in Cisco Spaces > Admin Management > Roles and pass the role name as the role string value in the IDP response.
The following information from the metadata.xml file:
SSO Details
Entity
Entry point
Once you provide the above details, the Cisco Spaces support team will send you the following so that you can configure your application:
Entity ID
Reply URL (also known as Assertion Consumer Service URL)
Cisco metadata file with the following information:
Depending on the location of your application, either the US or EU Cisco Spaces IDP metadata
Initially, you must contact the Cisco Spaces support team for creating a Cisco Spaces account. You will get an invite to activate your Cisco Spaces account through e-mail. Click the Accept Activate button, and in the window that displays configure the log in credentials, and click Activate Account. You are now logged into Cisco Spaces. If you are a Dashboard Admin, you can now invite other Cisco Spaces users.
Connect to your wireless network and configure the wireless network for Cisco Spaces referring to the instructions in the Setup section of the Cisco Spaces dashboard.
The setup instructions are also available in the following sections of this guide:
CiscoAireOS Wireless Controller or Cisco Catalyst 9800 Series Wireless Controller (without Cisco CMX ).
Note
Connecting through the Cisco Wireless Controller Direct Connection method is only recommended for small scale deployments.
All large-scale production deployments require a Cisco Spaces: Connector.
Cisco Spaces provides a universal account so that you can connect Cisco Spaces to multiple wireless networks.
Step 3
Add your team members, and assign them roles and permissions. For more information about adding Cisco Spaces users, refer to Manage Cisco Spaces Users.
The following steps are optional and depend on the apps that you want to use and the activities that you want to perform.
Step 5
To use the Captive Portals app, import SSIDs to Cisco Spaces. For more information on importing the SSIDs, refer to the “SSIDs” section.
Step 6
Define Location Personas Rules to tag customers. For more information on creating a Location Personas Rule, refer to the
“Creating or Modifying Tags Using a Location Persona App” section.
Step 7
Configure supporting features such as SMS Gateways. Refer to the respective topic in this guide for configuration.
Step 8
If required, create Captive Portals. For more information on creating the captive portals, refer to the “Creating and Managing
Portal” section .
Step 9
If required, create Captive Portal Rules to display the appropriate captive portal to various customers. For more information
on creating Captive Portal Rules, refer to the “Captive Portal Rule” section.
Step 10
If required, create Engagement Rules to send appropriate notifications to the customers. For more information on creating
Engagement Rules, refer to the “Creating an Engagement Rule” section.
Step 11
Analyze the Cisco Spaces performance, and your business performance using apps such as Behavior Metrics, Location Analytics, and Impact Analysis.
For more information on these apps, refer to the respective section..
Step 12
Monitor the Cisco Spaces domain and apps using the Monitor section.
Profile Information
Cisco Spaces supports adding the profile information such as first name, last name, and mobile number of the Cisco Spaces dashboard user.
A tab, My Profile, is available in the Account Preferences window to add the profile information. You can specify the first name, last name, and mobile number in this window, where
mobile number and its verification are optional. When you specify the mobile number, a Verify Mobile Number link appears, which allows you to verify the mobile number using One Time Password. Once the mobile number is verified, the
status Verified is shown. The Verify Mobile Number link will appear again when you change your mobile number.
The Login workflow for Cisco Spaces displays the Update Profile Information dialog box as part of the login process if the Profile Information is not available for the particular Cisco Spaces user. You can skip this step, and can proceed to log in. You can then add the profile details through the Account Preferences
window any time later. However, the Profile Information dialog box is shown as part of the Login workflow till the time information is provided.
Note
The SSO users will not be able to edit the profile information or verify the mobile number. Also, the Update Profile Information dialog box will not be shown to SSO users during login.
Activation requests reminder emails
The Cisco Spaces platform now automatically sends a sequence of reminder emails if you are newly invited and have not yet activated your account.
If you do not activate your account with the initial invitation, you will receive additional reminders on day 2, day 4, and
day 5, so you have more opportunities to complete activation before the link expires.
Additionally, you can now request a resend of your activation link directly through the Cisco Spaces platform. Your request immediately generates and delivers a new activation email, so you do not need support assistance or
manual processing.
These improvements make onboarding easier for you, provide faster responses to activation requests, and reduce support delays.
With this enhancement, you receive timely reminders and can easily obtain a new activation link whenever you need, making
the activation process simple.
Cisco Spaces Dashboard GUI Enhancements
Cisco Spaces has introduced a new Beta version of the existing dashboard. The new beta dashboard exclusively offers all new features and
enhancements, retaining the functionalities of the current one while providing an improved experience. We encourage you to
try the beta version for an enhanced experience and better performance.
To highlight few updates in the new beta version:
The Location Hierarchy feature is available in the previous version of the Cisco Spaces dashboard. In the beta UI, experience the features of Location Hierarchy 2.0 that includes features to import the locations in the same structure in which you have defined in your wireless network such
as Cisco AireOS Wireless Controller, Cisco Catalyst 9800 Series Wireless Controller, or Cisco Meraki.
Instead of the Map Service (Set Up > Map Service) feature available in the previous version, use the Locations and Maps ( Setup > Locations and Maps) feature to import, normalize and unify network hierarchies from various sources such as Cisco Meraki, Catalyst Center, and
Cisco Prime Infrastructure into a single business oriented hierarchy.
The Room Occupancy Reports feature is available under the Cisco Spaces: Space Utilization App application.
To access the new beta Cisco Spaces dashboard, click the Try new version (Beta) () toggle option that is available on the top-right corner of the Cisco Spaces dashboard window.
To go back to the old version, click Switch to old version (). Use the Feedback pop-up window to share your feedback and valuable suggestions to improve the user experience.
Figure 6.
Cisco Spaces: Licenses
Cisco Spaces new dashboard UI (React dashboard) includes these license updates:
The SEE and ACT licenses are renamed as ESSENTIAL and ADVANTAGE, respectively.
The location-level license is now shown beside each location in the Location Hierarchy tree for Cisco Spaces accounts registered with smart licensing.
Verticals overview
Cisco Spaces apps supports various verticals to provide tailored solutions for different industries.
Currently, Behavior Metrics App and Space Utilization App supports verticals.
These are the four verticals supported:
Generic: Provides insights into behavior patterns, monitors and locates assets in real-time to optimize operations.
Workspaces: Utilizes Wi-Fi-associated devices and room sensors to provide accurate occupancy data. Campus-level computation
is implemented for the Workspaces vertical.
Retail: Uses Wi-Fi probing, cameras, and sensors to gather data.
Education: Smart campus solutions, attendance tracking, and wayfinding.
Verticals for apps are defined at the backend level. Currently, Cisco Spaces does not support a GUI to select verticals for apps.
Cisco Spaces supports associating verticals to the Cisco Spaces account. Verticals are added with the Cisco Spaces account when the account is onboarded to Cisco for the first time.
You can onboard Cisco Spaces through the Cisco Meraki Dashboard. The new seamless integration flow eliminates the need for multiple manual steps in establishing a mapping between
the Cisco Meraki Dashboard and Cisco Spaces. This eliminates the need to manually copy and paste the API key and post URLs from one platform to the other. With the new
integration, you can easily initiate the integration from the Meraki dashboard with just a few clicks.
Native Integration: Simple and seamless flow to enable Cisco Spaces integration via Cisco Meraki dashboard
Bundled Licensing: Cisco Spaces Licenses are now bundled with Cisco Meraki Enterprise and Advanced licenses.
If you already have a Cisco Spaces account with Smart Licensing, you must create a new Cisco Spaces account when integrating Cisco Meraki Organization with
Cisco Spaces. Otherwise, the bundled Cisco Meraki licenses are not displayed in Cisco Smart Software Manager (CSSM), and the
Smart Licensing dashboard displays the status as Out of Compliance.
If you already have a Cisco Spaces account with Legacy Licensing, and the existing licensing tier matches the Cisco Meraki Organization being integrated, we
recommend that you use the existing account when integrating Cisco Meraki Organization.
For example, if the existing Cisco Spaces account is Spaces EXTEND licensing and the Cisco Meraki licensing is MR Enterprise, that would be the same Cisco Spaces licensing tier.
If you already have a Cisco Spaces account with Cisco Spaces Legacy Licensing, and the existing licensing tier is higher than
the Cisco Meraki Organization being integrated, we recommend that you create a new Cisco Spaces account when integrating Cisco
Meraki Organization.
For example, if the existing Cisco Spaces account is Spaces ACT licensing and the Cisco Meraki licensing is MR Enterprise,
that would be a higher Cisco Spaces licensing tier.
Manage Networks in Cisco Meraki Dashboard
Cisco Spaces offers Manage Networks capability for Cisco Meraki integration users. This enhancement gives users direct control over which Cisco Meraki networks are synchronized with Cisco Spaces.
Key details include:
Availability: Once the Meraki integration is completed, the Manage Networks option becomes available on the Meraki integration details page.
Network Selection: All networks are selected and synced by default. Users can now explicitly choose which Meraki networks should be synchronized
with Cisco Spaces.
Selected Networks: Networks chosen for synchronization are imported into the Cisco Spaces Dashboard and kept automatically in sync.
Ability to Deselect Networks: Any network that is deselected is removed from the Locations Hierarchy, and further synchronization for that network is
stopped. Existing data associated with the unselected network is also removed, unless there are active app-specific configurations
or rules attached to that node.
In such cases, you must remove those associations before the network can be completely deleted from Cisco Spaces.
Cisco Magnetic Design
Cisco Spaces - Partner Dashboard user experience is enhanced by adhering to the Cisco Magnetic Design guidelines for a consistent and intuitive graphical
user interface (GUI) across the Cisco Spaces - Partner Dashboard ecosystem.
The enhancements include:
Faster load times and smoother interactions
Improved usability and accessibility
Cisco Spaces: Connector 3.0
Cisco Spaces: Connector (referred to as Connector in all subsequent references in this document) is a fully redesigned version of the Connector with
the capability to efficiently manage multiple services that connect to different network devices such as Cisco Wireless controller
and switches for data. The Connector platform makes it easy to add/remove new services from the cloud. It enables enhanced
troubleshooting with debugging, log upload, and restart functionalities from the cloud. Connector also provides detailed metrics
for each service with CPU, Memory, Connectivity and Up/Down status.
Connector is the next generation connector of Cisco Spaces that provides an enhanced user experience, architecture to support
multiple services, simplicity, modularity, seamless upgrade and High Availability. Connector supports an active-active High
Availability setup. Unlike the earlier releases of Connector 2.x, you can specifically configure and monitor the High Availability
pair. All services and device configurations are managed at the Connector level to make it easy to pair with High Availability.
The Connector and device status is also aggregated at the Connector level from each instance for easy monitoring. Connector
provides full visibility to each instance of a High Availability pair. You can view how the services are running on each instance,
their upgrade status and so on. You can also perform actions on a particular instance, such as restarting of services.
Idle Timeout for Cisco Spaces
A user who is logged in to the Cisco Spaces dashboard can remain idle only for a specific time period. If inactive for 20 minutes, the user is automatically logged out of the
dashboard. A notification is displayed 5 minutes before the idle timeout and the title of the browser window where the Cisco Spaces application is open changes to INACTIVE: You will be logged out in 5 mins. Any action performed on the corresponding window extends the user's session.
Migrate Data from Cisco Prime Infrastructure to Catalyst Center
In the Cisco Spaces Location Hierarchy, if you have previously imported map data using Cisco Prime Infrastructure's import feature, you can now perform the same map data import using Catalyst Center's import feature.
This migration from Cisco Prime Infrastructure import to Catalyst Center import is considered as the source data migration in Cisco Spaces Location Hierarchy. After the migration, the import type source is considered as Catalyst Center import.
Before proceeding with map import or data migration, we strongly recommend that you reach out to the Cisco Spaces support team for assistance and guidance.
Contact Cisco Spaces Support
The process for requesting support for Cisco Spaces is enhanced. To contact Cisco Spaces support, you now need to raise a case using the Support Case Manager, based on the account types: Paid and Non-Paid.
Note
All the support contact email addresses are decommissioned.
Follow these steps to raise a support case.
Procedure
Step 1
Log in to Cisco Spaces.
Step 2
In the Cisco Spaces Dashboard, click the (Support) icon displayed at the top-right.
Step 3
Click Support. The Support slide-in pane displays.
Step 4
Depending on the account types, the following support options are available:
Paid: There are two different SCM links for Paid accounts.
For General Support, raise a case with Moderate Impact (S3) severity.
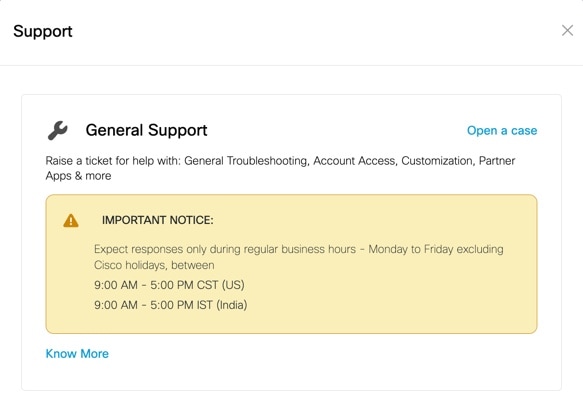
Non-Paid: Use the General Support link to raise both general support and onboarding/use case deployment assistance cases.
Figure 8. Non-Paid Account Support Options
Step 5
Click Open a Case to raise a case using SCM.
Cisco Spaces Documentation
You can access the documentation for Cisco Spaces including Configuration Guides and Release Notes using the Cisco Spaces Support icon () displayed at the top-right of the Cisco Spaces dashboard.


 ) and choose
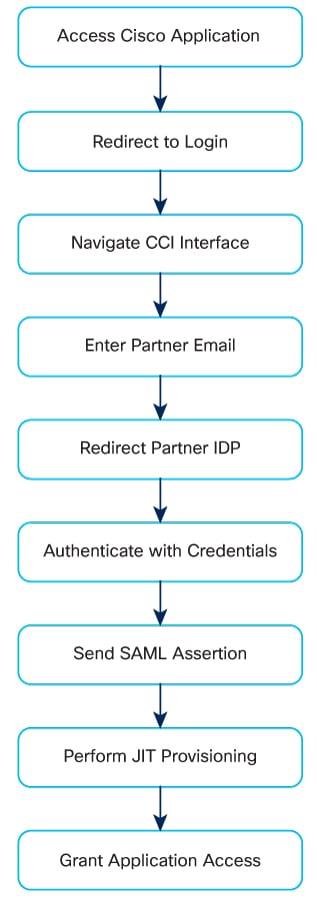
 ) toggle option that is available on the top-right corner of the
  ). Use the

 ) displayed at the top-right of the
  Feedback