Multi-Pod

This chapter contains the following sections:

About Multi-Pod

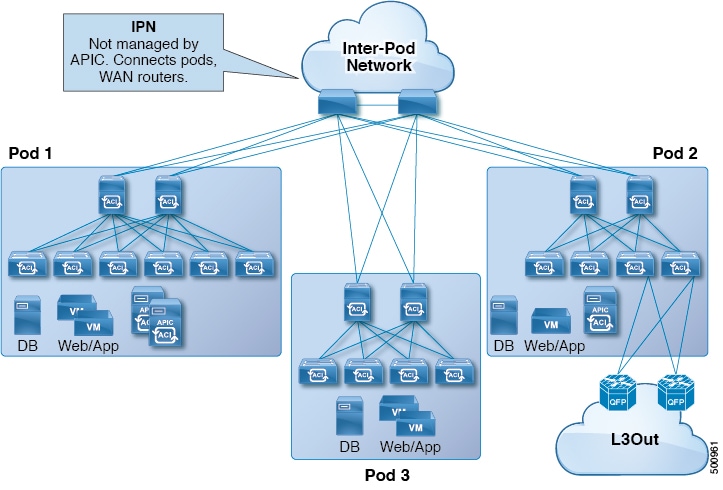
Multi-Pod enables provisioning a more fault-tolerant fabric comprised of multiple pods with isolated control plane protocols. Also, Multi-Pod provides more flexibility with regard to the full mesh cabling between leaf and spine switches. For example, if leaf switches are spread across different floors or different buildings, Multi-Pod enables provisioning multiple pods per floor or building and providing connectivity between pods through spine switches.

Multi-Pod uses MP-BGP EVPN as the control-plane communication protocol between the ACI spines in different pods.

WAN routers can be provisioned in the Inter-Pod Network (IPN), directly connected to spine switches, or connected to border leaf switches. Spine switches connected to the IPN are connected to at least one leaf switch in the pod.

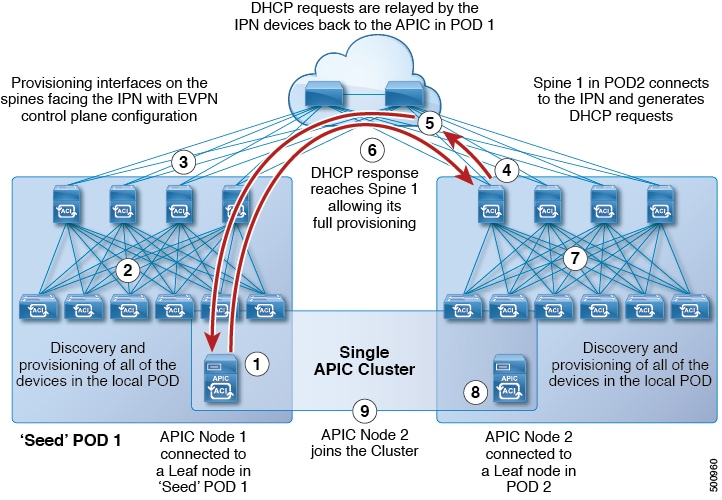
Multi-Pod uses a single APIC cluster for all the pods; all the pods act as a single fabric. Individual APIC controllers are placed across the pods but they are all part of a single APIC cluster.

Figure 1. Multi-Pod Overview

Multi-Pod Provisioning

The IPN is not managed by the APIC. It must be preconfigured with the following information:

  • Configure the interfaces connected to the spines of all pods. Use Layer 3 sub-interfaces tagging traffic with VLAN-4 and increase the MTU at least 50 bytes above the maximum MTU required for inter-site control plane and data plane traffic.

    If remote leaf switches are included in any pods, we strongly recommend that you deploy ACI software release 4.1(2) or later. A more complex configuration is required with earlier releases to connect the spines to the IPN, mandating the use of two sub-interfaces (with VLAN-4 and VLAN-5 tags) and a separate VRF on the IPN devices. For more information, see the Cisco ACI Remote Leaf Architecture White Paper.

  • Enable OSPF on sub-interfaces with the correct area ID.

  • Enable DHCP Relay on IPN interfaces connected to all spines.

  • Enable PIM.

  • Add bridge domain GIPO range as PIM Bidirectional (bidir) group range (default is 225.0.0.0/8).

    A group in bidir mode has only shared tree forwarding capabilities.

  • Add 239.255.255.240/28 as PIM bidir group range.

  • Enable PIM and IGMP on the interfaces connected to all spines.


Note


When deploying PIM bidir, at any given time it is only possible to have a single active RP (Rendezvous Point) for a given multicast group range. RP redundancy is hence achieved by leveraging a Phantom RP configuration. Because multicast source information is no longer available in Bidir, the Anycast or MSDP mechanism used to provide redundancy in sparse-mode is not an option for bidir.
Figure 2. Multi-Pod Provisioning

Guidelines for Setting Up a Multi-Pod Fabric

To configure a Multi-Pod fabric, follow these guidelines:

  • Multi-Pod is supported on the following:

    • All ACI-mode spine switches

    • All Cisco Nexus 9000 Series ACI-mode leaf switches

    • All of the Cisco Nexus 9500 platform ACI-mode switch line cards and fabric modules

  • Create the associated node group and Layer 3 Out policies.

  • Before you make any changes to a spine switch, ensure that there is at least one operationally “up” external link that is participating in the Multi-Pod topology. Failure to do so could bring down the Multi-Pod connectivity.

  • If you have to convert a Multi-Pod setup to a single pod (containing only Pod 1), the APIC controller(s) connected to the pod(s) that are decommissioned should be re-initialized and connected to the leaf switches in Pod 1, which will allow them to re-join the cluster after going through the initial setup script. See Moving an APIC from One Pod to Another Pod for those instructions. The TEP pool configuration should not be deleted.

  • In a Multi-Pod fabric, the Pod 1 configuration (with the associated TEP pool) must always exist on APIC, as the APIC nodes are always addressed from the Pod 1 TEP pool. This remains valid also in the scenario where the Pod 1 is physically decommissioned (which is a fully supported procedure) so that the original Pod 1 TEP pool is not re-assigned to other pods that may be added to the fabric.

  • Support for Cisco ACI GOLF (also known as Layer 3 EVPN Services for Fabric WAN) and Multi-Pod used together varies, depending on the APIC release:

    • For releases prior to APIC release 2.0(2), GOLF was not supported with Multi-Pod.

    • For APIC release 2.0(2) to APIC release 2.1(1), GOLF and Multi-Pod were supported in the same fabric only over Generation 1 switches, which are switch models that can be identified by the lack of "EX" or "FX" at the end of the switch name (for example N9K-9312TX).

    • Since the 2.1(1) release, the two features can be deployed together over all the switches used in the Multi-Pod and EVPN topologies.

    For more information on GOLF, see Cisco ACI GOLF.

  • For the period from APIC release 2.0(2) to APIC release 2.1(1), a bug exists where using a pod as a transit for WAN connectivity with other pods is not supported when using GOLF with Multi-Pod.

    If a spine switch in Pod 1 uses an infra tenant (for example, L3extOut-1), and that spine switch in Pod 1 is serving for GOLF, then:

    • It will be used only for Pod 1 leaf switch GOLF functionality.

    • Each pod must use its own spine switch and infra L3extOut. The spine switches of the other pods (Pod 2, Pod 3) cannot use the same infra L3extOut (L3extOut-1) for Layer 3 EVPN control plane connectivity. You must different L3Outs because you want to use a different provider label for the different consumer L3Out.

    • For leaf switches in the other pods (Pod 2, Pod 3), if you want to enable those leaf switches in the other pods for GOLF, then you must use the spine switches for those other pods (the Pod 2 spine switch or Pod 3 spine switch).

  • In a Multi-Pod fabric setup, if a new spine switch is added to a pod, it must first be connected to at least one leaf switch in the pod. This enables the APIC to discover the spine switch and join it to the fabric.

  • After a pod is created and nodes are added in the pod, deleting the pod results in stale entries from the pod that are active in the fabric. This occurs because the APIC uses open source DHCP, which creates some resources that the APIC cannot delete when a pod is deleted

  • For APIC releases 2.2(2) and earlier, Forward Error Correction (FEC) is enabled for all 100G transceivers by default. Do not use QSFP-100G-LR4-S / QSFP-100G-LR4 transceivers for Multi-Pod configuration. ACI enables FEC mode by default for 100G-LR4 optics. Spine switches with these optics should not be used for Multi-Pod if the spines connect to IPN devices that cannot enable FEC mode.

  • The following is required when deploying a pair of Active/Standby Firewalls (FWs) across pods:

    Scenario 1: Use of PBR to redirect traffic through the FW:

    • Mandates the use of Service Graphs and enables connecting the FW inside/outside interfaces to the ACI Fabric. This feature is fully supported from the 2.1(1) release.

    • Flows from all the compute leaf nodes are always sent to the leaf switches connected to the Active FW.

    Scenario 2: Use of separate L3Out connections in each pod between the border leaf switches and the FW:

    • Fully supported starting from 2.0(1) release.

    • Only supported with dynamic routing (no static routing) and with Cisco ASA (not with FWs using VRRP).

    • Active FW only peers with the BL nodes in the local pod. The leafs inject external routing information into the fabric.

    • Dynamic peering sessions must be re-established in the new pod, due to longer traffic outages after FW failover.

    Scenario 3: Use of a single L3Out stretched across pods.

    • Active and Standby FWs connected to a single leaf node with a physical link or (local port-channel) is supported in releases 2.1(2e) and 2.2(2e) on all ACI leaf nodes (E, EX, FX).

    • Active and Standby FWs connected in vPC mode in each pod to a pair of leaf nodes is supported from release 2.3(1) and only for EX, FX or newer ACI leaf nodes.

  • If you delete and recreate the Multi-Pod L3out, for example to change the name of a policy, a clean reload of some of the spine switches in the fabric must be performed. The deletion of the Multi-Pod L3Out causes one or more of the spine switches in the fabric to lose connectivity to the APICs and these spine switches are unable to download the updated policy from the APIC. Which spine switches get into such a state depends upon the deployed topology. To recover from this state, a clean reload must be performed on these spine switches. The reload is performed using the setup-clean-config.sh command, followed by the reload command on the spine switch.


Note


Cisco ACI does not support IP fragmentation. Therefore, when you configure Layer 3 Outside (L3Out) connections to external routers, or Multi-Pod connections through an Inter-Pod Network (IPN), it is recommended that the interface MTU is set appropriately on both ends of a link. On some platforms, such as Cisco ACI, Cisco NX-OS, and Cisco IOS, the configurable MTU value does not take into account the Ethernet headers (matching IP MTU, and excluding the 14-18 Ethernet header size), while other platforms, such as IOS-XR, include the Ethernet header in the configured MTU value. A configured value of 9000 results in a max IP packet size of 9000 bytes in Cisco ACI, Cisco NX-OS, and Cisco IOS, but results in a max IP packet size of 8986 bytes for an IOS-XR untagged interface.

For the appropriate MTU values for each platform, see the relevant configuration guides.

We highly recommend that you test the MTU using CLI-based commands. For example, on the Cisco NX-OS CLI, use a command such as ping 1.1.1.1 df-bit packet-size 9000 source-interface ethernet 1/1.


You can set the global MTU for control plane (CP) packets sent by the nodes (APIC and the switches) in the fabric at Fabric > Access Policies > Global Policies > CP MTU Policy.

In a Multi-Pod topology, the MTU set for the fabric external ports must be greater than or equal to the CP MTU value set. Otherwise, the fabric external ports might drop the CP MTU packets.

If you change the IPN or CP MTU, we recommend changing the CP MTU value first, then changing the MTU value on the spine of the remote pod. This reduces the risk of losing connectivity between the pods due to MTU mismatch. This is to ensure that the MTU across all the interfaces of the IPN devices between the pods is large enough for both control plane and VXLAN data plane traffic at any given time. For data traffic, keep in mind the extra 50 bytes due to VXLAN.

To decommission a pod, decommission all the nodes in the pod. For instructions, see Decommissioning and Recommissioning a Pod in Cisco APIC Troubleshooting Guide.

Setting Up a Multipod Fabric Using a Wizard with the APIC GUI, Release 3.1(x) or Later

In Cisco APIC, release 3.1(x) and later, a wizard was added to the GUI to simplify multipod configuration. You can still use the other methods to configure multipod documented in this chapter. To configure multipod using the wizard, perform the steps in this topic.

Before you begin

The node group and L3Out policies have already been created.

The spine switch used to connect to the IPN is also connected to at least one leaf switch in the pod.

The Interpod Network (IPN) is already configured. For a sample configuration, see Sample IPN Configuration for Multi-Pod For Cisco Nexus 9000 Series Switches.

Procedure


Step 1

On the menu bar, click Fabric > Inventory.

Step 2

In the Navigation pane, expand Quick Start, and click Node or Pod Setup.

Step 3

Click Setup Multipod and follow the instructions to configure the following details:

  • Pod Fabric—Choose the pod ID and enter the IP address and subnet mask for the Pod TEP Pool.

  • Inter-Pod Network—Enter the community name (which must be extended:as2-nn4:5:16). Also configure the Pod Connection Profile (the Dataplane TEP Pool netmask must be less than /23, and once configured, should not be deleted). Also add the Fabric External Routing Profile subnets.

    Note


    If you select Route Reflector in the Peering Type field and you attempt to remove the spine switch from the controller at some point in the future, you must remember to disable Route Reflector in the BGP Route Reflector page before removing the spine switch from the controller. Not doing so will result in an error.

    To disable a route reflector, right-click on the appropriate route reflector in the Route Reflector Nodes area in the BGP Route Reflector page and select Delete. See the section "Configuring an MP-BGP Route Reflector Using the GUI" in MP-BGP Route Reflectors for instructions on accessing the BGP Route Reflector page.

  • Connectivity—Enter the OSPF details, router IDs for spine switches, and routed sub-interfaces for spine switches.

    Note


    The default or inherited MTU for spine switch links to the Inter-Pod Network (IPN) links is 9150. Be sure to configure the MTU value of 9150 on all IPN interfaces connected to spines.

    Add all the spine nodes from existing pods that will take part in outside connectivity through the IPN, and add the nodes from the new pod that is being created.

Step 4

Click Update and Finish.

The Pod Fabric Setup Policy information page displays the pod details.

Setting Up a Multipod Fabric Using the APIC GUI

Before you begin

Procedure


Step 1

On the menu bar, click Fabric > Inventory.

Step 2

In the Navigation pane, right-click Pod Fabric Setup Policy, click Setup Pods and perform the following steps:

  1. In the Fabric Setup Policies dialog box, enter the Pod ID and the TEP Pool IP address and netmask.

    Note


    TEP Pools, once configured, should not be deleted.

  2. Click the + to create Remote Pools, enter the remote ID and remote pool (IP address and subnet), then click Update.

  3. Click Submit.

Step 3

In the Navigation pane, right-click Pod Fabric Setup Policy, and click Create Multi-Pod.

Step 4

In the Create Multi-Pod dialog box, make the following entries:

  1. In the Community field, enter the community name. Only the community name extended:as2-nn4:5:16 is allowed for multipod.

  2. In the Peering Type field, choose either Full Mesh or Route Reflector for the route peering type.

    Note


    If you select Route Reflector in the Peering Type field and you attempt to remove the spine switch from the controller at some point in the future, you must remember to disable Route Reflector in the BGP Route Reflector page before removing the spine switch from the controller. Not doing so will result in an error.

    To disable a route reflector, right-click on the appropriate route reflector in the Route Reflector Nodes area in the BGP Route Reflector page and select Delete. See the section "Configuring an MP-BGP Route Reflector Using the GUI" in MP-BGP Route Reflectors for instructions on accessing the BGP Route Reflector page.

  3. Expand the Pod Connection Profile table, and enter the Dataplane TEP address for each pod.

  4. Expand the Fabric External Routing Profile table, and enter the profile Name and Subnet address. Click Submit.

Step 5

In the Navigation pane, right-click Pod Fabric Setup Policy, choose Create Routed Outside for Multipod, and perform the following steps:

  1. Enable OSPF, and enter the OSPF details, as they are configured in the IPN.

  2. Click Next.

  3. Expand the Spines table, enter the Router ID for each node, and click Update.

  4. Choose an OSPF Policy from the drop down list or choose Create OSPF Interface Policy to create one, and click Submit.

    Note


    The default or inherited MTU for spine links to the Inter-Pod Network (IPN) links is 9150. Be sure to configure the MTU value of 9150 on all IPN interfaces connected to spines.

  5. Repeat to add all the spine nodes from existing pods that will take part in outside connectivity through the IPN, and add the nodes from the new pod that is being created.

  6. Expand the Routed Sub-Interfaces table, in the Path field navigate to the interface ID, and in the IPv4 Primary Address field, enter the address information. Click Update and then click Finish.

    Note

     
    • Pod-2 spine should now be visible under Fabric Membership for verification.

    • Be sure to provide the Node-ID and Name to this spine before proceeding to Step 6.

Step 6

To configure an L3Out for a single pod, go to the Navigation pane, right-click Pod Fabric Setup Policy, choose Config Routed Outside for a Pod, and perform the following steps:

  1. Expand the Spines table, enter the Router ID for each node, clicking Update after each one.

  2. Expand the Routed Sub-Interfaces table, in the Path field navigate to the interface ID, and in the IPv4 Primary Address field, enter the address information. Click Update and then click Submit.

This completes the multipod configuration.

Step 7

To verify the multipod configuration; on the menu bar click Tenants > Infra, and expand Networking and External Routed Networks.

Click the multipod L3Out to view the details.

Pod-2 spine should now be active with TEP IP address and the leaves of pod-2 should be visible and their Node-IDs and Names can be verified.


Setting Up Multi-Pod Fabric Using the NX-OS CLI

Before you begin

  • The node group and L3Out policies have already been created.

Procedure


Step 1

Set up the multi-pod, as in the following example:

Example:

ifav4-ifc1#  show run system
# Command: show running-config system
# Time: Mon Aug  1 21:32:03 2016
  system cluster-size 3
  system switch-id FOX2016G9DW 204 ifav4-spine4 pod 2
  system switch-id SAL1748H56D 201 ifav4-spine1 pod 1
  system switch-id SAL1803L25H 102 ifav4-leaf2 pod 1
  system switch-id SAL1819RXP4 101 ifav4-leaf1 pod 1
  system switch-id SAL1931LA3B 203 ifav4-spine2 pod 2
  system switch-id SAL1934MNY0 103 ifav4-leaf3 pod 1
  system switch-id SAL1934MNY3 104 ifav4-leaf4 pod 1
  system switch-id SAL1938P7A6 202 ifav4-spine3 pod 1
  system switch-id SAL1938PHBB 105 ifav4-leaf5 pod 2
  system switch-id SAL1942R857 106 ifav4-leaf6 pod 2
  system pod 1 tep-pool 10.0.0.0/16
  system pod 2 tep-pool 10.1.0.0/16
ifav4-ifc1#

Step 2

Configure a VLAN domain, as in the following example:

Example:

ifav4-ifc1# show running-config vlan-domain l3Dom
# Command: show running-config vlan-domain l3Dom
# Time: Mon Aug  1 21:32:31 2016
  vlan-domain l3Dom
    vlan 4
    exit
ifav4-ifc1#

Step 3

Configure the fabric external connectivity, as in the following example:

Example:

ifav4-ifc1# show running-config fabric-external
# Command: show running-config fabric-external
# Time: Mon Aug  1 21:34:17 2016
  fabric-external 1
    bgp evpn peering
    pod 1
      interpod data hardware-proxy 100.11.1.1/32
      bgp evpn peering
      exit
    pod 2
      interpod data hardware-proxy 200.11.1.1/32
      bgp evpn peering
      exit
    route-map interpod-import
      ip prefix-list default permit 0.0.0.0/0
      exit
    route-target extended 5:16
    exit
ifav4-ifc1#

Step 4

Configure the spine switch interface and OSPF configuration as in the following example:

Example:

# Command: show running-config spine
# Time: Mon Aug  1 21:34:41 2016
  spine 201
    vrf context tenant infra vrf overlay-1
      router-id 201.201.201.201
      exit
    interface ethernet 1/1
      vlan-domain member l3Dom
      exit
    interface ethernet 1/1.4
      vrf member tenant infra vrf overlay-1
      ip address 201.1.1.1/30
      ip router ospf default area 1.1.1.1
      ip ospf cost 1
      exit
    interface ethernet 1/2
      vlan-domain member l3Dom
      exit
    interface ethernet 1/2.4
      vrf member tenant infra vrf overlay-1
      ip address 201.2.1.1/30
      ip router ospf default area 1.1.1.1
      ip ospf cost 1
      exit
    router ospf default
      vrf member tenant infra vrf overlay-1
        area 1.1.1.1 loopback 201.201.201.201
        area 1.1.1.1 interpod peering
        exit
      exit
    exit
  spine 202
    vrf context tenant infra vrf overlay-1
      router-id 202.202.202.202
      exit
    interface ethernet 1/2
      vlan-domain member l3Dom
      exit
    interface ethernet 1/2.4
          vrf member tenant infra vrf overlay-1
      ip address 202.1.1.1/30
      ip router ospf default area 1.1.1.1
      exit
    router ospf default
      vrf member tenant infra vrf overlay-1
        area 1.1.1.1 loopback 202.202.202.202
        area 1.1.1.1 interpod peering
        exit
      exit
    exit
  spine 203
    vrf context tenant infra vrf overlay-1
      router-id 203.203.203.203
      exit
    interface ethernet 1/1
      vlan-domain member l3Dom
      exit
    interface ethernet 1/1.4
      vrf member tenant infra vrf overlay-1
      ip address 203.1.1.1/30
      ip router ospf default area 0.0.0.0
      ip ospf cost 1
      exit
    interface ethernet 1/2
      vlan-domain member l3Dom
      exit
    interface ethernet 1/2.4
      vrf member tenant infra vrf overlay-1
      ip address 203.2.1.1/30
      ip router ospf default area 0.0.0.0
      ip ospf cost 1
      exit
    router ospf default
      vrf member tenant infra vrf overlay-1
        area 0.0.0.0 loopback 203.203.203.203
        area 0.0.0.0 interpod peering
        exit
      exit
    exit
  spine 204
    vrf context tenant infra vrf overlay-1
      router-id 204.204.204.204
      exit
    interface ethernet 1/31
      vlan-domain member l3Dom
      exit
    interface ethernet 1/31.4
      vrf member tenant infra vrf overlay-1
      ip address 204.1.1.1/30
      ip router ospf default area 0.0.0.0
      ip ospf cost 1
      exit
    router ospf default
      vrf member tenant infra vrf overlay-1
        area 0.0.0.0 loopback 204.204.204.204
        area 0.0.0.0 interpod peering
        exit
      exit
    exit
ifav4-ifc1#
 

Setting Up Multi-Pod Fabric Using the REST API

Procedure


Step 1

Login to Cisco APIC:

Example:

http://<apic-name/ip>:80/api/aaaLogin.xml

data: <aaaUser name="admin" pwd="ins3965!”/>

Step 2

Configure the TEP pool:

Example:

http://<apic-name/ip>:80/api/policymgr/mo/uni/controller.xml

<fabricSetupPol status=''>
    <fabricSetupP podId="1" tepPool="10.0.0.0/16" />
    <fabricSetupP podId="2" tepPool="10.1.0.0/16" status='' />
</fabricSetupPol>

Step 3

Configure the node ID policy:

Example:

http://<apic-name/ip>:80/api/node/mo/uni/controller.xml

<fabricNodeIdentPol>
<fabricNodeIdentP serial="SAL1819RXP4" name="ifav4-leaf1" nodeId="101" podId="1"/>
<fabricNodeIdentP serial="SAL1803L25H" name="ifav4-leaf2" nodeId="102" podId="1"/>
<fabricNodeIdentP serial="SAL1934MNY0" name="ifav4-leaf3" nodeId="103" podId="1"/>
<fabricNodeIdentP serial="SAL1934MNY3" name="ifav4-leaf4" nodeId="104" podId="1"/>
<fabricNodeIdentP serial="SAL1748H56D" name="ifav4-spine1" nodeId="201" podId="1"/>
<fabricNodeIdentP serial="SAL1938P7A6" name="ifav4-spine3" nodeId="202" podId="1"/>
<fabricNodeIdentP serial="SAL1938PHBB" name="ifav4-leaf5" nodeId="105" podId="2"/>
<fabricNodeIdentP serial="SAL1942R857" name="ifav4-leaf6" nodeId="106" podId="2"/>
<fabricNodeIdentP serial="SAL1931LA3B" name="ifav4-spine2" nodeId="203" podId="2"/>
<fabricNodeIdentP serial="FGE173400A9" name="ifav4-spine4" nodeId="204" podId="2"/>
</fabricNodeIdentPol>

Step 4

Configure infra L3Out and external connectivity profile:

Example:

http://<apic-name/ip>:80/api/node/mo/uni.xml

<polUni>

<fvTenant descr="" dn="uni/tn-infra" name="infra" ownerKey="" ownerTag="">

   <l3extOut descr="" enforceRtctrl="export" name="multipod" ownerKey="" ownerTag="" targetDscp="unspecified" status=''>
      <ospfExtP areaId='0' areaType='regular' status=''/>
      <l3extRsEctx tnFvCtxName="overlay-1"/>
      <l3extProvLbl descr="" name="prov_mp1" ownerKey="" ownerTag="" tag="yellow-green"/>

      <l3extLNodeP name="bSpine">
         <l3extRsNodeL3OutAtt rtrId="201.201.201.201" rtrIdLoopBack="no" tDn="topology/pod-1/node-201">
            <l3extInfraNodeP descr="" fabricExtCtrlPeering="yes" name=""/>
            <l3extLoopBackIfP addr="201::201/128" descr="" name=""/>
            <l3extLoopBackIfP addr="201.201.201.201/32" descr="" name=""/>
         </l3extRsNodeL3OutAtt>

         <l3extRsNodeL3OutAtt rtrId="202.202.202.202" rtrIdLoopBack="no" tDn="topology/pod-1/node-202">
            <l3extInfraNodeP descr="" fabricExtCtrlPeering="yes" name=""/>
            <l3extLoopBackIfP addr="202::202/128" descr="" name=""/>
            <l3extLoopBackIfP addr="202.202.202.202/32" descr="" name=""/>
         </l3extRsNodeL3OutAtt>
         
         <l3extRsNodeL3OutAtt rtrId="203.203.203.203" rtrIdLoopBack="no" tDn="topology/pod-2/node-203">
            <l3extInfraNodeP descr="" fabricExtCtrlPeering="yes" name=""/>
            <l3extLoopBackIfP addr="203::203/128" descr="" name=""/>
            <l3extLoopBackIfP addr="203.203.203.203/32" descr="" name=""/>
         </l3extRsNodeL3OutAtt>

         <l3extRsNodeL3OutAtt rtrId="204.204.204.204" rtrIdLoopBack="no" tDn="topology/pod-2/node-204">
            <l3extInfraNodeP descr="" fabricExtCtrlPeering="yes" name=""/>
            <l3extLoopBackIfP addr="204::204/128" descr="" name=""/>
            <l3extLoopBackIfP addr="204.204.204.204/32" descr="" name=""/>
         </l3extRsNodeL3OutAtt>         

         <l3extLIfP name='portIf'>
            <l3extRsPathL3OutAtt descr='asr' tDn="topology/pod-1/paths-201/pathep-[eth1/1]" encap='vlan-4'  ifInstT='sub-interface' addr="201.1.1.1/30" />
            <l3extRsPathL3OutAtt descr='asr' tDn="topology/pod-1/paths-201/pathep-[eth1/2]" encap='vlan-4'  ifInstT='sub-interface' addr="201.2.1.1/30" />
            <l3extRsPathL3OutAtt descr='asr' tDn="topology/pod-1/paths-202/pathep-[eth1/2]" encap='vlan-4'  ifInstT='sub-interface' addr="202.1.1.1/30" />
            <l3extRsPathL3OutAtt descr='asr' tDn="topology/pod-2/paths-203/pathep-[eth1/1]" encap='vlan-4'  ifInstT='sub-interface' addr="203.1.1.1/30" />
            <l3extRsPathL3OutAtt descr='asr' tDn="topology/pod-2/paths-203/pathep-[eth1/2]" encap='vlan-4'  ifInstT='sub-interface' addr="203.2.1.1/30" />
            <l3extRsPathL3OutAtt descr='asr' tDn="topology/pod-2/paths-204/pathep-[eth4/31]" encap='vlan-4'  ifInstT='sub-interface' addr="204.1.1.1/30" />          

           <ospfIfP>
               <ospfRsIfPol tnOspfIfPolName='ospfIfPol'/>
           </ospfIfP>

         </l3extLIfP>
      </l3extLNodeP>

      <l3extInstP descr="" matchT="AtleastOne" name="instp1" prio="unspecified" targetDscp="unspecified">
          <fvRsCustQosPol tnQosCustomPolName=""/>
      </l3extInstP>
   </l3extOut>

   <fvFabricExtConnP descr="" id="1" name="Fabric_Ext_Conn_Pol1" rt="extended:as2-nn4:5:16" status=''>
      <fvPodConnP descr="" id="1" name="">
         <fvIp addr="100.11.1.1/32"/>
      </fvPodConnP>
      <fvPodConnP descr="" id="2" name="">
         <fvIp addr="200.11.1.1/32"/>
      </fvPodConnP>
      <fvPeeringP descr="" name="" ownerKey="" ownerTag="" type="automatic_with_full_mesh"/>
      <l3extFabricExtRoutingP descr="" name="ext_routing_prof_1" ownerKey="" ownerTag="">
         <l3extSubnet aggregate="" descr="" ip="100.0.0.0/8" name="" scope="import-security"/>
         <l3extSubnet aggregate="" descr="" ip="200.0.0.0/8" name="" scope="import-security"/>
         <l3extSubnet aggregate="" descr="" ip="201.1.0.0/16" name="" scope="import-security"/>
         <l3extSubnet aggregate="" descr="" ip="201.2.0.0/16" name="" scope="import-security"/>
         <l3extSubnet aggregate="" descr="" ip="202.1.0.0/16" name="" scope="import-security"/>
         <l3extSubnet aggregate="" descr="" ip="203.1.0.0/16" name="" scope="import-security"/>
         <l3extSubnet aggregate="" descr="" ip="203.2.0.0/16" name="" scope="import-security"/>
         <l3extSubnet aggregate="" descr="" ip="204.1.0.0/16" name="" scope="import-security"/>
      </l3extFabricExtRoutingP>
   </fvFabricExtConnP>
</fvTenant>
</polUni>

Sample IPN Configuration for Multi-Pod For Cisco Nexus 9000 Series Switches


Note


  • The deployment of a dedicated VRF in the IPN for Inter-Pod connectivity is optional, but is a best practice recommendation. You can also use a global routing domain as an alternative.

  • For the area of the sample configuration that shows ip dhcp relay address 10.0.0.1, this configuration is valid based on the assumption that the TEP pool of Pod 1 is 10.0.0.0/x.


Procedure


Sample configuration:

Example:

Sample IPN configuration for Cisco Nexus 9000 series switches:
=================================
 
  (pod1-spine1)-----2/7[ IPN-N9K ]2/9-----(pod2-spine1)
 
 
feature dhcp
feature pim
 
service dhcp
ip dhcp relay
ip pim ssm range 232.0.0.0/8
 
# Create a new VRF for Multipod.
vrf context fabric-mpod
  ip pim rp-address 12.1.1.1 group-list 225.0.0.0/8 bidir
  ip pim rp-address 12.1.1.1 group-list 239.255.255.240/28 bidir
  ip pim ssm range 232.0.0.0/8
 
interface Ethernet2/7
  no switchport
  mtu 9150
  no shutdown
 
interface Ethernet2/7.4
  description pod1-spine1
  mtu 9150
  encapsulation dot1q 4
  vrf member fabric-mpod
  ip address 201.1.2.2/30
  ip router ospf a1 area 0.0.0.0
  ip pim sparse-mode
  ip dhcp relay address 10.0.0.1
  ip dhcp relay address 10.0.0.2
  ip dhcp relay address 10.0.0.3
  no shutdown
 
 
interface Ethernet2/9
  no switchport
  mtu 9150
  no shutdown
 
interface Ethernet2/9.4
  description to pod2-spine1
  mtu 9150
  encapsulation dot1q 4
  vrf member fabric-mpod
  ip address 203.1.2.2/30
  ip router ospf a1 area 0.0.0.0
  ip pim sparse-mode
  ip dhcp relay address 10.0.0.1
  ip dhcp relay address 10.0.0.2
  ip dhcp relay address 10.0.0.3
  no shutdown
 
interface loopback29
  vrf member fabric-mpod
  ip address 12.1.1.1/32
 
router ospf a1
  vrf fabric-mpod
    router-id 29.29.29.29

Moving an APIC from One Pod to Another Pod

Use this procedure to move an APIC from one pod to another pod in an Multi-Pod setup.

Procedure


Step 1

Decommission the APIC in the cluster.

  1. On the menu bar, choose System > Controllers.

  2. In the Navigation pane, expand Controllers > apic_controller_name > Cluster as Seen by Node.

  3. In the Navigation pane, click an apic_controller_name that is within the cluster and not the controller that is being decommissioned.

  4. In the Work pane, verify that the Health State in the Active Controllers summary table indicates the cluster is Fully Fit before continuing.

  5. In the Work pane, click Actions > Decommission.

  6. Click Yes.

    The decommissioned controller displays Unregistered in the Operational State column. The controller is then taken out of service and no longer visible in the Work pane.

Step 2

Move the decommissioned APIC to the desired pod.

Step 3

Enter the following commands to reboot the APIC.


apic1# acidiag touch setup
apic1# acidiag reboot

Step 4

In the APIC setup script, specify the pod ID where the APIC node has been moved.

  1. Log in to Cisco Integrated Management Controller (CIMC).

  2. In the pod ID prompt, enter the pod ID.

Note


Do not modify the TEP Pool address information.

Step 5

Recommission the APIC.

  1. From the menu bar, choose SYSTEM > Controllers.

  2. In the Navigation pane, expand Controllers > apic_controller_name > Cluster as Seen by Node.

  3. From the Work pane, verify in the Active Controllers summary table that the cluster Health State is Fully Fit before continuing.

  4. From the Work pane, click the decommissioned controller that displaying Unregistered in the Operational State column.

  5. From the Work pane, click Actions > Commission.

  6. In the Confirmation dialog box, click Yes.

  7. Verify that the commissioned Cisco APIC controller is in the operational state and the health state is Fully Fit.