- Title Page
- Table of Contents
- Preface
- Setting Up Devices and Using the GUI Clients
- Working with the Cisco Prime Network Vision Client
- Viewing and Managing NE Properties
- Device Configurations and Software Images
- Working with Prime Network Vision Maps
- Working with Links
- Labeling NEs Using Business Tags
- Working with the Prime Network Events
- Tracking Faults Using Prime Network Events
- Working with Tickets in Cisco Prime Network Vision
- Working with Reports
- Using Cisco PathTracer to Diagnose Problems
- Monitoring Carrier Ethernet Services
- Monitoring Carrier Grade NAT Properties
- Monitoring DWDM Properties
- Monitoring Ethernet Operations, Administration,and Maintenance Tool Properties
- Monitoring Y.1731 IPSLA Configuration
- IPv6 and IPv6 VPN over MPLS
- Monitoring MPLS Services
- Viewing IP and MPLS Multicast Configurations
- Monitoring MToP Services
- Viewing and Managing SBCs
- Monitoring AAA Configurations
- Monitoring IP Pools
- Monitoring BNG Configurations
- Monitoring Mobile Technologies
- Monitoring Data Center Configurations
- Icon and Button Reference
- Glossary
- Index
Labeling NEs Using Business Tags
A business tag is a string that is meaningful to the business, and which can be used to label a component of a network element for use in Prime Network screens and reports.
Business tags are normally applied to a business element, which is a construction or organization of certain network elements and their properties into a logical entity. This provides users with the ability to track them in a way that makes sense from a business perspective. Examples of business elements include Layer 2 VPNs, Layer 3 VPNs, and virtual routers.
The following topics describe how to manage and view Cisco Prime Network Vision business tags and business elements:
•![]() User Roles Required to Work with Business Tags and Business Elements
User Roles Required to Work with Business Tags and Business Elements
•![]() Attaching and Detaching Business Tags
Attaching and Detaching Business Tags
•![]() Searching for Business Tags and Viewing Their Properties
Searching for Business Tags and Viewing Their Properties
User Roles Required to Work with Business Tags and Business Elements
This topic identifies the roles that are required to work with business tags and business elements. Prime Network determines whether you are authorized to perform a task as follows:
•![]() For GUI-based tasks (tasks that do not affect elements), authorization is based on the default permission that is assigned to your user account.
For GUI-based tasks (tasks that do not affect elements), authorization is based on the default permission that is assigned to your user account.
•![]() For element-based tasks (tasks that do affect elements), authorization is based on the default permission that is assigned to your account. That is, whether the element is in one of your assigned scopes and whether you meet the minimum security level for that scope.
For element-based tasks (tasks that do affect elements), authorization is based on the default permission that is assigned to your account. That is, whether the element is in one of your assigned scopes and whether you meet the minimum security level for that scope.
For more information on user authorization, see the Cisco Prime Network 3.10 Administrator Guide.
The following tables identify the tasks that you can perform:
•![]() Table 7-1 identifies the tasks that you can perform if a selected element is not in one of your assigned scopes.
Table 7-1 identifies the tasks that you can perform if a selected element is not in one of your assigned scopes.
•![]() Table 7-2 identifies the tasks that you can perform if a selected element is in one of your assigned scopes.
Table 7-2 identifies the tasks that you can perform if a selected element is in one of your assigned scopes.
By default, users with the Administrator role have access to all managed elements. To change the Administrator user scope, see the topic on device scopes in the Cisco Prime Network 3.10 Administrator Guide.
|
|
|
|
|
|
|
|---|---|---|---|---|---|
Attach a business tag |
— |
— |
— |
Partial1 |
X |
Detach a business tag |
— |
— |
— |
Partial1 |
X |
Search for a business tag |
— |
— |
— |
Partial1 |
X |
View business tag properties |
— |
— |
— |
Partial1 |
X |
Rename a business element |
X |
X |
X |
X |
X |
Delete a business element |
X |
X |
X |
X |
X |
1 Configurator user role default permission supports the action for business elements, which do not have scopes. The Configurator user role default permission supports the action for elements only if the elements are in the user's scope. |
|
|
|
|
|
|
|
|---|---|---|---|---|---|
Attach a business tag |
— |
— |
— |
Partial1 |
X |
Detach a business tag |
— |
— |
— |
Partial1 |
X |
Search for a business tag |
— |
— |
— |
Partial1 |
X |
View business tag properties |
— |
— |
— |
Partial1 |
X |
Rename a business element |
X |
X |
X |
X |
X |
Delete a business element |
X |
X |
X |
X |
X |
1 Configurator user role default permission supports the action for business elements, which do not have scopes. The Configurator user role default permission supports the action for elements only if the elements are in the user's scope. |
Using Chinese Characters
Cisco Prime Network Vision supports Chinese characters in business tags, enabling you to perform the following activities using Chinese characters:
•![]() Create a business tag—Attaching and Detaching Business Tags.
Create a business tag—Attaching and Detaching Business Tags.
•![]() Search for business tags and view business tag properties—Searching for Business Tags and Viewing Their Properties.
Search for business tags and view business tag properties—Searching for Business Tags and Viewing Their Properties.
•![]() Generate a list of business tags.
Generate a list of business tags.
•![]() Edit the details of a business tag.
Edit the details of a business tag.
•![]() Write business tag notes.
Write business tag notes.
•![]() Remove business tags.
Remove business tags.
•![]() Create aggregations.
Create aggregations.
•![]() Export a business tag through a northbound interface.
Export a business tag through a northbound interface.
See the following documents for more information about these features:
•![]() Configuring your system to use Chinese characters— Cisco Prime Network 3.10 Installation Guide.
Configuring your system to use Chinese characters— Cisco Prime Network 3.10 Installation Guide.
•![]() Integration over northbound interfaces—Cisco Prime Network 3.11 Integration Developer Guide.
Integration over northbound interfaces—Cisco Prime Network 3.11 Integration Developer Guide.
Attaching and Detaching Business Tags
You can attach one business tag for each entity, such as a port or interface. A business tag might identify a new subscriber to a port, or other information that is relevant in your environment.
To attach a business tag:
Step 1 ![]() Right-click the required network object and choose Attach Business Tag. The Attach Business Tag dialog box is displayed, as shown in Figure 7-1.
Right-click the required network object and choose Attach Business Tag. The Attach Business Tag dialog box is displayed, as shown in Figure 7-1.
Figure 7-1 Attach Business Tag Dialog Box
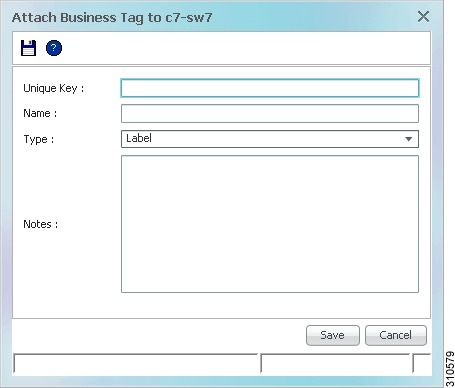
Step 2 ![]() Enter the information for the business tag:
Enter the information for the business tag:
•![]() Unique Key—Enter a unique identifier for the business tag.
Unique Key—Enter a unique identifier for the business tag.
•![]() Name—Enter a name for the business tag.
Name—Enter a name for the business tag.

Note ![]() Business tag names are case-sensitive.
Business tag names are case-sensitive.
•![]() Type—Choose the type of business tag: Subscriber, Provider Connection, or Label.
Type—Choose the type of business tag: Subscriber, Provider Connection, or Label.
Note ![]() If you select Label, the name of the network object changes to display the business tag name if the Replace name with Business Tag option is selected in the Options dialog box (Tools > Options). For more information about display options, see Adjusting the Prime Network Vision GUI Client Settings.
If you select Label, the name of the network object changes to display the business tag name if the Replace name with Business Tag option is selected in the Options dialog box (Tools > Options). For more information about display options, see Adjusting the Prime Network Vision GUI Client Settings.
•![]() Notes—(Optional) Enter a free-text message.
Notes—(Optional) Enter a free-text message.
Step 3 ![]() Click Save. The business tag is attached to the network object and displayed in the Business Tag tab of the inventory window for the selected network object. The business tag name is also displayed throughout Cisco Prime Network Vision, such as in the navigation pane, maps, and Cisco PathTracer.
Click Save. The business tag is attached to the network object and displayed in the Business Tag tab of the inventory window for the selected network object. The business tag name is also displayed throughout Cisco Prime Network Vision, such as in the navigation pane, maps, and Cisco PathTracer.
You can search and edit business tag information attached to a network object using tools available from the appropriate Business Tag dialog box.
To detach a business tag, right-click the network object and choose Detach Business Tag.
Searching for Business Tags and Viewing Their Properties
Cisco Prime Network Vision enables you to find a business tag by entering the full or partial business tag key, the full or partial business tag, or by specifying a specific type of business tag. In response, the business tags that meet the search criteria are listed.
If you know the location of the business tag, you can view its properties by opening the Business Tag tab in the element's inventory window.
To search for a business tag:
Step 1 ![]() Choose Edit > Find Business Tag from the main menu. Figure 7-2 shows an example of the Find Business Tag dialog box.
Choose Edit > Find Business Tag from the main menu. Figure 7-2 shows an example of the Find Business Tag dialog box.
Figure 7-2 Find Business Tag Dialog Box
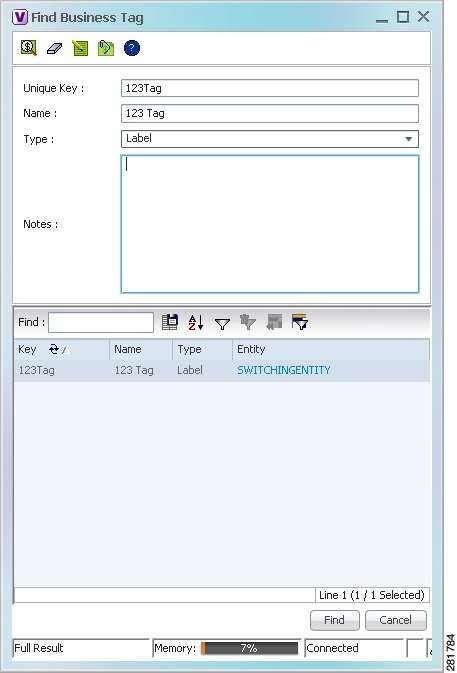
Table 7-3 describes the fields in the Find Business Tag dialog box.


Step 2 ![]() Enter the search criteria using the information for the Input Fields in Table 7-3, keeping in mind that the search function is case-sensitive.
Enter the search criteria using the information for the Input Fields in Table 7-3, keeping in mind that the search function is case-sensitive.
Step 3 ![]() Click Find. The search results are displayed in the Results Table at the bottom of the Find Business Tag dialog box, as shown in Figure 7-2.
Click Find. The search results are displayed in the Results Table at the bottom of the Find Business Tag dialog box, as shown in Figure 7-2.
Step 4 ![]() View additional details as required:
View additional details as required:
•![]() To view the business tag's properties, double-click the business tag in the search results table.
To view the business tag's properties, double-click the business tag in the search results table.
•![]() To go to the business tag's location, click the hyperlink provided in the search results table.
To go to the business tag's location, click the hyperlink provided in the search results table.
Renaming a Business Element
The following caveats apply when renaming a business element:
•![]() Except for network VLANs, the original name of the business element is not saved, so you cannot revert to the original name.
Except for network VLANs, the original name of the business element is not saved, so you cannot revert to the original name.
•![]() Renaming a business element affects all users who have the business element loaded in their service view maps.
Renaming a business element affects all users who have the business element loaded in their service view maps.
To rename business elements in service view maps, right-click the business element and choose Rename.
Deleting a Business Element
You can delete business elements from the database. However, if you delete a business element from the database, it can no longer be viewed in Prime Network. We recommend that you delete a business element only when the physical element no longer exists.

Table 7-4 lists the requirements that must be met before you can delete a business element.
To delete a business element:
Step 1 ![]() Verify that the business element meets all requirements specified in Table 7-4. You cannot delete the element if all requirements are not met.
Verify that the business element meets all requirements specified in Table 7-4. You cannot delete the element if all requirements are not met.
Step 2 ![]() In the Cisco Prime Network Vision navigation pane or a map, right-click the business element, and choose Delete.
In the Cisco Prime Network Vision navigation pane or a map, right-click the business element, and choose Delete.
Step 3 ![]() In the confirmation message, click Yes to delete the currently selected element, or click Yes to All to delete multiple selected elements.
In the confirmation message, click Yes to delete the currently selected element, or click Yes to All to delete multiple selected elements.
The selected business element is deleted from the business configuration of all users.
 Feedback