Cisco Catalyst Center Administrator Guide, Release 3.2.x

PDF

Set up disaster recovery

Want to summarize with AI?

Log in

Overview

Provides a quick overview of the disaster recovery setup process.

Setting up disaster recovery in your Catalyst Center deployment is a two-step process. The first step is to register the sites that will comprise your disaster recovery system. The second step is to activate your system, enabling disaster recovery. Refer to this section's topics for a description of the steps you need to complete, as well as information on the errors you may encounter during this process and how to deal with them.


Main site registration considerations

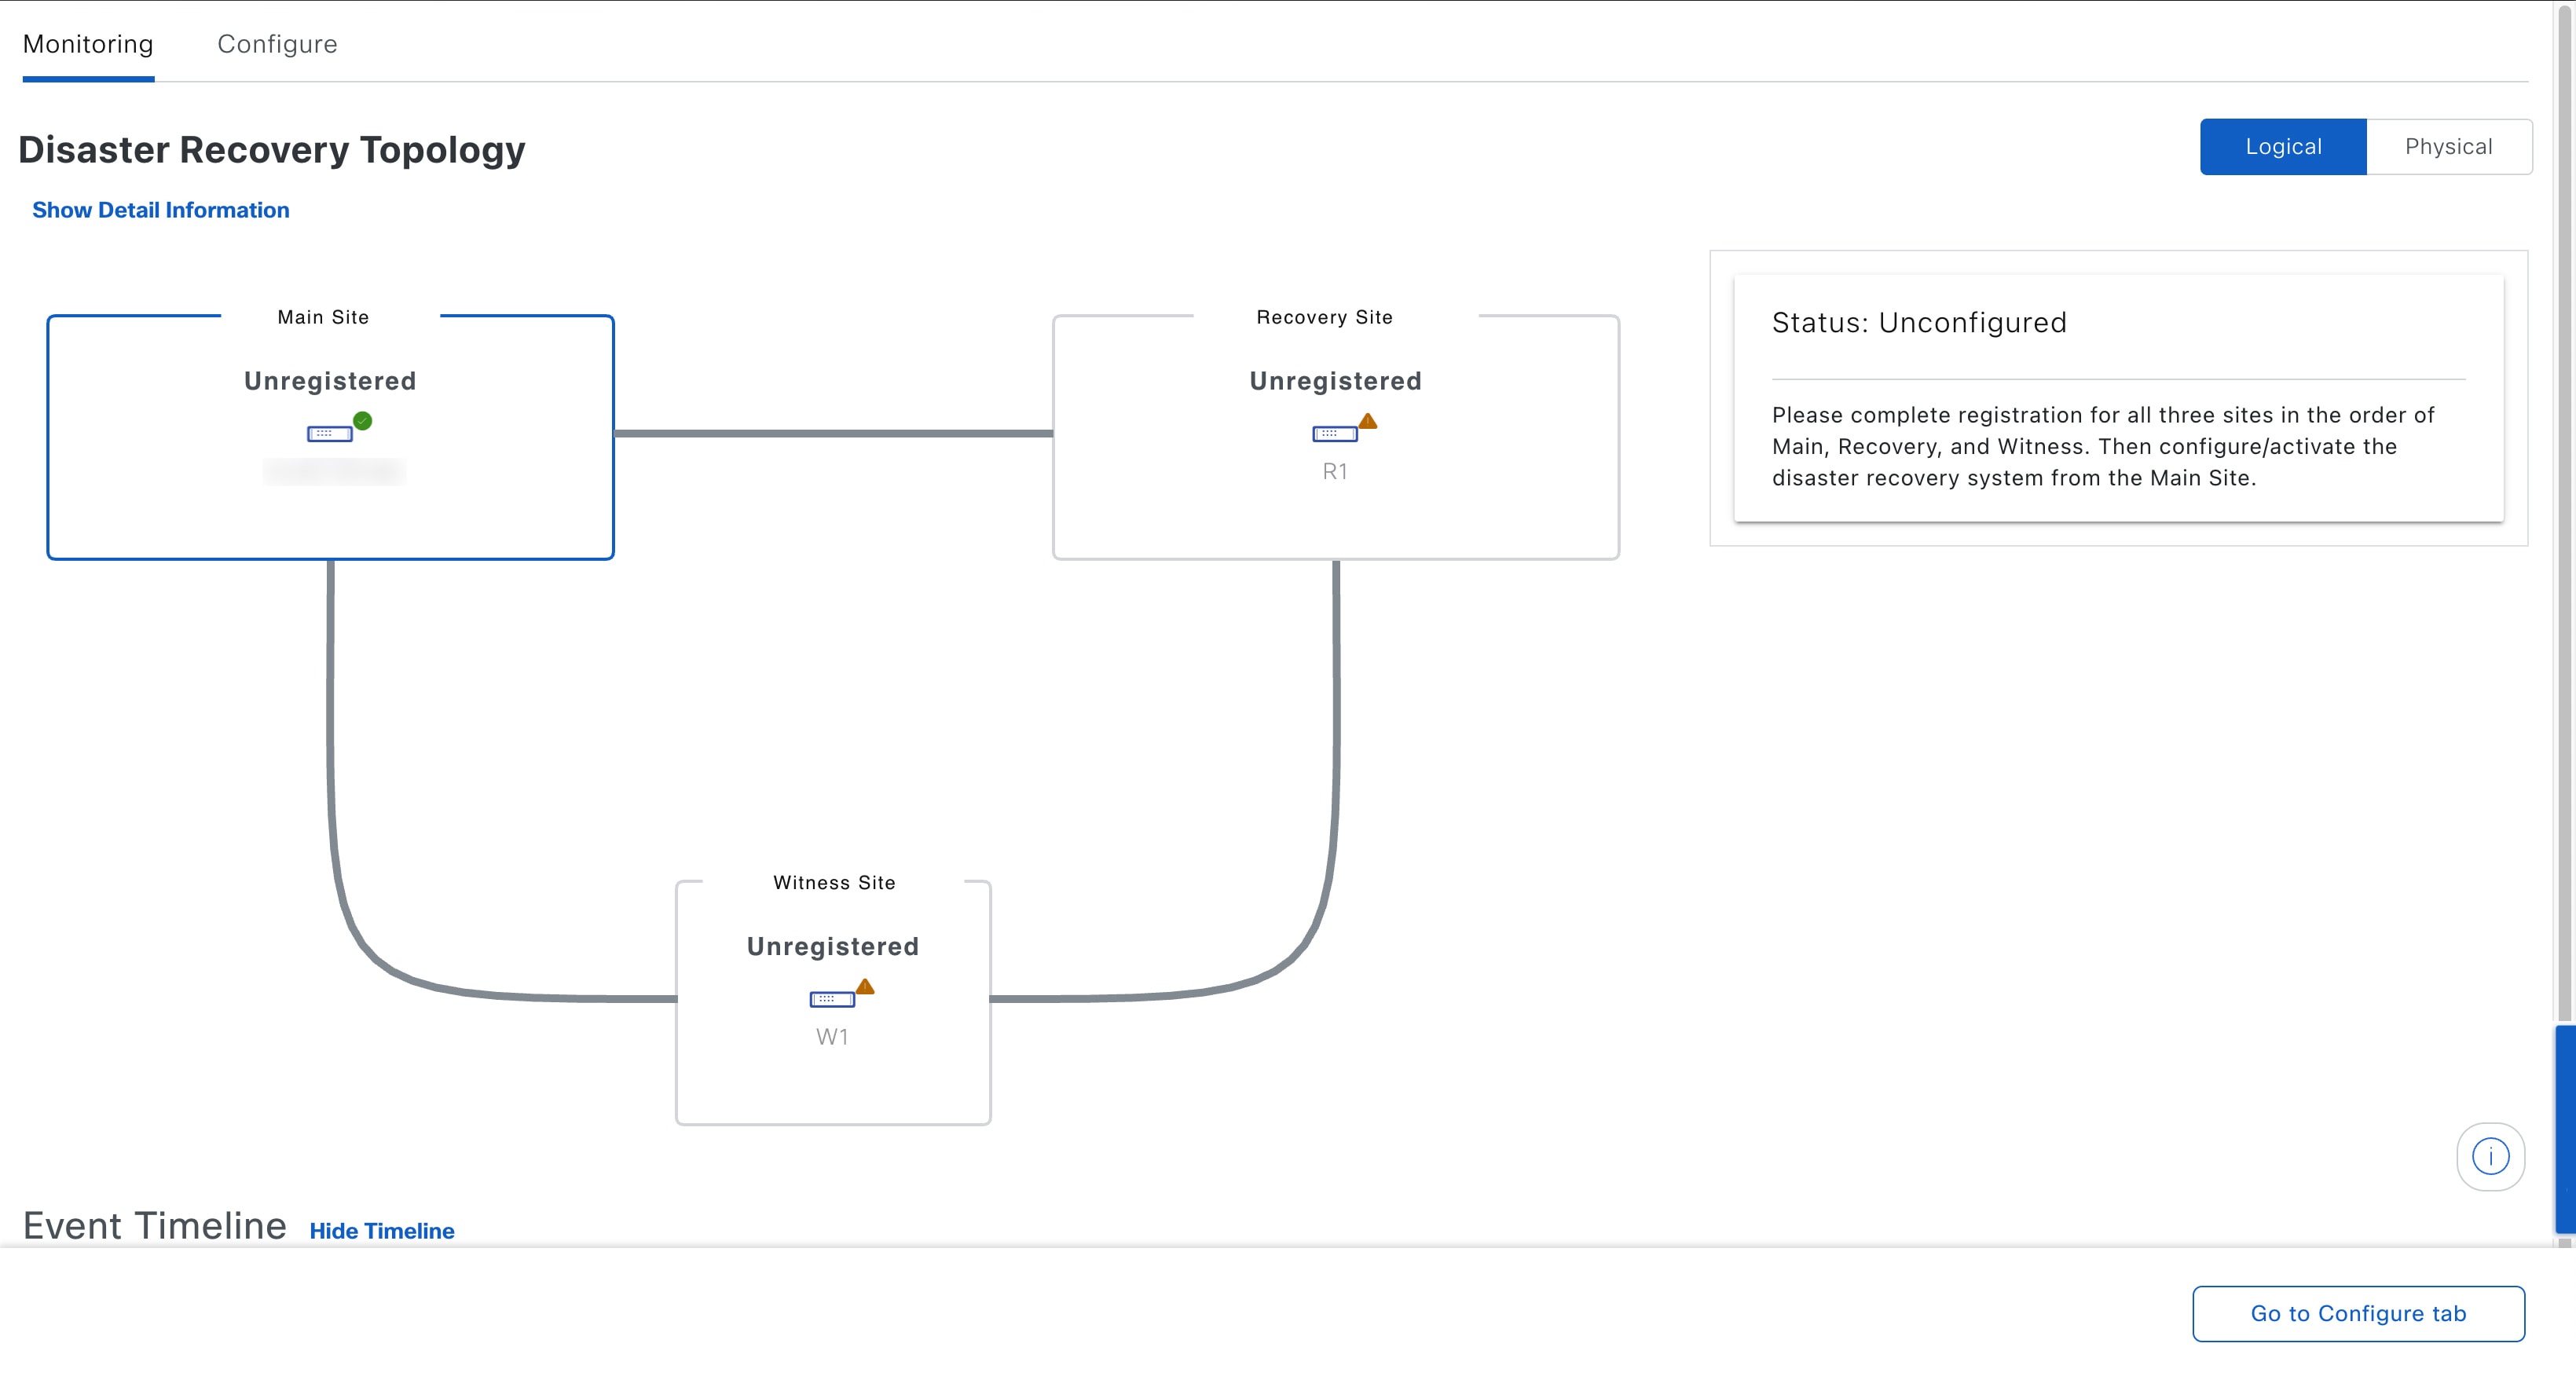
Before you register your disaster recovery system's main site, you'll need to decide how to make use of the following features.
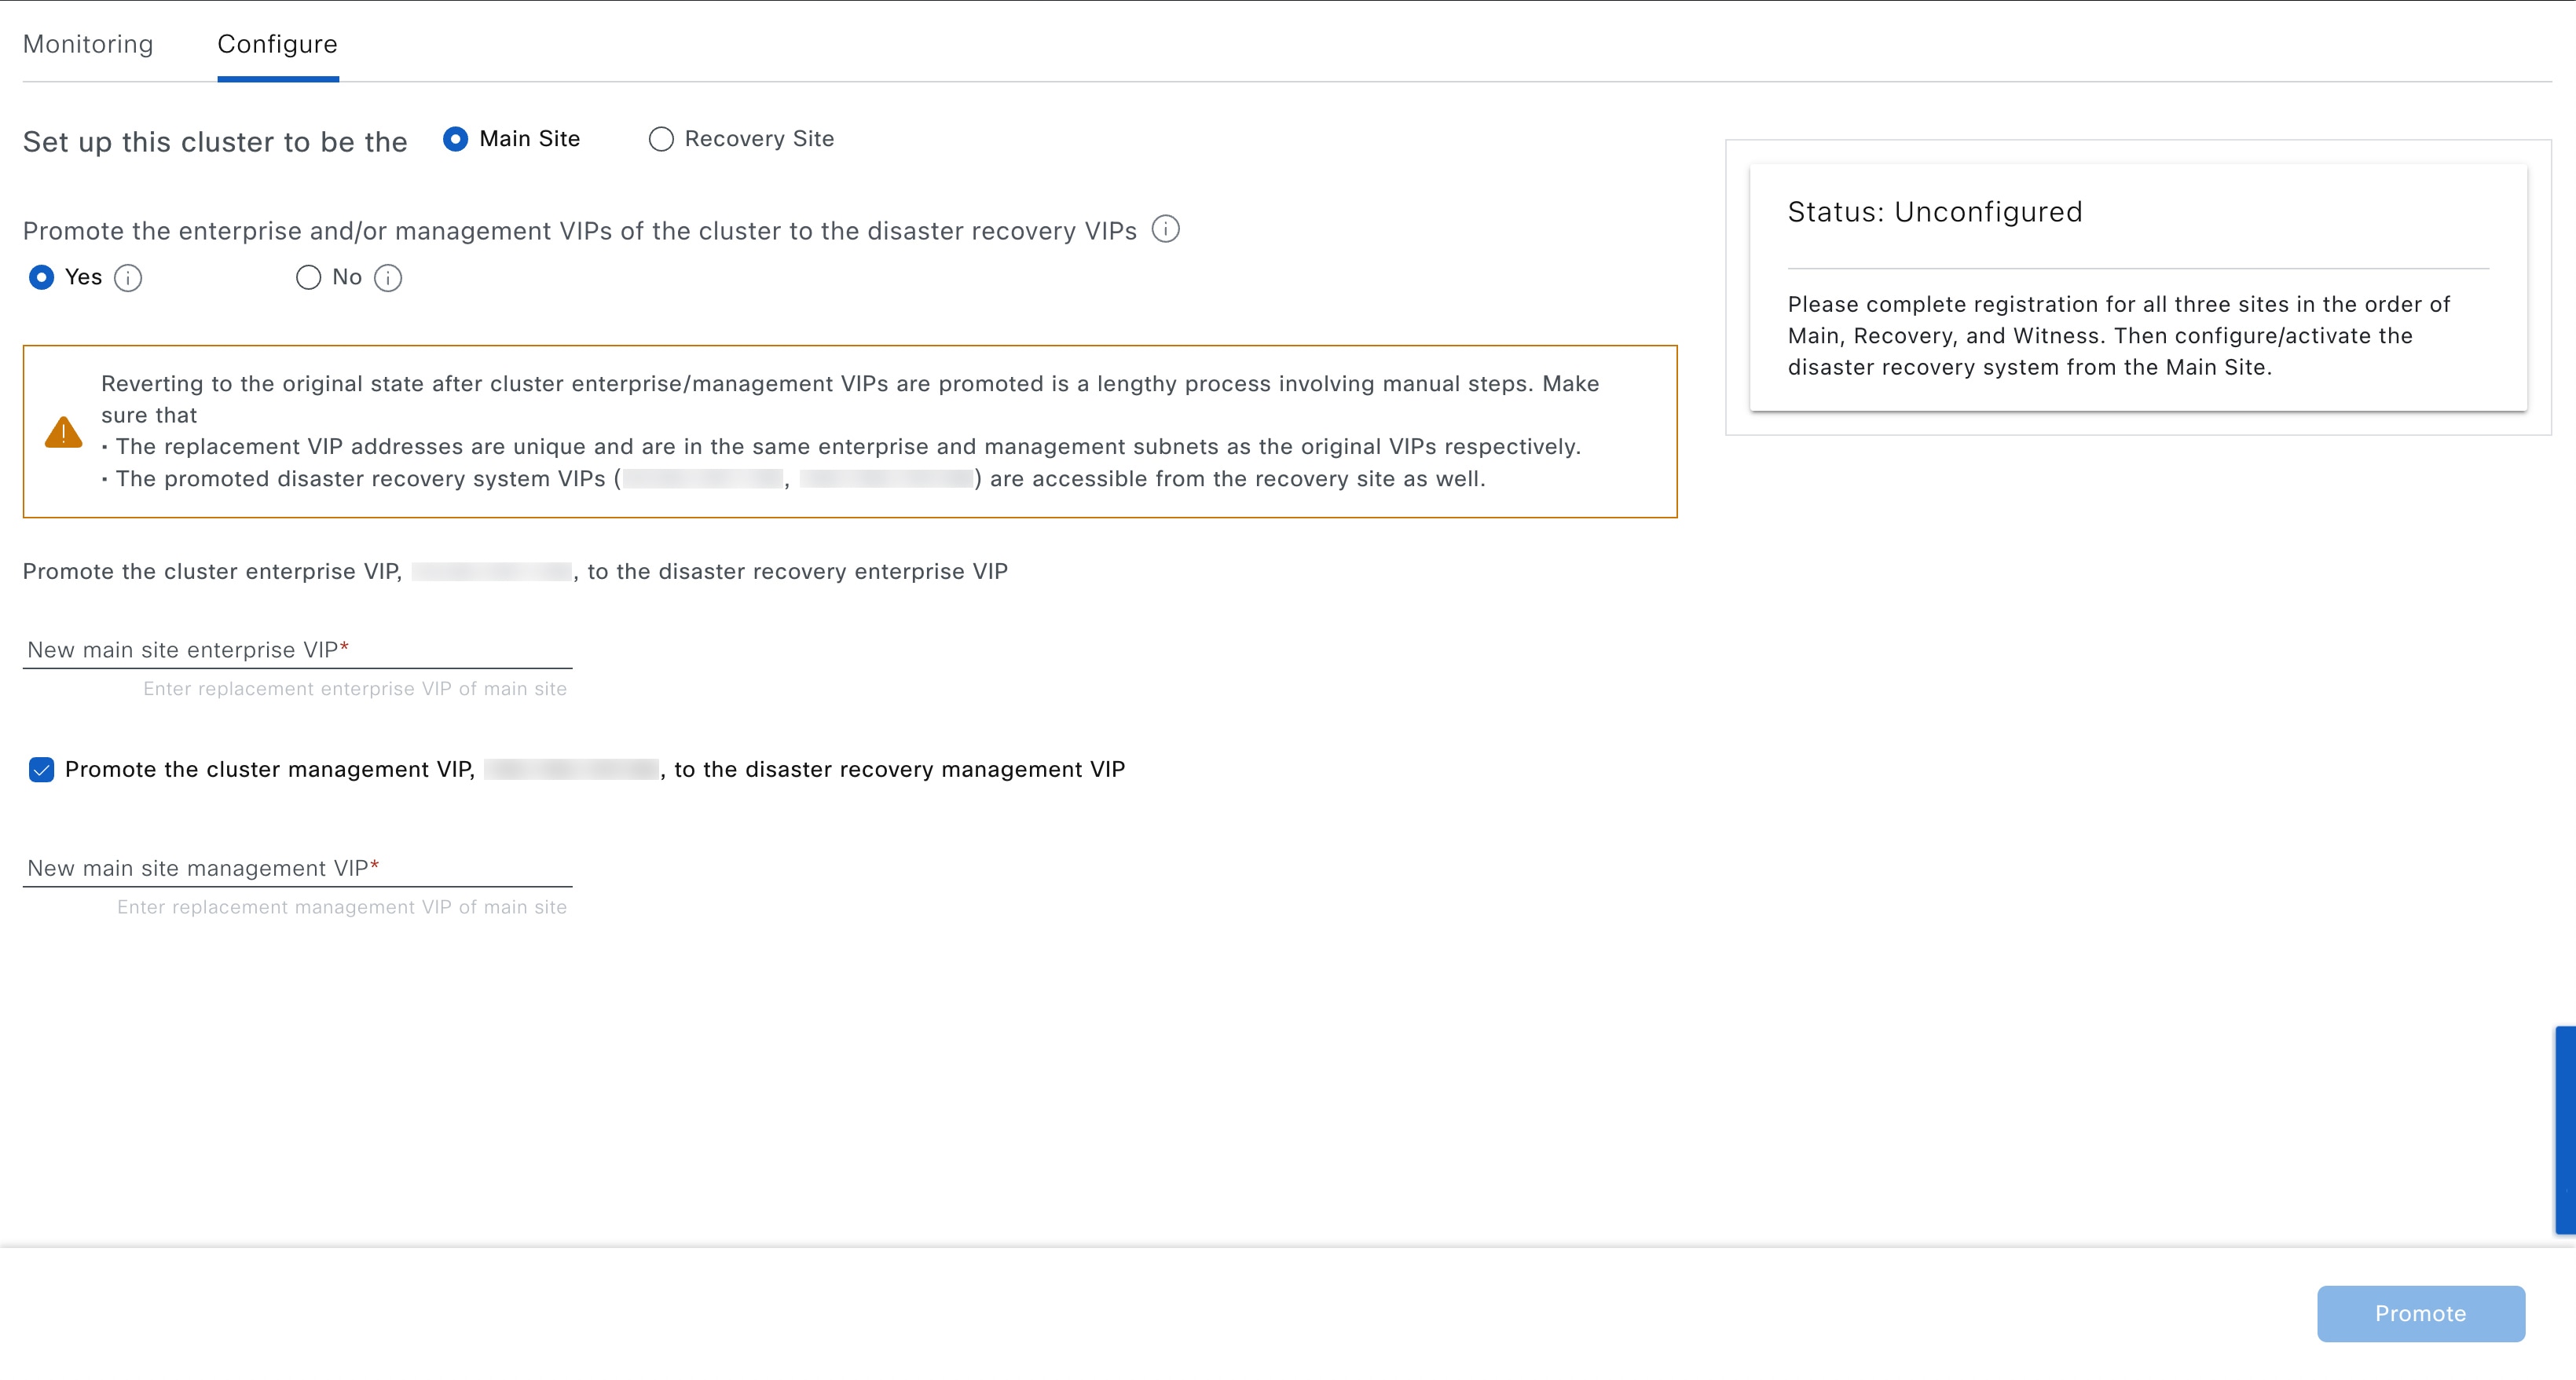
VIP Promotion

You'll need to decide whether you want to use the Enterprise interface VIP configured for your Catalyst Center deployment as your system's disaster recovery VIP. VIP promotion is suitable only if all of these items are applicable:

  • You have a brownfield deployment, where an existing Catalyst Center instance is managing the network and all devices are configured with the instance's Enterprise VIP. This instance will act as your disaster recovery system's main site.

  • The existing Enterprise interface VIP address is allowed to float between the two data centers where your main and recovery sites will reside. This is usually applicable in the case of an extended L2 network that spans multiple data centers.

  • You don't want the existing devices to be reconfigured when the new disaster recovery system's Enterprise interface VIP.

If you want to use VIP promotion, complete Steps 2b through 2e in Register the main site, clicking the Yes radio button in Step 2b.

Route Advertisement Options

You'll then need to decide the route advertisement option your deployment will use. One of disaster recovery's main objectives is to enable continuous network operation after a failover takes place without the need for device reprovisioning. This is achieved by specifying a floating VIP that's automatically configured on the disaster recovery system's current active site. Whenever a failover occurs, this VIP (referred to as the disaster recovery VIP in this chapter) is cleared from the previous active site and set on the new active site. This ensures that your network's devices can continue to communicate with Catalyst Center, regardless of which site is currently active. There are three route advertisement option to choose from when you complete Step 2g in Register the main site:

  • Border Gateway Protocol (BGP): This option, which is recommended for most disaster recovery systems, is selected by default. BGP route advertisement ensures that you can access your system's current active site, which is critical after a failover takes place.

    • If you want to use this option, first complete the steps described in the last two bullets of the "Main and Recovery Site Prerequisites" section (which can be found in the Prerequisites topic).

    • The peer router must use BGP. Beyond the peer router, you can use any IGP protocol such as OSPF and EIGP.

  • Disaster recovery VIPs without route advertisement: Choose this option if you want to configure virtual IP addresses for your system whose routes are not advertised using BGP. This option is suitable for data centers where both the main and recovery sites can access the subnet that the system's global virtual IP addresses reside within.

  • No disaster recovery VIPs: When this option is selected, the virtual IP address that's configured for a site is automatically configured on the devices that belong to that site. Each time a failover takes place, this virtual IP address is reconfigured on the devices.


Register the main site

Complete this procedure to register your system's main site.

Before you begin

  • Ensure that you've reviewed Main site registration considerations.

  • On the Catalyst Center appliances or clusters where your disaster recovery system's main and recovery site will reside, do these tasks:

    • Configure the same backup schedule and proxy server. If you don't take care of this before you activate your system, you'll need to specify these two settings again after a failover occurs and the recovery site becomes the active site.

    • Configure an NFS backup configuration where each site points to a different NFS device.

Procedure

1.

From the main menu, choose System > Disaster Recovery to open the Disaster Recovery page.

On the Disaster Recovery window, the Monitoring tab is selected and the Disaster Recovery Topology is displayed with the status of Unconfigured.

The Monitoring tab is selected, by default.

2.

Register your main site:

  1. Click the Configure tab.

    The Main Site radio button should already be selected.

    On the Disaster Recovery window, the Configure tab is selected and the main site configuration options are displayed.
  2. In the Promote the enterprise and/or management VIPs of the cluster to the disaster recovery VIPs area, click one of these radio buttons:

    • Click Yes to set up a cluster as the main site and automatically propagate virtual IP address changes to the devices that are connected to this cluster. This is accomplished by promoting the virtual IP addresses that are currently configured for the cluster and assigning them as your disaster recovery system's global virtual IP addresses. We recommend choosing this option if you are enabling disaster recovery on a cluster that has a lot of connected devices. Otherwise, these devices will need to be reconfigured to communicate with the new disaster recovery virtual IP address. If you choose this option:

      1. In the New main site enterprise VIP field, enter a new virtual IP address for the site's Enterprise network. This will replace the address that is going to be promoted. Ensure that it is a unique address that is not already used and that it resides in the same subnet as the previous virtual IP address.

      2. (Optional) Check the Promote the cluster management VIP, <IP-address>, to the disaster recovery management VIP check box.

      3. (Optional) In the New main site management VIP field, enter a new virtual IP address for the site's Management network. This will replace the address that is going to be promoted. Ensure that it is a unique address that is not already used and that it resides in the same subnet as the previous virtual IP address.

    • Click No to set up a cluster as the main site without propagating virtual IP address changes to connected devices. We recommend this option for a brand-new cluster that isn't connected to any devices yet or is only connected to a few devices. If you choose this option, skip ahead to Step 2f.

  3. In the Action area, click Promote.

    The Disaster Recovery VIP Promotion dialog opens.

  4. Click Continue.

    Catalyst Center validates the virtual IP addresses you entered.

  5. In the VIP Promotion Status area, view the validation status:

    • If any of the addresses you entered are invalid (likely because it doesn't reside in the same subnet as the address it's replacing), make the necessary corrections and repeat Step 2c.

    • If the addresses you entered are successfully validated, the VIP Promotion Status area lists all of the virtual IP addresses that will be configured for your disaster recovery system. Proceed to the next step.

  6. Enter this information in the Site VIP/IP addresses area:

    • Main Site VIP: The virtual IP address that manages traffic between the active site's cluster nodes and your Enterprise network. Catalyst Center prepopulates this field, based on your system's information.

    • Recovery Site VIP: The Enterprise virtual IP address that manages traffic between the recovery site's cluster nodes and your Enterprise network.

    • Witness Site IP: The IP address that manages traffic between the witness site's virtual machine and your Enterprise network.

    Ensure that the addresses that you enter are currently reachable. Otherwise, the registration of your system's sites will fail.

    Note

    At any point between Steps 2f and Step 2j, you can click Reset to clear all of the settings that you have entered. You will then need to repeat Step 2f and enter the correct settings before you register the main site.

  7. Click one of these radio buttons in the Route advertisement area:

    • Border Gateway Protocol (BGP): This is the recommeded option.

    • Disaster recovery VIPs without route advertisement

    • No disaster recovery VIPs: Skip ahead to Step 2k if you click this radio button.

  8. If you clicked either of the first two radio buttons in the previous step, enter a value in the Enterprise VIP for Disaster Recovery field.

    When configured, this floating virtual IP address automatically moves to and operates on the site that is currently acting as your network's active site. This address manages traffic between your disaster recovery system and your Enterprise network.

    Note
    • If you clicked the Border Gateway Protocol (BGP) radio button and don't want to configure a Management virtual IP address, skip ahead to Step 2j.

    • If you clicked the Disaster recovery VIPs without route advertisement radio button and don't want to configure a Management virtual IP address, skip ahead to Step 2k.

  9. (Optional) Enter a value in the Management VIP for Disaster Recovery field.

    When configured, this floating virtual IP address automatically moves to and operates on the site that is currently acting as your network's active site. This address manages traffic between your disaster recovery system and your Management network.

  10. If you clicked the Border Gateway Protocol (BGP) radio button, enter the information required to enable route advertisement:

    • In the Border Gateway Protocol Type area, specify whether your BGP peers will establish exterior (Exterior BGP (eBGP)) or interior (Interior BGP (iBGP)) sessions with one another.

    • In the Main Site Router Settings for Enterprise Network and Recovery Site Router Settings for Enterprise Network areas, enter the IP address of the remote router that Catalyst Center will use to advertise the Enterprise virtual IP address that's configured for the disaster recovery system's Main and Recovery sites. Also enter the router's remote and local AS numbers.

      Note these points:

      • Click the Add (+) icon if you want to configure an additional remote router. You can configure a maximum of two routers for each site.

      • When entering an AS number, ensure that it's a 32-bit unsigned number that falls within the 1–4,294,967,295 range.

      • When the iBGP option is selected, Catalyst Center will automatically set the local AS number to the value you enter as the remote AS number.

      • If you configured a Management virtual IP address in the previous step, the Main Site Router Settings for Management Network and Recovery Site Router Settings for Management Network areas are also displayed. Enter the appropriate information for the remote router that Catalyst Center will use to advertise this virtual IP address.

  11. From the Action area, click Register.

    The Disaster Recovery Registration dialog opens.

  12. Click Continue.

    The token that your recovery and witness sites need to use in order to register with your main site is generated.

3.

In the Registration Information area, click Copy Token.

On the Disaster Recovery window, the Monitoring tab is selected and the Disaster Recovery Topology is displayed with the status of Registering.

Main site registration errors

You may encounter errors when registering your system's main site. This topic describes these errors and how to deal with them.

Validation Type Validation Made Error Resolution

VIP reachability

Checks whether a TCP socket can be opened on the recovery site's port 443.

Make sure the recovery site's VIP matches the Enterprise VIP configured for the recovery site's Catalyst Center instance and that it's reachable from the main site.

Checks whether a TCP socket can be opened on the witness site's port 2222.

Make sure the witness site's IP address is configured correctly and reachable from the main site.

Enterprise and Management interface VIP reachability

Confirms whether the disaster recovery system's VIP can be reached via the Enterprise interface by looking for these items:

  • A static route defined on the Enterprise interface for the disaster recovery system's VIP

  • A default gateway configured on the Enterprise interface

If neither of these items are present, the validation fails.

Define either a static route on the Enterprise interface for the disaster recovery system's Enterprise VIP or a default gateway on the Enterprise interface.

Confirms whether the disaster recovery system's VIP can be reached via the Management interface by looking for these items:

  • A static route defined on the Management interface for the disaster recovery system's VIP

  • A default gateway configured on the Management interface

If neither of these items are present, the validation fails.

Define either a static route on the Management interface for the disaster recovery system's Management VIP or a default gateway on the Management interface.

Certificate upload

Confirms whether a third-party certificate has been uploaded. If so, Catalyst Center also confirms that the certificate is not self-signed.

In the System Certificates page (System > Settings > Certificates > System Certificates), checks that one of these is true:

  • The Use System Certificate for Disaster Recovery as well option is selected.

  • A certificate that's specific to disaster recovery has been uploaded.

In both cases, the certificate must have a nonwildcard DNS name specified as the first entry in its SAN field.

For errors not described above, their cause will be identified in the Status area. Make the necessary corrections and proceed by choosing one of these options from the Action area:

  • Retry: If the cause of the error is fixed or the error was caused by an intermittent issue (such as the restart of a dependent service during the registration process), try this option to continue registration.

  • Deregister: If you want to change any configuration or start over with the registration, use this option so that you can enter the details and options from the beginning.


Register the recovery site

Complete these steps to register the recovery site.

Note

At any point before Step 4, you can click Reset to clear all of the settings that you have entered. You will then need to repeat this procedure from the beginning and enter the correct settings before you register the recovery site.

Before you begin

View the Prerequisites topic and ensure that the requirements described in the "Main and Recovery Site Prerequisites" section have been met.

Procedure

1.

From the Registration Information area, right-click the Recovery Site link and open the resulting page in a new browser tab.

2.

If necessary, enter the appropriate username and password to log in to your recovery site.

The Disaster Recovery page's Configure tab opens, with the Recovery Site radio button already selected.

On the Disaster Recovery window, the Configure tab and the Recovery Site radio button are selected.
3.

Enter this information:

  • Main Site VIP: The virtual IP address that manages traffic between the active site's cluster nodes and your Enterprise network.

  • Recovery Site VIP: The virtual IP address that manages traffic between the recovery site's cluster nodes and your Enterprise network. Catalyst Center prepopulates this field, based on your system's information.

    Note

    After a IPSec tunnel has been configured between the main and recovery sites, Enterprise traffic on the node(s) hosting the VIP will be sourced via the Enterprise VIP (UDP/TCP/ICMP).

  • The registration token that you generated while registering the main site.

  • The username and password configured for your active site's super-admin user.

4.

From the Action area, click Register.

The Disaster Recovery Registration dialog opens.

5.

Click Continue.

The topology updates the status for the main and recovery sites after they have been connected.


Register the witness site

Complete these steps to register the witness site.

Before you begin

Ensure that these conditions are true before you register your disaster recovery system's witness site:

  • The witness site is reachable from both the main and recovery site.

  • The VIPs configured for the main and recovery site are reachable from the witness site.

Procedure

1.

Return to the main site's browser tab.

On the Disaster Recovery window, the Monitoring tab is selected and the Disaster Recovery Topology is displayed with the Registering status.
2.

From the Registration Information area, click Copy Witness Login Command.

3.

Open an SSH console to the witness site, paste the command you just copied, and then run it to log in.

4.

When prompted, enter the default (maglev) user's password.

5.

Return to the Registration Information area and click Copy Witness Register Command.

6.

In the SSH console, paste the command you just copied.

7.

Replace <main_admin_user> with the super-admin user's username and then run the command.

8.

When prompted, enter the super-admin user's password.


Witness site registration errors

This topic describes errors you may encounter when registering the witness site and how to deal with them.

Error Type Validation Made Resolution

IP validation

Validates that the witness site IP address entered during main site registration matches the IP address entered during witness site registration.

Ensure that you enter the same IP address for the witness site when registering the main and witness sites.

Version validation

Validates that the witness site's OVA package is the correct version for the Catalyst Center version that's installed on your system's main and recovery sites. Each Catalyst Center version supports only one OVA version.

Deploy the witness site OVA package version listed in the error message.

For errors that don't involve validation checks, their cause is identified in the Status area. Make the necessary corrections and proceed by doing one of these tasks:

  • After logging in to the witness site, run the witness reset command.

  • To make any registration setting changes or restart the process from the beginning, click Deregister from the Action area.


Activate your disaster recovery system

After registering your system's sites, complete this procedure to activate the system for use in your Catalyst Center deployment.

Procedure

1.

Verify that your main, recovery, and witness sites registered successfully:

  1. Return to the main site's browser tab and click Monitoring to view the Disaster Recovery Monitoring tab.

    On the Disaster Recovery window, the Monitoring tab is selected and the Disaster Recovery Topology is displayed with the Registered status.
  2. In the Logical Topology area, confirm that the three sites are displayed and their status is Registered.

  3. In the Event Timeline area, confirm that the registration of each site is listed as an event and that each task completed successfully.

    The Event Timeline displays the witness site registration, recovery site registration, and main site registration details.
2.

In the Action area, click Activate.

A dialog box opens, indicating that all the data that currently resides in your recovery site will be erased.

3.

To begin the configuration of your disaster recovery system and the replication of your main site's data to the recovery site, click Continue.

Note

The activation process may take some time to complete. View the Event Timeline in order to monitor its progress.

4.

After Catalyst Center has completed the necessary tasks, verify that your system is operational:

  1. View its topology and confirm that the following status is displayed for your respective sites:

    The main site, recovery site, and witness site are displayed in the topology.
  2. View the Event Timeline and confirm that the Activate Disaster Recovery System task completed successfully.

    The Event Timeline displays the activate disaster recovery system details.
  3. Verify that your sites are reachable by pinging them from the main site.


Disaster recovery system validations

This table describes the validations that the disaster recovery system makes after the Activate and Rejoin operations have been initiated.

Validation Description
Package match

Confirms whether the packages installed on both the main and recovery sites are the same version.

Key services health

Checks the health of managed services and other key services that are critical for disaster recovery operations.

IPsec status and transmission

Confirms whether the IPSec tunnel is up for all of the disaster recovery system's sites.

Consul connectivity

Determines if the consul (the distributed database shared by the main, recovery and witness sites) is able to communicate with all of the sites.