Manage System Access and Security

This section contains the following topics:

Manage Users

As a best practice, administrators should create separate accounts for all users. Prepare a list of the people who will use Cisco Crosswork. Decide on their user names and preliminary passwords, and create user profiles for them. During the creation of a user account, you assign a user role to determine the functionality to which the user will have access. If you will be using user roles other than "admin", create the user roles before you add your users (see Create User Roles).

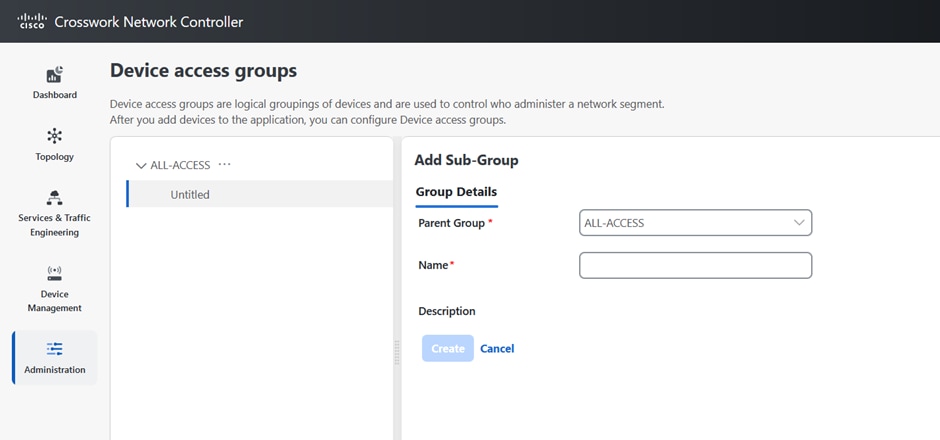
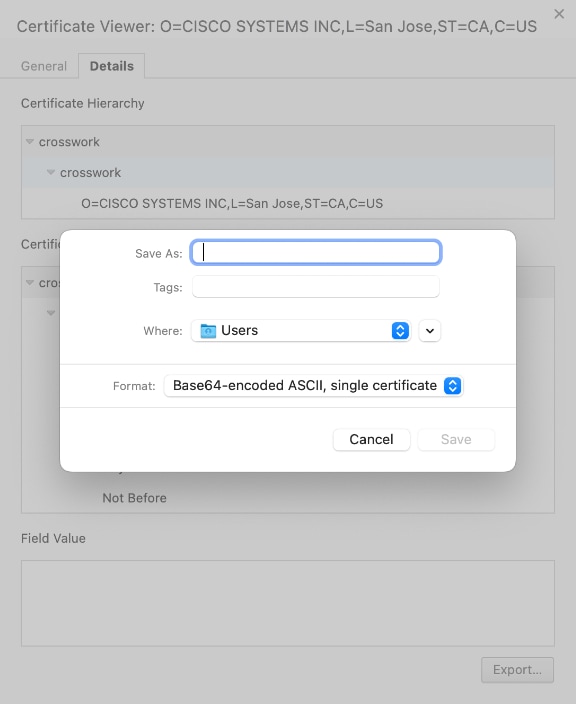
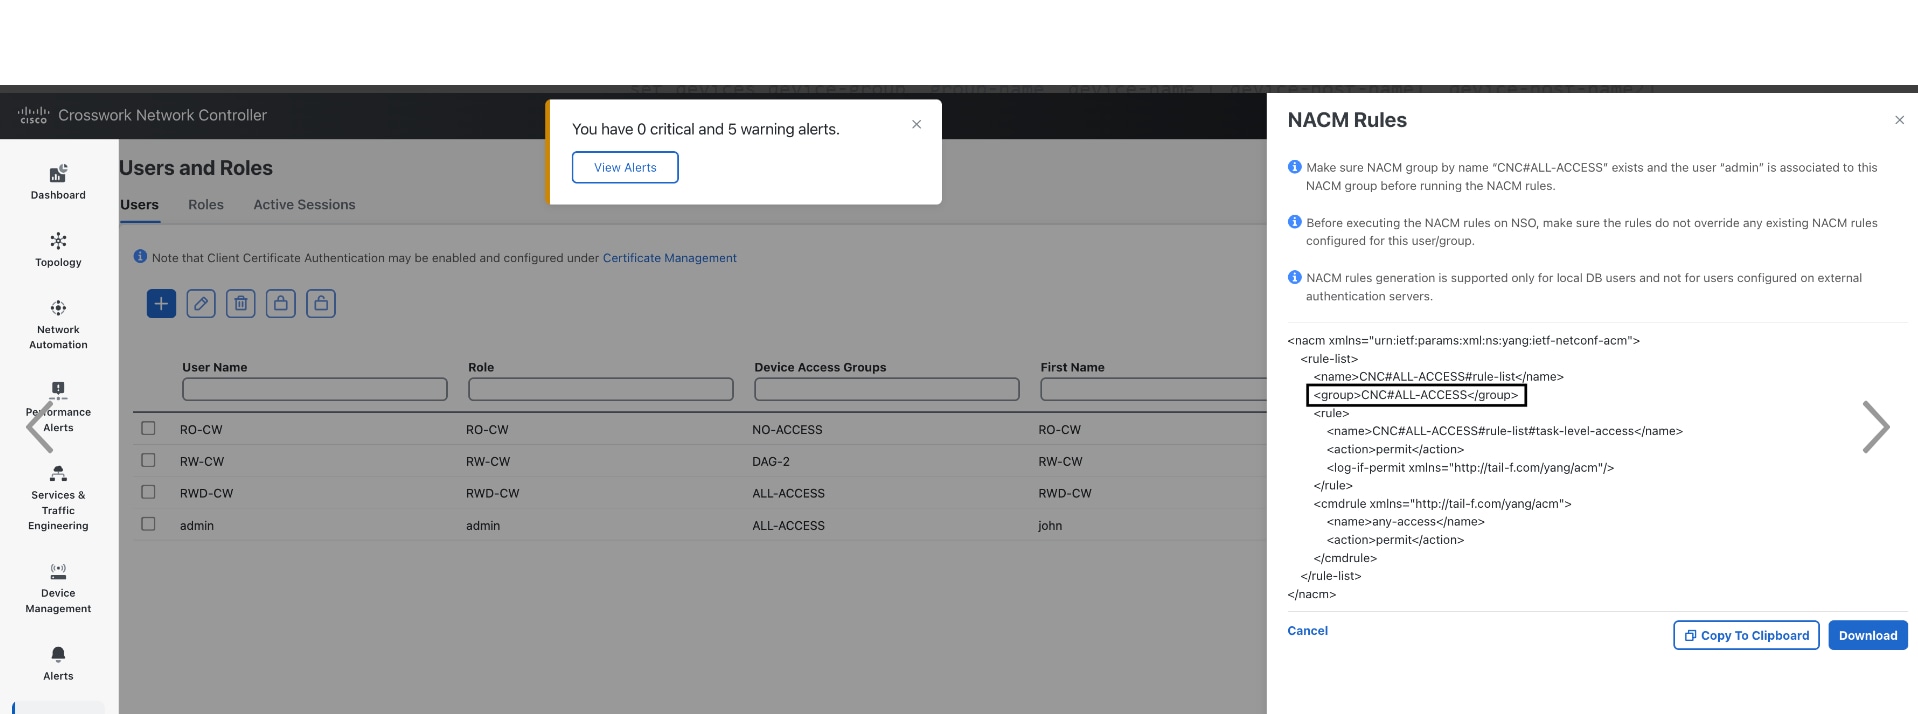
You can optionally view the NETCONF Access Control Model (NACM) rules that let admin members grant access to devices in selected groups and deny access to other devices.

Procedure


Step 1

From the main menu, select Administration > Users and Roles > Users tab. From this window, you can add a new user, edit the settings for an existing user, and delete a user.

Step 2

To add a new user:

  1. Click Add icon and enter the required user details.

    When you are configuring Device Access Groups for your users, select the Device Access Group listed in the right pane to assign it to the new user you are creating.

    Note

     
    1. By default users associated with ALL-ACCESS Device Access Group are provided access to ALL devices.

    2. You must associate at least one Device Access Group to a user.

  2. Click Save.

Step 3

To edit a user:

  1. Click the checkbox next to the User and click Edit icon.

  2. After making changes, click Save.

Step 4

To delete a user:

  1. Click the checkbox next to the User and click Delete icon.

  2. In the Confirm Deletion window, click Delete.

Step 5

To view the audit log for a user:

  1. Click the icon under the Actions column, and select Audit Log.

    The Audit Log window is displayed for the selected user name. For more information on the Audit Logs, see View Audit Log.

Step 6

(Optional) To view NACM rules for a user:

  1. Click the icon under the Actions column, and select Generate NACM Rules.

    The NACM Rules window is displayed for the selected user name.

    If you have an NSO service configured on your Crosswork Network Controller, you can generate NACM rules by clicking the icon under the Actions column for a user and selecting Generate NACM Rules. This will integrate device-level NACM control with the NSO workflow. Note that for each unique combination of Device Access Group associated with a user, there is:

    • A NACM group associated with the user.

    • A corresponding NACM rule list associated with the user.

    The rule will allow access to devices in selected Device Access Groups and deny access to other devices. You can copy the XML rules file and add it in your NSO NACM Rule configuration setup. The options available under the NSO Actions tab, located in Device Management > Network Devices, will also be restricted based on the Device Access Groups permissions of the user.

    You also view the Crosswork Audit log and the NSO commit logs to track and verify the activities of users using the NACM rules, ensuring traceability.


Administrative Users Created During Installation

During installation, Crosswork creates two special administrative IDs:

  1. The virtual machine administrator, with the username cw-admin, and the default password admin. Data center administrators use this ID to log in to and troubleshoot the VM hosting the Crosswork server.

  2. The Cisco Crosswork administrator, with the username admin and the default password admin. Product administrators use this ID to log in to and configure the user interface, and to perform special operations, such as creating new user IDs.

The default password for both administrative user IDs must be changed the first time they are used.

User Roles, Functional Categories and Permissions

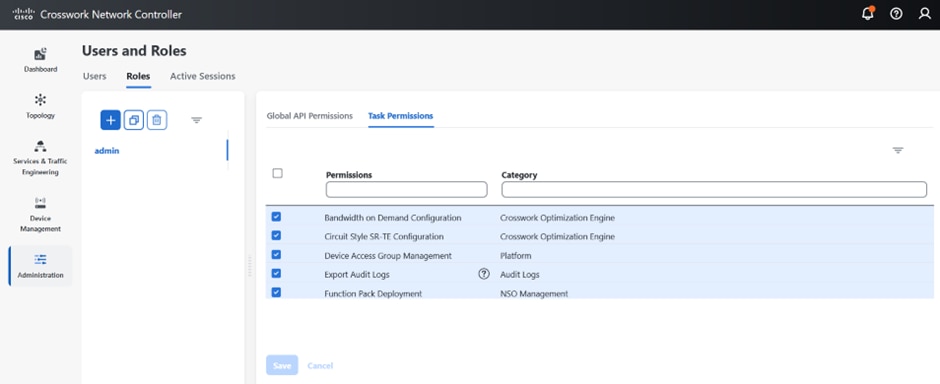
The Roles window lets users with the appropriate privileges define custom user roles. As with the default admin role, a custom user role consists of:

  • A unique name, such as “Operator” or “admin”.

  • One or more selected, named functional categories, which control whether or not a user with that role has access to the APIs needed to perform specific Cisco Crosswork functions controlled by that API.

  • One or more selected permissions, which control the scope of what a user with that role can do in the functional category.

For a user role to have access to a functional category, that category and its underlying API must show as selected on the Roles page for that role. If the user role shows a functional category as unselected, then users with this role assigned will have no access to that functional area at all.

Some functional categories group multiple APIs under one category name. For example: The “AAA” category controls access to the Password Change, Remote Authentication Servers Integration, and Users and Role Management APIs. With this type of category, you can deny access to some of the APIs by leaving them unselected, while providing access to other APIs under the category by selecting them . For example: If you want to create an “Operator” role who is able to change his own password, but not see or change the settings for your installation’s integration with remote AAA servers, or create new users and roles, you would select the “AAA” category name, but uncheck the “Remote Authentication Server Integration API” and “Users and Role Management API” checkboxes.

For each role with a selected category, the Roles page also lets you define permissions to each underlying functional API:

  • Read permission lets the user see and interact with the objects controlled by that API, but not change or delete them.

  • Write permission lets the user see and change the objects controlled by that API, but not delete them.

  • Delete permission gives the user role delete privileges over the objects controlled by that API. It is useful to remember that delete permission does not override basic limitations set by the Crosswork platform and it applications.

Although you can mix permissions as you wish:

  • If you select an API for user access, you must provide at least “Read” permission to that API.

  • When you select an API for user access, Cisco Crosswork assumes that you want the user to have all permissions on that API, and will select all three permissions for you, automatically.

  • If you uncheck all of the permissions, including “Read”, Cisco Crosswork will assume that you want to deny access to the API, and unselect it for you.

Best Practices:

Cisco recommends that you follow these best practices when creating custom user roles:

  • Restrict Delete permissions in roles for admin users with explicit administrative responsibility for maintenance and management of the Crosswork deployment as a whole.

  • Roles for developers working with all the Cisco Crosswork APIs will need the same permissions as admin users.

  • Apply at least Read and Write permissions in roles for users who are actively engaged in managing the network using Cisco Crosswork.

  • Give read-only access to roles for users who only need to see the data to help their work as system architects or planners.

The following table describes some sample custom user roles you should consider creating:

Table 1. Sample custom user roles

Role

Description

Categories/API

Privileges

Operator

Active network manager, triggers Playbooks in response to KPI alerts

All

Read, Write

Monitor

Monitors alerts only

Health Insights, Inventory, Topology

Read only

API Integrator

All

All

All


Note


Admin role needs to include permissions for Read, Write, and Delete, while read-write roles need to include both Read and Write permissions. Using Zero Touch Provisioning features requires access to all ZTP APIs.


Create User Roles

Procedure

Step 1

From the main menu, choose Administration > Users and Roles > Roles tab.

The Roles window has a Roles table on the left side and a corresponding Global API Permissions tab on the right side which shows the grouping of user permissions for the selected role.

Step 2

On the Roles table, click Add icon to display a new role entry in the table.

Step 3

Enter a unique name for the new role.

Step 4

To define the user role's privilege settings, select the Global API Permissions tab and perform the following:

  1. Check the check box for every API that users with this role can access. The APIs are grouped logically based their corresponding application.

  2. For each API, define whether the user role has Read, Write, and Delete permission by checking the appropriate check box. You can also select an entire API group (such as AAA), and all the APIs under the group will be selected with Read,Write and Delete permissions pre-selected.

Step 5

Click Save to create the new role.

To assign the new user role to one or more user IDs, edit the Role setting for the user IDs (see Edit User Roles).


Clone User Roles

Cloning an existing user role is the same as creating a new user role, except that you need not set privileges for it. If you like, you can let the cloned user role inherit all the privileges of the original user role.

Cloning user roles is a handy way to create and assign many new user roles quickly. Following the steps below, you can clone an existing role multiple times. Defining the cloned user role's privileges is an optional step; you are only required to give the cloned role a new name. If you like, you can assign it a name that indicates the role you want a group of users to perform. You can then edit the user IDs of that group of users to assign them their new role (see Manage Users). Later, you can edit the roles themselves to give users the privileges you want (see Edit User Roles).


Note


Some API permissions are predefined in the system admin role and remain unchanged in the cloned role. For example, the system admin role includes the default Read and Write permissions for the Alarms & Events API. These permissions are not configurable for both, original, and cloned admin roles.


Procedure

Step 1

From the main menu, choose Administration > Users and Roles > Roles tab.

Step 2

Click an existing role.

Step 3

Click User Role Clone to create a new duplicate entry in the Roles table with all the permissions of the original role.

Step 4

Enter a unique name for the cloned role.

Step 5

(Optional) Define the role's settings:

  1. Check the check box for every API that the cloned role can access.

  2. For each API, define whether the clone role has Read, Write, and Delete permission by checking the appropriate check box. You can also select an entire API group (such as AAA), and all the APIs under the group will be selected with Read,Write and Delete permissions pre-selected.

Step 6

Click Save to create the newly cloned role.


Edit User Roles

Users with administrator privileges can quickly change the privileges of any user role other than the default admin role.

Procedure

Step 1

From the main menu, choose Administration > Users and Roles > Roles tab.

Step 2

Click and select on an existing role from the left side table. The Global API Permissions tab on the right side displays the permission settings for the selected role.

Step 3

Define the role's settings:

  1. Check the check box for every API that the role can access.

  2. For each API, define whether the role has Read, Write, and Delete permission by checking the appropriate check box. You can also select an entire API group (such as AAA), and all the APIs under the group will be selected with Read,Write and Delete permissions pre-selected.

Step 4

When you are finished, click Save.


Delete User Roles

Users with administrator privileges can delete any user role that is not the default admin user role or that is not currently assigned to a user ID. If you want to delete a role that is currently assigned to one or more user IDs, you must first edit those user IDs to assign them to a different user role.

Procedure

Step 1

From the main menu, choose Administration > Users and Roles > Roles tab.

Step 2

Click on the role you want to delete.

Step 3

Click Delete icon.

Step 4

Click Delete to confirm that you want to delete the user role.


Global API Permissions

The Roles window lets users with the appropriate privileges define custom user roles.

The following table is an overview of the various Global API Permissions in Cisco Crosswork:

Table 2. Global API Permission Categories

Category

Global API Permissions

Description

AAA

Password Change

Provides permission to manage passwords. The READ and WRITE permissions are automatically enabled by default. The DELETE permission is not applicable to the password change operation (You cannot delete a password, you can only change it.)

Remote Authentication Servers Integration

Provides permission to manage remote authentication server configurations in Crosswork. You must have READ permission to view/read configuration, and WRITE permission to add/update the configuration of any external authentication server (e.g. LDAP, TACACS) into Crosswork. The Delete permissions are not applicable for these APIs.

Users and Roles Management

Provides permission to manage users, roles, sessions, and password policies. Supported operations include "Create new user/role", "Update user/role", "Delete a user/role", "Update task details for a user/role", "Session management (Idle-timeout, max session..)", "update password policy”, “get password tooltip help text”, “get active sessions”, etc.

The READ permission allows you to view the content.

The WRITE permission allows you to create and update.

The DELETE permission allows you to delete a user or role.

Know my role - Read only

Enables the logged in users to understand their permissions, or get new permissions.

WRITE and DELETE permissions are not applicable for these APIs.

User Preferences

Allows you to manage the dashlets in the homepage.

The READ permission allows you to view dashboards, WRITE permission allows your to edit dashboards, DELETE permission allows you to delete dashboards.

Administrative Operations

External Notification Subscription

Allows you to subscribe or unsubscribe the external kafka notification streaming.

The READ permission allows you to view the list of subscriptions.

The WRITE and DELETE permissions allows you to edit and delete the subscriptions respectively.

RESTCONF Notification Subscription

Allows you to subscribe or unsubscribe the RESTCONF notification streaming (websocket and connectionless).

The READ permission allows you to view the list of subscriptions.

The WRITE and DELETE permissions allows you to edit and delete the subscriptions respectively.

Device Monitoring

Device Inventory RESTCONF

Responsible for the retrieving the inventory information.

The READ permission allows you to get all the inventory data such as nodes,termination points, equipments, and modules.

The WRITE and DELETE permissions are not applicable for this API as there is no support for configuration-related operations.

Performance Monitoring Dashboards

The READ permission allows displaying any metrics on the Crosswork Network Controller homepage, dashboard window, and deep inventory.

The WRITE and DELETE permissions are not applicable for this API.

Performance Monitoring Policies

Allows you to manage monitoring policies.

The READ permission allows you to view the monitoring policies.

The WRITE permission allows you to create and update monitoring policies.

The DELETE permission allows you to delete monitoring policies.

Performance Monitoring RESTCONF

Responsible for the retrieving the device performance metrics.

The READ permission allows you to get the metrics information such as CPU, temperature, CRC, and interface utilization.

The WRITE and DELETE permissions are not applicable for this API as there is no support for configuration-related operations.

Alarms and Events

Alarm Notification Policies

The READ permission allows you to read system/network, and device alarm notification policies.

The WRITE permission allows you to create system/network, and device alarm notification policies.

Alarm Settings

The READ permission allows you to view alarm settings.

The WRITE permission allows you to view and update alarm settings.

Alarm Suppression Policies

The READ permission allows you to view a suppression alarm policy.

The WRITE permission allows you to create, update and delete a suppression alarm policy.

Alarm & Events

Allows you to manage alarms.

The READ permission allows you to get events/alarms according to request criteria, get the list of Syslog destinations, and get the list of trap destinations.

The WRITE permission allows you to set a response for when an alarm is raised, acknowledged, or unacknowledged, create/raise an event, update the event info manifest, and add notes to alarms.

The DELETE permission allows you to delete REST destinations, Syslog destinations and trap destinations.

Alarm and Events RESTCONF

Responsible for performing alarms related operations.

The READ permission allows you to get all the alarm data (system,network & device).

The WRITE permission allows you to acknowledge, unacknowledge, and clear alarms.

The DELETE permission is not applicable for these APIs.

Automated Assurance DSS Instance

Data Store Service Administrator Settings

Allows Administrators to view Datastore storage info (READ permission) and run diagnostic tests for external storage (WRITE permission).

Data Store Service API

Allows you to use external storage for longer retention, and to manage external datastore used by Service Assurance for archiving service metrics data.

The READ permission allows you to get storage provider information, check storage stats, etc.

The WRITE permission allows you to sync the local CW datastore with the external storage and run diagnostics.

The DELETE permission allows you to delete an external storage provider.

CNC

CAT FP Deployment Manager APIs

Allows you to manage function pack upload and deployment.

The READ permission enables you to get the list of packages, files, and deployment information.

The WRITE permission allows you to upload/deploy/un-deploy a package/function pack/file.

The DELETE permission is not applicable for these APIs.

CAT Inventory RESTCONF APIs

North Bound Interface (NBI) RESTCONF interface for the CAT services inventory data (from CAT to external consumers).

The READ permission allows you to fetch the services information from CAT.

The WRITE permission allows you to invoke operations APIs to retrieve the service information from CAT.

The DELETE permission is not applicable for these APIs.

CAT ISTP REST APIs

System use only.

The READ/WRITE permissions are mandatory for CAT UI/ISTP to function.

The DELETE permission is not applicable for these APIs.

CAT Service Overlay

Primarily used to investigate issues in the overlay. Only READ permission is applicable.

CAT UI

Mandatory APIs that enable CAT UI to fetch all NSO services and resources.

The READ permission allows you to fetch and display all service information.

The WRITE permission allows you to commit service assurance information.

The DELETE permission is not applicable for these APIs.

NSO Connector APIs

Allows you to perform services resync, full-resync, change log-level and return service HA status.

The READ permission allows you to check the service status.

The WRITE permission is required for all other operations.

The DELETE permission is not applicable for these APIs.

OAM Service APIs

Not Applicable

Change Automation

Administration APIs

Provides administrative control to manage job scheduling, manage override credentials, and configuration of user roles for playbook executions.

The READ permission allows you to check the status and fetch the information. , while the WRITE permission allows you to make changes.

The DELETE permission is not applicable for these APIs.

Application APIs

Allows you to manage the Change Automation tasks (for example, schedule playbook executions, execute playbooks, update playbook jobs, check playbook executions status, check playbook job-set details, list supported YANG modules, etc.)

The READ permission allows you to view the applicable information (for example, check the job status, fetch job details, etc.).

The WRITE permission is required for playbook job scheduling/execution.

The DELETE permission is not applicable for these APIs.

Playbook APIs

Allows you to manage playbooks.

The READ permission allows you to retrieve playbooks, params, and policy specs.

The WRITE permission allows you to import/export, and generate playbooks.

The DELETE permission enables you to delete playbooks.

Play APIs

Allows you to manage plays.

The READ permission allows you to fetch or view plays, while the WRITE permission allows you to create, update or import a play. The DELETE permission allows you to delete a play.

Collection Infra

Collection APIs

Permissions for APIs to manage collection jobs.

Based on the READ/WRITE/DELETE permissions, you can view collection jobs, create/update new collection jobs (external), or delete existing collection jobs. System collection jobs (data collection setup internally for Crosswork consumption) cannot be modified irrespective of these permissions (permitted for Administrators only), but users with the READ permission will be able to view the details of all collection jobs including system collection jobs.

For most users, READ-only permissions would be enough as it enables them to view Collection jobs detail (request and status) and actual data collection status/metrics per device/sensor path level.

Data Gateway Manager APIs

Permissions to perform CRUD operations on Destinations, Data Gateways, Custom Packages, etc.

The READ permission allows you to view the data, while the WRITE permission allows you to perform these actions:

  • Add, edit, or delete Data Gateways and Data Gateway instances.

  • View the vitals

  • Add, edit, delete, and view the custom packages

  • View the system packages

  • Add, edit, or delete data destinations

  • Update resources

  • Create, edit, or delete Data Gateway pools

  • Revoke the provisioning permission from task permissions

  • Restrict user access by revoking the Inventory API, Data gateway APIs, and Platform APIs permissions.

  • Troubleshoot data collection issues

Crosswork Optimization Engine

OPTIMA Analytics

Allows you to manage analytics in Crosswork Optimization Engine.

The READ permission allows you to view/export historical data.

The WRITE permission enables you to change the Traffic Engineering Dashboard settings.

The DELETE permission is not applicable for these APIs.

OPTIMA Analytics Service

Allows you to manage analytics service in Crosswork Optimization Engine.

The READ permission enables you to get LSP events data, LSP utilization, LSP SR-PM metric, Link SR-PM and underutilized LSPs.

The WRITE and DELETE permissions are not applicable for these APIs.

Optima Engine RESTCONF

and

Optima Engine RESTCONF API for backwards compatibility

Allows you to customize the RESTCONF API permissions in Crosswork Optimization Engine.

The READ permission grants access to perform these actions:

  • Fetch L2 and L3 topology details, as well as Segment Routing policy information

  • Preview SR Policy route

  • Filter SR Policies on Interfaces and nodes

  • Preview RSVP-TE tunnels

  • Get LCM domains and LCM recommendation SR Policies

  • Preview LCM recommendations

  • Get LCM configuration and managed interfaces

  • Get Circuit Style SR Policy paths on interfaces and nodes

  • Get all Circuit Style SR Policy paths

  • Get Circuit Style Manager interface bandwidth pool

  • Get a plan file for the network model

The WRITE permission grants access to perform these actions:

  • Provision, modify, and delete SR policies

  • Provision, modify, and delete RSVP-TE tunnels

  • Provision, modify, and delete SR P2MP policies

  • Configure LCM configuration and managed interfaces

  • Remove LCM domains

  • Commit and pause LCM recommendations

  • Set CSM interface bandwidth pool

  • Create notification streams

  • Reoptimize Circuit Style SR policies

The DELETE permission is not applicable for these APIs.

Optimization Engine UI

Allows you to manage SR policies, RSVP tunnels, LCM, BWoPT, BWoD, Traffic Engineering settings, and Preview policies.

The READ permission allows you to view deployed policies, settings, routes, LCM domain config/data, service overlay data, path queries, dashboard metrics, etc.

The WRITE permission allows you to configure LCM, BWoD, BWopt, deploy policies, preview Crosswork Optimization Engine-managed policies, etc.

The DELETE permission allows you to delete SR policies, RSVP tunnels, remove affinity mapping, and delete LCM domains.

Crosswork Optimization Engine v2

Optimization Engine RESTCONF API v2

Allows you to customize the RESTCONF interface permissions in Crosswork Optimization Engine.

The READ permission enables you to fetch L2 and L3 topology details, and Segment Routing Policy details.

The WRITE permission allows you to fetch policy routes, provision/modify/delete/preview SR policies, and manage LCM configuration.

The DELETE permission is not applicable for these APIs.

Data Gateway Global Settings

Data Gateway Global Parameters API

There are certain parameters in the data gateway, which can be changed globally across all gateways in a Deployment.

The READ permission allows you to view the data, while the WRITE permission is required to reset/update the data.

Data Gateway Global Resources Reset API

Allows you to reset updates done to the Global Parameters.

The READ permission allows you to view the data, while the WRITE permission resets the data.

Data Gateway Global Resources Update API

Allows you to update the Global Parameters.

The READ permission allows you to view the data, while the WRITE permission updates the data.

Data Gateway Troubleshooting

Data Gateway Reboot API

Reboots a data gateway.

The WRITE permission allows you to reboot the data gateway.

Data Gateway Showtech API

Generates and downloads showtech logs for a data gateway.

The READ permission allows you to view showtech, while WRITE permission generates showtech.

Write Permission allows u to generate showtech

Health Insights

Health Insights APIs

Allows you to manage Health Insights KPIs.

The READ permission allows you to view all KPIs, KPI profiles, job details, alerts, etc.

The WRITE permission allows you to create or update KPIs and KPI profiles, enable/disable KPI profiles, link KPIs to playbooks, etc.

The DELETE permission allows you to delete custom KPIs and KPI profiles.

Inventory

Inventory APIs

Allows you to manage inventory.

The READ permission allows you to

  • Fetch the list of nodes, the node credentials, and the count of nodes in the database.

  • Retrieve the list of HA pools, data gateway enrollments, virtual data gateways, and inventory job information.

  • Retrieve the list of policies, providers, and tags.

The WRITE permission allows you to

  • Update device mapping to virtual data gateway pool.

  • Lock/unlock the requested nodes.

  • Remove tag associations from nodes. Does not support partial un-assignment.

  • Update input data to a set of devices.

  • Set API endpoint for provider onboarding.

  • Update collections job cadence

The DELETE permission allows you to

  • Perform bulk deletion of credential profiles and nodes.

  • Upload CSV for delete operations.

  • Delete HA pools, Data Gateway enrollments, and virtual data gateways.

  • Delete policies, providers, and tags.

Platform

Platform APIs

The READ permission allows you to fetch the server status, cluster node information, application health status, collection job status, certificate information, backup and restore job status, etc.

The WRITE permission allows you to

  • Enable/disable the maintenance mode

  • Enable/disable the xFTP server

  • Manage cluster (set the login banner, restart a microservice, etc.)

  • Rebalance cluster resources

  • Manage nodes (export cluster inventory, add VM, apply VM configuration, remove VM from a cluster, etc.)

  • Manage certificates (export trust store and intermediate key store, create or update certificate, configure the web server, etc.)

  • Perform normal/data-only backup and restore operations.

  • Manage applications (activate, deactivate, uninstall, add package, etc.)

The DELETE permission allows you to delete a VM (identified by an ID) and remove applications from the software repository.

Grouping APIs

Grouping management and Topology groups selection tree.

The READ permission allows you to view topology UI, while the WRITE permission allows you to create/update groups. The DELETE permission is needed to delete groups from the Grouping Management page.

Note


When READ access is removed for Grouping APIs, in addition to being blocked out of the Grouping window, the users will also be unable to access the Traffic Engineering, VPN Services, and Topology Services windows.  

View APIs

Views Management in Topology.

The READ permission allows you to see views, the WRITE permission allows you to create/update views, and the DELETE permission will enable delete capabilities.

Topology

Geo

Provides geo service for offline maps.

The READ permission allows you to use Geo Map in offline mode, the WRITE allows you to upload Geo Map files, and DELETE permission allows you to delete the map files in settings.

Topology

Allows you to manage topology pages, settings, or any other pages that uses the Topology visualization framework.

The READ permission is mandatory for topology visualization. The WRITE permission enables you to update topology settings, and the DELETE permission allows you to delete a topological link if it goes down.

Probe Manager

Probe Manager APIs

The READ permission allows you to retrieve the status of a probe session for a given service.

The WRITE permission allows you to reactivate a probe.

The DELETE permission is not applicable for these APIs.

Proxy

Crosswork Proxy APIs

Permissions to manages Crosswork proxy APIs for NSO Restconf NBI.

The READ permission allows all GET request for NSO REST conf NBI, the WRITE permission allows POST/PUT/PATCH operation, and the DELETE permission enables all delete APIs.

Software Image Management

SWIM

Allows you to upload images to the SWIM repository, distribute them to devices and install them.

The READ permission allows you to list all images from the SWIM repository, view image information from a device, and check the details of any SWIM job. The WRITE permission allows you to upload/distribute and perform all install-related operations. The DELETE permission allows you to delete copied images from a device.

You require WRITE/DELETE permission to execute software install/uninstall playbooks in Change Automation.

Service Health

Archiver APIs

The READ permission allows you to

  • Check if Historical Data exists for a given service.

  • Get the Historical Timeline series for a given service.

  • Get a Service Graph for a selected timestamp of the service.

  • Retrieve probe and 24 hours metric data for a given service.

The WRITE/DELETE permissions are not applicable for these APIs.

Assurance Graph Manager APIs

The READ permission allows you to:

  • Fetch details of a service.

  • Get the impacted list of services.

  • Retrieve the list of matching sub-services (transport or device only).

The WRITE/DELETE permissions are not applicable for these APIs.

CAT SH UI

The READ permission allows you to:

  • Retrieve service data, including the total number of monitored services, the count of basic services, and the count of advanced services.

  • Retrieve the number of services based on health status (for example, Good, Degraded, Down, Error, Initiated, and Paused).

  • Retrieve the number of provisioned and monitored services categorized by service type (L2 and L3).

The WRITE/DELETE permissions are not applicable for these API.

Config Manager APIs

The READ permission allows you to:

  • Retrieve advanced and total counts of services with monitoring enabled and published.

  • Force reconciliation with ISTP.

The WRITE permission allows you to update the maximum number of services supported for Total and Advanced monitoring.

The DELETE permission is not applicable for these APIs.

Heuristic Package Manager APIs

Permissions for Heuristic package management and to manage plugins and config profiles for Service Assurance.

The READ permission allows you to export heuristic packages, query for heuristic package details (Rules, Profiles, SubServices, Metrics, Plugins), and query for assurance options.

The WRITE permission allows you to import heuristic packages and perform all create/update operations.

The DELETE permission allows you to perform delete operations (for example, delete the RuleClass, MetricClass, etc.)

Metric Scheduler APIs

Not Applicable

Zero Touch Provisioning

Config Service

The READ permission allows you to

  • List all day-0 configuration files stored in the ZTP config repository.

  • Fetch count of day-0 configuration files stored in the ZTP config repository.

  • Download the day-0 configuration file from the ZTP config repository.

  • List all device family/device versions and device platforms based on information associated with day-0 config files stored in the CW ZTP repository.

The WRITE permission allows you to

  • Upload the day-0 config file or script to the ZTP config repository.

  • List/update relevant metadata associated with specific day-0 config files stored in the ZTP config repository

The DELETE permission allows you to delete config files and scripts uploaded in the ZTP config repository.

Image Service

The READ permission allows you to

  • List all device image files stored in the ZTP image repository.

  • List all device platform/family names associated with image files stored in the CW ZTP repository.

  • Download the device image file by ID.

The WRITE permission allows you to update relevant metadata associated with specific image files stored in the ZTP image repository.

The DELETE permission allows you to delete image files uploaded in the ZTP image repository

ZTP Service

Allows you to manage the ZTP devices and profiles - add/update/delete into Crosswork.

The READ permission enables you to fetch ZTP devices, serial number/OVs, profiles, sample data CSV, list ZTP devices, profiles, and export ZTP devices and metadata.

The WRITE permission allows you to add ZTP devices, serial numbers/OVs, profiles and add/update the ZTP device's attributes.

The DELETE permission allows you to delete ZTP devices, profiles, serial numbers/ownership vouchers.

Licensing

Common Licensing Management Service (CLMS) APIs

Permissions for APIs to manage license registration in Crosswork.

The READ permission enables you to view Smart Licensing settings, registration status, and license usage while the WRITE permission is required to change any Smart Licensing setting such as register, re-register, de-register, renew a license etc.

The DELETE permission is not applicable for these APIs.

te-manager

TE Auto Policy Binding Service

The READ permission allows you to view individual or all TE criteria and policy templates.

The WRITE permission allows you to create or update TE criteria, criteria expression, and policy templates, and to associate or disassociate TE criteria with policy templates and vice versa.

The DELETE permission allows you to delete TE criteria, criteria expression, and policy templates, and remove any residual data associated with a service.

Manage Active Sessions

As an administrator, you can monitor and manage the active sessions in the Cisco Crosswork UI, and perform the following actions:

  • Terminate a user session

  • View user audit log


Attention


  • Non-admin users with permission to terminate can terminate their own sessions.

  • Non-admin users with read-only permission can only collect the audit log for their sessions.

  • Non-admin users without read permissions can’t view the Active Sessions window.


Procedure


Step 1

From the main menu, choose Administration > Users and Roles > Users.

The Active Sessions tab displays all the active sessions in the Cisco Crosswork with details such as user name, source IP, login time, and login method.

Note


The Source IP column appears only when you check the Enable source IP for auditing check box and relogin to Cisco Crosswork. This option is available in the Source IP section of the Administration > AAA > Settings page.

Step 2

To terminate a user session, click the icon under the Actions column, and select Terminate Session. A dialog box is displayed to confirm your action. Select Terminate to terminate the session.

Attention

 
  • You are recommended to use caution while terminating a session. A user whose session is terminated will not receive any prior warning and will lose any unsaved work.

  • Any user whose session is terminated will see the following error message: "Your session has ended. Log into the system again to continue".

Step 3

To view audit log for a user, click the icon under the Actions column, and select Audit Log.

The Audit Log window is displayed for the selected user name. For more information on the Audit Logs, see View Audit Log.


Manage WebSocket subscriptions

If you have subscribed to WebSocket subscriptions using JWT based authentication to authenticate and establish your connections, you can view these subscriptions in the Crosswork Network Controller UI. The types of subscriptions that are supported are:

  • Inventory

  • Alarm

  • Service Notification

Procedure


Step 1

From the main menu, choose Administration > Users and Roles.

Step 2

Click WebSocket subscriptions.

It displays details such as Subscription ID, Topic, Subscribed By, Subscription Time and Source IP.

Note

 
  • The Source IP column appears when you check the Enable source IP for auditing check box. This option is available in the Source IP section of the Administration > AAA > Settings page.

Step 3

To delete a subscription, choose the subscription you want to remove and click the Delete icon.


Manage Device Access Groups

Crosswork offers access control based on user roles, with read/write/delete permissions for specific APIs grouped by functional areas.

While this centralizes access control, it does not extend to device-level access. To manage device access for users, Device Access Groups can be used to logically group devices. Non-admin users assigned to the system-level task of Device Access Groups management can create and manage these groups.

APIs, Tasks and Device Access Groups- Know the Difference

Device Access Groups are not directly related to API access control or task-based access control. Here's a breakdown of their differences and roles:

  • APIs: Control read/write/delete access levels to the APIs but do not control the UI access of a user. Permissions for APIs are defined and enforced at the API level, allowing administrators to specify what actions a user can perform.

  • Tasks: Control access to certain functionalities by combining a set of APIs. Enabling a specific task also enables the corresponding APIs required for that task.

  • Device Access Groups: Serve as an extra security layer to control access to specific devices or resources within Crosswork, beyond API and task-based access controls. They are used to logically group devices for user management.

Administrators have full control over building user roles and permissions, including defining Device Access Groups. Device Access Groups become relevant only after a user has passed the initial API-based and/or task-based access controls set by an administrator. Once these initial access levels are granted, Device Access Groups provide additional control over which devices a user can have WRITE permissions for provisioning.

Administrators can configure Device Access Groups according to specific requirements, adding an extra layer of control and customization for access management within Crosswork.

How do Device Access Groups work?

When a user is associated with one or more Device Access Groups, they can make configuration changes and provision services on the devices within those groups. A Crosswork user with an administrator role or a mapped Device Access Groups management task can:

  • Create and manage Device Access Groups.

  • Assign users to specific Device Access Groups.

  • Define and control which devices users can access and modify.

  • Ensure that users have the appropriate permissions to perform their tasks on designated devices.


Important


Device Access Groups control device-level WRITE or Provisioning and Crosswork flows that trigger such operations. They do not affect WRITE or EDIT operations within Crosswork itself.


You can restrict users to specific tasks based on their role's permissions, ensuring only authorized individuals have access and control over their actions within the system. Crosswork's role-based access control synchronizes with NSO and Device Access Groups to streamline device configurations, using JWT tokens for authentication and authorization in RESTCONF and JSON-RPC API workflows. However, reverse synchronization is not possible; changes in NSO are not reflected in Crosswork Device Access Groups (for detailed information on the prerquisites for setting up NSO, see Configure NSO Servers). External LDAP, TACACS, and RADIUS servers support Device Access Groups integration.

Create Device Access Groups

To enable seamless device-level granular Role-Based Access Control across Crosswork applications and integrated NSO, create a Device Access Group that will allow for centralized management of device access permissions, ensuring consistent role based access implementation across the system. Only users belonging to a role that has the "Device Access Group Management" task enabled have the ability to perform Create, Read, Update and Delete operations on the Device Access Groups.

Procedure


Step 1

From the main menu, choose Administration > Device Access Groups.

Step 2

Click the icon next to ALL-ACCESS, then click Add Sub-Group.

Step 3

Add the name and description of the sub-group under Group Details.

Step 4

Click Create.

When you add a devices to a Device Access Group, you can view the Devices tab next to Group Details.

Step 5

Click on Add Devices.

Step 6

Select the devices you want to add and click Save.

You can also filter the devices that you want to add using the Filter By options for Host Name, Product Type and Node IP. The devices are added under Device Access Groups as well as updated in the NSO site.

Step 7

Click Save.


Edit Device Access Groups

You can add or remove a device from an existing Device Access Group.


Attention


The delete group check is only relevant for local users defined in Crosswork and does not apply to users managed by external AAA servers.


Procedure


Step 1

From the main menu, choose Administration > Device Access Groups.

Step 2

Click the Device Access Group that you want to edit and then click Edit Group.

You can add more devices by clicking Add Devices or remove them by clicking Remove Devices.

Step 3

Click Save.

Note


You cannot delete a Device Access Group if a user is exclusively associated with it. However, if all users associated with the Device Access Group also belong to other Device Access Groups, you can delete it.


Assign Task permissions

You can assign the tasks that you have created to a specific role. You can enable or disable these tasks based on the permissions you want to give for a role. The task permissions are defined by the Global APIs, which allow you to assign Read/Write/Delete permissions for that specific task.

Procedure


Step 1

From the main menu, choose Administration > Users and Roles > Roles.

Step 2

Click Task Permissions to view a list of all the available tasks for your application.

Figure 1. Users and Roles Window
Users and Roles Window

Step 3

Select the task for which you want to assign permissions. Under the Global API Permissions tab, you can also view the specific Read/Write/Delete permissions that are automatically enabled for the selected task.

Step 4

Click Save.


Associate a User with a Device Access Group

Once you have created a user, you can associate that user with a specific Device Access Group. You can then assign task permissions for this user, which lets you restrict or allow certain tasks for them.

Procedure


Step 1

Create a role with read/ write/ delete API permissions and assign the set of specific tasks that need to be enabled within each role. Refer to the section, User Roles, Functional Categories and Permissions for more details.

Step 2

Assign this role and one or more Device Access Group to a user. Refer to the section, Manage Users for more details.

When the user logs in, the user can only perform operations allowed by the tasks on devices belonging to the associated Device Access Groups. Based on task permissions and Device Access Group privileges, a restricted read-only Device Access Group user has the following capabilities while provisioning policies on BWoD, LCM, CSM, DLM, DGM and CAT. Such a user can-

  • Preview and dry run policies but cannot provision or commit changes for the policies.

  • View Services and Traffic Engineering configuration pages but cannot edit or import files.

  • Perform Path Query operations.

  • View Services and Traffic Engineering configuration pages but cannot edit or import files.

  • Create VPN services.

  • View the devices that are associated with a failed service, along with the detailed error message but cannot take actions on the errors.

Correspondingly, a Device Access Group user with all the read/ write/ delete permissions has the following capabilities. Such a user can-

  • Perform all the tasks listed for a restricted read-only Device Access Group user.

  • Provision policies for which they have been granted access to. For instance, if a user wants to create an RSVP-TE policy on a Tunnel, they will be able to do so only if they have been granted access to the head-end node. However, note that access to the end-points and hops is not checked for Device Access Group control.

  • View the devices that are associated with a failed service, along with the detailed error message. Additionally, users with all privileges can take actions on errors such as Check-Sync, Sync-To, and Compare-Config at the node level.

  • Run and execute Playbooks.

Note


To restrict device access in Crosswork for read-only users, the administrators must create an empty Device Access Group (for example, NO_DEVICE_ACCESS) without any devices, and assign it while creating read-only user profiles (or user profiles associated with read-only roles).


Configure NSO Servers

The integration of authentication and authorization between Crosswork and NSO for RESTCONF and JSON-RPC API workflows is facilitated through the use of JWT. To enable role-based access control and seamless synchronization between Crosswork and NSO refer to the prerequisite steps listed under the following sections:


Note


  • Only administrators are allowed to make modifications to tasks.

  • If any changes are made to NACM settings, the user must log out and then log back in. This is necessary to regenerate the JWT.

  • When a user with limited device access tries to edit a service or upload an XML file in the Provisioning UI, the commit button is enabled. However, it throws an error when the user clicks the commit button.


Configure Standalone NSO

Follow the steps below to configure a standalone NSO server to sync role-based access control functions with Crosswork.

Procedure

Step 1

Enable cisco-cfp-jwt-auth.

  1. Update the ncs.conf file: Open the ncs.conf` file in the NSO directory. Add the following configuration under the <aaa> section.

    
     <aaa>
        <package-authentication>
         <enabled>true</enabled>
         <packages>
           <package>cisco-cfp-jwt-auth</package>
         </packages>
        </package-authentication>
    </aaa>
    - Make sure to restart ncs for the configuration in ncs.conf to take effect:
       /etc/init.d/ncs restart

    Note

     
    Make sure to restart NCS for the configuration in the ncs.conf file to take effect. If you do not want to use this feature, change 'package-authentication' to 'false' in 'ncs.conf in the AAA section under the NCS configuration file and restart NCS. This disables the package authentication for 'cisco-cfp-jwt-auth'.
  2. Copy the certificate file from Crosswork to the NSO VM. To get the certificate from Crosswork to NSO VM, follow these steps:

    1. Open the Chrome browser and navigate to the Crosswork website for which you want to import the certificate.

    2. Click the padlock icon in the address bar to view the site information and then click Certificate is not Valid > View Certificate.

      Figure 2. View Certificate Window
      View Certificate Window
    3. In the Certificate Viewer window, go to the Details tab.

      Figure 3. Details for Certificate Viewer
      Details for Certificate Viewer
    4. Click Crosswork under Certificate Hierarchy.

    5. Click the Export button and choose a file name and location to save the certificate. Choose the Base64-encoded ASCII, single certificate option and save it with the extrension .pem. For example: crosswork.pem.

      Note


      In case you encounter issues saving the file in the .pem format, an alternative is to save it as a .cer file. Once saved, proceed to use this .cer file during the bootstrap configuration process. Make sure to reference the file path of the .cer file in all subsequent steps that require it.

      Figure 4. Save the Certificate Window
      Save the Certificate Window
    6. Copy the .pem file to NSO VM.

      Note


      Make sure that the value of the pem-key-path parameter and the filename are the same on the primary and secondary host.

  3. Configure Bootstrap: To configure the Bootstrap authentication package, perform the following steps:

    Login to NSO VM and load the cw-jwt-auth.xml file using the merge operation.

    <config xmlns="http://tail-f.com/ns/config/1.0">
      <jwt-auth xmlns="http://cisco.com/ns/nso/cfp/cisco-cfp-jwt-auth">
        <ip-address>172.20.100.42</ip-address>
        <port>30603</port>
        <pem-key-path>/home/nso/crosswork.pem</pem-key-path>
      </jwt-auth>
    </config>

    OR

    Log in to ncs_cli and enter config mode.
    set jwt-auth cnc-host <Crosswork IP>
    set jwt-auth port 30603
    set jwt-auth pem-key-path /home/nso/crosswork.pem
    commit

Step 2

Enable service level NACM.

Before creating a Rule-list, create the NACM group manually and update the user as needed when the same group applies to more that one user.

ncs_cli -u admin
configure
set nacm enforce-nacm-on-service true
commit dry-run
commit

Step 3

Create NACM Groups and Rule list.

  1. For admin users: Follow the steps below to create NACM groups and Rule-list for admin users.

    1. User Association: If a NSO user is an admin user, they will automatically be part of the "ncsadmin" group, which grants them all access by default. However, if the admin user does not add this user to the "CNC#ALL-ACCESS" group, the functionalities will still work properly. If the NSO user has a different name, such as "cisco", then you must add the user to the "CNC#ALL-ACCESS" group.

      Note that user creation is not required at this point.

    2. Create Device group: When a Device Access Group gets created in Crosswork, an equivalent device-group is created in NSO.

      Note that the ALL-ACCESS Device Access Group is not created by default, and is not needed for an admin user. If you want, you can create it manually using the following command, where group-name is the name of the group you create.
      ncs_cli -u admin
      configure
      set devices device-group "group-name" device-name [ device-host-name1, device-host-name2]
      commit dry-run
      commit
      You can also copy this from Crosswork by navigating to Administration > Users and Roles > Users > Generate NACM Rules.
      Figure 5. Generate NACM Rules WindowGenerate NACM Rules Window
    3. Create a NACM group manually and update the user as needed when the same group applies to more that one user. Make sure to do this before you create the Rule-list.

      ncs_cli -u admin
      configure
      set nacm groups group "CNC#ALL-ACCESS" user-name admin
      commit dry-run
      commit
    4. Create NACM Rule list: When a User with a Role and Device Access Group is set in Crosswork, the UI displays an option to generate the NACM rules under each user. You can either copy these rules and apply them to NSO using the commit manager or copy the xml to the file <sample-nacm.xml> and load it using the merge operation. Note that for admin users only the task level access and cmd-rule are required.

      <nacm xmlns="urn:ietf:params:xml:ns:yang:ietf-netconf-acm">
          <rule-list>
              <name>CNC#ALL-ACCESS#rule-list</name>
              <group>CNC#ALL-ACCESS</group>
              <rule>
                  <name>CNC#ALL-ACCESS#rule-list#task-level-access</name>
                  <action>permit</action>
                  <log-if-permit xmlns="http://tail-f.com/yang/acm"/>
              </rule>
              <cmdrule xmlns="http://tail-f.com/yang/acm">
                  <name>any-access</name>
                  <action>permit</action>
              </cmdrule>
          </rule-list>
      </nacm>
  2. For non-admin users: Follow the steps below to create NACM groups and Rule-list for non- admin users.

    In the code sample below, we have used RW-CW as an example for non-admin user and DAG-2 as a Device Access Group name.

    1. Create NACM Group: See the code sample below:
      ncs_cli -u admin
      configure
      set nacm groups group "CNC#DAG-2" user-name RW-CW
      commit dry-run
      commit

      You can copy the Group name from Crosswork using the Generate NACM Rules option.

    2. Create NACM Rule list:You can copy the Rule list from Crosswork using Generate NACM Rules option. Here is a sample-
      <nacm xmlns="urn:ietf:params:xml:ns:yang:ietf-netconf-acm">
          <rule-list>
              <name>CNC#DAG-2#rule-list</name>
              <group>CNC#DAG-2</group>
              <rule>
                  <name>CNC#DAG-2#rule-list#allow-DAG-2</name>
                  <device-group xmlns="http://tail-f.com/yang/ncs-acm/device-group-authorization">DAG-2</device-group>
                  <access-operations>create read update delete exec</access-operations>
                  <action>permit</action>
                  <log-if-permit xmlns="http://tail-f.com/yang/acm"/>
              </rule>
              <rule>
                  <name>CNC#DAG-2#rule-list#deny-others</name>
                  <path>/devices</path>
                  <access-operations>create update delete exec</access-operations>
                  <action>deny</action>
              </rule>
              <rule>
                  <name>CNC#DAG-2#rule-list#task-level-access</name>
                  <action>permit</action>
                  <log-if-permit xmlns="http://tail-f.com/yang/acm"/>
              </rule>
              <cmdrule xmlns="http://tail-f.com/yang/acm">
                  <name>any-access</name>
                  <action>permit</action>
              </cmdrule>
          </rule-list>
      </nacm>

      You can push these rules to NSO via commit manager or copy them to a xml file (For example: sample-nacm.xml) and then add it on NSO with these commands:

      Load sample-nacm.xml
      
      ncs_cli -u admin
      configure
      load merge /home/nso/sample-nacm.xml
      commit

Configure LSA NSO

Follow the steps below to configure a LSA NSO server to sync role-based access control functions with Crosswork.

Procedure

Step 1

Enable local authentication in the ncs.conf file under the AAA section on all the NSO RFS nodes. (If you are using the CFS node, you can skip this step)

<local-authentication>
      <enabled>true</enabled>
</local-authentication>

Restart NSO by running the command sudo /etc/init.d/ncs restart on each RFS node.

Step 2

Enable cisco-cfp-jwt-auth: Refer to the same steps to enable cisco-cfp-jwt-auth as described in the section, Configure Standalone NSO.

Make sure that the value of the pem-key-path parameter and the filename are the same on the primary and secondary host.

Step 3

Enable service level NACM.

ncs_cli -u admin
configure
set nacm enforce-nacm-on-service true
commit dry-run
commit

You must enable this on both the CFS and RFS nodes.

Step 4

Create NACM Groups and Rule list. (This is applicable for both admin users and non admin-users)

  1. Associate Users: To enhance security with LSA role-based authentication in NSO, we recommend that you remove the "auth-group default" map if NSO is exclusively used with Crosswork. However, if there are non-Crosswork NSO users, they must use the default map. In this case, every Crosswork user must have an entry in the "auth-group umap" to ensure the Role-Based Access Control flow functions correctly.

  2. Define a Crosswork user under "aaa:aaa" as an authentication user on every RFS node. This configuration enables communication between CFS and RFS for this user. Note that the username must match the username used in Crosswork, but the password can differ.

  3. Add every Crosswork user as a "umap" entry under the device authentication group in the CFS. This ensures proper functionality and enforces Role-Based Access Control for users in Crosswork. This also allows the CFS to pass user requests to the RFS node as the corresponding user. If you want a role-based access for a user, you must create the umap entry in the CFS auth-group. Otherwise, the default map applies, which breaks the role-based access workflow.

  4. Define a generic NACM group and NACM rule with all permissions on the CFS, to enable access to RFS nodes for all users. This grants access to RFS for all users. Additionally, when creating any user in Crosswork, add that user to the "CNC#ALL-ACCESS" NACM group in CFS. This ensures that the user has the necessary access privileges and permissions to perform actions within Crosswork.

    group "CNC#ALL-ACCESS" {
            user-name [ RW-CW admin rw-user ];
        }

    You can copy the NACM rules from Crosswork.

    <nacm xmlns="urn:ietf:params:xml:ns:yang:ietf-netconf-acm">
        <!--NACM rules for NSO - CFS-->
        <rule-list>
            <name>CNC#ALL-ACCESS#rule-list</name>
            <group>CNC#ALL-ACCESS</group>
            <rule>
                <name>CNC#ALL-ACCESS#rule-list#task-level-access</name>
                <action>permit</action>
                <log-if-permit xmlns="http://tail-f.com/yang/acm"/>
            </rule>
            <cmdrule xmlns="http://tail-f.com/yang/acm">
                <name>any-access</name>
                <action>permit</action>
            </cmdrule>
        </rule-list>
    </nacm>
    <nacm xmlns="urn:ietf:params:xml:ns:yang:ietf-netconf-acm">
        <!--NACM rules for NSO - RFS-->
        <rule-list>
            <name>CNC#ALL-ACCESS#rule-list</name>
            <group>CNC#ALL-ACCESS</group>
            <rule>
                <name>CNC#ALL-ACCESS#rule-list#task-level-access</name>
                <action>permit</action>
                <log-if-permit xmlns="http://tail-f.com/yang/acm"/>
            </rule>
            <cmdrule xmlns="http://tail-f.com/yang/acm">
                <name>any-access</name>
                <action>permit</action>
            </cmdrule>
        </rule-list>
    </nacm>

Step 5

Create Device group: Add the Device Access Groups and NACM rules on the RFS node. By defining NACM rules for a user, access to devices can be granted based on the specific rules that you configure for that user. Note that Device Access Group creation is automatically handled by Crosswork, so you do not need any additional steps for Device Access Group creation on NSO.

Note

 
If you have Geo-HA set up, and encounter the 503 error, follow the steps below to resolve it.

Add the following configurations exclusively to the /etc/environment file within the CFS node:

  1. Open the file sudo vi /etc/environment.

  2. Add the following lines:

    https_proxy="http://proxy.esl.cisco.com:80"
    http_proxy="http://proxy.esl.cisco.com:80"
  3. Define exceptions with the line:

    no_proxy="localhost,127.0.0.1,10.0.0.0/8,192.168.0.0/16,172.16.0.0/12,cisco.com,<az1 mgmt vip>,<az2 mgmt vip>,<fqdn of CW geo-mgmt VIP>"
    
    For example:
    no_proxy="localhost,127.0.0.1,10.0.0.0/8,192.168.0.0/16,172.16.0.0/12,cisco.com, 192.168.6.50,192.168.5.50,geomanagement.cw.cisco,cw.cisco" 
    
  4. Source the file: source /etc/environment

  5. Reboot the CFS nodes for the proxy settings to take effect.


Security Hardening Overview

Security hardening entails making adjustments to ensure that the following components optimize their security mechanisms:

  • Cisco Crosswork infrastructure

  • Cisco Crosswork storage system (local or external)

Hardening Cisco Crosswork security requires completion of the following tasks:

  • Shutting down insecure and unused ports

  • Configuring network firewalls

  • Hardening the Cisco Crosswork infrastructure, as needed

Although your primary source of information is your Cisco representative, who can provide server hardening guidance specific to your deployment, you can also follow the steps in this section to secure Cisco Crosswork.

Authentication Throttling

Cisco Crosswork throttles the login attempts after a failed login attempt to avoid password guessing and other related abuse scenarios. After a failed login attempt for a username, all authentication attempts for that username would be blocked for 3 seconds. The throttling is applicable to all supported authentication schemes such as TACACS, LDAP and the default local authentication.

Core Security Concepts

If you are an administrator and are looking to optimize the security of your Cisco Crosswork product, you should have a good understanding of the following security concepts.

HTTPS

Hypertext Transfer Protocol Secure (HTTPS) uses Secure Sockets Layer (SSL) or its subsequent standardization, Transport Layer Security (TLS), to encrypt the data transmitted over a channel. Several vulnerabilities have been found in SSL, so Cisco Crosswork now supports TLS only.


Note


TLS is loosely referred to as SSL often, so we will also follow this convention.

SSL employs a mix of privacy, authentication, and data integrity to secure the transmission of data between a client and a server. To enable these security mechanisms, SSL relies upon certificates, private-public key exchange pairs, and Diffie-Hellman key agreement parameters.

X.509 Certificates

X.509 certificates and private-public key pairs are a form of digital identification for user authentication and the verification of a communication partner’s identity. Certificate Authorities (CAs), such as VeriSign and Thawte, issue certificates to identify an entity (either a server or a client). A client or server certificate includes the name of the issuing authority and digital signature, the serial number, the name of the client or server that the certificate was issued for, the public key, and the certificate's expiration date. A CA uses one or more signing certificates to create SSL certificates. Each signing certificate has a matching private key that is used to create the CA signature. The CA makes signed certificates (with the public key embedded) readily available, enabling anyone to use them to verify that an SSL certificate was actually signed by a specific CA.

In general, setting up certificates in both High Availability (HA) and non-HA environments involves the following steps:

  1. Generating an identity certificate for a server.

  2. Installing the identity certificate on the server.

  3. Installing the corresponding root certificate on your client or browser.

The specific tasks you need to complete will vary depending on your environment.

Note the following:

  • The start-stop sequencing of servers needs to be done carefully in HA environments.

  • Non-HA environments, where a virtual IP address is configured, require the completion of a more complicated certificate request process.

1-Way SSL Authentication

This authentication method is used when a client needs assurance that it is connecting to the right server (and not an intermediary server), making it suitable for public resources like online banking websites. Authentication begins when a client requests access to a resource on a server. The server on which the resource resides then sends its server certificate (also known as an SSL or x.509 certificate) to the client in order to verify its identity. The client then verifies the server certificate against another trusted object: a server root certificate, which must be installed on the client or browser. After the server has been verified, an encrypted (and therefore secure) communication channel is established. At this point, the Cisco Crosswork server prompts for the entry of a valid username and password in an HTML form. Entering user credentials after an SSL connection is established protects them from being intercepted by an unauthorized party. Finally, after the username and password have been accepted, access is granted to the resource residing on the server.


Note


A client might need to store multiple server certificates to enable interaction with multiple servers.

To determine whether you need to install a root certificate on your client, look for a lock icon in your browser’s URL field. If you see this icon, this generally indicates that the necessary root certificate has already been installed. This is usually the case for server certificates signed by one of the bigger Certifying Authorities (CAs), because root certificates from these CAs are included with popular browsers.

If your client does not recognize the CA that signed a server certificate, it will indicate that the connection is not secure. This is not necessarily a bad thing. It just indicates that the identity of the server you want to connect has not been verified. At this point, you can do one of two things: First, you can install the necessary root certificate on your client or browser. A lock icon in your browser’s URL field will indicate the certificate was installed successfully. And second, you can install a self-signed certificate on your client. Unlike a root certificate, which is signed by a trusted CA, a self-signed certificate is signed by the person or entity that created it. While you can use a self-signed certificate to create an encrypted channel, understand that it carries an inherent amount of risk because the identity of the server you are connected with has not been verified.

Disable Insecure Ports and Services

As a general policy, any ports that are not needed should be disabled. You need to first know which ports are enabled, and then decide which of these ports can be safely disabled without disrupting the normal functioning of Cisco Crosswork. You can do this by listing the ports that are open and comparing it with a list of ports needed for Cisco Crosswork.

To view a list of all open listening ports:

Procedure


Step 1

Log in as a Linux CLI admin user and enter the netstat -aln command.

The netstat -aln command displays the server's currently open (enabled) TCP/UDP ports, the status of other services the system is using, and other security-related configuration information. The command returns output similar to the following:

[root@vm ~]# netstat -aln
Active Internet connections (servers and established)
Proto  Recv-Q   Send-Q   Local Address            Foreign Address         State
tcp    0        0        0.0.0.0:111              0.0.0.0:*               LISTEN
tcp    0        0        127.0.0.1:8080           0.0.0.0:*               LISTEN
tcp    0        0        0.0.0.0:22               0.0.0.0:*               LISTEN
tcp    0        0        127.0.0.1:25             0.0.0.0:*               LISTEN
tcp    0        0        127.0.0.1:10248          0.0.0.0:*               LISTEN
tcp    0        0        127.0.0.1:10249          0.0.0.0:*               LISTEN
tcp    0        0        192.168.125.114:40764    192.168.125.114:2379    ESTABLISHED
tcp    0        0        192.168.125.114:48714    192.168.125.114:10250   CLOSE_WAIT
tcp    0        0        192.168.125.114:40798    192.168.125.114:2379    ESTABLISHED
tcp    0        0        127.0.0.1:33392          127.0.0.1:8080          TIME_WAIT
tcp    0        0        192.168.125.114:40814    192.168.125.114:2379    ESTABLISHED
tcp    0        0        192.168.125.114:40780    192.168.125.114:2379    ESTABLISHED
tcp    0        0        127.0.0.1:8080           127.0.0.1:44276         ESTABLISHED
tcp    0        0        192.168.125.114:40836    192.168.125.114:2379    ESTABLISHED
tcp    0        0        192.168.125.114:40768    192.168.125.114:2379    ESTABLISHED
tcp    0        0        127.0.0.1:59434          127.0.0.1:8080          ESTABLISHED
tcp    0        0        192.168.125.114:40818    192.168.125.114:2379    ESTABLISHED
tcp    0        0        192.168.125.114:22       192.168.125.1:45837     ESTABLISHED
tcp    0        0        127.0.0.1:8080           127.0.0.1:48174         ESTABLISHED
tcp    0        0        127.0.0.1:49150          127.0.0.1:8080          ESTABLISHED
tcp    0        0        192.168.125.114:40816    192.168.125.114:2379    ESTABLISHED
tcp    0        0        192.168.125.114:55444    192.168.125.114:2379    ESTABLISHED

Step 2

Check the Cisco Crosswork Network Controller 7.2 Installation Guide for the table of ports used by Cisco Crosswork, and see if your ports are listed in that table. That table will help you understand which services are using the ports, and which services you do not need—and thus can be safely disabled. In this case, safe means you can safely disable the port without any adverse effects to the product.

Note

 
If you are not sure whether you should disable a port or service, contact the Cisco representative.

Step 3

If you have firewalls in your network, configure the firewalls to only allow traffic that is needed for Cisco Crosswork to operate.


Harden Your Storage

We recommend that you secure all storage elements that will participate in your Cisco Crosswork installation, such as the database, backup servers, and so on.

  • If you are using external storage, contact the storage vendor and the Cisco representative.

  • If you are using internal storage, contact the Cisco representative.

  • If you ever uninstall or remove Cisco Crosswork, make sure that all VM-related files that might contain sensitive data are digitally shredded (as opposed to simply deleted). Contact the Cisco representative for more information.

Configure System Settings

Administrator users can configure the following system settings:

Configure a Syslog Server

Crosswork allows external syslog consumers to:

  • Register on Crosswork to receive system events, audit events, and internal collection jobs from the Syslog and Trap servers.

  • Define and filter which kind of events should be forwarded as a syslog, per consumer.

  • Define the rate at which syslogs are forwarded to the consumer.


Note


After the Syslog TLS server certificate is added, wait for 5-10 minutes before configuring the syslog server.


Attention


The APIs to configure a syslog server are deprecated in the Crosswork 6.0 release.


Before you begin

Ensure that you have uploaded the Syslog TLS server certificate.

Procedure


Step 1

From the main menu, choose Administration > Settings > System settings tab.

Step 2

Under Alarms and events settings, click the Notification destination option.

Step 3

Click Add icon to add the destination.

Step 4

In the Add Destination pane, from the Destination drop-down, select Syslog receiver.

Step 5

Enter the Syslog destination details. For more information, click Field Help icon next to each option.

Step 6

If you have selected the Protocol as TLS, select the certificate from the Syslog certificate drop-down.

Step 7

Click Save.


Syslog Events

After the Syslog destination is configured, Crosswork generates events in the form of Syslogs and sends it to the Syslog destination. The events have the following format:

<pri><v> <stamp> <vip> <app> <PID> <Message ID> <Structure Data> <Message>

The following table lists the fields that are sent in syslogs.

Table 3. Syslog Event Fields and Description

Field

Description

Example

Pri

The priority of the event generated:

Priority = (8*facility + severity)

Where facility is the category of the event generated.

The category of the event generated represented using an integer value:

System = 3, Network = 7, Audit = 13, Security = 4, External = 1

The alarm severity indicates the severity of the event using an integer value:

Critical=2, Major=3, Warning=4, Minor=5, Info=6,Clear=7

Event with the Category as System and Severity as Major, the Pri = 8 * 3 + 3 = 27.

v

The version of the Syslog server.

NA

Stamp

The timestamp at which the event is created.

Mar 28 15:2:22 10.56.58.188

VIP

The Crosswork VIP address.

10.56.58.188

App

The event OriginServiceId and OriginAppId.

orchestrator-capp-infra
PID

The process ID.

NA
Message ID

The event ID.

8586f9cf-d05d-4d94-ab62-27d7e808b5f6
Structured Data

The event ObjectId and event type.

robot-topo-svc-0

Message

The description of the event.

Restart of robot-topo-svc successful.

Configure a Trap Server

Cisco Crosswork allows external trap consumers to:

  • Register on Crosswork and receive system events and audit log as traps.

  • Define and filter which kind of events should be forwarded as traps, per consumer.

  • Define the rate of which traps are forwarded to the consumer.

For more information on trap handling, see Enable trap handling.


Attention


The APIs to configure a trap server are deprecated in the Crosswork 6.0 release.


Follow the procedure below to manage Trap Servers from the Settings window:

Procedure


Step 1

From the main menu, choose Administration > Settings > System settings tab.

Step 2

Under Alarms and events settings, click the Notification destination option.

Step 3

Click Add icon to add the destination.

Step 4

In the Add Destination pane, from the Destination drop-down, select Trap receiver.

Step 5

Enter Trap destination details. For more information, click Field Help icon next to each option.

Step 6

After entering all the relevant information, click Add.


Create Notification Policy for System Event

This topic explains the steps to create a notification policy for a system event.

For information on notification policies for Network or Device events, see Set Up and Monitor Alarms and Events section in the Cisco Crosswork Network Controller 7.2 Device Lifecycle Management Guide.

Procedure


Step 1

From the main menu, choose Alerts > Notification Policies.

The Notification Policies window is displayed.

Step 2

Click Create and select System/Network events.

The Create window is displayed.

Step 3

Under Policy Attributes, enter relevant values for the following fields:

  • Policy name

  • Description

  • Criteria

    Note


    If you do not want to specify any criteria, you can add an asterisk ('*') to the Criteria field.

Step 4

Click Next. Under Destination, select the destination(s) for the notification policy. The destination can be a trap receiver, syslog receiver, or an external kafka.

If there are no destinations available, click Add icon to add a destination.

Step 5

Click Next. Review the summary details, and click Save to confirm the policy details.


Configure the Interface Data Collection

Crosswork Data Gateway collects the interface state and stats data such as name, type, and traffic counters from the devices through the SNMP or gNMI protocol. Crosswork Data Gateway starts the data collection when a device is onboarded and attached to the data gateway.

Follow the steps to configure interface data collection settings:

Before you begin

Create a tag and assign it to the device for which Crosswork collects the interface data. For information on how to create and assign a tag to the device, see Create tags and Apply or Remove Device Tags.

Procedure


Step 1

From the main menu, choose Administration > Settings > System Settings tab.

Step 2

Under Data Collection, select Interfaces.

Figure 6. Interface Data Window

Step 3

In the Interface data pane, select the appropriate method:

  • SNMP: Crosswork collects the IF-MIB and IP-MIB data from the devices.

  • gNMI: Crosswork collects the openconfig-interfaces data from the devices.

  • Both: Depending on the device's capability, select SNMP and gNMI protocol to discover the devices.

If you choose Both as the method, you must select the appropriate SNMP and gNMI device tags. If you choose SNMP or gNMI method, the device tags become optional.

Step 4

From the Select {SNMP or gNMI} Device Tag drop-down, select unique tags for SNMP and gNMI protocols.

The precreated tags associated to the device are listed. If you select No Tag Selected option, Crosswork starts the data collection for devices with system SNMP or gNMI tags.

Step 5

In the Interface Collection Interval field, specify the duration between the data collection requests. The default duration is 5 minutes.

Step 6

Click Save.


Set the Pre-Login Disclaimer

Many organizations require that their systems display a disclaimer message in a banner before users login. The banner reminds the authorized users of their obligations when using the system, or provide warnings to unauthorized users. You can enable such a banner for Crosswork users, and customize the disclaimer message as needed.

Procedure


Step 1

From the main menu, choose Administration > Settings > System Settings tab.

Step 2

Under Notifications, click the Pre-Login Disclaimer option.

Step 3

To enable the disclaimer and customize the banner:

  1. Check the Enabled check box.

  2. Customize the banner Title, the Icon, and the Disclaimer Text as needed.

  3. Optional: While editing the disclaimer, you can:

    • Click Preview to see how your changes look when displayed before the Crosswork login prompt.

    • Click Discard Changes to revert to the last saved version of the banner.

    • Click Reset to revert to the original, default version of the banner.

  4. When you are satisfied with your changes, click Save to save them and enable display of the custom disclaimer to all users.

Step 4

To turn off the disclaimer display: Select Administration > Settings > System Settings > Pre-Login Disclaimer, then uncheck the Enabled check box.


Manage File Server Settings

Cisco Crosswork provides secure file transfer services (FTP and SFTP) for Crosswork applications that need them. They are disabled by default.

Procedure


Step 1

To enable an FTP server:

  1. From the main menu, choose Administration > Settings > System Settings > Servers > Filer Servers.

  2. Under FTP, select the Enable FTP (Port TCP 30621) check box.

  3. Click Save to save your settings.

Step 2

To enable an SFTP server:

  1. From the main menu, choose Administration > Settings > System Settings > Servers > Filer Servers.

  2. Select the Enable SFTP server upload Upload (Port TCP 30622) check box.

    Caution


    SFTP supports an upload option that allows write access to the Cisco Crosswork storage from the outside. Use caution while enabling the upload, and it should be disabled as soon as it is no longer needed.

  3. Click Save to save your settings.