Using the Device Management User Interface
Available Languages
Table Of Contents
Using the Device Management User Interface
Accessing and Logging in to the WebNS Device Management User Interface
Navigating the WebNS Device Management Interface
Adding or Modifying Configuration Information
Exiting from the Device Management User Interface
Known Caveats with Netscape Communicator
Known Caveats with Microsoft Internet Explorer
Using the Device Management User Interface
Using the WebNS Device Management user interface, you can manage your CSS using a standard Web browser. This chapter describes the basics of using the Device Management user interface. It includes:
•
Accessing and Logging in to the WebNS Device Management User Interface
•
•
Accessing and Logging in to the WebNS Device Management User Interface
Before establishing a WebNS Device Management user interface session, you must enable Device Management through the CLI and optionally create an ACL that defines the IP address that can connect to the management port. For more information, refer to Chapter 2, Configuring the CSS for Device Management, the "Enabling the WebNS Device Management User Interface" and "Configuring an SNMP Community" sections. For information on creating an ACL, refer to the Cisco Content Services Switch Security Configuration Guide.

Note
To access the WebNS Device Management user interface:
1.
For example:
https://161.16.2.3The Security Alert message boxes appear informing you that you are about to view pages over a secure connection. These are the standard Web browser message boxes that appear when requesting any secure page on the Internet. For details on SSL security and installing the SSL security certificate, refer to Chapter 2, Configuring the CSS for Device Management, the "Viewing and Installing the SSL Security Certificate" section.
2.
Figure 3-1 WebNS Device Management Login Form
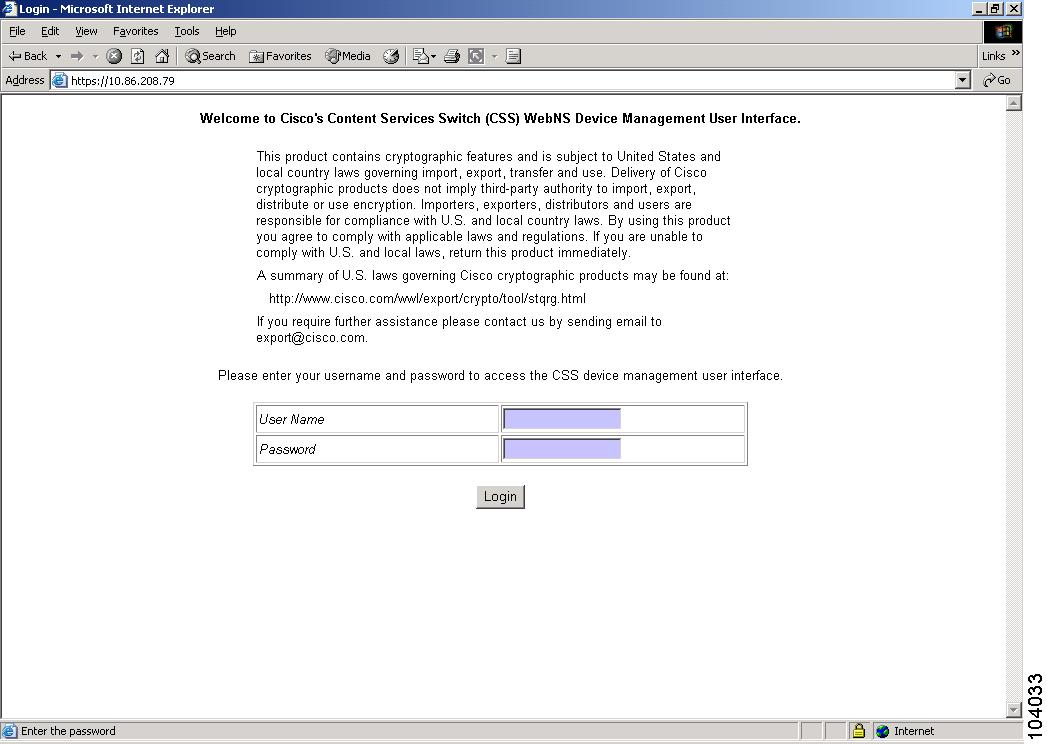
3.
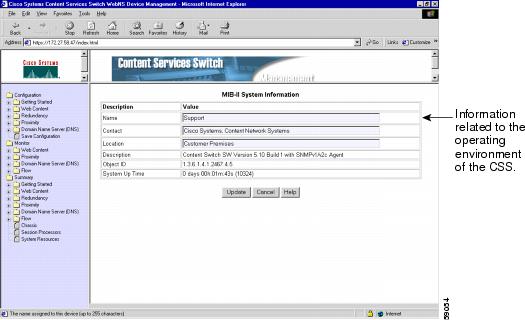
Note
Figure 3-2 WebNS Device Management MIB-II System Information Form
Navigating the WebNS Device Management Interface
The Navigation tree (located in the lower left frame of the browser window) displays a list of folders that contain Configuration, Monitor, and Summary options that you select to configure and manage a CSS. Expand the appropriate folder, then select the option you want to configure. The Navigation tree lists Configuration, Monitor, and Summary options arranged by category.
Note
For example, to configure access to your CSS:
1.
2.
Figure 3-3 Access Configuration Form
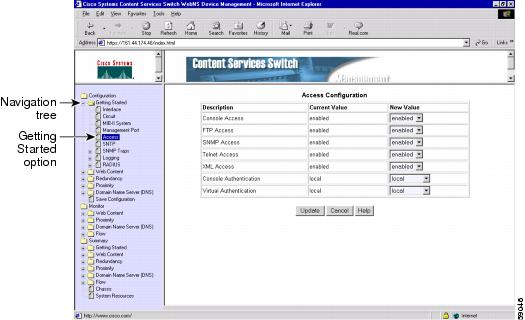
3.
To remove any changes you made in the form and return to the default values, click Cancel.
To obtain Online Help on a Device Management form and its fields, click the Help button at the bottom of the form (see the "Using Online Help" section for details on using Online Help).
Adding or Modifying Configuration Information
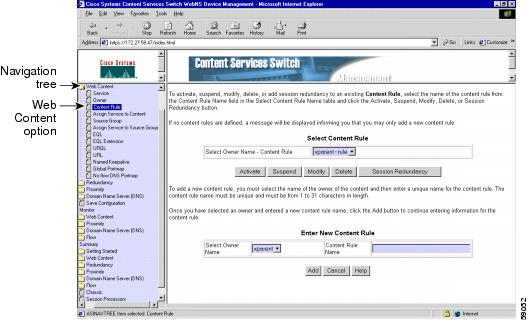
A number of Configuration forms in the Web Content, Proximity, and Domain Name Server (DNS) Navigation tree allow you to add new configuration information to the CSS running configuration, and then to access, view, and modify that configuration information at a later time.
For example, to add a new content rule to the CSS running configuration, and then modify parameters in the content rule:
1.
Figure 3-4 Content Rule Name Configuration Form
2.
3.
Figure 3-5 Content Rule Configuration Form
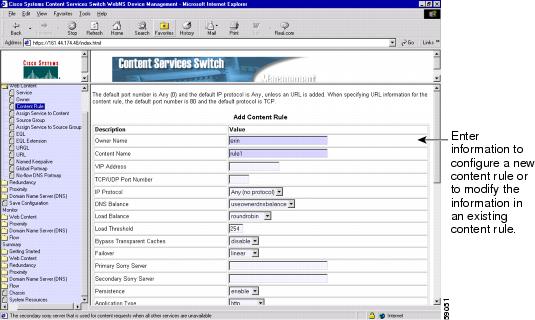
4.
5.
6.
7.
Using a Monitor Form
There are a number of forms in the WebNS Device Management user interface that allow you to view statistical information about your CSS. Refer to Chapter 1, Using the Device Management User Interface, the "CSS Monitor Form Features" section.
To use a Monitor form, click the plus sign next to a folder in the Monitor tree. The folder expands to display a list of areas in your CSS that you can monitor.
Figure 3-6 Monitor Form Example
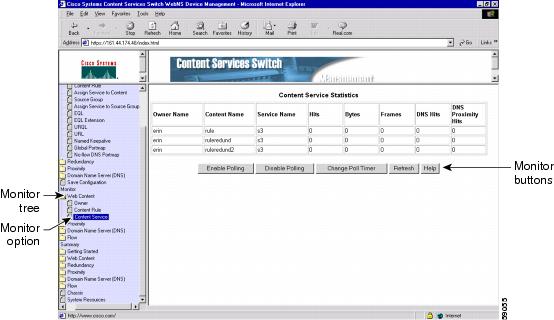
Monitor forms are polled pages, that is, the software automatically updates the information in the active Monitor form every 60 seconds. The polling interval (time between automatic refreshes) defaults to 60 seconds with a maximum of 24 hours.
Each Monitor form includes the following buttons:
•
•
•
•
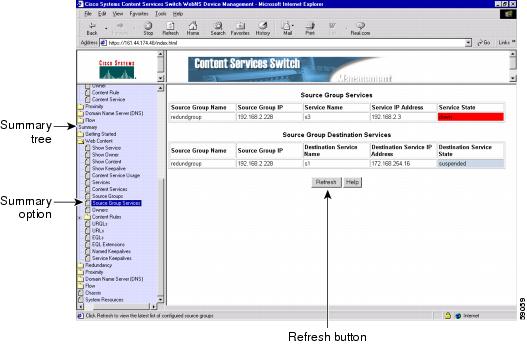
Using a Summary Form
There are a number of forms in the WebNS Device Management user interface that allow you to view configuration and statistical summary information about your CSS. Refer to Chapter 1, Using the Device Management User Interface, the "CSS Summary Form Features" section.
To use a Summary form:
1.
Figure 3-7 Summary Form Example
2.
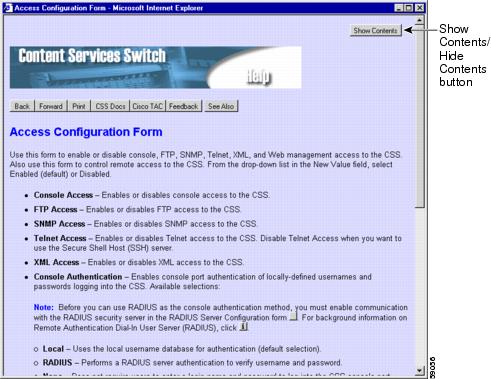
Using Online Help
Each form in the WebNS Device Management user interface has a context-sensitive Online Help file associated with it. Each Online Help file contains information related to the form that you are using and also contains links to related topics. Online Help also includes a series of quick start procedures to assist you in navigating through the specific forms in the user interface and perform specific configuration procedures (for example, to configure a service or to configure a Client Side Accelerator).
Note
To access Online Help:
1.
Figure 3-8 Online Help Topic Example
2.
Note
3.
Exiting from the Device Management User Interface
When you have finished configuring and monitoring your CSS with the Device Management user interface, exit from the software. This action clears the cache.
Troubleshooting
In addition to the information in this section, refer to the release notes that are included with your CSS for any additional caveats related to the WebNS Device Management user interface.
When establishing a Device Management session, if you experience a problem where your web browser fails to display the initial Device Management user interface screen, your Web browser may have failed to properly connect to the CSS. Verify that you have performed the following actions:
•
•
•
•
•
# show acl configFor information on ACLs, refer to the Cisco Content Services Switch Security Configuration Guide.
•
Known Caveats with Netscape Communicator
The WebNS Device Management user interface may experience problems if you are using an unsupported version of Netscape Navigator or Communicator. Currently, the Device Management user interface supports the following versions of Netscape:
•
•
To download a supported Netscape browser, enter the following URL in your browser:
http://www.netscape.com/Known Caveats with Microsoft Internet Explorer
With Microsoft Internet Explorer 6.0, whenh a Device Management opage is displayed and you highlight the page in the Address field and press Enter, an Internet Explorer expired page appears. To redisplay the Device Management page, click Refresh in the browser navigation bar, then click Retry in the message box that appears.
 Feedback
Contact Cisco
- Open a Support Case

- (Requires a Cisco Service Contract)
This Document Applies to These Products
- Collaboration Endpoints - Retired Products
- Conferencing - Retired Products
- Contact Center - Retired Products
- Optical Networking - Retired Products
- Routers - Retired Products
- Security - Retired Products
- Servers - Unified Computing (UCS) Retired Products
- Storage Networking Retired Products
- Switches - Retired Products
- Video - Retired Products
- Wireless - Retired Products