Simple network management protocol
Simple network management protocol (SNMP) is a network protocol that enables network management functionalities in URWB software.
SNMP communication process
The SNMP communication process involves the following steps:
-
The SNMP client sends a request to the SNMP agent.
-
The SNMP agent passes the request to the subagent.
-
The subagent responds to the SNMP agent.
-
The SNMP agent creates an SNMP response packet and sends it to the remote network management station that initiates the request.

Configure SNMP from CLI
Configure SNMP to enable monitoring and management of network devices through network management systems.
SNMP configuration allows network management systems to monitor device status and receive trap notifications. Configure all parameters before enabling SNMP.
 Note |
|
Before you begin
Follow these steps to configure SNMP from CLI:
Procedure
|
Step 1 |
Use the configure snmp {v2c| v3} command to configure the SNMP protocol version. Example: |
|
Step 2 |
Configure version-specific parameters. |
|
Step 3 |
Use the configure snmp nms-hostname{hostname| ip-address} command to configure the SNMP hostname or IP address. Example: |
|
Step 4 |
Configure trap settings. |
|
Step 5 |
Use the configure snmp enable command to enable SNMP functionality. Example: |
What to do next
Example configurations:
CLI for SNMP v2:
Device#configure snmp v2 community-id <length 1-64>
Device#configure snmp nms-hostname hostname/Ip Address
Device#configure snmp trap-period <1-2147483647>
Device#configure snmp periodic-trap enable/disable
Device#configure snmp event-trap enable/disable
Device#configure snmp version v2c
Device#configure snmp enabled
CLI for SNMP v3:
Device#configure snmp nms-hostname hostname/Ip Address
Device#configure snmp trap-period <1-2147483647>
Device#configure snmp v3 username <length 32>
Device#configure snmp v3 password <length 8-64>
Device#configure snmp auth-method <md5|sha>
Device#configure snmp encryption <aes|des|none>
Device#configure snmp secret <length 8-64>
Device#configure snmp periodic-trap enable/disable
Device#configure snmp event-trap enable/disable
Device#configure snmp version v3
Device#configure snmp enabled
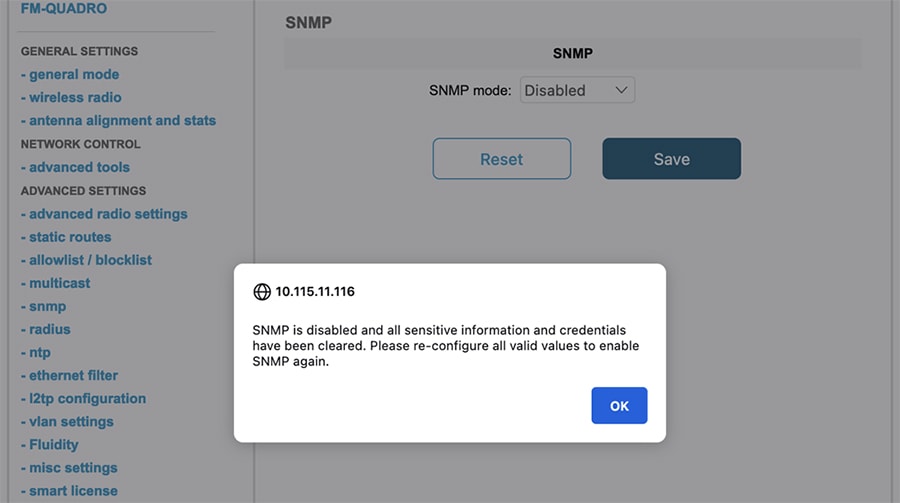
To disable SNMP configuration:
Device#configure snmp disabledDisabling SNMP clears all sensitive information, including credentials. To enable SNMP again, specify all required values
Validate SNMP from CLI
Use the show snmp command to validate the SNMP.
Device# show snmp
SNMP: enabled
Version: v3
Username: username
Password: password
Authentication method: SHA
Encryption: AES
Encryption Passphrase: passphrase
Engine ID: 0x8000000903c0f87fe5f314
Periodic Trap: enabled
Notification Period (minutes): 5
Event Trap: enabled
NMS hostname: 192.168.116.11
Device# show snmp
SNMP: enabled
Version: v2c
Community ID: test
Periodic Trap: enabled
Notification Period (minutes): 5
Event Trap: enabled
NMS hostname: 192.168.116.11
Device# show system status snmpd
Service Status
Service Name : snmpd
Loaded : loaded
Active : active (running)
Main ProcessID : 6437
Running Since : Mon 2022-09-19 14:45:27 UTC; 3h 34min ago
Service Restart : 0
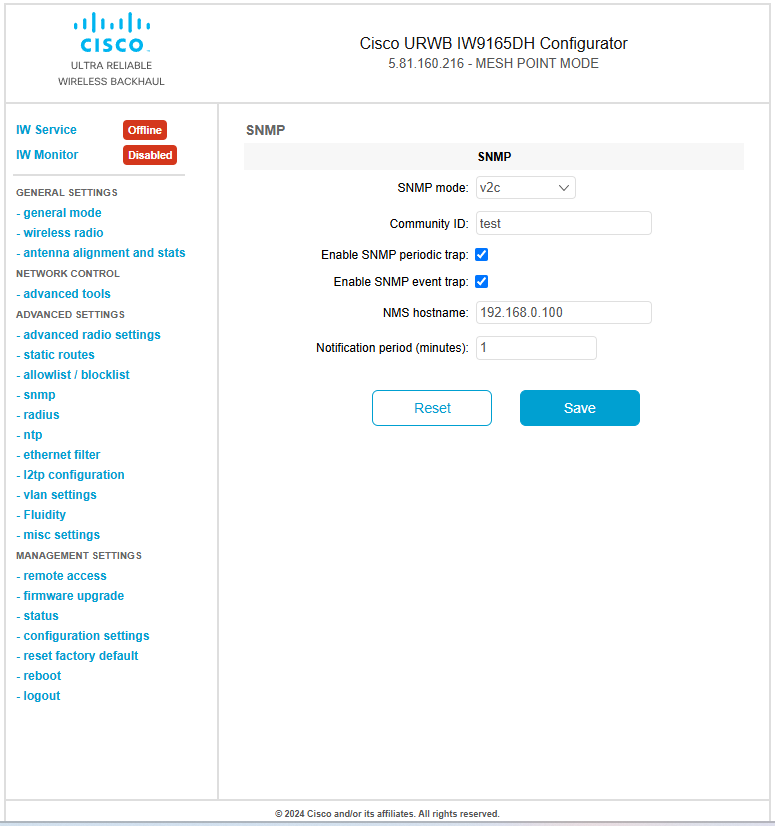
Configure SNMP version v2c using GUI
This task enables SNMP version v2c on access points to allow network monitoring and management through SNMP operations and trap notifications.
By default, the access points are shipped from the factory with SNMP in disabled mode.
Before you begin
Follow these steps to change the access point's SNMP mode to version v2c and configure the access point:
Procedure
|
Step 1 |
Choose the version v2c from the SNMP mode drop-down list. The SNMP window appears.
|
||
|
Step 2 |
Enter the community identity value in the Community ID field.
|
||
|
Step 3 |
Check the Enable SNMP event trap check box to enable SNMP event traps for significant system-related events, and then enter the network management station (NMS) host name in the NMS hostname field.
|
||
|
Step 4 |
Check the Enable SNMP periodic trap check box to enable periodic SNMP traps to send SNMP traps at defined periodic intervals and then enter the host name of NMS in the NMS hostname field. Enter the notification period (minutes) in the Notification period. |
||
|
Step 5 |
Click Save. |
Configure SNMP version v3 using GUI
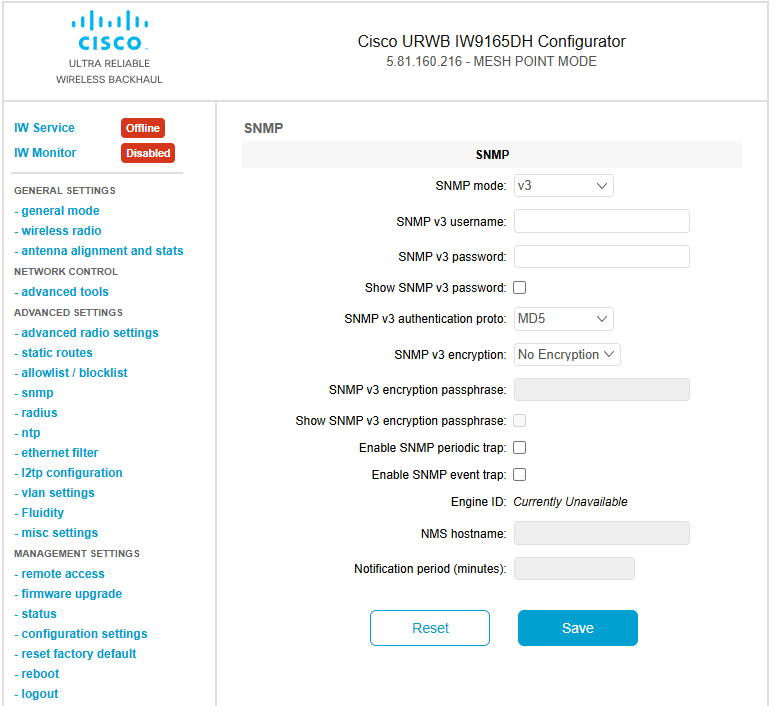
Configure SNMP version v3 to enable secure network monitoring and management of access points.
By default, the access points are shipped from the factory with SNMP in disabled mode.
Procedure
|
Step 1 |
Choose the version v3 from the SNMP mode drop-down list.
|
||
|
Step 2 |
Enter the SNMP v3 username in the SNMP v3 username field.
|
||
|
Step 3 |
To change the current SNMP v3 password, enter the new password in the SNMP v3 password field. |
||
|
Step 4 |
Choose the authentication type from the SNMP v3 authentication proto drop-down list. The available options are:
|
||
|
Step 5 |
Choose the appropriate encryption protocol from the SNMP v3 encryption drop-down list. The available options are:
|
||
|
Step 6 |
To change the encryption passphrase, enter a new passphrase in the SNMP v3 encryption passphrase field. |
||
|
Step 7 |
Check the Enable SNMP periodic trap check box to enable the periodic SNMP traps to send SNMP traps at defined periodic intervals and then enter the host name of NMS in the NMS hostname field. Enter the notification period (minutes) in the Notification period. |
||
|
Step 8 |
Check the Enable SNMP event trap check box to enable the SNMP event traps for significant system-related events and then enter the host name of NMS in the NMS hostname field.
|
||
|
Step 9 |
Click Save.
|
 Feedback