Adding an 8, 16, or 32 Gigabyte DIMM to a Cisco Nexus 9000 Series Switch
Available Languages
Adding an 8, 16, or 32 Gigabyte DIMM to a Cisco Nexus 9300 Series Switch
Overview
Cisco provides two modes of operation for Cisco Nexus 9300 series switches: Cisco NX-OS Software and Cisco Application Centric Infrastructure (Cisco ACI™). You can use Cisco NX-OS software to deploy the switches in standard Cisco Nexus switch environments (NX-OS mode). Cisco ACI™ platform takes full advantage of an automated, policy-based, systems-management approach (ACI mode).
If you ordered a Cisco Nexus switch with base memory, and you want to upgrade the system memory, you must install additional memory. Here are two use cases that require additional memory upgrade:
1. To support the maximum route scale in Cisco NX-OS or ACI. For details, check the NX-OS Scalability Guide or the ACI Verified Scalability Guide.
2. To support Cisco ACI software on a switch with base memory only. Cisco ACI software supports switches with a minimum of 24 GB of memory or higher. If your switch model has less than 24 GB of memory, and you want to upgrade the Cisco ACI software version, you must install additional memory in the system.
Before you perform a memory upgrade on your switch model, refer to the table for additional memory required.
Table 1. Memory on Nexus 9300 Series Switches
| Nexus 9300 Switch model |
Base Memory |
Memory Upgrade (required) |
| N9K-C9324C-SE1U |
96GB |
NA |
| N9K-C9348Y2C6D-SE1U |
64GB |
32GB |
| N9K-C93240YC-FX2 |
16GB |
8GB |
| N9K-C93360YC-FX2 |
16GB |
8GB |
| N9K-C93216TC-FX2 |
16GB |
8GB |
| N9K-C93108TC-FX3P |
16GB |
16GB |
| N9K-C93180YC-FX3 |
16GB |
16GB |
| N9K-C93108TC-FX3 |
32GB |
32GB |
| N9K-C9348GC-FX3 |
32GB |
32GB |
| N9K-C9348GC-FX3PH |
32GB |
32GB |
| N9K-C9364C-GX |
16GB |
16GB |
| N9K-C9348D-GX2A |
32GB |
32GB |
| N9K-C9364D-GX2A |
32GB |
32GB |
| N9K-C9332D-GX2B |
32GB |
NA |
| N9K-C9348LD-H1 |
32GB |
32GB |
| N9K-C9364C-H1 |
32GB |
32GB |
| N9K-C9332D-H2R |
32GB |
32GB |
To check how much system memory is available, use the show system commands. Examples for Cisco NX-OS and Cisco ACI are below:
Steps to upgrade:
· Get the 8G DIMM as a spare, PID: NXK-MEM-8GB
· Get the 16G DIMM as a spare, PID: NXK-MEM-16GB
· Get the 32G DIMM as a spare, PID: NXK-MEM-32GB
Switch upgrade
1. Turn the power off before removing the access panel of the switch.
2. Wear an ESD wrist strap and place antistatic foam or antistatic padding under the DIMM.
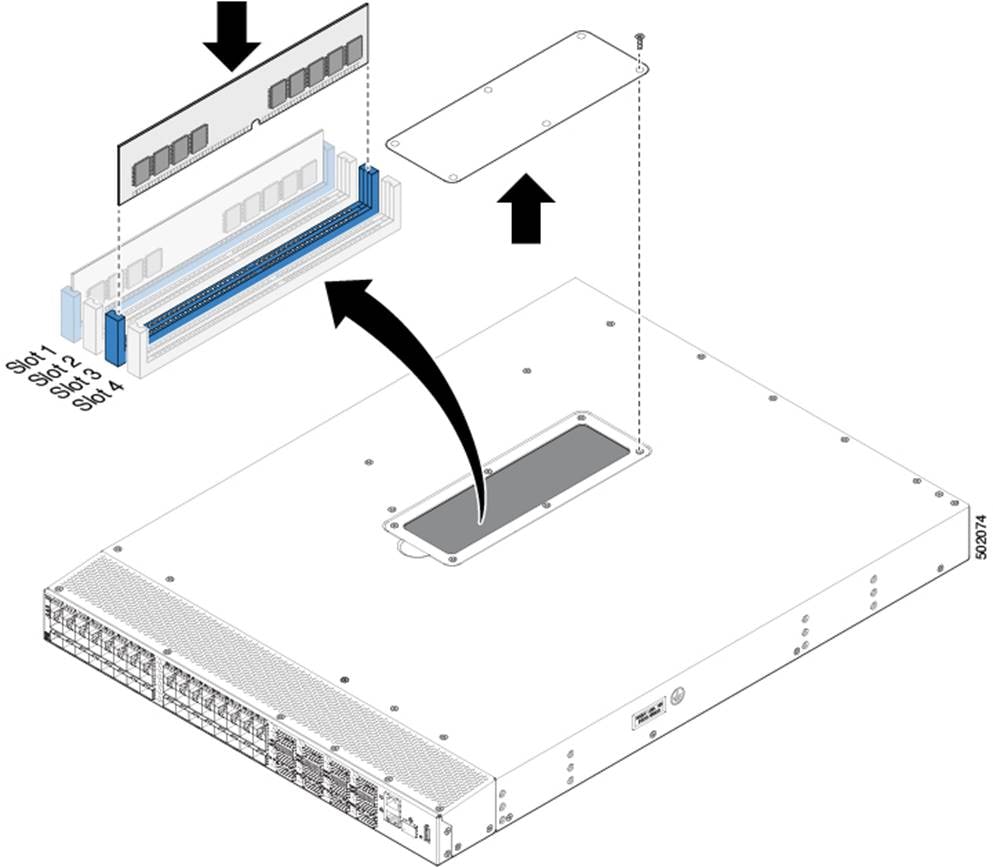
3. Remove the DIMM installed in slot 3 and add the new DIMM, in addition to the standard memory DIMM already installed, in slot 1.
Step 1
Remove the screws and the DIMM access panel (see figure 1).
Step 2
Remove the old DIMM from slot 3.
Step 3
Align the 8G, 16G or 32G DIMM card to DIMM slot 3 inside the chassis. Push the DIMM card into the slot until it is fully inserted (see figure 1).
Step 4
Figure 1. Upgrading the DIMM card
Related Documentation
· Cisco NX-OS 9300 Series documentation
· Cisco NX-OS 9300 Series release notes
Documentation Feedback
To provide technical feedback on this document, or to report an error or omission, please send your comments to mailto:nexus9k-docfeedback@cisco.com. We appreciate your feedback.
Legal Information
Cisco and the Cisco logo are trademarks or registered trademarks of Cisco and/or its affiliates in the U.S. and other countries. To view a list of Cisco trademarks, go to this URL: https://www.cisco.com/go/trademarks. Third-party trademarks mentioned are the property of their respective owners. The use of the word partner does not imply a partnership relationship between Cisco and any other company. (1110R)
Any Internet Protocol (IP) addresses and phone numbers used in this document are not intended to be actual addresses and phone numbers. Any examples, command display output, network topology diagrams, and other figures included in the document are shown for illustrative purposes only. Any use of actual IP addresses or phone numbers in illustrative content is unintentional and coincidental.
 Feedback
Contact Cisco
- Open a Support Case

- (Requires a Cisco Service Contract)
This Document Applies to These Products
- Collaboration Endpoints - Retired Products
- Conferencing - Retired Products
- Contact Center - Retired Products
- Optical Networking - Retired Products
- Routers - Retired Products
- Security - Retired Products
- Servers - Unified Computing (UCS) Retired Products
- Storage Networking Retired Products
- Switches - Retired Products
- Video - Retired Products
- Wireless - Retired Products