Overview
Learn how to verify a completed deployment in Azure by reviewing the resource group, virtual machine status, and associated resources. Confirm that the VM is running, identify the assigned public IP address, and access the web interface to validate successful setup and connectivity.
After the Firewall Management Center Virtual VM is created, the Microsoft Azure Dashboard lists the new Firewall Management Center Virtual VM under Resource groups. The corresponding storage account and network resources also are created and listed. The Dashboard provides a unified view of your Azure assets, and provides an easy, at-a-glance assessment of the health and performance of the Firewall Management Center Virtual.
Before you begin
The Firewall Management Center Virtual VM is started automatically. During deployment the status is listed as "Creating" while Azure creates the VM, and then the status changes to "Running" once the deployment is complete.
Remember that deployment times vary in Azure, and the total time until the Firewall Management Center Virtual is usable is approximately 30 minutes, even when the Azure Dashboard shows the status of the Firewall Management Center Virtual VM as "Running".
Procedure
| 1. | To view the Firewall Management Center Virtual resource group and its resources after deployment is completed, from the left menu pane, click Resource groups to access the Resource groups page. The following figure shows an example of a Resources groups page in the Microsoft Azure portal. Notice the Firewall Management Center Virtual VM as well as its corresponding resources (storage account, network resources, etc.). 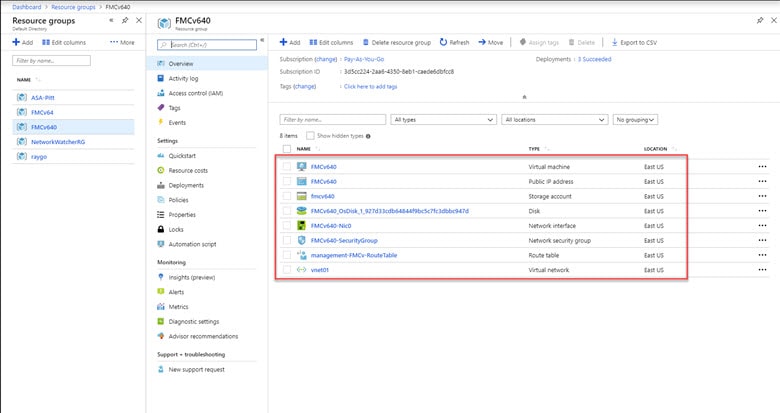
|
|
| 2. | To view details of the Firewall Management Center Virtual VM associated with the resource group, click the name of the Firewall Management Center Virtual VM. The following figure shows an example of the Virtual machine overview page associated with the Firewall Management Center Virtual VM. You access this overview from the Resources groups page. 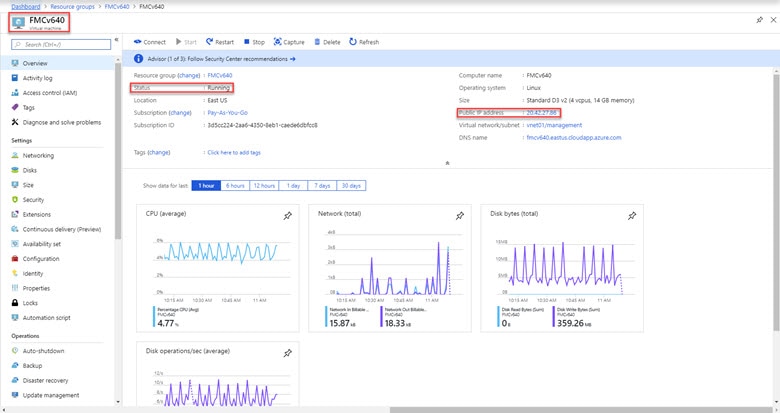
Observe that the status is Running. You can stop, start, restart, and delete the Firewall Management Center Virtual VM from the Virtual machine page in the Microsoft Azure portal. Note that these controls are not graceful shutdown mechanisms for the Firewall Management Center Virtual; see Guidelines and Limitations for graceful shutdown information. |
|
| 3. | From the Virtual machine page, find the Public IP address assigned to the Firewall Management Center Virtual.
|
|
| 4. | Direct your browser to https://public_ip/, where public_ip is the IP address assigned to the Firewall Management Center Virtual’s management interface when you deployed the VM. The login page appears. |
|
| 5. | Log in using admin as the username and the password for the admin account that you specified when you deployed the VM. |
What to do next
-
We recommend that you complete some administrative tasks that make your deployment easier to manage, such as creating users and reviewing health and system policies. Refer to Firewall Management Center Virtual Initial Administration and Configuration for an overview how to get started.
-
You should also review your device registration and licensing requirements.
-
For information on how you can begin to configure your system, see the complete Secure Firewall Management Center Configuration Guide for your software version.