Learn how to configure the Oracle Cloud Infrastructure Virtual Cloud Network and deploy Firewall Management Center Virtual on OCI.
Configure the Virtual Cloud Network (VCN)
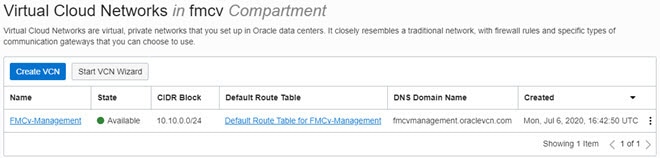
You configure the Virtual Cloud Network (VCN) for your Firewall Management Center Virtual deployment.
Before you begin
After you select a service from the navigation menu, the menu on the left includes the compartments list. Compartments help you organize resources to make it easier to control access to them. Your root compartment is created for you by Oracle when your tenancy is provisioned. An administrator can create more compartments in the root compartment and then add the access rules to control which users can see and take action in them. See the Oracle document “Managing Compartments” for more information.
Procedure
| 1. | Log into OCI and choose your region. OCI is divided into multiple regions that are isolated from each other. The region is displayed in the upper right corner of your screen. Resources in one region do not appear in another region. Check periodically to make sure you are in the intended region. |
|
| 2. | Choose and click Create VCN. |
|
| 3. | Enter a descriptive Name for your VCN, for example FMCv-Management. |
|
| 4. | Enter a CIDR block for your VCN. |
|
| 5. | Click Create VCN. |
What to do next
You can continue with the following procedures to complete the Management VCN.
Create the Network Security Group
A network security group consists of a set of vNICs and a set of security rules that apply to the vNICs.
Procedure
| 1. | Choose , and click Create Network Security Group. |
|
| 2. | Enter a descriptive Name for your Network Security Group, for example FMCv-Mgmt-Allow-22-443-8305. |
|
| 3. | Click Next. |
|
| 4. | Add your security rules: |
|
| 5. | Click Create. |
Create the Internet Gateway
An Internet gateway is required to make your management subnet publicly accessible.
Procedure
| 1. | Choose , and click Create Internet Gateway. |
|
| 2. | Enter a descriptive Name for your Internet gateway, for example FMCv-IG. |
|
| 3. | Click Create Internet Gateway. |
|
| 4. | Add the route to the Internet Gateway:
|
Create the Subnet
Each VCN will have one subnet, at a minimum. You’ll create a Management subnet for the Management VCN.
Procedure
| 1. | Choose , and click Create Subnet. |
|
| 2. | Enter a descriptive Name for your subnet, for example Management. |
|
| 3. | Select a Subnet Type (leave the recommended default of Regional). |
|
| 4. | Enter a CIDR Block, for example 10.10.0.0/24. The internal (non-public) IP address for the subnet is taken from this CIDR block. |
|
| 5. | Select one of the route tables you created previously from the Route Table drop-down. |
|
| 6. | Select the Subnet Access for your subnet. For the Management subnet, this must be Public Subnet. |
|
| 7. | Select the DHCP Option. |
|
| 8. | Select a Security List that you created previously. |
|
| 9. | Click Create Subnet. |
What to do next
After you configure your Management VCN you are ready to launch the Firewall Management Center Virtual. See the following figure for an example of the Firewall Management Center Virtual VCN configuration.
Create the Firewall Management Center Virtual Instance on OCI
You deploy the Firewall Management Center Virtual on OCI via a Compute instance using the Firewall Management Center Virtual - BYOL offering on the Oracle Cloud Marketplace. You select the most appropriate machine shape based on characteristics such as the number of CPUs, amount of memory, and network resources.
Procedure
| 1. | Log into the OCI portal. The region is displayed in the upper right corner of your screen. Make sure you are in the intended region. |
|
| 2. | Choose . |
|
| 3. | Search Marketplace for “Firewall Management Center Virtual” and choose the offering. |
|
| 4. | Review the Terms and Conditions, and check the I have reviewed and accept the Oracle Terms of Use and the Partner terms and conditions.check box. |
|
| 5. | Click Launch Instance. |
|
| 6. | Enter a descriptive Name for your instance, for example Cisco-FMCv. |
|
| 7. | Click Change Shape and select the shape with the number of CPUs, amount of RAM, and number of interfaces required for the Firewall Management Center Virtual, for example VM.Standard2.4 (see OCI Compute Shapes). |
|
| 8. | From the Virtual Cloud Network drop-down, choose the Management VCN. |
|
| 9. | From the Subnet drop-down, choose the Management subnet if it's not autopopulated. |
|
| 10. | Check Use Network Security Groups to Control Traffic and choose the security group you configured for the Management VCN. |
|
| 11. | Click the Assign a Public Ip Address radio button. |
|
| 12. | Under Add SSH keys, click the Paste Public Keys radio button and paste the SSH key. Linux-based instances use an SSH key pair instead of a password to authenticate remote users. A key pair consists of a private key and public key. You keep the private key on your computer and provide the public key when you create an instance. See Managing Key Pairs on Linux Instances for guidelines. |
|
| 13. | Click the Show Advanced Options link to expand the options. |
|
| 14. | Under Initialization Script, click the Paste Cloud-Init Script radio button to provide the day0 configuration for the Firewall Management Center Virtual. The day0 configuration is applied during the firstboot of the Firewall Management Center Virtual. The following example shows a sample day0 configuration you can copy and paste in the Cloud-Init Script field: |
|
| 15. | Click Create. |
What to do next
Monitor the Firewall Management Center Virtual instance, which shows the state as Provisioning after you click the Create button. It’s important to monitor the status. Look for the Firewall Management Center Virtual instance to go from Provisioning to Running state, which indicates the Firewall Management Center Virtual boot is complete.