User Roles
The Firepower System lets you allocate user privileges based on the user’s role. For example, you can grant analysts predefined roles such as Security Analyst and Discovery Admin and reserve the Administrator role for the security administrator managing the Firepower System. You can also create custom user roles with access privileges tailored to your organization’s needs.
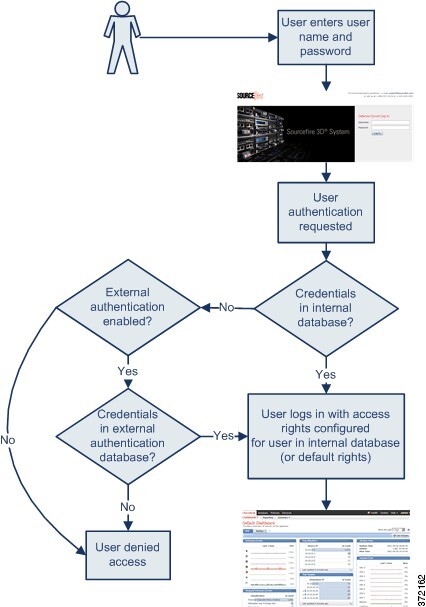
In the platform settings policy for a managed device, you set a default access role for all users from that device who are externally authenticated. After an externally authenticated user logs in for the first time, you can add or remove access rights for that user on the User Management page. If you do not modify the user’s rights, the user has only the rights granted by default. Because you create internally authenticated users manually, you set the access rights when you create them.
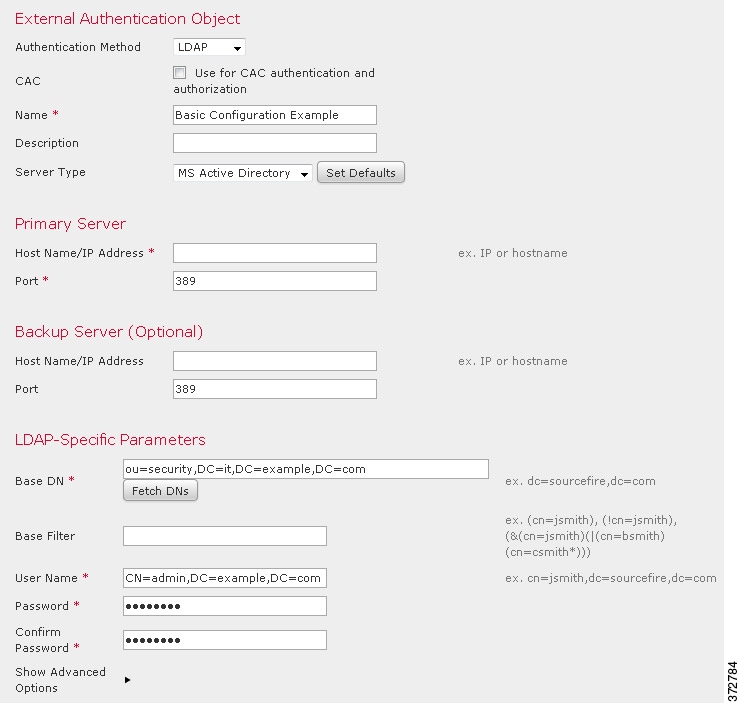
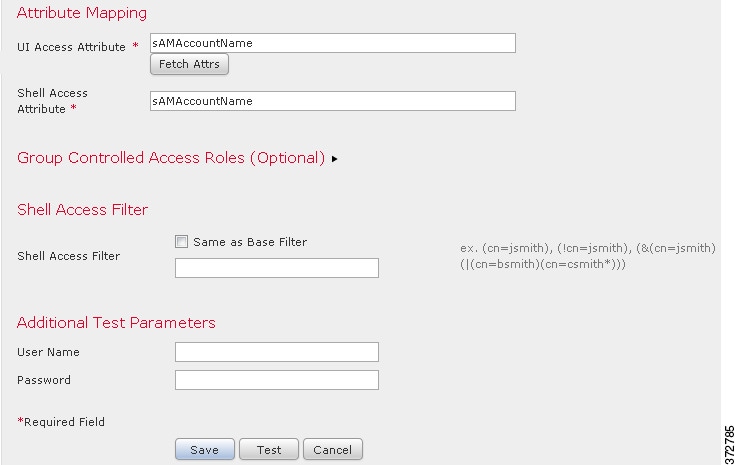
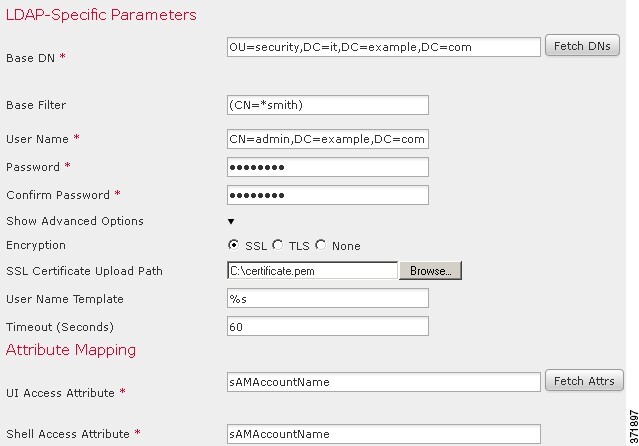
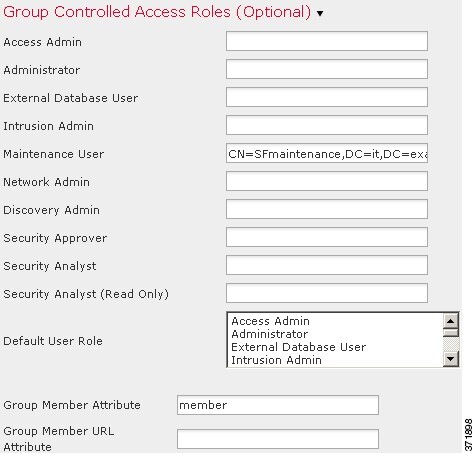
If you configured management of access rights through LDAP groups, the access rights for users are based on their membership in LDAP groups. They receive the default access rights for the group that they belong to that has the highest level of access. If they do not belong to any groups and you have configured group access, they receive the default user access rights configured in the authentication object for the LDAP server. If you configure group access, those settings override the default access setting in the platform settings policy.
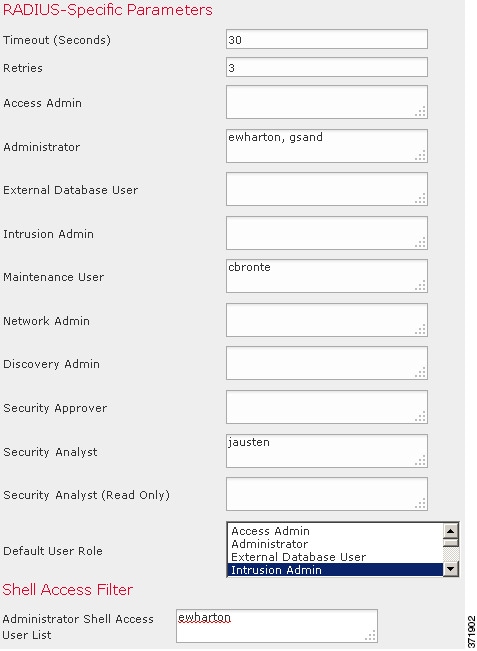
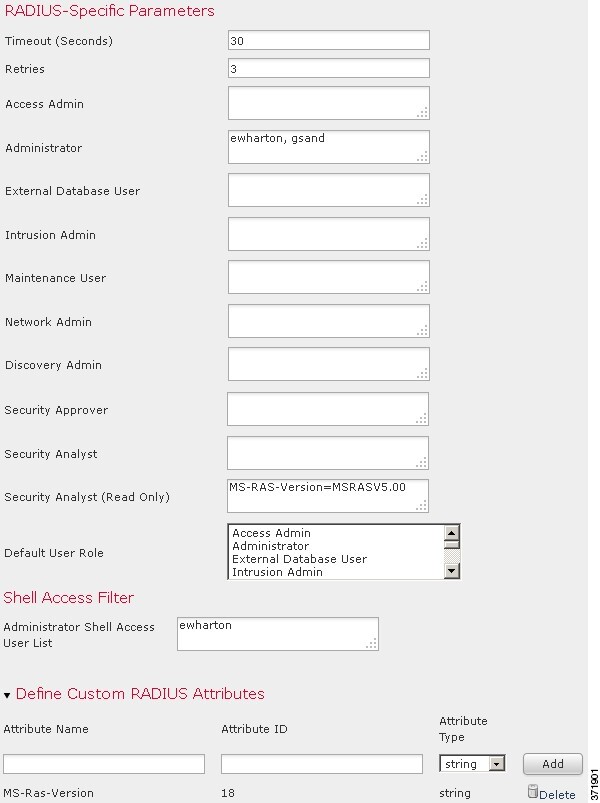
Similarly, if you assign a user to specific user role lists in a RADIUS authentication object, the user receives all assigned roles, unless one or more of those roles are mutually incompatible. If a user is on the lists for two mutually incompatible roles, the user receives the role that has the highest level of access. If the user does not belong to any lists and you have configured a default access role in the authentication object, the user receives that role. If you configure default access in the authentication object, those settings override the default access setting in the platform settings policy.
In a multidomain deployment, you can assign users roles in multiple domains. For example, you can assign a user read-only privileges in the Global domain, but Administrator privileges in a subdomain.
Predefined User Roles
The Firepower System includes ten predefined user roles that provide a range of access privilege sets to meet the needs of your organization. Note that 7000 and 8000 Series devices have access to only three of the ten predefined user roles: Administrator, Maintenance User, and Security Analyst.
Although you cannot edit predefined user roles, you can use their access privilege sets as the basis for custom user roles. In addition, you cannot configure them to escalate to another user role.
The following table briefly describes the predefined roles available to you.
- Access Admin
-
Provides access to access control policy and associated features in the Policies menu. Access Admins cannot deploy policies.
- Administrator
-
Administrators have access to all functionality; their sessions present a higher security risk if compromised, so you cannot make them exempt from login session timeouts.
You should limit use of the Administrator role for security reasons.
- Discovery Admin
-
Provides access to network discovery, application detection, and correlation features in the Policies menu. Discovery Admins cannot deploy policies.
- External Database User
-
Provides read-only access to the Firepower System database using an application that supports JDBC SSL connections. For the third-party application to authenticate to the Firepower System appliance, you must enable database access in the system settings. On the web interface, External Database Users have access only to online help-related options in the Help menu. Because this role’s function does not involve the web interface, access is provided only for ease of support and password changes.
- Intrusion Admin
-
Provides access to all intrusion policy, intrusion rule, and network analysis policy features in the Policies and Objects menus. Intrusion Admins cannot deploy policies.
- Maintenance User
-
Provides access to monitoring and maintenance features. Maintenance Users have access to maintenance-related options in the Health and System menus.
- Network Admin
-
Provides access to access control, SSL inspection, DNS policy, and identity policy features in the Policies menu, as well as device configuration features in the Devices menus. Network Admins can deploy configuration changes to devices.
- Security Analyst
-
Provides access to security event analysis features, and read-only access to health events, in the Overview, Analysis, Health, and System menus.
- Security Analyst (Read Only)
-
Provides read-only access to security event analysis features and health event features in the Overview, Analysis, Health, and System menus.
- Security Approver
-
Provides limited access to access control and associated policies and network discovery policies in the Policies menu. Security Approvers can view and deploy these policies, but cannot make policy changes.
Externally authenticated users, if assigned no other roles, have minimum access rights based on the settings in LDAP or RADIUS authentication objects and in platform settings. You can assign additional rights to these users, but to remove or change minimum access rights, you must perform the following tasks:
-
Move the user from one list to another in the authentication object or change the user's attribute value or group membership on the external authentication server.
-
Update platform settings.
-
Use the User Management page to remove the access from that user account.
Custom User Roles
In addition to the predefined user roles, you can also create custom user roles with specialized access privileges. Custom user roles can have any set of menu-based and system permissions, and may be completely original or based on a predefined user role. Like predefined user roles, custom roles can serve as the default role for externally authenticated users. Unlike predefined roles, you can modify and delete custom roles.
Selectable permissions are hierarchical, and are based on the Firepower System menu layout. Permissions are expandable if they have sub-pages or if they have more fine-grained permissions available beyond simple page access. In that case, the parent permission grants page view access and the children granular access to related features of that page. Permissions that contain the word “Manage” grant the ability to edit and delete information that other users create.
 Tip |
For pages or features not included in the menu structure, privileges are granted by parent or related pages. For example, the Modify Intrusion Policy privilege also allows you to modify network analysis policies. |
You can apply restricted searches to a custom user role. These constrain the data a user may see in the event viewer. You can configure a restricted search by first creating a private saved search and selecting it from the Restricted Search drop-down menu under the appropriate menu-based permission.
When you configure a custom user role on a Firepower Management Center, all menu-based permissions are available for you to grant. When you configure a custom user role on a managed device, only some permissions are available — those relevant to device functions.
The selectable options under System Permissions allow you to create a user role that can make queries to the external database or escalate to the permissions of a target user role.
Optionally, instead of creating a new custom user role, you can export a custom user role from another appliance, then import it onto your appliance. You can then edit the imported role to suit your needs before you apply it.
Example: Custom User Roles and Access Control
You can create custom user roles for access control-related features to designate whether Firepower System users can view and modify access control and associated policies.
The following table lists custom roles that you could create and user permissions granted for each example. The table lists the privileges required for each custom role. In this example, Policy Approvers can view (but not modify) access control and intrusion policies. They can also deploy configuration changes to devices.
|
Custom Role Permission |
Example: Access Control Editor |
Example: Intrusion & Network Analysis Editor |
Example: Policy Approver |
|---|---|---|---|
|
Access Control |
yes |
no |
yes |
|
Access Control Policy |
yes |
no |
yes |
|
Modify Access Control Policy |
yes |
no |
no |
|
Intrusion Policy |
no |
yes |
yes |
|
Modify Intrusion Policy |
no |
yes |
no |
|
Deploy Configuration to Devices |
no |
no |
yes |
User Account Privileges
The following sections provide a list of the configurable user permissions in the Firepower System and the predefined user roles that can access them. Not all permissions are available on managed devices; permissions available only on the Firepower Management Center are marked accordingly.
Overview Menu
The following table lists, in order, the user role privileges required to access each option in the Overview menu and whether the user role has access to the sub-permissions within. The Security Approver, Discovery Admin, Intrusion Admin, Access Admin, Network Admin, and External Database User roles have no permissions in the Overview menu.
|
Permission |
Admin |
Maint User |
Security Analyst |
Security Analyst (RO) |
|---|---|---|---|---|
|
Dashboards |
yes |
yes |
yes |
yes |
|
Manage Dashboards |
yes |
no |
no |
no |
|
Appliance Information Widget |
yes |
yes |
yes |
yes |
|
Appliance Status Widget (FMC only) |
yes |
yes |
yes |
yes |
|
Correlation Events Widget |
yes |
no |
yes |
yes |
|
Current Interface Status Widget |
yes |
yes |
yes |
yes |
|
Current Sessions Widget |
yes |
no |
no |
no |
|
Custom Analysis Widget (FMC only) |
yes |
no |
yes |
yes |
|
Disk Usage Widget |
yes |
yes |
yes |
yes |
|
Interface Traffic Widget |
yes |
yes |
yes |
yes |
|
Intrusion Events Widget (FMConly) |
yes |
no |
yes |
yes |
|
Network Correlation Widget (FMC only) |
yes |
no |
yes |
yes |
|
Product Licensing Widget (FMC only) |
yes |
yes |
no |
no |
|
Product Updates Widget |
yes |
yes |
no |
no |
|
RSS Feed Widget |
yes |
yes |
yes |
yes |
|
System Load Widget |
yes |
yes |
yes |
yes |
|
System Time Widget |
yes |
yes |
yes |
yes |
|
White List Events Widget (FMC only) |
yes |
no |
yes |
yes |
|
Reporting (FMC only) |
yes |
no |
yes |
yes |
|
Manage Report Templates (FMC only) |
yes |
no |
yes |
yes |
|
Summary |
yes |
no |
yes |
yes |
|
Intrusion Event Statistics (FMC only) |
yes |
no |
yes |
yes |
|
Intrusion Event Performance |
yes |
no |
no |
no |
|
Intrusion Event Graphs (FMC only) |
yes |
no |
yes |
yes |
|
Discovery Statistics (FMC only) |
yes |
no |
yes |
yes |
|
Discovery Performance (FMConly) |
yes |
no |
no |
no |
|
Connection Summary (FMC only) |
yes |
no |
yes |
yes |
Analysis Menu
The following table lists, in order, the user role privileges required to access each option in the Analysis menu and whether the user role has access to the sub-permissions within. Permissions that appear multiple times under different headings will be listed on the table only where they first appear, except to indicate submenu headings. The Security Approver, Intrusion Admin, Access Admin, Network Admin, and External Database User roles have no permissions in the Analysis menu. The Analysis menu is only available on the Firepower Management Center.
|
Menu |
Admin |
Discovery Admin |
Maint User |
Security Analyst |
Security Analyst (RO) |
|---|---|---|---|---|---|
|
Context Explorer |
yes |
no |
no |
yes |
yes |
|
Connection Events |
yes |
no |
no |
yes |
yes |
|
Modify Connection Events |
yes |
no |
no |
yes |
no |
|
Connection Summary Events |
yes |
no |
no |
yes |
yes |
|
Modify Connection Summary Events |
yes |
no |
no |
yes |
no |
|
Security Intelligence Events |
yes |
no |
no |
yes |
yes |
|
Modify Security Intelligence Events |
yes |
no |
no |
yes |
no |
|
Intrusion |
yes |
no |
no |
yes |
yes |
|
Intrusion Events |
yes |
no |
no |
yes |
yes |
|
Modify Intrusion Events |
yes |
no |
no |
yes |
no |
|
View Local Rules |
yes |
no |
no |
yes |
yes |
|
Reviewed Events |
yes |
no |
no |
yes |
yes |
|
Clipboard |
yes |
no |
no |
yes |
yes |
|
Incidents |
yes |
no |
no |
yes |
yes |
|
Modify Incidents |
yes |
no |
no |
yes |
no |
|
Files |
yes |
no |
no |
yes |
yes |
|
Malware Events |
yes |
no |
no |
yes |
yes |
|
Modify Malware Events |
yes |
no |
no |
yes |
no |
|
File Events |
yes |
no |
no |
yes |
yes |
|
Modify File Events |
yes |
no |
no |
yes |
no |
|
Captured Files |
yes |
no |
no |
yes |
yes |
|
Modify Captured Files |
yes |
no |
no |
yes |
no |
|
File Trajectory |
yes |
no |
no |
yes |
yes |
|
File Download |
yes |
no |
no |
yes |
yes |
|
Dynamic File Analysis |
yes |
no |
no |
yes |
no |
|
Hosts |
yes |
no |
no |
yes |
yes |
|
Network Map |
yes |
no |
no |
yes |
yes |
|
Hosts |
yes |
no |
no |
yes |
yes |
|
Modify Hosts |
yes |
no |
no |
yes |
no |
|
Indications of Compromise |
yes |
no |
no |
yes |
yes |
|
Modify Indications of Compromise |
yes |
no |
no |
yes |
no |
|
Servers |
yes |
no |
no |
yes |
yes |
|
Modify Servers |
yes |
no |
no |
yes |
no |
|
Vulnerabilities |
yes |
no |
no |
yes |
yes |
|
Modify Vulnerabilities |
yes |
no |
no |
yes |
no |
|
Host Attributes |
yes |
no |
no |
yes |
yes |
|
Modify Host Attributes |
yes |
no |
no |
yes |
no |
|
Applications |
yes |
no |
no |
yes |
yes |
|
Application Details |
yes |
no |
no |
yes |
yes |
|
Modify Application Details |
yes |
no |
no |
yes |
no |
|
Host Attribute Management |
yes |
no |
no |
no |
no |
|
Discovery Events |
yes |
no |
no |
yes |
yes |
|
Modify Discovery Events |
yes |
no |
no |
yes |
no |
|
Users |
yes |
yes |
no |
yes |
yes |
|
User Activity |
yes |
yes |
no |
yes |
yes |
|
Modify User Activity Events |
yes |
yes |
no |
yes |
no |
|
Users |
yes |
yes |
no |
yes |
yes |
|
Modify Users |
yes |
yes |
no |
yes |
no |
|
Vulnerabilities |
yes |
no |
no |
yes |
yes |
|
Third-party Vulnerabilities |
yes |
no |
no |
yes |
yes |
|
Modify Third-party Vulnerabilities |
yes |
no |
no |
yes |
no |
|
Correlation |
yes |
yes |
no |
yes |
yes |
|
Correlation Events |
yes |
yes |
no |
yes |
yes |
|
Modify Correlation Events |
yes |
yes |
no |
yes |
no |
|
White List Events |
yes |
yes |
no |
yes |
yes |
|
Modify White List Events |
yes |
yes |
no |
yes |
no |
|
White List Violations |
yes |
yes |
no |
yes |
yes |
|
Remediation Status |
yes |
yes |
no |
no |
no |
|
Modify Remediation Status |
yes |
yes |
no |
no |
no |
|
Custom |
yes |
no |
no |
yes |
yes |
|
Custom Workflows |
yes |
no |
no |
yes |
yes |
|
Manage Custom Workflows |
yes |
no |
no |
yes |
yes |
|
Custom Tables |
yes |
no |
no |
yes |
yes |
|
Manage Custom Tables |
yes |
no |
no |
yes |
yes |
|
Search |
yes |
no |
yes |
yes |
yes |
|
Manage Search |
yes |
no |
no |
no |
no |
|
Bookmarks |
yes |
no |
no |
yes |
yes |
|
Manage Bookmarks |
yes |
no |
no |
yes |
yes |
|
Application Statistics |
yes |
no |
no |
yes |
yes |
|
Geolocation Statistics |
yes |
no |
no |
yes |
yes |
|
User Statistics |
yes |
no |
no |
yes |
yes |
|
URL Category Statistics |
yes |
no |
no |
yes |
yes |
|
URL Reputation Statistics |
yes |
no |
no |
yes |
yes |
|
DNS Queries by Record Types |
yes |
no |
no |
yes |
yes |
|
SSL Statistics |
yes |
no |
no |
yes |
yes |
|
Intrusion Event Statistics by Application |
yes |
no |
no |
yes |
yes |
|
Intrusion Event Statistics by User |
yes |
no |
no |
yes |
yes |
|
Security Intelligence Category Statistics |
yes |
no |
no |
yes |
yes |
|
File Storage Statistics by Disposition |
yes |
no |
no |
yes |
yes |
|
File Storage Statistics by Type |
yes |
no |
no |
yes |
yes |
|
Dynamic File Analysis Statistics |
yes |
no |
no |
yes |
yes |
Policies Menu
The following table lists, in order, the user role privileges required to access each option in the Policies menu and whether the user roles has access to the sub-permissions within. The External Database User, Maintenance User, Security Analyst, and Security Analyst (Read Only) roles have no permissions in the Policies menu. The Policies menu is only available on the Firepower Management Center.
Note that the Intrusion Policy and Modify Intrusion Policy privileges also allow you to create and modify network analysis policies.
|
Menu |
Access Admin |
Admin |
Discovery Admin |
Intrusion Admin |
Network Admin |
Security Approver |
|---|---|---|---|---|---|---|
|
Access Control |
yes |
yes |
no |
no |
yes |
yes |
|
Access Control Policy |
yes |
yes |
no |
no |
yes |
yes |
|
Modify Access Control Policy |
yes |
yes |
no |
no |
yes |
no |
|
Modify Administrator Rules |
yes |
yes |
no |
no |
yes |
no |
|
Modify Root Rules |
yes |
yes |
no |
no |
yes |
no |
|
Intrusion Policy |
no |
yes |
no |
yes |
no |
yes |
|
Modify Intrusion Policy |
no |
yes |
no |
yes |
no |
no |
|
Malware & File Policy |
yes |
yes |
no |
no |
no |
yes |
|
Modify Malware & File Policy |
yes |
yes |
no |
no |
no |
no |
|
DNS Policy |
yes |
yes |
no |
no |
yes |
yes |
|
Modify DNS Policy |
yes |
yes |
no |
no |
yes |
no |
|
Identity Policy |
yes |
yes |
no |
no |
yes |
no |
|
Modify Identity Policy |
yes |
yes |
no |
no |
yes |
no |
|
Modify Administrator Rules |
yes |
yes |
no |
no |
yes |
no |
|
Modify Root Rules |
yes |
yes |
no |
no |
yes |
no |
|
SSL Policy |
yes |
yes |
no |
no |
yes |
yes |
|
Modify SSL Policy |
yes |
yes |
no |
no |
yes |
no |
|
Modify Administrator Rules |
yes |
yes |
no |
no |
yes |
no |
|
Modify Root Rules |
yes |
yes |
no |
no |
yes |
no |
|
Prefilter Policy |
yes |
yes |
no |
no |
yes |
yes |
|
Modify Prefilter Policy |
yes |
yes |
no |
no |
yes |
no |
|
Network Discovery |
no |
yes |
yes |
no |
no |
yes |
|
Custom Fingerprinting |
no |
yes |
yes |
no |
no |
no |
|
Modify Custom Fingerprinting |
no |
yes |
yes |
no |
no |
no |
|
Custom Topology |
no |
yes |
yes |
no |
no |
no |
|
Modify Custom Topology |
no |
yes |
no |
no |
no |
no |
|
Modify Network Discovery |
no |
yes |
yes |
no |
no |
no |
|
Application Detectors |
no |
yes |
yes |
no |
no |
no |
|
Modify Application Detectors |
no |
yes |
yes |
no |
no |
no |
|
User 3rd Party Mappings |
no |
yes |
yes |
no |
no |
no |
|
Modify User 3rd Party Mappings |
no |
yes |
no |
no |
no |
no |
|
Custom Product Mappings |
no |
yes |
yes |
no |
no |
no |
|
Modify Custom Product Mappings |
no |
yes |
no |
no |
no |
no |
|
Correlation |
no |
yes |
no |
no |
no |
no |
|
Policy Management |
no |
yes |
no |
no |
no |
no |
|
Modify Policy Management |
no |
yes |
yes |
no |
no |
no |
|
Rule Management |
no |
yes |
no |
no |
no |
no |
| Modify Rule Management |
no |
yes |
yes |
no |
no |
no |
|
White List |
no |
yes |
no |
no |
no |
no |
|
Modify White List |
no |
yes |
yes |
no |
no |
no |
|
Traffic Profiles |
no |
yes |
no |
no |
no |
no |
|
Modify Traffic Profiles |
no |
yes |
yes |
no |
no |
no |
|
Actions |
no |
yes |
yes |
no |
no |
yes |
|
Alerts |
no |
yes |
yes |
no |
no |
yes |
|
Impact Flag Alerts |
no |
yes |
yes |
no |
no |
no |
|
Modify Impact Flag Alerts |
no |
yes |
yes |
no |
no |
no |
|
Discovery Event Alerts |
no |
yes |
yes |
no |
no |
no |
|
Modify Discovery Event Alerts |
no |
yes |
yes |
no |
no |
no |
|
|
no |
yes |
no |
yes |
no |
no |
|
Modify Email |
no |
yes |
no |
yes |
no |
no |
|
Modify Alerts |
no |
yes |
yes |
no |
no |
no |
|
Scanners |
no |
yes |
yes |
no |
no |
no |
|
Scan Results |
no |
yes |
yes |
no |
no |
no |
|
Modify Scan Results |
no |
yes |
yes |
no |
no |
no |
|
Modify Scanners |
no |
yes |
yes |
no |
no |
no |
|
Groups |
no |
yes |
no |
no |
no |
no |
|
Modify Groups |
no |
yes |
yes |
no |
no |
no |
|
Modules |
no |
yes |
no |
no |
no |
no |
|
Modify Modules |
no |
yes |
yes |
no |
no |
no |
|
Instances |
no |
yes |
no |
no |
no |
no |
|
Modify Instances |
no |
yes |
yes |
no |
no |
no |
Devices Menu
The Devices menu table lists, in order, the user role privileges required to access each option in the Devices menu and the sub-permissions within. The Discovery Admin, External Database User, Intrusion Admin, Maintenance User, Security Analyst, and Security Analyst (Read Only) have no permissions in the Devices menu. The Devices menu is only available on the Firepower Management Center.
|
Menu |
Access Admin |
Admin |
Network Admin |
Security Approver |
|---|---|---|---|---|
|
Device Management |
no |
yes |
yes |
yes |
|
Modify Devices |
no |
yes |
yes |
no |
|
NAT |
yes |
yes |
yes |
yes |
|
NAT List |
yes |
yes |
yes |
yes |
|
Modify NAT Policy |
yes |
yes |
yes |
no |
|
VPN |
no |
yes |
yes |
yes |
|
Modify VPN |
no |
yes |
yes |
no |
|
QoS |
yes |
yes |
yes |
no |
|
Modify QoS Policy |
yes |
yes |
yes |
no |
|
Device Management |
no |
yes |
yes |
no |
|
Modify Devices |
no |
yes |
yes |
no |
Object Manager Menu
The Object Manager menu table lists, in order, the user role privileges required to access each option in the Object Manager menu and the sub-permission within. The Discovery Admin, Security Approver, Maintenance User, External Database User, Security Analyst, and Security Analyst (Read Only) have no permissions in the Object Manager menu. The Object Manager menu is available only on theFirepower Management Center.
|
Menu |
Access Admin |
Admin |
Intrusion Admin |
Network Admin |
|---|---|---|---|---|
|
Object Manager |
yes |
yes |
no |
yes |
|
Rule Editor |
no |
yes |
yes |
no |
|
Modify Rule Editor |
no |
yes |
yes |
no |
|
NAT List |
yes |
yes |
no |
yes |
|
Modify Object Manager |
no |
yes |
no |
no |
Cisco AMP
The Cisco AMP permission is available only to the Administrator user role. This permission is available only on the Firepower Management Center.
Deploy Configuration to Devices
The Deploy Configuration to Devices permission is available to the Administrator, Network Admin, and Security Approver roles. This permission is available only on the Firepower Management Center.
System Menu
The following table lists, in order, the user role privileges required to access each option in the System menu and whether the user role has access to the sub-permissions within. The External Database User role has no permissions in the System Menu.
|
Menu |
Access Admin |
Admin |
Discovery Admin |
Intrusion Admin |
Maint User |
Network Admin |
Security Approver |
Security Analyst |
Security Analyst (RO) |
|---|---|---|---|---|---|---|---|---|---|
|
Configuration |
no |
yes |
no |
no |
no |
no |
no |
no |
no |
|
Domains |
no |
yes |
no |
no |
no |
no |
no |
no |
no |
|
Integration |
no |
yes |
no |
no |
no |
yes |
yes |
no |
no |
|
Cisco CSI |
yes |
yes |
no |
no |
no |
yes |
yes |
no |
no |
|
Identity Realms (FMC only) |
yes |
yes |
no |
no |
no |
yes |
yes |
no |
no |
|
Modify Identity Realms (FMC only) |
yes |
yes |
no |
no |
no |
yes |
no |
no |
no |
|
Identity Sources (FMC only) |
yes |
yes |
no |
no |
no |
yes |
yes |
no |
no |
|
Modify Identity Sources (FMC only) |
yes |
yes |
no |
no |
no |
yes |
no |
no |
no |
|
eStreamer |
no |
yes |
no |
no |
no |
no |
no |
no |
no |
|
Host Input Client (FMC only) |
no |
yes |
no |
no |
no |
no |
no |
no |
no |
|
Smart Software Satellite (FMC only) |
yes |
yes |
no |
no |
no |
yes |
yes |
no |
no |
|
Modify Smart Software Satellite (FMC only) |
yes |
yes |
no |
no |
no |
yes |
no |
no |
no |
|
User Management |
no |
yes |
no |
no |
no |
no |
no |
no |
no |
|
Users |
no |
yes |
no |
no |
no |
no |
no |
no |
no |
|
User Roles |
no |
yes |
no |
no |
no |
no |
no |
no |
no |
|
External Authentication (FMC only) |
no |
yes |
yes |
no |
no |
no |
no |
no |
no |
|
Updates |
no |
yes |
no |
no |
no |
no |
no |
no |
no |
|
Rule Updates (FMC only) |
no |
yes |
no |
yes |
no |
no |
no |
no |
no |
|
Rule Update Import Log (FMC only) |
no |
yes |
no |
no |
no |
no |
no |
no |
no |
|
Licenses |
no |
yes |
no |
no |
no |
no |
no |
no |
no |
|
Smart Licences |
no |
yes |
no |
no |
no |
no |
no |
no |
no |
|
Modify Smart Licenses |
no |
yes |
no |
no |
no |
no |
no |
no |
no |
|
Classic Licenses |
no |
yes |
no |
no |
no |
no |
no |
no |
no |
|
Health (FMC only) |
no |
yes |
no |
no |
yes |
no |
no |
yes |
yes |
|
Health Policy (FMC only) |
no |
yes |
no |
no |
yes |
no |
no |
yes |
no |
|
Modify Health Policy (FMC only) |
no |
yes |
no |
no |
yes |
no |
no |
yes |
no |
|
Apply Health Policy (FMC only) |
no |
yes |
no |
no |
yes |
no |
no |
yes |
no |
|
Health Events (FMC only) |
no |
yes |
no |
no |
yes |
no |
no |
yes |
yes |
|
Modify Health Events (FMC only) |
no |
yes |
no |
no |
yes |
no |
no |
yes |
no |
|
Monitoring |
no |
yes |
no |
no |
yes |
yes |
yes |
yes |
no |
|
Audit |
no |
yes |
no |
no |
yes |
no |
no |
no |
no |
|
Modify Audit Log |
no |
yes |
no |
no |
yes |
no |
no |
no |
no |
|
Syslog |
no |
yes |
no |
no |
yes |
no |
no |
no |
no |
|
Statistics |
no |
yes |
no |
no |
yes |
no |
no |
no |
no |
|
Tools |
no |
yes |
no |
no |
yes |
no |
no |
yes |
no |
|
Backup Management |
no |
yes |
no |
no |
yes |
no |
no |
no |
no |
|
Restore Backup |
no |
yes |
no |
no |
yes |
no |
no |
no |
no |
|
Scheduling |
no |
yes |
no |
no |
yes |
no |
no |
no |
no |
|
Delete Other Users’ Scheduled Tasks |
no |
yes |
no |
no |
no |
no |
no |
no |
no |
|
Import/Export |
no |
yes |
no |
no |
no |
no |
no |
no |
no |
|
Discovery Data Purge (FMC only) |
no |
yes |
no |
no |
no |
no |
no |
yes |
no |
|
Whois (FMC only) |
no |
yes |
no |
no |
yes |
no |
no |
yes |
yes |
Help Menu
The Help menu and its permissions are accessible to all user roles. You cannot restrict Help menu options.
Managing User Roles
|
Smart License |
Classic License |
Supported Devices |
Supported Domains |
Access |
|---|---|---|---|---|
|
Any |
Any |
Any |
Any |
Admin |
Each Firepower System user is associated with a user access role or roles. These user roles are assigned permissions that determine access to menus and other options in the system. For example, an analyst needs access to event data to analyze the security of your network, but might not require access to administrative functions for the Firepower System itself. You can grant Security Analyst access to analysts while reserving the Administrator role for the user or users managing the Firepower System.
The Firepower System includes ten predefined user roles designed for a variety of administrators and analysts. These predefined user roles have a set of predetermined access privileges.
You can also create custom user roles with more granular access privileges.
You can also restrict the data that a user role can view in the event viewer by applying a restricted search to that role. To create a custom role with restricted access, you must choose the tables you want to restrict from the Menu Based Permissions list, then choose private saved searches from the Restrictive Search drop-down lists.
You cannot delete predefined user roles, but you can delete custom roles that are no longer necessary. If you want to disable a custom role without removing it entirely, you can deactivate it instead. Note that you cannot delete your own user role or a role that is set as a default user role in a platform settings policy.
Procedure
|
Step 1 |
Choose . |
||
|
Step 2 |
Click the User Roles tab. |
||
|
Step 3 |
Manage user roles:
|
Activating and Deactivating User Roles
|
Smart License |
Classic License |
Supported Devices |
Supported Domains |
Access |
|---|---|---|---|---|
|
Any |
Any |
Any |
Any |
Admin |
You cannot delete predefined user roles, but you can deactivate them. Deactivating a role removes that role and all associated permissions from any user who is assigned that role.
In a multidomain deployment, the system displays custom user roles created in the current domain, which you can edit. It also displays custom user roles created in ancestor domains, which you cannot edit. To view and edit custom user roles in a lower domain, switch to that domain.
 Caution |
If a deactivated role is the only role assigned to a given user, that user can log in and access the User Preferences menu, but is otherwise unable to access the Firepower System. |
Procedure
|
Step 1 |
Choose . |
|
Step 2 |
Click the User Roles tab. |
|
Step 3 |
Click the slider next to the user role you want to activate or deactivate. If the controls are dimmed, the configuration belongs to an ancestor domain, or you do not have permission to modify the configuration. If you deactivate, then reactivate, a role with Lights-Out Management while a user with that role is logged in, or restore a user or user role from a backup during that user’s login session, that user must log back into the web interface to regain access to IPMItool commands. |
Creating Custom User Roles
|
Smart License |
Classic License |
Supported Devices |
Supported Domains |
Access |
|---|---|---|---|---|
|
Any |
Any |
Any |
Any |
Admin |
 Caution |
Users with menu-based User Management permissions have the ability to elevate their own privileges or create new user accounts with extensive privileges, including the Administrator user role. For system security reasons we strongly recommend you restrict the list of users with User Management permissions appropriately. |
Procedure
|
Step 1 |
Choose . |
|
Step 2 |
Click the User Roles tab. |
|
Step 3 |
Click Create User Role. |
|
Step 4 |
In the Name field, enter a name for the new user role. User role names are case sensitive. |
|
Step 5 |
Optionally, add a Description. |
|
Step 6 |
Choose menu-based permissions for the new role. When you choose a permission, all of its children are chosen, and the multi-value permissions use the first value. If you clear a high-level permission, all of its children are cleared also. If you choose a permission but not its children, it appears in italic text. Copying a predefined user role to use as the base for your custom role preselects the permissions associated with that predefined role. |
|
Step 7 |
Optionally, set database access permissions for the new role by checking or unchecking the External Database Access checkbox. |
|
Step 8 |
Optionally, on Firepower Management Centers, set escalation permissions for the new user role as described in Configuring a Custom User Role for Escalation. |
|
Step 9 |
Click Save. |
Copying User Roles
|
Smart License |
Classic License |
Supported Devices |
Supported Domains |
Access |
|---|---|---|---|---|
|
Any |
Any |
Any |
Any |
Admin |
You can copy an existing role to use as the basis for a new custom role. This preselects the existing role’s permissions in the User Role Editor so you can model one role on another.
You can copy any existing role, including predefined user roles and custom user roles inherited from ancestor domains.
Procedure
|
Step 1 |
Choose . |
|
Step 2 |
Click the User Roles tab. |
|
Step 3 |
Click Copy ( |
|
Step 4 |
Enter a new Name. The system
creates a default name for the new user role by combining the name of the
original user role and the
|
|
Step 5 |
Enter a new Description. The system retains the description of the original user role if you do not overwrite it. |
|
Step 6 |
Optionally, modify the menu-based permissions inherited from the original user role. When you choose a permission, all of its children are chosen, and the multi-value permissions use the first value. If you clear a high-level permission, all of its children are cleared also. If you choose a permission but not its children, the permission appears in italic text. |
|
Step 7 |
Optionally, set the database access permissions for the new role by checking or unchecking the External Database Access checkbox. |
|
Step 8 |
Optionally, set escalation permissions for the new user role as described in Configuring a Custom User Role for Escalation. |
|
Step 9 |
Click Save. |
Editing Custom User Roles
|
Smart License |
Classic License |
Supported Devices |
Supported Domains |
Access |
|---|---|---|---|---|
|
Any |
Any |
Any |
Any |
Admin |
You cannot edit predefined user roles.
In a multidomain deployment, the system displays custom user roles created in the current domain, which you can edit. It also displays custom user roles created in ancestor domains, which you cannot edit. To view and edit custom user roles in a lower domain, switch to that domain.
Procedure
|
Step 1 |
Choose . |
|
Step 2 |
Click the User Roles tab. |
|
Step 3 |
Click Edit ( |
|
Step 4 |
Modify the Name and Description fields. User role names are case sensitive. |
|
Step 5 |
Choose menu-based permissions for the user role. When you choose a permission, all of its children are chosen, and the multi-value permissions use the first value. If you clear a high-level permission, all of its children are cleared also. If you choose a permission but not its children, the permission appears in italic text. |
|
Step 6 |
Optionally, set the database access permissions for the role by checking or unchecking the External Database Access checkbox. |
|
Step 7 |
Optionally, on Firepower Management Centers, set escalation permissions for the user role as described in Configuring a Custom User Role for Escalation. |
|
Step 8 |
Click Save. |
User Role Escalation
You can give custom user roles the permission, with a password, to temporarily gain the privileges of another, targeted user role in addition to those of the base role. This allows you to easily substitute one user for another during an absence, or to more closely track the use of advanced user privileges.
For example, a user whose base role has very limited privileges may escalate to the Administrator role to perform administrative actions. You can configure this feature so that users can use their own passwords, or so they use the password of another user that you specify. The second option allows you to easily manage one escalation password for all applicable users.
Note that only one user role at a time can be the escalation target role. You can use a custom or predefined user role. Each escalation lasts for the duration of a login session and is recorded in the audit log.
Setting the Escalation Target Role
|
Smart License |
Classic License |
Supported Devices |
Supported Domains |
Access |
|---|---|---|---|---|
|
Any |
Any |
Any |
Any |
Admin |
You can assign any of your user roles, predefined or custom, to act as the system-wide escalation target role. This is the role to which any other role may escalate, if it has the ability.
Procedure
|
Step 1 |
Choose . |
||
|
Step 2 |
Click User Roles. |
||
|
Step 3 |
Click Configure Permission Escalation. |
||
|
Step 4 |
Choose a user role from the drop-down list. |
||
|
Step 5 |
Click OK to save your changes.
|
Configuring a Custom User Role for Escalation
|
Smart License |
Classic License |
Supported Device |
Supported Domains |
Access |
|---|---|---|---|---|
|
Any |
Any |
Any |
Any |
Admin |
Consider the needs of your organization when you configure the escalation password for a custom role. If you want to easily manage many escalating users, you may want to choose another user whose password serves as the escalation password. If you change that user’s password or deactivate that user, all escalating users who require that password are affected. This allows you to manage user role escalation more efficiently, especially if you choose an externally authenticated user that you can manage centrally.
Procedure
|
Step 1 |
Begin configuring your custom user role as described in Creating Custom User Roles. |
||
|
Step 2 |
In System Permissions, choose the Set this role to escalate to: check box. The current escalation target role is listed beside the check box. |
||
|
Step 3 |
Choose the password that this role uses to escalate. You have two options:
|
||
|
Step 4 |
Click Save. |
Escalating Your User Role
|
Smart License |
Classic License |
Supported Device |
Supported Domains |
Access |
|---|---|---|---|---|
|
Any |
Any |
FMC |
Any |
Any |
When a user has an assigned custom user role with permission to escalate, that user may escalate to the target role’s permissions at any time. Note that escalation has no effect on user preferences.
Before you begin
-
Confirm that a system administrator configured the escalation target role or custom user role for escalation as described in Setting the Escalation Target Role or Configuring a Custom User Role for Escalation.
Procedure
|
Step 1 |
From the drop-down list under your user name, choose Escalate Permissions. |
||
|
Step 2 |
Enter the authentication password. |
||
|
Step 3 |
Click Escalate. You now have all permissions of the escalation target role in addition to your current role.
|
 )
) )
) )
) )
)
 Feedback