System Setup and Software Installation Guide for Cisco NCS 1001

PDF

System Setup and Software Installation Guide for Cisco NCS 1001

Feature packages

Want to summarize with AI?

Log in

This section explains how Cisco IOS XR packages and software maintenance updates add specific features to Cisco NCS 1001 and how package filenames identify installable content.


A feature package is a software bundle that

  • adds specific functionality to NCS 1001 devices,

  • uses package filenames to identify installable content, and

  • allows selection and installation of features based on operational requirements.

Packages and software maintenance updates (SMUs) can be installed on NCS 1001 devices. Installing a package adds specific features included within that package. Cisco IOS XR software is divided into various packages, allowing you to select which features to run on NCS 1001. Each package contains components that perform specific functions for the device.

The naming convention of the package is <platform>-<pkg>-<pkg version>-<release version>.<architecture>.rpm.

Table 1. Standard packages

Feature Set

Filename

Description

Composite package

Cisco IOS XR Core Bundle + Manageability Package

ncs1001-iosxr-px-k9-7.10.1.tar

Contains required core packages, including OS, Admin, Base, Forwarding, SNMP Agent, FPD, and Alarm Correlation and Netconf-yang, Telemetry, Extensible Markup Language (XML) Parser, HTTP server packages.

Individually-installable optional packages

Cisco IOS XR Security Package

ncs1001-k9sec-1.0.0.0-r7101.x86_64.rpm

Support for Encryption, Decryption, IP Security (IPSec), Secure Socket Layer (SSL), and Public-key infrastructure (PKI).


Package installation and removal workflows

Package installation and removal workflows are related package-management procedures that

  • install a feature package or software maintenance update on a Cisco NCS 1001, and

  • remove the package if it causes an issue.

Package management procedures

Use these procedures to manage packages:

Each linked topic contains a flowchart for its procedure. If an installed software maintenance update or feature package causes an issue, use the removal procedure.


Software repositories for Cisco IOS XR package installation

A software repository is a storage location that

  • holds Cisco IOS XR packages, upgrades, and update files required for installation,

  • enables access for both local and remote installations via supported protocols, and

  • allows routers and remote servers to fetch files through FTP, HTTP, HTTPS, or local file paths.

To install packages (RPM), code upgrades, and updates in XR, you need to copy the required RPMs to a reachable repository to download and install. You can host the repository locally on the router or on a remote server that can be accessed via FTP, HTTP, or HTTPS.

When you access the repository remotely, you must provide a repository URL from where the install files are fetched. The URL contains:

  • IP address of the server

  • Port number of the server

The format of the repository URL is one of the following:

  • FTP: ftp://[;]/

  • HTTP: http://[;]/

  • HTTPS: https://[;]/

  • Local: file:///

    The path to the repository must be under /harddisk:/ location, for example, the URL for HTTP server is http://172.16.0.0:3333/.

    Note

    Username and password are not supported for HTTP and FTP repositories.


Create and configure local repository

Create a local repository on the router hard disk and point the install repository configuration to that location.

The router can serve as a repository to host the RPMs. You must be a root-lr user with access to the router shell. Remote repository is the recommended method to access the RPMs. However, if remote repository is not your preferred option, then you can use the router as a repository to host the RPMs.

Using a local repository removes the need to setup an external server for software installation. In this method, the image files are copied directly to the router, and used to create a repository locally. However, on the downside, the files for future updates must be copied to each router individually.

Follow these steps to create and configure a local repository:

Procedure

1.

Create a directory locally on the router's /harddisk, for example, "new_repo".

[node0_RP0_CPU0:/harddisk:]$mkdir /harddisk\:/new_repo
2.

Copy the required RPMs and ISO files (using the copy or scp command) from the server to the local directory on the router.

3.

Access the shell of the router using run the command and untar the RPMs.

Example:

Router#run
[node:~]$cd <directory-with-rpms>
[node:~]$tar -xvzf <rpm-name>.tgz
4.

Exit from the shell.

5.

Configure the local repository.

Example:


RP/0/RP0/CPU0:ios# install repository new_repo url file:/harddisk:/new_repo 
RP/0/RP0/CPU0:ios#install commit 
RP/0/RP0/CPU0:ios# show running-config install repository new_repo   
Mon Mar  6 16:46:45.891 IST install 
 repository new_repo   url file:/harddisk:/new_repo  ! 
! 
Note

Only the top-level packages are displayed. The contents of the repository are displayed only when the configured repository is valid, and the RPMs are present in the repository. It displays only the packages that are available in the repository and not part of the active system.

The router accesses locally stored RPM and ISO files from the configured repository for software installation and upgrades.


Create and configure external repository

Create repository metadata on an external server and configure Cisco NCS 1001 to access that repository.

To create an external repository, use a server that can be reached over HTTP, HTTPS, or FTP. The following instructions are applicable to Linux distribution systems. Using an external repository provides a central common repository to be used across devices. This eliminates the need to copy files for future updates to each router individually. It also serves as a single source when new RPMs (bug fixes, packages, and updates) are made available. This is the recommended method to setup a repository.

Ensure that you have completed the following tasks:

  • Set up your HTTP, HTTPS, or FTP server. Ensure that the server is reachable.

  • Install the createrepo utility on the Linux distribution system (if not installed already).

Follow these steps to create and configure an external repository:

Procedure

1.

Create a new directory on the server and copy all the RPMs to a directory. This directory hosts the repository and must be accessible to the HTTP, HTTPS, or FTP server that the router will use to access the repository. For example, /var/www/html, is the directory where the repository will be created.

If the RPM files are archived (.tar format) or compressed (.tgz or .gz format), extract the files. The files hierarchically arrange in sub directories under the main directory that is used as a repository.

2.

Convert the directory to a repository by running 'createrepo </path/to/repo-dir/>' . This creates a directory named repodata with the metadata of all the RPMs.


[node]$createrepo --database /var/www/html/
Saving Primary metadata
Saving file lists metadata
Saving other metadata
Generating sqlite DBs
Sqlite DBs complete
[node]$cd /var/www/html/
[node]$ls
Repodata

If you add new packages to the repository, change, or remove packages from the repository, you must run createrepo command again to update the metadata. This ensures that the package manager chooses the correct packages.

3.

Configure the external repository.


RP/0/RP0/CPU0:ios# install repository new_repo url file:/harddisk:/new_repo RP/0/RP0/CPU0:ios#install commit 
RP/0/RP0/CPU0:ios# show running-config install repository new_repo   
Mon Mar  6 16:46:45.891 IST install 
repository new_repo   url file:/harddisk:/new_repo  ! !

Verify connectivity to the server and check the contents of the repository.

The external repository is available for package installation operations from Cisco NCS 1001 routers.


Install packages

Upgrade the Cisco NCS 1001 system or install patches by adding software packages, ISO images, or software maintenance updates (SMUs). Bundles such as .tar files may contain multiple packages for streamlined updates.

Complete this task to upgrade the system or install a patch. The system upgrade is done using an ISO image file, while the patch installation is done using packages and SMUs. This task is also used to install .tar files. The .tar file contains multiple packages and SMUs that are merged into a single file. A single .tar file can contain up to 64 individual files. The packaging format defines one RPM per component, without dependency on the card type.

Note

To install a System Admin package or a XR package, execute the install commands in System Admin EXEC mode or XR EXEC mode respectively. All install commands are applicable in both these modes.

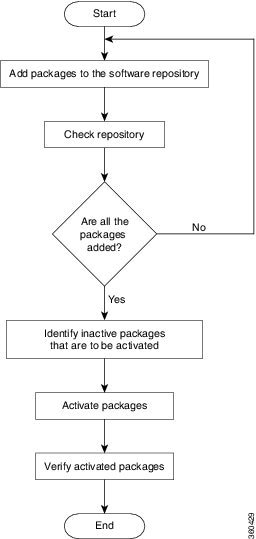
The workflow for installing a package is shown in this flowchart.

Figure 1. Installing Packages Workflow

Add packages workflow

Note

Disable auto-fpd upgrade before start of software upgrade.


RP/0/RP0/CPU0:ios#configure
RP/0/RP0/CPU0:ios(config)#fpd auto-upgrade disable
RP/0/RP0/CPU0:ios(config)#commit
RP/0/RP0/CPU0:ios(config)#end

Before you begin

  • Configure and connect to the management port. You can access the installable file through the management port. For details about configuring the management port, see Configure the management interface.

  • You need to create either local or external repository to copy the tar file from FTP or TFTP server. For more information, See Creating Repository to Access Files for Upgrading IOS XR Software.

  • Copy the package to be installed either on the NCS 1001 hard disk or on a network server to which the NCS 1001 has access.

  • When ncs1001-k9sec package is not installed, use only FTP or TFTP to copy files or during the install add operation.

Procedure

1.

Download the install package files.

For details about download install package files, see Download install package files.

2.

Add and verify the install packages.

For details about add and verify install packages, see Add and verify install packages.

3.

Activate and commit the install packages.

For details about activate and commit install packages, see Activate and commit install packages.

The selected packages are downloaded, added to the repository, activated, and committed.

What to do next

  • After performing a system upgrade, upgrade FPD by using the upgrade hw-module location all fpd all command from the Cisco IOS XR mode. The progress of FPD upgrade process can be monitored using the show hw-module fpd command.

  • Reload NCS 1001 if any FPD status is in RLOAD REQ state. If CTRL FPGA is in RLOAD REQ state, use the hw-module location 0/0 reload command. If Daisy Duke or BIOS is in RLOAD REQ state, use the hw-module location 0/RP0 reload command.

  • Verify the installation using the install verify packages command.

  • Uninstall the packages or SMUs if their installation causes any issues on the NCS 1001. See uninstall packages.

    Note

    ISO images cannot be uninstalled. However, you can perform a system downgrade by installing an older ISO version.


Download install package files

Obtain the install package files and ensure they are available on your router or repository for software upgrades.

Use this task when you need to upgrade Cisco NCS 1001 software and must place package files where the install operation can access them.

Procedure

1.

Log into the Cisco software download site with your Cisco user ID and password.

2.

Click Browse All to see the product categories.

3.

Select the software either by searching across all product categories or by entering the complete product name or a partial string in the search box.

Example:

For example, NCS1001 software download page is available at Cisco software download site

4.

Download the Cisco IOS tar file either to FTP or TFTP server.

5.

Copy the tar file from the FTP or TFTP server either to router's harddisk or external repository.

Example:

RP/0/RP0/CPU0:ios#copy tftp:ncs1001-iosxr-px-k9-7.10.1.tar harddisk
RP/0/RP0/CPU0:ios#copy ftp:ncs1001-iosxr-px-k9-7.10.1.tar harddisk
Note

This operation may take time, depending on the size of the files being added. For details about configuring the repository, see Creating Repository to Access Files for Upgrading IOS XR Software.

The install package files are stored on the router hard disk or in the configured repository, ready for use in the upgrade process.


Add and verify install packages

Add packages to the install repository and verify the add operation.

Follow these steps to add and verify install packages:

Procedure

1.

Execute install add command to extract and install the packages from the tar file.

  • install add source<tftp transfer protocol>/package_path/ filename1filename2...
  • install add source<ftp or sftp transfer protocol>//user@server:/package_path/ filename1filename2...

Example:

RP/0/RP0/CPU0:ios#install add source harddisk: ncs1001-k9sec-1.0.0.0-r7101.x86_64.rpm

or

RP/0/RP0/CPU0:ios#install add source tftp://10.58.230.32/mystique/iso/7.10.1/ ncs1001-mini-x-7.10.1.iso ncs1001-k9sec-1.0.0.0-r7101.x86_64.rpm

Thu Jul 25 14:26:43.661 CEST
Jul 25 14:26:47 Install operation 13 started by root:
 install add source tftp://10.58.230.32/mystique/iso/7.10.1 ncs1001-k9sec-1.0.0.0-r7101.x86_64.rpm ncs1001-mini-x-7.10.1.iso
Jul 25 14:26:49 Install operation will continue in the background
Note
  • A space must be provided between the package_path and filename.

  • Install operation over IPv6 is not supported.

2.

Execute show install repository to display packages that are added to the repository.

Example:

RP/0/RP0/CPU0:router#show install repository
3.

(Optional) Execute the show install request command to display the operation ID of the add operation and its status. The operation ID can be used later to execute the activate command.

Example:

RP/0/RP0/CPU0:ios#show install request

User root, Op Id 13
install add  
ncs1001-k9sec-1.0.0.0-r7101.x86_64.rpm
ncs1001-mini-x-7.10.1.iso

The install add operation 13 is 30% complete

........
........
Jul 25 14:46:36 Install operation 13 finished successfully
4.

Execute show install logoperation ID to display packages that are added to the repository.

Example:

RP/0/RP0/CPU0:ios#show install log 13

Thu Jul 25 14:48:53.270 CEST
Jul 25 14:26:47 Install operation 13 started by root:
 install add source tftp://10.58.230.32/mystique/iso/7.10.1 ncs1001-k9sec-1.0.0.0-r7101.x86_64.rpm ncs1001-mini-x-7.10.1.iso 
Jul 25 14:26:48 Action 1: install add action started
Jul 25 14:26:49 Install operation will continue in the background
Jul 25 14:46:34 Packages added:
Jul 25 14:46:34     ncs1001-k9sec-1.0.0.0-r7101.x86_64.rpm
Jul 25 14:46:34     ncs1001-mini-x-7.10.1.iso
Jul 25 14:46:34 Action 1: install add action completed successfully
Jul 25 14:46:36 Install operation 13 finished successfully
Jul 25 14:46:36 Ending operation 13

Packages are displayed only after the install add operation is complete.

5.

Execute show install inactive to display inactive packages that are present in the repository. Only inactive packages can be activated.

Example:

RP/0/RP0/CPU0:ios#show install inactive

Thu Jul 25 14:51:45.852 CEST
2 inactive package(s) found:
ncs1001-k9sec-1.0.0.0-r7101.x86_64.rpm
ncs1001-mini-x-7.10.1.iso
    

The package files are now present as inactive packages and are ready for activation.


Activate and commit install packages

Activate new software packages on NCS 1001 and commit the active software state to ensure system updates and stability.

Follow these steps to activate and commit install packages:

Procedure

1.

Run one of these commands for the pre-activation checks and load individual components of the installable files onto the router setup.

  • install prepare

  • install prepare id


RP/0/RP0/CPU0:ios#install prepare ncs1001-mini-x-7.10.1.iso
ncs1001-k9sec-1.0.0.0-r7101.x86_64.rpm
or
RP/0/RP0/CPU0:ios#install prepare id 5
Fri Jul 26 11:36:41.163 CEST
Jul 26 11:36:45 Install operation 5 started by root:
install prepare pkg ncs1001-mini-x-7.10.1.iso pkg ncs1001-k9sec-1.0.0.0-r7101.x86_64.rpm
Jul 26 11:36:46 Package list:
Jul 26 11:36:46 ncs1001-mini-x-7.10.1.iso
Jul 26 11:36:46 ncs1001-k9sec-1.0.0.0-r7101.x86_64.rpm
Jul 26 11:36:53 Install operation will continue in the background
Could not start this install operation. Install operation 5 is still in progress
RP/0/RP0/CPU0:152#Jul 26 11:48:57 Install operation 5 finished successfully

The prepare process takes place. This operation is performed in asynchronous mode. The install prepare command runs in the background, and the EXEC prompt is returned.Install prepare is the first step of the activation process. If you use the operation ID, all packages that were added in the specified operation are prepared together. For example, if 5 packages are added in operation 5, by executing the install prepare id 5 command, all 5 packages are prepared together. You do not have to prepare the packages individually.

2.

Run one of these commands for the package activation. install activate package_name

  • Install activate package_name

  • Install activate id operation_id

Example:


RP/0/RP0/CPU0:ios#install activate ncs1001-k9sec-1.0.0.0-r7101.x86_64.rpm ncs1001-mini-x-7.10.1.iso
Thu Jul 25 14:53:27.564 CEST

Jul 25 14:53:30 Install operation 14 started by root:
  install activate pkg ncs1001-k9sec-1.0.0.0-r7101 ncs1001-mini-x-7.10.1
Jul 25 14:53:30 Package list:
Jul 25 14:53:30     ncs1001-k9sec-1.0.0.0-r7101.x86_64.rpm
Jul 25 14:53:31     ncs1001-mini-x-7.10.1.iso

This install operation will reload the system, continue?
 [yes/no]:[yes]   yes

Install operation will continue in the background

RP/0/RP0/CPU0:ios#show install log 14
Thu Jul 25 15:11:49.780 CEST
Jul 25 14:53:30 Install operation 14 started by root:
  install activate pkg ncs1001-k9sec-1.0.0.0-r7101.x86_64.rpm ncs1001-mini-x-7.10.1.iso
Jul 25 14:53:30 Package list:
Jul 25 14:53:30     ncs1001-k9sec-1.0.0.0-r7101.x86_64.rpm
Jul 25 14:53:31     ncs1001-mini-x-7.10.1.iso
Jul 25 14:53:37 Action 1: install prepare action started
Jul 25 14:55:17 The prepared software is set to be activated with reload upgrade
Jul 25 14:55:18 This install operation will reload the system, continue?
 [yes/no]:[yes] yes
Jul 25 14:55:18 Install operation will continue in the background
Jul 25 14:55:18 Start preparing new VM for reload upgrade
Jul 25 15:06:17 All the above nodes completed System Upgrade prepare.
Jul 25 15:06:18 Action 1: install prepare action completed successfully
Jul 25 15:06:19 Action 2: install activate action started
Jul 25 15:06:19 The software will be activated with reload upgrade
Jul 25 15:06:22 Following nodes are available for System Upgrade activate:
Jul 25 15:06:22  0/RP0 
Jul 25 15:11:09 Action 2: install activate action completed successfully
Jul 25 15:11:10 Action 2: install activate action completed successfully
Jul 25 15:11:20 Install operation 14 finished successfully
Jul 25 15:11:21 Ending operation 14

The package configurations are made active on the NCS 1001. As a result, new features and software fixes take effect. This operation is performed in asynchronous mode. The install activate command runs in the background, and the EXEC prompt is returned.

Note

After an RPM of a higher version is activated, and if it is required to activate an RPM of a lower version, use the force option. For example:

Using the traditional method, add the RPM with lower version to the repository and then force the activation:
install add source repository ncs1001-k9sec-1.0.0.0-r7101.x86_64.rpm
install activate ncs1001-k9sec-1.0.0.0-r7101.x86_64.rpm force

or

Using the install update command:
install update source repository ncs1001-k9sec-1.0.0.0-r7101.x86_64.rpm

If you use the operation ID, all packages that were added in the specified operation are activated together. For example, if 5 packages are added in operation 2, all the 5 packages are activated together. You do not have to activate the packages individually.

3.

Run the show install active to display active packages. You can verify from the result that the same image and package versions are active on all RPs and LCs

Example:


RP/0/RP0/CPU0:ios#show install active
Thu Jul 25 17:04:47.600 CEST
Node 0/RP0/CPU0 [RP]
  Boot Partition: xr_lv48
  Active Packages: 2
        ncs1001-xr-7.10.1 version=7.10.1 [Boot image]
        ncs1001-k9sec-1.0.0.0-r7101.x86_64.rpm

Review the command output for operation status, package names, and completion messages.

Displays packages that are active.

4.

Run the install commit to commit the Host, XR, and System Admin active software.

Example:


RP/0/RP0/CPU0:ios#install commit system
Thu Jul 25 17:05:27.364 CEST
Jul 25 17:05:30 Install operation 15 started by root:
  install commit system 
Jul 25 17:05:31 Install operation will continue in the background

Jul 25 17:05:55 Install operation 15 finished successfully
install commit system
Note
  • If you perform a manual or automatic system reload without completing the transaction with the install commit command during system upgrade, the action will revert the system to the point before the install transaction commenced, including any configuration changes. Only the log is preserved for debugging. This action clears all configuration rollback points available. You will not be able to rollback to, or view, any commits made until the install rollback event. Any new commits made after the install rollback event will start from commit ID '1000000001'.

  • On Multi-SDR mode, you can use the install commit sdr to commit just the sdr from where the CLI is being triggered.

5.

Run the show install commit command to display the committed packages.

Example:


RP/0/RP0/CPU0:ios#show install commit
Thu Jul 25 17:07:54.255 CEST
Node 0/RP0/CPU0 [RP]
  Boot Partition: xr_lv48
  Committed Packages: 2
        ncs1001-xr-7.10.1 version=7.10.1[Boot image]
        ncs1001-k9sec-1.0.0.0-r7101.x86_64.rpm

Review the command output for operation status, package names, and completion messages.

The selected package versions are active and fully committed on the NCS 1001.

What to do next

  • After performing a system upgrade, upgrade FPD by using the upgrade hw-module location all fpd all command from the Cisco IOS XR mode. The progress of FPD upgrade process can be monitored using the show hw-module fpd command.

  • Reload NCS 1001 if any FPD status is in RLOAD REQ state. If CTRL FPGA is in RLOAD REQ state, use the hw-module location 0/0 reload command. If Daisy Duke or BIOS is in RLOAD REQ state, use the hw-module location 0/RP0 reload command.

  • Verify the installation using the install verify packages command.

  • Uninstall the packages or SMUs if their installation causes any issues on the NCS 1001. See uninstall packages.

    Note

    ISO images cannot be uninstalled. However, you can perform a system downgrade by installing an older ISO version.


Uninstall packages

Deactivate inactive software packages from the running system and remove package files from the repository.

Complete this task to uninstall a package. All the NCS 1001 functionalities that are part of the uninstalled package are deactivated. Packages that are added in the XR mode cannot be uninstalled from the System Admin mode, and vice versa.

Note

Installed ISO images cannot be uninstalled. Also, kernel SMUs that install third party SMU on host, XR mode and System Admin mode, cannot be uninstalled. However, subsequent installation of ISO image or kernel SMU overwrites the existing installation.

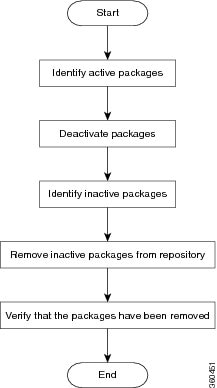
The workflow for uninstalling a package is shown in this flowchart.

Figure 2. Uninstalling Packages Workflow


Procedure

1.

Run the show install active command to displays active packages.

Example:


RP/0/RP0/CPU0:ios#show install active
Thu Jul 25 16:23:36.579 CEST
Node 0/RP0/CPU0 [RP]
  Boot Partition: xr_lv48
  Active Packages: 2
        ncs1001-xr-7.10.1 version=7.10.1 [Boot image]
        ncs1001-k9sec-1.0.0.0-r7101.x86_64.rpm

Only active packages can be deactivated.

2.

Run the show install repository command.

Example:

show install repository

Thu Jul 25 16:52:03.432 CEST
2 package(s) in XR repository:
    ncs1001-mini-x-7.10.1.iso
    ncs1001-k9sec-1.0.0.0-r7101.x86_64.rpm
3.

Run one of these commands:

  • install deactivate package_name
  • install deactivate id operation_id

Example:

RP/0/RP0/CPU0:ios#install deactivate ncs1001-k9sec-1.0.0.0-r7101.x86_64.rpm

or

RP/0/RP0/CPU0:ios#install deactivate id 48

All features and software patches associated with the package are deactivated. You can specify multiple package names and deactivate them simultaneously.

If you use the operation ID, all packages that were added in the specified operation are deactivated together. You do not have to deactivate the packages individually.


Thu Jul 25 16:23:52.789 CEST
Jul 25 16:23:56 Install operation 48 started by root:
  install deactivate pkg ncs1001-k9sec-1.0.0.0-r7101.x86_64.rpm
Jul 25 16:23:56 Package list:
Jul 25 16:23:56     ncs1001-k9sec-1.0.0.0-r7101.x86_64.rpm
Jul 25 16:24:11 Install operation will continue in the background
Jul 25 16:26:38 Install operation 48 finished successfully
4.

Run the show install inactive command.

Example:

RP/0/RP0/CPU0:ios#show install inactive

Thu Jul 25 16:27:54.005 CEST
1 inactive package(s) found:
    ncs1001-k9sec-1.0.0.0-r7101.x86_64.rpm

The deactivated packages are now listed as inactive packages. Only inactive packages can be removed from the repository.

5.

Run the install removepackage_name command to remove the inactive packages from the repository.

Example:

RP/0/RP0/CPU0:ios#install remove ncs1001-k9sec-1.0.0.0-r7101.x86_64.rpm

Thu Jul 25 16:30:11.870 CEST
Jul 25 16:30:14 Install operation 49 started by root:
  install remove ncs1001-k9sec-1.0.0.0-r7101.x86_64.rpm
Jul 25 16:30:14 Package list:
Jul 25 16:30:15     ncs1001-k9sec-1.0.0.0-r7101.x86_64.rpm
Jul 25 16:30:16 Install operation will continue in the background
Jul 25 16:30:21 Install operation 49 finished successfully

The inactive packages are removed from the repository.

Use the install remove command with the id operation-id keyword and argument to remove all packages that were added for the specified operation ID.

6.

Run the show install repository command to display the packages available in the repository.

Example:

RP/0/RP0/CPU0:ios#show install repository

Thu Jul 25 16:52:03.432 CEST
.. package(s) in XR repository:
    ncs1001-mini-x-7.10.1.iso

The package that are removed are no longer displayed in the result.

The specified packages are deactivated, removed from the repository, and no longer listed in the install repository.

What to do next

Install required packages. See install packages.