Starting the VPN Solutions Center Software
Available Languages
Table Of Contents
Starting the VPN Solutions Center Software
Starting the VPN Solutions Center Software
Starting the Watch Dog and the VPN Console
Installing the VPN Solutions Center License
Shutting Down the VPN Solutions Center Software
Starting the VPN Solutions Center Software
Cisco VPN Solutions Center (hereafter referred to as VPNSC) is a network service and management system that defines and monitors both MPLS-based and IPsec-based virtual private network (VPN) services for service providers. VPNSC allows service providers to seamlessly provision and manage intranet and extranet VPNs. The product provides the aspect of operations management that addresses flow-through provisioning, service auditing, and Service Level Agreement (SLA) measurement of IP-based VPN environments.
VPN Solutions Center focuses on provisioning, auditing, and monitoring the links between the customer's edge routers through the service providers's network.

Tips
If you need to convert a VPN Solutions Center Repository that was created prior to version 2.0, see the "Converting a VPN Solutions Center 1.x Repository to 2.0 Format" section.
Starting the VPN Solutions Center Software
Before you can start the VPN Solutions Center software, you must install the license key (see the "Installing the VPN Solutions Center License" section). The license key is supplied in the Right to Use document that is provided when VPN Solutions Center software is purchased.
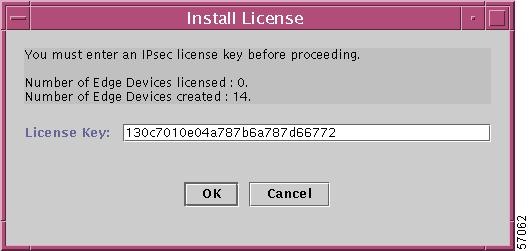
As shown in Figure 3-3, the Install License dialog box displays the number of edge devices you have a license for and the number of edge devices currently created. As you add edge devices to the VPNs defined in the VPN Solutions Center software, the number of edge devices created is incremented.
You can check the number anytime by choosing Tools > License Administration and viewing the updated number of edge devices created.
When you reach 90 percent of the number of devices you are licensed for, VPN Solutions Center sends you a message to alert you to that situation. Cisco Systems strongly recommends that you take measures to upgrade your license agreement at that time.

Note
Before you start the VPN Solutions Center software, complete these tasks:
Step 1
Step 2
Step 3
Step 4
xhost VPNSC_hostnameThe VPNSC_hostname parameter is the name of the VPN Solutions Center workstation. This command configures your system so that the Orbix administrative user (orbixadm) and the VPNSC administrative user (vpnadm) can communicate with your client system.
Starting Orbix
Starting the VPN Solutions Center software requires that you first start the Orbix process and then start the Watch Dog process and the VPN Console as described below. To start the Orbix software, follow these steps:
Step 1
Step 2
su - orbixadmOr if you are logging in remotely, enter this command:
rlogin VPNSC_hostname -l orbixadmStep 3
cd /opt/orbixadm/orbix/Orbix3You are now in the /opt/orbixadm/orbix/Orbix3 directory.
Step 4
C-Shell: source setenvs.csh
K-Shell: . setenvs.sh
Step 5
orbixd &
Starting the Watch Dog and the VPN Console
Step 1
Step 2
su - vpnadmOr if you are logging in remotely, enter this command:
rloginVPNSC_hostname-l vpnadmStep 3
cd /opt/vpnadm/vpnStep 4
C-Shell: source vpnenv.csh
K-Shell: . vpnenv.sh
Step 5
C-Shell: setenv DISPLAY
VPNSC_hostname:0.0K-Shell: export DISPLAY=
VPNSC_hostname:0.0The "VPNSC_hostname" you enter here should be the hostname used to Telnet to the VPN Solutions Center workstation.
Step 6
startwdTo stop the Watch Dog process, issue the stopwd -y command.
The Watch Dog log file is at /opt/vpnadm/vpn/tmp/wdlog.
Step 7
wdclient statusIf you would prefer to bring up the Watch Dog graphical user interface, issue this command:
wdgui &
Note
The following windows appear (see Figure 3-1).
Figure 3-1 VPN Solutions Center Watch Dog User Interface
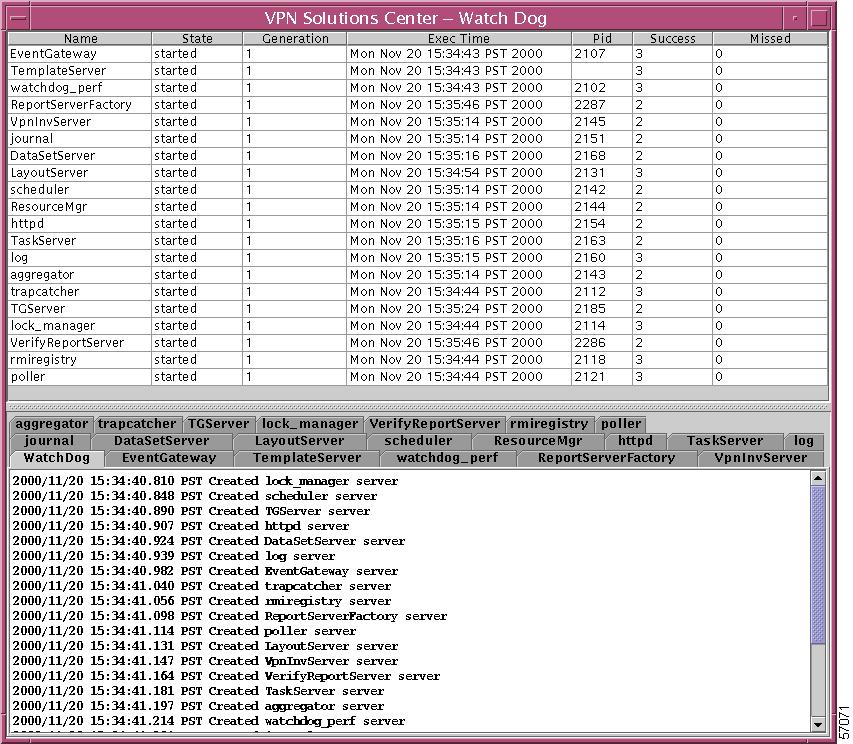
For a detailed description of the Watch Dog graphical user interface, refer to the "wdgui Command" section in Chapter 2, "Watch Dog Commands," of the Cisco VPN Solutions Center: IPsec Solution User Reference, Release 2.0.
Step 8
vpnconsole -mode ipsec &The VPN Solutions Center Security dialog box appears (see Figure 3-2).
Figure 3-2 VPN Solutions Center Security Dialog Box

Step 9
The default username is admin. The default password is admin.
Note
The password for the VPN Console must be at least six ( 6 ) characters in length and no more than eight ( 8 ) characters in length. For details, see "User Administration" in Chapter 9, "VPN Console: Tool Menu," of the Cisco VPN Solutions Center: IPsec Solution User Reference, Release 2.0.
Installing the VPN Solutions Center License
The first time you log in to VPN Solutions Center, the Install License dialog box appears (see Figure 3-3).
An edge device is counted only once when it is added to a VPN as an edge device router in an IPsec network. If another VPN uses an edge device already counted in another VPN, it is not added again to the license count.
Figure 3-3 Installing the License Key
Step 1
Your License Key is supplied in the Right to Use document.
Step 2
When all the VPN Solutions Center 2.0 servers initialize, the VPN Solutions Center VPN Console appears, as illustrated in Figure 3-4.
Figure 3-4 The VPN Console

The VPN Console is organized into two major panes: the hierarchy pane on the left and the data pane on the right. The hierarchy pane displays all the major elements that are configured and managed by VPN Solutions Center and organizes them into three tabs—Devices, Customers, and VPNs.
Click on each tab to see the associated inventory. You can use the open-close icon to view the folders and their related elements, or to close the folder to hide the subelements if desired. The data pane displays the windows and dialog boxes invoked when you provision VPNs through the VPN Solutions Center.
Proceed to the "Starting the VPN Solutions Center Software" section.
Shutting Down the VPN Solutions Center Software
This section assumes that the VPN Solutions Center software is running, and that the software administrative names—vpnadm and orbixadm—are active. It also assumes that Orbix is running as a background process. To shut down the VPN Solutions Center software, execute these commands:
Step 1
Step 2
Step 3
stopwd -y
Step 4
Shutting down Orbix is optional. To shut down Orbix, follow these steps:
Step 5
killit NS
Step 6
ps -ef | grep orbixd
Step 7
kill
orbixd_process_IDStep 8
 Feedback
Contact Cisco
- Open a Support Case

- (Requires a Cisco Service Contract)
This Document Applies to These Products
- Collaboration Endpoints - Retired Products
- Conferencing - Retired Products
- Contact Center - Retired Products
- Optical Networking - Retired Products
- Routers - Retired Products
- Security - Retired Products
- Servers - Unified Computing (UCS) Retired Products
- Storage Networking Retired Products
- Switches - Retired Products
- Video - Retired Products
- Wireless - Retired Products