- Preface
- Product Overview
- Graphical User Interface
- Device and Subdevice Manager
- Users Account Manager
- Configuration and Image Update Jobs Manager
- Groups
- Namespace Manager
- Query Manager
- Data Manager
- Directory Manager
- Parameters Manager
- Templates
- Security Manager
- Log Manager
- Service Manager
- Bulk Data Manager
- Email Manager
- Image Service
- Upgrade or Downgrade Cisco IOS Image
- Backup and Restore
- PIX Firewall Device Support
- ASA Firewall Device Support
- IMGW Device Module Development Kit
- Troubleshooting
- Software Licenses and Acknowledgements
- Index
Groups
To access Group management tasks, log into the system (see Logging In). Then, from the Home page, click the Tools tab. The Tools page appears.
From the Tools page, click Group Mgr . The Group Management page appears showing:
Viewing Groups
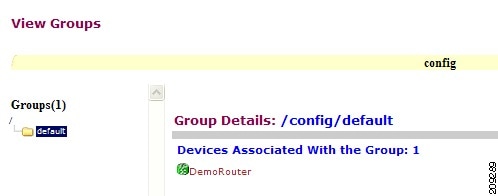
From the Group Management page, click View Groups . The View Groups page appears (see Figure 6-1).
Creating Groups
Step 1![]() From the Group Management page, click
Create Groups
.
From the Group Management page, click
Create Groups
.
The Create Groups page appears (see Figure 6-2).
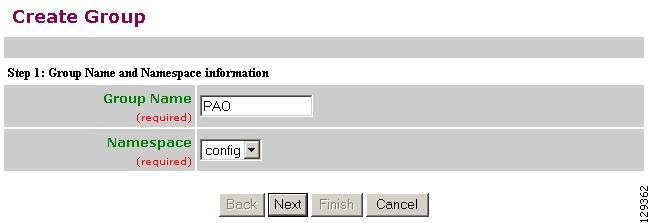
Step 3![]() Use the drop-down arrow to select a namespace value (only
config
available), then click
Next
.
Use the drop-down arrow to select a namespace value (only
config
available), then click
Next
.
The Select Parent Group page appears (see Figure 6-3).
Figure 6-3 Select Parent Group Page
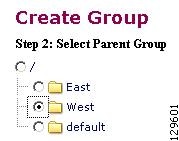
Step 4![]() Click the radio button(s) to select the parent group with which you want the new group to associated, then click Next.
Click the radio button(s) to select the parent group with which you want the new group to associated, then click Next.
The Select Member Devices page appears (see Figure 6-4).
Figure 6-4 Select Member Devices Page
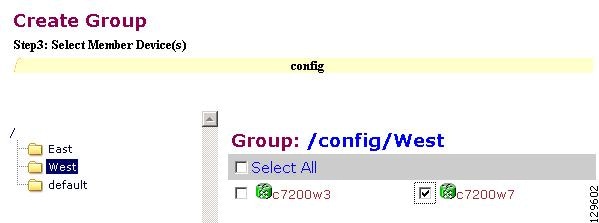
Step 5![]() Check to select the devices you want to be in this group, then click
Finish
.
Check to select the devices you want to be in this group, then click
Finish
.
Editing Groups
Step 1![]() From the Group Management page, click
Edit Group
.
From the Group Management page, click
Edit Group
.
Step 2![]() Click the radio button to select a group to edit, then click
Next
.
Click the radio button to select a group to edit, then click
Next
.
The Rename Group page appears.
Step 3![]() Rename group, if applicable, then click
Finish
to complete the task, or click
Next
to continue (see Figure 6-5).
Rename group, if applicable, then click
Finish
to complete the task, or click
Next
to continue (see Figure 6-5).
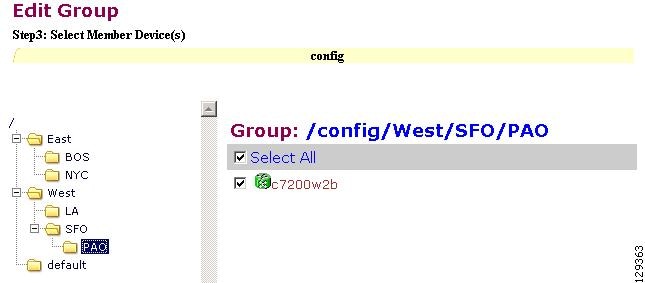
Step 4![]() Click the Group you are editing to bring up its members.
Click the Group you are editing to bring up its members.
Step 5![]() Modify the members in this group by using the check box next to each member, then click
Finish
.
Modify the members in this group by using the check box next to each member, then click
Finish
.
Cloning Groups
Step 1![]() From the Group Management page, click
Clone Group
.
From the Group Management page, click
Clone Group
.
Step 2![]() Select a group to clone.
Select a group to clone.
Step 4![]() Enter new group name. After cloning a group, the devices in the original group will exist in the cloned group.
Enter new group name. After cloning a group, the devices in the original group will exist in the cloned group.
Moving Groups
Step 1![]() From the Group Management page, click
Move Group
.
From the Group Management page, click
Move Group
.
Step 2![]() Select a group to move.
Select a group to move.
Deleting Groups
Step 1![]() From the Group Management page, click
Delete Groups
.
From the Group Management page, click
Delete Groups
.
Step 2![]() Check to select the group(s) you want to delete.
Check to select the group(s) you want to delete.

Note When you delete a group, the devices associated with that group will not be deleted.
Creating Groups Using Search
Step 1![]() From the Group Management page, click
Create Group Using Search
.
From the Group Management page, click
Create Group Using Search
.
The search for devices page appears (see Figure 6-6).
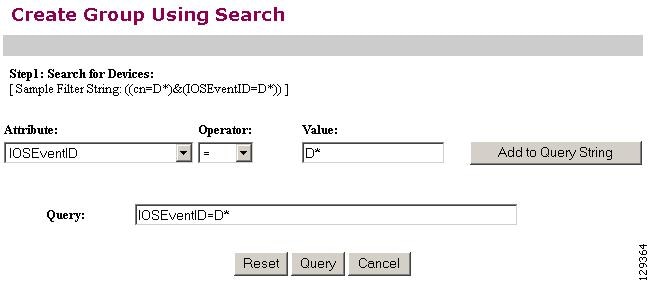
Step 2![]() Enter the appropriate arguments for the search, then click
Query
.
Enter the appropriate arguments for the search, then click
Query
.
Any devices found appear on the next page (see Figure 6-7).
Figure 6-7 Select Devices to Add to Group
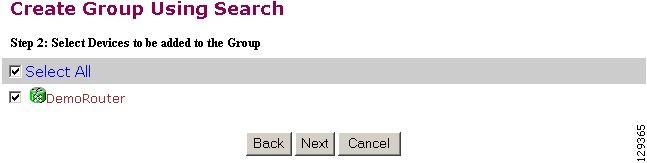
Step 3![]() Check to select the devices you want to become members of this new group, then click
Next
.
Check to select the devices you want to become members of this new group, then click
Next
.
The next page (see Figure 6-8) gives you the choice to add a new group, or just add the devices found to an existing group.
Figure 6-8 Name Group and Namespace
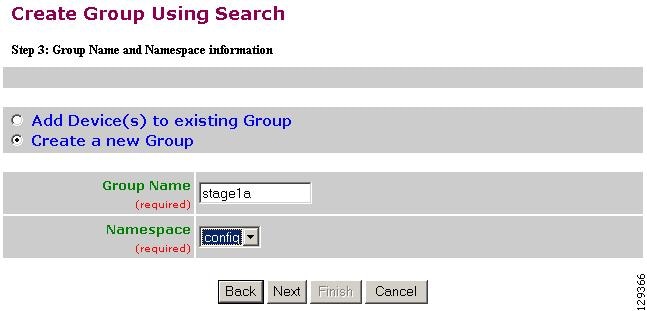
Step 5![]() Use the drop-down arrow to select a namespace value, then click
Next
.
Use the drop-down arrow to select a namespace value, then click
Next
.
Step 6![]() Select group parent, then click
Finish
.
Select group parent, then click
Finish
.
 Feedback