- Preface
- Product Overview
- Graphical User Interface
- Device and Subdevice Manager
- Users Account Manager
- Configuration and Image Update Jobs Manager
- Groups
- Namespace Manager
- Query Manager
- Data Manager
- Directory Manager
- Parameters Manager
- Templates
- Security Manager
- Log Manager
- Service Manager
- Bulk Data Manager
- Email Manager
- Image Service
- Upgrade or Downgrade Cisco IOS Image
- Backup and Restore
- PIX Firewall Device Support
- ASA Firewall Device Support
- IMGW Device Module Development Kit
- Troubleshooting
- Software Licenses and Acknowledgements
- Index
Templates
When creating a template, it is possible to specify variables that will be contextually substituted. Many of these variables are available in the drop-down menu in the Template Editor (see Figure 12-4). It is also possible to create these files offline without the Template Editor and still use these variables.
The basic format of a template file is simply the text of the configuration to be downloaded to your device (see “Sample Template” section). However, you can put variable substitutions of the following form (for example, the variable name could be iosipaddress ):
It is possible to create segments of templates that can be included in other templates. For example, you might have an Ethernet configuration that would be used by multiple devices. In each device template, you could have:
Now, you could centralize all the administration for Ethernet configuration in one file.

Sample Template
The following sample is the configuration template for the DemoRouter ( DemoRouter.cfgtpl ), which is pre-loaded on your system:
Configuration Control Templates
To restart a device with a new image, you need Configuration Control templates that contain the required CLI commands for image activation on particular devices.
For example, if you want to restart a Cisco 3600 Series router with an image named 3600.image, from the device console, you would issue the following CLI commands:
no boot system
boot system flash:3600.image
The content of the Configuration Control template for image activation should contain the CLI commands that you would normally enter from the device console to activate a new image on the device.
Dynamic Flow Control Template
The inventory information collected from image agents is made available for external users by means of the Dynamic Flow Control Template. This enables you to write templates that can control the flow of configuration and image distribution jobs, based on the inventory information.
Inventory Operations
These are the operations that are exposed to you to access the inventory of the device from the Dynamic Flow Control Templates:
Other Operations
These are the operations that are exposed to you to perform an action based on the above criterion from the Dynamic Flow Control Template:
Notes
The invObj.getDram() operation returns the following:
Dram = Main Mem Size + IO Mem Size
As seen in the example above, you can customize the flow of the job depending on the DRAM size.
When a custom job with the above inventory template is submitted, the device is queried for its inventory, and depending on the DRAM size, the decision is made if the image upgrade is to be performed or not. Hence when the above example inventory template is evaluated, if the DRAM size of the device is greater than 6100 bytes the image distribution and image activation will be performed.
Templates for Modular Routers
The template mechanism for the devices has been enhanced to support modular routers. A modular router chassis includes slots in which you can install modules. You can install any module into any available slot in the chassis. Some modules like 2 Ethernet 2 WAN card slot module can in turn have sub slots to install interface cards or line cards. Device management has been extended to support subdevices representing line cards.
Additional attributes representing line card number, line card type, and subdevices have been added to the existing device object structure in the directory server in order to have the same structure to represent the main device or the subdevice.
Currently, card type is a string that maps to the product code of the network module. Since the EPROM data in the card stores part numbers only, not product codes, the part numbers are mapped to product codes. The user uses part numbers and the configuration server maps part numbers to product codes.
In the context of main device, the line card number and line card type fields make no sense and hence are set to NULL value. The subdevices field in the sub device (representing the line card) is set to NULL value.
New interface variable support has been added. These variables are included in the templates, which are parameterize with the interface numbers in the template. These are not attributes. They are special format variables that are replaced by the configuration server based on the interface information, which comes from the device. These variables only specify the relative position of the interface on the module and are replaced by the actual slot number, shelf-ID or port number. The interface variables are wrapped in percent sign (%) characters and specify the type, if any, and the relative position. The configuration server replaces these variables with the interface numbers. The interface type still has to be specified in the CLI using the following syntax:
Interface Variable = %[InterfaceType] RelativePosition%
%FastEthernet 0% for interface FastEthernet
A network module with two FastEthernet ports plugged in Slot 2 would be referred in the configuration CLI as FastEthernet 2/0 and FastEthernet 2/1 and referred in the template as FastEthernet %FastEthernet 0% and FastEthernet %FastEthernet 1%:
Templates for these CLIs would be:
Example 2 (Voice card with two ports plugged in slot 3):
Templates for these CLIs would be:
The main device template does not include links to the subdevice templates. The subdevice templates are appended to the main device template. The line card numbers are a parameter in the subdevice templates.
All the CLI commands which reference a line card interface are specified in the subdevice template for that line card. This implies that any command in the global configuration mode, or otherwise, that refers to a particular line card interface is in the template for that subdevice (line card) and not in the main device template.
Only the CLI commands in the global configuration mode, and not pertaining to the any specific interface, are specified in the main device template.
The port number and channel number are not template parameters since these are fixed for a given line card. The network administrator can configure specific channels on the interfaces by explicitly specifying the channels in the subdevice templates.
Sample Templates for Modular Router
The names of the attributes for slot, slot-unit, line card type and so forth, are used for demonstration purposes.
Modular Router Events
Modular router events are published to the event bus and are accessible to applications connected to the bus. The IOS device publishes the system hardware configuration in the cisco.cns.config.device-details event after hardware discovery. The Cisco Configuration Engine is configured to listen for this event, retrieve it, and extract the hardware configuration of the device.
Following is the DTD of the cisco.cns.config.device-details event that the Cisco IOS device sends:
Dynamic Templates
There might be times when the actual contents of a template needs to be dynamically generated. To do this, you would use the #call mechanism. This executes a JavaScript program whose output becomes part of the template. The program is re-executed each time a device asks for the template.
For example, you might want to distribute the load across the various event gateway processes without permanently assigning a device to a particular event gateway. This is useful because of the limit of 500 devices per event gateway daemon instance.
Let us take the following template as an example:
Here is an example of an event_setup.js that one might use:
The result of this combination would be a template that appears as follows:
The last line is programmatically determined and recalculated every time the template is requested by the device. So the next time a device requests this template, the last line might be:
Simple modifications to event_setup.js could even be used to distribute devices across multiple host devices (by dynamically generating the IP address). It could also be used to affect any part of the device configuration—be it DNS servers or routing tables. Anything that is printed out by the JavaScript program becomes a dynamic part of the template.
Control Structures
The configuration template can include simple control structures such as, if , else and elseif . By using these control structures, the user can include or exclude a block of CLI commands based on a parameter stored in the directory.
The syntax for these # preprocessing control structures is as follows:
Syntax Description
Where constant is an integer, boolean or a string in single quotes and the < URL > is a URL pointing to an attribute in the Directory or Database.

Note Nested #if and #elseif is NOT supported.
Usage Guidelines
The configuration template can include #define entries to define short names for long URLs.
The syntax for the #define preprocessing command is as follows:
#define definition-name < URL > | constant
where < URL > is a reference to an attribute in the directory.
The configuration template can contain another # preprocessing command #include, which allows the inclusion of other configuration templates or the results of an ASP page.
The syntax for the # preprocessing command is as follows:
#include < URL > | ‘< Filename >’ | < Filename >
Whenever an #include directive is encountered, it is replaced by the content of the file.
The following configuration template sample includes either IP sub-template or ISDN sub-template based on the value of the parameter protocol in the directory or database.
Managing Templates
To access Template management tasks, log into the system (see “Logging In” section). Then, from the Home page, click the Tools tab. The Tools page appears.
From the Tools page, click Template Mgr . The Template Manager page appears showing:
Adding a Template
Step 1![]() From the Template Manager page, click
Add Template
.
From the Template Manager page, click
Add Template
.
The Template Engine page appears (see Figure 12-1).
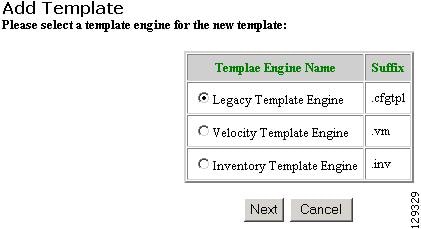
Select the Template Engine for the new template, then click Next .
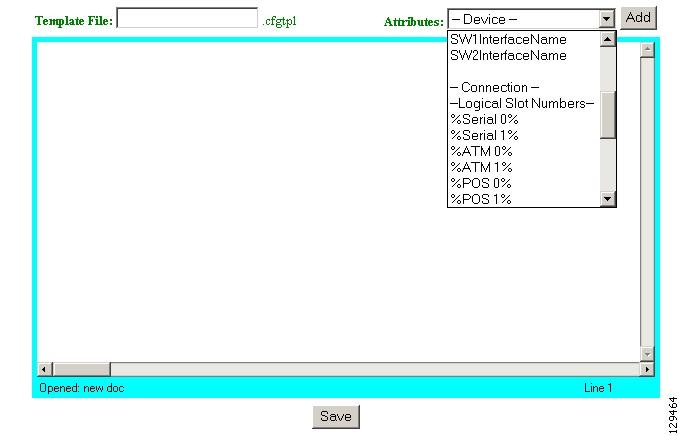
A blank template page appears (see Figure 12-2).
Figure 12-2 Blank Template Page
Step 2![]() Enter the filename for this template in the
Template File
field.
Enter the filename for this template in the
Template File
field.
Table 12-1 shows valid values for these fields.
Step 3![]() To choose the attributes you want to be included in this template, use the
Attributes
menu.
To choose the attributes you want to be included in this template, use the
Attributes
menu.
Step 4![]() To save your entries, click
Save
.
To save your entries, click
Save
.
Editing a Template
Step 1![]() From the Template Manager page, click
Edit Template
.
From the Template Manager page, click
Edit Template
.
The Edit Template list appears (see Figure 12-3).
Figure 12-3 Edit Template List
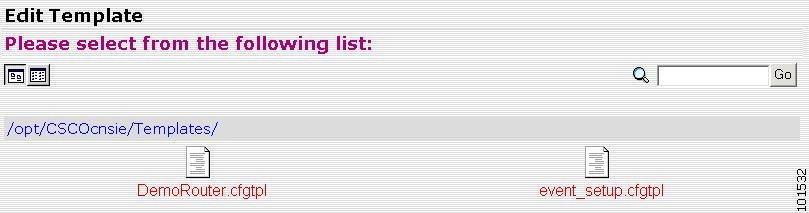
Step 2![]() Click on the icon for the template file you want to edit.
Click on the icon for the template file you want to edit.
Step 3![]() To edit parameters (attribute information):
To edit parameters (attribute information):
a.![]() From the template file page, click
Edit AttributeInfo
.
From the template file page, click
Edit AttributeInfo
.
b.![]() Edit the desired parameter fields.
Edit the desired parameter fields.
c.![]() To clear your entries, click
Reset
.
To clear your entries, click
Reset
.
d.![]() To save your changes, click
Save
.
To save your changes, click
Save
.
Step 4![]() To save and apply, Save and Apply.
To save and apply, Save and Apply.
Step 5![]() To edit template content:
To edit template content:
a.![]() To edit the content of a template, from the template file page, click
Edit Content
.
To edit the content of a template, from the template file page, click
Edit Content
.
The template content appears (see Figure 12-4).
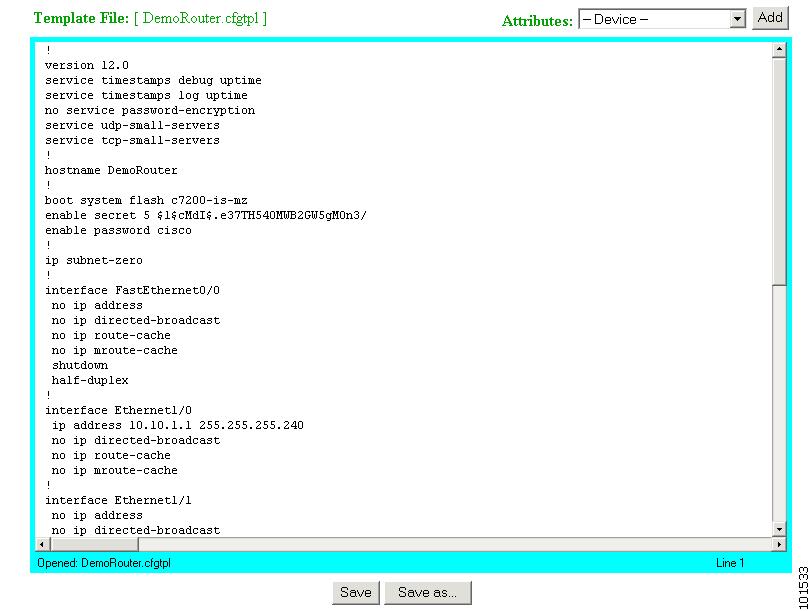
b.![]() Edit the content by adding or deleting attributes.
Edit the content by adding or deleting attributes.
c.![]() To save your edits, click
Save
.
To save your edits, click
Save
.
d.![]() To save as a new template, click
Save as
.
To save as a new template, click
Save as
.
Deleting a Template
Step 1![]() From the Template Manager page, click
Delete Template
.
From the Template Manager page, click
Delete Template
.
The template file list appears.
Step 2![]() Select the template you want to delete.
Select the template you want to delete.
Step 3![]() Delete the desired template file.
Delete the desired template file.
Importing a Template
Step 1![]() From the Template Manager page, click
Import Template
.
From the Template Manager page, click
Import Template
.
Figure 12-5 Importing a Template
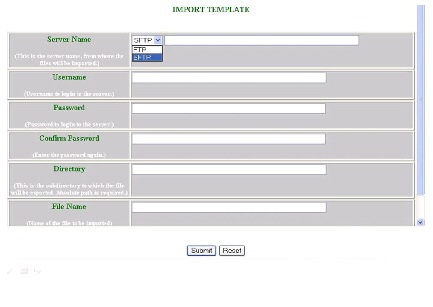
Step 2![]() In the dialog box that appears, enter the FTP or SFTP path of the server name in the
FTP/SFTP
field to which the files have to be exported.
In the dialog box that appears, enter the FTP or SFTP path of the server name in the
FTP/SFTP
field to which the files have to be exported.
Step 3![]() Enter the username in the
Username
field.
Enter the username in the
Username
field.
Step 4![]() Enter the password in the
Password
field.
Enter the password in the
Password
field.
Step 5![]() Reenter the password in the
Confirm Password field.
Reenter the password in the
Confirm Password field.
Step 6![]() Enter the subdirectory path in the Director field to which the file should be exported.
Enter the subdirectory path in the Director field to which the file should be exported.
Step 7![]() Enter the name of the template file in the Filename field, if known, or browse your directory tree to choose the filename you desire.
Enter the name of the template file in the Filename field, if known, or browse your directory tree to choose the filename you desire.
Step 8![]() To clear the field, click
Reset
.
To clear the field, click
Reset
.
Step 9![]() To import the template file, click
Submit
.
To import the template file, click
Submit
.
Exporting Template
Step 1![]() From the Template Manager page, click
Export Template
.
From the Template Manager page, click
Export Template
.
Figure 12-6 Exporting a Template
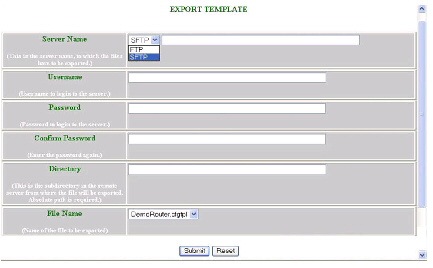
Step 2![]() In the dialog box that appears, enter the FTP or SFTP path of the server name in the
FTP/SFTP
field to which the files have to be exported.
In the dialog box that appears, enter the FTP or SFTP path of the server name in the
FTP/SFTP
field to which the files have to be exported.
Step 3![]() Dnter the username in the
Username
field.
Dnter the username in the
Username
field.
Step 4![]() Enter the password in the
Password
field.
Enter the password in the
Password
field.
Step 5![]() Reenter the password in the
Confirm Password field.
Reenter the password in the
Confirm Password field.
Step 6![]() Enter the subdirectory path in the Director field to which the file should be exported.
Enter the subdirectory path in the Director field to which the file should be exported.
Step 7![]() Enter the name of the template file in the Filename field, if known, or browse your directory tree to choose the filename you desire.
Enter the name of the template file in the Filename field, if known, or browse your directory tree to choose the filename you desire.
Step 8![]() To clear the field, click
Reset
.
To clear the field, click
Reset
.
Step 9![]() To import the femplate file, click
Submit
.
To import the femplate file, click
Submit
.
Importing Local Template
Step 1![]() From the Template Manager page, click
Import Local Template
.
From the Template Manager page, click
Import Local Template
.
Figure 12-7 Import Local Template

Step 2![]() Enter the name of the template file in the Filename field, if known, or browse your directory tree to choose the filename you prefer.
Enter the name of the template file in the Filename field, if known, or browse your directory tree to choose the filename you prefer.
Step 3![]() To import the template file, click
Upload
.
To import the template file, click
Upload
.
 Feedback