- Preface
- Product Overview
- Graphical User Interface
- Device and Subdevice Manager
- Users Account Manager
- Configuration and Image Update Jobs Manager
- Groups
- Namespace Manager
- Query Manager
- Data Manager
- Directory Manager
- Parameters Manager
- Templates
- Security Manager
- Log Manager
- Service Manager
- Bulk Data Manager
- Email Manager
- Image Service
- Upgrade or Downgrade Cisco IOS Image
- Backup and Restore
- PIX Firewall Device Support
- ASA Firewall Device Support
- IMGW Device Module Development Kit
- Troubleshooting
- Software Licenses and Acknowledgements
- Index
Log Manager
To access Log management tasks, log into the system (see “Logging In” section). Then, from the Home page, click the Tools tab. The Tools page appears.
From the Tools Page, click Log Manager. The Log Manager page appears showing:
Viewing Log Files
Step 1![]() From the Log Manager page, click
View Logs
.
From the Log Manager page, click
View Logs
.
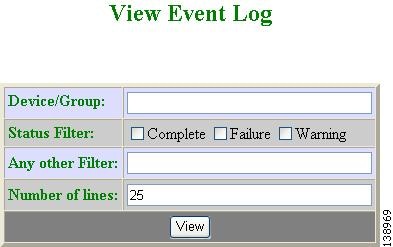
The View Log Files dialog box appears (see Figure 14-1).
Figure 14-1 Selecting Log File to View

Step 2![]() Select the log file you want to view.
Select the log file you want to view.
Table 14-1 shows valid values for these fields.
Step 3![]() For additional attributes related to viewing Event Logs, click
Advanced
.
For additional attributes related to viewing Event Logs, click
Advanced
.
The View Event Log window appears (see Figure 14-2).
Figure 14-2 Event Log Attributes
Step 4![]() Enter the attributes you want to view a specific Event Log, then click
View
.
Enter the attributes you want to view a specific Event Log, then click
View
.
Step 5![]() In the main View Log Files window (see Figure 14-1), set the number lines you want to display.
In the main View Log Files window (see Figure 14-1), set the number lines you want to display.
Step 6![]() To limit the report to display only specific entries, set a case-sensitive keyword filter, or leave blank.
To limit the report to display only specific entries, set a case-sensitive keyword filter, or leave blank.
Clearing Logs
Step 1![]() From the Log Manager page, click
Clear Logs
.
From the Log Manager page, click
Clear Logs
.
The Clear Log Files dialog box appears (see Figure 14-1).
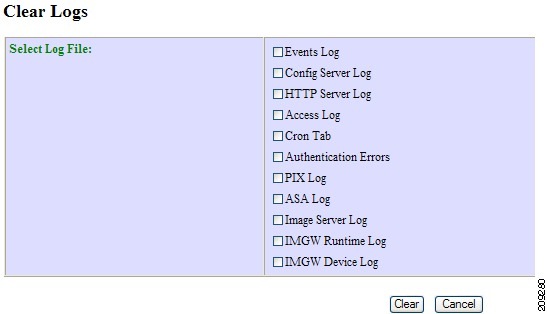
Step 2![]() Check the log files you want to clear.
Check the log files you want to clear.
Step 3![]() To cancel this task, click Cancel.
To cancel this task, click Cancel.
Step 4![]() To clear the selected log files, click Clear.
To clear the selected log files, click Clear.
Exporting Logs
Step 1![]() From the Log Manager page, click
Export Logs
.
From the Log Manager page, click
Export Logs
.
The Export Log Files dialog box appears (see Figure 14-4).
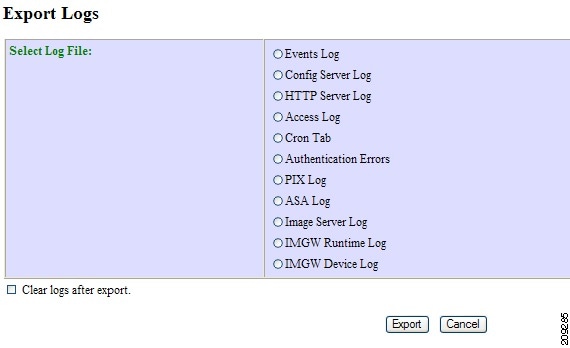
Step 2![]() Check the log files you want to export.
Check the log files you want to export.
Step 3![]() To clear logs after export, check the check box.
To clear logs after export, check the check box.
Step 4![]() To cancel this task, click Cancel.
To cancel this task, click Cancel.
Step 5![]() To export the selected log files, click Export.
To export the selected log files, click Export.
Changing Log Level
Step 1![]() From the Log Manager page, click
Change Log Level
.
From the Log Manager page, click
Change Log Level
.
The Change Log Level dialog box appears (see Figure 14-5):
Figure 14-5 Selecting Log Level
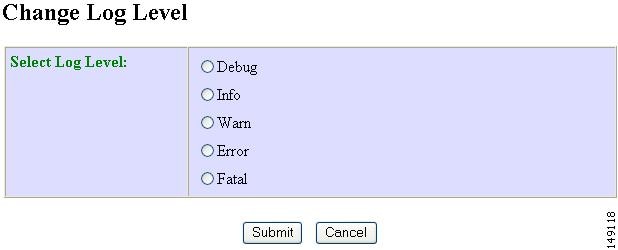
Step 2![]() Select the desired log level by clicking the appropriate radio button, then click
Submit
.
Select the desired log level by clicking the appropriate radio button, then click
Submit
.
 Feedback