- Preface
- Product Overview
- Graphical User Interface
- Device and Subdevice Manager
- Users Account Manager
- Configuration and Image Update Jobs Manager
- Groups
- Namespace Manager
- Query Manager
- Data Manager
- Directory Manager
- Parameters Manager
- Templates
- Security Manager
- Log Manager
- Service Manager
- Bulk Data Manager
- Email Manager
- Image Service
- Upgrade or Downgrade Cisco IOS Image
- Backup and Restore
- PIX Firewall Device Support
- ASA Firewall Device Support
- IMGW Device Module Development Kit
- Troubleshooting
- Software Licenses and Acknowledgements
- Index
Backup and Restore
This chapter describes Backup and Restore management tasks. The Backup and Restore function allows you to backup directory data (configuration templates, device and user information, and so forth) to a remote location.
Backup Procedure
Step 1![]() Log into the Cisco Configuration Engine user interface.
Log into the Cisco Configuration Engine user interface.
Step 2![]() Go to Tools > Data Manager > Schedule Backup.
Go to Tools > Data Manager > Schedule Backup.
The backup information dialog box appears (see Figure 20-1).
Figure 20-1 Backup Schedule Parameters
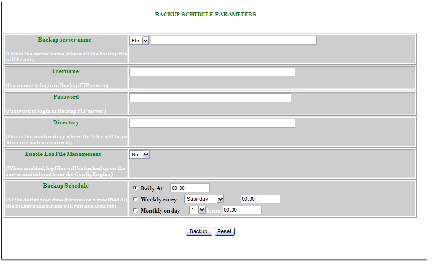
Step 3![]() Use the drop-down arrow to select
FTP
, or
TFTP
.
Use the drop-down arrow to select
FTP
, or
TFTP
.

Note If you select TFTP, the Username, Password, and Directory fields are disabled.
Step 4![]() To specify where you want the backup data to be stored, enter the FTP server name in the
FTP Server Name
field.
To specify where you want the backup data to be stored, enter the FTP server name in the
FTP Server Name
field.
Note To edit or remove a scheduled backup job, enter the crontab-e command.
Table 20-1 shows valid values for these fields.
Step 5![]() To specify the username to log into the FTP server, enter a valid username in the
Username
field.
To specify the username to log into the FTP server, enter a valid username in the
Username
field.
Step 6![]() To specify the password to use to log into the FTP server, enter a valid value in the
Password
field.
To specify the password to use to log into the FTP server, enter a valid value in the
Password
field.
Step 7![]() To specify the subdirectory where the data file is put, enter the absolute path in the
Directory
field.
To specify the subdirectory where the data file is put, enter the absolute path in the
Directory
field.
Step 8![]() Choose whether to
Enable Log File Management
.
Choose whether to
Enable Log File Management
.
Step 9![]() To specify the backup schedule, complete the fields in the
Backup Schedule
pane.
To specify the backup schedule, complete the fields in the
Backup Schedule
pane.
Note The time base for the host system should be set to Coordinated Universal Time (UTC).
Step 10![]() To cancel this task, click
Cancel
.
To cancel this task, click
Cancel
.
Step 11![]() To schedule the backup operation, click
Backup
.
To schedule the backup operation, click
Backup
.
Data Restore Procedure
Step 1![]() Log in to the host system.
Log in to the host system.
Step 2![]() Type datarestore at the command line, then press Enter.
Type datarestore at the command line, then press Enter.
Step 3![]() Provide inputs to following prompts:
Provide inputs to following prompts:
Sample user inputs are shown in bold text.
Definitions
FTP/TFTP Server: <hostname.domainname>, or IP address, of the FTP/TFTP server on which the backup file is located.
DNS Server: IP address of the DNS server. This appears when you enter a hostname instead of an IP address for the server prompt.
FTP Username: username used for FTP server.
FTP Password: password used to log into the FTP server.
Absolute pathname of backup file on FTP/TFTP server: fully specified path of the backup file stored on the FTP server, or TFTP server (relative to TFTP root directory).
 Feedback