- Preface
- Product Overview
- Graphical User Interface
- Device and Subdevice Manager
- Users Account Manager
- Configuration and Image Update Jobs Manager
- Groups
- Namespace Manager
- Query Manager
- Data Manager
- Directory Manager
- Parameters Manager
- Templates
- Security Manager
- Log Manager
- Service Manager
- Bulk Data Manager
- Email Manager
- Image Service
- Upgrade or Downgrade Cisco IOS Image
- Backup and Restore
- PIX Firewall Device Support
- ASA Firewall Device Support
- IMGW Device Module Development Kit
- Troubleshooting
- Software Licenses and Acknowledgements
- Index
Image Service
This chapter describes Image Service management tasks. To access the Image Service feature, click the Image Service tab. The Image Service Functional Overview page appears showing:

Note For External Directory Mode, the Search Parameters tab is called Preconditions.
Working with Images
From the Image Service Functional Overview page, click Images. The Images Functional Overview page appears showing:
Viewing an Image
Step 1![]() From the Images Functional Overview page, click View Image.
From the Images Functional Overview page, click View Image.
The list of images to view appears (see Figure 18-1).
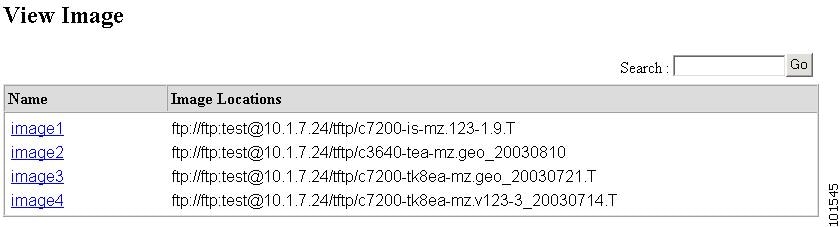
Step 2![]() From the Name column, select the image you want to view.
From the Name column, select the image you want to view.
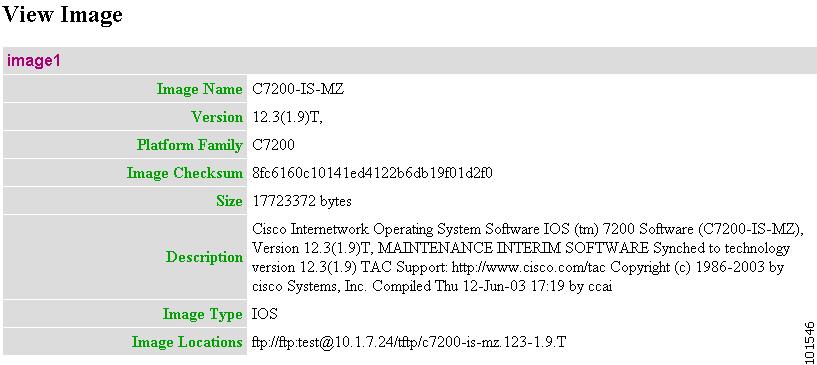
The image information appears (see Figure 18-2).
Figure 18-2 View Image Information
Adding an Image
Step 1![]() From the Image Service Functional Overview page, click Create Image.
From the Image Service Functional Overview page, click Create Image.
The Create Image page appears (see Figure 18-3).
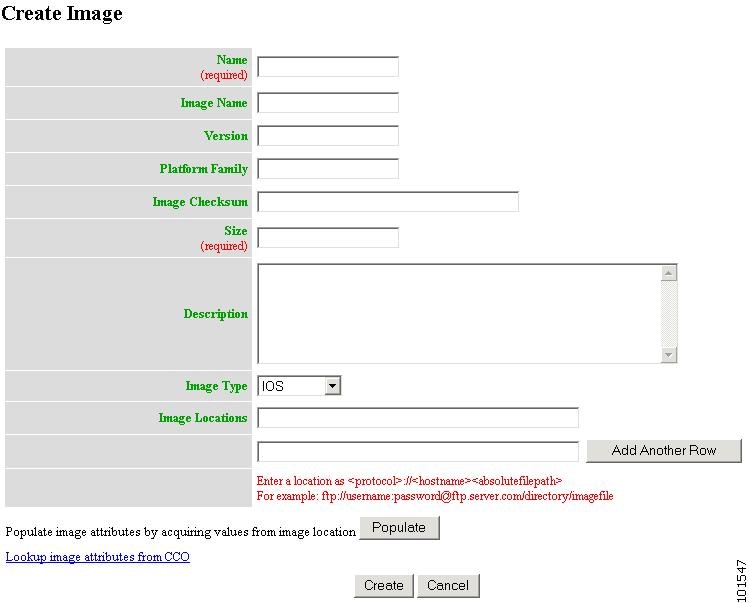
There are two methods for creating an Image Object:
To enter image information manually, jump to Step 2.

Timesaver You can get image attributes for manual entry by clicking the link: Lookup image attributes from Cisco.com.
a.![]() In the Image Location field, enter a valid URL for the desired image.
In the Image Location field, enter a valid URL for the desired image.
Step 2![]() Enter the name of the image used by Image Service to identify this image object in the Name field.
Enter the name of the image used by Image Service to identify this image object in the Name field.
Table 18-1 shows valid values for these attributes.
Step 3![]() Enter the actual image name in the Image Name field.
Enter the actual image name in the Image Name field.
Step 4![]() Enter the version of the image in the Version field.
Enter the version of the image in the Version field.
Step 5![]() Enter the name of the platform family in the Platform Family field.
Enter the name of the platform family in the Platform Family field.
Step 6![]() Enter the image checksum for the image in the Image Checksum field.
Enter the image checksum for the image in the Image Checksum field.
Step 7![]() Enter the size of this file in the Size field.
Enter the size of this file in the Size field.
Step 8![]() Enter a description of the image in the space provided.
Enter a description of the image in the space provided.
Step 9![]() Select an image type from the Image Type drop-down list.
Select an image type from the Image Type drop-down list.
Step 10![]() Enter a valid URL for the image location in the Image Location field.
Enter a valid URL for the image location in the Image Location field.
Follow the proper syntax as described.
Note You can create an image without specifying a location. You can add a location later by using the Edit Image function.
Step 11![]() To add another row for image location, click Add Another Row.
To add another row for image location, click Add Another Row.
You can locate multiple copies of an image on separate servers. This allows you to do load-sharing when updating a large number of devices. Each device in a large group can be associated with a copy of the image (see“Adding Devices” section) located at one of many server locations.
Step 12![]() To cancel this task, click Cancel.
To cancel this task, click Cancel.
Step 13![]() To create this image, click Create.
To create this image, click Create.
Editing an Image
Step 1![]() From the Image Service Functional Overview page, click Edit Image.
From the Image Service Functional Overview page, click Edit Image.
The Edit Image page appears (see Figure 18-4).
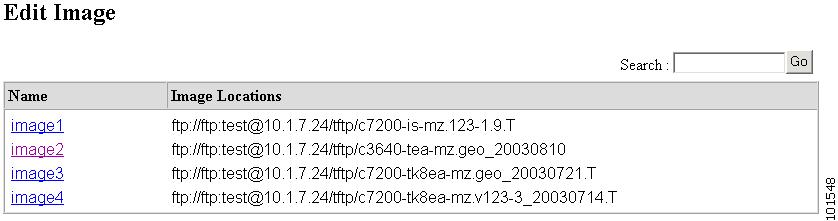
Step 2![]() Select the image you want to edit by clicking the Image Name.
Select the image you want to edit by clicking the Image Name.
The Edit Image information page appears (see).
Figure 18-5 Edit Image Information
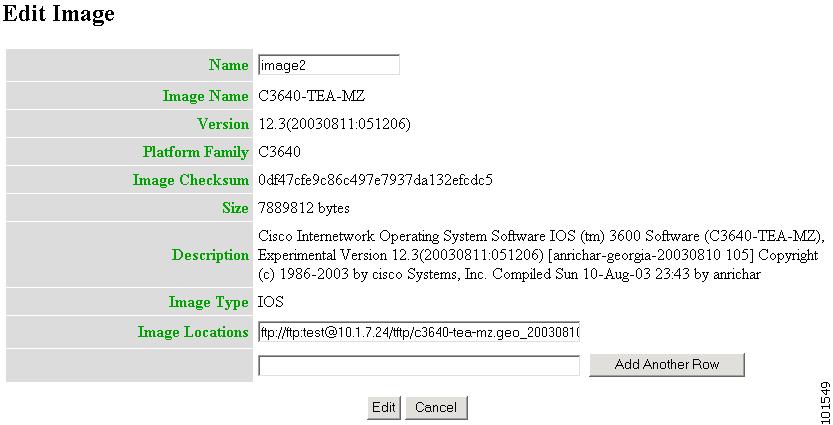
Step 3![]() To edit the image name, enter a new value in the Name field.
To edit the image name, enter a new value in the Name field.
Step 4![]() To edit the image location, enter a valid URL in the Image Location field.
To edit the image location, enter a valid URL in the Image Location field.
Step 5![]() To cancel this task, click Cancel.
To cancel this task, click Cancel.
Step 6![]() To make these changes, click Edit.
To make these changes, click Edit.
Deleting an Image
Step 1![]() From the Image Service Functional Overview page, click Delete Image.
From the Image Service Functional Overview page, click Delete Image.
The Delete Image page appears (see Figure 18-6).
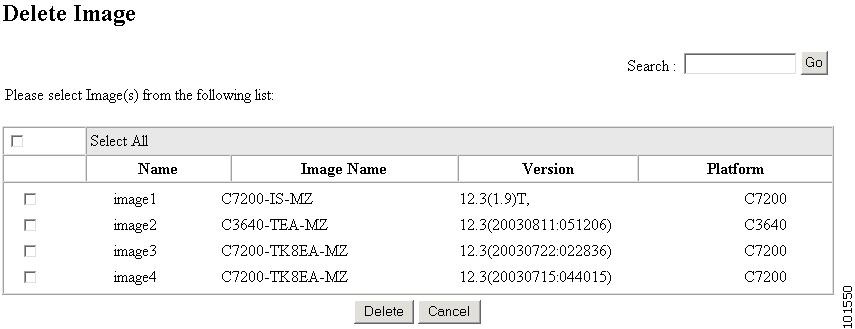
Step 2![]() Check the image(s) you want to delete.
Check the image(s) you want to delete.
Step 3![]() To cancel this task, click Cancel.
To cancel this task, click Cancel.
Step 4![]() To make these changes, click Delete.
To make these changes, click Delete.
Associating Images with Devices
Note To associate a device with the image, the device must have been registered for image service during device object creation by providing an ImageID. If this has not been done, before trying to associate the device, the device must be edited and an ImageID must be provided.
Step 1![]() From the Image Service Functional Overview page, click Associate Image with Device(s).
From the Image Service Functional Overview page, click Associate Image with Device(s).
The Associate Image with Device(s) page appears (see Figure 18-7).
Figure 18-7 Associate Image with Device(s)
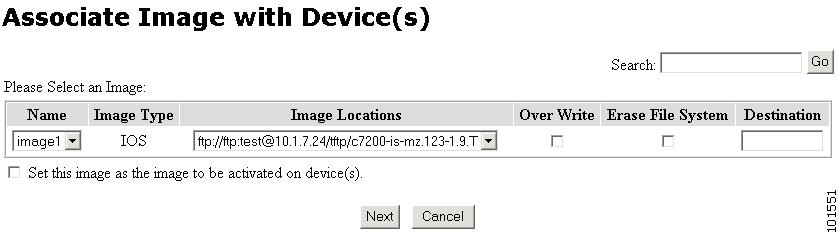
Step 2![]() Select the image from the Name drop-down list.
Select the image from the Name drop-down list.
The Image Type field and Image Location drop-down box are populated with corresponding information for the image.
Step 3![]() From the Image Location drop-down list, select the desired location.
From the Image Location drop-down list, select the desired location.
Step 4![]() In the Destination field, enter a valid URL where the image will be copied.
In the Destination field, enter a valid URL where the image will be copied.
Step 5![]() To assign this image to be the active image after distribution, check Set this image as the Image to be activated on device.
To assign this image to be the active image after distribution, check Set this image as the Image to be activated on device.
Step 6![]() To cancel this task, click Cancel.
To cancel this task, click Cancel.
Step 7![]() To continue, click Next.
To continue, click Next.
Step 8![]() To associate this image with a group of devices, check the group, then click Submit.
To associate this image with a group of devices, check the group, then click Submit.
Step 9![]() To associate this image with specific devices, click View.
To associate this image with specific devices, click View.
The Device list page appears (see Figure 18-8).

Step 10![]() Check the desired device(s).
Check the desired device(s).
Step 11![]() To cancel this task, click Cancel.
To cancel this task, click Cancel.
Step 12![]() To associate this image to the selected devices, click Submit.
To associate this image to the selected devices, click Submit.
Search Parameters
Each Search Parameter can be associated with an action to be performed. In this release, Search Parameters are associated with the action to delete certain files from the file system on a device.
For example, if you want to delete all files that contain .bin from a device, you can create a Search Parameter that states: FileName contains .bin and use this Precondition from the Devices > Delete Files .
From the Image Service Functional Overview page, click Search Parameters .
Note For External Directory Mode, the Search Parameters tab is called Preconditions.
The Search Parameters Functional Overview page appears showing:
Viewing Search Parameters
Step 1![]() From the Search Parameters Functional Overview page, click
View Search Parameters
.
From the Search Parameters Functional Overview page, click
View Search Parameters
.
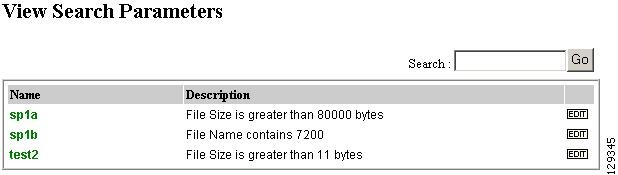
The View Search Parameters page appears (see Figure 18-9).
Figure 18-9 View Search Parameters
Step 2![]() To edit a Precondition, click
Edit
for the desired Precondition, then go to “Editing Search Parameters” section.
To edit a Precondition, click
Edit
for the desired Precondition, then go to “Editing Search Parameters” section.
Creating Search Parameters
Step 1![]() From the Search Parameters Functional Overview page, click
Create Search Parameter
.
From the Search Parameters Functional Overview page, click
Create Search Parameter
.
The Create Search Parameter page appears (see Figure 18-10).
Figure 18-10 Create Search Parameter
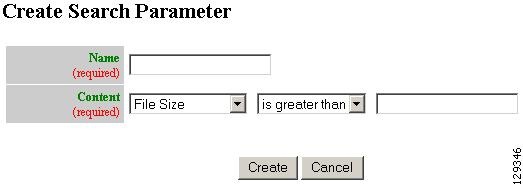
Step 2![]() Enter the name of this Search Parameter.
Enter the name of this Search Parameter.
Step 3![]() Use the drop-down arrow in the left Content menu to select:
Use the drop-down arrow in the left Content menu to select:
a.![]() For
File Size
, use the drop-down arrow in the center Content menu to select:
For
File Size
, use the drop-down arrow in the center Content menu to select:
b.![]() For
File Name
, the only choice is
contains
.
For
File Name
, the only choice is
contains
.
c.![]() For File Timestamp, the only choice is
before
.
For File Timestamp, the only choice is
before
.
Step 4![]() Enter the remaining portion of the argument in the right Content field.
Enter the remaining portion of the argument in the right Content field.
File Size is greater than 80,000 bytes
Step 5![]() To cancel this task, click
Cancel
.
To cancel this task, click
Cancel
.
Editing Search Parameters
Step 1![]() From the Search Parameters Functional Overview page, click
Edit Search Parameter
.
From the Search Parameters Functional Overview page, click
Edit Search Parameter
.
The Edit Search Parameter page appears.
Step 2![]() Select the Search Parameter you want to edit.
Select the Search Parameter you want to edit.
The argument page for the Search Parameter appears (see Figure 18-11).
Figure 18-11 Edit Search Parameter Argument
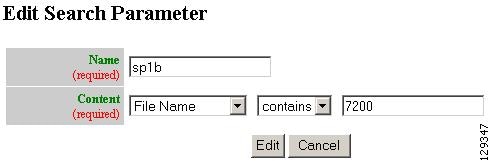
Step 3![]() Edit the name or argument as required.
Edit the name or argument as required.
Step 4![]() To cancel this task, click
Cancel
.
To cancel this task, click
Cancel
.
Step 5![]() To save your changes, click
Edit
.
To save your changes, click
Edit
.
Deleting Search Parameters
Step 1![]() From the Search Parameters Functional Overview page, click
Delete Search Parameter
.
From the Search Parameters Functional Overview page, click
Delete Search Parameter
.
The Delete Search Parameters page appears (see Figure 18-12).
Figure 18-12 Delete Search Parameters
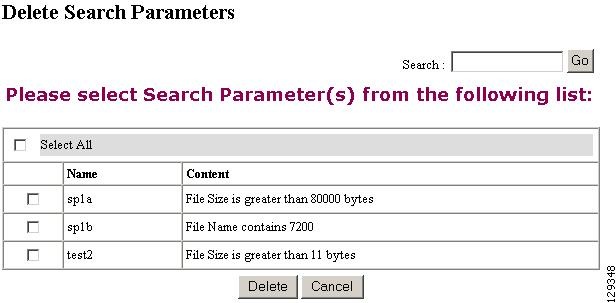
Step 2![]() Check to select the Search Parameter(s) to delete, then click
Delete
.
Check to select the Search Parameter(s) to delete, then click
Delete
.
 Feedback