Create and Use Patch Files

Patch files

A patch file is a file that

  • represents differences (or patches) between plan files

  • enables these differences to be applied to other plan files, and

  • offers a compact, efficient way to manage updates or changes across plans.

A common Cisco Crosswork Planning use case is to create a plan file for deployment. A typical workflow for doing this includes these steps:

  1. Open a plan file from the Cisco Crosswork Planning UI (refer to Open plan files).

  2. Duplicate the plan file using > Make a copy.

  3. Make LSP modifications as needed in the duplicated plan file.

  4. Open both plan files and create a patch file using Actions > Tools > Patches > Create patch.

  5. Deploy the patch file to the network using Actions > Tools > Patches > Apply patch.

Create patch files

Create patch files to automate the process of updating one plan file to match another. This process efficiently identifies additions, deletions, or modifications between the files.

The patch file created identifies how to get to the plan file identified in the To file field from the plan file identified in the From file field. These patch files only include differences in new, modified, and deleted objects that are supported by the Cisco Crosswork Planning YANG model.

Examples:

  • If From file iosnet.txt contains 33 LSPs and To file atlantic.txt contains 23 LSPs, the patch file identifies which 10 LSPs to delete from plan iosnet.txt to create plan atlantic.txt.

  • If From file iosnet.txt contains 10 LSPs and To file atlantic.txt contains 15 LSPs, the patch file identifies which 5 LSPs to add to plan iosnet.txt to create plan atlantic.txt.

  • If both plan files contain the same LSP, but in From file iosnet.txt the LSP has a SetupBW property equal to 100 and in the To file atlantic.txt it does not, the patch file identifies the need to modify the SetupBW property of this LSP in plan iosnet.txt so that it matches plan atlantic.txt.

Complete these steps to create patch files that identify differences between two plan files.

Procedure


Step 1

Open the two plan files that you are using for the patch file creation. For more information, refer to Open plan files.

Step 2

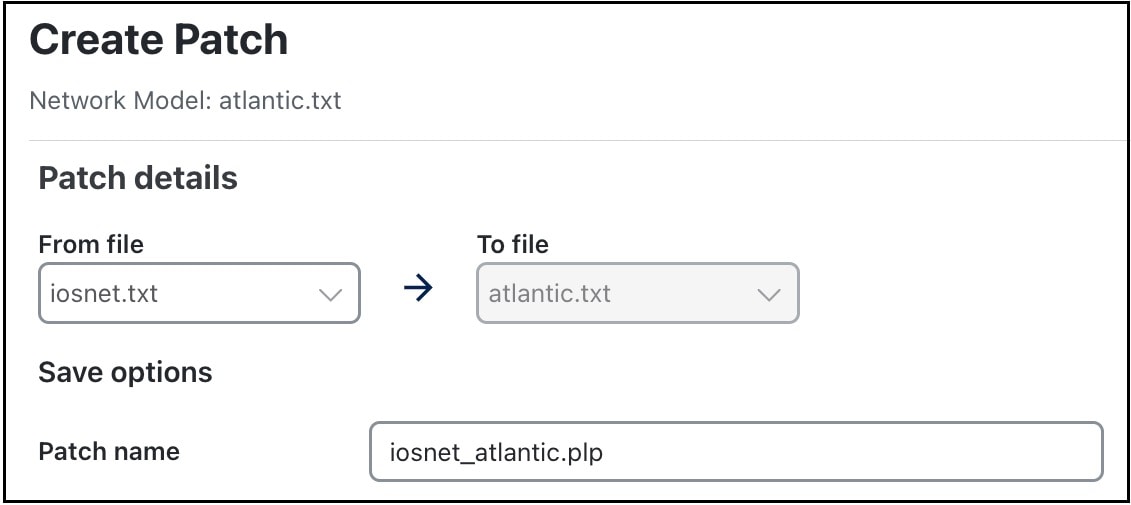
From the plan file you want to use as the target (the "To file"), choose Actions > Tools > Patches > Create patch from the toolbar.

Create patch options

Step 3

From the From file drop-down list, choose the plan file from which you are determining required changes to achieve the plan file identified in the "To file" field.

Step 4

Review the default patch filename, which combines the From and To plan filenames. Change the filename if required. Ensure it ends with a .plp extension. To prevent overwriting a patch file, ensure the filename is unique within its location.

Step 5

Click Create.


The patch file is created successfully. The generated patch file is saved under Network Models > User space > Other files. Use the button under the Actions column to open, download, delete, or view details of the patch file.

What to do next

Use the Edit patch button to edit the patch file. Use the Download button to download the file to your local machine.

Apply patch files

Use this task to make targeted changes or corrections to existing plan files using patch files.

You may need to update plan files with patch files to fix errors, add enhancements, or synchronize the design with new requirements.

Procedure


Step 1

Open the plan file in the Network Design page. For more information, refer to Open plan files.

Step 2

From the toolbar, choose Actions > Tools > Patches > Apply patch.

Step 3

Click Browse to browse to the location where the patch file resides. Choose from these options:

  • From user space: Choose this option to select the patch file saved in your user space.

  • From local: Choose this option to select the patch files saved in your local system. Click Browse, choose the patch file located in your local system, and click Import.

    Note that the patch file is imported into the user space as well.

Step 4

Specify whether to stop or continue in case of error.

Step 5

To verify the patch file’s contents before applying it, click the View details link. After viewing the patch, click Close. Use the Edit patch button to edit the patch file.

Step 6

Click Run in the Apply Patch page.


The patch file is applied to the selected plan file, updating its contents as specified.

View or edit patch files

Viewing the patch files lets you ensure they meet your needs before applying or deploying them.

If the patch files are available under Network Models > User space > Other files, then use > Open to view the patch file details.

Before you begin

Confirm patch files are available in either the user space or on your local system.

Procedure


Step 1

Open the plan file in the Network Design page. For more information, refer to Open plan files.

Step 2

From the toolbar, choose Actions > Tools > Patches > View patch.

Step 3

Browse to the location where the patch file resides. Choose from these options:

  • From user space: Lists the patch files saved in the User Space. Select the required patch file.

  • From local: Click Browse and choose the patch file located in your local system. Then, click Import.

Step 4

Click View details to examine the patch file contents.

Step 5

After reviewing the patch, take one of these actions:

  • Edit patch: Use this option to edit the patch file. The file becomes editable, displaying the contents of the patch as XML text. You can save or discard the patch text edits. The tool warns you if you try to save invalid XML syntax. Other standard text editing (cut, copy, paste, and so on) is also supported.

  • Download: Use this option to download the patch file to your local system.

  • Close: Use this option to close the window without deploying the patch.