Configuring QoS

This chapter describes how to configure quality of service (QoS) by using the modular QoS CLI (MQC) on the Cisco ASR 901 router. With QoS, you can provide preferential treatment to certain types of traffic at the expense of others. When QoS is not configured, the router offers the best-effort service to each packet, regardless of the packet contents or size. It sends the packets without any assurance of reliability, delay bounds, or throughput. MQC provides a comprehensive hierarchical configuration framework for prioritizing or limiting specific streams of traffic.


Note

IPv6 QoS is supported only from Cisco IOS Release 15.2(2)SNG onwards.

Finding Feature Information

Your software release may not support all the features documented in this module. For the latest feature information and caveats, see the release notes for your platform and software release. To find information about the features documented in this module, and to see a list of the releases in which each feature is supported, see the Feature Information for Configuring QoS.

Use Cisco Feature Navigator to find information about platform support and Cisco software image support. To access Cisco Feature Navigator, go to http://www.cisco.com/go/cfn . An account on Cisco.com is not required.

Understanding QoS

Typically, networks operate on a best-effort delivery basis, which means that all traffic has equal priority and an equal chance of being delivered in a timely manner. When congestion occurs, all traffic has an equal chance of being dropped.

When you configure the QoS feature, you can select specific network traffic, prioritize it according to its relative importance, and use traffic-management techniques to provide preferential treatment. Implementing QoS in your network makes network performance more predictable and bandwidth utilization more effective.

Modular QoS CLI Model shows the MQC QoS CLI model.

Figure 1. Modular QoS CLI Model

Basic QoS includes these actions:

Default QoS for Traffic from External Ethernet Ports

The Cisco ASR 901 router allows complete configuration of QoS via policy maps for the external ethernet ports. However, the default case when no policy map is configured is described below:

By default, the qos-group (internal-priority) applied to every packet from an External port is zero.

In cases where Cisco ASR 901 Router configuration causes those fields that were not present on the incoming packet, (to be generated, for example, if a VLAN tag or an MPLS label that was not present on the incoming packet is added by Cisco ASR 901 Router), the router uses the following default procedures to propagate the priority from the received frame as described below:

In the absence of a policy map, when adding an 802.1Q VLAN outer tag (service tag) when a service tag is not present, the priority value in the outer tag is zero. The priority value of the inner tag (if present) is not modified from its original value.

When adding an 802.1Q VLAN inner tag (customer tag), the default priority value for the inner tag is zero.

The default QoS-group used for internal prioritization, output queuing and shaping, and for propagating QoS information to MPLS EXP, is zero.

For tunneling technologies, such as EoMPLS pseudowires and L3VPN, additional defaults are in place to propagate QoS. These are described below:
  • For MPLS-based L3 VPN and for the EoMPLS (both VPWS and VPLS), upon imposition of the first (bottom of stack) MPLS label, ingress policy-map needs to be configured which matches based on COS for EoMPLS & matched based on DSCP for L3VPN and using "set action" of internal QoS group setting (internal priority), MPLS EXP values are set.

  • Using table-map on egress port, you can remark the EXP value if required.

Default QoS for Traffic from Internal Ports

The Cisco ASR 901 Router does not allow policy maps to be applied to internal ports, such as the Ethernet or PCI ports to the CPU, or the Ethernet ports to the timing CPU or the Winpath.

The Cisco ASR 901 Router generally treats these internal ports as trusted. The Cisco ASR 901 Router defaults to propagate the priority from the received frame, as described below:

By default, the QoS-group (internal-priority) applied to every packet from an internal port is equal to the priority received in the 802.1Q VLAN tag received on that packet.

If a packet is received on one of the internal interfaces that do not have a VLAN tag attached, a VLAN tag is added internally, with the priority value copied from the ip-precedence field (in case of IP packets), and zero (in case on non-IP packets).

The default QoS-group (internal priority) for internal queue assignment and for propagating QoS information to MPLS EXP, is set equal to the priority of the outer VLAN tag (either the original or the default value) on the received frame.

For tunneling technologies, such as EoMPLS pseudowires and L3VPN, additional defaults are in place to propagate QoS as follows:

  • For MPLS-based L3 VPN and for the EoMPLS (both VPWS and VPLS), upon imposition of the first (bottom of stack) MPLS label, MPLS EXP values are equal to the value is specified in the internal QoS group setting (internal priority).
  • When adding additional MPLS labels to an existing stack, the default MPLS EXP values are set to the match QoS group value.

This section contains the following topics:

Modular QoS CLI

Modular QoS CLI (MQC) allows users to create traffic policies and attach these policies to interfaces. A traffic policy contains a traffic class and one or more QoS features. Use a traffic class to classify traffic, and the QoS features in the traffic policy determine how to treat the classified traffic.

Complete the following steps to configure Modular QoS CLI:

Procedure


Step 1

Define a traffic class.

Use the class-map [match-all | match-any ] type number global configuration command to define a traffic class and to enter class-map configuration mode. A traffic class contains three elements: a name, an instruction on how to evaluate the configured match commands (if more than one match command is configured in the class map), and a series of match commands

  • Name the traffic class in the class-map command line to enter class-map configuration mode.
  • You can optionally include keywords to evaluate these match commands by entering class-map match-any or class-map match-all . If you specify match-any , the traffic being evaluated must match type number of the specified criteria. If you specify match-all , the traffic being evaluated must match type number of the specified criteria. A match-all class map can contain only one match statement, but a match-any class map can contain multiple match statements.
Note 
If you do not enter match-all or match-any , the default is to match all.
  • Use the policy-map class-map configuration commands to specify criteria for classifying packets. If a packet matches the specified criteria, that packet is considered a member of the class and is forwarded according to the QoS specifications set in the traffic policy. Packets that fail to meet any of the matching criteria are classified as members of the default traffic class.
Step 2

Create a traffic policy to associate the traffic class with one or more QoS features.

Use the policy-map type number global configuration command to create a traffic policy and to enter policy-map configuration mode. A traffic policy defines the QoS features to associate with the specified traffic class. A traffic policy contains three elements: a name, a traffic class (specified with the class policy-map configuration command), and the QoS policies configured in the class.

  • Name the traffic policy in the policy-map command line to enter policy-map configuration mode.
  • In policy-map configuration mode, enter the name of the traffic class used to classify traffic to the specified policy, and enter policy-map class configuration mode.
  • In policy-map class configuration mode, you can enter the QoS features to apply to the classified traffic. These include using the set , police , or police aggregate commands for input policy maps or the bandwidth , priority , or shape average commands for output policy maps.
Note 
A packet can match only one traffic class within a traffic policy. If a packet matches more than one traffic class in the traffic policy, the first traffic class defined in the policy is used. To configure more than one match criterion for packets, you can associate multiple traffic classes with a single traffic policy.
Step 3

Attach the traffic policy to an interface.

Use the service-policy interface configuration command to attach the policy map to an interface for packets entering or leaving the interface. You must specify whether the traffic policy characteristics should be applied to incoming or outgoing packets. For example, entering the service-policy output class1 interface configuration command attaches all the characteristics of the traffic policy named type number to the specified interface. All packets leaving the specified interface are evaluated according to the criteria specified in the traffic policy named type number .

Note 
If you enter the no policy-map configuration command or the no policy-map policy-map-name global configuration command to delete a policy map that is attached to an interface, a warning message appears that lists any interfaces from which the policy map is being detached. For example: Warning: Detaching Policy test1 from Interface GigabitEthernet0/1 The policy map is then detached and deleted.

Input and Output Policies

Policy maps are either input policy maps or output policy maps, attached to packets as they enter or leave the router by service policies applied to interfaces. Input policy maps perform policing and marking on the received traffic. Policed packets can be dropped or reduced in priority (marked down) if they exceed the maximum permitted rates. Output policy maps perform scheduling and queuing of traffic as it leaves the router.

Input policies and output policies have the same basic structure; the difference is in the characteristics that they regulate. Input and Output Policy Relationship shows the relationship of input and output policies.

You can configure a maximum of 32 policy maps.

You can apply one input policy map and one output policy map to an interface.

Figure 2. Input and Output Policy Relationship

Input Policy Maps

Input policy map classification criteria include matching a CoS, a DSCP, or an IP precedence value or VLAN ID (for per-port and per-VLAN QoS). Input policy maps can perform any of these actions:

  • Setting or marking a CoS, a DSCP, an IP precedence, or QoS group value
  • Individual policing
  • Aggregate policing

Only input policies provide matching on VLAN IDs, and only output policies provide matching on QoS groups. You can assign a QoS group number in an input policy and match it in the output policy. The class-default class is used in a policy map for any traffic that does not explicitly match any other class in the policy map. Input policy maps do not support queuing and scheduling keywords, such as bandwidth , priority , and shape average .

An input policy map can have a maximum of 64 classes plus class-default . You can configure a maximum of 64 classes in an input policy.

Output Policy Maps

Output policy map classification criteria include matching a CoS, a DSCP, an IP precedence, or a QoS group value. Output policy maps support scheduling of bandwidth , priority , and shape average .

Output policy maps do not support matching of access groups. You can use QoS groups as an alternative by matching the appropriate access groups in the input policy map and setting a QoS group. In the output policy map, you can then match the QoS group. For more information, see the Classification Based on QoS Groups.

Output policies do not support policing, except in the case of priority with policing.

The class-default class is used in a policy map for any traffic that does not explicitly match any other class in the policy map.

An output policy map attached to an egress port can match only the packets that have already been matched by an input policy map attached to the ingress port for the packets. You can attach an output policy map to any or all the ports on the router. The router supports configuration and attachment of a unique output policy map for each port. There are no limitations on the configurations of bandwidth, priority, or shaping.

Access Control Lists

Cisco IOS Release 15.2(2)SNH1 introduces support for access control list-based QoS on the Cisco ASR 901 Router. This feature provides classification based on source and destination IP. The current implementation of this feature supports only the named ACLs. Effective from Cisco IOS Release 15.4 (2) S, the Cisco ASR 901 Router supports IPv6 addresses in ACLs.

ACLs are an ordered set of filter rules. Each rule is a permit or a deny statement known as access control entry (ACE). These ACEs filter network traffic by forwarding or blocking routed packets at the interface of the router. The router examines each packet to determine whether to forward or drop the packets based on the criteria specified within the access list.

The permit and deny statements are not applicable when ACLs are used as part of ACL-based QoS. ACLs are used only for traffic classification purposes as part of QoS.

Restrictions

  • The Loopback feature should not be enabled when Layer 2 Control Protocol Forwarding is enabled.
  • The following Cisco IOS Keywords are not supported on the Cisco ASR 901 Router—match-any , ip-options , logging , icmp-type/code , igmp type , dynamic , reflective , evaluate . The icmp-type/code keyword is supported from Cisco IOS Release 15.5(2)S, as part of the support for ICMP based ACL feature.
  • Ingress PACL and RACL support TCP/UDP port range; egress ACLs are not supported.
  • Sharing access lists across interfaces is not supported.
  • ACLs are not supported on management port (Fast Ethernet) and serial interfaces.
  • Devices in the management network (network connected to the Fast Ethernet port) cannot be accessed from any other port. If the default route is configured on the Cisco ASR 901 to fast ethernet interface (Fa0/0), all the routed packets will be dropped. However, this configuration could keep the CPU busy and affect overall convergence.
  • Compiled ACLs are not supported in Cisco ASR 901 Router.
  • ACLs are not supported on EVC interfaces.
  • ACLs are not supported on interface loopback interfaces.

Classification

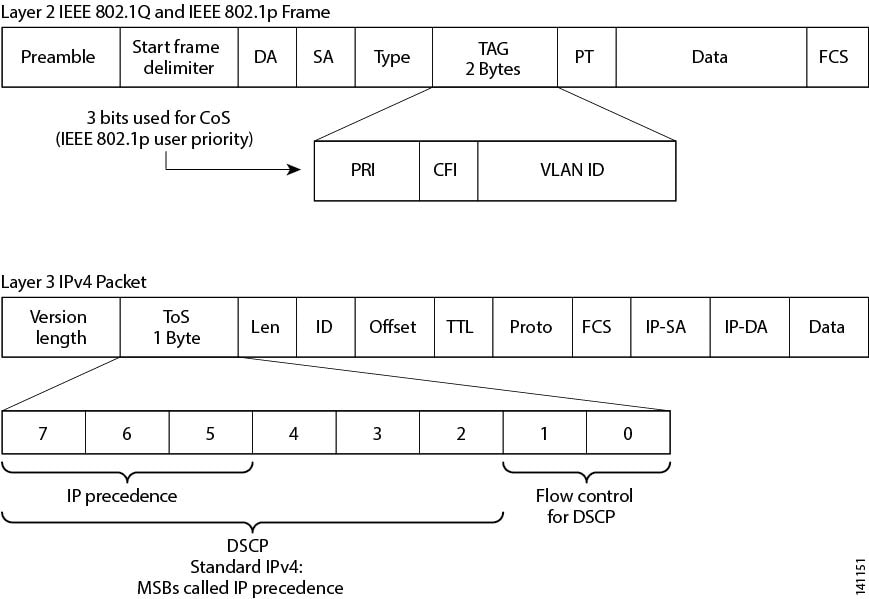
Classification distinguishes one kind of traffic from another by examining the fields in the packet header. When a packet is received, the router examines the header and identifies all the key packet fields. A packet can be classified based on the DSCP, the CoS, or the IP precedence value in the packet, or by the VLAN ID. QoS Classification Layers in Frames and Packets shows the classification information carried in a Layer 2 or a Layer 3 IP packet header, using six bits from the deprecated IP type of service (ToS) field to carry the classification information.

The classification information carried in a Layer 2 or Layer 3 IP packet is as follows:

  • On ports configured as Layer 2 IEEE 802.1Q trunks, all the traffic is in 802.1Q frames except for traffic in the native VLAN. Layer 2 802.1Q frame headers have a 2-byte Tag Control Information field that carries the CoS value, called the User Priority bits, in the three most-significant bits, and the VLAN ID value in the 12 least-significant bits. Other frame types cannot carry Layer 2 CoS values.

Layer 2 CoS values range from 0 to 7.

  • Layer 3 IP packets can carry either an IP precedence value or a DSCP value. QoS supports the use of either value because DSCP values are backward compatible with IP precedence values.

IP precedence values range from 0 to 7. DSCP values range from 0 to 63.

  • Output re-marking is based on the Layer 2 or Layer 3 marking type, marking value, and packet type.
Figure 3. QoS Classification Layers in Frames and Packets

This image 141151.jpg is not available in preview/cisco.com

These sections contain additional information about classification:

Class Maps

Use an MQC class map to name a specific traffic flow (or class) and to isolate it from all other traffic. A class map defines the criteria used to match against a specific traffic flow to further classify it. If you wish to classify more than one type of traffic, you can create another class map and use a different name. When you use the class-map command with a class-map name, the router enters the class-map configuration mode. In this mode, you define the match criteria for the traffic by using the match class-map configuration command. After a packet is matched against the class-map criteria, it is acted on by the associated action specified in a policy map.

You can match more than one criterion for classification. You can also create a class map that requires that all the matching criteria in the class map be in the packet header by using the class map match-all class-map name global configuration command and enter class map configuration mode.


Note

You can configure only one match entry in the match-all class map.

You can use the class map match-any class-map name global configuration command to define a classification with any of the listed criteria.


Note

If you do not enter match-all or match-any , the default is to match all. A match-all class map cannot have more than one classification criterion (match statement). A class map with no match condition has a default of match all.

The match Command

To configure the type of content used to classify packets, use the match class-map configuration command to specify the classification criteria. If a packet matches the configured criteria, it belongs to a specific class and is forwarded according to the specified policy. For example, you can use the match class-map command with CoS, IP DSCP, and IP precedence values. These values are referred to as markings on a packet.

  • For an input policy map, you cannot configure an IP classification (match ip dscp , match ip precedence , match ip acl ) and a non-IP classification (match cos or match mac acl ) in the same policy map or class map.
  • In an output policy map, no two class maps can have the same classification criteria, that is, the same match qualifiers and values.

This example shows how to create a class map example to define a class that matches any of the listed criteria. In this example, if a packet is received with the DSCP equal to 32 or a 40, the packet is identified (classified) by the class map.


Router(config)# class-map match-any example
Router(config-cmap)# match ip dscp 32
Router(config-cmap)# match ip dscp 40
Router(config-cmap)# exit

Classification Based on Layer 2 CoS

You can use the match command to classify Layer 2 traffic based on the CoS value, which ranges from 0 to 7.


Note

A match cos command is supported only on Layer 2 802.1Q trunk ports.

This example shows how to create a class map to match a CoS value of 5:


Router(config)# class-map premium
Router(config-cmap)# match cos 5
Router(config-cmap)# exit

Classification Based on IP Precedence

You can classify IPv4 traffic based on the packet IP precedence values, which range from 0 to 7.

This example shows how to create a class map to match an IP precedence value of 4:


Router(config)# class-map sample
Router(config-cmap)# match ip precedence 4
Router(config-cmap)# exit

Classification Based on IP DSCP

When you classify IPv4 traffic based on the IP DSCP value, and enter the match ip dscp class-map configuration command, you have several classification options to choose from:

  • Entering a specific DSCP value (0 to 63).
  • Using the Default service, that corresponds to an IP precedence and DSCP value of 0. The default per-hop behavior (PHB) is usually best-effort service.
  • Using Assured Forwarding (AF) by entering the binary representation of the DSCP value. AF sets the relative probability that a specific class of packets is forwarded when congestion occurs and the traffic does not exceed the maximum permitted rate. AF per-hop behavior provides delivery of IP packets in four different AF classes: AF11-13 (the highest), AF21-23, AF31-33, and AF41-43 (the lowest). Each AF class can be allocated a specific amount of buffer space and drop probabilities, specified by the binary form of the DSCP number. When congestion occurs, the drop precedence of a packet determines the relative importance of the packet within the class. An AF41 provides the best probability of a packet being forwarded from one end of the network to the other.
  • Entering Class Selector (CS) service values of 1 to 7, corresponding to the IP precedence bits in the ToS field of the packet.
  • Using Expedited Forwarding (EF) to specify a low-latency path. This corresponds to a DSCP value of 46. EF services use priority queuing to preempt lower-priority traffic classes.

This example shows the available classification options:


Router(config-cmap)# match ip dscp ?
  <0-63>   Differentiated services codepoint value
  af11     Match packets with AF11 dscp (001010)
  af12     Match packets with AF12 dscp (001100)
  af13     Match packets with AF13 dscp (001110)
  af21     Match packets with AF21 dscp (010010)
  af22     Match packets with AF22 dscp (010100)
  af23     Match packets with AF23 dscp (010110)
  af31     Match packets with AF31 dscp (011010)
  af32     Match packets with AF32 dscp (011100)
  af33     Match packets with AF33 dscp (011110)
  af41     Match packets with AF41 dscp (100010)
  af42     Match packets with AF42 dscp (100100)
  af43     Match packets with AF43 dscp (100110)
  cs1      Match packets with CS1(precedence 1) dscp (001000)
  cs2      Match packets with CS2(precedence 2) dscp (010000)
  cs3      Match packets with CS3(precedence 3) dscp (011000)
  cs4      Match packets with CS4(precedence 4) dscp (100000)
  cs5      Match packets with CS5(precedence 5) dscp (101000)
  cs6      Match packets with CS6(precedence 6) dscp (110000)
  cs7      Match packets with CS7(precedence 7) dscp (111000)
  default  Match packets with default dscp (000000)
  ef       Match packets with EF dscp (101110)

Note

For more information on DSCP prioritization, see RFC-2597 (AF per-hop behavior), RFC-2598 (EF), or RFC-2475 (DSCP).

Classification Comparisons

Table 1 shows the recommended IP DSCP, IP precedence, and CoS values for typical traffic types.

Table 1. Typical Traffic Types

Traffic Type

DSCP Per-Hop

DSCP (Decimal)

IP Precedence

CoS

Voice-bearer—Traffic in a priority queue or the queue with the highest service weight and lowest drop priority.

EF

46

5

5

Voice control—Signalling traffic related to call setup from a voice gateway or a voice application server.

AF31

26

3

3

Video conferencing—In most networks, video conferencing over IP has similar loss, delay, and delay variation requirements as Voice over IP traffic.

AF41

34

4

4

Streaming video—Relatively high bandwidth applications with a high tolerance for loss, delay, and delay variation. Usually considered more important than regular background applications such as e-mail and web browsing.

AF13

14

1

1

Mission-critical date (gold data)—Delay-sensitive applications critical to the operation of an enterprise, classified as:

  • Level 1
  • Level 2
  • Level 3

AF21

AF22

AF23

18

20

22

2

2

2

2

2

2

Less critical data (silver data)—Noncritical, but relatively important data, classified as:

  • Level 1
  • Level 2
  • Level 3

AF11

AF12

AF13

10

12

14

1

1

1

1

1

1

Best-effort data (bronze data)—Other traffic, including all the noninteractive traffic, regardless of importance.

Default

0

0

0

Less-than-best-effort data—Noncritical, bandwidth-intensive data traffic given the least preference. This is the first traffic type to be dropped, and includes these levels:

  • Level 1
  • Level 2
  • Level 3

2

4

6

0

0

0

0

0

0

Classification Based on QoS Groups

A QoS group is an internal label used by the router to identify packets as a members of a specific class. The label is not a part of the packet header, and is restricted to the router that sets the label. QoS groups provide a way to tag a packet for subsequent QoS action without explicitly marking (changing) the packet.

A QoS group is identified at ingress and used at egress; it is assigned in an input policy to identify packets in an output policy (see Classification Based on QoS Groups). The QoS groups help aggregate different classes of input traffic for a specific action in an output policy.

Figure 4. QoS Groups

You can use QoS groups to aggregate multiple input streams across input classes and policy maps for the same QoS treatment on the egress port. Assign the same QoS group number in the input policy map to all the streams that require the same egress treatment, and match the QoS group number in the output policy map to specify the required queuing and scheduling actions.

You can also use QoS groups to identify traffic entering a particular interface if the traffic has to be treated differently at the output based on the input interface.

You can use QoS groups to configure per-port, per-VLAN QoS output policies on the egress interface for bridged traffic on the VLAN. Assign a QoS group number to a VLAN on the ingress interface by configuring a per-port, per-VLAN input policy. Then use the same QoS-group number for classification at the egress. Because the VLAN of the bridged traffic does not change during forwarding through the router, the QoS-group number assigned to the ingress VLAN can be used on the egress interface to identify the same VLAN.

You can independently assign QoS-group numbers at the ingress to any combination of interfaces, VLANs, traffic flows, and aggregated traffic. To assign QoS-group numbers, configure a QoS group marking in an input policy map, along with any other marking or policing actions required in the input policy map for the same service class. This allows the input marking and policing functions to be decoupled from the egress classification function if necessary because only the QoS group must be used for egress classification.

This example identifies specific packets as part of QoS group 1 for later processing in an output policy:


Router(config)# policy-map in-gold-policy
Router(config-pmap)# class in-class1
Router(config-pmap-c)# set qos-group 1
Router(config-cmap-c)# exit
Router(config-cmap)# exit

Use the set qos-group command only in an input policy. The assigned QoS group identification is subsequently used in an output policy with no mark or change to the packet. Use the match qos-group in the output policy.


Note

You cannot configure match qos-group for an input policy map.

This example shows how to create an output policy to match the QoS group created in the input policy map in-gold-policy . Traffic that is internally tagged as qos-group 1 is identified and processed by the output policy.


Router(config)# class-map out-class1
Router(config-cmap)# match qos-group 1
Router(config-cmap)# exit

Classification Based on VLAN IDs

With classification based on VLAN IDs, you can apply QoS policies to frames carried on a user-specified VLAN for a given interface. Per-VLAN classification is not required on access ports because access ports carry traffic for a single VLAN.

The router supports two policy levels: a parent level and a child level. With the QoS parent-child structure, you can reference a child policy in a parent policy to provide additional control of a specific traffic type. For per-port, per-VLAN QoS, the parent-level matches the VLAN; match criteria is defined by the service instance encapsulation. You cannot configure multiple service classes at the parent level to match different combinations of VLANs.


Note

A per-port, per-VLAN parent-level class map supports only the class-default class; you should configure with a single rate policer. A flat policy can have multiple classes with match VALN and any action.

Note

You can configure only class default in the parent level of a per-port, per-VLAN hierarchical policy map.

In this example, the class maps in the child-level policy map specify the matching criteria for voice, data, and video traffic, and the child policy map sets the action for input policing each type of traffic. The parent-level policy map specifies the VLANs to which the child policy maps are applied on the specified port.


Router(config)# class-map match-any dscp-1 data
Router(config-cmap)# match ip dscp 1
Router(config-cmap)# exit
Router(config)# class-map match-any dscp-23 video
Router(config-cmap)# match ip dscp 23
Router(config-cmap)# exit
Router(config)# class-map match-any dscp-63 voice
Router(config-cmap)# match ip dscp-63
Router(config-cmap)# exit
Router(config)# policy-map customer-1-ingress
Router(config-pmap)# class class-default
Router(config-pmap-c)# service-policy child_policy-1

Note

You can also enter the match criteria as match vlan 100 200 300 in the child-level policy map.

Router(config)# policy-map child policy-1
Router(config-pmap)# class dscp-63 voice
Router(config-pmap-c)# police cir 10000000 bc 50000
Router(config-pmap-c)# conform-action set-cos-transmit 5
Router(config-pmap-c)# exceed-action drop
Router(config-pmap-c)# exit
Router(config-pmap)# class dscp-1 data
Router(config-pmap-c)# set cos 0
Router(config-pmap-c)# exit
Router(config-pmap)# class dscp-23 video
Router(config-pmap-c)# set cos 4
Router(config-pmap-c)# set ip precedence 4
Router(config-pmap-c)# exit
Router(config)# interface gigabitethernet0/1
Router(config-if)# service instance 100 ethernet
Router(config-if)# encapsulation dot1q 100
Router(config-if)# service-policy input customer-1-ingress
Router(config-if)# rewrite ingress tag pop 1 symmetric
Router(config-if)# bridge-domain 100

Classification Based on ACL

Effective with Cisco IOS Release 15.4 (2) S, the Cisco ASR 901 Router supports ACL-based QoS on Layer 4. This feature allows you to configure the Layer 3 or Layer 4 options while configuring the ACL for QoS on ingress only. Layer 3 or Layer 4 options such as ToS, source port, and destination port are supported.

The following example shows a sample configuration for ACL-based QoS on Layer 4:


ip access-list extended test
permit tcp any any
permit udp any any
class-map test
match access-group name test
policy-map test
class test
set dscp af11
interface gig 0/3
ip access-group test in
Restrictions
  • Only named ACLs are supported in Layer 4 ACL-based QoS.
  • The not operation is not supported in Layer 4 ACL-based QoS.
  • Layer 4 ACL-based QoS is not supported on a multilink interface and BCPoMLPPP.

Table Maps

You can use table maps to manage a large number of traffic flows with a single command. You can specify table maps in the set commands and use them as mark-down mapping for the policers. You can also use table maps to map an incoming QoS marking to a replacement marking without having to configure a large number of explicit matches and sets. Table maps are used only in input policy maps.

Table maps can be used to:

  • Correlate specific CoS, DSCP, or IP precedence values to specific CoS, DSCP, or IP precedence values
  • Mark down a CoS, DSCP, or IP precedence value
  • Assign defaults for unmapped values

This example shows how to create a table to map specific CoS values to DSCP values. The unspecified values are all mapped to a to-value (0).


Router(config)# table-map cos-dscp-tablemap
Router(config-tablemap)# map from 5 to 46
Router(config-tablemap)# map from 6 to 56
Router(config-tablemap)# map from 7 to 57
Router(config-tablemap)# exit

The Cisco ASR 901 Router supports a maximum of 32 unique table maps. You can enter up to 64 different map from to entries in a table map. These table maps are supported on the router:

  • Cos to QoS-group
  • QoS-group to mpls experimental topmost

Table maps modify only one parameter (CoS, IP precedence, or DSCP, whichever is configured) and are only effective when configured with a set command in a policy map.

Policing

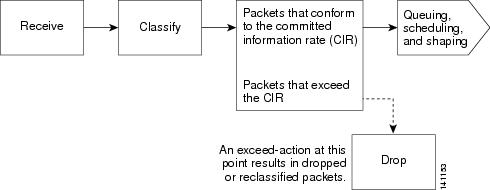
After a packet is classified, you can use policing, as shown in Policing of Classified Packets to regulate the class of traffic. The policing function limits the amount of bandwidth available to a specific traffic flow or prevents a traffic type from using excessive bandwidth and system resources. A policer identifies a packet as being in or out of profile by comparing the rate of the inbound traffic to the configuration profile of the policer and traffic class. Packets that exceed the permitted average rate or burst rate are out of profile or nonconforming . These packets are dropped or modified (marked for further processing), depending on the policer configuration.

Policing is used primarily on the receiving interfaces. You can attach a policy map to a policer only in an input service policy. The only policing allowed in an output policy map is in priority classes (see the Unconditional Priority Policing).

Figure 5. Policing of Classified Packets

This section contains the following topics:

Individual Policing

Individual policing applies only to input policy maps. In the policy-map configuration mode, use the class command followed by the class map name, and enter the policy-map class configuration mode. Effective Cisco IOS Release 15.3(3)S, the Cisco ASR 901 Router supports policing ingress traffic over the cross-connect EVC, similar to the bridge domain service policy.

Use the police policy-map class configuration command to define the policer, the committed rate limitations of the traffic, committed burst size limitations of the traffic, and the action to take for a class of traffic that is below the limits (conform-action ) and above the limits (exceed-action ). If you do not specify burst size (bc), the system calculates an appropriate burst size value. The calculated value is appropriate for most applications.

To make the policy map effective, attach it to a physical port by using the service-policy input interface configuration command. Policing is done only on received traffic, so you can only attach a policer to an input service policy.


Note

The QoS group precedes the CoS value that is matched in the class map, when the set qos-group command is used along with MPLS experimental imposition.
Restrictions
  • Only byte counters are supported.

  • Only drop and pass counters are supported.

  • If an ingress cross-connect policer is attached to a physical interface, an ingress cross-connect policer cannot be attached to EVCs under the specific physical port.

  • Applying or removing a policy-map on a cross-connect interface requires shutdown or no shutdown on the interface.

  • User class-based MPLS experimental imposition is supported only for user classes based on CoS match.

  • Only policy maps on 254 ingress cross-connect interfaces are supported.

  • Dynamic modification of policy maps (modifying a policy map or a class map while it is attached to an interface) is not supported for the policy maps applied on cross-connect.

  • The match cos inner is not supported.

Configuration Examples

The following is a sample configuration of basic policing for all the traffic received with a CoS of 4. The first value following the police command limits the average traffic rate to 10, 000,000 bits per second (bps); the second value represents the additional burst size (10 kilobytes). The policy is assigned to Gigabit Ethernet port 1.


Router(config)# class-map video-class
Router(config-cmap)# match cos 4
Router(config-cmap)# exit
Router(config)# policy-map video-policy
Router(config-pmap)# class video-class
Router(config-pmap-c)# police 10000000 10000
Router(config-pmap-c-police)# exit
Router(config-pmap-c)# exit
Router(config-pmap)# exit
Router(config)# interface gigabitethernet0/1
Router(config-if)# service-policy input video-policy
Router(config-if)# exit

The following is a sample configuration that shows the policing of traffic over cross-connect EVC:


Router(config)# interface GigabitEthernet0/3
Router(config-if)# service instance 22 ethernet
Router(config-if-svr)# encapsulation dot1q 22
Router(config-if-svr)# rewrite ingress tag pop 1 symmetric
Router(config-if-svr)# xconnect 1.1.1.1 100 encapsulation mpls
Router(config-if-svr)# service-policy input policy1

Router(config-if-svr)# exit

You can use the conform-action and exceed-action policy-map class configuration commands or the conform-action and exceed-action policy-map class police configuration commands to specify the action to be taken when a packet conforms to or exceeds the specified traffic rate.

Conform actions involve sending the corresponding packet without modifications, setting a new CoS, DSCP, or IP precedence value, or setting up a QoS group value for classification at the egress. Exceed actions involve dropping the packet, sending the packet without modification, setting a new CoS, DSCP, or IP precedence to a value, or setting a QoS group value for classification at the egress.

You can configure each marking action by using explicit values, table maps, or a combination of both. Table maps list specific traffic attributes and map (or convert) them to other attributes.

You can configure multiple conform and exceed actions simultaneously for each service class.

After you create a table map, configure a policy-map policer to use the table map.


Note

In Cisco ASR 901 router, the from –type action in the table map must be cos .

To configure multiple actions in a class, you can enter multiple conform or exceed action entries in the policy-map class police configuration mode, as in this example:


Router(config)# policy-map map1
Router(config-pmap)# class class1
Router(config-pmap-c)# police 100000 500000
Router(config-pmap-c-police)# conform-action set-cos-transmit 4
Router(config-pmap-c-police)# conform-action set-qos-transmit 4
Router(config-pmap-c-police)# exceed-action set-cos-transmit 2
Router(config-pmap-c-police)# exceed-action set-qos-transmit 2
Router(config-pmap-c-police)# exit
Router(config-pmap-c)# exit
Router(config-pmap)# exit

Unconditional Priority Policing

Priority policing applies only to output policy maps. You can use the priority policy-map class configuration command in an output policy map to designate a low-latency path or class-based priority queuing for a specific traffic class. With strict priority queuing, the packets in the priority queue are scheduled and sent until the queue is empty, at the expense of other queues. Excessive use of high-priority queuing may create congestion for lower-priority traffic.

To eliminate this congestion, you can use priority with implicit policer (priority policing) to reduce the bandwidth used by the priority queue, and allocate traffic rates on other queues. Priority with police is the only form of policing supported in output policy maps.


Note

You cannot configure a policer-committed burst size for an unconditional priority policer because any configured burst size is ignored.

This example shows how to use the priority percent command to configure out-class1 as the priority queue, with traffic going to the queue limited to 20,000,000 bps so that the priority queue never uses more than that. Traffic above that rate is dropped. This allows other traffic queues to receive some port bandwidth, in this case, a minimum bandwidth guarantee of 50 percent and 20 percent. The class-default class queue gets the remaining port bandwidth.


Router(config)# policy-map policy1
Router(config-pmap)# class out-class1
Router(config-pmap-c)# priority percent 20
Router(config-pmap-c)# exit
Router(config-pmap)# class out-class2
Router(config-pmap-c)# bandwidth percent 50
Router(config-pmap-c)# exit
Router(config-pmap)# class out-class3
Router(config-pmap-c)# bandwidth percent 20
Router(config-pmap-c)# exit
Router(config-pmap)# exit
Router(config)# interface gigabitethernet0/1
Router(config-if)# service-policy output policy1
Router(config-if)# exit

Egress Policing

Egress policing can be classified based on QoS groups, DSCP, and IP precedence value. For QoS groups to work at egress, you should map the traffic at ingress to a specific QoS group value.

Marking

You can use packet marking in input policy maps to set or modify the attributes for traffic belonging to a specific class. After network traffic is organized into classes, you use marking to identify certain traffic types for unique handling. For example, you can change the CoS value in a class or set IP DSCP or IP precedence values for a specific type of traffic. These new values are then used to determine how the traffic should be treated. You can also use marking to assign traffic to a QoS group within the router.

Traffic marking is typically performed on a specific traffic type at the ingress port. The marking action can cause the CoS, DSCP, or precedence bits to be rewritten or left unchanged, depending on the configuration. This can increase or decrease the priority of a packet in accordance with the policy used in the QoS domain so that other QoS functions can use the marking information to judge the relative and absolute importance of the packet. The marking function can use information from the policing function or directly from the classification function.

You can specify and mark traffic by using the set commands in a policy map for all supported QoS markings (CoS, IP DSCP, IP precedence, and QoS groups). A set command unconditionally marks the packets that match a specific class. You then attach the policy map to an interface as an input policy map.

You can also mark traffic by using the set command with table maps. Table maps list specific traffic attributes and maps (or converts) them to another attribute. A table map establishes a to-from relationship for the attribute and defines the change to be made.

You can simultaneously configure actions to modify DSCP, precedence, and COS markings in the packet for the same service along with QoS group marking actions. You can use the QoS group number defined in the marking action for egress classification.


Note

When you use a table map in an input policy map, the protocol type of the from -type action in the table map must be the same as the protocol type of the associated classification. If the class map represents a non-IP classification, the from -type action in the table map must be cos .

Note

Cisco ASR 901 transparently preserves the ECN bits while marking DSCP.

After you create a table map, configure a policy map to use the table map. See the Congestion Management and Scheduling. Marking of Classified Traffic shows the steps for marking traffic.

Figure 6. Marking of Classified Traffic

This example uses a policy map to remark a packet. The first marking (the set command) applies to the QoS default class map that matches all traffic not matched by class AF31-AF33 and sets all traffic to an IP DSCP value of 1. The second marking sets the traffic in classes AF31 to AF33 to an IP DSCP of 3.


Router(config)# policy-map Example
Router(config-pmap)# class class-default
Router(config-pmap-c)# set ip dscp 1
Router(config-pmap-c)# exit
Router(config-pmap)# class AF31-AF33
Router(config-pmap-c)# set ip dscp 3
Router(config-pmap-c)# exit
Router(config-pmap)# exit
Router(config)# interface gigabitethernet0/1
Router(config-if)# service-policy input Example 
Router(config-if)# exit

Congestion Management and Scheduling

Cisco Modular QoS CLI (MQC) provides several related mechanisms to control outgoing traffic flow. They are implemented in output policy maps to control output traffic queues. The scheduling stage holds packets until the appropriate time to send them to one of the four traffic queues. Queuing assigns a packet to a particular queue based on the packet class. You can use different scheduling mechanisms to provide a guaranteed bandwidth to a particular class of traffic while also serving other traffic in a fair way. You can limit the maximum bandwidth that can be consumed by a particular class of traffic and ensure that delay-sensitive traffic in a low-latency queue is sent before traffic in other queues.

The Cisco ASR 901 Router supports these scheduling mechanisms:

  • Traffic shaping

Use the shape average policy-map class configuration command to specify that a class of traffic should have a maximum permitted average rate. Specify the maximum rate in bits per second.

  • Class-based weighted fair queuing (CBWFQ)

Use the bandwidth policy-map class configuration command to control the bandwidth allocated to a specific class. The minimum bandwidth can be specified as percentage.

  • Priority queuing or class-based priority queuing

Use the priority policy-map class configuration command to specify the priority of a type of traffic over other types of traffic. You can specify strict priority for high-priority traffic and allocate excess bandwidth, if any, to other traffic queues, or specify priority with unconditional policing of high-priority traffic, and allocate the known remaining bandwidth among the other traffic queues.

  • To configure strict priority, use only the priority policy-map class configuration command to configure the priority queue. Use the bandwidth remaining percent policy-map class configuration command for the other traffic classes to allocate the excess bandwidth in the desired ratios.

  • To configure priority with unconditional policing, configure the priority queue by using the priority policy-map class configuration command and the police policy-map class configuration command to unconditionally rate-limit the priority queue. In this case, you can configure the other traffic classes with the bandwidth command or the shape average command, depending on your requirements

These sections contain additional information about scheduling:

Traffic Shaping

Traffic shaping is a traffic-control mechanism similar to traffic policing. While traffic policing is used in input policy maps, traffic shaping occurs as traffic leaves an interface. The router can apply class-based shaping to classes of traffic leaving an interface, and port shaping to all the traffic leaving an interface. Configuring a queue for traffic shaping sets the maximum bandwidth or peak information rate (PIR) of the queue.


Note

Effective Cisco IOS Release 15.2(2)SNI, the lower limit of the committed burst size (bc) is 1 ms.
Class-Based Shaping

Class-based shaping uses the shape average policy-map class configuration command to limit the rate of data transmission as the number of bits per second to be used for the committed information rate for a class of traffic. The router supports separate queues for three classes of traffic. The fourth queue is always the default queue for the class-default class, unclassified traffic.


Note

In the Cisco ASR 901 Router, configuring traffic shaping automatically sets the minimum bandwidth guarantee or committed information rate (CIR) of the queue to the same value as the PIR.

This example shows how to configure traffic shaping for outgoing traffic on a Gigabit Ethernet port so that outclass1 , outclass2 , and outclass3 get a maximum of 50, 20, and 10 Mbps, respectively, of the available port bandwidth. Theclass-default class gets the remaining bandwidth.


Router(config)# policy-map out-policy
Router(config-pmap)# class classout1
Router(config-pmap-c)# shape average 50000000
Router(config-pmap-c)# exit
Router(config-pmap)# class classout2
Router(config-pmap-c)# shape average 20000000
Router(config-pmap-c)# exit
Router(config-pmap)# class classout3
Router(config-pmap-c)# shape average 10000000
Router(config-pmap-c)# exit
Router(config-pmap)# exit
Router(config)# interface gigabitethernet 0/1
Router(config-if)# service-policy output out-policy
Router(config-if)# exit
Port Shaping

To configure port shaping (a transmit port shaper), create a policy map that contains only a default class, and use the shape average command to specify the maximum bandwidth for a port.

This example shows how to configure a policy map that shapes a port to 90 Mbps, allocated according to the out-policy policy map configured in the previous example. The service-policy policy map class command is used to create a child policy to the parent:


Router(config)# policy-map out-policy-parent
Router(config-pmap)# class class-default
Router(config-pmap-c)# shape average 90000000
Router(config-pmap-c)# service-policy out-policy
Router(config-pmap-c)# exit
Router(config-pmap)# exit
Router(config)# interface gigabitethernet0/1
Router(config-if)# service-policy output out-policy-parent
Router(config-if)# exit
Parent-Child Hierarchy

The router also supports parent policy levels and child policy levels for traffic shaping. The QoS parent-child structure is used for specific purposes, where a child policy is referenced in a parent policy to provide additional control of a specific traffic type.

The first policy level, the parent level, is used for port shaping. You can specific only one class of type class-default within the policy. This is an example of a parent-level policy map:


Router(config)# policy-map parent
Router(config-pmap)# class class-default
Router(config-pmap-c)# shape average 50000000
Router(config-pmap-c)# exit

The second policy level, the child level, is used to control a specific traffic stream or class, as shown in this example:


Router(config)# policy-map child
Router(config-pmap)# class class1
Router(config-pmap-c)# priority
Router(config-pmap-c)# exit

Note

The total of the minimum bandwidth guarantees (CIR) for each queue of the child policy cannot exceed the total port-shape rate.

This is an example of a parent-child configuration:


Router(config)# policy-map parent
Router(config-pmap)# class class-default
Router(config-pmap-c)# shape average 50000000
Router(config-pmap-c)# service-policy child
Router(config-pmap-c)# exit
Router(config-pmap)# exit
Router(config)# interface gigabitethernet0/1
Router(config-if)# service-policy output parent
Router(config-if)# exit

Class-Based Weighted Fair Queuing

You can configure CBWFQ to set the relative precedence of a queue by allocating a portion of the total bandwidth that is available for the port. Use the bandwidth policy-map class configuration command to set the output bandwidth for a class of traffic as a percentage of total bandwidth, or a percentage of remaining bandwidth.


Note

When you configure bandwidth in a policy map, you must configure all the rates in the same format. The total of the minimum bandwidth guarantees (CIR) for each queue of the policy cannot exceed the total speed of the parent.
When you use the bandwidth policy-map class configuration command to configure a class of traffic as a percentage of total bandwidth, it represents the minimum bandwidth guarantee (CIR) for that traffic class. This means that the traffic class gets at least the bandwidth indicated by the command, but is not limited to that bandwidth. Any excess bandwidth on the port is allocated to each class in the same ratio in which the CIR rates are configured.

Note

You cannot configure bandwidth as a percentage of total bandwidth when strict priority (priority without police) is configured for another class in the output policy.
When you use the bandwidth policy-map class configuration command to configure a class of traffic as a percentage of total bandwidth, it represents the portion of the excess bandwidth of the port that is allocated to the class. This means that the class is allocated bandwidth only if there is excess bandwidth on the port, and if there is no minimum bandwidth guarantee for this traffic class.

Note

You can configure bandwidth as a percentage of remaining the bandwidth only when strict priority (priority without police) is configured for another class in the output policy map.

Note

You cannot configure bandwidth and traffic shaping (shape average ) or priority queuing (priority ) for the same class in an output policy map.

This example shows how the classes outclass1 , outclass2 ,outclass3 , and class-default get a minimum of 40 percent, 20 percent, 10 percent, and 10 percent of the total bandwidth, respectively. Any excess bandwidth is divided among the classes in the same proportion as rated in the CIR.


Router(config)# policy-map out-policy
Router(config-pmap)# class outclass1
Router(config-pmap-c)# bandwidth percent 40
Router(config-pmap-c)# exit
Router(config-pmap)# class outclass2
Router(config-pmap-c)# bandwidth percent 20
Router(config-pmap-c)# exit
Router(config-pmap)# class outclass3
Router(config-pmap-c)# bandwidth percent 10
Router(config-pmap-c)# exit
Router(config-pmap)# class class-default
Router(config-pmap-c)# bandwidth percent 10
Router(config-pmap-c)# exit
Router(config-pmap)# exit
Router(config)# interface gigabitethernet 0/1
Router(config-if)# service-policy output out-policy
Router(config-if)# exit

Note

When you configure CIR bandwidth for a class as a percentage of the total bandwidth, any excess bandwidth remaining after servicing the CIR of all the classes in the policy map is divided among the classes in the same proportion as the CIR rates. If the CIR rate of a class is configured as 0, that class is also not eligible for any excess bandwidth, and as a result, receives no bandwidth.

This example shows how to allocate the excess bandwidth among queues by configuring bandwidth for a traffic class as a percentage of remaining bandwidth. The class outclass1 is given priority queue treatment. The other classes are configured to get percentages of the excess bandwidth if any, after servicing the priority queue; outclass2 is configured to get 20 percent, outclass3 to get 30 percent, and the class-default class to get the remaining 50 percent.


Router(config)# policy-map out-policy
Router(config-pmap)# class outclass1
Router(config-pmap-c)# priority
Router(config-pmap-c)# exit
Router(config-pmap)# class outclass2
Router(config-pmap-c)# bandwidth remaining percent 20
Router(config-pmap-c)# exit
Router(config-pmap)# class outclass3
Router(config-pmap-c)# bandwidth remaining percent 30
Router(config-pmap-c)# exit
Router(config-pmap)# exit
Router(config)# interface gigabitethernet 0/1
Router(config-if)# service-policy output out-policy
Router(config-if)# exit

Priority Queuing

You can use the priority policy-map class configuration command to ensure that a particular class of traffic is given preferential treatment. With strict priority queuing, the priority queue is constantly serviced. All the packets in the queue are scheduled and sent until the queue is empty. Priority queuing allows traffic for the associated class to be sent before the packets in the other queues are sent.


Caution

Be careful when using the priority command. Excessive use of strict priority queuing might cause congestion in other queues.


The router supports strict priority queuing or priority percent policy-map command.

  • Strict priority queuing (priority without police) assigns a traffic class to a low-latency queue to ensure that the packets in this class have the lowest possible latency. When this is configured, the priority queue is continually serviced until it is empty, possibly at the expense of packets in other queues.

Note

You cannot configure priority without policing for a traffic class when traffic shaping or CBWFQ are configured for another class in the same output policy map.
  • Use the priority percent policy-map command, or unconditional priority policing , to reduce the bandwidth used by the priority queue. This is the only form of policing that is supported in output policy maps. Using this combination of commands configures a maximum rate on the priority queue, and you can use the bandwidth and shape average policy-map commands for other classes to allocate traffic rates on other queues. Effective Cisco IOS Release 15.3(2)S, Cisco ASR 901 Router allows configuration of multiple classes to serve based on priority.

Note

When priority is configured in an output policy map without the priority command, you can only configure the other queues for sharing by using the bandwidth remaining percent policy-map command to allocate excess bandwidth.
Restrictions
  • You can associate the priority command with a single unique class for all the attached output polices on the router. Efective Cisco IOS Release 15.3(2)S, Cisco ASR 901 Router allows the configuration of multiple classes with priority percent .
  • You cannot configure priority and other scheduling action (shape average or bandwidth ) in the same class.
  • You cannot configure priority queuing for the class-default of an output policy map.

This example shows how to configure the class out-class1 as a strict priority queue so that all the packets in that class are sent before any other class of traffic. Other traffic queues are configured so that out-class-2 gets 50 percent of the remaining bandwidth and out-class3 gets 20 percent of the remaining bandwidth. The class-default class receives the remaining 30 percent with no guarantees.


Router(config)# policy-map policy1
Router(config-pmap)# class out-class1
Router(config-pmap-c)# priority
Router(config-pmap-c)# exit
Router(config-pmap)# class out-class2
Router(config-pmap-c)# bandwidth remaining percent 50
Router(config-pmap-c)# exit
Router(config-pmap)# class out-class3
Router(config-pmap-c)# bandwidth remaining percent 20
Router(config-pmap-c)# exit
Router(config-pmap)# exit
Router(config)# interface gigabitethernet 0/1
Router(config-if)# service-policy output policy1
Router(config-if)# exit

This example shows how to use the priority keyword with the percent command to configure out-class1 as the priority queue, with the traffic going to the queue limited to 20,000,000 bps so that the priority queue will never use more than that. Traffic above that rate is dropped. The other traffic queues are configured to use 50 percent and 20 percent of the bandwidth that is left, as shown in the previous example.


Router(config)# policy-map policy1
Router(config-pmap)# class out-class1
Router(config-pmap-c)# priority percent 20
Router(config-pmap-c)# exit
Router(config-pmap)# class out-class2
Router(config-pmap-c)# bandwidth percent 50
Router(config-pmap-c)# exit
Router(config-pmap)# class out-class3
Router(config-pmap-c)# bandwidth percent 20
Router(config-pmap-c)# exit
Router(config-pmap)# exit
Router(config)# interface gigabitethernet 0/1
Router(config-if)# service-policy output policy1
Router(config-if)# exit

The following example shows how to use the priority keyword with the percent command to configure multiple traffic classes:


Router(config)# policy-map pmap_bckbone
Router(config-pmap)# class VOICE_GRP
Router(config-pmap-c)# priority percent 50
Router(config-pmap-c)# exit
Router(config-pmap)# class CTRL_GRP
Router(config-pmap-c)# priority percent 5
Router(config-pmap-c)# exit
Router(config-pmap)# class E1_GRP
Router(config-pmap-c)# priority percent 55
Router(config-pmap-c)# exit
Router(config-pmap)# class class-default
Router(config-pmap-c)# bandwidth percent 10
Router(config-pmap-c)# exit
Router(config-pmap)# exit

Ingress and Egress QoS Functions

This section lists the supported and unsupported QoS functions for ingress and egress on the Cisco ASR 901 Router.

Ingress QoS Functions

In Cisco ASR 901 router:

  • Interfaces support ingress classification.
  • Ethernet interfaces support ingress policing.
  • Ethernet interfaces support ingress marking.
  • Ethernet interfaces do not support Low-Latency Queuing (LLQ). Ingress Priority is not supported on ingress.
  • Ethernet interfaces do not support queuing, shaping, and scheduling on ingress.
  • Classification based on QoS group is not supported.

Egress QoS Functions

In Cisco ASR 901 router:

  • Gigabit Ethernet interfaces support egress classification.
  • Gigabit Ethernet interfaces support egress marking.
  • Gigabit Ethernet interfaces support egress scheduling.
  • Interfaces support per interface and per QoS group shaping on egress ports.
  • Interfaces support LLQ and weighted random early detection on egress.

Configuring QoS

The following sections describe how to configure the QoS features supported by the Cisco ASR 901 Router:

QoS Limitations

The Cisco ASR 901 Router offers different QoS support according to the physical interface and traffic type. The following sections describe the limitations for each QoS capability on the Cisco ASR 901 Router.

General QoS Limitations

The following general QoS limitations apply to the Cisco ASR 901 Router:

  • You can create a maximum of 256 class maps, including the class-default class map.
  • You can create a maximum of 32 policy maps.
  • Input policy-map is not supported on SVI.
  • Output policy-map is not supported on service instance.
  • The CoS marking is supported only on normal interfaces.
  • EXP to COS marking is not supported on Port channel.
  • Policy-map having class-map with mpls experimental topmost must be applied only on MPLS enabled interface. Usage of policy-map on non-mpls interface can result in other packets matching this criteria.
  • The match cos inner is not supported.

  • Egress Queue on POCH is supported only on POCH interface and uses replication model.

The following limitations apply to the QoS policies on HDLC, PPP, PPP interfaces:

  • Input PPP interfaces support only QoS marking policies.
  • Only a maximum of eight match statements can be created within a class map in a service policy applied to a PPP interface.
  • Only a maximum of eight classes can be created within a policy map that is applied to a PPP interface. This number includes the default-class.
  • Only one priority class can be used within a policy map applied to a PPP interface.
  • The match-all keyword of the class-map command is not supported.
  • The following actions are not supported for egress policy:
    • Bandwidth value
    • Priority value
    • Set of qos-group (VLAN priority)—This is relevant only for Layer 2 Transport over MLPPP interface.
  • Requires explicit configuration of class-default with bandwidth percent.
  • DSCP marking is not supported for the class-default queue.

All the above restrictions are applicable to MPLS over MLPPP and IP over MLPPP, in addition to the following specific restrictions that apply to QoS policies on MPLS and IP over MLPPP interfaces:

  • The Cisco ASR 901 Router supports the DSCP marking priority, eight bandwidth queues, link fragmentation, interleave, and queue limits features for MLPPP egress.
  • Input policy is not supported.
  • EXP marking is not supported for the class-default queue.

The following limitations apply to Gigabit Ethernet interfaces:

  • You can apply only a maximum of two different service policies to the Gigabit Ethernet interfaces.
  • You can only use the class-default class for HQoS parent service policies applied to egress Gigabit Ethernet interfaces.

Statistics Limitations

The following statistical QoS limitations apply to the Cisco ASR 901 Router:

  • Input service policies on the Gigabit Ethernet interface support statistics only in bytes.
  • PPP and MLPPP interfaces support QoS statistics only in packets.
  • Output service policies on the Gigabit Ethernet interface support statistics only in bytes.
  • The 2R3C policer provides exceed-and-violate counters as a single counter.
  • Marking statistics will not be displayed for any class.

Propagation Limitations

The Cisco ASR 901 Router has the following limitations when propagating QoS values between interfaces:

  • The following limitation is applicable when traffic ingresses through a GigabitEthernet interface and egresses through a GigabitEthernet interface:
    • When traffic is switched at Layer 2, the QoS group is propagated through the router.
  • The following limitations are applicable when traffic ingresses through any other interface type (host-generated and PPP) and egresses through the GigabitEthernet interface.
    • The Precedence bit value is propagated to the CoS bit (for host-generated interface only).
    • The CoS bit value is mapped 1:1 to the QoS group value.

See the Sample QoS Configuration section for a sample QoS configuration that accounts for propagation limitations on the Cisco ASR 901 Router.

Classification Limitations

The following table summarizes the values that you can use to classify traffic based on interface type. The values are parameters that you can use with the match command.

Table 2. QoS Classification Limitations by Interface

Gigabit Ethernet

PPP

Value

Ingress

Egress

Ingress

Egress

access-group

X

all

X

X

any

X

X

X

X

class-map

cos

X

X

destination-address

discard-class

dscp

X

X

X

X

flow pdp

frde

frdlci

ip dscp

X

X

X

X

ip precedence

X

X

ip rtp

mpls experimental

X

not

packet length

precedence

X

X

protocol

qos-group

X

source-address

vlan

X

X

The following limitations are also applicable when configuring classification on the Cisco ASR 901 Router:

  • The set qos-group cos command used for trusting CoS is supported only under class-default, as a stand-alone class in the policy-map. No other user class is supported on the same policy-map. Counters are not supported for the policy-map.

  • The following limitations apply to the input Gigabit Ethernet interface QoS policies:
    • You can use the match vlan command with a maximum of four VLANs. The match vlan command is supported only for port, EVC, and pseudowire.
    • You can use the match dcsp command with a maximum of four DSCP values.
    • The Cisco ASR 901 Router first looks for IP DSCP and then the MPLS experimental imposition for the MPLS packets.
  • The following limitations apply to the output Gigabit Ethernet interface QoS policies:
    • Class maps with queuing action only support matching based on QoS group. This limitation does not apply to the class-default class map.
    • You cannot create two matching class maps based on the same QoS group value.
    • Class-default on the egress supports matching only on qos-group 0.
  • The following limitation applies to input PPP interfaces:
    • You can create only up to eight matches in a class map, using DSCP or MPLS Exp values.

Note

The show policy-map interface counters command does not display cumulative queue statistics for priority classes. It shows only queue statistics for individual priority classes. Similarly, output or marking counters are not supported.


Marking Limitations

The following table summarizes the values that you can use to mark traffic, based on interface type. The values are parameters that you can use with the set command.

Gigabit Ethernet

PPP

Value

Ingress

Egress

Ingress

Egress

atm-clp

cos

discard-class

X

dscp

X

dscp-transmit

X

ip dscp

X

X

X

ip precedence

X

X

mpls experimental

mpls experimental imposition

X

X

mpls experimental topmost qos-group

X

precedence

X

prec-transmit

X

qos-group

X

X

Congestion Management Limitations

The congestion management limitations for the Cisco ASR 901 Router are described in the following sections:

Queuing Limitations

The Cisco ASR 901 Router uses Class-Based Weighted Fair Queuing (CBWFQ) for congestion management. The following table summarizes the queuing commands that you can apply when using CBWFQ according to interface type.

Table 3. QoS Queuing Limitations by Interface

Gigabit Ethernet

PPP

Value

Ingress

Egress

Ingress

Egress

bandwidth (kbps)

bandwidth percent

X

X

bandwidth remaining percent

X

X

compression header ip

drop

fair-queue

priority

X

X

priority (kbps)

priority (without queue-limit)

priority percent

X

X

queue-limit (cells)

queue-limit (packets)

X

random-detect discard-class-based

X

Rate-Limiting Limitations

You can use rate limiting for congestion management on the Cisco ASR 901 Router. The following table summarizes the rate-limiting parameters that you can use with the police command, according to interface type. The table uses the following terms:

  • Rate—A speed of network traffic, such as a committed information rate (CIR) or peak information rate (PIR).
  • Actions—A defined action when traffic exceeds a rate, such as conform-action, exceed-action, or violate-action.
Table 4. QoS Rate Limiting Limitations by Interface

Gigabit Ethernet

PPP

Policing With

Ingress

Egress

Ingress

Egress

One rate

One rate and two actions

X

Two rates and two actions

Two rates and three actions

X

Shaping Limitations

The following table summarizes the values that you can use to mark traffic based on interface type. The values are parameters that you can use with the shape command.

Table 5. QoS Shaping Limitations by Interface

Gigabit Ethernet

MLPPP

Value

Ingress

Egress

Ingress

Egress

adaptive

average

X

X

fecn-adapt

max-buffers

peak

The following limitations also apply to QoS shaping on the Cisco ASR 901 Router:

  • The following limitations apply to the input Gigabit Ethernet interfaces:
    • You cannot apply shaping to the class-default class unless you are using hierarchical policy maps and applying shaping to the parent policy map.
    • If you are using hierarchical policy maps, you can only apply the class-default class to the parent policy map.
  • The following limitations apply to Egress Shaping on the MLPPP interfaces:
    • Only shape average is supported.
    • Hierarchical shaping is not supported.
    • More than one shape in the same policy-map is not allowed.

    • Shape and bandwidth in the same class is not allowed.

    • Shape command in default class is not allowed.

ACL-based QoS Restrictions

In addition to all the limitations applicable to a current QoS configuration, the following restrictions are applicable for ACL-based QoS:

  • IPv6 ACL-based QoS is not supported.
  • ACL-based QoS is limited to source and destination IP addresses. Extended ACLs with extended options such as DSCP, fragments, option, precedence, time-range, ToS, and TTL are not supported.
  • MAC ACLs are not supported. Only IP ACLs are supported.
  • You can configure only named access lists in QoS; other ACL types are not supported.
  • Only source and destination IPv4 addresses are supported in the access-list definition.
  • You can add only a maximum of 128 ACL match filters (including default deny ace) as part of class or classes.

Improving Feature Scalability

Effective Cisco IOS Release 15.3(2)S, Ternary content-addressable memory (TCAM) is allocated and deallocated dynamically based on system configuration. This improves both feature scalability and efficiency of TCAM usage. 25 percent of this memory is reserved for Layer 2 and Layer 3 control protocols and the remaining 75 percent is allocated dynamically based on the requirements. Layer 2 and Layer 3 forwarding tables are independent of TCAM.

TCAM with QoS

The scalability of QoS changes depending on the features configured on the Cisco ASR 901 Router, as shown in the following examples:

  • You can create a maximum of 768 TCAM rules.
  • You can create a maximum of 640 TCAM rules with remote loopback in Ethernet OAM (802.3ah), Ethernet loopback, and DelayMeasurement configured.
  • You can create a maximum of 512 TCAM rules with remote loopback in Ethernet OAM (802.3ah), Ethernet loopback, DelayMeasurement, and Router ACL configured.

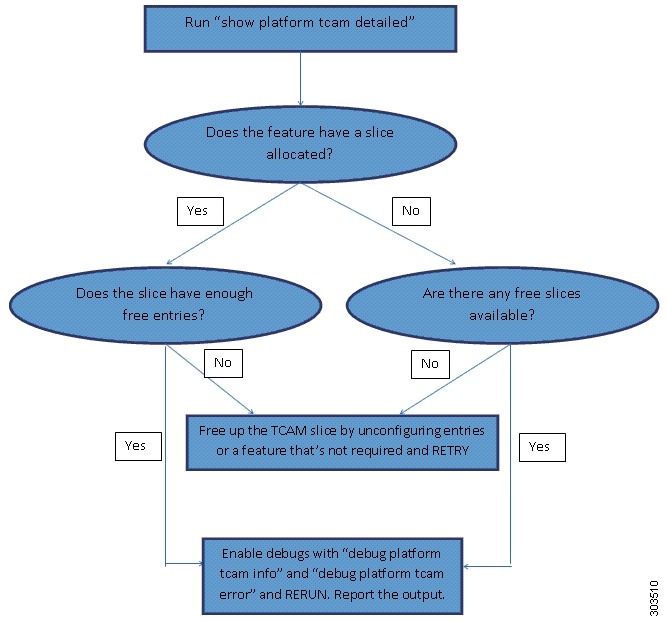
For more information on troubleshooting scalability, see Troubleshooting Tips.

QoS for MPLS over MLPPP and IP over MLPPP

Effective Cisco IOS Release 15.4(1)S, the extended QoS functionality is supported on the MLPPP interface. The egress policy supports classification on the MLPS EXP bits.

The following actions are supported:

  • Bandwidth percent
  • Priority percent
  • Setting the MPLS EXP bits
  • Setting the queue limit
  • Egress shaping

QoS for CPU-Generated Traffic

Effective Cisco IOS Release 15.4(1)S, QoS is provided for CPU-generated traffic. The classification is based on DSCP (for packets going over IP adjacency) or EXP (for packets going over TAG adjacency).

QoS treatment is available for the following CPU generated traffic:

  • Open Shortest Path First (OSPF) Packets
  • Internet Control Message Protocol (ICMP) Packets
  • Border Gateway Protocol (BGP) Packets
  • Label Distribution Protocol (LDP) Packets
  • Intermediate System to Intermediate System (IS-IS) Frames

The QoS configuration for CPU-generated traffic is the same as that of QoS for MPLS over MLPPP. However, you should use class-map to match the DSCP or EXP values of the CPU-generated traffic.

For example:

  • If the OSPF packets use DSCP CS6, the policy map should use the class map to match DSCP CS6.
  • BGP and LDP packets use either IP adjacency or TAG adjacency (depending on the type of packets)
    • Packets going over IP adjacency use DSCP CS6
    • Packets going over TAG adjacency use EXP 6
  • For ICMP packets (PING traffic), the default DSCP value is 0; you can specify TOS value while sending the ping traffic.
  • If IS-IS packets do not have either DSCP or EXP; they are treated with the policy configuration of DSCP CS6.

Note

The show policy-map interface multilink bundle-number command shows the combined counters of the CPU-generated traffic and data traffic if both the data traffic and CPU-generated traffic flow in the same class.

Egress Shaping on the MLPPP Interfaces

Traffic shaping allows you to control the speed of traffic that is leaving an interface to match the intake capacity of the receiving interface. Cisco IOS Release 15.5(1)S introduces support for Egress shaping over MLPPP interfaces. This feature allows you to shape all MLPPP interfaces using a port policy with a class-default shaper configuration.

You should complete the following steps to configure Egress Shaping over MLPPP:

  1. Configure a Class-map

  2. Configure the policy-map with shaping and bandwidth

  3. Attach the policy-map on the MLPPP interface

QoS Configuration Guidelines

  • You can configure QoS on physical ports and EFPs (only in ingress).
  • QoS can likely be configured on port channel.
  • Only table-map configuration is allowed on Switch Virtual Interface (SVI) interfaces.
  • On a port configured for QoS, all the traffic received through the port is classified, policed, and marked according to the input policy map attached to the port. On an EFP configured for QoS, traffic in all the VLANs received through the port is classified, policed, and marked according to the policy map attached to the port. If a per-port, per-VLAN policy map is attached, traffic on the trunk port is classified, policed, and marked for the VLANs specified in the class filter.
  • If you have EtherChannel ports configured on your router, you must configure QoS classification, policing, mapping, and queuing on the individual physical ports that comprise the EtherChannel. You must decide whether the QoS configuration should match on all the ports in the EtherChannel.
  • Control traffic (such as Spanning-tree Bridge Protocol Data Units [BPDUs] and routing update packets) received by the router are subject to all ingress QoS processing.
  • You might lose data when you change queue settings. Therefore, try to make changes when traffic is at a minimum.
  • When you try to attach a new policy to an interface and this brings the number of policer instances to more than 255, you receive an error message, and the configuration fails.
  • When you try to attach a new policy to an interface and this brings the number of policer profiles to more than 254, you receive an error message, and the configuration fails. A profile is a combination of commit rate, peak rate, commit burst, and peak burst. You can attach one profile to multiple instances, but if one of these characteristics differs, the policer is considered to have a new profile.
  • On all Cisco ASR 901 Routers, you can specify 128 unique VLAN classification criteria within a per-port, per-VLAN policy map, across all the ports on the router. Any policy attachment or change that causes this limit to be exceeded fails with a VLAN label resources exceeded error message.
  • On all Cisco ASR 901 Routers, you can attach per-port, per-VLAN policy-maps across all ports on the router until QoS classification resource limitations are reached. Any policy attachment or change that causes this limit to be exceeded fails with a TCAM resources exceeded error message.

Sample QoS Configuration

The following configuration demonstrates how to apply QoS given the hardware limitations. The Cisco ASR 901 Router processes traffic between interfaces as follows:

  • For Layer 2 traffic passing between the Gigabit Ethernet 0/2 interface and the Gigabit Ethernet 0/0 interface, the output queue is determined by the QoS group assigned in the in-qos policy map.
  • For Layer 3 traffic passing between Gigabit Ethernet 0/2 interface and the Gigabit Ethernet 0/0 interface, the output queue is determined based on the CoS value assigned in the in-qos policy map. (the CoS value is mapped 1:1 to the QoS group value.)
  • For traffic passing between other interfaces, the output queue is determined based on the CS fields (top three bits) of the IP DSCP bits; these bits are copied to the CoS bits, which are mapped 1:1 to the QoS group value.

The following is a sample configuration for QoS:


Note

The sample configuration is a partial configuration intended to demonstrate the QoS feature.

!
class-map match-all q0
 match qos-group 0
class-map match-all q1
 match qos-group 1
class-map match-all q2
 match qos-group 2
class-map match-all q3
 match qos-group 3
class-map match-all q4
 match qos-group 4
class-map match-all q5
 match qos-group 5
class-map match-all q6
 match qos-group 6
class-map match-all q7
 match qos-group 7
class-map match-any Voice
 match dscp ef 
class-map match-any Signaling
 match dscp af41 
class-map match-any HSDPA
 match dscp af11 af12
class-map match-any TCAM1 
!translates to 3 TCAM rules because each match in match-any uses one entry 
match dscp af21 
match cos 3 
match mpls experimental topmost 
class-map match-all TCAM2 
!translates to 1 TCAM rules because all the match-all clauses together take only 1 entry
match dscp af21 
match cos 3 
match mpls experimental topmost 1  
! 
policy-map in-qos
 class Voice
  set cos 5
  set qos-group 5
 class control_plane
  set cos 4
  set qos-group 4
 class HSDPA
  set cos 1
  set qos-group 1
!
policy-map out-child
 class q5
    priority percent 20
 class q4
    bandwidth remaining percent 20
 class q1
    bandwidth remaining percent 59
!
!
policy-map out-parent
 class class-default
    shape average 100000000
  service-policy out-child
!

Configuring Classification

Classifying network traffic allows you to organize packets into traffic classes based on whether the traffic matches specific criteria. Classifying network traffic is the foundation for enabling many QoS features on your network.

This section contains the following topics:

Creating a Class Map for Classifying Network Traffic

Class maps allow you to define classes of network traffic in order to apply QoS features to each class. Complete the following steps to create a class map:

Procedure

Step 1

Enter the enable mode.

Example:

Router> enable 
Step 2

Enter the password.

Example:

Password: password

When the prompt changes to Router , you have entered enable mode.

Step 3

Enter global configuration mode.

Example:

Router# configure terminal
Enter configuration commands, one per line. End with CNTL/Z.
Step 4

Use the class-map command to define a new class map and enter class map configuration mode.

Example:

Router(config)# class-map class1
Step 5

Use the match command to specify the match criteria for the class map. You can define a variety of match criteria including CoS, DSCP, MPLS Exp, or QoS group value.

Example:

Router(config-cmap)# match qos-group 7
Note 
The class-default queue matches packets with qos-group 0.
Example:

Step 6

Exit configuration mode.

Example:

Router(config-cmap)# end
Router#

Creating a Policy Map for Applying a QoS Feature to Network Traffic

A policy map allows you to apply a QoS feature to network traffic based on the traffic classification. Complete the following steps to create and configure a policy map that uses an existing class map.

Procedure

Step 1

Enter the enable mode.

Example:

Router> enable 
Step 2

Enter the password.

Example:

Password: password

When the prompt changes to Router , you have entered enable mode.

Step 3

Enter the global configuration mode.

Example:

Router# configure terminal
Enter configuration commands, one per line. End with CNTL/Z.
Step 4

Use the policy-map command to define a new policy map and enter policy map configuration mode.

Example:

Router(config)# policy-map policy1
Router(config-pmap)#
Step 5

Use the class command to specify a traffic class to which the policy applies. This command enters policy-map class configuration mode, which allows you to define the treatment for the traffic class.

Example:

Router(config-pmap)# class class1
Router(config-pmap-c)#

Use the bandwidth command to specify the bandwidth allocated for a traffic class attached to the policy map. You can define the amount of bandwidth in kbps, a percentage of bandwidth, or an absolute amount of bandwidth. This step is optional.

Note 
GigabitEthernet interfaces only support bandwidth defined as a percentage or remaining percent.
Example:

Router(config-pmap-c)# bandwidth percent 50 
Step 6

Exit the configuration mode.

Example:

Router(config-cmap)# end
Router#
Note 
You can use the show policy-map command to verify your configuration.

Attaching the Policy Map to an Interface

After you create the policy map, you must attach it to an interface. Policy maps can be attached to either the input or output direction of the interface.

Complete these steps to attach the policy map to an interface:

Procedure

Step 1

Enter enable mode.

Example:

Router> enable 
Step 2

Enter the password.

Example:

Password: password

When the prompt changes to Router, you have entered enable mode.

Step 3

Enter global configuration mode.

Example:

Router# configure terminal
Enter configuration commands, one per line. End with CNTL/Z.
Step 4

Specify the interface to which you want to apply the policy map.

Example:

Router(config)# interface gigabitEthernet0/1
Step 5

Use the service-policy command to attach the policy map to an interface. The input and output parameters specify the direction in which router applies the policy map.

Example:

Router(config-if)# service-policy output policy1
Step 6

Exit configuration mode.

Example:

Router(config-cmap)# end
Router#
Note 
You can use the show policy map interface command to verify your configuration.

For more information about configuring classification, see the Cisco IOS Quality of Service Solutions Configuration Guide, Release 12.2SR .


Attaching a Policy Map to a Cross-Connect EVC

After you create a policy map, you must attach it to a cross-connect EVC. Policy maps can be attached only to ingress.

Procedure
  Command or Action Purpose
Step 1

enable

Example:

Router> enable

Enables privileged EXEC mode.

Enter your password if prompted.

Step 2

configure terminal

Example:

Router# configure terminal

Enters global configuration mode.

Step 3

interface type number

Example:

Router(config)# interface 
GigabitEthernet0/3

Specifies an interface type and number, and enters interface configuration mode.

Step 4

service instance instance-id ethernet

Example:

Router(config-if)# service instance 22 
ethernet

Creates a service instance on an interface and defines the matching criteria.

  • instance-id —Unique identifier of the instance.
Step 5

encapsulation dot1q vlan-id

Example:

Router(config-if)# encapsulation dot1q 22

Defines the matching criteria to be used to map 802.1Q frames ingress on an interface to the appropriate EFP. Enter a single VLAN ID for an exact match of the outermost tag. VLAN IDs are 1 to 4094.

Note 
VLAN IDs 4093, 4094, and 4095 are reserved for internal use.
Step 6

rewrite ingress tag pop 1 symmetric

Example:

Router(config-if-svr)# rewrite ingress 
tag pop 1 symmetric

Specifies the encapsulation modification to occur on packets at ingress.

  • pop 1 —the outermost tag.
  • symmetric —Configure the packet to undergo the reverse of the ingress action at egress. If a tag is removed at ingress, it is added at egress.

Although the symmetric keyword appears to be optional, you must enter it for rewrite to function correctly.

Step 7

xconnect peer-ip-address vc-id encapsulation mpls

Example:

Router(config-if-srv)# xconnect 1.1.1.1 100 
encapsulation mpls 

Binds an attachment circuit to a pseudowire, and configures an Any Transport over MPLS (AToM) static pseudowire.

  • peer-ip-address —IP address of the remote provider edge (PE) peer. The remote router ID can be any IP address, as long as it is reachable.
  • vc-id —The 32-bit identifier of the virtual circuit (VC) between the PE routers.
  • encapsulation —Specifies the tunneling method to encapsulate the data in the pseudowire.
  • mpls —Specifies MPLS as the tunneling method.
Step 8

service policy input policy name

Example:

Router(config-if-srv)# service-policy 
input policy1

Attaches the policy map to an interface.

  • input —Specifies the direction in which the router applies the policy map.
  • policy name —The name of the policy map.
Step 9

exit

Enters global configuration mode.

Configuring Marking

Marking network traffic allows you to set or modify the attributes for packets in a defined traffic class. You can use marking with traffic classification to configure a variety of QoS features for your network.

The Cisco ASR 901 Router marking allows you to modify the following packet attributes:

  • Differentiated services code point (DSCP) value
  • Class of service (CoS) value
  • MPLS Exp bit value
  • Qos group value (internal)

For instructions on how to configure marking for IP Precedence, DSCP, or CoS value, see the following sections:

For instructions on how to configure MPLS Exp bit marking, see:

Creating a Class Map for Marking Network Traffic

Class maps allow you to define classes of network traffic in order to apply QoS features to each class. Complete the following steps to define a traffic class to mark network traffic:

Procedure

Step 1

Enter the enable mode.

Example:

Router> enable 
Step 2

Enter the password.

Example:

Password: password

When the prompt changes to Router , you have entered enable mode.

Step 3

Enter the global configuration mode.

Example:

Router# configure terminal
Enter configuration commands, one per line. End with CNTL/Z.
Step 4

Use the class-map command to define a new class map and enter class map configuration mode.

Example:

Router(config)# class-map class1
Step 5

Use the match command to specify the match criteria for the class map. You can define a variety of match criteria including CoS, DSCP, MPLS Exp, or QoS group value.

Example:

Router(config-cmap)# match qos-group 7
Step 6

Exit the configuration mode.

Example:

Router(config-cmap)# end
Router#

Creating a Policy Map for Applying a QoS Feature to Network Traffic

Policy maps allow you to apply the appropriate QoS feature to the network traffic based on the traffic classification. The following sections describe how to create and configure a policy map to use a class map or table map.

The following restrictions apply when applying a QoS feature to network traffic:

  • A policy map containing the set qos-group command can only be attached as an intput traffic policy.
  • A policy map containing the set cos command can only be attached as an input traffic policy.

Complete the following steps to create a policy map.

Procedure

Step 1

Enter the enable mode.

Example:

Router> enable 
Step 2

Enter the password.

Example:

Password: password

When the prompt changes to Router , you have entered enable mode.

Step 3

Enter the global configuration mode.

Example:

Router# configure terminal
Enter configuration commands, one per line. End with CNTL/Z.
Step 4

Use the policy-map command to define a policy map and enter policy map configuration mode.

Example:

Router(config)# policy-map policy1
Router(config-pmap)#
Step 5

Use the class command to specify the traffic class for which you want to create a policy and enter policy map class configuration mode. You can also use the class-default parameter to define a default class.

Example:

Router(config-pmap)# class class1 
Router(config-pmap-c)#
Step 6

Use one of the set commands listed in Table 1 to define a QoS treatment type.

Table 6. set Commands Summary

set Commands

Traffic Attributes

Network Layer

Protocol

set cos

Layer 2 CoS value of the outgoing traffic

Layer 2

802.1q

set dscp

DSCP value in the ToS byte

Layer 3

IP

set qos-group

QoS group ID

Layer 3

IP, MPLS

Step 7

Exit the configuration mode.

Example:

Router(config-pmap)# end
Router#
Note 
You can use the show policy-map or show policy-map policy-map class class-name commands to verify your configuration.

Attaching the Policy Map to an Interface

Procedure

Step 1

Enter enable mode.

Example:

Router> enable 
Step 2

Enter the password.

Example:

Password: password

When the prompt changes to Router, you have entered enable mode.

Step 3

Enter global configuration mode.

Example:

Router# configure terminal
Enter configuration commands, one per line. End with CNTL/Z.
Step 4

Specify the interface to which you want to apply the policy map.

Example:

Router(config)# interface gigabitEthernet0/1
Step 5

Use the service-policy command to attach the policy map to an interface. The input and output parameters specify the direction in which router applies the policy map.

Example:

Router(config-if)# service-policy input policy1
Step 6

Exit configuration mode.

Example:

Router(config-cmap)# end
Router#
Note 
You can use the show policy map interface command to verify your configuration.

Configuring MPLS Exp Bit Marking using a Pseudowire

You can also configure MPLS Exp bit marking within an EoMPLS pseudowire interface using the set mpls experimental imposition command. MQC based policy configuration supersedes pseudowire-class mode of configuring QoS marking. The MQC policy shall contain only class-default with set action to achieve the same. Follow these steps to configure MPLS Exp bit marking using a pseudowire interface.


Note

The policy-map configured with the set mpls experimental imposition command, is allowed only on the cross-connect EFP.


Complete the following steps to apply a marking policy to a pseudowire:

Procedure

Step 1

Enter the interface configuration mode.

Example:

Router(config)# interface gigabitethernet 0/0
Router(config-if)#
Step 2

Specify an EVC.

Example:

Router(config-if)# service instance 1 ethernet
Router(cfg-if-srv)#
Step 3

Specify an encapsulation type for the EVC.

Example:

Router(cfg-if-srv)# encapsulation dot1q 200
Step 4

Use the xconnect command with the service policy that uses the configuration defined in the pseudowire class.

Example:

Router(cfg-if-srv)# xconnect 10.10.10.1 121 
Router(cfg-if-srv)# service-policy in <mark-policy>

For more information about configuring marking, see the Cisco IOS Quality of Service Solutions Configuration Guide, Release 12.2SR.

Note 
The Cisco ASR 901 does not support all of the commands described in the IOS Release 12.2SR documentation.

Configuration Example

This is a sample configuration example for applying a marking policy to a pseudowire.


policy-map cos-6
class cos-6
 police rate percent 5
  conform-action transmit 
  exceed-action drop 
set mpls experimental imposition 4
interface GigabitEthernet0/3
no ip address
load-interval 30
negotiation auto
service instance 22 ethernet
 encapsulation dot1q 22
 rewrite ingress tag pop 1 symmetric
 service-policy input cos-6
 xconnect 2.2.2.2 22 encapsulation mpls

Configuring Congestion Management

The following sections describe how to configure congestion management on the Cisco ASR 901.

Configuring Low Latency Queueing

Low latency queuing allows you to define a percentage of bandwidth to allocate to an interface or PVC as a percentage. You can define a percentage for priority or nonpriority traffic classes.

Complete the following steps to configure LLQ.

Procedure

Step 1

Enter enable mode.

Example:

Router> enable 
Step 2

Enter the password.

Example:

Password: password

When the prompt changes to Router , you have entered enable mode.

Step 3

Enter global configuration mode.

Example:

Router# configure terminal
Enter configuration commands, one per line. End with CNTL/Z.
Step 4

Use the policy-map command to define a policy map.

Example:

Router(config)# policy-map policy1 
Step 5

Use the class command to reference the class map that defines the traffic to which the policy map applies.

Example:

Router(config-pmap)# class class1
Step 6

Use the priority command to specify the priority percentage allocated to the traffic class assigned to the policy map. You can use the burst parameter to configures the network to accommodate temporary bursts of traffic.

Example:

Router(config-pmap-c)# priority percent 10 
Step 7

Use the bandwidth command to specify the bandwidth available to the traffic class within the policy map. You can specify the bandwidth in kbps or by a percentage of bandwidth.

Example:

Router(config-pmap-c)# bandwidth percent 30
Step 8

Exit configuration mode.

Example:

Router(config-pmap-c)# end 
Note 
You can use the show policy-map , show policy-map policy-map class class-name, or show policy-map interface commands to verify your configuration.

Configuring Multiple Priority Queueing

Multiple priority queuing allows you to configure more than one class with priority percentage. The queue-number decides the ordering. The QoS group is serviced in the descending order starting with the highest queue number. This guarantees each of the queues its allocated bandwidth. This configuration has a higher latency on the lower priority queue like voice, due to servicing multiple traffic types on priority.


Note

There is no provision to configure the priority level for a traffic class.

Complete the following steps to configure multiple priority queueing.


Procedure
  Command or Action Purpose
Step 1

configure terminal

Enters global configuration mode. Enter your password if prompted.

Step 2

policy-map

Example:

Router(config)# policy-map policy1

Defines a new policy map and enters policy map configuration mode.

Step 3

class class-name

Example:

Router(config-pmap)# class class1

Specifies a traffic class to which the policy applies. This command enters policy-map class configuration mode, which allows you to define the treatment for the traffic class.

Step 4

priority percent percent

Example:

Router(config-pmap-c)# priority percent 10 

Specifies the priority percentage allocated to the traffic class assigned to the policy map.

Step 5

bandwidth percent percent

Example:

Router(config-pmap-c)# bandwidth percent 50 

(Optional) Specifies the bandwidth allocated for a traffic class attached to the policy map. You can define the percentage of bandwidth, or an absolute amount of bandwidth.

Step 6

exit

Returns to global configuration mode.

Configuration Examples

This section shows sample configuration examples for multiple priority queuing on Cisco ASR 901 router:


policy-map pmap_bckbone
 class VOICE_GRP
  priority percent 50
 class CTRL_GRP
  priority percent 5
 class E1_GRP
  priority percent 35
 class class-default
  bandwidth percent 10

Note

You can use the show policy-map , show policy-map policy-map class class-name, or show policy-map interface commands to verify your configuration.

Configuring Class-Based Weighted Fair Queuing (CBFQ)

The Cisco ASR 901 supports Class-Based Weighted Fair Queuing (CBWFQ) for congestion management.

Complete the following steps to configure CBWFQ.

Procedure

Step 1

A class map contains match criteria against which a packet is checked to determine if it belongs to the class. You can use class maps to define criteria that are referenced in one or more policy maps. Use the class-map command to create a class map.

  1. class-map class-map name

    Example:
    
    Router(config)# class-map class1
    Router(config-cmap)#
    
  2. Use the match command to specify the match criteria for the class map. You can define a variety of match criteria including CoS, DSCP, MPLS Exp, or QoS group value.

    Example:
    
    Router(config-cmap)# match qos-group 7
    
  3. Use the exit command to exit class map configuration.

    Example:
    
    Router(config-cmap)# exit
    Router(config)#
    
Step 2

Complete the following steps to configure a policy map and attach it to an interface.

Note 
This router does not support queue-limit commands. Only random-detect discard-class-based is supported on GigabitEthernet Interfaces.
  1. Use the policy-map command to define a policy map.

    Example:
    
    Router(config)# policy-map policy1
    Router(config-pmap)#
    
  2. Use the class command to reference the class map that defines the traffic to which the policy map applies.

    Example:
    
    Router(config-pmap)# class class1
    Router(config-pmap-c)#
    
  3. Use the bandwidth command to specify the bandwidth allocated for the traffic class.

    Example:
    
    Router(config-pmap-c)# bandwidth percent 10
    
  4. Use the exit command to exit the policy map class configuration.

    Example:
    
    Router(config-pmap-c)# exit
    Router(config-pmap)#
    
  5. Use the exit command to exit the policy map configuration.

    Example:
    
    Router(config-pmap)# exit
    Router(config)#
    
  6. Enter configuration for the interface to which you want to apply the policy map.

    Example:
    
    Router(config)# interface atm0/ima0
    
  7. Use the service-policy command to apply the service policy to the interface.

    Example:
    
    Router(config-if)# service-policy output policy1

Modifying CPU Queue Limits

You can modify the rate-limit and burst of network packets that are received by the CPU queue on the Cisco ASR 901 platform by using the following command:

router(config)#platform cosq <cosq-number> rate-limit <rate-limit> [burst <burst-value>]
Table 7. Syntax Description

cosq

Enter the CPU queue number. The queue number ranges from 0 to 47.

rate-limit

Enter the number of packets that should be received by the CPU queue. The value ranges from 1 to 1000 packets.

burst

(Optional) Enter the number of packets that must be pushed above the configured bandwitdth limit. The value ranges from 1 to 100.

To disable the command, use the no form of this command.

router(config)#no platform cosq <cosq-number>  

Upon execution of the above command, the rate limit and burst values of the specified queue are reset to their default values.

The following example shows how to modify the defualt rate-limit and burst values for a CPU queue:

router(config)#platform cosq 38 rate-limit 500 [burst 100]

Weighted Random Early Detection (WRED)

Random Early Detection (RED) is a congestion avoidance mechanism that takes advantage of the congestion control mechanism of TCP. By randomly dropping packets prior to periods of high congestion, RED tells the packet source to decrease its transmission rate. WRED drops packets selectively based on IP discard-class. Discard-class is assigned to packets at the ingress, as they enter the network. WRED is useful on any output interface where you expect to have congestion. However, WRED is usually used in the core routers of a network, rather than at the edge. WRED uses discard-class to determine how it treats different types of traffic.

When a packet arrives, the following events occur:

  1. The average queue size is calculated.
  2. If the average is less than the minimum queue threshold, the arriving packet is queued.
  3. If the average is between the minimum queue threshold for that type of traffic and the maximum threshold for the interface, the packet is either dropped or queued, depending on the packet drop probability for that type of traffic.
  4. If the average queue size is greater than the maximum threshold, the packet is dropped.

Note

Cisco ASR 901 supports configuration of random-detect thresholds only in number-of-packets.

Complete the following steps to configure WRED:

Procedure
  Command or Action Purpose
Step 1

configure terminal

Enter the global configuration mode

Step 2

policy-map

Example:
Example 
Example:

Router(config)# policy-map policy1

Define a new policy map and enter policy map configuration mode.

Step 3

class

Example:

Router(config-pmap)# class class1

Specify a traffic class to which the policy applies. This command enters policy-map class configuration mode, which allows you to define the treatment for the traffic class.

Step 4

bandwidth

Example:

Router(config-pmap-c)# bandwidth percent 50 

Specify the bandwidth allocated for a traffic class attached to the policy map. You can define the percentage of bandwidth, or an absolute amount of bandwidth.

This step is optional.

Step 5

[no] random-detect discard-class-based

Base WRED on the discard class value of a packet.

To disable this feature, use the no form of this command.

Step 6

[no] random-detect discard-class

Example:

Router(config-pmap-c)# random-detect 
discard-class 2 100 200 10

Configure WRED parameters for a discard-class value for a class policy in a policy map.

  • Discard class. Valid values are 0 to 2.
Note 
WRED counters are not supported for discard class 0.
  • min-threshold— Minimum threshold in number of packets. Valid values are 1 to 4096. When the average queue length reaches the minimum threshold, WRED randomly drops some packets with the specified IP precedence.
  • max-threshold— Maximum threshold in number of packets. Valid values are 1 to 4096. When the average queue length exceeds the maximum threshold, WRED drops all packets with the specified IP precedence.
Note 
Max-threshold values configured above 1024 cannot be reached.
  • —Denominator for the fraction of packets dropped when the average queue depth is at the maximum threshold. For example, if the denominator is 512, 1 out of every 512 packets is dropped when the average queue is at the maximum threshold. Valid values are 1 to 65535. The default is 10; 1 out of every 10 packets is dropped at the maximum threshold.

To return the values to the default for the discard class, use the no form of this command.

Configuring Shaping

The Cisco ASR 901 supports class-based traffic shaping. Follow these steps to configure class-based traffic shaping.

Class-based traffic shaping is configured using a hierarchical policy map structure; you enable traffic shaping on a primary level (parent) policy map and other QoS features such as queuing and policing on a secondary level (child) policy map.

This section contains the following topics:

Configuring Class-Based Traffic Shaping in a Primary-Level (Parent) Policy Map

Follow these steps to configure a parent policy map for traffic shaping.

Procedure

Step 1

Use the policy-map command to specify the policy map for which you want to configure shaping and enter policy-map configuration mode.

Example:

Router(config)# policy-map output-policy
Step 2

Use the class command to specify the traffic class to which the policy map applies.

Example:

Router(config-pmap)# class class1
Router(config-pmap-c)#
Step 3

Use the shape command to define algorithm and rate used for traffic shaping.

Example:

Router(config-pmap-c)# shape average mean-rate burst-size
Step 4

Use the service-policy command to attach the policy map to the class map.

Example:

Router(config-pmap-c)# service-policy policy-map
Step 5

Exit configuration mode.

Example:

Router(config-pmap-c)# end
Router#
Note 
You can use the show policy-map command to verify your configuration.

For more information about configuring shaping, see Regulating Packet Flow on a Per-Class Basis---Using Class-Based Traffic Shaping .

Note 
This router does not support all of the commands described in the IOS Release 12.2SR documentation.

Configuring the Secondary-Level (Child) Policy Map

Follow these steps to create a child policy map for traffic shaping.

Procedure

Step 1

Use the policy-map command to specify the policy map for which you want to configure shaping and enter policy-map configuration mode.

Example:

Router(config)# policy-map output-policy
Step 2

Use the class command to specify the traffic class to which the policy map applies.

Example:

Router(config-pmap)# class class1
Step 3

Use the bandwidth command to specify the bandwidth allocated to the policy map. You can specify the bandwidth in kbps, a relative percentage of bandwidth, or an absolute amount of bandwidth.

Example:

Router(config-pmap-c)# bandwidth percent 50
Step 4

Exit configuration mode.

Example:

Router(config-pmap-c)# end

For more information about configuring shaping, see Regulating Packet Flow on a Per-Class Basis---Using Class-Based Traffic Shaping .

Note 
The Cisco ASR 901 does not support all of the commands described in the IOS Release 12.2SR documentation.

Configuring Ethernet Trusted Mode

The Cisco ASR 901 supports trusted and non-trusted mode for Gigabit ethernet ports. Gigabit ethernet ports are set in non-trusted mode by default. Trust mode is configured through table-maps. Use the set qos-group cos command to use default mapping.

Creating IP Extended ACLs

Complete the following steps to create an IP extended ACL for IP traffic:

Procedure

  Command or Action Purpose
Step 1

configure terminal

Enter the global configuration mode.

Step 2

access-list access-list-numberpermit access-list-number access-list-number access-list-number [precedence access-list-number ] [tos access-list-number ] [dscp access-list-number ]

Create an IP extended ACL. Repeat the step as many times as necessary.

  • For access-list-number , enter the access list number. The range is 100 to 199 and 2000 to 2699.
  • For access-list-number , enter the name or number of an IP protocol. Use the question mark (?) to see a list of available protocols. To match any Internet protocol (including ICMP, TCP, and UDP), enter ip .
  • The access-list-number is the number of the network or host sending the packet.
  • The access-list-number applies wildcard bits to the source.
  • The access-list-number is the network or host number receiving the packet.
  • The access-list-number applies wildcard bits to the destination.

You can specify source, destination, and wildcards as:

  • The 32-bit quantity in dotted-decimal format.
  • The keyword any for 0.0.0.0 255.255.255.255 (any host).
  • The keyword host for a single host 0.0.0.0.
Step 3

ip access-list extended access-list-number

Define an extended IPv4 access list using a name, and enter access-list configuration mode. The name can be a number from 100 to 199.

In access-list configuration mode, enter permit protocol source source-wildcard destination destination-wildcard } .

Step 4

end

Return to the privileged EXEC mode.

Step 5

show access-lists

Verify your entries.

Step 6

copy running-config startup-config

(Optional) Save your entries in the configuration file.

What to do next

To delete an access list, use the no access-list access-list-number global configuration command.

This example shows how to create an ACL that permits IP traffic from a source host at 10.1.1.1 to a destination host at 10.1.1.2:


Router(config)# access-list 100 permit ip host 10.1.1.1 host 10.1.1.2

Using Class Maps to Define a Traffic Class

You use the class-map global configuration command to name and to isolate a specific traffic flow (or class) from all other traffic. A class map defines the criteria to use to match against a specific traffic flow to further classify it. Match statements can include criteria such as CoS value, DSCP value, IP precedence values, or QoS group values, or VLAN IDs. You define match criterion with one or more match statements entered in the class-map configuration mode.

Follow these guidelines when configuring class maps:

  • A match-all class map cannot have more than one classification criterion (one match statement), but a match-any class map can contain multiple match statements.
  • The match cos and match vlan commands are supported only on Layer 2 802.1Q trunk ports.
  • You use a class map with the match vlan command in the parent policy in input hierarchical policy maps for per-port, per-VLAN QoS on trunk ports. A policy is considered a parent policy map when it has one or more of its classes associated with a child policy map. Each class within a parent policy map is called a parent class. You can configure only the match vlan command in parent classes. You cannot configure the match vlan command in classes within the child policy map.
  • You cannot configure match qos-group for an input policy map.
  • In an output policy map, no two class maps can have the same classification criteria; that is, the same match qualifiers and values.
  • The maximum number of class maps supported on the Cisco ASR 901 router is 256.

Complete the following steps to create a class map and to define the match criterion to classify traffic:

Procedure

  Command or Action Purpose
Step 1

configure terminal

Enter the global configuration mode.

Step 2

class-map [match-all | match-any ] controller e1slot/subslot

Create a class map, and enter class-map configuration mode. By default, no class maps are defined.

  • (Optional) Use the match-all keyword to perform a logical-AND of all matching statements under this class map. All match criteria in the class map must be matched.
  • (Optional) Use the match-any keyword to perform a logical-OR of all matching statements under this class map. One or more match criteria must be matched.
  • For controller e1slot/subslot , specify the name of the class map.

If no matching statements are specified, the default is match-all .

Note 
A match-all class map cannot have more than one classification criterion (match statement).
Step 3

match {cos controller e1slot/subslot | ip dscp controller e1slot/subslot | ip precedence controller e1slot/subslot | qos-group controller e1slot/subslot | vlan controller e1slot/subslot

Define the match criterion to classify traffic. By default, no match criterion is defined.

Only one match type per class map is supported.

  • For cos controller e1slot/subslot , enter a list of up to four CoS values in a single line to match against incoming packets. Separate each value with a space. You can enter multiple controller e1slot/subslot lines to match more than four CoS values. The range is 0 to 7.
  • For ip dscp controller e1slot/subslot , enter a list of up to eight IPv4 DSCP values to match against incoming packets. Separate each value with a space. You can enter multiple controller e1slot/subslot lines to match more than eight DSCP values. The numerical range is 0 to 63. You can also configure DSCP values in other forms. See the Classification Based on IP DSCP.
  • For ip precedence controller e1slot/subslot , enter a list of up to four IPv4 precedence values to match against incoming packets. Separate each value with a space. You can enter multiple controller e1slot/subslot lines to match more than four precedence values. The range is 0 to 7.
  • For vlan controller e1slot/subslot specify a VLAN ID or a range of VLANs to be used in a parent policy map for per-port, per-VLAN QoS on a trunk port. The VLAN ID range is 1 to 4094.
  • For qos-group controller e1slot/subslot specify the QoS group number. The range is 0 to 7. Matching of QoS groups is supported only in output policy maps.
Step 4

end

Return to the privileged EXEC mode.

Step 5

show class-map

Verify your entries.

Step 6

copy running-config startup-config

(Optional) Save your entries in the configuration file.

What to do next

This example shows how to create a class map called controller e1slot/subslot , which matches incoming traffic with DSCP values of 10, 11, and 12.


Router(config)# class-map match-any class2
Router(config-cmap)# match ip dscp 10 11 12
Router(config-cmap)# exit

Creating a Named Access List

To create a standard or extended named access list, perform the following tasks:


Note

Extended ACLs with extended options like DSCP, fragments, option, precedence, time-range, ToS, and TTL are not supported. Only ACLs with source and destination IP addresses are supported.


Procedure

  Command or Action Purpose
Step 1

enable

Example:


Router> enable

Enables the privileged EXEC mode.

  • Enter your password if prompted.
Step 2

configure terminal

Example:


Router# configure terminal

Enters the global configuration mode.

Step 3

Do one of the following:

  • ip access-list {standard | extended} name

Example:


Router(config)# ip access-list 
standard acl-std 

Define a standard or extended IP access list using a name.

  • standard —Specifies a standard IP access list.
  • extended —Specifies an extended IP access list.
  • name —Name of the IP access list or object-group ACL. Names cannot contain a space or quotation mark, and must begin with an alphabetic character to prevent ambiguity with numbered access lists.
Step 4

permit {source [source-wildcard] | any} log

Example:


Router(config-std-nacl)# permit 10.10.10.10 255.255.255.0

Enters access-list configuration mode, and specifies one or more allowed or denied conditions. This determines whether the packet is passed or dropped.

  • source —Number of the network or host from which the packet is sent in a 32-bit quantity in four-part, dotted-decimal format.
  • source-wildcard —(Optional) Wildcard bits to be applied to the source in four-part, dotted-decimal format. Place ones in the bit positions you want to ignore.
  • any —Specifies any source or destination host as an abbreviation for the source-addr or destination-addr value and the source-wildcard, or destination-wildcard value of 0.0.0.0 255.255.255.255.
  • log —Causes an informational logging message about the packet that matches the entry to be sent to the console. (The level of messages logged to the console is controlled by the logging console command.)
Step 5

exit

Example:


Router(config-std-nacl)# exit 

Enters the global configuration mode.

Step 6

class-map class-map-name

Example:


Router(config)# class-map class-acl-std

Defines name for the class map and enters class-map config mode.

  • class-map-name —Name of the class map.
Step 7

match access-group name access-group-name

Example:


Router(config-cmap)# match access-group 
name acl-std

Defines a named ACL for the match criteria.

  • access-group-name—Specifies a named ACL whose contents are used as the match criteria against which packets are checked to determine if they belong to the same class. The name can be up to 40 alphanumeric characters.

TCAM with ACL

The scalability of ACLs will change depending on the features configured on the Cisco ASR 901 Router. With on-demand allocation, ACLs can be allocated up to a maximum of 1536 TCAM rules. For more information on troubleshooting scalability, see Troubleshooting Tips.

Configuration Examples for ACL

The following is a sample output of the show ip access-lists tcam command.


Router# show ip access-lists tcam1 
!consumes 1 TCAM entry per rule + a default rule. 
!4 TCAM entries in this case]
Extended IP access list tcam1
    10 permit ip host 1.1.1.12 any
    20 deny ip host 2.2.2.11 any
    30 permit ip host 1.1.1.13 any
Router#
Router# show run int gig 0/1
Building configuration...
Current configuration : 221 bytes
!
interface GigabitEthernet0/1
 no ip address
 ip access-group tcam1 in
 negotiation auto
Router# show platform tcam detailed
Ingress    : 6/8 slices, 1536/2048 entries used
Pre-Ingress: 3/4 slices, 768/1024 entries used
Egress     : 0/4 slices, 0/512 entries used
Slice ID: 1
Stage: Pre-Ingress
Mode: Single
Entries used: 29/256
Slice allocated to: Layer-2 Classify and Assign Group
Slice ID: 4
Stage: Pre-Ingress
Mode: Double
Entries used: 11/128
Slice allocated to: L2CP
Slice ID: 2
Stage: Ingress
Mode: Double
Entries used: 27/128
Slice allocated to: L2 Post-Switch Processing Group
Slice ID: 5
Stage: Ingress
Mode: Single	
Entries used: 4/256
Slice allocated to: Port ACLs
Slice ID: 7
Stage: Ingress
Mode: Double
Entries used: 10/128
Slice allocated to: OAM, Ethernet loopback, Y.1731 DMM
Slice ID: 3
Stage: Ingress
Mode: Double
Entries used: 15/128
Slice allocated to: CESoPSN-UDP, CEF, Layer-3 Control Protocols
Slice ID: 8
Stage: Ingress
Mode: Double
Entries used: 220/256
Slice allocated to: Quality Of Service

Verifying Named Access List

To verify the standard or extended access list configuration, use the show access-lists command as given below:


Router# show access-lists tes456
Extended IP access list tes456
    10 permit ip host 10.1.1.1 192.168.1.0 0.0.0.255
    20 permit ip host 10.1.1.1 192.168.2.0 0.0.0.255
    30 permit ip host 10.1.1.1 192.168.3.0 0.0.0.255
    40 permit ip host 10.1.1.1 192.168.4.0 0.0.0.255
    50 permit ip host 10.1.1.1 192.168.5.0 0.0.0.255
    60 permit ip host 10.1.1.1 192.168.6.0 0.0.0.255
    70 permit ip host 10.1.1.1 192.168.7.0 0.0.0.255
    80 permit ip host 10.1.1.1 192.168.8.0 0.0.0.255
    90 permit ip host 10.1.1.1 192.168.9.0 0.0.0.255
!
!
!

To verify the ACL-based QoS classification, use the show policy-map command as given below:


Router# show policy-map interface gigabitethernet 0/0
 GigabitEthernet0/0 
  Service-policy input: test
    Class-map: test (match-any)  
      0 packets, 244224 bytes
      5 minute offered rate 6000 bps, drop rate 0000 bps
      Match: access-group name test
      QoS Set
        dscp af32
          Packets marked 0
        No marking statistics available for this class 
    Class-map: class-default (match-any)  
      0 packets, 239168 bytes
      5 minute offered rate 6000 bps, drop rate 0000 bps
      Match: any 

Configuration Example for Named Access List

The following is the sample configuration of a named access list on the Cisco ASR 901 router.


Note

In the following configuration, both the ACL and ACL-based QoS are exclusive of each other and are not related to each other.

Router# show running-config 
Building configuration...
Current configuration : 11906 bytes
!
! Last configuration change at 22:51:12 UTC Sun May 13 2001
!
version 15.2
service timestamps debug datetime msec
service timestamps log datetime msec
!
hostname Router
!
boot-start-marker
boot-end-marker
!
!
!card type command needed for slot/vwic-slot 0/0
enable password lab
!
no aaa new-model
ip cef
!
!
!
!         
no ipv6 cef
!
!
mpls label protocol ldp
multilink bundle-name authenticated
!
table-map sach
 map from  0 to 0
 map from  1 to 1
 map from  2 to 2
 map from  3 to 3
 map from  4 to 3
 map from  5 to 5
 map from  6 to 6
 map from  7 to 7
 default copy
!
l3-over-l2 flush buffers
!
!
!
!
!         
!
!
spanning-tree mode pvst
spanning-tree extend system-id
username lab password 0 lab
!
!
!
class-map match-any test
 match access-group name test123
class-map match-all test456
 match access-group name tes456
class-map match-any test1
 match access-group name test123
!
policy-map test
 class test456
 class class-default
!
!
! 
!
!
!
interface Loopback0
 ip address 10.10.10.1 255.255.255.255
!
interface Port-channel1
 no negotiation auto
!
interface Port-channel8
 no negotiation auto
 service-policy input test
 service instance 2000 ethernet
  encapsulation dot1q 2000
  rewrite ingress tag pop 1 symmetric
  bridge-domain 2000
 !
!
interface GigabitEthernet0/0
 no negotiation auto
 service-policy input test
!
interface GigabitEthernet0/1
 shutdown
 no negotiation auto
!
interface GigabitEthernet0/2
 negotiation auto
 channel-group 8 mode active
!
interface GigabitEthernet0/3
 no negotiation auto
!
interface GigabitEthernet0/4
 negotiation auto
 service instance 200 ethernet
  encapsulation untagged
  bridge-domain 200
 !        
!
interface GigabitEthernet0/5
 negotiation auto
!
interface GigabitEthernet0/6
 no negotiation auto
!
interface GigabitEthernet0/7
 no negotiation auto
!
interface GigabitEthernet0/8
 negotiation auto
 channel-group 8 mode active
!
interface GigabitEthernet0/9
 no negotiation auto
!
interface GigabitEthernet0/10
 no negotiation auto
!
interface GigabitEthernet0/11
 no negotiation auto
!         
interface FastEthernet0/0
 ip address 10.104.99.152 255.255.255.0
 full-duplex
!
interface Vlan1
 no ip address
!
interface Vlan108
 ip address 11.11.11.1 255.255.255.0
 mpls ip
!
interface Vlan200
 ip address 10.1.1.2 255.255.255.0
 mpls ip
!
interface Vlan2000
 ip address 200.1.1.1 255.255.255.0
!
router ospf 1
 router-id 10.10.10.1
 network 10.10.10.1 0.0.0.0 area 0
 network 200.1.1.0 0.0.0.255 area 0
!         
router bgp 1
 bgp router-id 10.10.10.1
 bgp log-neighbor-changes
 neighbor 10.1.1.1 remote-as 2
 neighbor 10.10.10.50 remote-as 1
 neighbor 10.10.10.50 update-source Loopback0
!
ip forward-protocol nd
!
!
no ip http server
ip route 0.0.0.0 0.0.0.0 10.104.99.1
!
ip access-list extended check
 deny   ip any any
ip access-list extended tes456
 permit ip host 10.1.1.1 192.168.1.0 0.0.0.255
 permit ip host 10.1.1.1 192.168.2.0 0.0.0.255
 permit ip host 10.1.1.1 192.168.3.0 0.0.0.255
 permit ip host 10.1.1.1 192.168.4.0 0.0.0.255
 permit ip host 10.1.1.1 192.168.5.0 0.0.0.255
 permit ip host 10.1.1.1 192.168.6.0 0.0.0.255
 permit ip host 10.1.1.1 192.168.7.0 0.0.0.255
 permit ip host 10.1.1.1 192.168.8.0 0.0.0.255
 permit ip host 10.1.1.1 192.168.9.0 0.0.0.255
 permit ip host 10.1.1.1 192.168.10.0 0.0.0.255
 permit ip host 10.1.1.1 192.168.11.0 0.0.0.255
 permit ip host 10.1.1.1 192.168.12.0 0.0.0.255
 permit ip host 10.1.1.1 192.168.13.0 0.0.0.255
 permit ip host 10.1.1.1 192.168.14.0 0.0.0.255
 permit ip host 10.1.1.1 192.168.15.0 0.0.0.255
 permit ip host 10.1.1.1 192.168.16.0 0.0.0.255
 permit ip host 10.1.1.1 192.168.17.0 0.0.0.255
 permit ip host 10.1.1.1 192.168.18.0 0.0.0.255
 permit ip host 10.1.1.1 192.168.19.0 0.0.0.255
 permit ip host 10.1.1.1 192.168.20.0 0.0.0.255
 permit ip host 10.1.1.1 192.168.21.0 0.0.0.255
 permit ip host 10.1.1.1 192.168.22.0 0.0.0.255
 permit ip host 10.1.1.1 192.168.23.0 0.0.0.255
 permit ip host 10.1.1.1 192.168.24.0 0.0.0.255
 permit ip host 10.1.1.1 192.168.25.0 0.0.0.255
 permit ip host 10.1.1.1 192.168.26.0 0.0.0.255
 permit ip host 10.1.1.1 192.168.27.0 0.0.0.255
 permit ip host 10.1.1.1 192.168.28.0 0.0.0.255
 permit ip host 10.1.1.1 192.168.29.0 0.0.0.255
 permit ip host 10.1.1.1 192.168.30.0 0.0.0.255
 permit ip host 10.1.1.1 192.168.31.0 0.0.0.255
 permit ip host 10.1.1.1 192.168.32.0 0.0.0.255
 permit ip host 10.1.1.1 192.168.33.0 0.0.0.255
 permit ip host 10.1.1.1 192.168.34.0 0.0.0.255
 permit ip host 10.1.1.1 192.168.35.0 0.0.0.255
 permit ip host 10.1.1.1 192.168.36.0 0.0.0.255
 permit ip host 10.1.1.1 192.168.37.0 0.0.0.255
 permit ip host 10.1.1.1 192.168.38.0 0.0.0.255
 permit ip host 10.1.1.1 192.168.40.0 0.0.0.255
 permit ip host 10.1.1.1 192.168.41.0 0.0.0.255
 permit ip host 10.1.1.1 192.168.42.0 0.0.0.255
 permit ip host 10.1.1.1 192.168.43.0 0.0.0.255
 permit ip host 10.1.1.1 192.168.44.0 0.0.0.255
 permit ip host 10.1.1.1 192.168.45.0 0.0.0.255
 permit ip host 10.1.1.1 192.168.46.0 0.0.0.255
 permit ip host 10.1.1.1 192.168.47.0 0.0.0.255
 permit ip host 10.1.1.1 192.168.48.0 0.0.0.255
 permit ip host 10.1.1.1 192.168.49.0 0.0.0.255
 permit ip host 10.1.1.1 192.168.50.0 0.0.0.255
 permit ip host 10.1.1.1 192.168.51.0 0.0.0.255
 permit ip host 10.1.1.1 192.168.52.0 0.0.0.255
 permit ip host 10.1.1.1 192.168.53.0 0.0.0.255
 permit ip host 10.1.1.1 192.168.54.0 0.0.0.255
 permit ip host 10.1.1.1 192.168.55.0 0.0.0.255
 permit ip host 10.1.1.1 192.168.56.0 0.0.0.255
 permit ip host 10.1.1.1 192.168.57.0 0.0.0.255
 permit ip host 10.1.1.1 192.168.58.0 0.0.0.255
 permit ip host 10.1.1.1 192.168.59.0 0.0.0.255
 permit ip host 10.1.1.1 192.168.60.0 0.0.0.255
 permit ip host 10.1.1.1 192.168.61.0 0.0.0.255
 permit ip host 10.1.1.1 192.168.62.0 0.0.0.255
 permit ip host 10.1.1.1 192.168.63.0 0.0.0.255
 permit ip host 10.1.1.1 192.168.64.0 0.0.0.255
 permit ip host 10.1.1.1 192.168.65.0 0.0.0.255
 permit ip host 10.1.1.1 192.168.66.0 0.0.0.255
 permit ip host 10.1.1.1 192.168.67.0 0.0.0.255
 permit ip host 10.1.1.1 192.168.68.0 0.0.0.255
 permit ip host 10.1.1.1 192.168.69.0 0.0.0.255
 permit ip host 10.1.1.1 192.168.70.0 0.0.0.255
 permit ip host 10.1.1.1 192.168.71.0 0.0.0.255
 permit ip host 10.1.1.1 192.168.72.0 0.0.0.255
 permit ip host 10.1.1.1 192.168.73.0 0.0.0.255
 permit ip host 10.1.1.1 192.168.74.0 0.0.0.255
 permit ip host 10.1.1.1 192.168.75.0 0.0.0.255
ip access-list extended test123
 remark 1 
 permit ip host 10.1.1.1 192.168.1.0 0.0.0.255
 remark 2 
 permit ip host 10.1.1.1 192.168.2.0 0.0.0.255
 remark 3
 permit ip host 10.1.1.1 192.168.3.0 0.0.0.255
 remark 4
 permit ip host 10.1.1.1 192.168.4.0 0.0.0.255
 remark 5
 permit ip host 10.1.1.1 192.168.5.0 0.0.0.255
 remark 6
 permit ip host 10.1.1.1 192.168.6.0 0.0.0.255
 remark 7
 permit ip host 10.1.1.1 192.168.7.0 0.0.0.255
 remark 8
 permit ip host 10.1.1.1 192.168.8.0 0.0.0.255
 remark 9
 permit ip host 10.1.1.1 192.168.9.0 0.0.0.255
 remark 10
 permit ip host 10.1.1.1 192.168.10.0 0.0.0.255
 remark 11
 permit ip host 10.1.1.1 192.168.11.0 0.0.0.255
 remark 12
 permit ip host 10.1.1.1 192.168.12.0 0.0.0.255
 remark 13
 permit ip host 10.1.1.1 192.168.13.0 0.0.0.255
 remark 14
 permit ip host 10.1.1.1 192.168.14.0 0.0.0.255
 remark 15
 permit ip host 10.1.1.1 192.168.15.0 0.0.0.255
 remark 16
 permit ip host 10.1.1.1 192.168.16.0 0.0.0.255
 remark 17
 permit ip host 10.1.1.1 192.168.17.0 0.0.0.255
 remark 18
 permit ip host 10.1.1.1 192.168.18.0 0.0.0.255
 remark 19
 permit ip host 10.1.1.1 192.168.19.0 0.0.0.255
 remark 20
 permit ip host 10.1.1.1 192.168.20.0 0.0.0.255
 remark 21
 permit ip host 10.1.1.1 192.168.21.0 0.0.0.255
 remark 22
 permit ip host 10.1.1.1 192.168.22.0 0.0.0.255
 remark 23
 permit ip host 10.1.1.1 192.168.23.0 0.0.0.255
 remark 24
 permit ip host 10.1.1.1 192.168.24.0 0.0.0.255
 remark 25
 permit ip host 10.1.1.1 192.168.25.0 0.0.0.255
 remark 26
 permit ip host 10.1.1.1 192.168.26.0 0.0.0.255
 remark 27
 permit ip host 10.1.1.1 192.168.27.0 0.0.0.255
 remark 28
 permit ip host 10.1.1.1 192.168.28.0 0.0.0.255
 remark 29
 permit ip host 10.1.1.1 192.168.29.0 0.0.0.255
 remark 30
 permit ip host 10.1.1.1 192.168.30.0 0.0.0.255
 remark 31
 permit ip host 10.1.1.1 192.168.31.0 0.0.0.255
 remark 32
 permit ip host 10.1.1.1 192.168.32.0 0.0.0.255
 remark 33
 permit ip host 10.1.1.1 192.168.33.0 0.0.0.255
 remark 34
 permit ip host 10.1.1.1 192.168.34.0 0.0.0.255
 remark 35
 permit ip host 10.1.1.1 192.168.35.0 0.0.0.255
 remark 36
 permit ip host 10.1.1.1 192.168.36.0 0.0.0.255
 remark 37
 permit ip host 10.1.1.1 192.168.37.0 0.0.0.255
 remark 38
 permit ip host 10.1.1.1 192.168.38.0 0.0.0.255
 remark 39
 permit ip host 10.1.1.1 192.168.39.0 0.0.0.255
 remark 40
 permit ip host 10.1.1.1 192.168.40.0 0.0.0.255
 remark 41
 permit ip host 10.1.1.1 192.168.41.0 0.0.0.255
 remark 42
 permit ip host 10.1.1.1 192.168.42.0 0.0.0.255
 remark 43
 permit ip host 10.1.1.1 192.168.43.0 0.0.0.255
 remark 44
 permit ip host 10.1.1.1 192.168.44.0 0.0.0.255
 remark 45
 permit ip host 10.1.1.1 192.168.45.0 0.0.0.255
 remark 46
 permit ip host 10.1.1.1 192.168.46.0 0.0.0.255
 remark 47
 permit ip host 10.1.1.1 192.168.47.0 0.0.0.255
 remark 48
 permit ip host 10.1.1.1 192.168.48.0 0.0.0.255
 remark 49
 permit ip host 10.1.1.1 192.168.49.0 0.0.0.255
 remark 50
 permit ip host 10.1.1.1 192.168.50.0 0.0.0.255
!
access-list 2600 permit ip any any
!
mpls ldp router-id Loopback0
!
!
control-plane
!
environment monitor
!
line con 0
line aux 0
 transport preferred none
 transport output lat pad telnet rlogin udptn ssh
line vty 0 4
 exec-timeout 3 3
 password lab
 login
!
exception crashinfo buffersize 128
!
!
end

Access Control Lists for IPv6 Traffic Filtering

The standard ACL functionality in IPv6 is similar to standard ACLs in IPv4. Access lists determine what traffic is blocked and what traffic is forwarded at router interfaces and allow filtering based on source and destination addresses and inbound interface. Each access list has an implicit deny statement at the end. IPv6 ACLs are defined and their deny and permit conditions are set using the ipv6 access-list command with the deny and permit keywords in global configuration mode.

Creating and Configuring an IPv6 ACL for Traffic Filtering

Perform the following task to create and configure IPv6 ACL to filter traffic.

Restrictions

  • Port based ACLs are not supported.
  • Outbound ACLs are not supported due to hardware limitations.
  • Only named ACLs are supported for IPv6 ACLs.
  • Only standard IPv6 headers are supported in Layer 3 options. Extended IPv6 headers are not supported.
  • Only layer 3 options such as dscp and flow-label are supported for IPv6 ACLs.
  • Only layer 4 options such as ack, eq, established, fin, gt, lt, psh, ranges, rst, and syn are supported for IPv6 ALCs.
  • The scale of IPv6 ACL varies based on the QoS, Layer 4 ACL, multicast, and storm features configured on the Cisco ASR 901 Router.
Procedure
  Command or Action Purpose
Step 1

enable

Example:

Router> enable

Enables the privileged EXEC mode.

  • Enter your password if prompted.
Step 2

configure terminal

Example:

Router# configure terminal

Enters the global configuration mode.

Step 3

ipv6 access-list access-list- name

Example:

Router(config)# ip access-list source

Defines an IPv6 ACL, and enters IPv6 access list configuration mode.

  • name —Name of the IPv6 access list. Names cannot contain a space or quotation mark, and must begin with an alphabetic character to prevent ambiguity with numbered access lists.
Step 4

Do one of the following:

  • permit protocol {source [source-ipv6-prefix/prefix-length] | any | host source-ipv6-address | auth]}[operator [port-number]]{destination [destination-ipv6-prefix | prefix-length | any | host destination-ipv6-address | auth]} [operator [port-number]] [dest-option-type [doh-number | doh-type]] [dscp value] [flow-label value][fragments][hbh][log][log-input] [routing][routing-type routing-number] [sequence value][time-range name]
  • or deny protocol {source [source-ipv6-prefix/prefix-length] | any | host source-ipv6-address | auth]}[operator [port-number]]{destination [destination-ipv6-prefix | prefix-length | any | host destination-ipv6-address | auth]} [operator [port-number]] [dest-option-type [doh-number | doh-type]] [dscp value] [flow-label value][fragments][hbh][log][log-input] [routing][routing-type routing-number] [sequence value][time-range name]
Example:

Router(config-ipv6-acl)# permit ipv6 
host 2001:DB8:0:4::32 any eq telnet
Example:

Router(config-ipv6-acl)# deny tcp host 2001:1::2 eq 30 any dscp af11

Specifies permit or deny conditions for an IPv6 ACL.

Enters access-list configuration mode, and specifies one or more allowed or denied conditions. This determines whether the packet is passed or dropped.

  • source —Number of the network or host from which the packet is sent in a 32-bit quantity in four-part, dotted-decimal format.
  • source-wildcard —(Optional) Wildcard bits to be applied to the source in four-part, dotted-decimal format. Place ones in the bit positions you want to ignore.
  • any —Specifies any source or destination host as an abbreviation for the source-addr or destination-addr value and the source-wildcard, or destination-wildcard value of 0.0.0.0 255.255.255.255.
  • log —Causes an informational logging message about the packet that matches the entry to be sent to the console. (The level of messages logged to the console is controlled by the logging console command.)
Configuration Example

This section shows sample configuration for creating and configuring the IPv6 ACL on the Cisco ASR 901 router.


ipv6 access-list source
deny tcp host 2001:1::2 eq 30 any dscp af11
permit ipv6 any any

Applying the IPv6 ACL to an Interface

Perform the following task to apply the IPv6 ACL to an interface.

Procedure
  Command or Action Purpose
Step 1

enable

Example:

Router> enable

Enables privileged EXEC mode.

  • Enter your password if prompted.
Step 2

configure terminal

Example:

Router# configure terminal

Enters global configuration mode.

Step 3

interface type number

Example:

Router(config)# interface vlan 100

Specifies the interface type and number, and enters interface configuration mode.

Step 4

ipv6 traffic-filter access-list-name in

Example:

Router(config-if) # ipv6 traffic-filter source in

Applies the specified IPv6 access list to the SVI interface specified in the previous step. Only inbound filtering is supported with port ACLs. You can apply one port ACL to an interface.

Configuration Example

This section shows sample configuration for applying the IPv6 ACL on an interface.


int vlan 100
ipv6 traffic-filter source in
end

QoS Treatment for Performance-Monitoring Protocols

This section contains the following topics:

Cisco IP-SLAs

For information about Cisco IP service level agreements (IP-SLAs), see Understanding Cisco IOS IP SLAs, page 3-2 .

QoS Treatment for IP-SLA Probes

The QoS treatment for IP-SLA and TWAMP probes must exactly reflect the effects that occur to the normal data traffic crossing the device.

The generating device should not change the probe markings. It should queue these probes based on the configured queueing policies for normal traffic.

Marking

By default, the class of service (CoS) marking of CFM traffic (including IP SLAs using CFM probes) is not changed. This feature cannot change this behavior.

By default, IP traffic marking (including IP SLA and TWAMP probes) is not changed. This feature can change this behavior.

Queuing

The CFM traffic (including IP SLAs using CFM probes) is queued according to its CoS value and the output policy map configured on the egress port, similar to normal traffic. This feature cannot change this behavior.

IP traffic (including IP SLA and TWAMP probes) is queued according to the markings specified in the cpu traffic qos global configuration command and the output policy map on the egress port. If this command is not configured, all IP traffic is statically mapped to a queue on the egress port.

QoS Marking for CPU-Generated Traffic

You can use QoS marking to set or modify the attributes of traffic from the CPU. The QoS marking action can cause the CoS bits in the packet to be rewritten or leave the CoS, DSCP, or IP precedence bits in the packet unchanged. QoS uses packet markings to identify certain traffic types and how to treat them on the local router and the network.

You can also use marking to assign traffic to a QoS group within the router. This QoS group is an internal label that does not modify the packet, but it can be used to identify the traffic type when configuring egress queuing on the network port.

You can specify and mark traffic CPU-generated traffic by using these global configuration commands:

cpu traffic qos cos {cos_value | cos [table-map table-map-name ] | dscp [table-ma p table-map-name ] | precedence [table-map table-map-name ]}

You can mark a QoS group by configuring an explicit value or by using the table-map keyword. Table maps list specific traffic attributes and map (or convert) them to another attribute. A table map establishes a to-from relationship for the attribute and defines the change to be made:

  • Marking CoS by using the CoS, or the IP-DSCP, or the IP precedence of IP CPU-packets
  • Marking CoS by using the CoS of non-IP CPU-packets.
  • Marking IP DSCP by using the CoS, or the IP-DSCP, or the IP precedence of the CPU-packet
  • Marking IP precedence by using the CoS, or the IP-DSCP, or the IP precedence of the CPU-packet

You can configure either IP-DSCP or IP precedence marking.

You can also simultaneously configure marking actions to modify CoS, IP-DSCP or IP precedence, and QoS group.

The cpu traffic qos command specifies the traffic to which it applies: all CPU traffic, only CPU IP traffic, or only CPU non-IP traffic. All other traffic retains its QoS markings. This feature does not affect CFM traffic (including Layer 2 IP SLA probes using CFM).

QoS Queuing for CPU-Generated Traffic

You can use the QoS markings established for the CPU-generated traffic by the cpu traffic qos global configuration command as packet identifiers in the class-map of an output policy-map to map CPU traffic to class-queues in the output policy-map on the egress port. You can then use output policy-maps on the egress port to configure queuing and scheduling for traffic leaving the router from that port.

If you want to map all CPU-generated traffic to a single class in the output policy-maps without changing the CoS, IP DSCP, or IP-precedence packet markings, you can use QoS groups for marking CPU-generated traffic.

If you want to map all CPU-generated traffic to classes in the output policy maps based on the CoS without changing the CoS packet markings, you can use the table map:

  • Configure CoS marking by using CoS as the map from value without a table map.
  • Configure CoS marking using CoS as the map from value with a table map, using only the default and copy keywords.

For details about table maps, see the Table Maps.

Using the cpu traffic qos global configuration command with table mapping, you can configure multiple marking and queuing policies to work together or independently. You can queue native VLAN traffic based on the CoS markings configured using the cpu traffic qos global configuration command.

The cpu traffic qos command specifies the traffic to which it applies: all CPU traffic, only CPU-IP traffic, or only CPU non-IP traffic. All other traffic is statically mapped to a CPU-default queue on the egress port. All CFM traffic (including Layer 2 IP SLA probes using CFM) is mapped to classes in the output policy map, and queued based on their CoS value.

Extending QoS for MLPPP

Configuring Class-map for Matching MPLS EXP Bits

Complete the following steps to configure class-map for matching MPLS experimental bits.

Procedure

  Command or Action Purpose
Step 1

enable

Example:


Router> enable

Enables privileged EXEC mode.

  • Enter your password if prompted.
Step 2

configure terminal

Example:


Router# configure terminal

Enters global configuration mode.

Step 3

class-map match-any class-map-name

Example:


Router(config)# 
class-map match-any mplsexp 

Creates a class map to be used for matching packets to a specified class and to enter QoS class-map configuration mode:

  • class-map-name—Name of the class for the class map. The class name is used for both the class map and to configure a policy for the class in the policy map.
Step 4

match mpls experimental topmost number

Example:


Router(config-cmap)# match mpls experimental topmost 5

Matches the experimental (EXP) value in the topmost label header.

  • number—Multiprotocol Label Switching (MPLS) EXP field in the topmost label header. Valid values are 0 to 7.
Note 
In this configuration packets with experimental bits of value 5 are matched. Repeat this step to configure more values. If any one of the values is matched, action pertaining to the class-map is performed.
Step 5

exit

Example:


Router(config-cmap)# exit

Exits class-map configuration mode.

Configuring Class-map for Matching IP DSCP Value

This classification is required for all the packets flowing without an MPLS header like normal IP packets flowing through an MLPPP Interface.

Complete the following steps to configure class-map for matching IP DSCP Values.

Procedure

  Command or Action Purpose
Step 1

enable

Example:


Router> enable

Enables privileged EXEC mode.

  • Enter your password if prompted.
Step 2

configure terminal

Example:


Router# configure terminal

Enters global configuration mode.

Step 3

class-map match-any class-map-name

Example:


Router(config)# 
class-map match-any matchdscp 

Creates a class map to be used for matching packets to a specified class and to enter QoS class-map configuration mode:

  • class-map-name—Name of the class for the class map. The class name is used for both the class map and to configure a policy for the class in the policy map.
Step 4

match ip dscp [dscp-value...dscp-value]

Example:


Router(config-cmap)# match ip dscp af11

Identify one or more differentiated service code point (DSCP), Assured Forwarding (AF), and Class Selector (CS) values as a match criterion.

  • dscp-value—The DSCP value used to identify a DSCP value.
Note 
In this configuration packets with IP DSCP of value af11 are matched. Repeat this step to configure more values. If any one of the values is matched, action pertaining to the class-map is performed.
Step 5

exit

Example:


Router(config-cmap)# exit

Exits class-map configuration mode.

Configuring Class-map for Matching MPLS EXP Bits or IP DSCP Value

In this configuration, all MPLS packets flowing through the MLPPP Interface EXP value are matched and all the IP Packets flowing through the MLPPP Interface IP DSCP value are matched.

Complete the following steps to configure class-map for matching MPLS EXP bits or IP DSCP Values.

Procedure

  Command or Action Purpose
Step 1

enable

Example:


Router> enable

Enables privileged EXEC mode.

  • Enter your password if prompted.
Step 2

configure terminal

Example:


Router# configure terminal

Enters global configuration mode.

Step 3

class-map match-any class-map-name

Example:


Router(config)# class-map match-any matchdscp 

Creates a class map to be used for matching packets to a specified class and to enter QoS class-map configuration mode:

  • class-map-name—Name of the class for the class map. The class name is used for both the class map and to configure a policy for the class in the policy map.
Step 4

match mpls experimental topmost number

Example:


Router(config-cmap)# match mpls experimental topmost 5

Matches the experimental (EXP) value in the topmost label header.

  • number—Multiprotocol Label Switching (MPLS) EXP field in the topmost label header. Valid values are 0 to 7.
Step 5

match ip dscp dscp-value

Example:


Router(config-cmap)# match ip dscp af11

Identifies the DSCP values as a match criterion.

  • dscp-value—The DSCP value used to identify a DSCP.
Step 6

exit

Example:


Router(config-cmap)# exit 

Exits class-map configuration mode.

Configuring a Policy-map

Complete the following steps to configure a policy-map.

Procedure

  Command or Action Purpose
Step 1

enable

Example:


Router> enable

Enables privileged EXEC mode.

  • Enter your password if prompted.
Step 2

configure terminal

Example:


Router# configure terminal

Enters global configuration mode.

Step 3

policy-map policy-map-name

Example:


Router(config)# policy-map mplsomlpppqos 

Configures a policy map that can be attached to one or more interfaces and enters QoS policy-map configuration mode.

  • policy-map-name —Name of the policy map.
Step 4

class class-name

Example:


Router(config-pmap)# 
class mplsexp 

Specifies the name of the class whose policy you want to create.

  • class-name —Name of the class to be configured or whose policy is to be modified. The class name is used for both the class map and to configure a policy for the class in the policy map.
Step 5

priority percent percentage

Example:


Router(config-pmap-c)# 
priority percent 10 

Configures priority to a class of traffic belonging to a policy map.

  • percentage —Total available bandwidth to be set aside for the priority class.
Step 6

class class-name

Example:


Router(config-pmap-c)# class matchdscp 

Specifies the name of the class whose policy you want to create.

Step 7

bandwidth percent percentage

Example:


Router(config-pmap-c)# bandwidth percent 20 

Configures the bandwidth allocated for a class belonging to a policy map.

  • percentage—Specifies the percentage of guaranteed bandwidth based on an absolute percent of available bandwidth to be set aside for the priority class or on a relative percent of available bandwidth.
Step 8

class class-name

Example:


Router(config-pmap-c)# class mplsexpvalues 

Specifies the name of the class whose policy you want to create.

Step 9

set mpls experimental topmost mpls-exp-value

Example:


Router(config-pmap-c)# set mpls experimental topmost 4 

Sets the MPLS EXP field value in the topmost label on an interface.

  • mpls-exp-value —Specifies the value used to set MPLS experimental bits defined by the policy map.
Step 10

class class-name

Example:


Router(config-pmap-c)# class matchdscpvalues 

Specifies the name of the class whose policy you want to create.

Step 11

set dscp dscp-value

Example:


Router(config-pmap-c)# set dscp af41 

Marks a packet by setting the differentiated services code point (DSCP) value in the type of service (ToS) byte.

  • dscp-value —The DSCP value used to identify a DSCP.
Step 12

class class-name

Example:


Router(config-pmap-c)# class mplsexp_or_dscp 

Specifies the name of the class whose policy you want to create.

Step 13

bandwidth percent percentage

Example:


Router(config-pmap-c)# bandwidth percent 20 

Configures the bandwidth allocated for a class belonging to a policy map.

Step 14

set mpls experimental topmost mpls-exp-value

Example:


Router(config-pmap-c)# set mpls experimental topmost 1

Sets the MPLS EXP field value in the topmost label on an interface.

Step 15

set dscp dscp-value

Example:


Router(config-pmap-c)# set dscp af11 

Marks a packet by setting the differentiated services code point (DSCP) value in the type of service (ToS) byte.

Step 16

queue-limit queue-limit-size packets

Example:


Router(config-pmap-c)# queue-limit 80 packets

Configures the queue limit (size) for a class in packets.

  • queue-limit-size —The maximum size of the queue.
  • packets —Indicates that the unit of measure is packets.
Note 
To configure queue-limit , you should configure either priority percent or bandwidth percent.
Step 17

end

Example:


Router(config-pmap-c)# exit

Exits QoS policy-map class configuration mode.

Attaching the Policy-map to MLPPP Interface

Complete the following steps to attach the policy-map to an MLPPP interface.

Procedure

  Command or Action Purpose
Step 1

enable

Example:


Router> enable

Enables privileged EXEC mode.

  • Enter your password if prompted.
Step 2

configure terminal

Example:


Router# configure terminal

Enters global configuration mode.

Step 3

interface multilink group-number

Example:


Router(config)# interface multilink5 

Creates a multilink bundle and enters the interface configuration mode:

  • group-number —Number of the multilink bundle.
Step 4

ip address address [subnet mask]

Example:


Router(config-if)# ip address 84.1.2.3 255.255.255.0

Assigns an IP address to the multilink interface.

  • address — IP address.
  • subnet mask —Network mask of IP address.
Step 5

load-interval interval

Example:


Router(config-if)# load-interval 30

Configures the length of time for which data is used to compute load statistics.

  • interval —Length of time for which data is used to compute load statistics.
Step 6

mpls ip

Example:


Router(config-if)# mpls ip

Enables MPLS forwarding of IPv4 packets along normally routed paths for a particular interfaces.

Step 7

keepalive period

Example:


Router(config-if)# keepalive 1

Enables keepalive packets and specifies the number of times that the router tries to send keepalive packets without a response before bringing down the interface.

  • period —Time interval, in seconds, between messages sent by the router to ensure that a network interface is alive.
Step 8

ppp multilink

Example:


Router(config-if)# ppp multilink

Enables Multilink PPP (MLP) on an interface.

Step 9

ppp multilink group group-number

Example:


Router(config-if)# ppp multilink group 3

Restricts a physical link to join only one designated multilink group interface.

  • group-number —Multilink group number (a nonzero number).
Step 10

ppp multilink endpoint string char-string

Example:


Router(config-if)# ppp multilink endpoint string ML3

Configures the default endpoint discriminator the system uses when negotiating the use of MLPPP with the peer.

  • char-string —Uses the supplied character string.
Step 11

service-policy output policy-map-name

Example:


Router(config-if)# service-policy output mplsomlpppqos

Attaches a policy map to an interface that will be used as the service policy for the interface.

  • policy-map-name —The name of a service policy map (created using the policy-map command) to be attached.
Step 12

exit

Example:


Router(config-if)# exit 

Exits interface configuration mode.

Re-marking IP DSCP Values of CPU Generated Traffic

Complete the following steps to re-mark the IP DSCP values of the CPU generated traffic.

Procedure

  Command or Action Purpose
Step 1

enable

Example:


Router> enable

Enables the privileged EXEC mode.

  • Enter your password if prompted.
Step 2

configure terminal

Example:


Router# configure terminal

Enters the global configuration mode.

Step 3

cpu traffic ppp set ip dscp cs5

Example:


Router(config)# 
cpu traffic ppp set ip dscp cs5 

Re-marks the IP DSCP value to give the desired QoS treatment to CPU generated traffic.

Step 4

exit

Example:


Router(config)# exit 

Exits the configuration mode.

Re-marking MPLS EXP Values of CPU Generated Traffic

Complete the following steps to re-mark the MPLS EXP values of the CPU generated traffic.

Procedure

  Command or Action Purpose
Step 1

enable

Example:


Router> enable

Enables the privileged EXEC mode.

  • Enter your password if prompted.
Step 2

configure terminal

Example:


Router# configure terminal

Enters the global configuration mode.

Step 3

cpu traffic ppp set mpls experimental topmost number

Example:


Router(config)# cpu traffic ppp set mpls experimental topmost 4

Re-marks Multiprotocol Label Switching (MPLS) experimental (EXP) topmost value to give the desired QoS treatment to CPU generated traffic.

  • number—MPLS EXP field in the topmost label header. Valid values are 0 to 7.
Step 4

exit

Example:


Router(config)# exit 

Exits the configuration mode.

Configuring a Policy-map to Match on CS5 and EXP4

Complete the following steps to configure a policy-map to match on CS5 and EXP4.

Procedure

  Command or Action Purpose
Step 1

enable

Example:


Router> enable

Enables privileged EXEC mode.

  • Enter your password if prompted.
Step 2

configure terminal

Example:


Router# configure terminal

Enters global configuration mode.

Step 3

class-map match-any dscp cs-value

Example:


Router(config)# class-map match-any dscpcs5 

Configures a class map to be used for matching packets to a specified class and enters QoS class-map configuration mode.

Step 4

match ip dscp cs-value

Example:


Router(config-cmap)# match ip dscp cs5

Identify one or more differentiated service code point (DSCP) CS value as a match criterion.

  • cs-value —The Class Selector(CS) value.
Step 5

class-map match-any class-map-name

Example:


Router(config-cmap)# class-map match-any exp4 

Creates a class map to be used for matching packets to a specified class.

  • class-map-name —Name of the class for the class map.
Step 6

match mpls experimental topmost number

Example:


Router(config-cmap)# match mpls experimental topmost 4

Matches the experimental (EXP) value in the topmost label header.

  • number —Multiprotocol Label Switching (MPLS) EXP field in the topmost label header. Valid values are 0 to 7.
Step 7

policy-map policy-map-name

Example:


Router(config-cmap)# policy-map dscp_exp 

Configures a policy map that can be attached to one or more interfaces and enters QoS policy-map configuration mode.

  • policy-map-name —Name of the policy map.
Step 8

class class-name

Example:


Router(config-pmap)# class dscpcs5 

Specifies the name of the class whose policy you want to create.

  • class-name —Name of the class to be configured or whose policy is to be modified. The class name is used for both the class map and to configure a policy for the class in the policy map.
Step 9

bandwidth percent percentage

Example:


Router(config-pmap-c)# bandwidth percent 20 

Configures the bandwidth allocated for a class belonging to a policy map.

  • percentage —Specifies the percentage of guaranteed bandwidth based on an absolute percent of available bandwidth to be set aside for the priority class or on a relative percent of available bandwidth.
Step 10

set ip dscp cs-value

Example:


Router(config-pmap-c)# set ip dscp cs6 

Marks a packet by setting the differentiated services code point (DSCP) value in the type of service (ToS) byte.

Step 11

class class-name

Example:


Router(config-pmap-c)# class exp4 

Specifies the name of the class whose policy you want to create.

Step 12

bandwidth percent percentage

Example:


Router(config-pmap-c)# bandwidth percent 20 

Configures the bandwidth allocated for a class belonging to a policy map.

  • percentage —Specifies the percentage of guaranteed bandwidth based on an absolute percent of available bandwidth to be set aside for the priority class or on a relative percent of available bandwidth.
Step 13

set mpls experimental topmost mpls-exp-value

Example:


Router(config-pmap-c)# set mpls experimental topmost 6

Sets the MPLS EXP field value in the topmost label on an interface.

  • mpls-exp-value —Specifies the value used to set MPLS experimental bits defined by the policy map.
Step 14

class class-name

Example:


Router(config-pmap-c)# class class-default 

Specifies the name of the class whose policy you want to create.

Step 15

bandwidth percent percentage

Example:


Router(config-pmap-c)# bandwidth percent 20 

Configures the bandwidth allocated for a class belonging to a policy map.

Step 16

end

Example:


Router(config-pmap-c)# exit

Exits QoS policy-map class configuration mode.

Attaching the Policy-map to Match on CS5 and EXP4 to MLPPP Interface

See Attaching the Policy-map to MLPPP Interface for configuration steps.


Note

DSCP CS6 and EXP 6 are default values. If you configure the CPU generated traffic to these values using CLI, you cannot see them in the output of the show running-configuration command.

Configuration Examples for Extending QoS for MPLS over MLPPP

Configuring Class-map for Matching MPLS EXP Bits

The following example shows a configuration of class-map for matching MPLS EXP bits.


Building configuration...
Current configuration : 101 bytes
!
class-map match-any mpls_exp5
 match mpls experimental topmost 5
!

Configuring Class-map for Matching IP DSCP Value

The following example shows a configuration of class-map for matching IP DSCP value.


Building configuration...
Current configuration : 101 bytes
!
!
class-map match-any dscpaf11
 match ip dscp af11
!

Configuring Class-map for Matching MPLS EXP Bits or IP DSCP Value

The following example shows a configuration of class-map for matching MPLS EXP Bits or IP DSCP value.


Building configuration...
Current configuration : 101 bytes
!
!
class-map match-any mplsexp_or_cos
 match mpls experimental topmost 4
 match ip dscp af41
!

Configuring a Policy-map

The following example shows a configuration of a policy-map.


Building configuration...
Current configuration : 101 bytes
!
policy-map mplsomlpppqos
 class mplsexp
  priority percent 10
 class mplsexpvalues
  set mpls experimental topmost 4
 class matchdscp
  bandwidth percent 20
 class matchdscpvalues
  set dscp af41
 class mplsexp_or_dscp
  bandwidth percent 20
  queue-limit 80 packets
  set mpls experimental topmost 1
  set dscp af11
!

Configuring a Policy-map to Match on CS5 and EXP 4

The following example shows a configuration of a policy-map.


Building configuration...
Current configuration : 101 bytes
!
class-map match-any dscpcs5
 match ip dscp cs5
class-map match-any exp4
 match mpls experimental topmost 4
policy-map dscp_exp
 class dscpcs5
  bandwidth percent 20
  set ip dscp cs6
 class exp4
  bandwidth percent 20
  set mpls experimental topmost 6
 class class-default
  bandwidth percent 20
!

Attaching the Policy-map to MLPPP Interface

The following example shows a configuration of attaching the policy-map to MLPPP interface.


Building configuration...
Current configuration : 101 bytes
!
!
interface Multilink3
 ip address 84.1.2.3 255.255.255.0
 load-interval 30
 mpls ip
 keepalive 1
 ppp multilink
 ppp multilink group 3
 ppp multilink endpoint string ML3
 service-policy output mplsomlpppqos
!

Configuring a Class-map

Procedure

  Command or Action Purpose
Step 1

enable

Example:

Router> enable

Enables privileged EXEC mode.

  • Enter your password if prompted.
Step 2

configure terminal

Example:

Router# configure terminal

Enters global configuration mode.

Step 3

class-map match-any class-map-name

Example:

Router(config)# class-map match-any QOS-GROUP5

Creates a class map to be used for matching packets to a specified class and enters QoS class-map configuration mode.

Step 4

Choose one of the following:

  • match qos-group qos-group-value
  • match dscp dscp-value
  • match mpls experimental topmost number

Example:

Router(config-cmap)# match qos-group 5

Identifies a specific quality of service (QoS) group value or DSCP value or MPLS EXP number as a match criterion.

What to do next

Configure the policy-map with shaping and bandwidth.

Configuring the Policy-map with Shaping

The shape rate provides a maximum rate limit for the traffic class.

In this procedure, the QOS-GROUP5 traffic class is shaped to an average rate of 100 Kbps.

Procedure

  Command or Action Purpose
Step 1

enable

Example:

Router> enable

Enables privileged EXEC mode.

  • Enter your password if prompted.
Step 2

configure terminal

Example:

Router# configure terminal

Enters global configuration mode.

Step 3

policy-map policy-map-name

Example:

Router(config)# policy-map SHAPE_BW

Configures a policy map that can be attached to an interface.

Step 4

class class-name

Example:

Router(config-pmap)# class QOS-GROUP5

Specifies the name of the class whose policy you want to create or change or to specify the default class (commonly known as the class-default class) before you configure its policy.

Step 5

shape average mean-rate

Example:

Router(config-pmap)# shape average 100000

Shapes traffic to the indicated bit rate according to the algorithm specified.

What to do next

Attach the policy-map on the MLPPP interface.

Attaching the Policy-map on the MLPPP Interface

This procedure attaches the