Transfer and Queue Calls with Unified CVP

IVRs From Perspective of Unified ICME

Unified ICME categorizes IVRs into one of the following two types:

  • Intelligent Peripheral IVRs (in control of Unified ICME) - the carrier network routes calls to the IVR and then removes calls from the IVR for delivery to agents. With Intelligent Peripheral IVRs, once the prompting or queuing treatment of IVR is complete, the IVR has no further role to play for that call.

  • Service Node IVRs (following prompting/queuing treatment) - the IVR initiates call delivery to agents, who are in control of Unified ICME. When functioning as a Service Node IVR, Unified CVP can stay involved with a call even after it is transferred to another VoIP endpoint.

Unified CVP can act as either IVR type.


Note


For information about the call flow models for Unified CVP, see the chapter "Unified CVP Call Flow Models".

Call Transfer Using Unified CVP in Comprehensive Mode

This section provides examples of Unified CVP call transfer scripts.


Note


The Script Editor Busy and Ring nodes are not supported.

Call Transfer Using SIP Service

You can configure the SIP Service to operate in two modes to perform Unified CVP transfers. Unified CVP remains in the signaling path for the duration of the call, and in this usual mode it uses SIP re-INVITE messages to perform the transfers. This causes Unified CVP to hold the port license for the call duration.

To operate in standard re-INVITE mode, you do not need to modify the Unified ICME script. However, to send a REFER transfer, send a dynamic label with the letters "rf" prepended to it. Or, when using a Queue node in the Unified ICME script, define an ECC variable called "user.sip.refertransfer" and set it to the value of the lowercase "y." Unified CVP then uses the REFER method to blind transfer to agent labels.

Alternatively, Unified CVP can perform a SIP REFER type transfer where it moves out of the signaling path after sending a referral to the caller to the label that Unified ICME provides. This allows Unified CVP to release the port license after the REFER is sent. Unified CVP receives notification of the outcome of the call using SIP NOTIFY messages, and this is included in the reporting database.


Note


If Unified CVP is configured to redirect calls to the ingress gateway for 9292 DN and the SIP REFER type transfer fails, then the ingress gateway must be configured to handle the failure by using the survivability script or by creating a 9292 dial peer directed to VVB.


Caution


When using REFER, do not apply the survivability script for TDM callers on the Ingress gateway. Also, SIP transfers to VoiceXML gateways for micro-applications do not use the REFER method. It is only used for non-"SEND TO VRU" type transfers. When using REFERs, note that the survivability script does not currently support REFER messaging events, so when using REFER with TDM calls on the IOS gateway, the survivability service must be removed from the pots dial peer for those calls. REFER is used as a "blind refer" operation and can typically be used when sending calls to third-party ACD agents. However, it can also be used to send calls to the Cisco Unified Communications Manager (Unified CM) extensions as well, if desired.

Example: Transfer Call to a Label

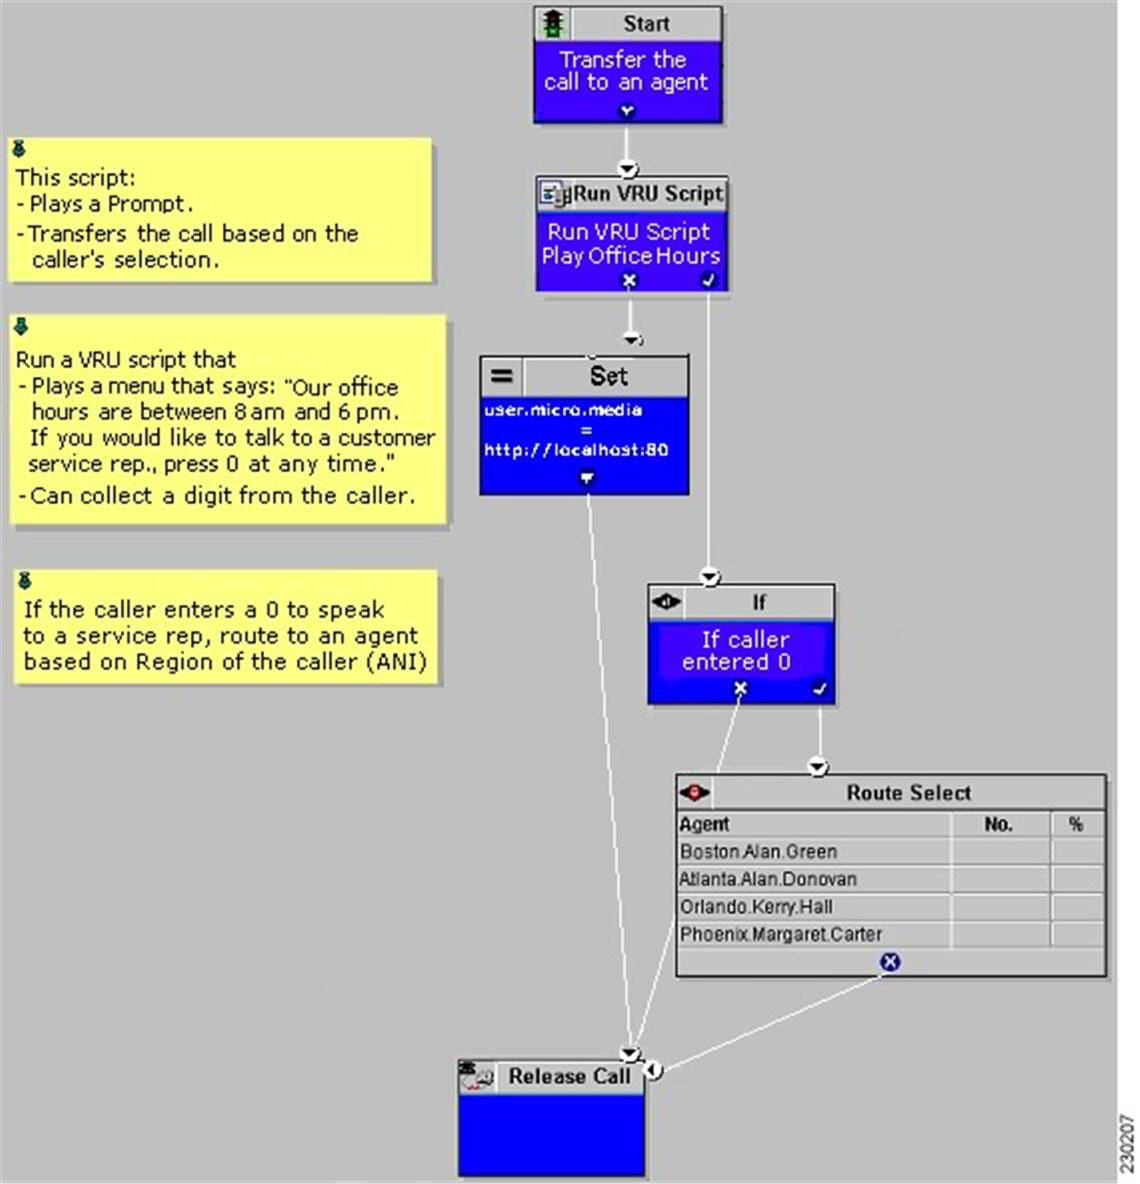
This example shows sample ICM Configuration Manager and Script Editor screen captures for a Menu application that plays a prompt presenting a menu ("Our office hours are between 8 AM and 6 PM. If you would like to talk to a customer service representative, press 0 at any time.") and then performs one of the following actions:

  • If the caller presses 0, the system collects the digit, and then routes and queues the call.

  • If the caller does not press 0, the system releases the call.

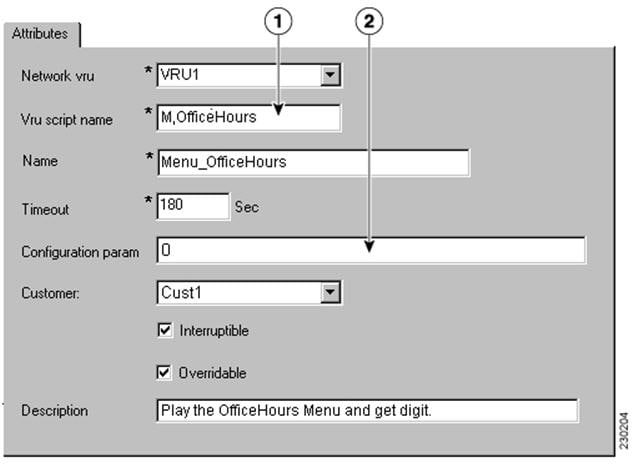
Figure 1. Call Transfer to a Label


The Attributes tab of the Network VRU Script List tool in the figure above shows:

  1. The VRU Script Name field contains two Unified CVP parameters:

    M: Menu

    OfficeHours: Media File name

  2. The Config Params field contains the following Unified CVP parameter:

    0: The number 0 is the only valid option.

Figure 2. Network VRU Script


Example: Queue and Transfer Call to a Skill Group

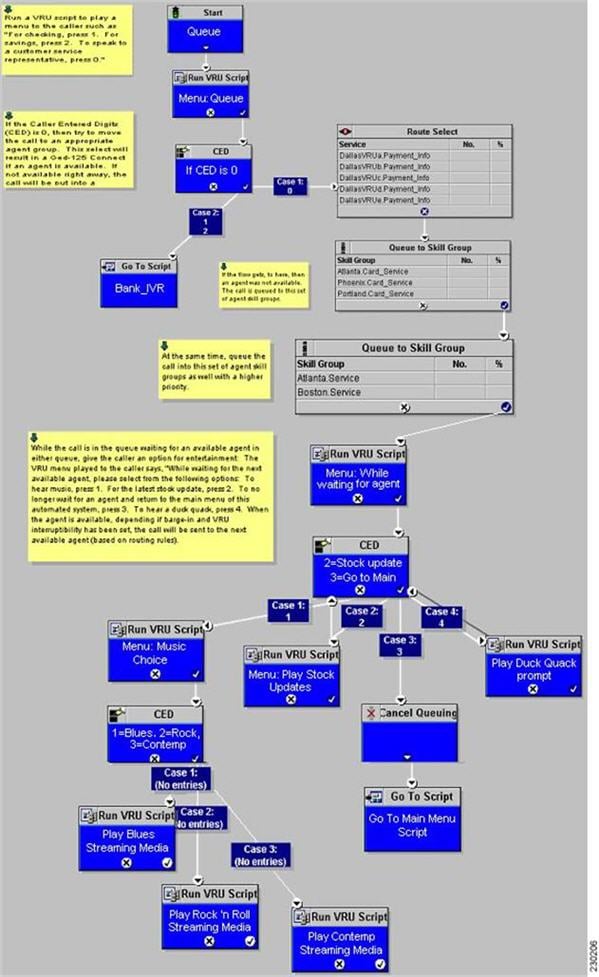
Use Unified ICME to queue a call to an agent group and instruct Unified CVP to entertain the caller with IVR scripting using the Run VRU Script and other nodes. When the resource becomes available, Unified ICME and Unified CVP perform the following tasks:

  1. Unified ICME tells Unified CVP to cancel the original request.

  2. Unified CVP then confirms the cancel request.

  3. Unified ICME sends the label for the destination.

  4. Unified CVP or the network transfers the call to a freed-up agent.

This example shows sample ICM Configuration Manager and Script Editor screen captures for a Menu application that plays a prompt presenting a menu ("For Checking, press 1. For Savings, press 2. To speak to a customer service representative, press 0."), retrieves any caller-entered digits, and then routes and queues the call.

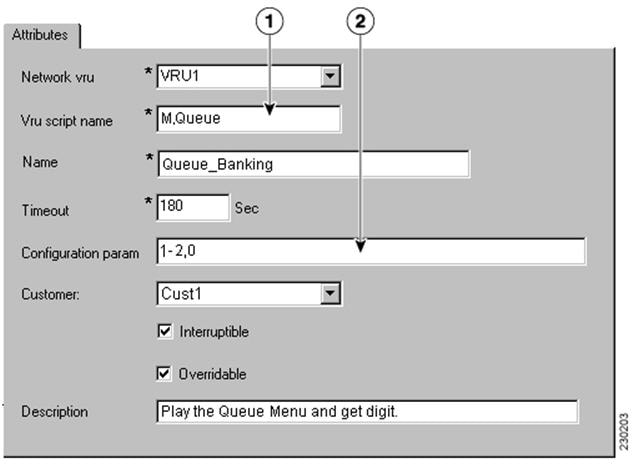
Figure 3. Sample ICM Configuration Manager and Script Editor Screen


The Network VRU Script List tool’s Attribute tab in the figure above shows:

  1. The VRU Script Name field containing two Unified CVP parameters:

    M: Menu

    Queue: Media File name

  2. The Configuration Param field containing the following Unified CVP parameters:

    1-2,0: The numbers. 1, 2, and 0 are valid options

Figure 4. Running VRU Script


Example: Network Transfer Script

Unified CVP provides capabilities to transfer calls to another destination after they an agent answers them. These capabilities are referred to as Network Transfer. The Network Transfer feature does not require any special installation on the part of Unified CVP. By default, the feature is disabled for all PG types except Enterprise Agent (EA).

To change the Network Transfer setting, perform the following steps:

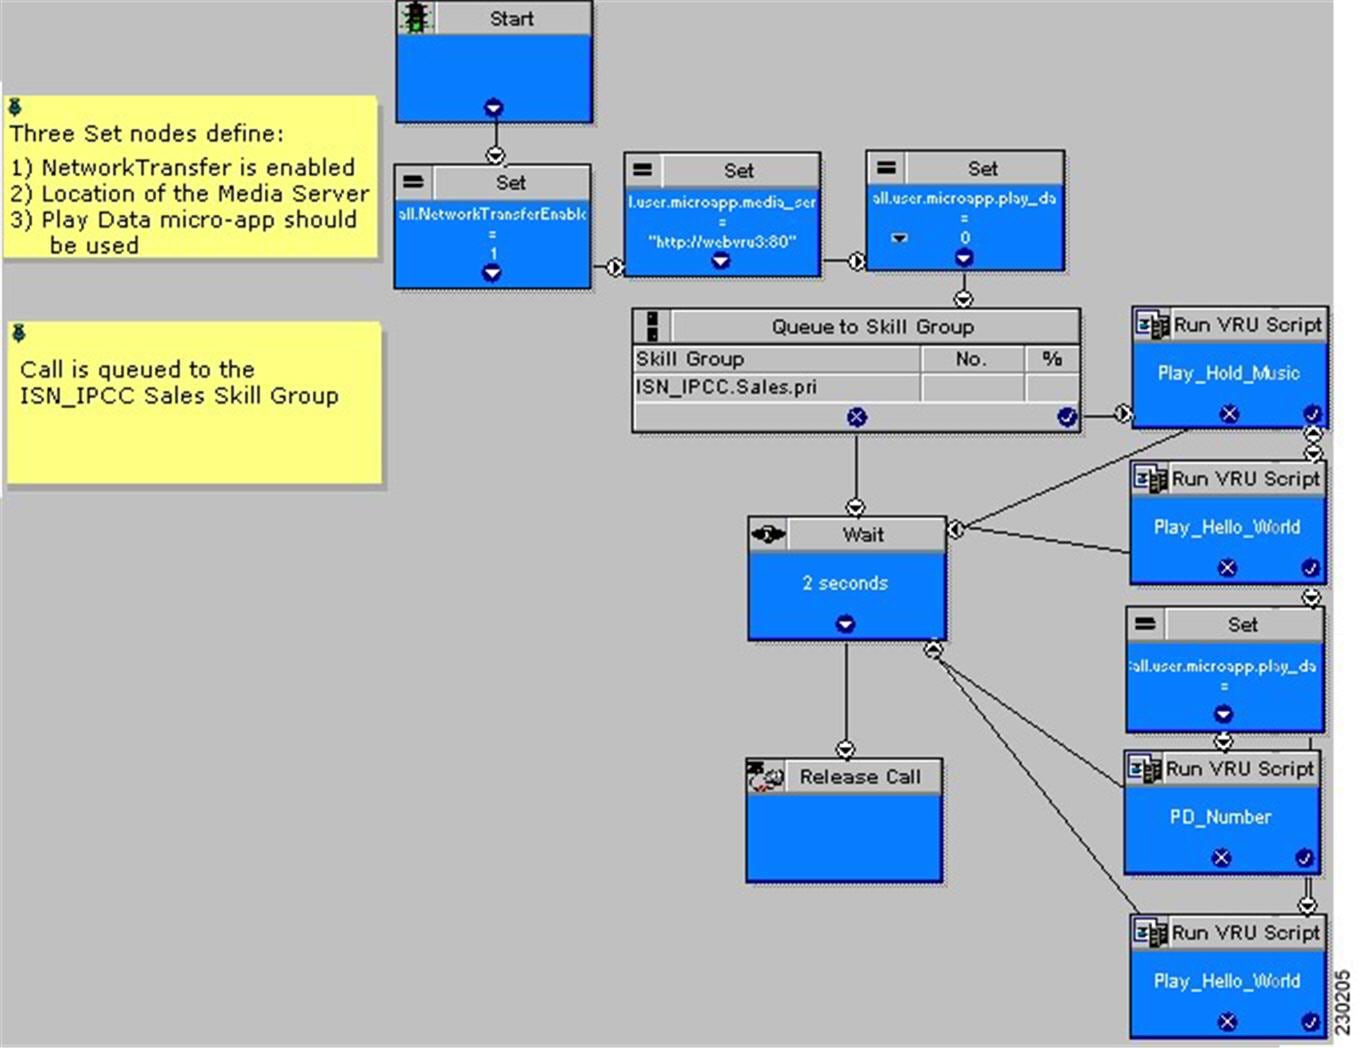
  1. Use Set node of the Script Editor to specify the Call.NetworkTransferEnabled variable. If you set this variable to 1, Network Transfer is enabled and if you set it to 0, Network Transfer is not enabled.

  2. In EA PG setups where the EA is behind a PBX, use the Network Transfer Preferred check box on the Routing Client tab of the PG Explorer. Network Transfer is enabled only if this check box is checked.

Figure 5. Network Transfer Setting


Call Transfer From Agent to Agent

When a call is transferred from Unified CVP to an agent, and that agent wants to transfer the call to another agent, the agent can make the transfer using either the agent IP phone or agent desktop. Transfers from the IP phone are made using CTI route points that point to a Unified ICME script. Transfers from the agent desktop are made using the Dialed Number Plan.

For network transfer from either the IP phone or CTI OS Agent Desktop, you must Queue the call to skill group in the first Unified ICME script, for example "NetXfer1", to create the call context. In this script, the "networkTransferEnabled" flag must be set to "1".


Note


The NetworkTransferEnabled setting must explicitly be set to 1 in all postroute scripts.

Configure Network Transfer From IP Phone

Procedure


Step 1

In Unified CM, define a CTI Route Point, for example "9999." Associate it with the JTAPI user that is connected to Unified CCE PIM in Unified ICME.

Step 2

In the ICM Admin Workstation, define a Dialed Number with a call Type for Unified CCE PIM. This call type can then be associated with a Unified ICME Script, for example, "NetXfer2".

Note

 
Avoid defining the labels of agents for the Unified CCE PIM. Define the labels for VRU PIM so that the route result is returned to VRU instead of Unified CCE PIM. If you define the agent labels for the Unified CCE PIM, the Unified ICME router returns the route result to the VRU PIM if "Network Transfer Preferred" is enabled on the Unified CCE PIM and VRU PIM and returns the route result to the Unified CCE PIM if "Network Transfer Preferred" is disabled on the Unified CCE PIM and VRU PIM.

Step 3

When the call is delivered to Agent 1 using the Unified ICME Script "NetXfer1", the agent can dial the number 9999 to send the call to another script, "NetXfer2."


Configure Network Transfer From CTI OS Agent Desktop

Procedure


Step 1

Define a Dialed Number Plan in Unified ICME.

The routing client is the Unified CCE PIM and dialed number is the one defined before for the Unified CCE PIM, that is, IPCC_PIM.9999.

Step 2

Set Post Route to Yes and Plan to be international.

Step 3

In the Agent Desk Settings, check all the Outbound access check boxes.


Example of IP Transfer

An IP transfer to an Unified CCE agent is very similar to an IP transfer to an ACD (TDM) agent with the following exceptions:

  • The egress Gateway for this case is Unified CM.

  • When Unified CM receives the new call, it uses the "Skinny protocol" to connect to the agent at an IP phone. The voice channels are then connected from the Ingress Gateway to the IP phone.

CLI Field on Outgoing Transfers

Calling Line Identification (CLI) is a set of digits and related indicators (type of number, numbering, plan identification, screening indicator, and presentation indicator) that provide numbering information related to the calling party. This feature allows customers to override the CLI field on outgoing transfers, using either a Label node or an ECC variable in the Unified ICME routing script. This feature is required for transfers into Unity, which uses both Automatic Number Identification (ANI) and Dialed Number Identification Service (DNIS) to determine the appropriate mailbox to access. CLI is passed through most networks and into most call-handling devices, so this feature provides a back-door method to transmit arbitrary data during transfers when translation routing is not feasible.

The following section describes how to enable the call.user.microapp.override_cli ECC variable, which you must configure to enable this feature.

Configure CLI Override

CLI override is controlled from the Unified ICME routing script.


Note


For IP originated calls, you need to check the "Asserted-Identity" check box on the Unified Communications Manager, SIP Trunk configuration.

Note


For SIP calls, the CLI Override feature is only supported using the ECC variable as shown in second method. Using a dynamic label as in Method #1 with "CLI" prepended is not supported.
You can configure CLI override one of following two ways:
  • First method: Append CLI=NNNNNNNN to the label in a LABEL node. Setting NNNNNNNN to the word null will blank out the CLI on the transfer.

    Example: Setting a label node to 1111;CLI=9876543 results in a transfer to 1111 using a CLI of 9876543.

    Example: Setting a label node to 1111;CLI=null results in a transfer to 1111 using an empty CLI.

  • Second method:Set the call.user.microapp.override_cli ECC variable before invoking a transfer using Queue to Skill Group, Label node, and so on. For the call.user.microapp.override_cli Expanded Call Variable List, set the maximum length to the maximum length of the data that will be used for CLI override. The Unified CVP Call Server must be restarted after adding this variable to Unified ICM. Setting the variable to " " will blank out the CLI on the transfer.

    Example: Setting call.user.microapp.override_cli ECC variable to 9876543 prior to a Queue to SkillGroup where agent 1111 becomes available, results in a transfer to 1111 using a CLI of 9876543.

    Example: Setting call.user.microapp.override_cli=" " ECC variable prior to a Queue to Skill Group where agent 1111 becomes available, results in a transfer to 1111 using an empty CLI.

If both of the methods are used in one routing script, the LABEL node CLI value takes precedence over the ECC variable.

CLI override takes precedence over the SetSetupCallingNum command in VBAdmin. That is, the new CLI is always be propagated to the transfer call leg regardless of the value of ShowSetupCallingNum.

CLI override also forces the presentationIndicator to presentationAllowed on the transfer call leg.


Note


For SIP calls, the CLI Override feature is only supported using the ECC variable. Using a dynamic label with "CLI" prepended is not supported.

Unified CCE Reroute on No Answer Configuration for Unified CVP

This section describes how to use the Reroute On No Answer function when using Unified CVP as a queue point for Unified CCE.

When you use Unified CCE with Unified CVP as a queuing point and routing client, configure the Reroute On No Answer function differently than when you use it with Unified IP IVR. The difference is when you use Unified IP IVR the call control is with Unified CM, whereas with Unified CVP, the call control is with Unified CVP.

Reroute on No Answer Operation for Unified CCE with Unified IP IVR

The Reroute On No Answer function ensures that when an agent does not answer a call, the call is taken away after ringing for a configurable number of seconds and presented to another agent or put back in queue, and the agent who did not answer the call is put in "Not Ready" state. An example of an agent not answering a call is when the agent is not at the desk and the presence of agent is not changed to the "Not Ready" state.

This function is implemented by setting a Reroute On No Answer timeout in the agent desk settings. When the call has been ringing for the configured number of seconds, the Unified CM PG makes the agent unavailable and send a postroute request to Unified ICME using a dialed number that is also configured in the Agent Desk Settings. A routing script is run that determines a new destination for the call. This can be another agent, or the script can put the call back in a queue. When using Reroute On No Answer with Unified IP IVR, Unified ICME software responds back to Unified CM with the new destination for the call. Unified CM is responsible for sending the call to the right destination (IP IVR for queuing or new agent).

Reroute on No Answer Operation with Unified CVP

When you use Unified CCE with Unified CVP, Unified CM does not control the queuing platform (Unified CVP), and hence cannot send the call back to Unified CVP for requeuing. Instead, Unified CVP controls the call and needs to take action.

The solution is to use the Reroute On No Answer function only to make the agent state “Ready” or “Not_Ready” when the agent does not answer the call, and to use the ICM Router Requery function to take the call away from the non-answering agent.

Reroute on No Answer Agent Desk Settings Configuration

For Agent state to be READY after CVP RNA expires:

  • In Agent Desk Settings, the Ring no answer dialed number field is set to blank.

  • Enter a value in the Ring No Answer time field. Set the timeout to the maximum time you want to allow the agent to answer a call; for example, 2 rings = 8 seconds. This value must be at least 2 seconds more than the timeout configured at Unified CVP for RNATimeout.

For Agent state to be NOT_READY after CVP RNA expires:

  • In Agent Desk Settings, the Ring no answer dialed number field is set to blank.

  • Do not enter a value in the Ring No Answer time field.

Router Requery Configuration

Router Requery is triggered by the routing client (Unified CVP) when a No Answer timer expires (a different timer than the Reroute On No Answer timer in the Agent Desk Settings).

  • The No Answer timer for Router Requery is not controlled by Unified ICME, but by the switching fabric that is Unified CVP in this case. CVP 1.0 has a fixed No Answer timer of 15 seconds. The Unified CVP SIP has a configurable No Answer timer (RNATimeout) with a default value of 15 seconds.

    When using Unified CVP, set RNATimeout to the desired number of seconds that the agent phone should ring before being taken away. In any case, this timeout must be at least 2 seconds shorter than the Re-route On No Answer timeout if it was set in the Agent Desk Settings.

    After the Unified CVP VB RNATimeout expires, the VB/AS/PG sends an EventReport=NoAnswer to the router. The router picks another target according to the routing script and sends the Connect message to Unified CVP. The target might be another agent or it might be a VRU label to requeue the call. When the call disappears from the first agent, this agent is put in "Ready" or "Not Ready" based on No Answer Timeout in the desk setting.


    Note


    Do not set the No Answer DN in the desk setting, because this is a global Unified ICME setting for all scripts. The No Answer DN may not be suitable for all scripts depending on the complexity of the deployment. Instead, each script should have the X path of the queue node set appropriately for each script.
  • Enable Requery on the node in the script that selects the first agent. Depending on the type of node used, the Requery mechanism selects a new target from the available agents or will require additional scripting. The Scripting and Media Routing Guide for Cisco Unified ICM/Contact Center Enterprise & Hosted describes how Requery works for the different nodes.

In most cases Unified CCE uses the Queue node. The Queue node requires additional scripting to handle the requeuing of the call in front of the queue. The script example below provides a standard way of handling the requeuing of the call.

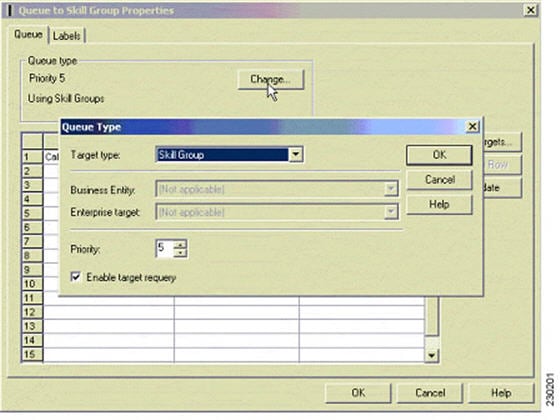
If there is an available agent, the Queue node selects the longest available agent from the skill groups. If there is no available agent, it queues the call with a priority set in the node (see the following figure) and continues down the success exit of the node. When an agent becomes available, Unified ICME always selects the longest queued call from the ones with the highest priority. When the Queue node connects the call to an agent and the agent does not answer the call, Unified CVP Ring-No-Answer timeout expires causing the Requery mechanism to start.

Figure 6. Queue to Skill Group Properties


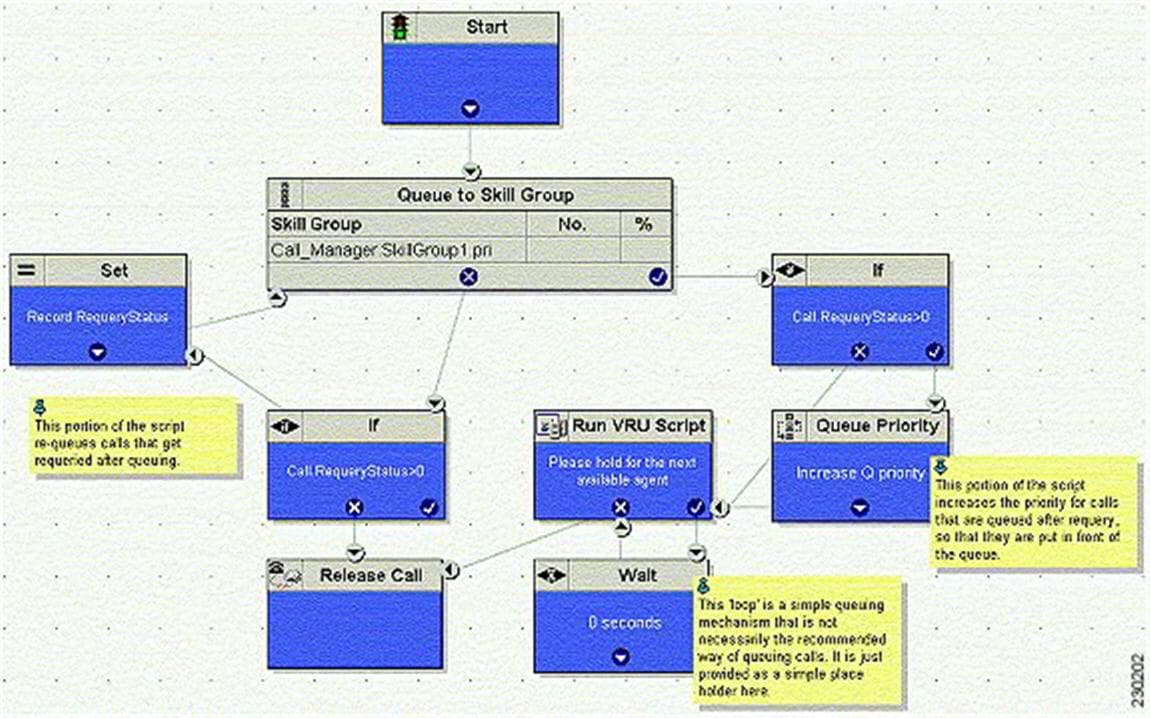
When this happens, the script immediately continues through the failure exit of the Queue node with the Requery Status variable set to ‘No Answer’ (= 3). The typical treatment is to put the call back into the same queue but with a higher priority than all other calls, since the call needs to go in the front of the queue, not the back.

Figure 7. Requery Mechanism


In this script, when the Queue node selects an agent who does not answer the call, the script exits through the failure exit (X) of the Queue node. The If node tests the RequeryStatus variable. If it has value of greater than zero, this is a requery call, and the script requeues the call. In the preceding example, it also sets a flag using a call variable for reporting purposes. Assuming that there are no agents available, the Queue node immediately exits through the success exit (Checkmark). The node checks to see if this is a requeried call. If so, it increases the Queue Priority of the call so that it is handled before any other calls in queue. It then enters the usual wait loop with RunScripts.

The call flow is as follows:

  • Script connects call to agent by sending connect message to Unified CVP (with requery enabled).

  • Agent phone rings.

  • After the Unified CVP VB RNATimeout expires, the VB/AS/PG sends an EventReport=No Answer to the router. The router picks another target according to the routing script and sends the Connect message to Unified CVP. The target might be another agent or it might be a VRU label to requeue the call.

  • When the call disappears from the first agent, this agent is put in "Ready" or "Not Ready" state based on No Answer Timeout in the desk setting.

Limitations

The only limitation for the configuration described in this section is that each call that is redirected by this mechanism is counted twice in the Skill Group—once as redirected, and next as handled (if the call is finally handled). However, the Call Type is only count this call once. Although it is counted Handled and Requeried, Requeried is not used to balance CallsOffered in the Call Type. If you want to see this call counted twice in the Call Types, address this by changing the call type in the error path before the second queue to skill group node.

Reroute Configuration on No Answer for Unified CM with Unified CVP

In case of an agent transfer, when calls are originated from Unified CM to a CTI Route Point, routing client responsibilities should be passed back to Unified CVP as soon as possible upon entering the Unified ICM script. To ensure that Unified ICM Router directs calls to Unified CVP, include a SendtoVRU node in the Unified ICM script before any Runscript or SkillGroup node is run. When the routing script runs the SendToVRU node, the ICM Router instructs Unified CVP to become the routing client to handle for any subsequent transfers or VRU call processing.

RONA Operation to a script CTI Route Point Transfer

The "Go to Script" node is used as a RONA destination when "enable target requery" is configured on the Queue to Skill Group node and the agent does not answer. When the ICM script runs the "Go To Script" node, script proceeds to the specified script. For example, when an agent does not answer a call, the X-path out of the Queue to Skill Group Node will target a "Go To Script" node with the "CTI_Route_Point_Transfer" script specified. Script processing then continues from the beginning of the CTI_Route_Point_Transfer"script and proceeds as usual.

Following are the valid destinations out of the X-path of Queue to Skill Group node:

  • Another skill group

  • A prompt

  • GoTo node (do not use "Dynamic Label")

Limitations

The limitation for the configuration described in this section is that the disposition of the requeried call is not correctly reported. The Redirect No Answer field in the agent and skill group reports do not show calls that are redirected by this mechanism. Each call that is redirected by this mechanism is counted twice—Once as abandoned, and next as handled (if the call is finally handled). There are two Unified CCE TerminationCallDetail records for this call—One for the rerouted call (with CallDisposition ‘Abandoned while Ringing’, code 3), and other for the handled call with a CallDisposition depending on how the call was finally handled. The scripting example above shows how a Peripheral Call Variable can be used to mark and count calls Requeried because of no answer. A custom reporting template can be written to report on this data.

Call Survivability

This section describes how to install and configure Unified CVP with a script that allows the gateway to transfer a call in the event of a critical Unified CVP application error or WAN failure. Place this application on the incoming pots dial-peer or the incoming VOIP dial-peer that is destined for Unified CVP. Call survivability is supported in all Unified CVP call flow models except the VRU-Only call flow model. In the Unified CVP Standalone call flow model, survivability is invoked if the gateway encounters an error from the CVP Voice Server, the "param survive" parameter is included and a survivability service is defined.

In the event of critical Unified CVP application errors or a WAN failure that would usually disconnect the caller, this script allows the gateway to attempt a transfer to some alternate location after the failure occurs instead of disconnecting the caller. In the event that the call cannot be transferred to an alternate agent, the script plays a "call-back-later" message and disconnects the call.

This script provides the following capabilities:

  • Perform multiple types of transfer in call failure conditions:

    • *8 transfer connect (outpulse)

    • Hairpin

    • SRST

    • Hookflash Relay

    • Two B-Channel Transfer (TBCT)

  • Differentiate call recovery behavior by incoming DNIS.

  • Differentiate call recovery behavior by incoming DNIS and how long the call had been in Unified CVP prior to failure.

  • Differentiate call recovery behavior based on time of day and date.

  • Hand off to an auto-attendant type application in the event of some downstream failure (for example, WAN failure, Unified ICME failure, Unified CVP failure). This auto-attendant functionality can be BACD of CME, a Unified CVP Standalone call flow model, a VXML Server application, or a custom-written VXML application.


Caution


This script is a component of the Unified CVP software. Hence, do not make any modifications to this script. Modifications to this script not made as part of an official Unified CVP release nullify Cisco support responsibility for this script.

Install Call Survivability Script

Procedure


Step 1

Log in to the Operations Console, and copy all script and prompt files to the gateway.

Step 2

On the gateway, perform the following:

For a Unified CVP Comprehensive call flow model, define the following services:


                                    application
                                    service survive flash:survivability.tcl
                                    paramspace callfeature med-inact-det enable
                                    service handoff flash:handoff.tcl
                                

And, then add the following parameters:


                                    ip rtcp report interval 2000
                                    gateway
                                    timer receive-rtcp 4
                                

Note

 
This causes survivability to be invoked between 8 and 16 seconds ((2000 ms *4) * 2) for an active call after a WAN failure. If IOS detects the absence of both RTP and RTCP packets after 8 to 16 seconds, it raises an error event and survivability is invoked. (The factor of 2 is a built-in IOS factor that cannot be configured. Do not adjust these values lower as this can cause the survivability event to be prematurely invoked.)

Note

 
The timer receive-rtcp command configures a media activity timer for SIP calls.

For a Unified CVP Standalone call flow model, first define one service:


                                    application
                                    service my-survivability-service flash:survivability.tcl
                                

Note

 
You can replace my-survivability-service with any desired name.

Then associate the my-survivability-service that you just created as a parameter on the CVPSelfService.tcl service associated with the incoming pots dial-peer. Note that the text "param survive" must be entered exactly as shown, but the my-survivability-service service can be renamed to the service name of your choice. For example:


                                    dial-peer voice XXXX pots
                                    service my-CVP-service
                                    incoming called-number NNNNN
                                    service my-CVP-service flash:CVPSelfService.tcl
                                    param CVPPrimaryVXMLServer my-VXML-server-IP
                                    param CVPBackupVXMLServer my-backup-VXML-server-IP
                                    param CVPSelfService-app my-VXML-server-app
                                    param keepalive my-CVP-service
                                    param survive my-survivability-service
                                    service my-survivability-service flash:survivability.tcl
                                

Optionally, start a background keepalive service to the VXML Server. For example, for a service name of "my-standalone-service":


                                    service my-standalone-service
                                    param keepalive my-standalone-service
                                

Note

 
This service prevents the caller from hearing a period of silence at the start of each call if the VXML Server is down, as the gateway will know the current status of the VXML Server.

Step 3

On the gateway, perform a "call appl voice load my-survivability-service" and "call appl voice load handoff."

Step 4

Perform the following:

On a Unified CVP Comprehensive call flow model:

  • Create a Unified CVP pots dial-peer on the gateway, placing the Unified CVP called number on an incoming-called-number parameter.

  • Assign the my-survivability-service service to this dial-peer.

On a Unified CVP Standalone call flow model, no special survivability dial-peer needs to be created. However, the parameter "param survive my-survivability-service" must be included on the CVPSelfService.tcl service. This parameter indicates which service to run in the event of a system failure. In this way, different survivability services can be invoked depending on the incoming pots dial-peer invoked.


Configure the Gateway for Call Survivability

Configure the following parameters on the gateway for call survivability:
  • open-hours-agent—The destination recovery target DNIS to be used when the current time matches any open-hours-time parameter. The script cycles through all agents sequentially until an agent answers. If no agent answers, (or in the case of a takeback transfer, the PSTN does not take back the call), the script cycles through all after-hours-agents (maximum of 50 agents).

    • Syntax: open-hours-agentX DNIS

    • Arguments: X = a number from 0 to 49, DNIS = target destination for the recovery transfer.

    • Example 1: DTMF*8,9875551212 (When PSTN *8 takeback is desired), where DTMF - Indicates takeback and transfer via DTMF tones *8 - The sequence the switch recognizes to perform the takeback. Zero or more commas - Each comma represents a pause of 100 ms. Some switches require a pause between the takeback sequence and the DNIS. 9875551212 - The actual DNIS to which the PSTN should transfer the call.

    • Example 2: HF,,,,,9875551212 (when hookflash transfer is desired) where: HF - Indicates takeback and transfer via hookflash relay Zero or more commas - Each comma represents a pause of 100 ms. Some switches require a pause between the hookflash and the DNIS. 9875551212 - The actual DNIS to which the switch should transfer the call. Note: When using either DTMF or hookflash takeback, you need to configure the following additional parameters on the gateway voice ports:

      
      voice-port 7/1:0
      no echo-cancel
      enable no non-linear
      no vad
      playout-delay maximum 250
      playout-delay nominal 200
      playout-delay minimum high
      playout-delay mode fixed
    • Example 3: 9875551212 (when hairpin or SRST transfer is desired)

    • Example 4: TBCT9875551212 (when TBCT is desired)

    • Example 5: <retry> (when a retry to the original CVP DNIS is desired) - Assuming the original Unified CVP DNIS was 4444:, <retry> will send the call to CVP using DNIS. 4444 56<retry>78 will send the call to CVP using DNIS 56444478.

  • after-hours-agent—The destination recovery target DNIS to be used when the current time matches any after-hours-time parameter or as a default destination if transfers to the open-hours-agent's fail. The script will cycle through all agents sequentially until one answers (maximum of 50 agents). If no one answers, a call-back-later message will be played to the caller and then disconnected.

    • Syntax: identical to open-hours-agent

  • open-hours-time—A string representing the date or days of week and time of day that open-hours-agent's will be used for the recovery transfer (maximum of 20 values). Month/day has higher selection priority than days of the week.

    • Syntax: open-hours-timeX {month/day | days-of-week}[:HHMM-HHMM]

    • Arguments:X = a number from 0 to 19, month/day = month of year and day of month (no year), days-of-week = a string of up to seven digits representing the days of the week (Sunday = 0, Saturday = 6), HHMM-HHMM = the starting and ending time of the period, expressed in 24-hour clock notation.

    • after-hours-time—A string representing the date or days of week and time of day that after-hours-agents use for the transfer. These do not explicitly need to be listed. If the current date/time does not fall in an open-hours-time slot, it defaults to an after-hours agent. A typical use is to specify holidays that would fall on working weekdays. A maximum of 20 values are allowed.

    • Syntax: identical to open-hours-time

  • open-hours-cvptime—You may want to choose a particular recovery agent based on how long the call had been in Unified CVP before the failure occurred. If no open-hours-cvptime is specified, the associated open-hours-agent will be used regardless.

    • Syntax: number-of-seconds

    • Arguments: X = a number from 0 to 19, corresponding to the associated open-hours-agent number-of-seconds55 would use open-hours-agent0 only when the call had been in Unified CVP less than 55 secs.

  • after-hours-cvptime—Same as open-hours-cvptime, but applies instead to after-hours-agents.

  • alert-timeout—A numeric value indicating the maximum number of seconds the destination phone should ring before stopping the call attempt.

    • Syntax: alert-timeout 20

  • setup-timeout—A numeric value indicating the maximum number of seconds that the tcl script will wait in establishing a tcp connection to Unified CVP before stopping the call attempt. This value should be greater than the "h225 timeout tcp establish" parameter under the voice class h323 configuration on the gateway.

    • Syntax: setup-timeout 7

  • aa-name—If non-blank, indicates that when a failure occurs, the Unified CVP survivability script hands off the caller to the BACD auto-attendant application. Enter the following:
    
             service <survivability-servicename>
             param aa-name <BACD-servicename>
             service <BACD-servicename>
             param isn-name <survivability-servicename>


    Where servicename is the service name of the BACD auto-attendant script to which control should be passed.

Procedure

  • standalone—If non-blank, indicates that when a failure occurs, this Unified CVP survivability script passes control to the service name specified. Typically, that service would reference the CVPSelfService.tcl script to invoke a Call Studio application to provide IVR treatment to the caller; for example:

    
              service survivability flash:survivability.tcl
              param standalone vxmlapp
              service vxmlapp flash:CVPSelfService.tcl
                                    
  • standalone-isntime—Select the standalone option depending on how long the call had been in Unified CVP before the failure occurred. If no standalone-isntime is specified, the standalone option is invoked if it is non-blank.

    1. Syntax: standalone-isntime {> OR <}number-of-seconds

    2. Arguments: number-of-seconds = number of seconds the call was in Unified CVP before the call failed, prefixed with > or <. For example, standalone-isntime <2 would use standalone only when the call had been in Unified CVP less than 2 seconds.

  • icm-tbct—A numeric boolean value (0 or 1) indicating whether or not Unified ICME scripts will issue TBCT transfers. Default is 0 (by default, Unified ICME does not handle TBCT transfers). Set this value to 1 to enable TBCT transfers issued from a TBCT label in an Unified ICME script.

    1. Syntax Example: icm-tbct 1

  • disableDnisStrip—By default survivability.tcl will strip of all leading zeros from the dialed number. To disable this, you can set the disableDnisStrip parameter to a value of 1.

    1. Syntax Example: disableDnisStrip 1

    Configure the following parameters on the gateway for call survivability in case of REFER call flow:

    • refer-prefix—A numeric array value of 3 digits indicating whether to handle transfers as SIP REFER pass-through or SIP REFER consume on the gateway. If the transfer number matches this prefix then SIP REFER pass-through is used, otherwise SIP REFER consume is used.

      • Syntax Example: refer-prefix "800 888 877 866 855"


    Note


    If survivability is configured for REFER pass-through scenario, then the gateway must have outbound dial-peer for the referred DN.


What to do next

Configure the following parameters on the gateway for call survivability in case of REFER call flow:

  • refer-prefix—A numeric array value of 3 digits indicating whether to handle transfers as SIP REFER pass-through or SIP REFER consume on the gateway. If the transfer number matches this prefix then SIP REFER pass-through is used, otherwise SIP REFER consume is used.

    Syntax Example: refer-prefix "800 888 877 866 855"

  • refer-pass-setup-timeout—A numeric value indicating the maximum number of seconds that the tcl script will wait in establishing a call that is a refer pass-through. To disable the timer, you can set the refer-prefix parameter to a value of 0. The default value is 7.

    Syntax Example: refer-pass-setup-timeout 7

Examples of Call Survivability

In the first Call Survivability example, the following configurations are used:


                                service survivability flash:survivability.tcl

                                param open-hours-agent0 9777123400
                                param open-hours-agent1 4444888
                                param open-hours-time0 12345:0900-1730
                                param open-hours-time1 12/18:0600-2300

                                param after-hours-agent0 7777008
                                param after-hours-agent1 8766008
                                param after-hours-time0 7/21:0700-0800
                                param after-hours-time1 11/25

                                param setup-timeout 7
                                param alert-timeout
                                dial-peer voice 800232 pots
                                application survivability
                                incoming called-number 8002321765
                                direct-inward-dial
                            

Using the above survivability configurations, review the following cases:

  • Case 1: Assume today is a holiday, Thursday, 11/25 at 1300 hours. Since 11/25 is defined as a specific after-hours-time, it is selected before the 12345:0900-1730 open-hours-time, which also falls on a Thursday. If the WAN fails, this script first tries a transfer to 7777008, and then to 8766008.

  • Case 2: Assume today is Saturday, 12/18 at 0900 hours, peak of the holiday shopping season. Since 12/18 is defined as a specific open-hours-time, it is selected for an open-hours-agent even though it falls on a Saturday, which would usually be after hours time. If the WAN fails, this script first tries a transfer to 9777123400, then try 4444888, 7777008, and 8766008.

  • Case 3: If time-of-day routing is not important, but you need a last-resort transfer mechanism, put one or more DNIS in the after-hours-agent slots and do not define any times. Any failed call is always directed to the list of after-hours-agents.

The next example illustrates how to organize call survivability functionality by incoming DNIS, create a separate application for each DNIS and apply desired call recovery properties to each application. For example:

  • Assume billing callers dial 45XX and sales callers dial 55XX to access Unified CVP.

  • Assume that a billing call fails somewhere in the course of the call:

    • If the call fails and the call had been in Unified CVP less than 30 seconds (this would also include the case where the call had *never* made it to Unified CVP; for example, 0 seconds), send the caller back through the PSTN via a *8 takeback to 8005556666.

    • If the call fails and the call had been in Unified CVP greater than or equal to 30 seconds, send the caller back through the PSTN via a *8 takeback to 8007778888.

  • Assume that a sales call fails somewhere in the course of the call:

    • If the call fails (in this case, the amount of time the call had been in Unified CVP is irrelevant), send the caller back through the PSTN via a hairpin transfer to 8009990000.

  • Assume the PSTN switch is sending ANI and DNIS in such a way that the ANI and DNIS are concatenated together in the DNIS field. Assume that ANI length is 10 and DNIS length is 4. Also assume that ANI can be blank; for example, blocked callerID.

The IOS configuration elements necessary to accomplish these cases are shown below.


Note


Dial-peers 2 and 4 are necessary in the event of no ANI (blocked caller ID). The lower preferences of dial-peers 2 and 4 is to protect against the case where a caller's ANI begins with 45, for example. For example, assume caller with ANI 4521111111 dials the sales DNIS. Without lower preferences, the caller would have matched dial-peer 2 and gone to the billing application instead of sales (you wanted it to match dial-peer 3).

The following are the configuration elements for the second example:


                                dial-peer voice 1 pots
                                preference 1
                                application billing
                                incoming called-number 45..
                                #------------------------------------------
                                dial-peer voice 2 pots
                                preference 2
                                application billing
                                incoming called-number 45..
                                #------------------------------------------
                                dial-peer voice 3 pots
                                preference 1
                                application sales
                                incoming called-number 55..
                                #------------------------------------------
                                dial-peer voice 4 pots
                                preference 2
                                application sales
                                incoming called-number 55..
                                #------------------------------------------
                                dial-peer voice 5 pots
                                destination-pattern 8009990000
                                port 7/0:D (or whatever port is desired)
                                #------------------------------------------
                                dial-peer voice 6 voip
                                incoming called-number 8009990000
                                codec g711ulaw (To force the call to g711ulaw on the outgoing hairpin)
                                #------------------------------------------
                                service billing flash:survivability.tcl
                                param after-hours-agent0 DTMF*8,,,8005556666
                                param after-hours-cvptime0 <30
                                param after-hours-agent1 DTMF*8,,,8007778888
                                param after-hours-cvptime1 >29
                                param ani-dnis-split 10:4
                                #------------------------------------------
                                service sales flash:survivability.tcl
                                param after-hours-agent0 8009990000
                                param ani-dnis-split 10:4
                            

Enhanced Location Call Admission Control

Enhanced Location Call Admission Control (ELCAC) is used to maximize local branch resources, keeping a call within the branch whenever possible and limiting the number of calls that go over the WAN. Unified CVP supports queue-at-the-edge, a simpler and more effective configuration of ELCAC than the transfer and queue calls with Unified CVP. Using the queue-at-the-edge functionality, the call originating from a specific branch office is deterministically routed to a local VXML Gateway based on priority, which means that ELCAC always selects a local branch agent, if possible.

ELCAC Topic Definitions

The following definitions are used in the configuration of ELCAC:

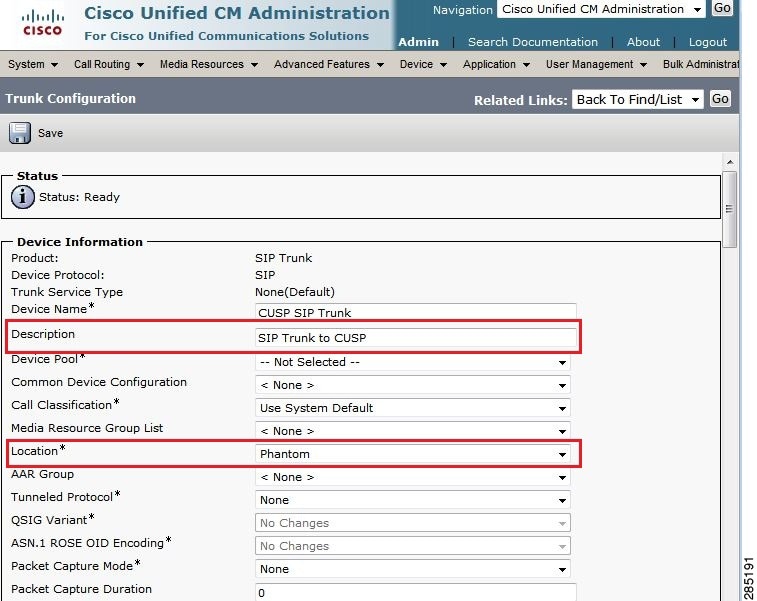
  • Phantom Location: A default location with unlimited bandwidth used when calculating calls that are hairpinned over a SIP trunk or when the SIP call is queued at the local branch, to enable correct bandwidth calculations. The Phantom location should be assigned to the gateway or trunk for CVP.

  • SiteID: The SiteID is a string of numbers that is appended to the label from Unified ICM so that the dial plan can be configured to route the call to a specific destination, such as the branch VXML gateway or egress gateway, or Unified CM node. The SiteID can be appended at the front of the label, at the end, or not at all. This configuration is separate from the Unified CM location configuration, and is specific to Unified CVP. The SiteID is used to indicate the real location of the call and allow the bandwidth to be deducted from the correct location.

  • Shadow Location: This new location is used for inter-cluster trunks between two Cisco Unified Communications Manager clusters. This location is not used as inter-cluster ELCAC is not supported in Unified CVP 9.0(1).


Note


The CVP server does not calculate bandwidth when using the ELCAC feature. This calculation is performed on the CUCM server.


ELCAC Queue-at-the-Edge Configuration

The following steps provide an example configuration for ELCAC with queue-at-the-edge functionality.

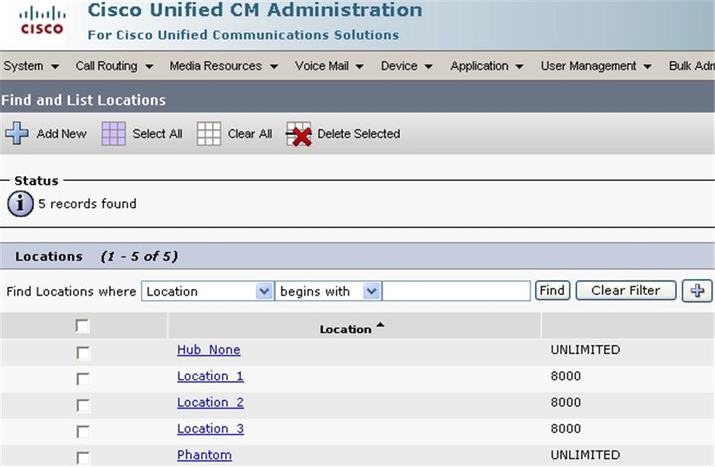
Through the Unified CM, configure all branches so that Location and Bandwidth are defined:

  1. From Unified CM Administration, select System > Location. Click Find to list the locations and add new ones as appropriate.


    Note


    Unlimited must be unchecked for each branch (the box to the left of the location name); otherwise bandwidth is not deducted for that branch. (The Phantom location still has unlimited bandwidth even when unchecked.)
    Figure 8. Cisco Unified CM Administration—Find and List Locations


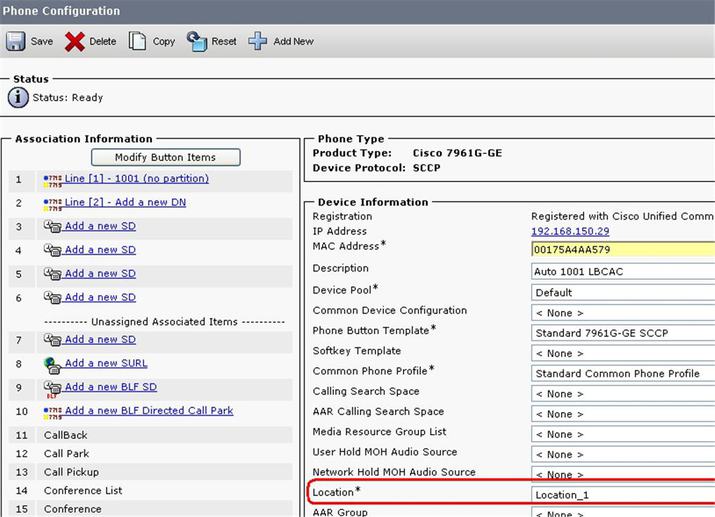
  2. For the branch phones, configure each phone so that it is assigned the branch location for that phone.

    • Select Device > Phone. Click Find to list the phones.

    • Select a phone and set the Location field.

    Figure 9. Phone Configuration Screen


  3. Verify that the Cisco AXL Web Service is started and that an Application User is defined and has a role of Standard AXL API Access.

    • From Cisco Unified Servicability, select Tools > Control Center > Feature Services

    • Start the Cisco AXL Web Service, if it is not started.

    • From Cisco Unified CM Administration, select User Management > Application User. Verify you have a user with the role of Standard AXL API Access, or create a new one and add that user to a group that has the role of Standard AXL API Access.

On Unified CVP, perform the following steps using the Operations Console:

  1. In Device Management > Unified CM, in the section Enable Synchronization for Location , enable synchronization and provide the credentials required to log in.

  2. In System > Location, click Synchronize to retrieve the locations defined on Unified CM.

    Select System > Location and verify that the locations have been synchronized from Unified CCM.

  3. In Device Management > Gateway, define the Ingress and VXML gateways.

  4. Assign IDs. In System > Location, select a location.

    • Assign a Site ID and Location ID to the location, then add the associated gateways to the location.

    • Repeat for each of the locations.

  5. In System > Location, navigate to Call Server Deployment and select the Call Servers where the configuration is to be deployed. Click Save and Deploy.

  6. For the insertion point of the SiteID, use the default location between the Network VRU label and the correlation ID as shown in the following screenshot.

SIP Deployments—Unified CM Steps:

  1. Using Unified CM, create a SIP trunk toward the SIP proxy server and select the Phantom location.


  2. Create a SIP trunk for each ingress gateway and make the location of these ingress TDM-IP gateways the actual branch location.


  3. Create a route pattern pointing the Network VRU Label of the CCM routing client to the SIP trunk toward the SIP proxy you created in Step 1.

    The SIP proxy should route the Network RRU label of CCM routing client to the farm of CVP Call Servers.

  4. For any IP-originated calls, the CCM route pattern should be associated with the SIP trunk created in Step 1.

  5. Associate the new SIP profile from Step 3 with the trunk defined in Step 1 and each Ingress gateway defined in Step 2.

Locations-Based Call Admission Control Configuration

Locations-based call admission control (CAC) is used in the Unified CCE branch-office call flow model, which is also known as the Centralized Model. This means that all servers (Unified CVP, Unified ICME, Unified CM, SIP Proxy server, and Media Servers) are centralized at one or two data centers, and each branch office (of which there can hundreds or thousands) contains only a gateway and IP phones.

This section provides an overview on how to configure Unified CVP to perform the following tasks:
  • Accommodate Unified CM locations-based CAC.

  • Minimize bandwidth usage on the WAN.

This section also describes other call flow and bandwidth usage issues to consider.

The following sections do not include detailed installation and configuration instructions. They are intended to provide you with guidance as you set up the Unified CVP solutions in your network. For additional information about how to install, set up, run, and administer Unified CVP, see the Installation and Upgrade Guide for Cisco Unified Customer Voice Portal.

Unified CM Service Configuration Settings

Set the following configuration parameters to make Unified CM use the Ingress gateway instead of Unified CVP as the originating location of the call.

  • Set "Accept Unknown TCP connection" in Unified CM Service parameters.

  • Set the Unified CM Service parameter "GK controlled trunk that will listen to 1720" to "None".

  • Do not define Unified CVP as a gateway device in Unified CM.

  • Define the Ingress gateways as gateway devices in Unified CM. Assign the correct location to the devices.

These settings ensure that CAC can be adjusted based on the locations of the calling endpoint and the phone.

Unified CVP Bandwidth Utilization

The following factors contribute to WAN bandwidth usage by Unified CVP in a CAC with Distributed Queuing call flow model:

The following sections describe the bandwidth requirements of these factors in an example Centralized Call Control with Distributed Queuing call flow model. The examples in these sections are based on data that Cisco obtained from testing.

In these examples, assume that:

  • Each call begins with some IVR treatment followed by a transfer to an agent.

  • Each branch has 20 agents and each agent handles 30 calls per hour. Thus, the total number of calls is as follows:

    20 * 30 = 600 calls per hour = 0.166 calls per second (CPS).

VoiceXML Documents

A VoiceXML document corresponds approximately to a Run External node in a Unified ICME script.

A round trip of a VoiceXML document between Unified CVP and the gateway consumes an average of 7 KB (7000 bytes). If each call includes approximately 20 VoiceXML documents, the WAN bandwidth consumed by VoiceXML documents can be calculated as follows:

  • 7000 bytes * 20 VoiceXML documents * 8 bits = 1,120,000 bits per call

  • 0.166 CPS * 1,120,000 bits per call = 185.9 Kbps per remote site

Prompt Retrieval

Store the voice prompts at the following locations:

  • In flash memory on each local site gateway - In this way, gateways do not need to retrieve .wav files for prompts and WAN bandwidth is not affected. However, if a prompt needs to change, you must change it on every gateway.

  • On an HTTP media server - In this way, each local site gateway (if properly configured) can cache many or all prompts, depending on the number and size of the prompts.

When prompts are stored on an HTTP media server, the refresh period for the prompts is defined on that server. The bandwidth consumed by prompts consists of the initial loading of the prompts at each gateway and of the periodic updates at the expiration of the refresh interval.

As an example of determining the bandwidth consumed by prompts, assume that a call flow has 50 prompts with an average size of 50 KB (50,000 bytes) each. Also, assume that the refresh period for the prompts is defined as 15 minutes (900 seconds) on the HTTP media server.

The WAN bandwidth required for prompts in this call flow can be calculated as follows:

  • 50 prompts * 50,000 bytes * 8 bits = 20,000,000 bits

  • 20,000,000 bits / 900 seconds = 22.2 Kbps per branch

Gateway Prompt Caching Considerations

When you store audio prompts on an HTTP media server, proper gateway prompt caching methods are necessary to optimize both the performance of the gateway and network bandwidth consumption. Gateway performance decreases by approximately 35-40% if caching is disabled entirely.

Configure Caching on the Gateway

Procedure

Step 1

Set the following settings on the gateway:

  1. ivr prompt memory 15000

  2. http client cache memory file 500

  3. http client cache memory pool 15000

Note

 
The 'http client cache memory file' represents the largest size prompt file (in Kbytes) that can be cached. In general, break up customer prompts larger than 500K (about a minute in length) into smaller, more manageable pieces to facilitate loading and caching. For example, queue music could be a repetitive loop of a 30 second prompt. Note also that because the prompts are streamed, the prompt will not be cached unless the whole prompt is played. Therefore, you must make prompts a manageable size.

Step 2

Synchronize the datetime between the gateway and the HTTP media server.

Note

 
Synchronization does not have to be exact, but at least within a minute or two. Times that are not synchronized can cause prompts to never refresh or they will refresh with every call, both of which are undesirable behaviors.

Step 3

On the media server, set the content expiration (for example 15 minutes).


Determine Gateway Caching

To determine if you have properly configured gateway caching, perform one of the following actions:
Procedure
  • The IIS log on the media server records every time a client requests a prompt. If caching is set up correctly, these requests appear approximately every X minutes, where "X" is the number of minutes defined as the refresh interval for any particular prompt. The log is located at C:\WINNT\system32\LogFiles\W3SVC1\ex*.

  • Run 'show http client cache’ on the gateway. The 'Fresh Time' column equals the refresh time period set on the HTTP media server. For example, if the refresh period was set to 15 minutes, it says 900 seconds. The 'Age' column shows how many seconds have passed since the prompt was last refreshed. In general, this number will be less than the 'Fresh Time'. However, if no call has ever accessed the prompt recently, this number could be greater than the fresh time. Prompts are only refreshed when triggered by a call and the prompt 'Fresh Time' has expired. If the Fresh Time is a very high value, the only way to remove the prompt from cache is to reload the gateway.

UUI as Correlation ID

Unified CVP uses the User-to-User Information (UUI) from the incoming call as a Correlation ID in the VRU-Only call flow model. This feature allows customers to transfer Correlation IDs through their network; for example, using a Call Routing Service Protocol (CRSP) NIC for call control.


Note


This feature applies only to the Unified CVP VRU-Only call flow model.

The network has no place to store a Correlation ID, so it must be "hidden" in the ISDN setup that arrives at the IOS gateway and then is extracted by the gateway. The UUS parameter, also known as the User-to-User Information (UUI) of the Generic Transparency Descriptor (GTD) data, can be used to "hide" the Correlation ID, provided the call control client has the capability of inserting a Correlation ID value into the GTD.

When the call arrives at the gateway from the network, the call control client extracts the value and appends it to the DNIS before sending an HTTP request to the Type3 Unified CVP Call Server.

How It Works

The call control client (such as the CRSP NIC) inserts the desired Correlation ID value into the dat field of the UUS parameter of the NSS IAM message. These NSS messages are used as the basis of building the GTD data that ultimately arrives at the IOS gateway from the PSTN. See the ITU-T Narrowband Signaling Syntax spec (Q.1980.1) for a detailed description of the IAM message and UUS parameter, included below for convenience. Note that the dat field contains pairs of hexadecimal digits, meaning that if the Correlation ID is "12345", the dat field must be populated as "3132333435". The gateway bootstrap.tcl script converts back to "12345" before appending to the DNIS and passing to the Unified CVP Call Server in the HTTP URL.

To configure a gateway, see Configure Gateway.

Debugging Tips

Debug Trace Settings for the Gateway

On the gateway, enter the following code:


                                debug voip application script
                                debug gtd
                            

GTD Values in the Gateway Log

In the gateway log, look for the following GTD values:


                                6616806: *Jan 31 17:12:41.220: cdapi_find_tsm:
                                Found a gtdmsg of length144:6616807: *Jan 31 17:12:41.220:
                                gtd msg = "IAM,PRN,isdn*,,
                                ATT5*,USI,rate,c,s,c,1USI,lay1,ulawTMR,00CPN,00
                                ,,u,5900CPC,09FCI,,,,,,,y,UUS,3,3132333435

                                ---> This is the UUI that will become the Correlation ID12345GCI, 87c0c79d91dd11daa9c4000bfda207f2"
                            

External Transfers in Unified ICME

Unified ICM Script Label for Outpulse Transfer

Labels in Unified ICM scripts for Unified CVP calls that require outpulse transfer mode must be prepended with the characters DTMF followed by *8 and some number of commas, where each comma represents a pause of 100 milliseconds. By configuring the target label with the form DTMFnnnnn (where nnnnn are the digits to outpulse), Unified CVP sends the digits out-of-band using H.245 signaling to the Ingress gateway for outpulsing.

To use the AT&T Transfer Connect feature to transfer the call to the number "4441234", configure the label as DTMF*8,,,4441234.


Note


Usually the PSTN switch expects a delay between the *8 and the phone number. Each comma represents 100ms by default. It can be changed with the SetTakebackDelay command in VBAdmin.

Note


In outpulse transfer mode, Unified CVP sends whatever digits are in the label to the Gateway for outpulsing. It is the customer’s responsibility to confirm interoperability with the target switch.

Note


In your Unified ICM script, when using outpulse transfers with SIP calls, digits can only be outpulsed on a call that has already been established. This means that it is necessary to transfer the call to the VXML gateway with a run external script node before you can send the DTMF*8 label. The Unified ICM script cannot send the DTMF*8 label back to Unified CVP for the first connect message in the call because the call has not been answered at this point. The Unified CVP Call Server uses SIP INFO messages to send the digits to the gateway for outpulsing.

Note


When using outpulse transfers with SIP, you can also use the comma duration as the default interdigit pause duration.

For example, with the default 100 msec comma duration, a label such as "DTMF*8,,,8009785001" will have 300 msecs between the first 8 and the second 8. The interdigit pause will also be 100 msecs. The tone duration is also configurable and defaults to 100 msecs.


Note


Outpulse transfer with SIP uses SIP INFO messages being sent to the TDM gateway, where the outpulsing of digits occurs. If the agent using the CTI desktop performs a blind transfer (single step transfer), and the scheduled script for the transfer DN returns a DTMF type label, the Unified Communications Manager SIP Trunk can loop the CVP DTMF label through the bridged call using an UPDATE message. Unified CVP can get the label back and convert the digits to SIP INFO messages to forward to the ingress gateway. This only works on blind transfers, and is not supported on consult transfers.

Unified ICME Script Label for Two B-Channel Transfer

For Unified CVP calls that require Two B-Channel Transfer (TBCT) mode, add a label node to your Unified ICME script with the following syntax:

TBCT99#8005551212#

Replace "8005551212" with your transfer destination target; TBCT99 and the # sign are mandatory.

By configuring the target label in this form, Unified CVP sends the digits to the Ingress endpoint for Two B-Channel transfer.

Unified ICME Script Label for Hookflash Transfer

Prepend labels in Unified ICME scripts for Unified CVP calls that require hookflash transfer mode with the characters HF. By configuring the target label with the form HFnnnnn (where nnnnn are the digits to call), Unified CVP sends the digits to the Ingress endpoint for hookflash transfer.

If the switch requires a pause after the hookflash, insert commas between the HF and the transfer number. (Each comma represents 100 milliseconds.)

For example, to use the hookflash feature to transfer the call to the number "4441234" with a 500- millisecond pause after the hookflash, configure the Unified ICME label as "HF,,,,,4441234."

Multicast Music on Hold (MMoH)

Multicasting may be used for Music On Hold with supplementary services on Unified CM as an alternative to the unicast MoH.

There are two ways to deploy this feature:

  • With the Unified CM multicasting the packets on the local LAN.

  • With the branch gateway(s) multicasting on their local LANs.

The latter is used when survivable remote site telephony (SRST) is configured on the gateway, and allows the deployment to utilize MOH locally and avoid MOH streaming over the WAN link.


Note


Associate the SIP Trunk for Unified CVP (configured on Unified CM) with a Media Resource Group List (MRGL) that supports MMOH resources. Access the following links for configuration details and on how to create the MRGL:

Multicast MOH Usage Guidelines

The following guidelines apply when using Multicast MOH:

  • Do not use this setting globally, or on a dial peer on the Ingress or Egress Gateway:
    modem passthrough nse codec g711ulaw
    This setting might cause Unified CM to stop the MOH after a timeout period of 10 to12 seconds.
  • Do not set media inactivity on the Ingress Voice Gateway because multicast MOH does not send RTP or RTCP, and the call might get disconnected due to media-inactivity configuration. The setting media-inactivity criteria does not support multicast traffic.

  • SIP-based multicast MOH is not supported on a 5400 platform because CCM-manager-based MOH subsystems are not supported on 5400 platform. This limitation also affects the ability of a TDM caller to hear multicast packets broadcasted from the Unified CM MOH server.

Mixed G.729 and G.711 Codec Support

Transcoders (DSPs) are required if the two endpoints participating in the call cannot negotiate a common codec. Therefore, midcall codec negotiation greatly reduces the need for transcoders.

CVP supports mixed G.711 and G.729 codecs in Standalone and Comprehensive SIP deployments with Cisco Unified Border Element Enterprise Edition (CUBE) and Cisco Unified Communications Manager (Unified CM). Calls that are ingressed through a SIP trunk from the carrier to a CUBE require Cisco IOS 15.1(2)T or later for mixed codec support. You can use any combination of codecs on the legs of a call. For example, a caller can place a call using the G.729 codec, hear an IVR prompt played using the G.711 codec, be transferred to the first Agent using the G.729 codec, and then transferred to the second agent using the G.711 codec.

A typical use case where transcoders may be required is when phones in a WAN connected location only support the G729 codec, and CVP is set up for G711 support. In this case, when these phones call into CVP, Unified Communications Manager engages transcoders. For inbound calls that arrive from a gateway or CUBE can start with G711 at CVP, then later renegotiate to G729 with the agents without the need for transcoders.

Transcoders (DSPs) are controlled by CUBE and Unified Communications Manager depending on the call flow. Because most of the service providers support midcall codec negotiation, transcoders in CUBE are not necessary. You commonly need transcoders controlled by Unified Communications Manager to support call flows, in which the phone supporting G729 is calling into CVP supporting G711.

Post Call Survey for SIP

A Post Call Survey takes place after usual call treatment. It is used to determine whether customers are satisfied with their call center experiences. This feature lets you configure a call flow that, after the agent disconnects from the caller, optionally sends the call to a Dialed Number configured for a Post Call Survey.

The Unified CCE script can enable and disable Post Call Survey on a per-call basis by testing for conditions and setting an expanded call variable that controls post call survey. For example, the script can invoke a prompt that asks callers whether they want to participate in a survey. Based on the caller's response, the script can set the expanded call variable that controls whether the call gets transferred to the Post Call Survey dialed number.

The Post Call Survey call works like a regular call from the Unified CCE point of view. Scripts can be invoked and the customer can use the keypad on a touch tone phone and voice with ASR/TTS to respond to questions asked during the survey. During Post Call Survey, the call context information is retrieved from the original customer call.


Note


For reporting purposes, the Post Call Survey call has the same CallGUID and call context as the original inbound call.

Note


Unified CVP can only send call variables and predefined ECC variables and ECC array like ToExtVXML and FromExtVXML in the call context to the NEW_CALL for PCS.

If you wish to use the Post Call Survey feature through Unified CVP, you must configure it on the Call Server. Also, you can configure the Unified ICM script to toggle the use of Post Call Survey off and on. The two configuration topics that follow, explain these methods.

Configure Call Server for Post Call Survey

In the following procedure, enter a dialed number pattern for the inbound call and a dialed number pattern for the post call survey. In both cases, the patterns can use alphanumeric characters and wildcard characters such as the exclamation point (!), asterisk (*), and single digit matches, such as the letter X (not x) or period (.). The pattern can end with an optional greater than (>) wildcard character. The maximum length of the dialed number pattern is 24 characters.

Procedure


Step 1

Access the CVP Operations Console by typing https://<OAMP_server_IP>:9443/oamp.

Step 2

Log in to the Operations Console and select Device Management > Unified CVP Call Server.

The Find, Add, Delete, Edit Call Servers window opens.

Step 3

Click the Call Server for which you want to configure Post Call Survey.

The Edit CVP Call Server Configuration page displays.

Step 4

Click the SIP tab. Verify the Override System Dialed Number Pattern Configuration is not checked.

Step 5

Click Save and Deploy to deploy the Unified CVP Call Server device.

Step 6

Select System > Dialed Number Pattern.

The Dialed Number Pattern window opens.

Step 7

Click Add New.

Step 8

Enter a pattern in the Dialed Number Pattern field. This is the incoming Dialed Number for calls that you want to direct to a Post Call Survey. Make sure that dialed number patterns entered here are unique. (An incoming dialed number can not be associated with multiple survey numbers.)

Step 9

Check Enable Post Call Survey for Incoming Calls. This action enables post call surveys for all incoming calls with the specified dialed number pattern.

The Survey Dialed Number Pattern field appears.

Step 10

In the Survey Dialed Number Pattern field, enter a dialed number for the Post Call Survey. This is the dialed number to which the calls should be transferred to after completing the usual call flow.

Record the number you have entered. In the next task, you create this dialed number in CCE Administration and create a call type to associate with this dialed number.

Step 11

Click Save to save the Dialed Number Pattern.

You are returned to the Dialed Number Pattern page.

Step 12

Click Deploy to deploy the configuration to all Call Servers.


Configure ICM for Post Call Survey

Configuration is not required on Unified ICM to use Post Call Survey, however, you can turn the feature off (and then on again) within an ICM script by using the ECC variableuser.microapp.isPostCallSurvey and a value of n or y (value is case insensitive) to disable and re-enable the feature.

Configure the ECC variable to a value of n or y before the label node or before the Queue to Skillgroup node. This sends the correct value to Unified CVP before the agent transfer. This ECC variable is not needed to initiate a Post Call Survey call, but you can use it to control the feature once Post Call Survey is configured using the Operations Console. As long as a DN is mapped in the Operations Console for Post Call Survey, the call will be automatically transferred to the configured Post Call Survey DN.


Note


  • The Post Call Survey DN is called if the Unified CVP has received at least one CONNECT message from ICM (either from the VRU leg or from the Agent leg). Use the END node in your ICM script if the Post Call Survey is not required for the calls disconnected from the IVR.

  • If Router Requery is configured incorrectly and the Ring-No-Answer timeout expires, the caller is still transferred to the Post Call Survey DN. This can occur if a Queue node is used and Enable target requery is not checked.


Procedure


Step 1

On the Unified ICM Administration Workstation, using configuration manager, select the Expanded Call Variable List (ECC) tool.

Step 2

Create a new ECC variable with Name:user.microapp.isPostCallSurvey.

Step 3

Set Maximum Length: to 1.

Step 4

Check the Enabled checkbox. Then click Save.

In your Unified ICM scripts, remember that, at script start, the default behavior of Post Call Survey equals enabled, even if user.microapp.isPostCallSurvey has not yet been set in the script. You can turn off Post Call Survey in the script by setting user.microapp.isPostCallSurvey to n. You can later re-enable Post Call Survey in the same path of the script by setting this variable to y.

Step 5

Select Manage > Call Types.

Step 6

Add the call type for Post Call Survey, and click Save.

Step 7

Select Manage > Dialed Numbers.

Step 8

Create Dialed Numbers with Routing Type External Voice for each of the Post Call Survey Dialed Number Patterns created in CVP and associate them to the Post Call Survey Call Type you just added.

Step 9

Click Save.

Step 10

If you added the new expanded call variable, you must restart the active generic PG (side A or B) to register the new variable.

If the expanded call variable already existed, you can skip this step.

Note


The user.microapp.isPostCallSurvey setting takes effect on CVP only when it receives a connect or temporary connect message. Therefore, if you do not want the survey to run, without first reaching an agent (such as 'after hours of treatment'), you must set the isPostCallSurvey to n before the initial 'Run script request'.