Table Of Contents
Configuring a Cisco Unified Presence Server for Deployment in the Network
How to Work with Subclusters in System Topology
How to Work with Nodes in System Topology
How to Work with User Assignments in System Topology
Dispersing Users Across a Multi-Node Deployment
Activating and Deactivating Default User Assignments
System Topology Troubleshooting
Configuring a Cisco Unified Presence Server for Deployment in the Network
October 1, 2009![]()
Note
•
This module is only applicable if you are configuring a multi-node deployment.
•
Perform the system topology configuration on the Cisco Unified Presence publisher node.
•
Before configuring the system topology, see the multi-node planning and deployment information in the Deployment Guide for Cisco Unified Presence for best practice information on configuring this type of deployment.
•
The System Topology Interface
•
How to Work with Subclusters in System Topology
•
How to Work with Nodes in System Topology
•
How to Work with User Assignments in System Topology
•
System Topology Troubleshooting
The System Topology Interface
The system topology interface allows you to configure the Cisco Unified Presence multi-node feature, and manage your subclusters, nodes and users.
The Cisco Unified Presence system topology (see Figure 3-1) is displayed in a graphical frameset containing the following frames:
•
Left Frame
This is the navigational frame, showing the system topology as a hierarchical tree of subclusters, nodes and users.
•
Right Frame
This is the contents frame, illustrating the topology details.
Figure 3-1 Cisco Unified Presence System Topology Navigation
![]()
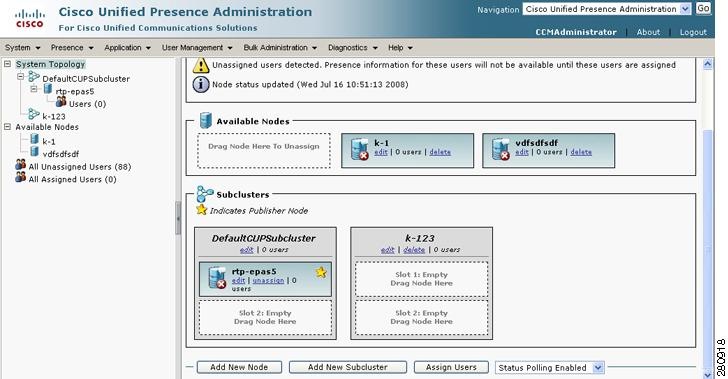
You can expand the tree hierarchy and select a navigational control in the left frame:
•
System Topology.
–
Subcluster. Select
![]()
–
Node. Select
![]()
–
Users. Select
![]()
![]()
Note
The overall system topology is represented by default in the right frame. If a node is marked with a star icon, it indicates that it is the Cisco Unified Presence publisher node.
After you select a navigational control in the left frame, the right frame displays the details and allows you to view and manipulate the configuration of the selected element. You can drag and drop nodes to subclusters on this page.
The main window includes the list box called Related Links in the upper, right corner. To access the configuration options in the list box, select the option that you want and select Go. The choices in the list box include the following configurable items:
•
System Topology — Shows the default Cisco Unified Presence topology. Use the System Topology window to configure Cisco Unified Presence subclusters, nodes, and users.
•
Assign Users —Takes you to the All Unassigned Users window that is used to identify and configure users who are not yet assigned to a Cisco Unified Presence node.
•
Add New Subcluster —Takes you to the Add New Subcluster page, a window that allows you to configure a new subcluster in the Cisco Unified Presence system topology.
•
Add New Node —Takes you to the Add New Node window, so you can configure and administer a new node in the Cisco Unified Presence system topology.
Related Topics
How to Work with Subclusters in System Topology
A subcluster is a logical container for grouping nodes within a cluster. Subclusters may be:
•
empty— placeholder for future assignments
•
contain one node — single node subclusters do not provide high availability (HA) / redundancy for users
•
contain two nodes — dual node subclusters provide HA / redundancy for users across the subcluster pair
A non-HA deployment can consist of up to six single node subclusters. We recommend HA deployments, comprising up to a maximum of three dual node subclusters. See the Deployment Guide for Cisco Unified Presence for specific multi-node deployment strategies and Cisco recommendations for high availability.
Configuring Subclusters
The Cisco Unified Presence publisher node is automatically assigned to a subcluster in the system topology interface. Following the installation of the Cisco Unified Presence publisher node, you must create the required subclusters and subsequent nodes in your Cisco Unified Presence cluster.
Repeat this procedure for each subcluster that you require for your deployment.
![]()
Note
Perform this procedure on the publisher Cisco Unified Presence node.
Before You Begin
•
Plan your multi-node deployment model.
Procedure
Step 1
Complete one or more of the following actions:
Step 2
Enter the appropriate subcluster configuration settings as described in Table 3-1.
Step 3
Select Save.
Troubleshooting Tips
•
Any subcluster that you configure is included as part of the system topology in the Topology Detail window.
•
You can also use the System Dashboard to view the subclusters, nodes and users of the system topology. Select Diagnostics > System Dashboard.
Related Topics
•
Deployment Guide for Cisco Unified Presence
What To Do Next
Deleting Subclusters
You can delete a subcluster in the Topology Detail window. Select Delete adjacent to the subcluster you want to remove.
Troubleshooting Tips
You can only delete an empty subcluster. If the subcluster contains nodes, you must unassign or reassign the nodes before you can proceed.
Related Topics
•
Deployment Guide for Cisco Unified Presence
How to Work with Nodes in System Topology
Every 60 seconds, Cisco Unified Presence monitors the status of the system topology, and returns the results of the poll in the System Topology window. An AJAX request is submitted to the Cisco Unified Presence server to retrieve information on all of the nodes in the cluster.
Once you exit this window, the polling of node status stops.
You can enable or turn off the poller from the list box at the bottom of the System Topology window. Select Status Polling Enabled or Status Polling Disabled.
Node Name Recommendations
By default, the name for a node is the hostname that you configure during the Cisco Unified Presenceinstallation. For example, if the hostname of your Cisco Unified Presence node is called "cup", the nodename is "cup 1". From the system topology interface, you can change the node name to the dotted IPaddress or the FQDN, for example, "192.168.0.1" or "cup1.acme.com". If you change the default name for the node, note the following:
•
You must be able to resolve the hostname or the FQDN from the Cisco Unified Presence server, and Cisco Unified Personal Communicator client computers.
•
If either Cisco Unified Presence server or the Cisco Unified Personal Communicator client computer cannot resolve the hostname or the FQDN, you must configure the IP address for the node name value.
•
To test the name resolution from the Cisco Unified Presence server, use the command utils network ping <node_name>
•
To test the name resolution from the Cisco Unified Personal Communicator client computer, use the command ping <node_name>
What To Do Next
Configuring Nodes
You must create the required subsequent nodes for your deployment. By creating the subsequent nodes in the topology view of the publisher node, the subsequent nodes are associated with the publisher node.
![]()
Note
•
Perform this procedure on the publisher Cisco Unified Presence node.
•
Perform this procedure before you install any of the subsequent Cisco Unified Presence nodes. If you assign a subsequent Cisco Unified Presence node to a subcluster prior to installing it, users in remote clusters will not receive availability information. An availability outage will occur until the node is installed.
Before You Begin
•
Create the required subclusters for your deployment.
•
All nodes in a cluster should be of the same hardware type.
•
Remember that single node configuration in a subcluster means that users who are assigned to that node have no other node in which to fail over. You can achieve failover protection for users by configuring a dual node subcluster. See the multi-node deployment recommendations. For more information, see the Deployment Guide for Cisco Unified Presence.
•
If you are configuring a large-scale deployment, complete the configuration of all nodes before you start system services. For more information, see the Deployment Guide for Cisco Unified Presence.
•
See the Node Name Recommendation topic for instructions.
•
Depending on how you plan to configure your node name, obtain the required value for your nodes (for example hostname, dotted IP address, FQDN or DNS-SRV).
•
When you add a new node in the System Topology window, the node is automatically added to the Cisco Unified Communications Manager Application Server list. Conversely, if a node is removed from Cisco Unified Presence via the System Topology window, the node is automatically removed from the Cisco Unified Communications Manager Application Server list.
Restrictions
•
If you wish to change the default node name, there are certain node name restrictions. See the Node Name Recommendation topic for instructions.
Procedure
Step 1
Do one or more of the following:
Step 2
Enter the appropriate node configuration settings as described in Table 3-2.
Step 3
Select Save.
Step 4
Review and verify that the node service status summary is correct as described in Table 3-3.
Table 3-3 Node Status Summary:
Troubleshooting Tips
•
Any node that you configure is included as part of the system topology in the Topology Detail window. Using your mouse, you can roll over the node for tooltip information about whether the node can be reached, and for service status.
•
You can also use the System Dashboard to view the subclusters, nodes and users of the system topology. Select Diagnostics > System Dashboard.
Related Topics
•
Deployment Guide for Cisco Unified Presence
What To Do Next
Assigning Nodes
The drag and drop functionality in the Topology Detail window enables you to assign and unassign nodes as required.
Before You Begin
Configure your nodes.
Restriction
You can only move a node from one subcluster to another if the node is assigned and has no users
Procedure
Step 1
Display the Topology Detail window in the right frame.
Step 2
Decide your node assignment criteria:
Related Topics
•
Deployment Guide for Cisco Unified Presence
What To Do Next
Deleting Nodes
You can delete a node in the Topology Detail window. Select Delete adjacent to the node you want to remove.
Troubleshooting Tips
You can only delete an unassigned node. If the node is assigned to a subcluster, you must unassign it before you can proceed.
Related Topics
•
Deployment Guide for Cisco Unified Presence
How to Work with User Assignments in System Topology
•
Dispersing Users Across a Multi-Node Deployment
•
Activating and Deactivating Default User Assignments
![]()
Note
You can use the Cisco Unified Presence Bulk Administration Tool (BAT) to assign and move blocks of users between nodes, and to export information about user assignments on Cisco Unified Presence subclusters. For more information, see Chapter 18, "Running Multiple Transactions in Bulk on Cisco Unified Presence."
Configuring User Assignments
![]()
Note
This topic is only applicable if you have chosen to manually assign your users in the system topology interface.
From the system topology interface, you can manually unassign, assign or reassign users. You can assign users to a single node, and you can also distribute groups of users across the node, or nodes, in a cluster, or a given subcluster.
Before You Begin
•
Assign your nodes.
•
You may want to export users in bulk. Use the Bulk Administration Tool (BAT) to perform this procedure.
Restriction
You can only assign users if they are licensed.
Procedure
Step 1
Perform one of the following actions:
•
Select All Unassigned Users in the Topology Navigation left frame.
•
Select User Management > Assign Users.
•
Select Assign Users from the Related Links list box.
–
Select Go.
Step 2
To find all records in the database, ensure that the dialog box is empty; go to Step 4.
Step 3
To filter or search records:
•
From the list box, select a search pattern.
•
Specify the appropriate search text, if applicable.
Step 4
Select Find.
Step 5
From the list of records that display, decide your user assignment criteria.
Step 6
Select Save.
Related Topics
•
Deployment Guide for Cisco Unified Presence
Troubleshooting Tips
•
To add additional search criteria as you filter records, select the + button. When you add criteria, the system searches for a record that matches all criteria that you specify. To remove criteria, select the - button to remove the last added criterion. Alternatively, select Clear Filter to remove all added search criteria.
•
When the matching records display, you can change the number of items that display in each window by choosing a different value from the Rows per Page list box.
•
Any users who you assign are included as part of the system topology in the Topology Detail window.
•
You can also use the System Dashboard to view the subclusters, nodes and users of the system topology. Select Diagnostics > System Dashboard.
What To Do Next
•
Dispersing Users Across a Multi-Node Deployment
You may want to redistribute or reassign users across nodes in your system topology. You can configure the User Assignment Mode service parameter in Cisco Unified Presence Administration to distribute your users in one of three ways:
•
Active/Standby— Assigns users only to the first node of each subcluster, or if there is only one node in the subcluster, to that one node.
•
Balanced — Assigns users evenly to all nodes in the subcluster or cluster respectively.
•
None — No users are assigned to subclusters and nodes.
Before You Begin
Configure your user assignments.
Perform the tasks that suit your requirements, as described in the table below
Troubleshooting Tips
If you simply add or remove nodes and the User Assignment mode service parameter is already set to either Active/Standby or Balanced, there is no need to reset the service parameter.
Related Topics
•
Deployment Guide for Cisco Unified Presence
•
Serviceability Configuration and Maintenance Guide for Cisco Unified Presence
What To Do Next
Activating and Deactivating Default User Assignments
Before You Begin
Configure your preferred User Assignment dispersal mode in Cisco Unified Presence Administration.
Perform the tasks that suit your requirements, as described in the table below.
Related Topics
•
Dispersing Users Across a Multi-Node Deployment
•
Deployment Guide for Cisco Unified Presence
•
Serviceability Configuration and Maintenance Guide for Cisco Unified Presence
Unassigning Users
You can unassign users (who are currently assigned) from a given subcluster, or from a specific node in the Cisco Unified Presence database.
Before You Begin
Unassigned users do not receive availability information.
Procedure
Step 1
Perform one of the following actions:
•
Select All Assigned Users in the Topology Navigation left frame.
•
Select Users adjacent to the node you want to update.
Step 2
To find all records in the database, ensure that the dialog box is empty; go to Step 4.
Step 3
To filter or search records, complete one of the following actions:
•
From the list box, select a search pattern.
•
Specify the appropriate search text, if applicable.
Step 4
Select Find.
Step 5
From the list of records that display, decide your user assignment criteria
Step 6
Select Save.
Troubleshooting Tips
•
To add additional search criteria as you filter search records, select the + button. When you add criteria, the system searches for a record that matches all criteria that you specify. To remove criteria, select the - button to remove the last added criterion or select the Clear Filter button to remove all added search criteria.
•
When the matching records display, you can change the number of items that display in each window by choosing a different value from the Rows per Page list box.
•
The users that you unassign are excluded from the system topology in the Topology Detail window
Related Topics
•
Deployment Guide for Cisco Unified Presence
Reassigning Users
You can reassign users (who are currently assigned) from a given subcluster to another, or from a specific node to another node in the Cisco Unified Presence database.
Procedure
Step 1
Perform one of the following actions:
•
Select All Assigned Users in the Topology Navigation left frame.
•
Select Users adjacent to the node you want to update.
Step 2
To find all records in the database, ensure that the dialog box is empty; go to Step 4.
Step 3
To filter or search records
•
From the list box, select a search pattern.
•
Specify the appropriate search text, if applicable.
Step 4
Select Find.
Step 5
From the list of records that display, decide your user assignment criteria
Step 6
Select Save.
Troubleshooting Tips
•
To add additional search criteria as you filter records, select the + button. When you add criteria, the system searches for a record that matches all criteria that you specify. To remove criteria, select the - button to remove the last added criterion or select the Clear Filter button to remove all added search criteria.
•
When the matching records display, you can change the number of items that display in each window by choosing a different value from the Rows per Page list box.
•
The users that you reassign are updated in the system topology in the Topology Detail window.
Related Topics
•
Deployment Guide for Cisco Unified Presence
System Topology Troubleshooting
You can use the System Configuration Troubleshooter to diagnose configuration issues with the Cisco Unified Presence system topology, after your initial configuration is complete. The Troubleshooter performs a set of tests on the system topology to validate the Cisco Unified Presence configuration.
Related Topics
•
Appendix A, "Troubleshooting Tests and Solutions."