Configuring IP ACLs
Available Languages
Contents
- Configuring IP ACLs
- Information About ACLs
- ACL Types and Applications
- Order of ACL Application
- About Rules
- Protocols
- Source and Destination
- Implicit Rules
- Additional Filtering Options
- Sequence Numbers
- Logical Operators and Logical Operation Units
- Statistics and ACLs
- VTY Support
- Session Manager Support for IP ACLs
- Licensing Requirements for IP ACLs
- Prerequisites for IP ACLs
- Guidelines and Limitations for IP ACLs
- Default Settings for IP ACLs
- Configuring IP ACLs
- Creating an IP ACL
- Changing an IP ACL
- Creating a VTY ACL
- Changing Sequence Numbers in an IP ACL
- Removing an IP ACL
- Applying an IP ACL as a Router ACL
- Applying an IP ACL as a Port ACL
- Applying an IP ACL as a VACL
- Enabling or Disabling ACL Capture
- Configuring an ACL Capture Session
- Applying an ACL with Capture Session ACEs to an Interface
- Applying a Whole ACL Capture Session to an Interface
- Verifying IP ACL Configurations
- Monitoring and Clearing IP ACL Statistics
- Configuration Examples for IP ACLs
Configuring IP ACLs
This chapter describes how to configure IP access control lists (ACLs) on Cisco NX-OS .
Unless otherwise specified, the term IP ACL refers to IPv4 ACLs.
Note
The Cisco NX-OS release that is running on a managed may not support all documented features or settings. For the latest feature information and caveats, see the documentation and release notes for your platform and software release.
This chapter includes the following sections:
- Information About ACLs
- Licensing Requirements for IP ACLs
- Prerequisites for IP ACLs
- Guidelines and Limitations for IP ACLs
- Default Settings for IP ACLs
- Configuring IP ACLs
- Verifying IP ACL Configurations
- Monitoring and Clearing IP ACL Statistics
- Configuration Examples for IP ACLs
Information About ACLs
An ACL is an ordered set of rules that you can use to filter traffic. Each rule specifies a set of conditions that a packet must satisfy to match the rule. When the device determines that an ACL applies to a packet, it tests the packet against the conditions of all rules. The first matching rule determines whether the packet is permitted or denied. If there is no match, the device applies the applicable implicit rule. The device continues processing packets that are permitted and drops packets that are denied.
You can use ACLs to protect networks and specific hosts from unnecessary or unwanted traffic. For example, you could use ACLs to disallow HTTP traffic from a high-security network to the Internet. You could also use ACLs to allow HTTP traffic but only to specific sites, using the IP address of the site to identify it in an IP ACL.
- ACL Types and Applications
- Order of ACL Application
- About Rules
- Statistics and ACLs
- VTY Support
- Session Manager Support for IP ACLs
ACL Types and Applications
The device supports the following types of ACLs for security traffic filtering:
- IPv4 ACLs
- The device applies IPv4 ACLs only to IPv4 traffic.
IP ACLs have the following types of applications:
- Port ACL
- Filters Layer 2 traffic
- Router ACL
- Filters Layer 3 traffic
- VLAN ACL
- Filters VLAN traffic
- VTY ACL
- Filters virtual teletype (VTY) traffic
Order of ACL Application
When the device processes a packet, it determines the forwarding path of the packet. The path determines which ACLs that the device applies to the traffic. The device applies the ACLs in the following order:
- Port ACL
- Ingress VACL
- Ingress router ACL
- Ingress VTY ACL
- Egress VTY ACL
- Egress router ACL
- Egress VACL
If the packet is bridged within the ingress VLAN, the device does not apply router ACLs.
Figure 1. Order of ACL Application. The following figure shows the order in which the device applies ACLs.
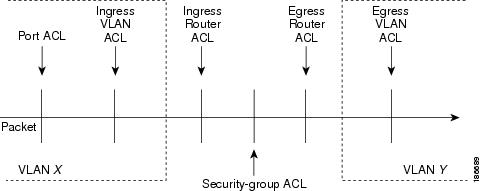
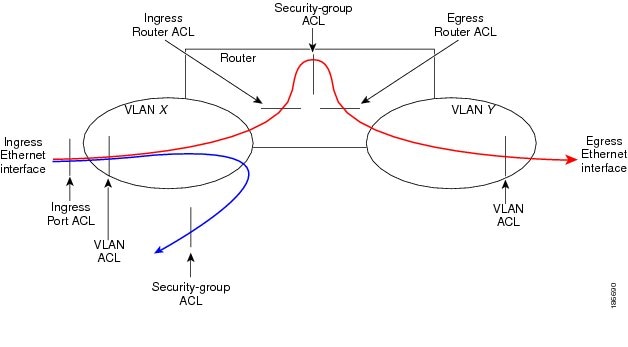
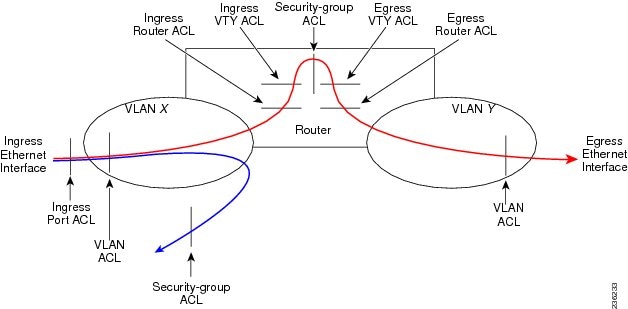
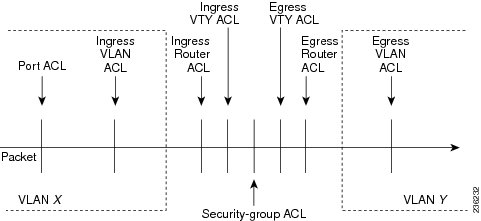 Figure 2. ACLs and Packet Flow .
The following figure shows where the device applies ACLs, depending upon the type of ACL. The red path indicates a packet sent to a destination on a different interface than its source. The blue path indicates a packet that is bridged within its VLAN.
The device applies only the applicable ACLs. For example, if the ingress port is a Layer 2 port and the traffic is on a VLAN that is a VLAN interface, a port ACL and a router ACL both can apply. In addition, if a VACL is applied to the VLAN, the device applies that ACL too.
 Related Concepts
About Rules
Rules are what you create, modify, and remove when you configure how an ACL filters network traffic. Rules appear in the running configuration. When you apply an ACL to an interface or change a rule within an ACL that is already applied to an interface, the supervisor module creates ACL entries from the rules in the running configuration and sends those ACL entries to the applicable I/O module. Depending upon how you configure the ACL, there may be more ACL entries than rules, especially if you implement policy-based ACLs by using object groups when you configure rules.
You can create rules in access-list configuration mode by using the permit or deny command. The device allows traffic that matches the criteria in a permit rule and blocks traffic that matches the criteria in a deny rule. You have many options for configuring the criteria that traffic must meet in order to match the rule.
This section describes some of the options that you can use when you configure a rule. For information about every option, see the applicable permit and deny commands in the Cisco Nexus 7000 Series NX-OS Security Command Reference.
- Protocols
- Source and Destination
- Implicit Rules
- Additional Filtering Options
- Sequence Numbers
- Logical Operators and Logical Operation Units
Protocols
IPv4 ACLs allow you to identify traffic by protocol. For your convenience, you can specify some protocols by name. For example, in an IPv4 ACL, you can specify ICMP by name.
You can specify any protocol by number.
In IPv4, you can specify protocols by the integer that represents the Internet protocol number. For example, you can use 115 to specify Layer 2 Tunneling Protocol (L2TP) traffic.
For a list of the protocols that each type of ACL supports by name, see the applicable permit and deny commands in the Cisco Nexus 3000 Series NX-OS Security Command Reference.
Source and Destination
In each rule, you specify the source and the destination of the traffic that matches the rule. You can specify both the source and destination as a specific host, a network or group of hosts, or any host. How you specify the source and destination depends on whether you are configuring IPv4 ACLs.
Implicit Rules
IP and MAC ACLs have implicit rules, which means that although these rules do not appear in the running configuration, the device applies them to traffic when no other rules in an ACL match. When you configure the device to maintain per-rule statistics for an ACL, the device does not maintain statistics for implicit rules.
All IPv4 ACLs include the following implicit rule:
deny ip any anyThis implicit rule ensures that the device denies unmatched IP traffic.
This implicit rule ensures that the device denies the unmatched traffic, regardless of the protocol specified in the Layer 2 header of the traffic.
Additional Filtering Options
You can identify traffic by using additional options. These options differ by ACL type. The following list includes most but not all additional filtering options:
- IPv4 ACLs support the following additional filtering options:
- Layer 4 protocol
- Authentication Header Protocol
- Enhanced Interior Gateway Routing Protocol (EIGRP)
- Open Shortest Path First (OSPF)
- Payload Compression Protocol
- Protocol-independent multicast (PIM)
- TCP and UDP ports
- ICMP types and codes
- Precedence level
- Differentiated Services Code Point (DSCP) value
- TCP packets with the ACK, FIN, PSH, RST, SYN, or URG bit set
- Established TCP connections
- Packet length
Sequence Numbers
The device supports sequence numbers for rules. Every rule that you enter receives a sequence number, either assigned by you or assigned automatically by the device. Sequence numbers simplify the following ACL tasks:
- Adding new rules between existing rules
By specifying the sequence number, you specify where in the ACL a new rule should be positioned. For example, if you need to insert a rule between rules numbered 100 and 110, you could assign a sequence number of 105 to the new rule.
- Removing a rule
Without using a sequence number, removing a rule requires that you enter the whole rule, as follows:
switch(config-acl)# no permit tcp 10.0.0.0/8 anyHowever, if the same rule had a sequence number of 101, removing the rule requires only the following command:
switch(config-acl)# no 101- Moving a rule
With sequence numbers, if you need to move a rule to a different position within an ACL, you can add a second instance of the rule using the sequence number that positions it correctly, and then you can remove the original instance of the rule. This action allows you to move the rule without disrupting traffic.
If you enter a rule without a sequence number, the device adds the rule to the end of the ACL and assigns a sequence number that is 10 greater than the sequence number of the preceding rule to the rule. For example, if the last rule in an ACL has a sequence number of 225 and you add a rule without a sequence number, the device assigns the sequence number 235 to the new rule.
In addition, Cisco NX-OS allows you to reassign sequence numbers to rules in an ACL. Resequencing is useful when an ACL has rules numbered contiguously, such as 100 and 101, and you need to insert one or more rules between those rules.
Logical Operators and Logical Operation Units
IP ACL rules for TCP and UDP traffic can use logical operators to filter traffic based on port numbers. The device stores operator-operand couples in registers called logical operator units (LOUs).
The LOU usage for each type of operator is as follows:
- eq
- Is never stored in an LOU
- gt
- Uses 1 LOU
- lt
- Uses 1 LOU
- neq
- Uses 1 LOU
- range
- Uses 1 LOU
Statistics and ACLs
The device can maintain global statistics for each rule that you configure in IPv4, IPv6, and MAC ACLs. If an ACL is applied to multiple interfaces, the maintained rule statistics are the sum of packet matches (hits) on all the interfaces on which that ACL is applied.
Note
The device does not support interface-level ACL statistics.
For each ACL that you configure, you can specify whether the device maintains statistics for that ACL, which allows you to turn ACL statistics on or off as needed to monitor traffic filtered by an ACL or to help troubleshoot the configuration of an ACL.
The device does not maintain statistics for implicit rules in an ACL. For example, the device does not maintain a count of packets that match the implicit deny ip any any rule at the end of all IPv4 ACLs. If you want to maintain statistics for implicit rules, you must explicitly configure the ACL with rules that are identical to the implicit rules.
Related Concepts
Related References
VTY Support
Cisco NX-OS does not support applying an ACL directly to a VTY line; however, you can use control plane policing (CoPP) to filter VTY traffic. To do so, you must define two ACLs for use with filtering VTY traffic: one ACL that permits traffic that you want to allow and another ACL that permits traffic that you want to drop. Then you can configure CoPP to transmit the packets that are permitted by the ACL that matches desirable traffic and to drop the packets that are permitted by the ACL that matches undesirable traffic.
In the following example, the ACL copp-system-acl-allow explicitly allows Telnet, SSH, SNMP, NTP, RADIUS, and TACACS+ traffic that is inbound from the 10.30.30.0/24 network and allows any traffic outbound from the device to the 10.30.30.0/24 network. The copp-system-acl-deny explicitly allows all traffic. The policing policies are configured to transmit the traffic permitted by the copp-system-acl-allow ACL and to drop the traffic permitted by the copp-system-acl-deny ACL.
ip access-list copp-system-acl-allow
  10 remark ### ALLOW TELNET from 10.30.30.0/24
  20 permit tcp 10.30.30.0/24 any eq telnet
  30 permit tcp 10.30.30.0/24 any eq 107
  40 remark ### ALLOW SSH from 10.30.30.0/24
  50 permit tcp 10.30.30.0/24 any eq 22
  60 remark ### ALLOW SNMP from 10.30.30.0/24
  70 permit udp 10.30.30.0/24 any eq snmp
  80 remark ### ALLOW TACACS from 10.30.30.0/24
  90 permit tcp 10.30.30.0/24 any eq tacacs
  100 remark ### ALLOW RADIUS from 10.30.30.0/24
  110 permit udp 10.30.30.0/24 any eq 1812
  120 permit udp 10.30.30.0/24 any eq 1813
  130 permit udp 10.30.30.0/24 any eq 1645
  140 permit udp 10.30.30.0/24 any eq 1646
  150 permit udp 10.30.30.0/24 eq 1812 any
  160 permit udp 10.30.30.0/24 eq 1813 any
  170 permit udp 10.30.30.0/24 eq 1645 any
  180 permit udp 10.30.30.0/24 eq 1646 any
  190 remark ### ALLOW NTP from 10.30.30.0/24
  200 permit udp 10.30.30.0/24 any eq ntp
  210 remark ### ALLOW ALL OUTBOUND traffic TO 10.30.30.0/24
  220 permit ip any 10.30.30.0/24
  statistics  # keep statistics on matches
ip access-list copp-system-acl-deny
  10 remark ### this is a catch-all to match any other traffic
  20 permit ip any any
  statistics  # keep statistics on matches
class-map type control-plane match-any copp-system-class-management-allow
  match access-group name copp-system-acl-allow
class-map type control-plane match-any copp-system-class-management-deny
  match access-group name copp-system-acl-deny
policy-map type control-plane copp-system-policy
    class copp-system-class-management-allow
        police cir 60000 kbps bc 250 ms conform transmit violate drop
    class copp-system-class-management-deny
        police cir 60000 kbps bc 250 ms conform drop violate drop
control-plane
  service-policy input copp-system-policy
Session Manager Support for IP ACLs
Session Manager supports the configuration of IP and MAC ACLs. This feature allows you to verify ACL configuration and confirm that the resources required by the configuration are available prior to committing them to the running configuration. For more information about Session Manager, see the .
Licensing Requirements for IP ACLs
The following table shows the licensing requirements for this feature:
Product
License Requirement
Cisco NX-OS
No license is required to use IP ACLs. However to support up to 128K ACL entries using an XL line card, you must install the scalable services license. Any feature not included in a license package is bundled with the Cisco NX-OS system images and is provided at no extra charge to you. For an explanation of the Cisco NX-OS licensing scheme, see the Cisco NX-OS Licensing Guide.
Guidelines and Limitations for IP ACLs
IP ACLs have the following configuration guidelines and limitations:
- We recommend that you perform ACL configuration using the Session Manager. This feature allows you to verify ACL configuration and confirm that the resources required by the configuration are available prior to committing them to the running configuration. This is especially useful for ACLs that include more than about 1000 rules.
- In most cases, ACL processing for IP packets occurs on the I/O modules, which use hardware that accelerates ACL processing. In some circumstances, processing occurs on the supervisor module, which can result in slower ACL processing, especially during processing that involves an ACL with a large number of rules. Management interface traffic is always processed on the supervisor module. If IP packets in any of the following categories are exiting a Layer 3 interface, they are sent to the supervisor module for processing:
Rate limiters prevent redirected packets from overwhelming the supervisor module.
- Packets that fail the Layer 3 maximum transmission unit check and therefore require fragmenting.
- IPv4 packets that have IP options (additional IP packet header fields following the destination address field).
Note
Prior to Cisco NX-OS Release 4.2(3), ACL logging does not support ACL processing that occurs on the supervisor module.
- When you apply an ACL that uses time ranges, the device updates the ACL entries on the affected I/O modules whenever a time range referenced in an ACL entry starts or ends. Updates that are initiated by time ranges occur on a best-effort priority. If the device is especially busy when a time range causes an update, the device may delay the update by up to a few seconds.
- To apply an IP ACL to a VLAN interface, you must have enabled VLAN interfaces globally.
- The maximum number of supported IP ACL entries is 64K for devices without an XL line card and 128K for devices with an XL line card.
- If you try to apply too many ACL entries to a non-XL line card, the configuration is rejected.
- Each forwarding engine on an F1 Series module supports 1K ingress ACL entries, with 984 entries available for user configuration. The total number of IP ACL entries for the F1 Series modules is from 1K to 16K, depending on which forwarding engines the policies are applied.
- F1 Series modules do not support router ACLs.
- F1 Series modules do not support ACL logging.
- F1 Series modules do not support bank chaining.
- Each port ACL can support up to four different Layer 4 operations for F1 Series modules.
- Each of the 16 forwarding engines in an F1 Series module supports up to 250 IPv6 addresses across multiple ACLs.
- The VTY ACL feature restricts all traffic for all VTY lines. You cannot specify different traffic restrictions for different VTY lines.
- Any router ACL can be configured as a VTY ACL.
- ACL policies are not supported on the Fabric Extender fabric port channel.
Configuring IP ACLs
- Creating an IP ACL
- Changing an IP ACL
- Creating a VTY ACL
- Changing Sequence Numbers in an IP ACL
- Removing an IP ACL
- Applying an IP ACL as a Router ACL
- Applying an IP ACL as a Port ACL
- Applying an IP ACL as a VACL
- Enabling or Disabling ACL Capture
- Configuring an ACL Capture Session
- Applying an ACL with Capture Session ACEs to an Interface
- Applying a Whole ACL Capture Session to an Interface
Creating an IP ACL
Before You BeginSUMMARY STEPSWe recommend that you perform ACL configuration using the Session Manager. This feature allows you to verify ACL configuration and confirm that the resources required by the configuration are available prior to committing them to the running configuration. This is especially useful for ACLs that include more than about 1000 rules.
1. configure terminal
2. Enter one of the following commands:
3. (Optional) fragments {permit-all | deny-all}
4. [sequence-number] {permit | deny} protocol source destination
5. (Optional) statistics per-entry
6. (Optional) Enter one of the following commands:
7. (Optional) copy running-config startup-config
DETAILED STEPS
Command or Action Purpose Step 1 configure terminal
Example:switch# configure terminal switch(config)#Enters global configuration mode.
Step 2 Enter one of the following commands:
Example:switch(config)# ip access-list acl-01 switch(config-acl)#Creates the IP ACL and enters IP ACL configuration mode. The name argument can be up to 64 characters.
Step 3 fragments {permit-all | deny-all}
Example:switch(config-acl)# fragments permit-all(Optional) Optimizes fragment handling for noninitial fragments. When a device applies to traffic an ACL that contains the fragments command, the fragments command only matches noninitial fragments that do not match any explicit permit or deny commands in the ACL.
Step 4 [sequence-number] {permit | deny} protocol source destination
Example:switch(config-acl)# permit ip 192.168.2.0/24 anyCreates a rule in the IP ACL. You can create many rules. The sequence-number argument can be a whole number between 1 and 4294967295.
The permit and deny commands support many ways of identifying traffic.
Step 5 statistics per-entry
Example:switch(config-acl)# statistics per-entry(Optional) Specifies that the device maintains global statistics for packets that match the rules in the ACL.
Step 6 Enter one of the following commands:
Example:switch(config-acl)# show ip access-lists acl-01(Optional) Displays the IP ACL configuration.
Step 7 copy running-config startup-config
Example:switch(config-acl)# copy running-config startup-config(Optional) Copies the running configuration to the startup configuration.
Changing an IP ACL
You can add and remove rules in an existing IPv4 ACL. You cannot change existing rules. Instead, to change a rule, you can remove it and recreate it with the desired changes.
If you need to add more rules between existing rules than the current sequence numbering allows, you can use the resequence command to reassign sequence numbers.
Before You BeginSUMMARY STEPSWe recommend that you perform ACL configuration using the Session Manager. This feature allows you to verify ACL configuration and confirm that the resources required by the configuration are available prior to committing them to the running configuration. This is especially useful for ACLs that include more than about 1000 rules.
1. configure terminal
2. Enter one of the following commands:
3. (Optional) [sequence-number] {permit | deny} protocol source destination
4. (Optional) [no] fragments {permit-all | deny-all}
5. (Optional) no {sequence-number | {permit | deny} protocol source destination}
6. (Optional) [no] statistics per-entry
7. (Optional) Enter one of the following commands:
8. (Optional) copy running-config startup-config
DETAILED STEPS
Command or Action Purpose Step 1 configure terminal
Example:switch# configure terminal switch(config)#Enters global configuration mode.
Step 2 Enter one of the following commands:
Example:switch(config)# ip access-list acl-01 switch(config-acl)#Enters IP ACL configuration mode for the ACL that you specify by name.
Step 3 [sequence-number] {permit | deny} protocol source destination
Example:switch(config-acl)# 100 permit ip 192.168.2.0/24 any(Optional) Creates a rule in the IP ACL. Using a sequence number allows you to specify a position for the rule in the ACL. Without a sequence number, the rule is added to the end of the rules. The sequence-number argument can be a whole number between 1 and 4294967295.
The permit and deny commands support many ways of identifying traffic.
Step 4 [no] fragments {permit-all | deny-all}
Example:switch(config-acl)# fragments permit-all(Optional) Optimizes fragment handling for noninitial fragments. When a device applies to traffic an ACL that contains the fragments command, the fragments command only matches noninitial fragments that do not match any explicit permit or deny commands in the ACL.
The no option removes fragment-handling optimization.
Step 5 no {sequence-number | {permit | deny} protocol source destination}
Example:switch(config-acl)# no 80(Optional) Removes the rule that you specified from the IP ACL.
The permit and deny commands support many ways of identifying traffic.
Step 6 [no] statistics per-entry
Example:switch(config-acl)# statistics per-entry(Optional) Specifies that the device maintains global statistics for packets that match the rules in the ACL.
The no option stops the device from maintaining global statistics for the ACL.
Step 7 Enter one of the following commands:
Example:switch(config-acl)# show ip access-lists acl-01(Optional) Displays the IP ACL configuration.
Step 8 copy running-config startup-config
Example:switch(config-acl)# copy running-config startup-config(Optional) Copies the running configuration to the startup configuration.
Related Tasks
Creating a VTY ACL
You can configure a VTY ACL to control access to all IPv4 or IPv6 traffic over all VTY lines in the ingress or egress direction.
Before You BeginSUMMARY STEPSSet identical restrictions on all the virtual terminal lines because a user can connect to any of them.
Ensure that you are in the correct VDC (or use the switchto vdc command).
We recommend that you perform ACL configuration using the Session Manager. This feature allows you to verify ACL configuration and confirm that the resources required by the configuration are available prior to committing them to the running configuration, which is especially useful for ACLs that include more than about 1000 rules. For more information about Session Manager, see the .
1. configure terminal
2. {ip | ipv6} access-list name
3. {permit | deny} protocol source destination [log] [time-range time]
4. exit
5. line vty
6. {ip | ipv6} access-class name {in | out}
7. (Optional) show {ip | ipv6} access-lists
8. (Optional) copy running-config startup-config
DETAILED STEPS
Command or Action Purpose Step 1 configure terminal
Example:switch# configure terminal switch(config)#Enters global configuration mode.
Step 2 {ip | ipv6} access-list name
Example:switch(config)# ip access-list vtyaclCreates an ACL and enters IP access list configuration mode for that ACL. The maximum length for the name argument is 64 characters.
Step 3 {permit | deny} protocol source destination [log] [time-range time]
Example:switch(config-ip-acl)# permit tcp any anyCreates an ACL rule that permits TCP traffic from and to the specified sources.
Step 4 exit
Example:switch(config-ip-acl)# exit switch(config)#Exits IP access list configuration mode.
Step 5 line vty
Example:switch(config)# line vty switch(config-line)#Specifies the virtual terminal and enters line configuration mode.
Step 6 {ip | ipv6} access-class name {in | out}
Example:switch(config-line)# ip access-class vtyacl outRestricts incoming or outgoing connections to and from all VTY lines using the specified ACL. The maximum length for the name argument is 64 characters.
Step 7 show {ip | ipv6} access-lists
Example:switch# show ip access-lists(Optional) Displays the configured ACLs, including any VTY ACLs.
Step 8 copy running-config startup-config
Example:switch# copy running-config startup-config(Optional) Copies the running configuration to the startup configuration.
Changing Sequence Numbers in an IP ACL
Before You BeginSUMMARY STEPSWe recommend that you perform ACL configuration using the Session Manager. This feature allows you to verify ACL configuration and confirm that the resources required by the configuration are available prior to committing them to the running configuration. This is especially useful for ACLs that include more than about 1000 rules.
1. configure terminal
2. (Optional) show ip access-lists name
3. (Optional) copy running-config startup-config
DETAILED STEPS
Command or Action Purpose Step 1 configure terminal
Example:switch# configure terminal switch(config)#Enters global configuration mode.
Step 2 show ip access-lists name
Example:switch(config)# show ip access-lists acl-01(Optional) Displays the IP ACL configuration.
Step 3 copy running-config startup-config
Example:switch(config)# copy running-config startup-config(Optional) Copies the running configuration to the startup configuration.
Removing an IP ACL
Before You BeginSUMMARY STEPSEnsure that you know whether the ACL is applied to an interface. The device allows you to remove ACLs that are currently applied. Removing an ACL does not affect the configuration of interfaces where you have applied the ACL. Instead, the device considers the removed ACL to be empty. Use the show ip access-lists command command with the summary keyword to find the interfaces that an IP ACL is configured on.
1. configure terminal
2. Enter one of the following commands:
3. (Optional) Enter one of the following commands:
4. (Optional) copy running-config startup-config
DETAILED STEPS
Command or Action Purpose Step 1 configure terminal
Example:switch# configure terminal switch(config)#Enters global configuration mode.
Step 2 Enter one of the following commands:
Example:switch(config)# no ip access-list acl-01Removes the IP ACL that you specified by name from the running configuration.
Step 3 Enter one of the following commands:
Example:switch(config)# show ip access-lists acl-01 summary(Optional) Displays the IP ACL configuration. If the ACL remains applied to an interface, the command lists the interfaces.
Step 4 copy running-config startup-config
Example:switch(config)# copy running-config startup-config(Optional) Copies the running configuration to the startup configuration.
Applying an IP ACL as a Router ACL
You can apply an IPv4 ACL to any of the following types of interfaces:
- Physical Layer 3 interfaces and subinterfaces
- Layer 3 Ethernet port-channel interfaces and subinterfaces
- VLAN interfaces
- Tunnels
- Management interfaces
ACLs applied to these interface types are considered router ACLs.
Note
Logical operation units (LOUs) are not available for router ACLs applied in the "out" direction. If an IPv4 ACL is applied as a router ACL in the "out" direction, ACEs containing logical operators for TCP/UDP port numbers are expanded internally to multiple ACEs and may require more TCAM entries when compared to the same ACL applied in the "in" direction.
Before You BeginSUMMARY STEPSEnsure that the ACL you want to apply exists and that it is configured to filter traffic in the manner that you need for this application.
1. configure terminal
2. Enter one of the following commands:
3. Enter one of the following commands:
4. (Optional) show running-config aclmgr
5. (Optional) copy running-config startup-config
DETAILED STEPS
Command or Action Purpose Step 1 configure terminal
Example:switch# configure terminal switch(config)#Enters global configuration mode.
Step 2 Enter one of the following commands:
- interface ethernet slot/port[. number]
- interface port-channel channel-number[. number]
- interface tunnel tunnel-number
- interface vlan vlan-ID
- interface mgmt port
Example:switch(config)# interface tunnel 13 switch(config-if)#Enters configuration mode for the interface type that you specified.
Step 3 Enter one of the following commands:
Example:switch(config-if)# ip access-group acl-120 outApplies an IPv4 ACL to the Layer 3 interface for traffic flowing in the direction specified. You can apply one router ACL per direction.
Step 4 show running-config aclmgr
Example:switch(config-if)# show running-config aclmgr(Optional) Displays the ACL configuration.
Step 5 copy running-config startup-config
Example:switch(config-if)# copy running-config startup-config(Optional) Copies the running configuration to the startup configuration.
Related Tasks
Applying an IP ACL as a Port ACL
You can apply an IPv4 ACL to a Layer 2 interface, which can be a physical port or a port channel. ACLs applied to these interface types are considered port ACLs.
Before You BeginSUMMARY STEPSEnsure that the ACL you want to apply exists and that it is configured to filter traffic in the manner that you need for this application.
Note
If the interface is configured with the mac packet-classify command, you cannot apply an IP port ACL to the interface until you remove the mac packet-classify command from the interface configuration.
1. configure terminal
2. Enter one of the following commands:
3. Enter one of the following commands:
4. (Optional) show running-config aclmgr
5. (Optional) copy running-config startup-config
DETAILED STEPS
Command or Action Purpose Step 1 configure terminal
Example:switch# configure terminal switch(config)#Enters global configuration mode.
Step 2 Enter one of the following commands:
Example:switch(config)# interface ethernet 2/3 switch(config-if)#Enters configuration mode for the interface type that you specified.
Step 3 Enter one of the following commands:
Example:switch(config-if)# ip port access-group acl-l2-marketing-group inApplies an IPv4 ACL to the interface or port channel. Only inbound filtering is supported with port ACLs. You can apply one port ACL to an interface.
Step 4 show running-config aclmgr
Example:switch(config-if)# show running-config aclmgr(Optional) Displays the ACL configuration.
Step 5 copy running-config startup-config
Example:switch(config-if)# copy running-config startup-config(Optional) Copies the running configuration to the startup configuration.
Enabling or Disabling ACL Capture
SUMMARY STEPS
1. configure terminal
2. [no] hardware access-list capture
3. (Optional) show hardware access-list status module slot
4. (Optional) copy running-config startup-config
DETAILED STEPS
Command or Action Purpose Step 1 configure terminal
Example:switch# configure terminal switch(config)#Enters global configuration mode.
Step 2 [no] hardware access-list capture
Example:switch(config)# hardware access-list captureEnables or disables ACL capture on all VDCs.
Note When you enable ACL capture, a warning message appears to inform you that ACL logging is being disabled for all VDCs. When you disable ACL capture, ACL logging is enabled.
Step 3 show hardware access-list status module slot
Example:switch(config)# show hardware access-list status module 2(Optional) Displays the ACL capture configuration.
Step 4 copy running-config startup-config
Example:switch(config)# copy running-config startup-config(Optional) Copies the running configuration to the startup configuration.
Related Concepts
Configuring an ACL Capture Session
SUMMARY STEPS
1. configure terminal
2. monitor session session type acl-capture
3. destination interface interface slot/port
4. no shut
5. exit
6. (Optional) show ip access-lists capture session session
7. (Optional) copy running-config startup-config
DETAILED STEPS
Command or Action Purpose Step 1 configure terminal
Example:switch# configure terminal switch(config)#Enters global configuration mode.
Step 2 monitor session session type acl-capture
Example:switch(config)# monitor session 2 type acl-capture switch(config-acl-capture)#Configures an ACL capture session. The range for the session argument is from 1 to 48.
Step 3 destination interface interface slot/port
Example:switch(config-acl-capture)# destination interface ethernet 2/2 switch#Configures a destination for ACL capture packets.
Note Only the physical interface can be used for the destination. Port-channel interfaces and supervisor in-band ports are not supported.
Note You can enter this command multiple times to add multiple destinations.
Step 4 no shut
Example:switch(config-acl-capture)# no shutBrings the ACL capture session administratively up.
Note The session becomes operationally up only after the monitor confirms that the ACL capture has been enabled in the default VDC.
Step 5 exit
Example:switch(config-acl-capture)# exit switch(config)#Updates the monitor configuration and exits the ACL capture configuration mode.
Step 6 show ip access-lists capture session session
Example:switch(config)# show ip access-lists capture session 2(Optional) Displays the ACL capture session configuration.
Step 7 copy running-config startup-config
Example:switch# copy running-config startup-config(Optional) Copies the running configuration to the startup configuration.
Applying an ACL with Capture Session ACEs to an Interface
SUMMARY STEPSYou can enable a capture session for an ACL's access control entries (ACEs) and then apply the ACL to an interface.
1. configure terminal
2. ip access-list name
3. permit protocol source destination capture session session
4. exit
5. interface interface slot/port
6. ip access-group name in
7. no shut
8. (Optional) show running-config aclmgr
9. (Optional) copy running-config startup-config
DETAILED STEPS
Command or Action Purpose Step 1 configure terminal
Example:switch# configure terminal switch(config)#Enters global configuration mode.
Step 2 ip access-list name
Example:switch(config)# ip access-list acl1 switch(config-acl)#Creates an access list.
Step 3 permit protocol source destination capture session session
Example:switch(config-acl)# permit tcp any any capture session 2Enables a capture session for the ACL's ACEs. The range for the session argument is from 1 to 16.
Step 4 exit
Example:switch(config-acl)# exit switch(config)#Exits the access list configuration mode.
Step 5 interface interface slot/port
Example:switch(config)# interface ethernet 7/1 switch(config-if)#Specifies a port and enters interface configuration mode.
Step 6 ip access-group name in
Example:switch(config-if)# ip access-group acl1 inApplies an ACL with capture session ACEs to the interface.
Step 7 no shut
Example:switch(config-if)# no shutBrings the interface administratively up.
Step 8 show running-config aclmgr
Example:switch(config-if)# show running-config aclmgr(Optional) Displays the ACL configuration and the interfaces to which ACLs are applied.
Step 9 copy running-config startup-config
Example:switch(config-if)# copy running-config startup-config(Optional) Copies the running configuration to the startup configuration.
Applying a Whole ACL Capture Session to an Interface
SUMMARY STEPS
1. configure terminal
2. ip access-list name
3. capture session session
4. exit
5. interface interface slot/port
6. ip access-group name in
7. no shut
8. (Optional) show running-config aclmgr
9. (Optional) copy running-config startup-config
DETAILED STEPS
Command or Action Purpose Step 1 configure terminal
Example:switch# configure terminal switch(config)#Enters global configuration mode.
Step 2 ip access-list name
Example:switch(config)# ip access-list acl1 switch(config-acl)#Creates an access list.
Step 3 capture session session
Example:switch(config-acl)# capture session 2Enables a capture session for the whole ACL. The range for the session argument is from 1 to 16.
Step 4 exit
Example:switch(config-acl)# exit switch(config)#Exits the access list configuration mode.
Step 5 interface interface slot/port
Example:switch(config)# interface ethernet 7/1 switch(config-if)#Specifies a port and enters interface configuration mode.
Step 6 ip access-group name in
Example:switch(config-if)# ip access-group acl1 inApplies an ACL with the capture session configuration to the interface.
Step 7 no shut
Example:switch(config-if)# no shutBrings the interface administratively up.
Step 8 show running-config aclmgr
Example:switch(config-if)# show running-config aclmgr(Optional) Displays the ACL configuration and the interfaces to which ACLs are applied.
Step 9 copy running-config startup-config
Example:switch(config-if)# copy running-config startup-config(Optional) Copies the running configuration to the startup configuration.
Verifying IP ACL Configurations
To display IP ACL configuration information, perform one of the following tasks.
Command
Purpose
show running-config aclmgr [all]
Displays the ACL running configuration, including the IP ACL configuration and the interfaces to which IP ACLs are applied.
Note Beginning with Cisco NX-OS Release 5.2, this command displays the user-configured ACLs in the running configuration. The all option displays both the default (CoPP-configured) and user-configured ACLs in the running configuration.
show startup-config aclmgr [all]
Displays the ACL startup configuration.
Note Beginning with Cisco NX-OS Release 5.2, this command displays the user-configured ACLs in the startup configuration. The all option displays both the default (CoPP-configured) and user-configured ACLs in the startup configuration.
Monitoring and Clearing IP ACL Statistics
To monitor or clear IP ACL statistics, use one of the commands in this table.
Command
Purpose
show ip access-lists
Displays IPv4 ACL configuration. If the IPv4 ACL includes the statistics per-entry command, then the show ip access-lists command output includes the number of packets that have matched each rule.
clear ip access-list counters
Clears statistics for all IPv4 ACLs or for a specific IPv4 ACL.
Configuration Examples for IP ACLs
The following example shows how to create an IPv4 ACL named acl-01 and apply it as a port ACL to Ethernet interface 2/1, which is a Layer 2 interface:
ip access-list acl-01
  permit ip 192.168.2.0/24 any
interface ethernet 2/1
  ip port access-group acl-01 in
The following example shows how to create an IPv6 ACL named acl-120 and apply it as a router ACL to Ethernet interface 2/3, which is a Layer 3 interface:
ipv6 access-list acl-120
  permit tcp 2001:0db8:85a3::/48 2001:0db8:be03:2112::/64
  permit udp 2001:0db8:85a3::/48 2001:0db8:be03:2112::/64
  permit tcp 2001:0db8:69f2::/48 2001:0db8:be03:2112::/64
  permit udp 2001:0db8:69f2::/48 2001:0db8:be03:2112::/64
interface ethernet 2/3
  ipv6 traffic-filter acl-120 in
The following example shows how to create a VTY ACL named single-source and apply it on input IP traffic over the VTY line. This ACL allows all TCP traffic through and drops all other IP traffic:
ip access-list single-source
		permit tcp 192.168.7.5/24 any
		exit
		line vty
		ip access-class single-source in
		show ip access-lists

 Feedback
Contact Cisco
- Open a Support Case

- (Requires a Cisco Service Contract)
This Document Applies to These Products
- Collaboration Endpoints - Retired Products
- Conferencing - Retired Products
- Contact Center - Retired Products
- Optical Networking - Retired Products
- Routers - Retired Products
- Security - Retired Products
- Servers - Unified Computing (UCS) Retired Products
- Storage Networking Retired Products
- Switches - Retired Products
- Video - Retired Products
- Wireless - Retired Products