Install Windows agents for deep visibility and enforcement

Windows agent installation prerequisites

  • For platform requirements, refer to Supported Platforms and Requirements.

  • To install and execute the agent services, you must have root or administrator privileges.

  • On Windows 2008 R2 or agent versions earlier than 3.8, install the Npcap driver. If not already installed, the agent will install the recommended version in the background after the service starts. See Npcap version information for details. For more information, refer to the Npcap version information.

  • Ensure there is at least 1 GB of storage space for agent and log files.

  • Enable necessary Windows services for agent installation. Some services may be disabled if the host has been security hardened or deviates from default configurations. See Required Windows Services for full details.

  • Configure security exclusions on security applications to prevent blocking agent installation or activity. See Security Exclusions for more information.

Windows agent installation methods

Available installation methods

Auto-install agent using an installer: This method allows administrators to deploy Linux agents quickly using a pre-built installer package. For more information, refer to Install the Windows agent using the script installer method.

Manual installation using a classic packaged installer: Offers the flexibility of manual setup, suitable for environments requiring custom configurations. For more information, refer to Install the Windows agent using the image installer method

You can also install using a golden image. For more information, refer to Deploying Agents on a VDI Instance or VM Template (Windows).

Install the Windows agent using the script installer method

The script installer method quickly deploys Windows agents for Secure Workload. The installed agent supports both deep visibility and enforcement.

Follow these steps to install a Windows agent using the script installer method:

Before you begin

By default, enforcement is disabled. To enable enforcement, refer to Create an Agent Configuration Profile.

Procedure


Step 1

Navigate to Agent Installation Methods:

  • If you are a first-time user, launch the Quick Start wizard and click Install Agents.

  • From the navigation pane, choose Manage > Agents, and select the Installer tab.

Step 2

Click Agent Script Installer.

Step 3

From the Select Platform drop-down menu, choose Windows.

To view the supported Windows platforms, click Show Supported Platforms.

Step 4

Choose the tenant to install the agents.

Note


Selecting a tenant is not required for Secure Workload SaaS clusters.

Step 5

If you want to assign labels to the workload, choose the label keys and enter label values.

When the installed agent reports IP addresses on the host, the installer CMDB labels selected here, along with other uploaded CMDB labels that have been assigned to IPs reported by this host, would be assigned to the new IP address. If there are conflicts between uploaded CMDB labels and installer CMDB labels:

  • Labels assigned to an exact IP address take precedence over labels assigned to the subnet.

  • Existing labels assigned to an exact IP address take precedence over installer CMDB labels.

Step 6

If HTTP proxy is required to communicate with Secure Workload, choose Yes, and then enter a valid proxy URL.

Step 7

Under the Installer expiration section, select one from the available options:

  • No expiration: The installer script can be used multiple times.

  • One time: The installer script can be used only once.

  • Time bound: You can set the number of days for which the installer script can be used.

  • Number of deployments: You can set the number of times the installer script can be used.

Step 8

Click Download and save the file to the local disk.

Step 9

Copy the installer PowerShell script to all the Windows hosts for deployment and run the script with administrative privileges.

Note

 
  • Depending on the system settings, the command Unblock-File may need to be run before other commands.

  • The script does not run if the agent is already installed on the tenant.


We recommend running the pre-check, as specified in the script usage details.
Windows installer script usage details:
# powershell -ExecutionPolicy Bypass -File tetration_windows_installer.ps1 [-preCheck] [-skipPreCheck <Option>] [-noInstall] [-logFile <FileName>] [-proxy <ProxyString>] [-noProxy] [-help] [-version] [-sensorVersion <VersionInfo>] [-ls] [-file <FileName>] [-save <FileName>] [-new] [-reinstall] [
-npcap] [-forceUpgrade] [-upgradeLocal] [-upgradeByUUID <FileName>] [-visibility] [-goldenImage] [-installFolder <Installation Path>]
  -preCheck: run pre-check only
  -skipPreCheck <Option>: skip pre-installation check by given option; Valid options include 'all', 'ipv6' and 'enforcement'; e.g.: '-skipPreCheck all' will skip all pre-installation checks; All pre-checks will be performed by default
  -noInstall: will not download and install sensor package onto the system
  -logFile <FileName>: write the log to the file specified by <FileName>
  -proxy <ProxyString>: set the value of HTTPS_PROXY, the string should be formatted as http://<proxy>:<port>
  -noProxy: bypass system wide proxy; this flag will be ignored if -proxy flag was provided
  -help: print this usage
  -version: print current script's version
  -sensorVersion <VersionInfo>: select sensor's version; e.g.: '-sensorVersion 3.4.1.0.win64'; will download the latest version by default if this flag was not provided
  -ls: list all available sensor versions for your system (will not list pre-3.1 packages); will not download any package
  -file <FileName>: provide local zip file to install sensor instead of downloading it from cluster
  -save <FileName>: downloaded and save zip file as <FileName>
  -new: remove any previous installed sensor;
  -reinstall: reinstall sensor and retain the same identity with cluster; this flag has higher priority than -new
  -npcap: overwrite existing npcap
  -forceUpgrade: force sensor upgrade to version given by -sensorVersion flag; e.g.: '-sensorVersion 3.4.1.0.win64 -forceUpgrade'; apply the latest version by default if -sensorVersion flag was not provided
  -upgradeLocal: trigger local sensor upgrade to version given by -sensorVersion flag; e.g.: '-sensorVersion 3.4.1.0.win64 -upgradeLocal'; apply the latest version by default if -sensorVersion flag was not provided
  -upgradeByUUID <FileName>: trigger sensor whose uuid is listed in <FileName> upgrade to version given by -sensorVersion flag; e.g.: '-sensorVersion 3.4.1.0.win64 -upgradeByUUID "C:\\Program Files\\Cisco Tetration\\sensor_id"'; apply the latest version by default if -sensorVersion flag was not provided
  -visibility: install deep visibility agent only; -reinstall would overwrite this flag if previous installed agent type was enforcer
  -goldenImage: install Cisco Secure Workload Agent but do not start the Cisco Secure Workload Services; use to install Cisco Secure Workload Agent on Golden Images in VDI environment or Template VM. On VDI/VM instance created from golden image with different host name, Cisco Secure Workload Services will work normally
  -installFolder: install Cisco Secure Workload Agent in a custom folder specified by -installFolder e.g.: '-installFolder "c:\\custom sensor path"'; default path is "C:\Program Files\Cisco Tetration"

Install the Windows agent using the image installer method

While the automated installer script is recommended for most installations, you can use the Agent Image Installer method to manually install the Windows agent, especially if you have specific requirements.


Note


Do not manually deploy an older MSI agent version when an existing agent is already running on the host.


Site-related files that are in the package:

  • ca.cert: Mandatory—CA certificate for sensor communications.

  • enforcer.cfg: Mandatory only when installing enforcement sensor—Contains configuration of enforcement endpoints.

  • sensor_config: Mandatory—Configuration for deep visibility sensor.

  • sensor_type: Type of the sensor (enforcement or deep visibility).

  • site.cfg: Mandatory—Global site endpoint configuration.

  • user.cfg: Mandatory for SaaS—Sensor activation key and proxy configuration.

Follow these steps to install a Windows agent using the Agent Image Installer method:

Before you begin

Configure the ACTIVATION_KEY and HTTPS_PROXY in the user.cfg file for SaaS clusters and when you are installing the agent on a non-default tenant of on-premises clusters with multiple tenants. For more information, see (Manual Installations Only) Update the User Configuration File.

Procedure


Step 1

Navigate to Agent Installation Methods:

  • If you are a first-time user, launch the Quick Start wizard and click Install Agents.

  • From the navigation pane, choose Manage > Agents, and select the Installer tab.

Step 2

Click Agent Image Installer.

Step 3

In the Platform field, enter Windows.

Step 4

Enter the required agent type and the version of the agent, and then from the results, download the required version of the agent.

Step 5

Copy the tet-win-sensor<version>.win64-<clustername>.zip file to all the Windows hosts for deployment.

Step 6

Ensure that you have administrative privileges and extract the ZIP file.

Step 7

In the extracted folder, run the following command to install the agent: msiexec.exe /i TetrationAgentInstaller.msi

Additionally, these options are available for MSI installer.

Table 1. Available Options for MSI Installer

Options

Description

agenttype=<AgentType>

AgentType should be either sensor or enforcer, depending on whether enforcement is required. By default, the installer checks the content of the sensor_type file in the same folder and uses the content to overwrite the passed parameter. However, if agent is installed in /quiet mode, the option is required.

overwritenpcap=yes

For Windows 2008 R2, by default, the agent does not attempt to upgrade Npcap if Npcap already exists. Pass this parameter to upgrade the existing Npcap. If this option is used, subsequent agent auto-upgrades also upgrade Npcap to newer supported versions.

nostart=yes

Pass this parameter, when installing the agent using a golden image in a VDI environment or VM template, to prevent agent service— CswAgent from starting automatically. On VDI/VM instances created using the golden image and with a different host name, these services, as expected, start automatically.

installfolder=<FullPathCustomFolder>

Use this parameter, at the end of the install command, to install the agent in a custom folder.

serviceuser=<Service UserName>

Use this parameter, at the end of the install command, to configure the service user. The default service user is “LocalSystem”.

For local user, serviceuser=.\<Service UserName>

For domain user, serviceuser=<domain_name>\<samaccount name>

Service user must have local administrative privileges.

The Service account must have local administrative or domain admin group privileges.

servicepassword=<Service UserPassword>

Use this parameter, at the end of the install command, to configure the password for the service user. The password must be in plain-text format.

proxy=”<proxy_address>”

Use this parameter to set the HTTPS proxy for accessing the Secure Workload cluster.

activationkey=<activation Key>

Use this parameter to specify the tenant if agent is not being installed under the default tenant.


Note


  • If you use activation key and proxy options during manual installation, configuration of user.cfg is not required.

  • When you upgrade to version 3.8 on Windows versions other than 2008 R2, the Windows agent automatically uninstalls Npcap.

  • If the agent is already installed on the host, do not reinstall the agent. To upgrade the agent, refer to Upgrading Software Agents section.


Verify the installation of Windows agent

After installing the Windows agent, verify that all required folders, services, and processes are present and operational.

Procedure


Step 1

Verify that the folder C:\\Program Files\\Cisco Tetration (or your custom installation folder) exists.

Step 2

Ensure that the service TetSensor CswAgent, for deep visibility and enforcement, exists and is in the running state. Run command cmd.exe with administrative privileges.

Run the commands:

sc.exe query CswAgent

Check if the status is Running.

Run the command sc qc cswagent.

Check if the DISPLAY-NAME is Cisco Secure Workload Deep Visibility

Alternatively

Run the command services.msc.

Find the name Cisco Secure Workload Deep Visibility.

Check if the status is Running.


Verify the Windows agent in the configured service user context

These steps helps you validate that Cisco Secure Workload agent services (TetSensor for deep visibility, TetEnforcer for enforcement) are correctly set up to run in the configured service user context.

Before you begin:

  • Ensure that the service TetSensor (for deep visibility) and TetEnforcer (for enforcement) running in the config- ured service user context. TetSensor and TetEnforcer run in the same service user context.

  • Ensure that the service CswAgent running in the configured service user context. CswAgent runs in the same service user context.

Method 1: Use Command Prompt

  1. Open command prompt (cmd.exe) as an administrator.

  2. Run the command sc qc cswagent.

  3. In the output, check the value for SERVICE_START_NAME.

  4. Run the command sc qc cswagent.

  5. Confirm that it matches the configured service user.

Method 2: Use Windows Services

  1. Open Run and enter services.msc.

  2. Locate the Cisco Secure Workload Deep Visibility and Cisco Secure Workload Enforcement services.

  3. For each service, check the Log On As value.

  4. Confirm that Log On As matches the configured service user.

Method 3: Use Tasklist

  1. Open command prompt as an administrator.

  2. Run the command tasklist /v | find /i “cswengine”.

  3. Check the user context shown for the running process.

  4. Confirm that it matches the configured service user.

Modify the Windows agent service account

After installing the Windows Agent, use any of these methods to modify the existing CswAgent service to run under the configured service user account.

Method 1: Use Windows Services

  1. Open Run and enter: services.msc.

  2. Locate the CswAgent service.

  3. Open the service properties.

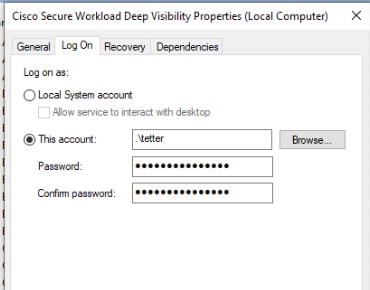
  4. Go to the Log On tab.

  5. Select This account, enter the configured service user credentials and apply the changes.

    Figure 1. Modify service account based on services.msc account
    Modify Service Account based on services.msc Account

Method 2: Use a Third-Party Tool

Use any approved third-party service management tool to configure the CswAgent service account.

Method 3: Use Command Prompt

  1. Open Command Prompt as an administrator.

  2. Modify the service account by running: sc config tetsensor obj= <service user name> password= <password>.

  3. Verify the service configuration by running: sc qc cswagent.

  4. Confirm that SERVICE_START_NAME matches the configured service user.

  5. Restart the CswAgent service:sc stop cswagent and sc start cswagent.

The CswAgent service runs under the configured service user account after restart.

Windows agents for VDI instances and VM templates

By default, agent services start automatically after agents are installed. If you are installing the agent on a golden image, you must use installer flags to prevent services from starting. When instances are cloned from the golden image, agent services, as expected, start automatically.

Install the agent on a golden image in a VDI environment or VM template

Procedure


Step 1

Install the agent on a golden image in a VDI environment or VM template using an MSI installer or PowerShell installer script:

Use MSI installer with nostart=yes

OR

Use PowerShell installer with the -goldenImage flag.

Step 2

Ensure that the folder C:\\Program Files\\Cisco Tetration (or the custom folder) exists.

Step 3

Ensure that the service CswAgent exists and is stopped:

Run the command cmd.exe with Admin privileges.

Run the command sc.exe query CswAgent

Check if the STATE is Stopped.

Step 4

The VM template is now configured.

Step 5

Shut down the VM template.


Create a new VDI instance VM

Procedure


Step 1

Create a new VDI instance VM by cloning the VM template.

Step 2

Reboot the VDI instance VM.

Step 3

After rebooting the VDI instance VM, ensure that the service CswAgent is running in the configured service context. See Verify the Agent is Installed.

Step 4

On the VDI instance VM, ensure that the NPCAP driver is installed and running:

Run the command cmd.exe with Admin privileges

Run the command sc query npcap

Check if STATE is Running

Step 5

On the VDI instance VM, ensure that the agent is registered using a valid sensor_id:

  • Check the sensor_id file in the installation folder.

  • If the sensor_id starts with “uuid”, it is not a valid sensor_id.

  • If the agent fails to register but the Secure Workload web interface shows that the agent is registered:

  • Delete the agent using OpenAPI. For more information, see Deploy Software Agents.

Note

 
  • Do not change the host name of the golden image or VM template.

  • If the golden image or VM template is rebooted after installing the agent, Secure Workload services start running after the reboot.

  • If the VDI instance VM fails to report network flows, see the VDI Instance VM in Network Flows section.

.

Windows agent installer and Npcap—For Windows 2008 R2

For supported Npcap versions, see the Support Matrix at https://www.cisco.com/go/secure-workload/requirements/agents.

Npcap Installation Behavior

If Npcap is not installed, the Windows Agent installs the supported Npcap version ten seconds after the service starts.

If Npcap is already installed but the version is older than the supported version, the Windows Agent does not upgrade it automatically during installation. To install the supported Npcap version, use one of the following options:

  • Manually upgrade Npcap.

  • Uninstall Npcap, and then run the agent installer.

  • Run the agent installer with the option overwritenpcap=yes.

  • Run the installer script with -npcap.

If the Npcap driver is in use by any application, the Windows Agent upgrades Npcap at a later time.

Npcap Upgrade Behavior

If Npcap was installed by the Windows Agent and the installed version is older than the supported version, the Windows Agent upgrades Npcap to the supported version ten seconds after the service starts.

If the Npcap driver is in use by any application, the Windows Agent upgrades Npcap at a later time.

If Npcap was not installed by the Windows Agent, the Windows Agent does not upgrade Npcap.

Npcap Uninstall Behavior

If Npcap was installed by the Windows Agent, the Windows Agent uninstalls Npcap when the agent is uninstalled.

If Npcap was installed by the user but upgraded by the agent installer with overwritenpcap=yes, the Windows Agent does not uninstall Npcap.

If the Npcap driver is in use by any application, the Windows Agent does not uninstall Npcap.

Windows agent flow capture

Starting with the latest version, the Windows agent uses the Microsoft built-in ndiscap.sys driver and the Event Tracing for Windows (ETW) framework to capture network flows.

During upgrade to the latest version, the agent switches from npcap.sys to ndiscap.sys.

The agent installer uninstalls Npcap when one of these conditions are met:

  • Npcap was installed by the agent.

  • Npcap is not in use.

  • The operating system is not Windows Server 2008 R2.

After the agent services are started, the agent creates ETW sessions, CSW_MonNet, and CSW_MonDns (for DNS data), and initiates the capture of network flows.

DNS Data on Windows Server 2012

On Windows Server 2012, network packets are parsed for DNS data.

Username Capture

On hosts running Windows Server 2012 and later, the Windows agent captures consumer and provider usernames. These usernames are available in flow observations.

This feature is not supported on Windows Server 2008 R2 because of operating system limitations.

To capture usernames, configure the following settings in the agent configuration profile:

  • Enable PID/User Lookup.

  • Set Flow Analysis Fidelity to Detailed.