Cisco Secure Workload User Guide SaaS, Release 4.0
Bias-Free Language
The documentation set for this product strives to use bias-free language. For the purposes of this documentation set, bias-free is defined as language that does not imply discrimination based on age, disability, gender, racial identity, ethnic identity, sexual orientation, socioeconomic status, and intersectionality. Exceptions may be present in the documentation due to language that is hardcoded in the user interfaces of the product software, language used based on RFP documentation, or language that is used by a referenced third-party product. Learn more about how Cisco is using Inclusive Language.
If the external authentication is enabled, authentication can be handed off to an external system. The current options for
authentication are Lightweight Directory Access Protocol (LDAP) and Single Sign-On (SSO). This means that once this is enabled,
all users signing in will use the chosen mechanism to authenticate. It is important to establish that the LDAP connection
is configured correctly, especially if no users are on the ‘Use Local Authentication’ option. The recommended approach is to have at least one locally authenticated user with Site Admin credentials by turning on the ‘Use Local Authentication’ option. This user can make sure that the LDAP configuration is set up correctly. Once the connection is successfully set up, this
user can also be transitioned to external authentication by unchecking the ‘Use Local Authentication’ option in the user edit
flow.
Site Admins can enable more debug messages which are useful to debug external connection issues, user sign-in failures and so on. This
can be enabled by checking the ‘External Auth Debug’ option. Once this is turned on, more descriptive log messages are written
into a separate log file titled ‘external_auth_debug.log’. The recommendation is to turn off ‘External Auth Debug’ once debugging
is done to prevent extra logs being written into the log file.
Note
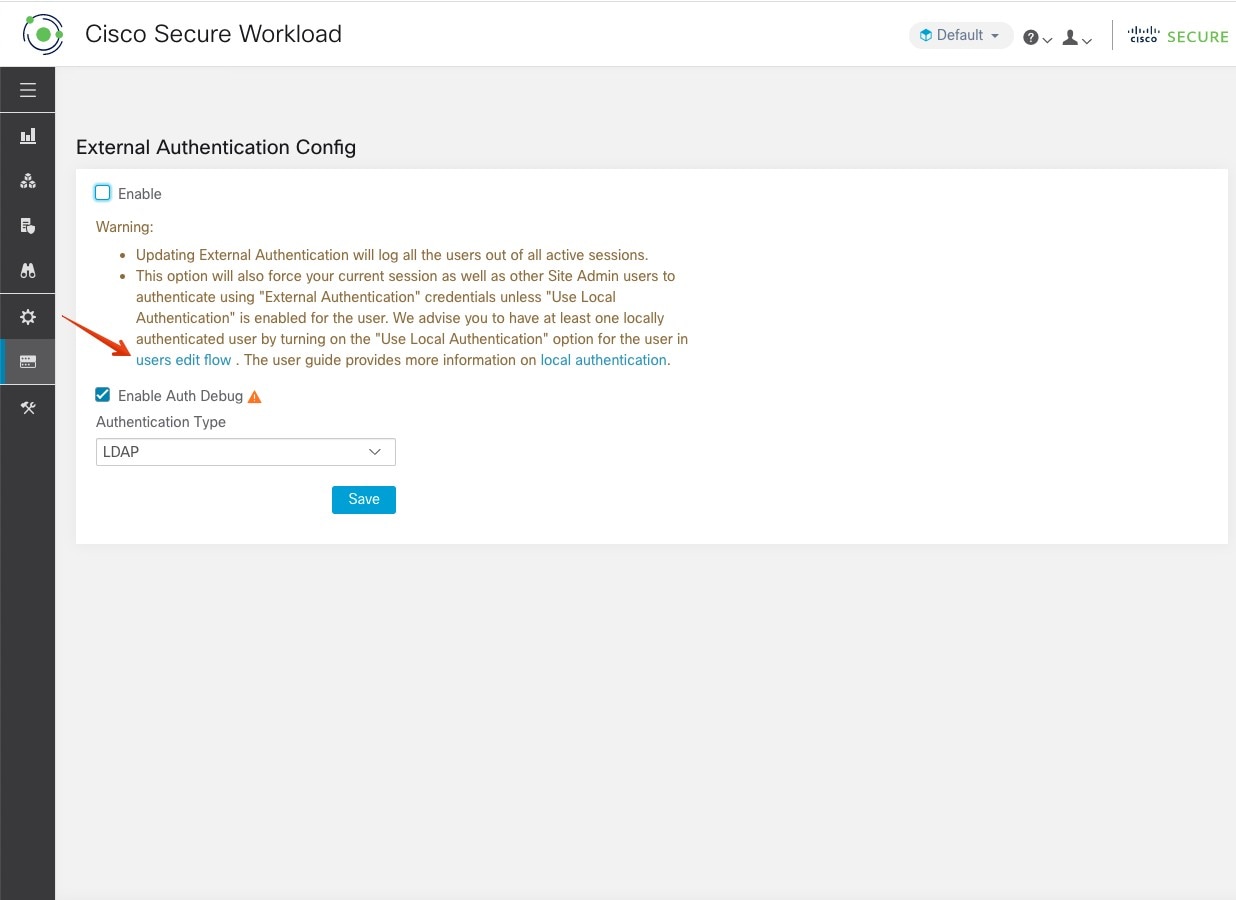
You can bypass external authentication once it is enabled on a per user basis as indicated in ‘Use Local Authentication’ option. This option can also be enabled by going to the user edit flow from link through the warning message when external authentication
is also enabled.
External Authentication with SSO is the recommended authentication approach if Federation is enabled. From the navigation
bar, choose Platform > External Authentication.
Note
Starting from Secure Workload release 3.7.1.5 and later, external authentication session for eviction time is increased from
six hours to nine hours. This setting is applicable for external authentication or on-premises only.
Both Site Admins and Customer Support can configure external authentication. Note that only Site Admins have the ability to generate recovery codes and if external authentication is enabled, recovery code generation is not supported.
Figure 1. Configure External Authentication
Note
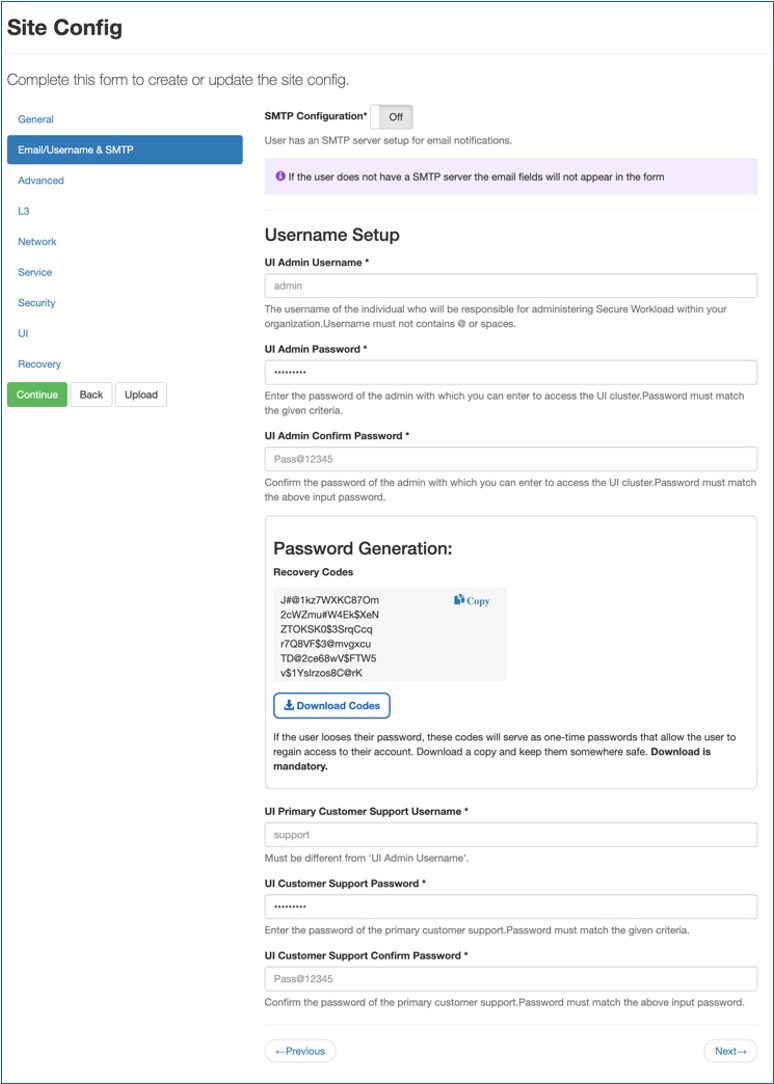
Each admin user is provided with six recovery codes for download. These recovery codes will have to be downloaded after the
admin user logs in.
Recovery codes must be used during login in conjunction with the username. Enter the recovery code in the password field.
When logging in with the username and the recovery code as the password, users will be redirected to the password reset screen
to set a new password. Note that the used recovery code will not be valid for subsequent logins.
We suggest users to regenerate their recovery codes before exhausting all available codes.
Figure 2. Configure External Authentication Continued
Figure 3. Configure External Authentication Continued
Figure 4. External Authentication Warning
Use Local Authentication’ Option
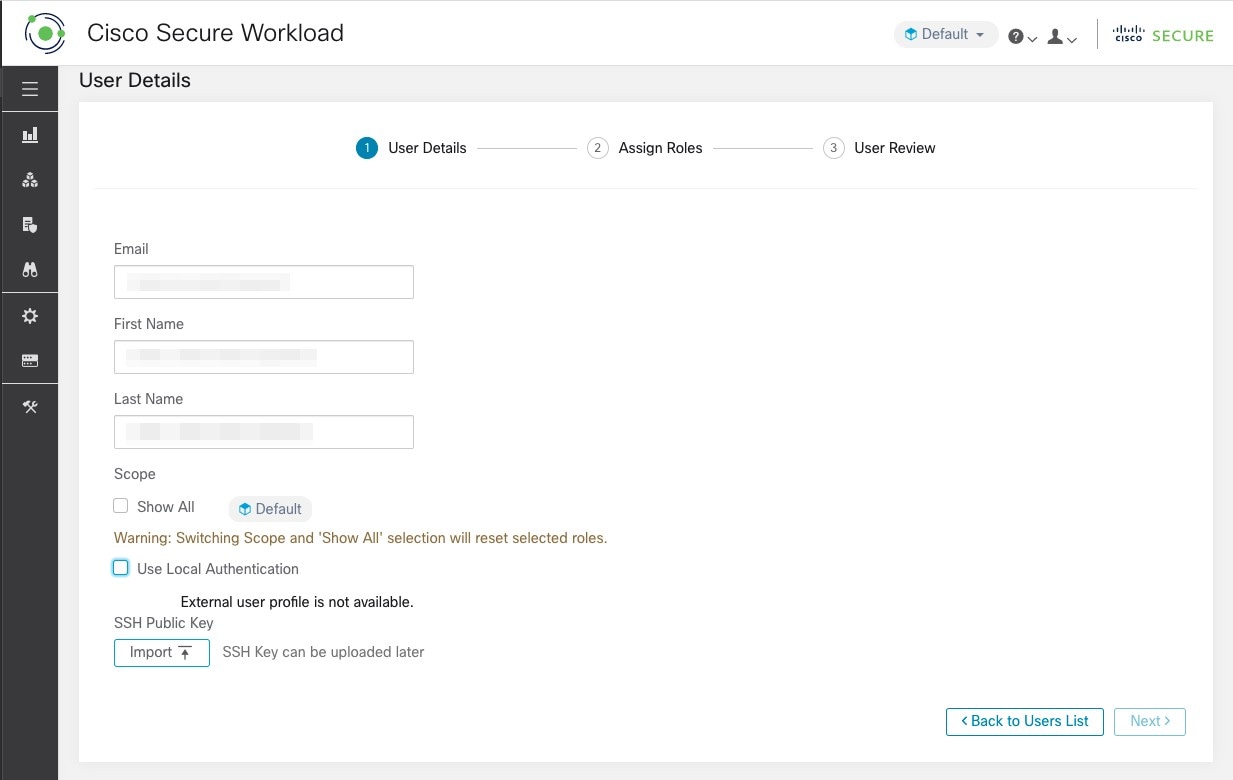
After setting up the configuration, site administrators can permit users to bypass external authentication. This can be achieved
on an individual user basis by enabling the 'Use Local Authentication' flag in the user edit section. Selecting this option
for a user will log them out of all active sessions.
Figure 5. Use Local Authentication
Warning
Ensure that at least one user has local authentication access!
If the ‘Use Local Authentication’ option is removed (i.e unchecked) for a user and this user happens to be the last user with
the option, then no user has local authentication access to sign in to Secure Workload. This means that no user can sign in if there is any disruption with the external authentication system, such as config issues,
connectivity issues, and so on. You see a warning if you try to delete the last locally authenticated user.
Users logging via external authentication has shorter sessions and will be prompted to log in when the session expires. Users
logging via external authentication cannot reset their password on the site (they have to do it on their company website).
However if the ‘Use Local Authentication’ flag is set for the user, password reset is possible.
Outbound HTTP Connection
To ensure the latest Threat Intelligence Datasets are retrieved from Cisco Cloud, we highly recommend that you set up an outbound
HTTP connection.
Warning
Your enterprise outbound HTTP request may require allowing traffic to periscope.tetrationcloud.com and uas.tetrationcloud.com from enterprise firewall outbound rules in addition to setting up the HTTP Proxy as shown below.
The TLS connection to periscope.tetrationcloud.com is used to transport Threat Intelligence Data for identifying known vulnerabilities. Therefore, it is essential for Cisco
Secure Workload to verify the authenticity of the domain name by verifying the domain’s X.509 certificate’s signing CA cert against reputable
root CA certificates included with Secure Workload. Tampering with the X.509 trust chain prevents the feature from working correctly.
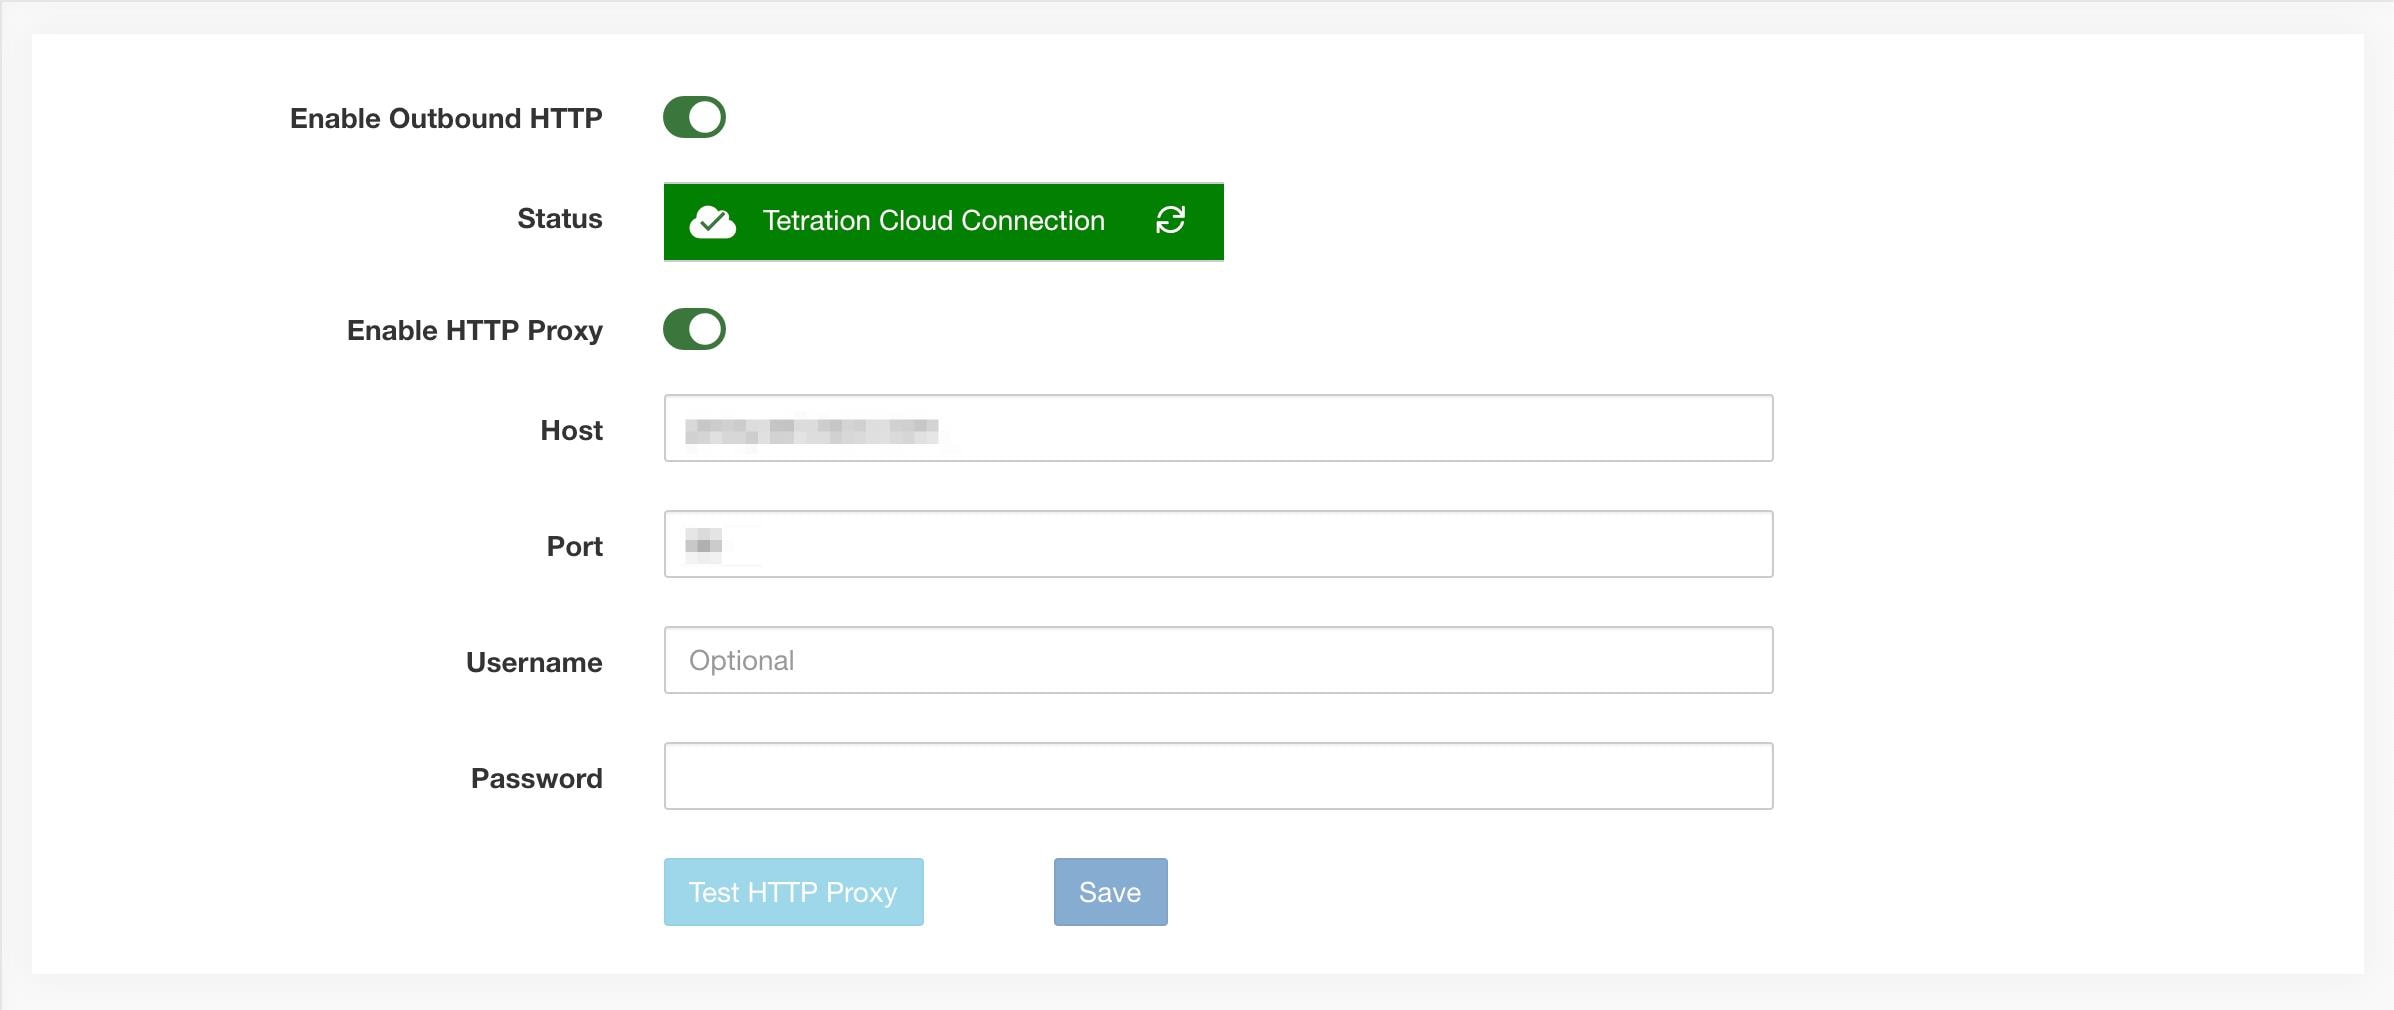
Figure 6. Outbound HTTP Connection
Site Admins and Customer Support users can access Outbound HTTP settings. In the navigation bar on the left, click Platform > Outbound HTTP.
Field
Description
Status
Indicates whether Secure Workload appliance can reach to Secure Workload Cloud to retrieve Threat Intelligence Dataset updates. The status check can be retriggered by clicking on the refresh button.
The following HTTP proxy settings can be used to configure HTTP Proxy settings based on your Secure Workload deployment.
Enable HTTP Proxy
All external HTTP connections use HTTP proxy if this option is enabled
Host
HTTP proxy host address
Port
HTTP proxy port number
Username
Required only if your HTTP proxy server uses basic authentication
password
Required only if your HTTP proxy server uses basic authentication
Configure Lightweight Directory Access Protocol
Choose the Lightweight Directory Access Protocol (LDAP) option to authenticate users. This means that once this is enabled
all users will be logged out and subsequent signing in will use their LDAP email and password to authenticate.
LDAP is currently not recommended as the authentication mechanism if you have ‘Federation’ enabled.
If you have enabled LDAP, the recommended workflow for new user creation is as follows.
Site Admins are encouraged to first create new users with their emails and assign the appropriate roles by Configuring LDAP Authorization (AD authorization) before new users logs in using LDAP for the first time. If a new user logs in through LDAP without the appropriate role,
no default role is assigned to the user.
Turning on ‘Auto Create Users’ will create users if they don’t exist at first login. This saves the site admins from having
to preprovision users before allowing users to log in. This option should be turned off if Secure Workload access should be limited to users manually created on the Users page.
Host
LDAP Host which will be used for authentication.
Port
LDAP Port which will be used for authentication.
Email Attribute
The Attribute field in the external authentication configuration for LDAP supports comma-separated values. This allows for multiple LDAP
attributes to be used as filters during authentication.
Note
If users in the LDAP database have samAccountName as their username, samAccountName must be included in the Attribute field for proper user authentication.
Base
LDAP base dn from where users will be searched.
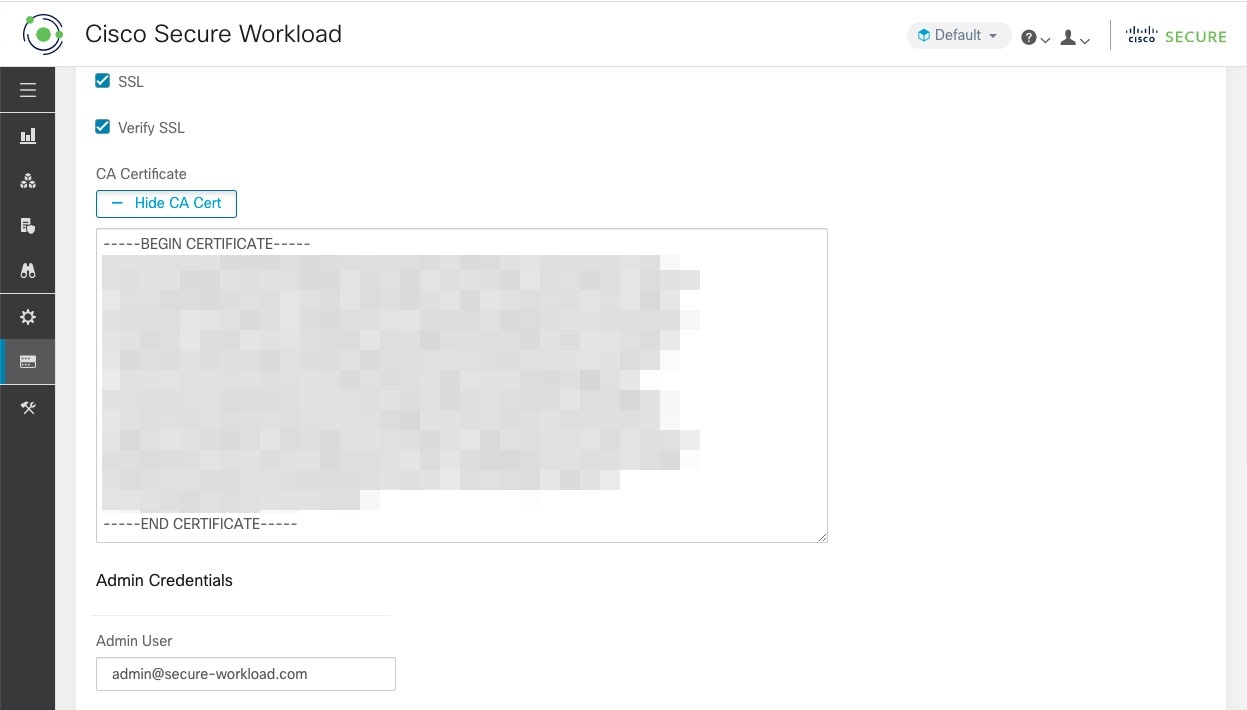
SSL
Enable encryption and use ‘ldaps://’.
SSL Verify
Verify server’s SSL attributes such as Fully Qualified Domain Name (FQDN) based on server’s certificate.
SSL Certificate Authority Cert
Signing cert for LDAP server’s SSL Cert. Required if server cert chain cannot be publicly verified.
Admin User
LDAP Admin user (not Secure Workload user) name used to bind against the LDAP server. For example: [User]@[Domain] or [Domain]\\[User]
Admin Password
LDAP Admin password that is used to bind against the LDAP server.
Without SMTP server configuration, Site Admins will not be able to authenticate users using their emails as email-based authentication will be affected without configuring
an SMTP server.
Once the LDAP config is enabled all users except users with ‘Use Local Authentication’ option enabled will be logged out of their sessions.
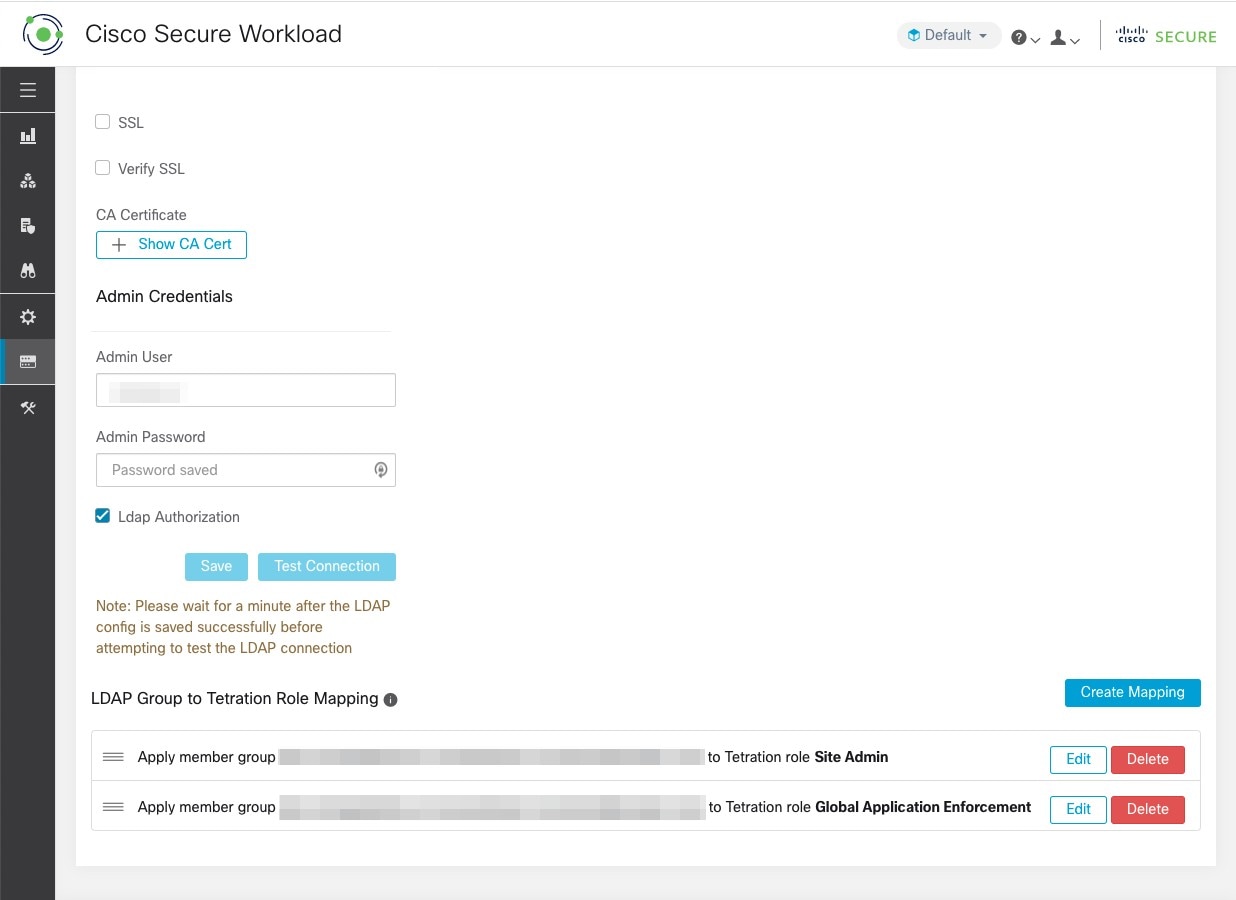
The LDAP config can be saved once the ‘Save’ button is clicked. We recommend that you wait for a minute after the LDAP config is saved successfully before attempting
to test the LDAP connection.
The LDAP connection can be tested out after the LDAP config has been saved using the ‘Test Connection’ button. This tries a bind against the LDAP server with the admin credentials entered.
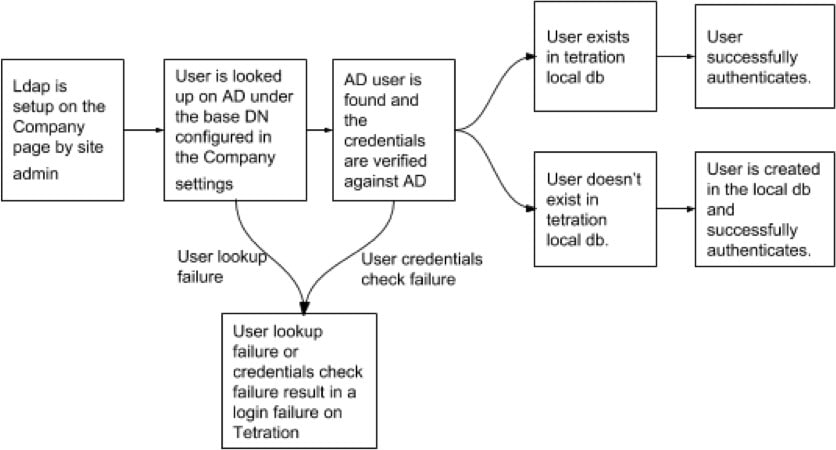
Figure 8. Authentication Workflow
Troubleshoot LDAP Issues
If an error is raised when you test the ldap connection, check the following:
Check whether the LDAP admin credentials are correct.
Check the connection params such as host, port, ssl and so on.
Check whether the LDAP server can be reached from Secure Workload UI VIPs.
Check whether the AD server is up.
Use command-line tools such as ‘ldapsearch’ with the connection details to see whether a bind can be made.
If an error is raised during login for a user, check the following:
Check whether the user can log in with their LDAP credentials to other company websites which use LDAP authentication.
Check whether the ‘base’ dn that is specified in the Company LDAP settings is correct. This can be done by using command-line
tools such as ‘ldapsearch’ to look up the user against the base dn.
Example ‘ldapsearch’ query to search a user by email:
Active Directory Authorization can be configured by enabling the ‘LDAP Authorization’ checkbox in the ‘Admin Credentials’
section of the External Authentication LDAP configuration. Once this setting is enabled, Site Admin must set up mappings of
LDAP ‘MemberOf’ groups to Secure Workload Roles in the section below. By default, without this configuration, Active Directory users must be preconfigured with one
or more Secure Workload roles prior to a login attempt.
LDAP MemberOf Group to Secure Workload Role Mapping must be set up if LDAP external authentication is enabled. ‘Create Mapping’ allows setting up an LDAP MemberOf
group value to be mapped to a Secure Workload Role. The roles in the role dropdown are prepopulated based on the scope that is selected in the scope selector. Once these
mappings are saved, all users get authorized based on these values on their subsequent login.
These mappings can be reordered, edited, or deleted. Any modifications to the mappings will be reflected on the roles assigned
to users on their subsequent login. A maximum of 50 LDAP MemberOf Group to Secure Workload Role Mappings can be created.
Duplicate LDAP MemberOf group names are not allowed. However multiple LDAP MemberOf groups can map to the same role. If more
than one group maps to the same role, the last mapping will be stored in the user as the matched LDAP MemberOf to Secure Workload role.
Figure 9. LDAP Group to Secure Workload Role SetUp
Figure 10. LDAP Group to Secure Workload Role Mapping
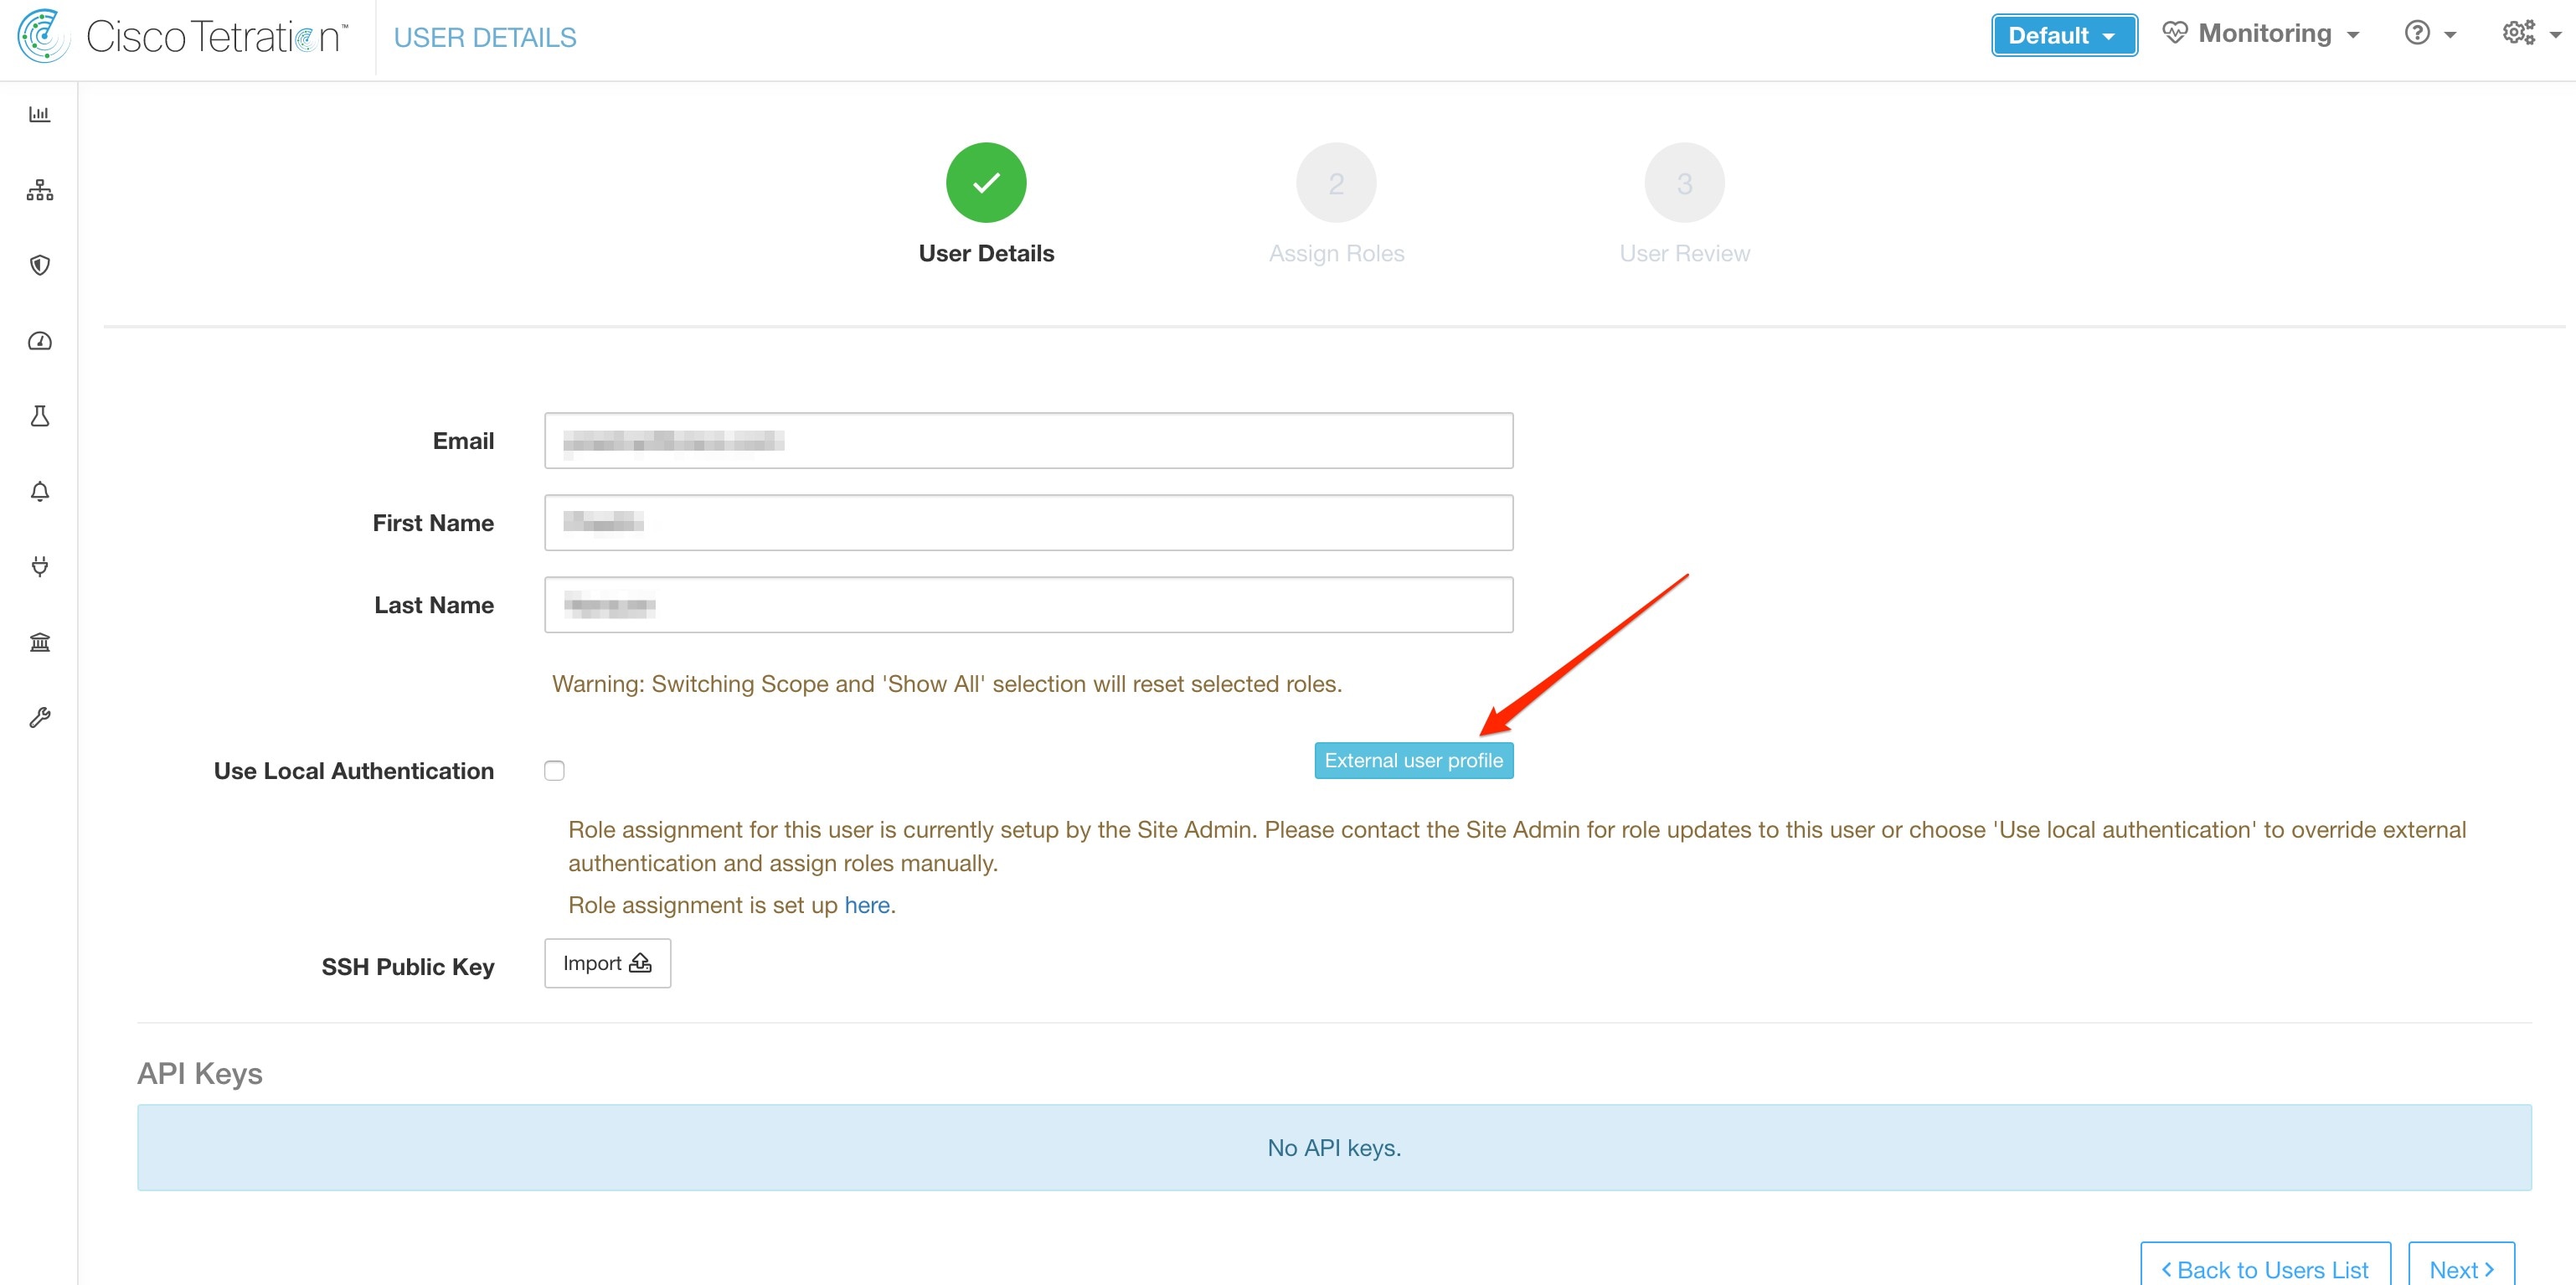
A site admin user can reconcile the assignment of roles based on the above role mapping with the help of external user’s information
that is obtained from the user’s last successful login.
Note
Users can bypass external authentication once it is enabled on a per user basis as indicated in ‘Use Local Authentication’ option. These users will also bypass the authorization process set up for AD authorization.
Figure 11. External User Information
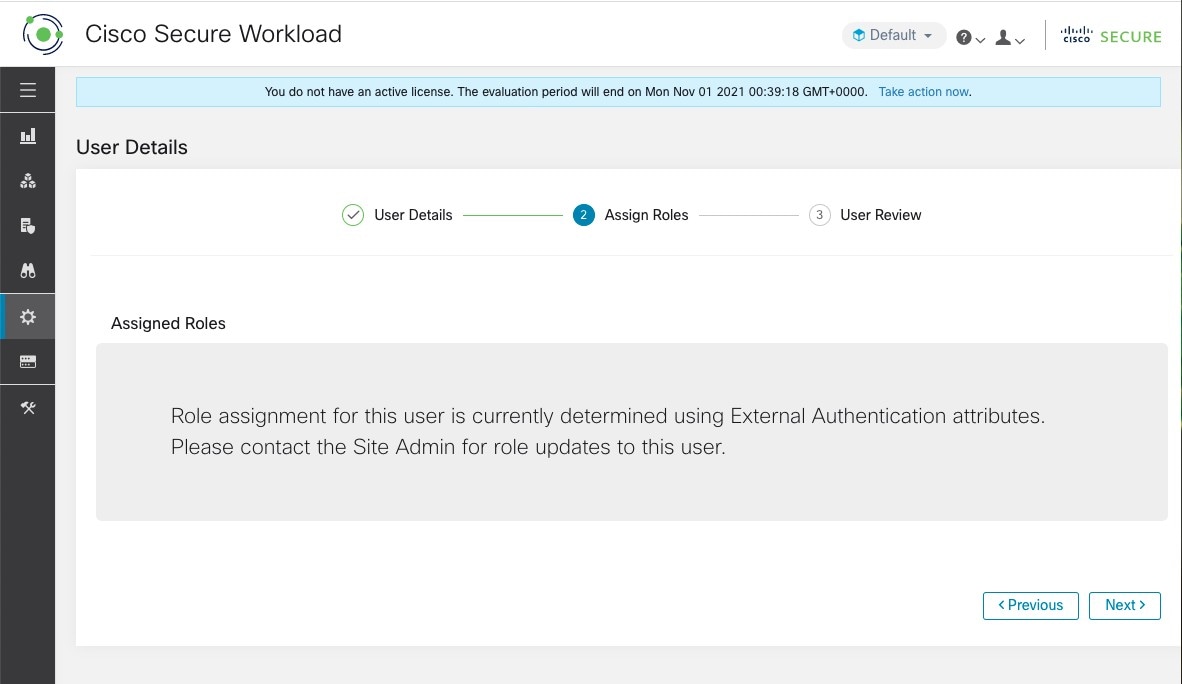
Once authorization is enabled, manual Secure Workload Role selection in the user creation (Add a User) and user edit flows (Editing a User Account) is disallowed.
Figure 12. Users Page
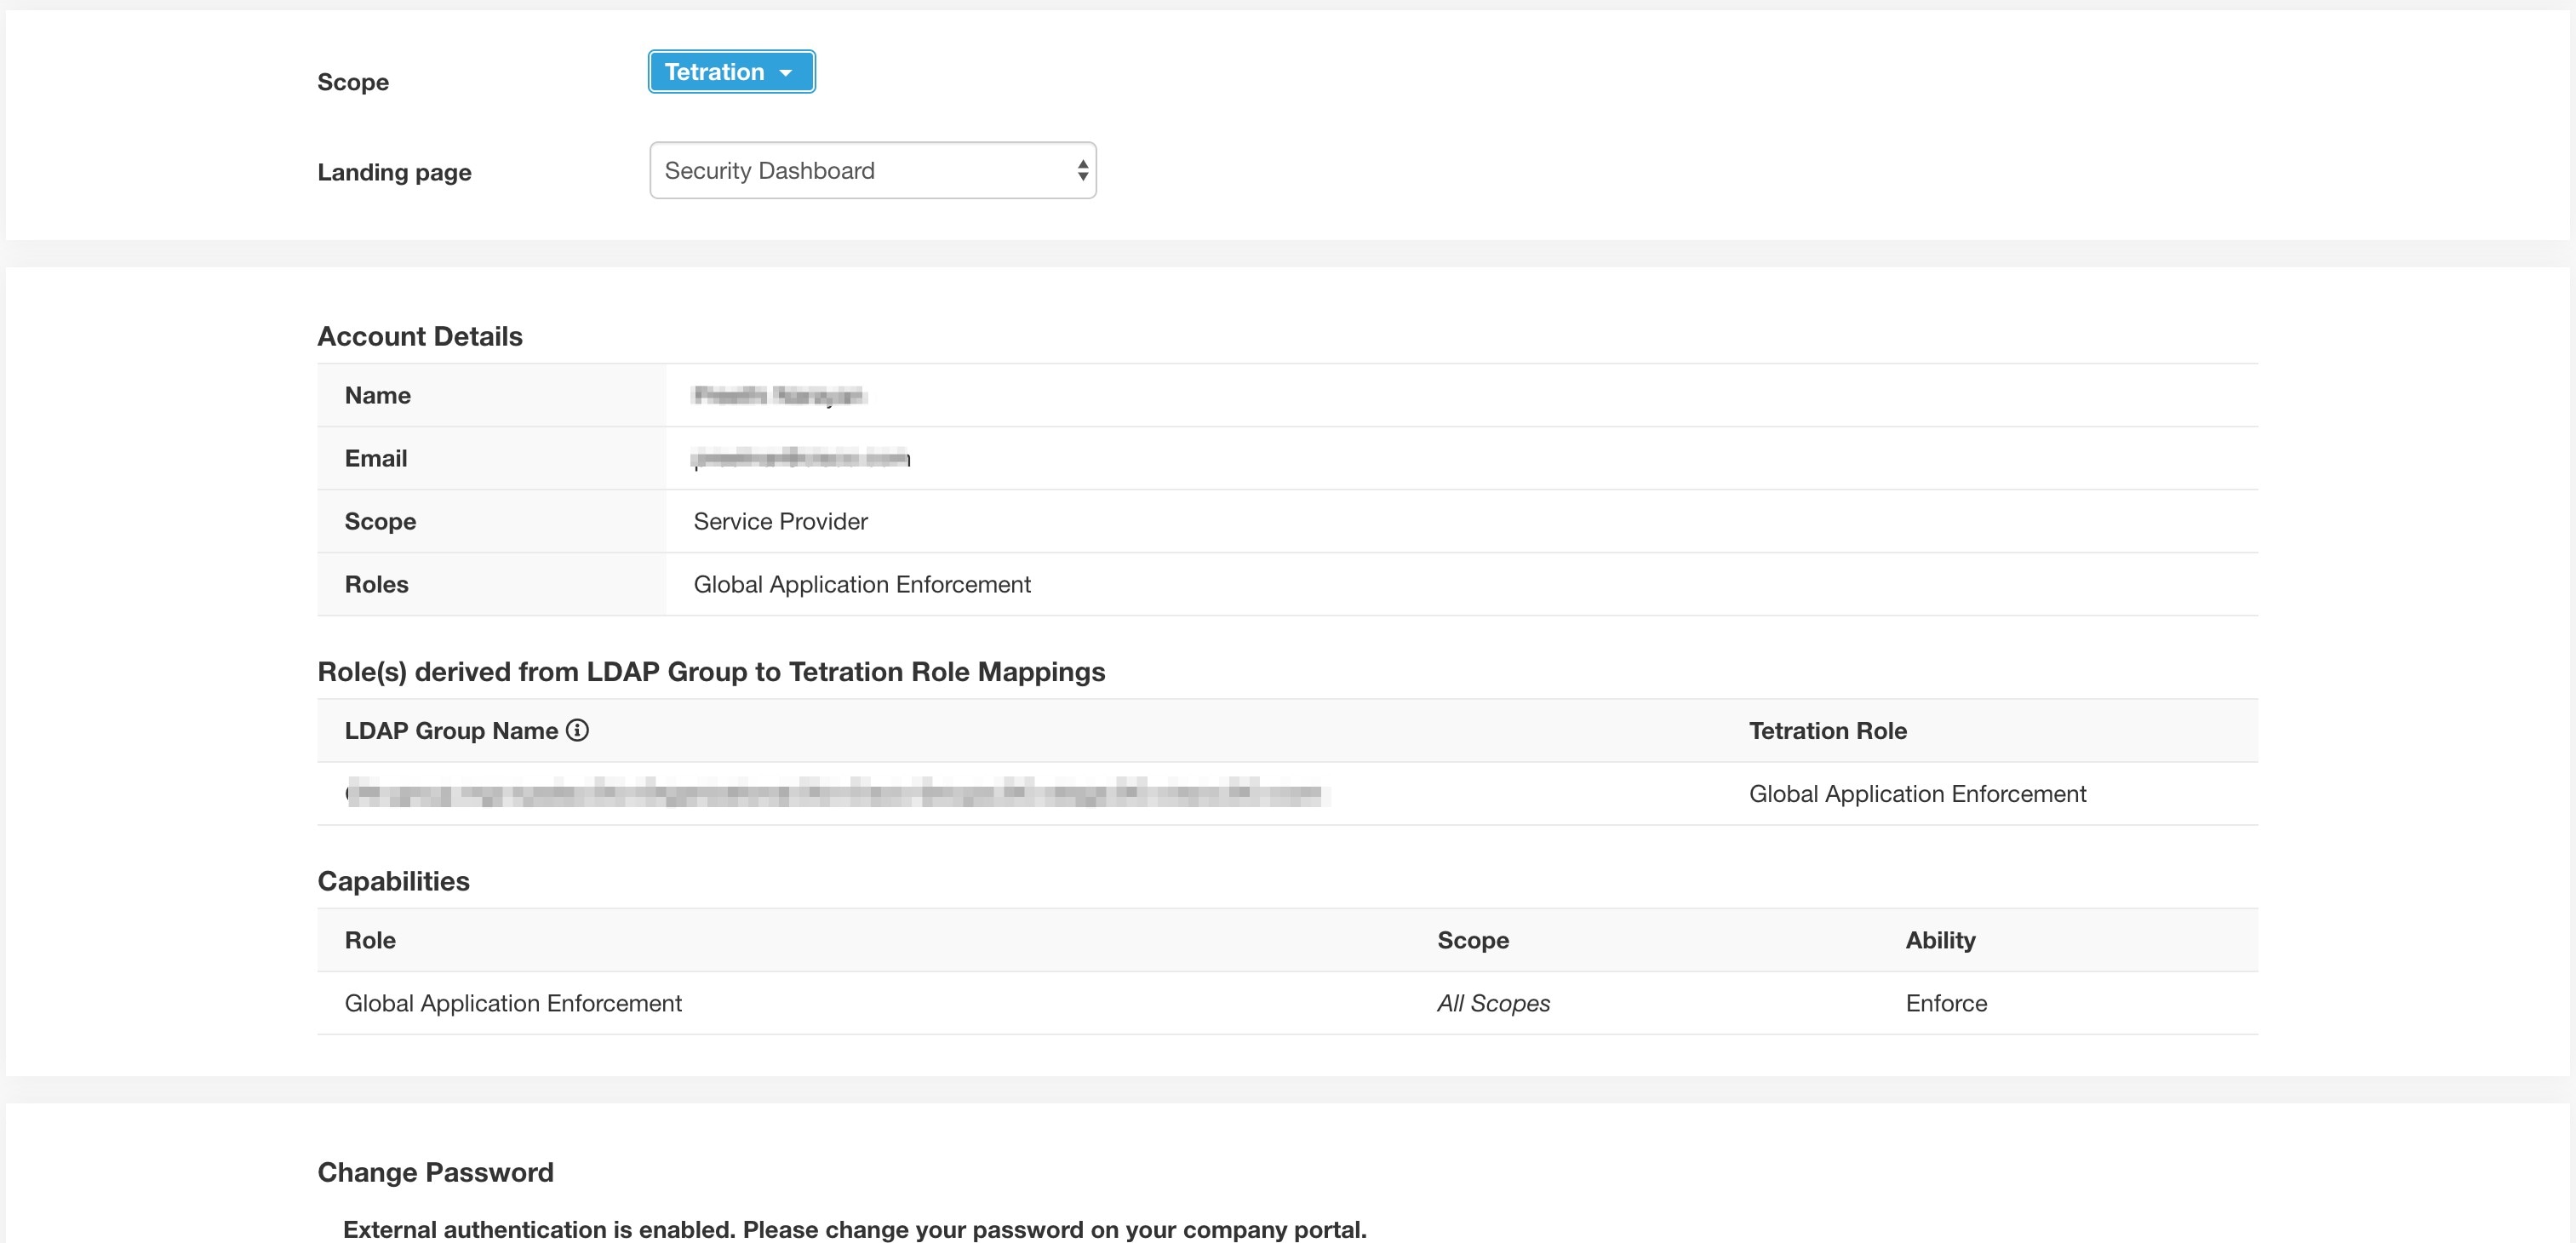
The mapped LDAP MemberOf groups to Secure Workload Roles are visible on the user profile page.
Figure 13. User Profile Page
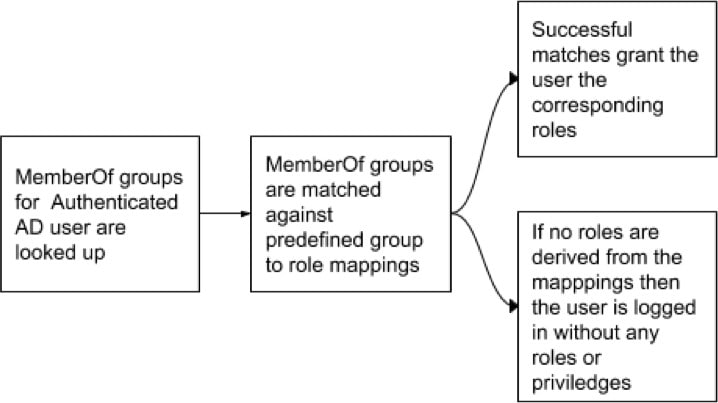
Figure 14. Authorization Workflow
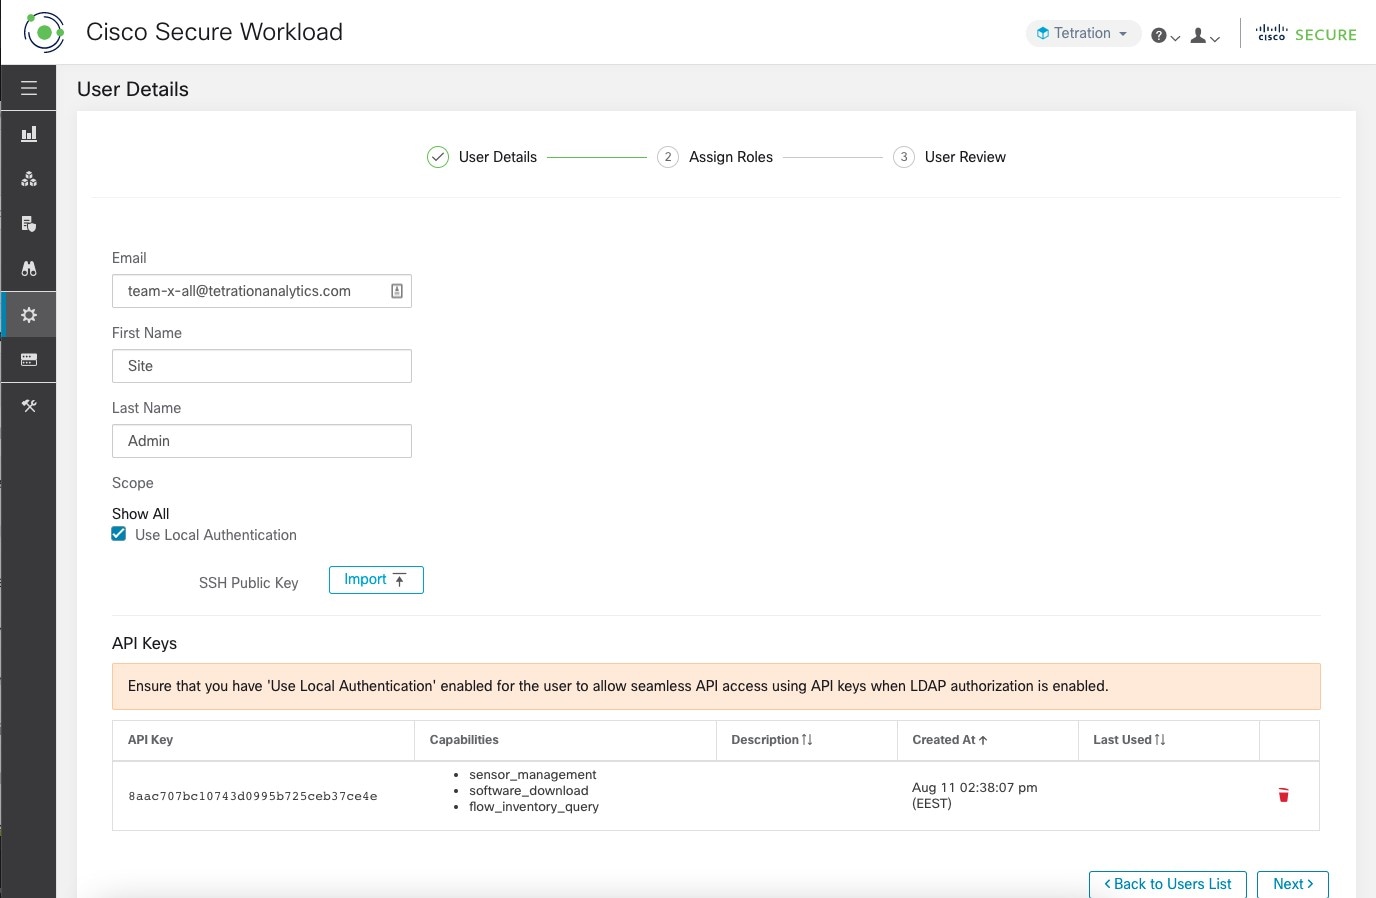
If LDAP Authorization is enabled, access to OpenAPI via API Keys cease to work seamlessly because Secure Workload roles that are derived from LDAP MemberOf groups are reassessed once the user session terminates. Hence to ensure uninterrupted
OpenAPI access, we recommend that users with API Keys have ‘Use Local Authentication’ option enabled.
Figure 15. LDAP Authorization API Key Warning
Figure 16. LDAP Authorization API Key Warning on Users Page
Troubleshoot LDAP Authorization Issues
If the roles are not getting assigned to users based on the mappings defined in the ‘External Authentication’, ‘LDAP Group
to Role Mappings’ section, check the role mappings setup and format once more.
Group string must be of the string format. For example: CN=group.jacpang,OU=Organizational,OU=Cisco Groups,DC=stage,DC=cisco,DC=com
Group names must be exact from what is present in AD with no spaces or extra characters.
Role mapping for the group must be selected from the role selector.
User Role Mapping Debug Steps
You must have two users, one that is Site Admin, the email of this user should not be the same as the AD user.
This user is called ‘SA User’ for the steps below.
SA user has previously set up the role-mapping configs on the Company page External Auth Config as described earlier. Let’s
assume ‘SA User’ will be logging in with [site-admin]@[Domain].
We assume that ‘AD User’ is [ad-user]@[Domain]. We assume that the LDAP setup is done and the AD user is able to log in but
not getting his role that is assigned.
As AD User, log in using incognito browser session. This splits the browser state from SA User session.
As SA User, login and go to Users page.
Click on the Edit Icon for the AD User that must have Role Mapping configured.
Click the ‘External User Profile’ button on the User Profile page.
You will see an External Auth Profile Table that includes a ‘memberof’ section.
This is one of the ‘memberof’ values that you can use for role mapping on Company page, External Auth Config, LDAP Group to
Role-Mapping section.
You must provide the whole ‘memberof’ per-line string to match. Once you create this role mapping, anyone who has the same
attribute ‘memberof’ will be assigned the mapped role.
For the AD User to be granted the newly mapped role, the user needs to log out then log back in to allow re-evaluation of
this mapping profile.
Once a user logs in and has roles that are assigned successfully as a result of group role mappings, the matching rules are
visible on the ‘Preferences’ page for that user.
Configure Single Sign-On
If this option is selected, single sign-on (SSO) can be used to authenticate users. This means that when this is enabled all
users will be redirected to the identity provider sign-in page to authenticate. Users with ‘Use Local Authentication’ option enabled can use the email and password sign-in form in the sign-in page to authenticate.
It is important to establish that the SSO configuration is set up correctly, especially if no users are on the ‘Use Local Authentication’ option. The recommended approach is to have at least one locally authenticated user with Site Admin credentials by turning on the ‘Use Local Authentication’ option. This user can make sure that the SSO configuration is set up correctly. When the connection is successfully set up, this
user can also be transitioned to external authentication by unchecking the ‘Use Local Authentication’ option in the user edit
flow.
If you enable SSO, the recommended workflow for new user creation is as follows.
Site Admins and Scope Owners are encouraged to first create new users with their emails and assign the appropriate roles and scopes before the new user
logs in via SSO for the first time. If a new user logs in using SSO without the appropriate role, no default role is assigned
to the user.
Note
Sending password reset instructions, which is reliant on email communication will be affected without an SMTP server configuration.
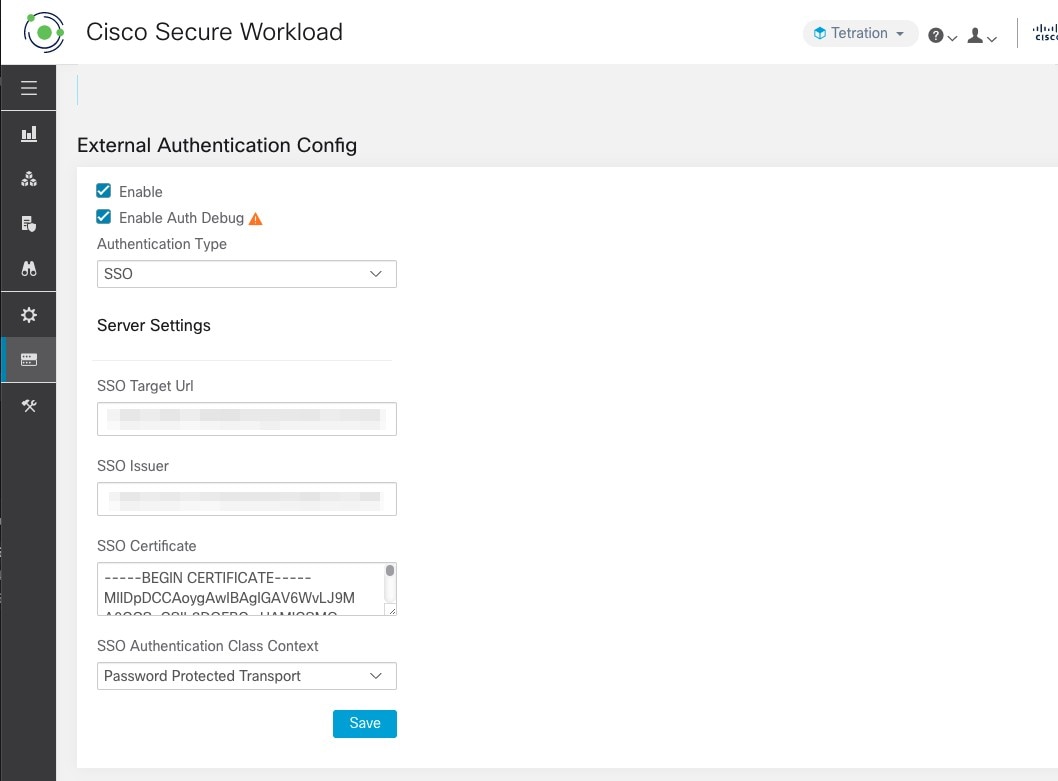
The following table describes the fields that must be set up to configure SSO on Secure Workload. Secure Workload is the service provider in this case.
Figure 17. Configure Single Sign-On
Field
Description
SSO Target Url
SSO IdP target URL to which users will be redirected to for login.
SSO Issuer
SSO Entity Id of your SP, a URL that uniquely identifies your SP. This is generally the metadata for the SP. In this case
it is:
SSO certificate that is provided by the Identity Provider (IdP).
SSO AuthN Context
Choice for SSO AuthN Context which is specified in the SAML Request. The default option is ‘Password Protected Transport’.
The other choices are ‘Integrated Windows Authentication’ and ‘X.509 Certificate’ for Windows and PIV-based authentication.
After the SSO configuration is enabled, all users, except the users who have enabled the Use Local Authentication option,
are logged out of their sessions.
The SSO configuration is saved after the Save button is clicked.
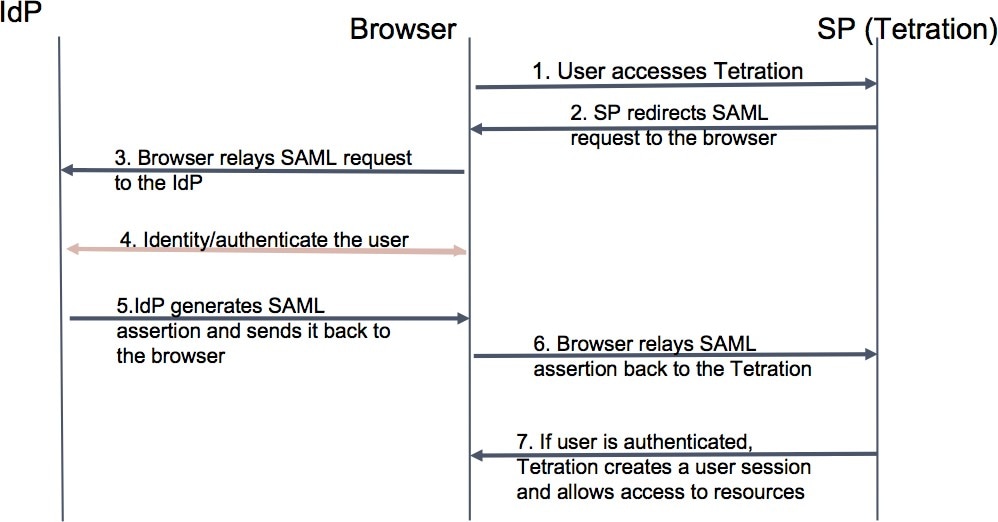
Figure 18. Authentication Workflow
Information Shared to Identity Provider (IdP)
The IdP requires some information from Secure Workload (SP) to set up SSO for authentication. The following table describes the fields that must be set up.
Field
Description
SSO Url
The authentication endpoint (url) which will consume the SAML assertion (response from the IdP). In our case, it will be:
User attributes are fetched from the IDP. We fetch these attributes as part of authentication:
email
firstName
lastName
Ensure that the attribute names are as specified previously.
Troubleshoot SSO Issues
Set up some downtime for this SSO config setup since the only way to verify authentication works (from the Service Provider)
it is after setting it up.
Check and validate the IdP metadata generated.
Check all configuration parameters that are exchanged between IdP and SP.
Config at the IdP - SSO url, Audience, Name ID, attributes and so on
Config on Secure Workload Company page - SSO Target url, SSO issuer, and SSO certificate.
Get a sample SAML assertion returned from the IdP from the server app logs. Validate it against a SAML validator to make sure
it is a valid SAML response.
Errors in the SP SSO setup may result in an error that is generated from the IdP. Using the browser inspect element, you can
see the network requests being made.
If a user has issues logging in, have the IdP admin check whether the user has access to the Secure Workload app.





 Feedback