Secure Workload Integration with Application Centric Infrastructure

Application Centric Infrastructure (ACI) is the prime network-fabric solution from Cisco for its datacenters. It offers unique advantages to automated networking constructs both through user interface and programmatically so that users can provision and scale application workloads faster.

Cisco Secure Workload integrates with Cisco ACI to enable microsegmentation and zero-trust security models. This integration allows Secure Workload to ingest ACI endpoints as inventory and monitor the status of: Application Policy Infrastructure Controller (APIC) cluster health, policy deviations, and suspend policy enforcement if TCAM over-utilization is estimated.


Attention


Due to recent GUI updates, some of the images or screenshots used in the user guide may not fully reflect the current design of the product. We recommend using this guide in conjunction with the latest version of the software for the most accurate visual reference.


Table 1. Feature History

Feature Name

Release

Feature Description

Where to Find

Application Centric Infrastructure (ACI) integration with Secure Workload

Release 4.0

Application Centric Infrastructure (ACI) is the prime network-fabric solution from Cisco for the datacenter.

The key capabilities of the integration are:

  • Dynamic policy updates: Automatically adjusts policies as environments change.

  • Enhanced visibility: Delivers detailed insights into workload behavior and traffic.

Application Centric Infrastructure (ACI) integration with Secure Workload

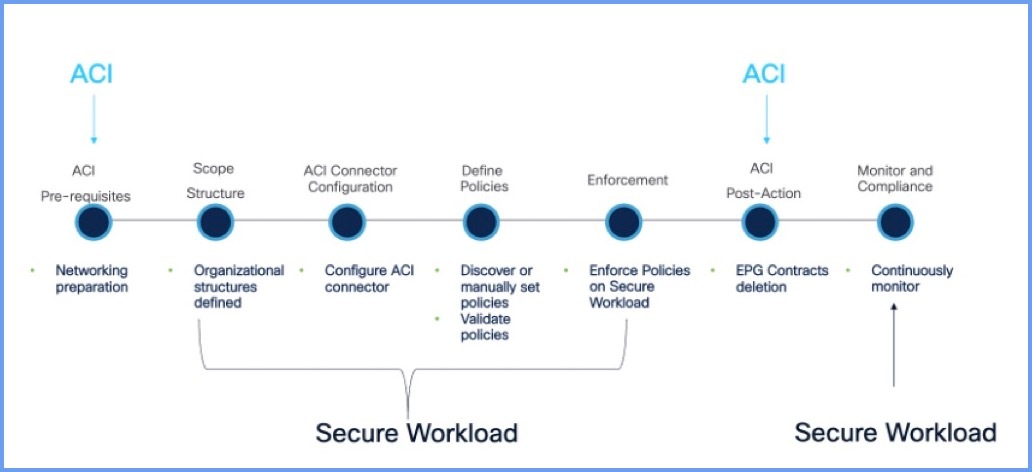
Overview of Integrating Secure Workload with ACI

Secure Workload integrates with Application Centric Infrastructure (ACI) to enhance workload visibility, policy enforcement, and segmentation within ACI environments. ​The integration enables dynamic policy optimization, telemetry collection, and enforcement of segmentation policies directly on ACI fabrics.

This integration offers the following features and benefits:

Realize better security—Using ACI fabric, you can easily move from network centric segmentation to granular application centric segmentation to protect critical business resources.

Monitor ACI fabric health—Gain visibility into switch memory (TCAM) health.

Protect existing infrastructure—Leverage existing ACI implementation on location and extend these capabilities to the broader Cisco Hybrid Mesh Firewall ecosystem.

Apply segmentation controls—Leverage AI/ML to discover, validate, analyze, and enforce segmentation policies without disrupting business operations.

Save time-managing policies—Automating the policy lifecycle saves you time by eliminating the need for manual deployment of segmentation policies and significantly reducing any operational overhead.

By integrating Secure Workload with ACI, users can achieve unified segmentation, enhanced visibility, and dynamic policy enforcement across their data center environments.

Prerequisites for ACI Integration with Secure Workload

Ensure the following are set up before proceeding with the integration:

  • Cisco Secure Workload setup:

    • Secure Workload (Cluster and Agents), Version 4.0 and later.

    • Identify scopes in Secure Workload that map with ACI.

    • Install and configure software agents for collecting data in visibility mode.​

  • ACI environment:

    • Ensure the ACI fabric is operational with the Application Policy Infrastructure Controller (APIC) that is configured.

    • Minimum requirements for ACI:

      • Secure Workload integration uses ACI Endpoint Security Group (ESG) constructs for policy enforcement.

      • ACI Version 5.0.1 and later (Enforcement for East-West/Intra-VRF traffic).

      • ACI Version 6.1(4) and later (Enforcement for North-South/External traffic).


        Note


        Note that enforcement that require L3Out external endpoints will fail for releases earlier than ACI, Release 6.1(4) and later than ACI, Release 5.0.


      • One-time configuration of Cisco ACI fabric Admin credentials in Secure Workload. These credentials are at a tenant-level that provide access to specific tenants.

      • For traffic flow visibility or learning, we recommend that you use any of the ACI software releases.

      • Allow configuration of ACI connectors during the upgrade or the policy enforcement phase.

  • ACI connector deployment:

    • Configure the IP addresses of APICs and admin credentials in the Secure Workload ACI connector.

    • Configure ACI connector in Secure Workload.

    • Map the Secure Workload scopes with the VRFs in ACI.


    Note


    The ACI fabric can have more than one connector; however, we recommended a single connector for every fabric to avoid unknown policy issues.


Known Caveats and Limitations

  • One ACI VRF can be mapped to only one scope in Secure Workload.

  • Secure Workload does not apply Deny or Block policies, as the ACI policy model is based on allow-list. Catch-All allow policies are also not rendered.

  • Once enforcement is enabled on Secure Workload, all policies for the VRF will be managed by Secure Workload even for the workloads where agent is not deployed.

  • Secure Workload assumes that all the required network configurations are existing on the ACI fabric.

  • ACI does not provide enforcement statistics for policies, such as per-rule statistics or policy-hit counts.

  • FQDN and process-based policies are not supported.

  • Dual-Management of policies (Secure Workload owned-policies and ACI owned-policies) is not supported.

  • Multi-Site ACI fabric deployment architectures are not supported.

Integrate Cisco Secure Workload with Cisco ACI

Cisco Secure Workload SaaS is centrally managed within Cisco Security Cloud Control. Secure Workload integrates with the ACI fabric through the ACI connector. The ACI connector enables Secure Workload to share and receive information, such as tags and fabric health from the Application Policy Infrastructure Controller (APIC). Secure Workload leverages AI to discover application and segmentation policies before enforcing them.


Note


The ACI fabric can have more than one connector; however, we recommended a single connector for every fabric to avoid unknown policy issues. Configure the IP addresses of APICs and Admin credentials in the ACI connector.

Cisco Secure Workload integration with ACI can be leveraged through Secure Workload on-premises after appropriate upgrades to Cisco Secure Workload, version 4.0.


Implement and manage workloads in ACI

Figure 1. Workflow of Implementing and managing workloads in ACI
Workflow diagram for implementing and managing workloads in ACI, showing sequential steps.

Procedure


Step 1

Prerequisites and connectivity:

  1. Verify APIC reachability from the Secure Workload environment. On Cisco Secure Workload, SSH or ping APIC:

    -ping <APIC_OOB_IP>
    -ssh admin@<APIC_OOB_IP>
    
  2. Confirm APIC cluster health (from APIC CLI):

    -ssh admin@<APIC_OOB_IP>
    -cluster_health
    
  3. Check for ACI fabric details:

    • On the APIC UI, discover the ACI fabric inventory, VRFs, and confirm EPGs exist and are operational.​

    • VRF to scope mapping: On the Secure Workload UI, associate each VRF with a scope. Map each discovered VRF to a Secure Workload scope, creating a one-to-one boundary for policy application.

Step 2

Prepare ACI for the Secure Workload ACI connector:

  1. Create or verify a dedicated ACI user for Secure Workload.

  2. Note the following for ACI connector configuration:

    • APIC URL (for example, https://<APIC_OOB_IP>).

    • ACI username/password (or certificate if using cert-based authorization).

Step 3

Verify Secure Workload readiness:

  • Confirm a Secure Workload cluster is deployed and is active (GUI or SSH to cluster).​

  • Verify agents are installed and sending telemetry on relevant workloads.

  • In the Secure Workload UI, check the inventory and software agents for the cluster 'Health' status, and check for the recent flow data.​

  • Make sure labels and scopes strategy is defined for how VRFs or ESGs will map to the Secure Workload scopes.​

Step 4

Create and configure the ACI Connector in Secure Workload:

  1. From the navigation pane, choose Manage > Workloads > Connectors.

  2. On the UI, click ACI Connector > Configure your New Connector and configure the settings.

    Attribute

    Description

    Connector Name

    The name of the connector associating with the ACI connector.

    Description

    Short description of the connector.

    APIC nodes

    The IP addresses and the port numbers of the APIC nodes for this connector.

    Note


    Note that you can add only 7 APIC nodes for the connector.

    Credentials

    Enter the username and the password. Check or unselect the check box of the Self-signed certificate.

    No proxy

    Secure Workload can directly connect to the destination system.

    Secure Connector

    Enable if a Secure Connector is used to tunnel connections from Secure Workload.

    Before you can enable this option, you should have deployed a Secure Connector.

    For more information, see Secure Connector.

    HTTP Proxy

    Proxy required for Secure Workload to reach APIC. Supported proxy ports: 80, 8080, 443, and 3128.

Step 5

Click Save.

Step 6

Provide details for the ACI fabric:

  • APIC URL: https://<APIC_OOB_IP>

  • Username: secureworkload (or your dedicated user)

  • Password or certificate.

  • Any required SSL/TLS options (for example, accept specific APIC certificates).​

Step 7

Validate ACI fabric discovery:

  1. After the Secure Workload ACI connector is connected, discover the ACI fabric in Secure Workload.

  2. Check for Tenants, VRFs, BDs, and endpoints that appear as labels. For example, vrf_dn, vrf, bridge_domain_dn, bridge_domain, fabric_path_dn, fabric_path, application_profile_dn, application_profile, endpoint_group_dn, endpoint_group, tenant, l3out_dn, l3out, l3out_subnet_dn.

Step 8

Segmentation or VRF–scope mapping:

  1. In Secure Workload, open the ACI Connector Segmentation tab: Map each ACI VRF to a single Secure Workload scope.​​

  2. For each mapped VRF: Enable or disable enforcement as required for your phase (start with visibility/learning).​​

    Note


    No specific ACI CLI commands are needed in this step; it is mostly configurations on Secure Workload.

Step 9

Policy configuration in Secure Workload:

  1. Ensure agents for ACI workloads have enforcement 'Disabled' in their agent profile so that when ACI enforces policies, it is not on the host agents.

  2. Run the automatic policy discovery and review the suggested microsegmentation policies.

  3. Validate the suggested policies for service ports, traffic flows, and scope membership before enabling enforcement.

Step 10

Enable policy enforcement on ACI:

In Secure Workload:

  • Enable enforcement on the application Workspace containing the ACI workloads.​​

  • Enable enforcement on the ACI Connector.​​

Verify contracts and ESGs on APIC:

  • APIC GUI: Check Tenant > Application Profiles created with names, such as secureworkload-<connectorid>; verify that contracts, ESGs, and filters exist and are associated correctly.​​

Step 11

Resource and status or TCAM checks:

In the Secure Workload ACI Connector Status tab:

  • Confirm TCAM utilization is within safe limits for all participating switches before enforcing policy updates.​​

Note


Policies will only be pushed when TCAM is sufficient; otherwise, enforcement is suspended.​​

Step 12

Monitoring and troubleshooting

  • On Secure Workload, monitor policy hit counts, alerts, and enforcement status for the ACI Connector.​

  • On the APIC fabric, monitor health scores for fabric, tenants, and application profiles.​


VMM Integration on Cisco ACI

In Cisco ACI, the Virtual Machine Manager (VMM) integration allows the fabric to extend ACI policies down into the hypervisor layer, so virtual switches and port groups are created and managed directly from the APIC. VMM domains represent the relationship between ACI and a virtualization platforms, such as VMware vCenter, Microsoft SCVMM, or Kubernetes.

In a Secure Workload integration, this is important because it gives Secure Workload accurate, policy-aligned visibility into which endpoints belong to which Endpoint Group (EPGs), VRFs, and bridge domains, and how they are connected in the ACI fabric. Secure Workload can then consume this topology and label information ensuring that intent-based microsegmentation is consistently enforced in both the ACI fabric and the host-level agents.

The difference scenarios are described below:

VMM Integration with Hosts Directly Connected to Leaf Switches

When hypervisor hosts are directly connected to ACI leaf switches, VMM integration provides a tightly coupled, automated workflow between APIC and the virtualization platform. After defining the VMM domain and establishing connectivity to the hypervisor manager. For example, for VMware vCenter or Nutanix, the APIC creates or attaches to a distributed virtual switch and automatically generates port groups that map to ACI Endpoint Groups (EPGs). The leaf ports facing the ESXi or Hyper-V hosts are configured using access policies and associated with an AEP that is bound to the VMM domain.

For Secure Workload, this model ensures that telemetry from host sensors lines up with ACI endpoint locations and EPG membership, enforcing consistent segmentation, and reducing the risk of drift between network and host policies.

Figure 2. Domains (Virtual Machines and Bare-Metals)

VMM Integration with Indirectly Attached Hosts

The configuration on the ACI is as below:

For certain deployment models, hypervisors or container nodes are not connected directly to ACI leaf switches, but instead connect through intermediate network layers, remote leaf sites, or L2 extension technologies. For example, Cisco UCS Fabric Interconnects (FIs) positioned between the compute hosts and the ACI leaf switches. VMM integration still functions in these scenarios, but the path between the virtual switch uplinks and the ACI fabric must preserve visibility for discovery of endpoints and policy enforcement.

From a Secure Workload standpoint, indirectly attached hosts still benefit from synchronized labels and EPG mappings, but accuracy depends on endpoints being properly discovered in ACI and consistently mapped to the right EPGs. In these topologies, specific configuration steps are required to ensure that micro-segmentation and policy enforcement function correctly across both the ACI fabric and intermediary layers.

Figure 3. Domains (Virtual Machines and Bare-Metals)
Figure 4. VMM integration with indirectly attached hosts

Procedure


Step 1

Edit the Endpoint Group (EPG) and tick the 'allow micro-segmentation' option. Specify the PVLANs to use. This will enable proxy ARP on the leaf switches and will configure the port group on the VDS to use the PVLANs.

Step 2

Configure the matching PVLANs on the intermediary switches.


Hosts Directly Connected to Leaf Switches (No VMM Integration)

When hosts are directly connected to ACI leaf switches without VMM integration, the setup applies to bare-metal servers or hypervisors managed independently, bypassing virtualization manager synchronization like vCenter or SCVMM. Administrators configure static paths or access ports on ACI leaf interfaces manually, associating them with specific Endpoint Groups through physical domains rather than dynamic VMM domains. Endpoints learning occurs using data-plane traffic within bridge domains, with policies like contracts enforced based on EPG membership determined by VLAN encapsulation or IP subnet rules.

For Secure Workload integration, this method ensures endpoints are still visible in the ACI fabric for policy correlation, but cannot enable Virtual Machine Manager (VMM) domain integration and instead rely on physical domains. This requires manual EPG assignments and increasing operational overhead for label synchronization within the ACI fabric.

Here's the workflow on the ACI fabric:

Procedure


Step 1

Edit the EPG and enable intra-EPG isolation and enable proxy ARP

Step 2

Configure or update the EPG static bindings to use PVLANs. For scale, configure the EPG under the AAEP and enable the PVLANs under the AAEP.

Step 3

Reconfigure the VDS port group to use the new PVLANs


Hosts Directly Connected to Intermediary Switches (No VMM Integration)

This approach of deployment is suitable where hypervisor hosts connect to ACI fabric through intermediary switches. For example, Top-of-Rack or Access switches, and VMM integration is unavailable. Instead of dynamic VMM domain synchronization, ACI uses physical domains with static bindings to enforce segmentation using Private VLANs (PVLANs). This ensures isolation without hypervisor manager involvement. Additinaly, intra-EPG isolation prevents direct communication between endpoints in the same Endpoint Group (EPG), while proxy ARP handles L2 resolution across the intermediary layer. This allows Secure Workload to correlate host telemetry with EPG labels for microsegmentation.

Here's the workflow on the ACI fabric:

Procedure


Step 1

Edit the EPG and enable intra-EPG isolation and enable proxy ARP.

Step 2

Configure or update the EPG static bindings to use PVLANs. For scale, configure the EPG under the AAEP and enable the PVLANs under the AAEP.

Step 3

Configure the matching PVLANs on the intermediary switches.

Step 4

Reconfigure the VDS port group to use the new PVLANs.


Policy Enforcement on ACI fabric

All workloads within the ACI fabric that have Cisco Secure Workload agents deployed continuously send telemetry data to the Secure Workload tenant. On the Secure Workload side, AI-based policy discovery runs automatically after a predefined period, generating suggested micro-segmentation policies. Initially, the agent profiles for these workloads should have enforcement disabled to prevent the agents from enforcing policies locally. Once policy analysis is complete, enforcement is enabled on the workspace associated with the application. For the policies to be enforced on the ACI fabric, enforcement must be activated both on the Secure Workload workspace and on the ACI connector.

Based on the discovered policies, Secure Workload creates an application profile that translates those policies into ACI contracts and corresponding Endpoint Security Groups (ESGs) with their membership. As of the current version, Secure Workload uses subnet selectors to define ESG membership automatically, requiring no manual intervention. After enforcement is enabled on the ACI connector, the system begins pushing the micro-segmentation policies dynamically to APIC for deployment in the fabric.

Figure 5. APIC UI for an ESG membership definition
In the Secure Workload + ACI flow, this represents how Secure Workload programs ESG membership: it defines which endpoints belong to an ESG by pushing IP subnet selectors like this one into the APIC tenant, instead of requiring manual static membership configuration.

The policies discovered by Secure Workload are translated into ACI contracts within the corresponding application profile. Each application profile that Secure Workload creates is assigned a generated name in the format Secure Workload <number>. These objects are managed exclusively by Secure Workload and must not be manually edited or modified in ACI. After policy enforcement is enabled and pushed, the resulting contracts appear on the ACI side.

Figure 6. Topology view of an automatically generated Secure Workload application profile
This APIC screen shows the topology view of an automatically generated Secure Workload application profile. The diagram visualizes EPGs and ESGs along with the contracts between them, using colored lines to indicate consumer, provider, and intra-EPG relationships in the Secure Workload tenant.

Note that in this phase of the ACI integration, Cisco Secure Workload agents on ACI workloads will collect telemetry and feed the data into the Secure Workload AI engine. Secure Workload then discovers application dependencies, derives segmentation intent, and automates the full policy lifecycle, including enforcement on the ACI fabric by using ESG-based constructs. This enables a consistent, application‑centric policy model in ACI, helping teams move away from purely network‑centric designs toward intent-driven segmentation aligned with how the application actually behaves.