Upgrade sequence of the nodes
You can upgrade Cisco ISE using the GUI, the backup and restore feature, or the CLI. If you upgrade using the GUI, you can select the upgrade order for the nodes. To minimize downtime and maximize resiliency, upgrade the nodes in the recommended order. Upgrading in this sequence helps minimize downtime, improve resiliency, and makes rolling back easier if needed.
-
Back up all configuration and monitoring data. Export the internal CA key and certificate chain. Back up server certificates for all ISE nodes. Complete these tasks before starting the upgrade to make manual rollback easier if needed.
-
Secondary Administration Node
At this point, the Primary Administration Node remains at the previous version and can be used for rollback if the upgrade fails.
-
Primary Monitoring Node or Secondary Monitoring Node
If you have a distributed deployment, upgrade the nodes available in the site with the Secondary Administration Node.
-
Policy Service Nodes
If you are upgrading from Cisco ISE, Release 2.6 to a higher release using the GUI, you can select a group of PSNs to be upgraded simultaneously. This will reduce the overall upgrade downtime.
If you are upgrading from an earlier Cisco ISE release to a recent release using the GUI, you can select a group of PSNs to be upgraded simultaneously. This will reduce the overall upgrade downtime.
After upgrading a set of Policy Service nodes, verify the upgrade's success (see Verify the upgrade process) and run network tests to ensure the new deployment works as expected. If the upgrade is successful, you can upgrade the next set of Policy Service nodes.
-
Secondary Monitoring Node or Primary Monitoring Node
-
Primary Administration Node
After upgrading the Primary Administration Node, rerun upgrade verification and network tests.

Note
If the upgrade fails when registering the Primary Administration Node, the system initiates a rollback and changes the node to standalone mode. Use the CLI to upgrade the node as a standalone. Then register it to the new deployment as a Secondary Administration Node.
After the upgrade, the Secondary Administration Node becomes the Primary Administration Node, and the original Primary Administration Node becomes the Secondary Administration Node. In the Edit Node window, click Promote to Primary to make the Secondary Administration Node the Primary Administration Node, if needed.
If the Administration Nodes also have the Monitoring persona, use the node sequence shown in the table.
|
Node personas in the current deployment |
Upgrade sequence |
|---|---|
|
Secondary Administration/Primary Monitoring Node, Policy Service Nodes, Primary Administration/Secondary Monitoring Node |
|
|
Secondary Administration/Secondary Monitoring Node, Policy Service Nodes, Primary Administration/Primary Monitoring Node |
|
|
Secondary Administration Node, Primary Monitoring Node, Policy Service Nodes, Primary Administration/Secondary Monitoring Node |
|
|
Secondary Administration Node, Secondary Monitoring Node, Policy Service Nodes, Primary Administration/Primary Monitoring Node |
|
|
Secondary Administration/Primary Monitoring Node, Policy Service Nodes, Secondary Monitoring Node, Primary Administration Node |
|
|
Secondary Administration/Secondary Monitoring Node, Policy Service Nodes, Primary Monitoring Node, Primary Administration Node |
|
You will get an error message "No Secondary Administration Node in the Deployment" under these circumstances:
-
There is no Secondary Administration node in the deployment.
-
The Secondary Administration node is down.
-
The Secondary Administration node is upgraded and moved to the upgraded deployment. This occurs when you use the Refresh Deployment Details option after upgrading the Secondary Administration node.
To resolve this issue, complete one of these tasks:
-
If the deployment does not have a Secondary Administration node, configure a Secondary Administration node and retry upgrade.
-
If the Secondary Administration node is down, bring up the node and retry upgrade.
-
If the Secondary Administration node is upgraded and moved to the upgraded deployment, use the CLI to manually upgrade the other nodes in the deployment.
Choose your upgrade method
You can choose an upgrade process based on your technical expertise and the time available for the upgrade. This release of Cisco ISE supports these upgrade processes:
-
Upgrade Cisco ISE using the backup and restore procedure.
-
Upgrade Cisco ISE using the GUI.
-
Upgrade Cisco ISE using the CLI.
Table 1 compares Cisco ISE upgrade methods.
|
Comparison factors |
Backup and restore |
Upgrade using the GUI |
Upgrade using CLI |
|---|---|---|---|
|
Process Type |
Fast |
Long administration required |
Longer |
|
Administration required |
More |
Less |
More |
|
Difficulty level |
Hard |
Easy |
Moderate |
|
VMs |
If there is enough capacity, new VMs can be prestaged and joined immediately to the new PAN. |
Each PSN is upgraded one after another, increasing the total upgrade time |
Each PSN is upgraded; however, they can be done in parallel to decrease total upgrade time. |
|
Upgrade time |
Least (because PSNs are imaged with new version instead of being upgraded). |
More (because each PSN is upgraded sequentially, which increases the total upgrade time linearly). |
Less (each PSN is upgraded; however, they can be done in parallel to decrease total upgrade time) |
|
Personnel required |
Stakeholders from multiple business units transfer configuration settings and operational logs. |
Fewer manual interventions are required because the upgrade process is automated. |
Technical expertise on Cisco ISE is required. |
|
Rollback options |
Difficult (requires reimaging of the nodes) |
Easy |
Easy |
Backup and restore method
Overview
The backup and restore method is the recommended approach for Cisco ISE deployment up to Cisco ISE release 3.2 patch 3.
Reimaging of the Cisco ISE node is performed during initial deployment and troubleshooting. You can also reimage the Cisco ISE node to upgrade a deployment, allowing restoration of the policy onto the new deployment once the new version is installed.
If resources are limited and the new deployment cannot support a parallel Cisco ISE node, the Secondary PAN and MnT are removed from the production deployment and upgraded before other nodes. The nodes are then moved into the new deployment. A configuration and operational backup from the previous deployment is restored on the respective nodes, creating a parallel deployment. This process restores policy sets, custom profiles, network access devices, and endpoints to the new deployment without manual intervention.
Why use the backup and restore method
We recommend the backup and restore upgrade process rather than other upgrade methods because it helps reinstate your current Cisco ISE deployment node settings and prevents data loss if an issue occurs during the upgrade process. This procedure starts by creating configuration and operational backups of the existing Cisco ISE deployment, and then applying them to the new deployment.
Upgrade advantages
The upgrade process for Cisco ISE using backup and restore offers these advantages:
-
You can restore the configuration setting and the operational logs from the previous Cisco ISE deployment, which prevents data loss.
-
You can select which nodes to reuse for the new deployment.
-
You can upgrade multiple PSNs in parallel, reducing the upgrade downtime.
-
You can stage the nodes outside maintenance windows, reducing the upgrade time during production.
Key considerations before the upgrade
You should consider these points before upgrading Cisco ISE using the backup and restore method:
-
Resources required: The backup and restore upgrade process requires additional resources. Reserve these resources for the Cisco ISE deployment before releasing them. If you reuse existing hardware, you must balance the additional load across the nodes that remain online. Therefore, evaluate the current load and latency limits before deployment. This evaluation ensures the deployment can support an increased number of users per node.
-
Personnel required: You will need resources from multiple business units to perform the upgrade. These units include network administration, security administration, data center, and virtualization teams. In addition, you must rejoin the node to the new deployment, restore certificates, rejoin to Active Directory, and wait for policy synchronization. These actions can lead to multiple reloads and require a timeframe similar to that of a net-new deployment.
-
Rollback mechanism: When you reimage the nodes, all information and configuration settings from the previous deployment are erased. Therefore, the rollback mechanism for a backup and restore upgrade follows the same procedure as reimaging the nodes again.
Best practices for the upgrade process
Here is a list of best practices for the backup and restore upgrade process.
-
Create a standalone environment or dedicate load balancers that switch the virtual IP address for RADIUS requests.
-
You can start the deployment process well before the maintenance window. Then, point the user load balancer to the new deployment.
-
If you use RSA SecurID Identity Sources, when you add a new PSN, you must generate a new configuration file with all the PSNs at the primary instance of your RSA Authentication Manager.
Note
To avoid generating a new RSA configuration every time you add a new PSN, you must know the IP address of all the nodes that you are going to add to the deployment before starting the backup and restore process. Then, you must generate the RSA configuration file using all the IP addresses and upload it to the PAN UI.
Steps to generate and import the RSA configuration file
-
Generate the Authentication Manager configuration file at your primary RSA Authentication Manager Security Console instance, with all the IP addresses of all the nodes, including those that are not in the deployment.
-
Import the new configuration file to the PAN UI.
Note
You must clear the node secret on your RSA Authentication Manager before uploading the new RSA configuration file. This helps to create a new node secret and share it between Cisco ISE and your RSA Authentication Manager.
-
Add a new node to the deployment without generating a new configuration file as it is replicated as part of the configuration using the IP addresses that are already present in the imported configuration file.
Process overview
Here is an overview of the steps involved in the backup and restore upgrade method:
-
Deregister a node: To remove a node from the deployment, deregister the node. For more information about node deregistration or removal, see the "Remove a Node from Deployment" section in Cisco Identity Services Engine Administrator Guide.
-
Reimage a node: To reimage a Cisco ISE node, first remove it from the deployment, then install Cisco ISE. For more information about Cisco ISE installation, see the "Install Cisco ISE" chapter in the Cisco Identity Services Engine Installation Guide.
Apply the latest patch to the newly installed Cisco ISE release.
-
Back up and restore: Back up and restore the configuration or operational database. For more information about the backup and restore operations, see the "Backup and Restore Operations" section in Cisco Identity Services Engine Administrator Guide.
-
Assign primary or secondary roles to a node: Assign a primary or secondary role to a node as required. For more information about how to assign a role to a Monitoring and Troubleshooting (MnT) node, see the "Manually Modify MnT Role" section in Cisco Identity Services Engine Administrator Guide.
-
Join the Policy Service Nodes: To join a Policy Service Node (PSN) to the new deployment, register the node as a PSN. For more information about registering or joining a PSN, see the "Register a Secondary Cisco ISE Node" section in Cisco Identity Services Engine Administrator Guide.
Note
After you upgrade Cisco ISE using the backup and restore method, you must manually sync all the nodes in the deployment.
-
Import certificates: Import the system certificates to the newly deployed nodes in Cisco ISE. For more information about how to import system certificates to a Cisco ISE node, see the "Import a System Certificate" section in Cisco Identity Services Engine Administrator Guide .
Backup and restore upgrade process
If you are currently using Cisco ISE, Release 2.7 or later, you can directly upgrade to Cisco ISE, Release 3.2.
In case you are using a Cisco ISE version that is not compatible to Cisco ISE Release 3.2, you need to first upgrade to an intermediate version, compatible to Cisco ISE, Release 3.2. And then you can upgrade from the intermediate version to Cisco ISE, Release 3.2. Follow the below steps to upgrade to an intermediate Cisco ISE version.
Upgrade secondary PAN and secondary MnT nodes to Cisco ISE, Release 2.7, 3.0 or 3.1
Before you begin
Restore backup from your existing Cisco ISE to intermediate Cisco ISE Release. If you do not want to retain the older reporting data, skip steps 4 to 6.
Procedure
|
Step 1 |
De-register Secondary PAN node. |
|
Step 2 |
Re-image the deregistered Secondary PAN node to the intermediate Cisco ISE Release, as a standalone node. After the install, make this node the Primary Administration Node in the new deployment. |
|
Step 3 |
Restore Cisco ISE configuration from the backup data. |
|
Step 4 |
De-register Secondary MnT node. |
|
Step 5 |
Re-image the deregistered Secondary MnT node to the intermediate Cisco ISE Release, as a standalone node. |
|
Step 6 |
Assign Primary role to this Mnt node and restore the operational backup from the backup repository. This is an optional step and needs to performed only if you need to report of the older logs |
|
Step 7 |
Import ise-https-admin CA certificates from your original Cisco ISE backup repository. |
Upgrade secondary PAN and MnT nodes to Cisco ISE, release 3.2
Procedure
|
Step 1 |
Take a backup of Cisco ISE configuration settings and operational logs. |
|
Step 2 |
De-register Secondary PAN node. |
|
Step 3 |
Re-image the deregistered secondary PAN node to Cisco ISE, Release 3.2. |
|
Step 4 |
Restore ISE configuration from the backup data and make this node as the Primary Node for your new deployment. |
|
Step 5 |
Import ise-https-admin CA certificates from the backup for this node unless you are using wild card certificates. |
|
Step 6 |
De-register Secondary MnT node. |
|
Step 7 |
Re-Image the deregistered Secondary MnT node to Cisco ISE, Release 3.2. |
|
Step 8 |
Restore your current ISE operational backup and join node as Primary MnT for new deployment. This is an optional step and needs to performed only if you need to report of the older logs. |
Join Policy Service Nodes to Cisco ISE, release 3.2
In case you have Cisco ISE nodes deployed in multiple sites, join the PSNs available in the site (that has Secondary PAN and MnT nodes) first and then join the PSNs available in the other sites followed by the PSNs available at the site (that has Primary PAN and MnT nodes of your existing Cisco ISE).
Procedure
|
Step 1 |
De-register PSNs. |
|
Step 2 |
Reimage PSN to Cisco ISE, release 3.2 latest patch and join PSN to new Cisco ISE, Release 3.2 deployment. |
What to do next
We recommend that you test your partially upgraded deployment at this point. You can do so by checking if logs are present and the upgraded nodes funtion as expected.
Upgrade Primary PAN and MnT to Cisco ISE, release 3.2
Procedure
|
Step 1 |
Reimage Primary MnT node and join as Secondary MnT to new deployment. In case you want to preserve the data for reporting, restore a copy of the operational backup to the Secondary MnT node. |
|
Step 2 |
Reimage Primary PAN node and join as Secondary PAN to new deployment. |
Upgrade a Cisco ISE deployment from the CLI
Upgrade from CLI
Upgrading Cisco ISE from the CLI is an elaborate process and requires the administrator to download the upgrade image to the local node, execute the upgrade, and monitor each node individually throughout the upgrade process. While the upgrade sequence is similar in nature to that of the GUI upgrade, this approach operationally intensive from a monitoring and actions point of view.
Upgrading from CLI is recommended for troubleshooting purposes only due to the level of effort required.
The advantages of upgrading Cisco ISE from the CLI are as follows:
-
CLI presents additional logging messages to the administrator while the upgrade is performed.
-
The nodes which are upgraded can be chosen with more control and upgraded in parallel. Nodes that are not being upgraded can handle additional load as endpoints are rebalanced across the deployment.
-
Rolling back at the CLI is much easier due to the ability to instruct scripts to undo previous changes.
-
As the image resides on the node locally, copy errors between PAN and PSNs, if any, can be eliminated.
You need technical expertise and longer time to upgrade your Cisco ISE using CLI.
The upgrade process using CLI depends on the deployment type.
Upgrade a standalone node
You can use the application upgrade <upgrade bundle name> <repository name> command directly, or the application upgrade prepare <upgrade bundle name> <repository name> and application upgrade proceed commands in the specified sequence to upgrade a standalone node.
You can run the application upgrade <upgrade bundle name> <repository name> command from the CLI on a standalone node that assumes the Administration, Policy Service, pxGrid, and Monitoring personas. If you choose to run this command directly, we recommend that you copy the upgrade bundle from the remote repository to the Cisco ISE node's local disk before you run the command to save time during upgrade.
Alternatively, you can use the application upgrade prepare <upgrade bundle name> <repository name> and application upgrade proceed commands. The application upgrade prepare <upgrade bundle name> <repository name> command downloads the upgrade bundle and extracts it locally. This command copies the upgrade bundle from the remote repository to the Cisco ISE node's local disk. After you have prepared a node for upgrade, run the application upgrade proceed command to complete the upgrade successfully.
We recommend that you run the application upgrade prepare <upgrade bundle name> <repository name> and application upgrade proceed commands as described below.
Before you begin
Ensure that you have read the instructions in the Prepare for Upgrade section.
Procedure
|
Step 1 |
Create a repository on the local disk. For example, you can create a repository called "upgrade." Example: |
||
|
Step 2 |
From the Cisco ISE CLI, enter application upgrade prepare <upgrade bundle name> <repository name> command. This command copies the upgrade bundle to the local repository "upgrade" that you created in the previous step and lists the MD5 and SHA256 checksum. |
||
|
Step 3 |
From the Cisco ISE CLI, enter the application upgrade proceed command.
|
What to do next
Upgrade a two-node deployment
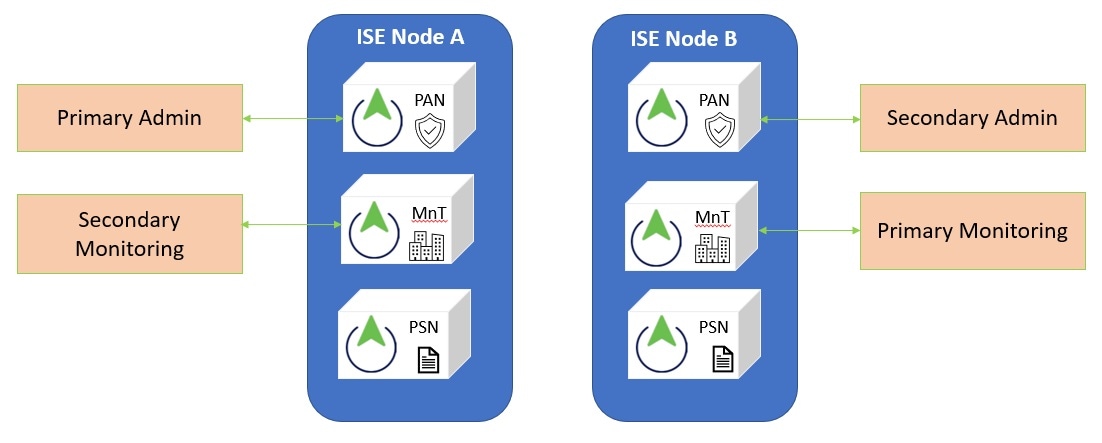
Use the application upgrade prepare <upgrade bundle name> <repository name> and proceed commands to upgrade a two-node deployment. You do not have to manually deregister the node and register it again. The upgrade software automatically deregisters the node and moves it to the new deployment. When you upgrade a two-node deployment, you should initially upgrade only the Secondary Administration Node(node B). When the secondary node upgrade is complete, you upgrade the primary node thereafter(node A). If you have a deployment set up as shown in the following figure, you can proceed with this upgrade procedure.
Before you begin
-
Perform an on-demand backup (manually) of the configuration and operational data from the Primary Administration Node.
-
Ensure that the Administration and Monitoring personas are enabled on both the nodes in the deployment.
If the Administration persona is enabled only on the Primary Administration Node, enable the Administration persona on the secondary node because the upgrade process requires the Secondary Administration Node to be upgraded first.
Alternatively, if there is only one Administration node in your two-node deployment, then deregister the secondary node. Both the nodes become standalone nodes. Upgrade both the nodes as standalone nodes and set up the deployment after the upgrade.
-
If the Monitoring persona is enabled only on one of the nodes, ensure that you enable the Monitoring persona on the other node before you proceed.
Procedure
|
Step 1 |
Upgrade the secondary node (node B) from the CLI. The upgrade process automatically removes Node B from the deployment and upgrades it. Node B becomes the upgraded primary node when it restarts. |
|
Step 2 |
Upgrade node A. The upgrade process automatically registers node A to the deployment and makes it the secondary node in the upgraded environment. |
|
Step 3 |
Promote node A, now to be the primary node in the new deployment. After the upgrade is complete, if the nodes contain old Monitoring logs, ensure that you run the application configure ise command and choose 5 (Refresh Database Statistics) on the nodes. |
What to do next
Upgrade a distributed deployment
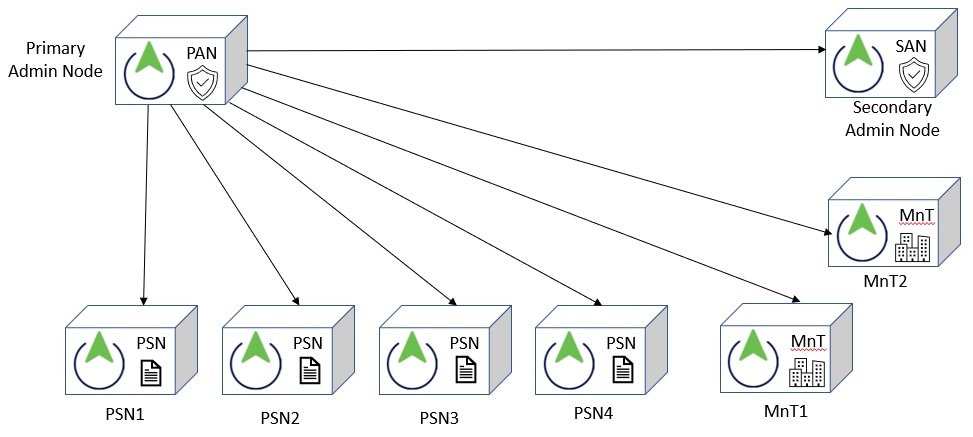
You must first upgrade the Secondary Administration Node (SAN)to the new release. For example, if you have a deployment setup as shown in the following figure, with one Primary Administration Node (PAN), one Secondary Administration Node, four Policy Service Nodes (PSNs) , one Primary Monitoring Node (MnT1), and one Secondary Monitoring Node (MnT2), you can proceed with the following upgrade procedure.
Note |
Do not manually deregister the node before an upgrade. Use the application upgrade prepare <upgrade bundle name> <repository name> and proceed commands to upgrade to the new release. The upgrade process deregisters the node automatically and moves it to the new deployment. If you manually deregister the node before an upgrade, ensure that you have the license file for the Primary Administration Node before beginning the upgrade process. If you do not have the file on hand (for example, if your license was installed by a Cisco partner vendor), contact the Cisco Technical Assistance Center for assistance. |
Before you begin
-
If you do not have a Secondary Administration Node in the deployment, configure a Policy Service Node to be the Secondary Administration Node before beginning the upgrade process.
-
Ensure that you have read and complied with the instructions given in the Prepare for Upgrade section.
-
When you upgrade a complete Cisco ISE deployment, Domain Name System (DNS) server resolution (both forward and reverse lookups) is mandatory; otherwise, the upgrade fails.
Procedure
|
Step 1 |
Upgrade the SAN from the CLI. The upgrade process automatically deregisters SAN from the deployment and upgrades it. SAN becomes the primary node of the new deployment when it restarts. Because each deployment requires at least one Monitoring node, the upgrade process enables the Monitoring persona on SAN even if it was not enabled on this node in the old deployment. If the Policy Service persona was enabled on SAN in the old deployment, this configuration is retained after upgrading to the new deployment. |
|
Step 2 |
Upgrade one of your Monitoring nodes (MnT1 and MnT2) to the new deployment. We recommend that you upgrade your Primary Monitoring Node before the Secondary Monitoring Node (this is not possible if your Primary Administration Node in the old deployment functions as your Primary Monitoring Node as well). Your primary Monitoring node starts to collect the logs from the new deployment and you can view the details from the Primary Administration Node dashboard. If you have only one Monitoring node in your old deployment, before you upgrade it, ensure that you enable the Monitoring persona on PAN, which is the Primary Administration Node in the old deployment. Node persona changes result in a Cisco ISE application restart. Wait for PAN to come up before you proceed. Upgrading the Monitoring node to the new deployment takes longer than the other nodes because operational data has to be moved to the new deployment. If node B, the Primary Administration Node in the new deployment, did not have the Monitoring persona enabled in the old deployment, disable the Monitoring persona on it. Node persona changes result in a Cisco ISE application restart. Wait for the Primary Administration Node to come up before you proceed. |
|
Step 3 |
Upgrade the Policy Service Nodes (PSNs) next. You can upgrade several PSNs in parallel, but if you upgrade all the PSNs concurrently, your network will experience a downtime. After the upgrade, the PSNs are registered with the primary node of the new deployment SAN, and the data from the primary node is replicated to all the PSNs. The PSNs retain their personas, node group information, and profiling probe configurations. |
|
Step 4 |
If you have a second Monitoring node in your old deployment, you must do the following: Except for the Primary Administration Node, you must have upgraded all the other nodes to the new deployment. |
|
Step 5 |
Finally, upgrade the Primary Administration Node. This node is upgraded and added to the new deployment as a Secondary Administration Node. You can promote the Secondary Administration Node to be the primary node in the new deployment. After the upgrade is complete, if the Monitoring nodes that were upgraded contain old logs, ensure that you run the application configure ise command and choose 5 (Refresh Database Statistics) on the Monitoring nodes. |
What to do next
Verify the upgrade process
We recommend that you run some network tests to ensure that the deployment functions as expected and that users are able to authenticate and access resources on your network.
If an upgrade fails because of configuration database issues, the changes are rolled back automatically.
Procedure
|
Perform any of the following options in order to verify whether the upgrade was successful.
You can grep for STEP to view the progress of the upgrade:
|
Roll back to the previous version
In rare cases, you might need to reimage your Cisco ISE appliance. Use the previous ISO image. Restore the data from the backup file. After restoring the data, you can register with the earlier deployment. Enable the personas as you did in the earlier deployment. Back up the Cisco ISE configuration and monitoring data before starting the upgrade process.
Upgrade failures sometimes occur due to issues in the configuration and monitoring database. In these cases, you must manually restore your system, as the system does not roll back automatically. If this happens, the system displays a notification that the database was not rolled back and provides an upgrade failure message. In these scenarios, you must manually reimage your system, install Cisco ISE, and restore the configuration data and monitoring data if the Monitoring persona is enabled..
Before rollback or recovery, generate a support bundle using the backup-logs command and save it in a remote repository.
Upgrade from the GUI
Overview
Starting with Cisco ISE release 3.2 patch 4, upgrading through the GUI is the recommended method. However, this method is not supported on cloud platforms such as Oracle Cloud Infrastructure (OCI), Amazon Web Services (AWS), and Azure Cloud Services.
You can also upgrade Cisco ISE from the GUI in a single click with some customizable options. In the Cisco ISE GUI, click the Menu icon (![]() ) and choose
. Create a new repository to download the ISO image.
) and choose
. Create a new repository to download the ISO image.
During the upgrade the Secondary PAN is moved into an upgraded deployment automatically and is upgraded first, followed by Primary MnT. As a result, if either of these upgrades fail, it is mandatory that the node will be rolled back to the previous version and re-join to the previous ISE deployment. Later PSN’s are moved one by one to the new deployment and upgraded. In case of an upgrade failure, you can also choose to continue or cease the upgrade. This will result in a dual-version of same Cisco ISE deployment, allowing for troubleshooting to occur before the upgrade continues. Once all PSN’s are upgraded, the Secondary MnT and Primary PAN is upgraded and joined to the new Cisco ISE deployment.
Given that this upgarde process requires limited technical expertise, a single administrator start the upgrade and assign NOC or SOC engineers to monitor and report the upgrade status or open a TAC case.
The advantages of upgrading Cisco ISE from the GUI are as follows:
-
The upgrade is automated with minimal intervention.
-
You can choose the upgrade order of the PSNs to ensure continuity whenever possible, especially when redundancy available between data centres.
-
A single administrator can execute the upgrade without any additional personnel, third party hypervisors or network access devices.
Below pointers should be kept in mind before upgrading Cisco ISE from GUI:
Continuation in Failure Scenarios: In case of an upgrade failure, you can also choose to continue or cease the upgrade. This will result in a dual-version of same Cisco ISE deployment, allowing for troubleshooting to occur before the upgrade continues. While the Cisco Upgrade Readiness Tool should indicate any incompatibilities or misconfigurations, if the Proceed field is checked, additional errors may be encountered if due diligence was not acted upon before the upgrade.
Rollback Mechanism: If an upgrade fails on a PAN or MnT node, the nodes are automatically rolled back. However, if a PSN fails to upgrade, the nodes remain on the same Cisco ISE version and can be fixed while impairing redundancy. Cisco ISE is still operational during this time, and therefore rollback abilities are limited without re-imaging.
Time Required: Each PSN takes around 90-120 minutes to upgrade, hence if you have a large number PSNs it takes time to upgrade all of them.
Best Practice for the Upgrade from GUI: If you have a larger number of PSNs, group the PSNs in batches and perform the upgrade.
Cisco ISE offers a GUI-based centralized upgrade from the Admin portal. The upgrade process is much simplified, and the progress of the upgrade and the status of the nodes are displayed on the screen.
Choose menu option lists all the nodes in your deployment, the personas that are enabled on them, the version of ISE installed, and the status (indicates whether a node is active or inactive) of the node. You can begin upgrade only if the nodes are in the Active state.
In the Cisco ISE GUI, click the Menu icon (![]() ) and choose
menu option lists all the nodes in your deployment, the personas that are enabled on them, the version of ISE installed,
and the status (indicates whether a node is active or inactive) of the nodes. You can begin upgrade only if the nodes are
in the Active state.
) and choose
menu option lists all the nodes in your deployment, the personas that are enabled on them, the version of ISE installed,
and the status (indicates whether a node is active or inactive) of the nodes. You can begin upgrade only if the nodes are
in the Active state.
GUI-based upgrade options in Cisco ISE
Depending on the release of Cisco ISE you have deployed, you can select one of the following options in the Administration > System > Upgrade> Upgrade Selection window to upgrade your Cisco ISE deployment:
-
Full Upgrade: Full upgrade is a multi-step process that enables a complete upgrade of all the nodes in your Cisco ISE deployment at the same time. This method will upgrade the deployment in lesser time when compared to the split upgrade process. The application services will be down during this upgrade process because all nodes are upgraded parallelly.
The full upgrade method is supported for all latest Cisco ISE 2.6 patch 10 and above, Cisco ISE 2.7 patch 4 and above, and Cisco ISE 3.0 patch 3 and above.
-
Split Upgrade: Split upgrade is a multi-step process that enables the upgrade of your Cisco ISE deployment while allowing services to remain available during the upgrade process. This upgrade method allows you to choose the Cisco ISE nodes to be upgraded on your deployment. In the new split upgrade workflow, the prechecks and data upgrade happens when the system is up and running, reducing the downtime considerably and leading to a reliable upgrade.
The new split upgrade method is supported from Cisco ISE 3.2 patch 3 and above.
-
Legacy Split Upgrade: Legacy Split upgrade is a multi-step process that enables the upgrade of your Cisco ISE deployment while allowing services to remain available during the upgrade process. This upgrade method allows you to choose the Cisco ISE nodes to be upgraded on your deployment.
You can perform a legacy split upgrade to Cisco ISE release 3.2 from Cisco ISE releases 2.7, 3.0 or 3.1. This option is not available on the Cisco ISE GUI from Cisco ISE release 3.2 patch 3 onwards.
Note |
In Cisco ISE release 3.2 , Upgrade Readiness Tool (URT) and User Interface (UI) pre-checks are necessary while using the Split Upgrade method. Only UI pre-checks are necessary while using the Full Upgrade method. Although these GUI upgrade methods are available from earlier releases onwards, you need to be running a minimum of Cisco ISE 2.7 patch 4 to upgrade to Cisco ISE 3.2 . |
Full upgrade of Cisco ISE deployment from the GUI
Cisco ISE offers a GUI-based centralized upgrade from the Admin portal. Full Upgrade is a multistep process that enables a complete upgrade of your Cisco ISE deployment.
To perform a full upgrade of your Cisco ISE deployment:
Procedure
|
Step 1 |
In the Cisco ISE GUI, click the Menu icon ( |
||||||||||||||||||||||||||||||||||||||
|
Step 2 |
In the Upgrade Selection window, click Full Upgrade and then click Start Upgrade. |
||||||||||||||||||||||||||||||||||||||
|
Step 3 |
Click Next in the window to start the upgrade workflow. |
||||||||||||||||||||||||||||||||||||||
|
Step 4 |
Complete all the tasks listed in the Checklist window to avoid any blockers or downtime during the upgrade process. |
||||||||||||||||||||||||||||||||||||||
|
Step 5 |
(Optional) Click Print Checklist to download the checklist for your reference. |
||||||||||||||||||||||||||||||||||||||
|
Step 6 |
Check the I have reviewed the checklist check box and then click Next, after you have verified the items listed in the upgrade checklist. The Prepare to Upgrade window appears. |
||||||||||||||||||||||||||||||||||||||
|
Step 7 |
From the Repository drop-down list, choose the repository where your upgrade bundle is stored. |
||||||||||||||||||||||||||||||||||||||
|
Step 8 |
From the Bundle drop-down list, choose the upgrade bundle. |
||||||||||||||||||||||||||||||||||||||
|
Step 9 |
All the patch releases are listed in the Patch drop-down list. Choose the latest patch for the Cisco ISE release you are upgrading to. |
||||||||||||||||||||||||||||||||||||||
|
Step 10 |
Click Start Preparation to validate all the Cisco ISE components and to generate a report for your deployment. Cisco ISE checks these during the upgrade process.
If any of the components are inactive or have failed, they are displayed in red. You will also be provided with the troubleshooting suggestions. Based on the upgrade criticality of the component that has failed, you can either proceed with the upgrade process or will be asked to resolve the issue in order to proceed further with the upgrade process. The Refresh Failed Checks option refreshes only the failures highlighted in red. It is mandatory to rectify these failures before performing an upgrade. Warnings highlighted in orange do not stop the upgrade process. However, they may affect certain Cisco ISE functionalities after the upgrade. Click the Refresh icon displayed next to each warning to refresh these checks after resolving the issues. Click the Expand to Show icon to see additional information about each node and its status. Click the Information icon to see more information about each component. Click Download Report to get a copy of the generated reports. You can see the estimated time taken for the staging and upgrade process. This is calculated based on the following:
|
||||||||||||||||||||||||||||||||||||||
|
Step 11 |
After the prechecks are completed for all the nodes, click Start Staging to start the staging process. During upgrade staging, the upgraded database file is copied to all the nodes in the deployment, and the configuration files are backed up on all the nodes in the deployment. 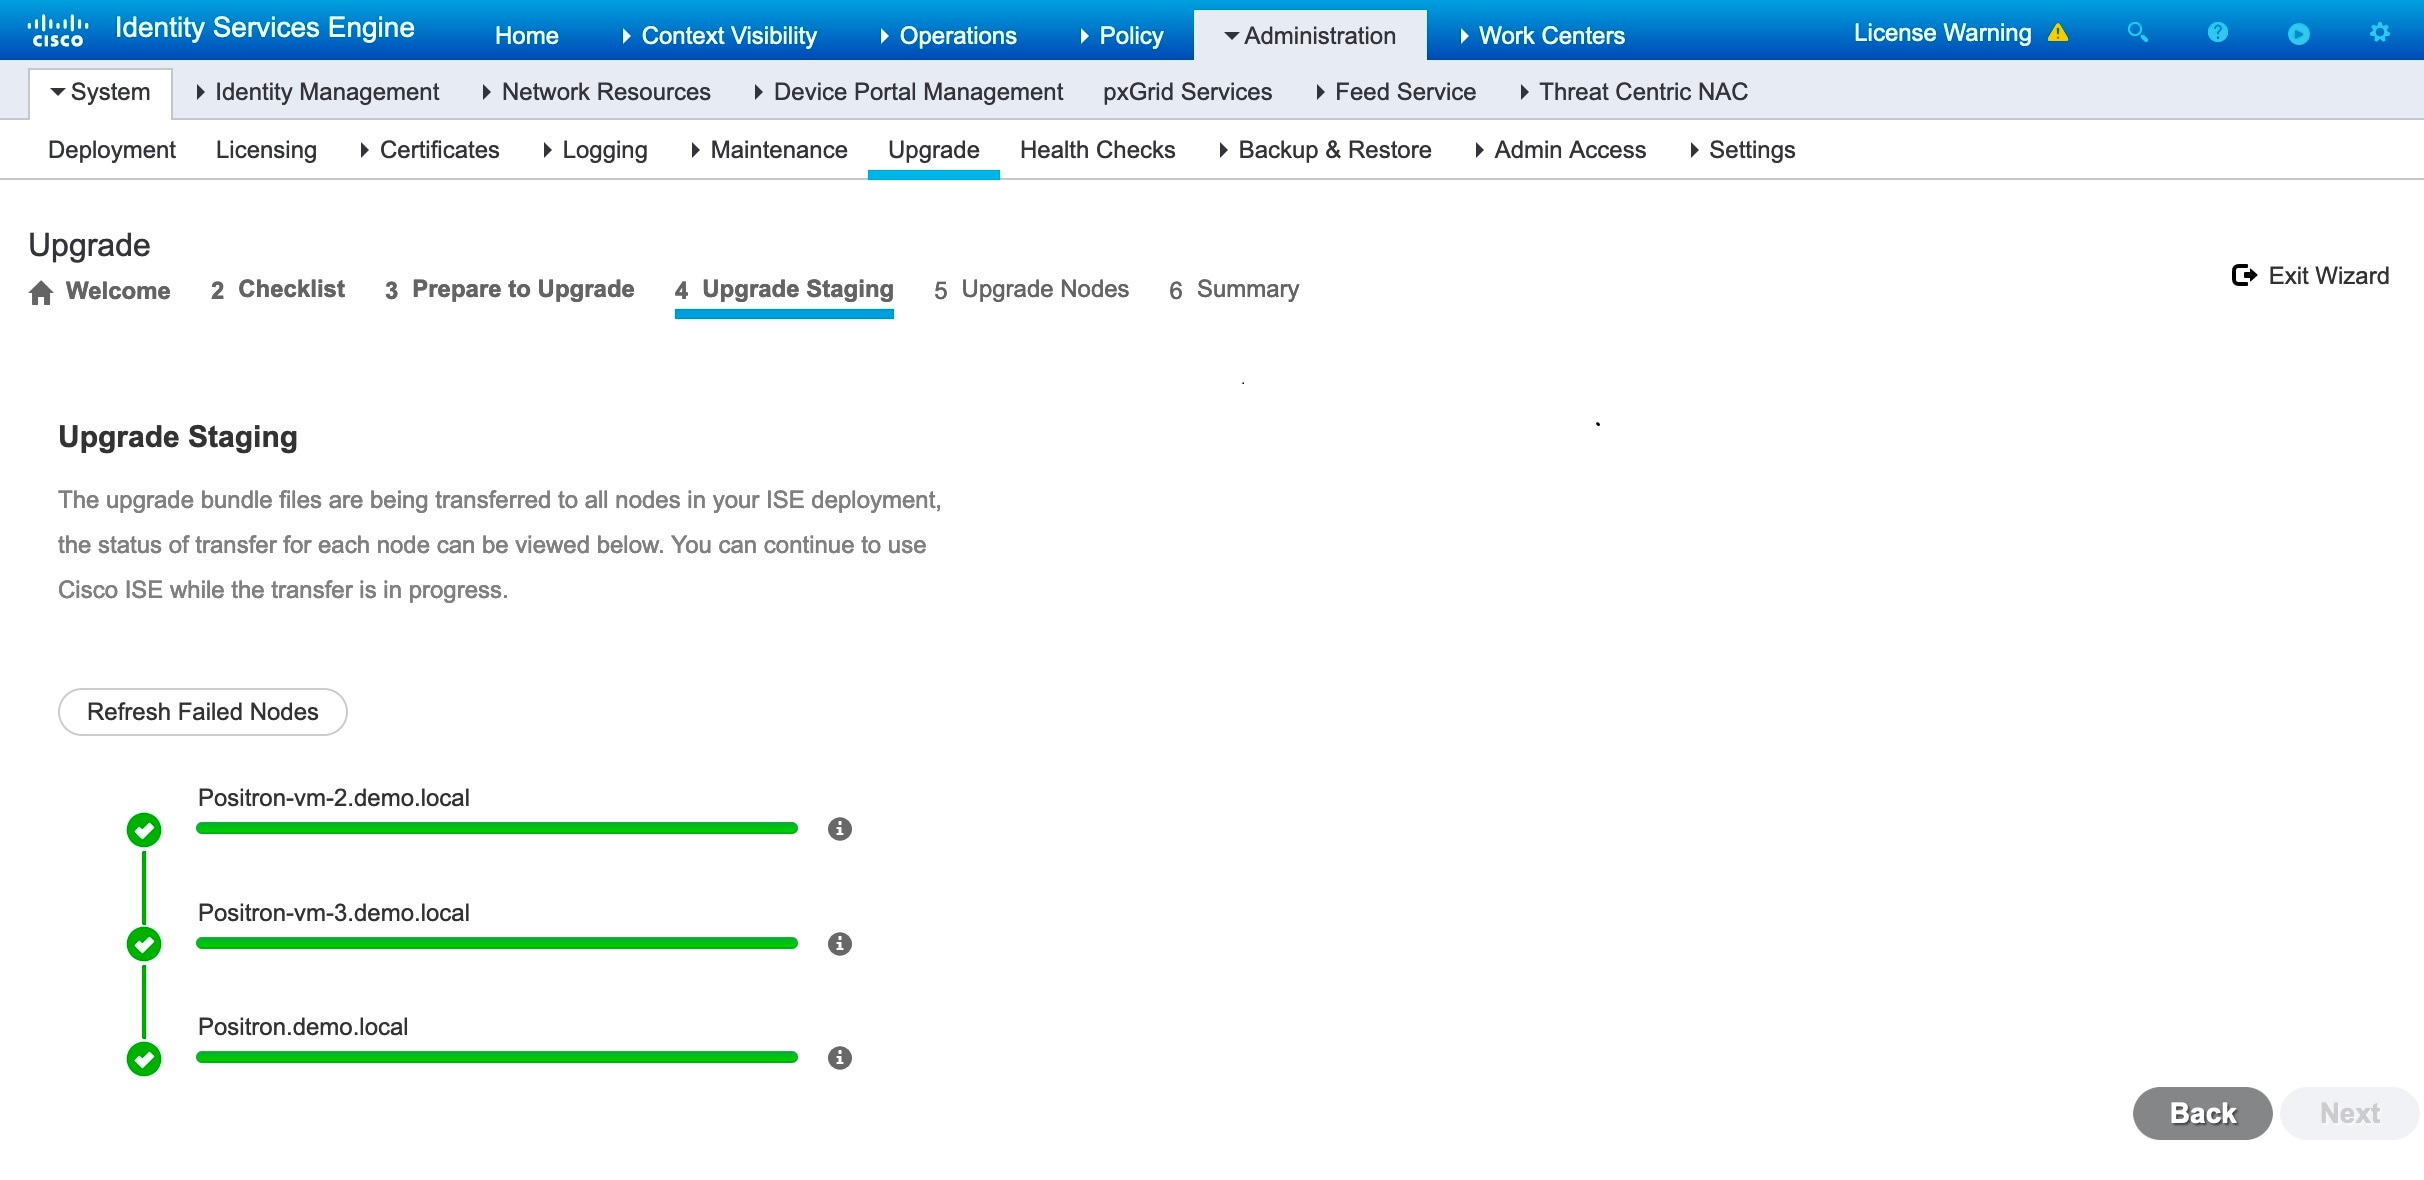
If upgrade staging on a node is successful, it is displayed in green. If the upgrade staging fails for a particular node, it is displayed in red. You will also be provided with the troubleshooting suggestions. Click the Refresh Failed Nodes icon to reinitiate the upgrade staging for the failed nodes. |
||||||||||||||||||||||||||||||||||||||
|
Step 12 |
Click Next to proceed to the Upgrade Nodes window. In the Upgrade Nodes window, you can see the overall upgrade progress and the status for each node in your deployment. |
||||||||||||||||||||||||||||||||||||||
|
Step 13 |
Click Start to initiate the upgrade process. Just before the upgrade procedure is completed, the message The system is about to upgrade. Logging out. is displayed. |
||||||||||||||||||||||||||||||||||||||
|
Step 14 |
Click OK to proceed.
You can monitor the primary PAN upgrade status from the secondary PAN dashboard while the primary PAN is upgraded. After the primary PAN is upgraded, you can monitor the upgrade status of all Cisco ISE nodes from the primary PAN dashboard. To monitor the upgrade process, you must have an active Cisco ISE Tier License. To view the upgrade process, the Cisco ISE Evaluation License is sufficient. If no active licenses are present, you cannot view or monitor the upgrade process. For more information on Cisco ISE licenses, see the chapter "Licensing" in the Cisco ISE Administrator Guide for your release. 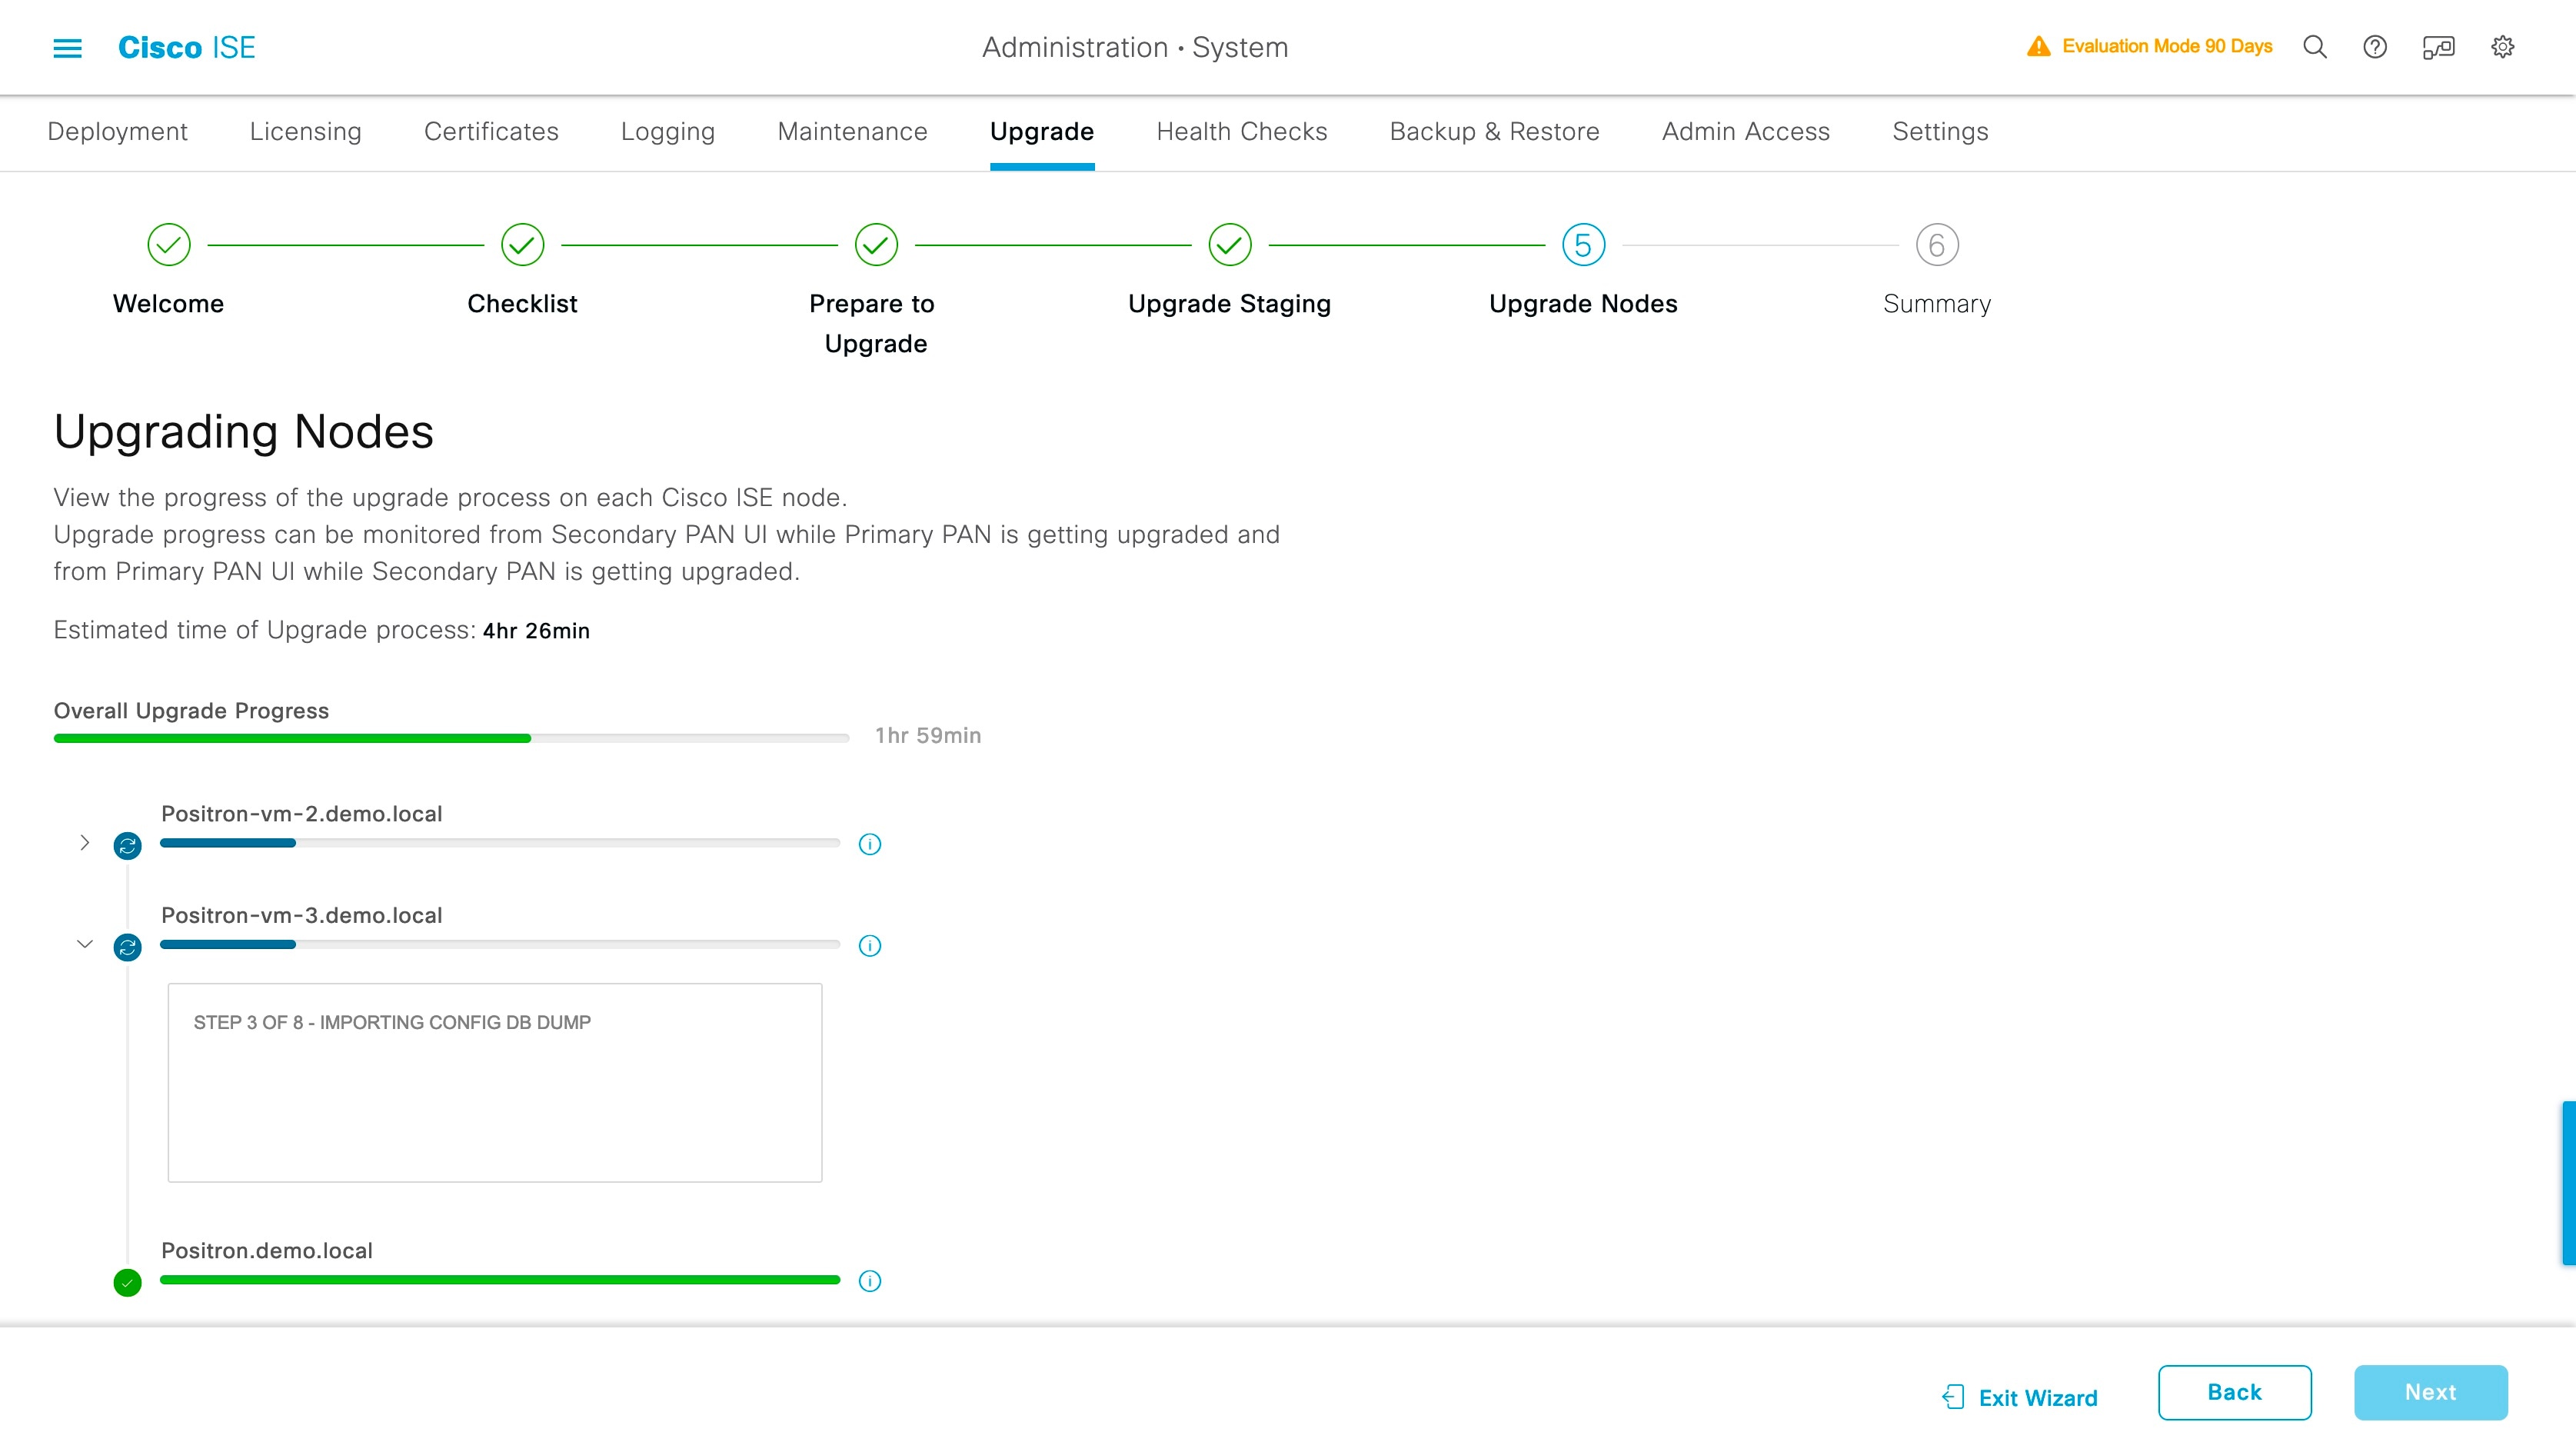
|
||||||||||||||||||||||||||||||||||||||
|
Step 15 |
Click Next in the Upgrade Nodes window to check whether all the nodes are upgraded successfully. If there are any failed nodes, a dialog box with information about the failed nodes is displayed. |
||||||||||||||||||||||||||||||||||||||
|
Step 16 |
Click OK in the dialog box to deregister the failed nodes from the deployment. After the upgrade process is completed, you can view and download the diagnostic upgrade reports for your deployment in the Summary window. You can verify and download the upgrade summary reports with relevant details such as Checklist, Prepare to Upgrade, Upgrade Report, and System Health checklist items. |
Split Upgrade of Cisco ISE Deployment from GUI
Cisco ISE offers a GUI-based centralized upgrade from the Admin portal. Split upgrade is a multi step process that enables the upgrade of your Cisco ISE deployment while allowing other services to be available for users. This may require changes to the network or load balancers, to ensure that nodes are available to perform authentications. A new split upgrade framework has been added from Cisco ISE Release 3.3 onwards, to increase stability and reduce downtime. The downtime can be limited in a split upgrade by dividing the nodes into batches and iterating the upgrade for each batch. However this process might take longer than a full upgrade. You can upgrade from Cisco ISE Release 3.2 Patch 3 and later to Cisco ISE Release 3.3 and later.
The new split upgrade workflow provides the following advantages:
-
The prechecks are done before the proceed phase of the upgrade.
-
Data upgrade happens during the precheck phase. This reduces the data upgrade time and the risk of the system getting into an unusable state because of data upgrade issues.
-
PSNs and MnT nodes can be selected in the first iteration itself along with the secondary PAN, and also in the last iteration along with the primary PAN. The selected MnT nodes can be primary or secondary. There is no mandate to upgrade the secondary or primary PAN separately.
-
The PSNs and MnT nodes are upgraded simultaneously when they are selected as a part of the same iteration, further reducing the upgrade time.
Perform the following procedure for a split upgrade of your Cisco ISE deployment.
Procedure
|
Step 1 |
In the Cisco ISE GUI, click the Menu icon ( |
||||||||||||||||||||||||||||||||||||||||||
|
Step 2 |
In the Upgrade Selection window, click Split Upgrade. A warning message is displayed stating that the Precheck Report will be cleared if the upgrade type is changed to Split Upgrade, and that ISE Services will continue to work during the Precheck Execution and Staging Nodes stages. Click OK to continue. |
||||||||||||||||||||||||||||||||||||||||||
|
Step 3 |
Click Start Upgrade. |
||||||||||||||||||||||||||||||||||||||||||
|
Step 4 |
Click Let's Do It in the window to start the upgrade workflow. |
||||||||||||||||||||||||||||||||||||||||||
|
Step 5 |
Complete all the tasks listed in the Checklist window to avoid delay or downtime during the upgrade process. |
||||||||||||||||||||||||||||||||||||||||||
|
Step 6 |
(Optional) Click Print Checklist to download the checklist for your reference. |
||||||||||||||||||||||||||||||||||||||||||
|
Step 7 |
Check the I have reviewed the checklist check box and then click Next, after you have verified the items listed in the upgrade checklist. The Node Selection window appears. |
||||||||||||||||||||||||||||||||||||||||||
|
Step 8 |
Check the check boxes next to the nodes that you want to upgrade in the current iteration.
|
||||||||||||||||||||||||||||||||||||||||||
|
Step 9 |
Click Next. The Prepare to Upgrade window opens. |
||||||||||||||||||||||||||||||||||||||||||
|
Step 10 |
From the Repository drop-down list, choose the repository in which your upgrade bundle is stored.
|
||||||||||||||||||||||||||||||||||||||||||
|
Step 11 |
From the Bundle drop-down list, choose the upgrade bundle. All the patch releases are listed in the Patch drop-down list. We recommend that you choose the latest patch for the Cisco ISE release you are upgrading to. |
||||||||||||||||||||||||||||||||||||||||||
|
Step 12 |
Click Start Preparation to validate all the Cisco ISE components and to generate a report for your deployment. Cisco ISE checks the following during the upgrade process.
If any of the components are inactive or have failed, they are displayed in red. You will also be provided with troubleshooting suggestions. Based on the upgrade criticality of the component that has failed, you can either proceed with the upgrade process or will be asked to resolve the issue in order to proceed further with the upgrade process. The Refresh Failed Checks option refreshes only the failures highlighted in red. It is mandatory to rectify these failures before performing an upgrade. Warnings highlighted in orange do not stop the upgrade process. However, they may affect certain Cisco ISE functionalities after the upgrade. Click the Refresh icon displayed next to each warning message, to refresh these checks after resolving the issues. Click the Expand to Show icon to see additional information about each node and its status. Click the Information icon to see more information about each component. Click Download Report to get a copy of the generated reports. You can see the estimated time taken for the upgrade process. This is calculated based on the following:
|
||||||||||||||||||||||||||||||||||||||||||
|
Step 13 |
After the prechecks are completed for all the nodes, click Start Staging to start the staging process. The Upgrade Staging window opens. During upgrade staging, the upgraded database file is copied to all the nodes selected in the iteration, and the configuration files are backed up on all the nodes selected in the iteration. If upgrade staging on a node is successful, it is displayed in green. If the upgrade staging fails for a particular node, it is displayed in red. You will also be provided with troubleshooting suggestions. Click the Refresh Failed Nodes icon to reinitiate the upgrade staging for the failed nodes. |
||||||||||||||||||||||||||||||||||||||||||
|
Step 14 |
Click Next to proceed to the Upgrade Nodes window. In the Upgrade Nodes window, you can see the overall upgrade progress and the status for each node in your deployment. |
||||||||||||||||||||||||||||||||||||||||||
|
Step 15 |
Click Start to initiate the upgrade process. The upgrade progress can be monitored from the secondary PAN GUI when the primary PAN is getting upgraded, and from the primary PAN GUI when the secondary PAN is getting upgraded.
|
||||||||||||||||||||||||||||||||||||||||||
|
Step 16 |
Click Next in the Upgrade Nodes window to check whether all the nodes are upgraded successfully. If there are any failed nodes, a dialog box with information about the failed nodes is displayed. |
||||||||||||||||||||||||||||||||||||||||||
|
Step 17 |
Click Finish in the Summary window. You are redirected to the Node Selection window, so that you can select the nodes for the next iteration. |
||||||||||||||||||||||||||||||||||||||||||
|
Step 18 |
Continue with the next iteration by following the sequence from Step 8 to Step 18 until all the nodes are upgraded. The Configuration Data Dump Generation precheck is run instead of the Configuration Data Upgrade precheck in all the iterations of the process, except the first. It is not mandatory to upgrade all nodes of a deployment while running the split upgrade process. You can stop after any number of iterations, but the Upgrade Tables in the new deployment need to be cleared using the CLI commands application configure ise> reset upgrade tables from the admin shell. After the upgrade process is completed, you can view and download the diagnostic upgrade reports for your deployment in the Summary window. You can verify and download the upgrade summary reports with relevant details such as the old and new personas of the upgraded nodes, the prechecks performed, and the Prepare to Upgrade and Upgrade Report checklist items. If you have carried out the Cisco ISE split upgrade, the secondary PAN is promoted to the primary PAN in the process. In the Cisco ISE administration portal, choose Administration > Licensing. In the Cisco Smart Licensing area, click Update. A licensing alarm is displayed in your Cisco ISE until you update your licenses. |
Legacy Split Upgrade of Cisco ISE Deployment from the GUI
You can perform a legacy split upgrade to Cisco ISE Release 3.2 from Cisco ISE Releases 2.7, 3.0 or 3.1
Before you begin
Ensure that you have read the instructions in the Prepare for Upgrade section.
Procedure
|
Step 1 |
In the Cisco ISE GUI, click the Menu icon ( |
||||
|
Step 2 |
Click Proceed. |
||||
|
Step 3 |
The Review Checklist window is displayed. Read the given instructions carefully. |
||||
|
Step 4 |
Check the I have reviewed the checklist check box, and click Continue. The Download Bundle to Nodes window is displayed. |
||||
|
Step 5 |
Download the upgrade bundle from the repository to the nodes: |
||||
|
Step 6 |
Click Continue. The Upgrade Nodes window appears. 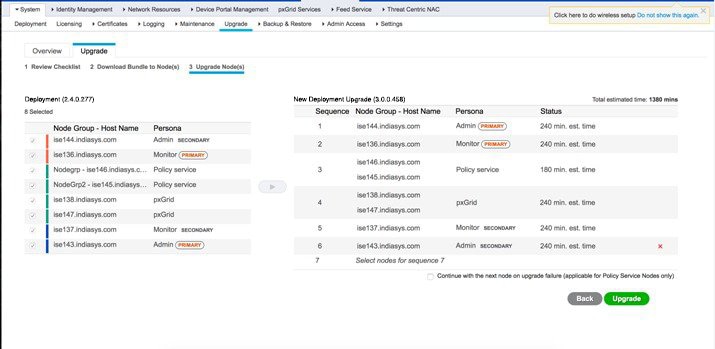 |
||||
|
Step 7 |
Choose the upgrade sequence. When you move a node to the new deployment, a time estimate for the upgrade is displayed on the Upgrade Nodes window. You can use this information to plan for an upgrade and minimize downtime. Use the sequence given below if you have a pair of Administration and Monitoring Nodes, and several Policy Service Nodes. |
||||
|
Step 8 |
Check the Continue with Upgrade on Failure check box if you want to continue with the upgrade even if the upgrade fails on any of the Policy Service Nodes in the upgrade sequence. This option is not applicable to the Secondary Administration Node and the Primary Monitoring Node. If any of these nodes fail, the upgrade process is rolled back. If any of the Policy Service Nodes fail, the Secondary Monitoring Node and the Primary Administration Node are not upgraded and remain in the old deployment. |
||||
|
Step 9 |
Click Upgrade to begin the deployment upgrade. 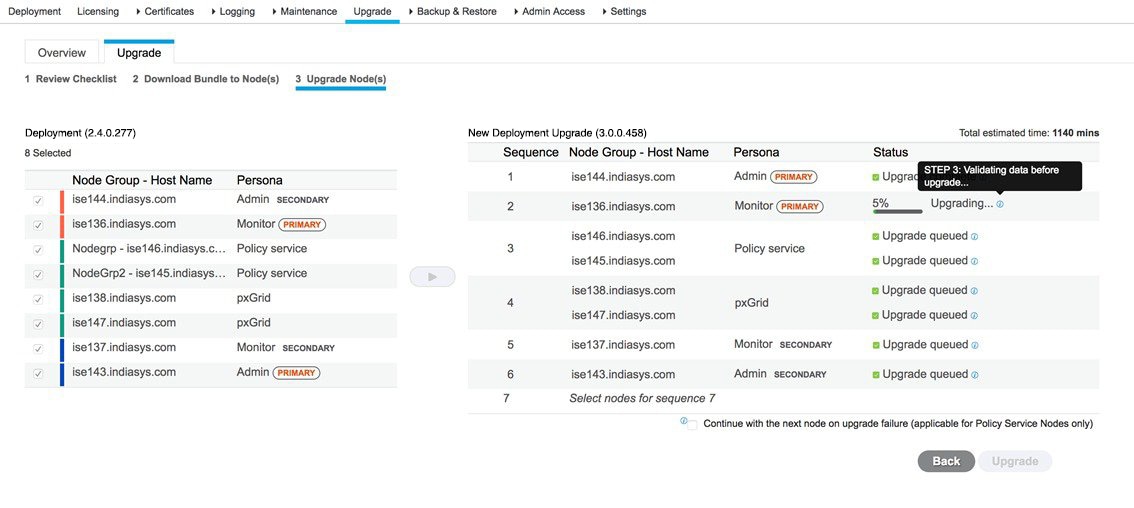 The upgrade progress is displayed for each node. On successful completion, the node status changes to Upgrade Complete.
If you get the warning message: The node has been reverted back to its pre-upgrade state , go to the Upgrade window, click the Details link. Address the issues that are listed in the Upgrade Failure Details window. After you fix all the issues, click Upgrade to reinitiate the upgrade. If you have carried out the Cisco ISE split upgrade, the secondary PAN is promoted to the primary PAN in the process. In the Cisco ISE administration portal, choose Administration > Licensing. In the Cisco Smart Licensing area, click Update. A licensing alarm is displayed in your Cisco ISE until you update your licenses.
|
 Feedback