Cisco Security Cloud Control: Secure Firewall Device Management

PDF

Cisco Security Cloud Control: Secure Firewall Device Management

Configuring Remote Access VPN for an FDM-Managed Device

Want to summarize with AI?

Log in

Learn how to configure and monitor Remote Access VPN for FDM-managed devices in Security Cloud Control, including AnyConnect packages, identity sources, RADIUS and Duo authentication, group policies, connection profiles, traffic access, licensing, verification, session reporting, and session management.


Security Cloud Control Firewall Management provides an intuitive user interface for configuring a new Remote Access Virtual Private Network (RA VPN). It also allows you to quickly and easily configure RA VPN connection for multiple FDM-managed devices that are on board in Security Cloud Control Firewall Management. AnyConnect is the only client that is supported on endpoint devices for an RA VPN connectivity to FDM-managed devices.

When the AnyConnect client negotiates an SSL VPN connection with the FDM-managed device, it connects using Transport Layer Security (TLS) or Datagram Transport Layer Security (DTLS). DTLS avoids latency and bandwidth problems associated with some SSL connections and improves the performance of real-time applications that are sensitive to packet delays. The client and the FDM-managed device negotiate the TLS/DTLS version to use. DTLS is used if the client supports it.

Security Cloud Control supports the following aspects of RA VPN functionality on FDM-managed devices:

  • SSL client-based remote access

  • IPv4 and IPv6 addressing

  • Shared RA VPN configuration across multiple FDM-managed devices

If an onboarded FDM-managed device (running on software version 6.7 or later) contains RA VPN configuration with SAML server as the authentication source, Security Cloud Control doesn't populate the AAA details in the connection profile as it doesn't manage SAML server objects in the current release. Thus you can't manage such RA VPN configuration from Security Cloud Control. However, Security Cloud Control reads the RA VPN connection profile and associated trusted CA certificate and SAML server objects.

Split Tunneling for RA VPN Users (Hair Pinning)

This article describes the split tunneling for RA VPN.

Typically, in remote access VPN, you might want the VPN users to access the Internet through your device. However, you can allow your VPN users to access an outside network while they are connected to an RA VPN. This technique is called split tunneling or hair pinning. The split tunnel allows VPN connectivity to a remote network across a secure tunnel, and it also allows connectivity to a network outside the VPN tunnel. Split tunneling reduces the network load on the FDM-managed devices and increases the bandwidth on the outside interface.

To configure a split-tunnel list, you must create a Standard Access List or Extended Access List. Follow the instructions explained in the How to Provide Internet Access on the Outside Interface for Remote Access VPN Users (Hair Pinning) section of Virtual Private Networks (VPN) chapter of the Cisco Firepower Threat Defense Configuration Guide for Firepower Device Manager for the version your device is running.


Control User Permissions and Attributes Using RADIUS and Group Policies

This article provides information on applying attributes to RA VPN connections from an external RADIUS server or a group policy.

You can apply user authorization attributes (also called user entitlements or permissions) to RA VPN connections from an external RADIUS server or from a group policy defined on the FDM-managed device. If the FDM-managed device receives attributes from the external AAA server that conflict with those configured on the group policy, then attributes from the AAA server always take precedence.

The FDM-managed device applies attributes in the following order:

Procedure

1.

User attributes defined on the external AAA server - The server returns these attributes after successful user authentication or authorization.

2.

Group policy configured on the FDM-managed device - If a RADIUS server returns the value of the RADIUS CLASS attribute IETF-Class-25 (OU= group-policy) for the user, the FDM-managed device places the user in the group policy of the same name and enforces any attributes in the group policy that are not returned by the server.

3.

Group policy assigned by the connection profile - The connection profile has the preliminary settings for the connection and includes a default group policy applied to the user before authentication. All users connecting to the FDM-managed device initially belong to this group, which provides any attributes that are missing from the user attributes returned by the AAA server, or the group policy assigned to the user.

FDM-managed devices support RADIUS attributes with vendor ID 3076. If the RADIUS server you use does not have these attributes defined, you must manually define them. To define an attribute, use the attribute name or number, type, value, and vendor code (3076).

The following topics explain the supported attributes based on whether the values are defined in the RADIUS server, or whether they are values the system sends to the RADIUS server.


Attributes Sent to the RADIUS Server

RADIUS attributes 146 and 150 are sent from the FDM-managed device to the RADIUS server for authentication and authorization requests. All the following attributes are sent from the FDM-managed device to the RADIUS server for accounting start, interim-update, and stop requests.

Table 1. Attributes Secure Firewall Threat Defense Sends to RADIUS

Attribute

Attribute

Syntax, Type

Single or Multi-valued

Description or Value

Client Type

150

Integer

Single

The type of client this is connecting to the VPN:

2= AnyConnect Client SSL VPN

Session Type

151

Integer

Single

The type of connection:

1 = AnyConnect Client SSL VPN

Tunnel Group Name

146

String

Single

The name of the connection profile that was used for establishing the session, as defined on the FDM-managed device. The name can be 1 - 253 characters.

Attributes Received from the RADIUS Server

The following user authorization attributes are sent to the FDM-managed device from the RADIUS server.

Attribute Attribute Number Syntax, Type Single or Multi-valued Description or Value
Access-List-Inbound 86 String Single Both Access-List attributes take the name of an ACL that is configured on the FDM-managed device. Create these ACLs in Firewall Device Manager using the Smart CLI Extended Access List object type (Log in to Firewall Device Manager and select Device > Advanced Configuration > Smart CLI > Objects). These ACLs control traffic flow in the inbound (traffic entering the FDM-managed device) or outbound (traffic leaving the FDM-managed device) direction.
Access-List-Outbound 87 String Single
Address-Pools 217 String Single The name of a network object defined on the FDM-managed device that identifies a subnet, which will be used as the address pool for clients connecting to the RA VPN. Define the network object on the Objects page.
Banner1 15 String Single The banner to display when the user logs in.
Banner2 36 String Single The second part of the banner to display when the user logs in. Banner2 is appended to Banner1.
Group-Policy 25 String Single

The group policy to use in the connection. You must create the group policy on the RA VPN Group Policy page. You can use one of the following formats:

  • group policy name

  • OU=group policy name

  • OU=group policy name;

Simultaneous-Logins 2 Integer Single The number of separate simultaneous connections the user can establish, 0 - 2147483647.
VLAN 140 Integer Single The VLAN on which to confine the user's connection, 0 - 4094. You must also configure this VLAN on a subinterface on the FDM-managed device.

Two-Factor Authentication

You can configure two-factor authentication for the RA VPN. With two-factor authentication, the user must supply a username and static password, plus an additional item such as a Duo passcode. Two-factor authentication differs from using a second authentication source in that two-factor is configured on a single authentication source, with the relationship to the Duo server tied to the primary authentication source. The exception is Duo LDAP, where you configure the Duo LDAP server as the secondary authentication source.


Duo Two-Factor Authentication Using RADIUS

You can configure the Duo RADIUS server as the primary authentication source. This approach uses the Duo RADIUS Authentication Proxy.

For the detailed steps to configure Duo, please see https://duo.com/docs/cisco-firepower.

You would then configure Duo to forward authentication requests directed to the proxy server to use another RADIUS server, or a Microsoft Active Directory(AD) server, as the first authentication factor, and the Duo Cloud Service as the second factor.

When using this approach, the user must authenticate using a username that is configured on both the Duo Authentication Proxy and the associated RADIUS/AD server, and the password for the username configured in the RADIUS/AD server, followed by one of the following Duo codes:

Duo-passcode. For example, my-password,12345.

push. For example, my-password,push. Use push to tell Duo to send a push authentication to the Duo Mobile app, which the user must have already installed and registered.

sms. For example, my-password,sms. Use sms to tell Duo to send an SMS message with a new batch of passcodes to the user’s mobile device. The user’s authentication attempt will fail when using sms. The user must then re-authenticate and enter the new passcode as the secondary factor.

phone. For example, my-password,phone. Use phone to tell Duo to perform phone callback authentication.

If the username and password are authenticated, the Duo Authentication Proxy contacts the Duo Cloud Service, which validates that the request is from a valid configured proxy device and then pushes a temporary passcode to the mobile device of the user as directed. When the user accepts this passcode, the session is marked authenticated by Duo and the RA VPN is established.

For a detailed explanation, see How to Configure Two-Factor Authentication using Duo RADIUS


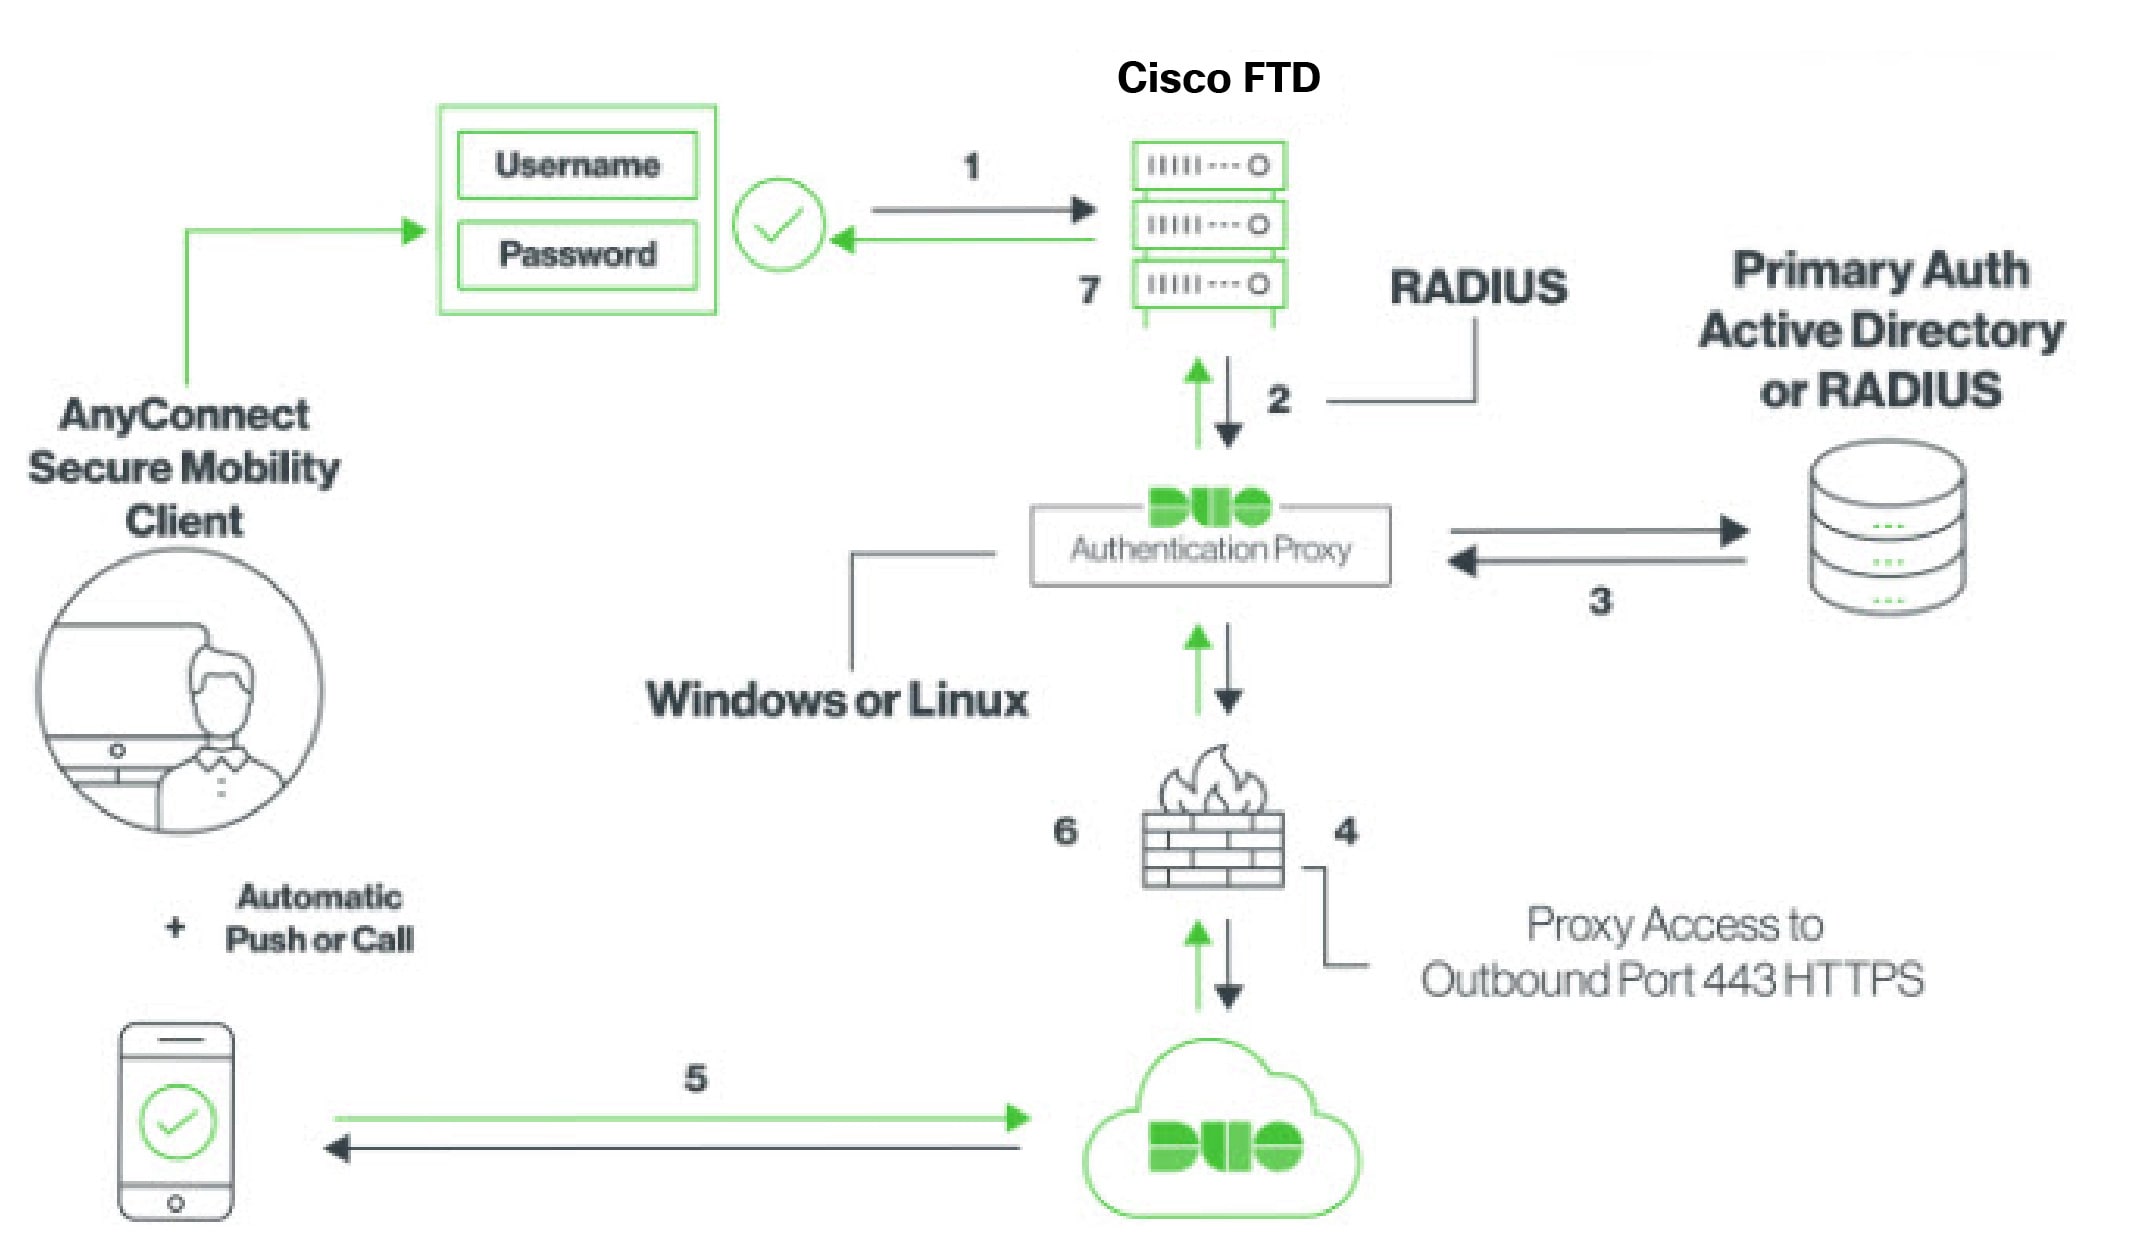
How to Configure Two-Factor Authentication using Duo RADIUS

You can configure the Duo RADIUS server as the primary authentication source. This approach uses the Duo RADIUS Authentication Proxy.

You would then configure Duo to forward authentication requests directed to the proxy server to use another RADIUS server, or an AD server, as the first authentication factor, and the Duo Cloud Service as the second factor.

The following topics explain the configuration in more detail:


System Flow for Duo RADIUS Secondary Authentication

Following is an explanation of the system flow:

  1. The user makes a remote access VPN connection to the FDM-managed device and provides username associated with RADIUS/AD server, the password for the username configured in the RADIUS/AD server, followed by one of the DUO codes, Duo-password, push, SMS, or phone. For more information, Duo Two-Factor Authentication Using RADIUS

  2. FDM-managed device sends the authentication request to the Duo Authentication proxy.

  3. Duo Authentication proxy authenticates this primary authentication attempt with the primary authentication server, which might be Active Directory or RADIUS.

  4. If the credentials are authenticated, the Duo Authentication Proxy connection is established to Duo Security over TCP port 443.

  5. Duo then authenticates the user separately through push notification, text message with a passcode, or a telephone call. The user must complete this authentication successfully.

  6. Duo authentication proxy receives the authentication response.

  7. If the secondary authentication was successful, the FDM-managed device establishes a remote access VPN connection with the user’s AnyConnect client.


Configure Duo RADIUS Secondary Authentication

Duo Authentication proxy authenticates this primary authentication attempt with the primary authentication server, which might be Active Directory or RADIUS.


Create a Duo Account

Create a Duo account and obtain the integration key, secret key, and API hostname.

Following is an overview of the process. For details, please see the Duo web site,

Procedure

1.

Sign up for a Duo account.

2.

Log in to the Duo Admin Panel and navigate to Applications.

3.

Click Protect an Application and locate Cisco Firepower Threat Defense VPN in the applications list.

4.

Click Protect this Application to get your integration key, secret key, and API hostname. You'll need this information when configuring the proxy. For help, see the Duo Getting Started guide, https://duo.com/docs/getting-started.

5.

Install and configure the Duo Authentication Proxy. For instructions, see the "Install the Duo Authentication Proxy" section in https://duo.com/docs/cisco-firepower.

6.

Start the Authentication Proxy. For instructions, see the "Start the Proxy" section in https://duo.com/docs/cisco-firepower.

For enrolling new users in Duo, see https://duo.com/docs/enrolling-users.


Configure Device for Duo RADIUS Using Security Cloud Control

Procedure

1.

From the Security Cloud Control Home page, click Firewall.

2.

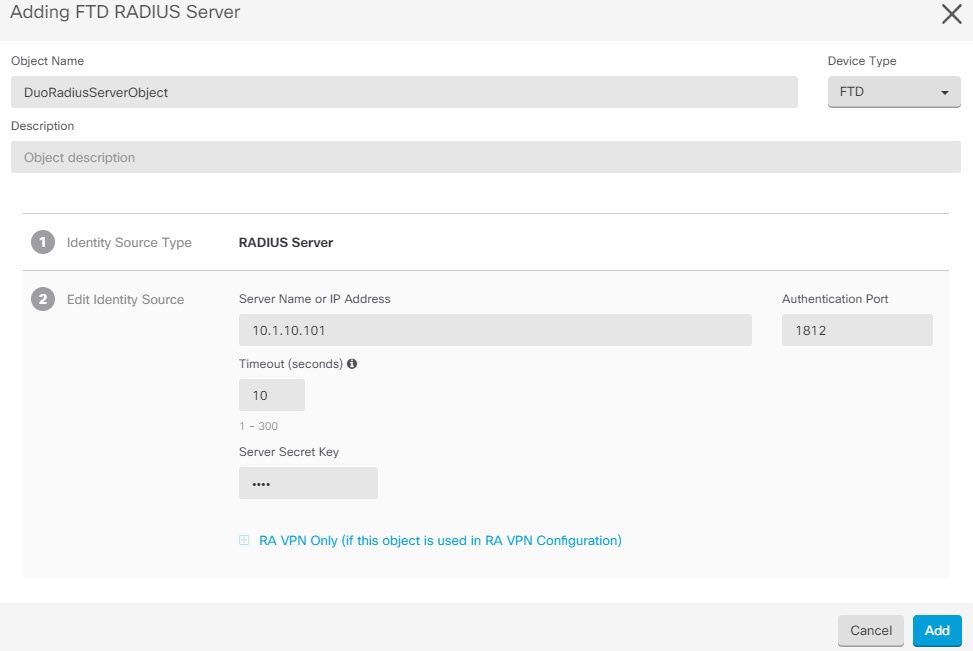
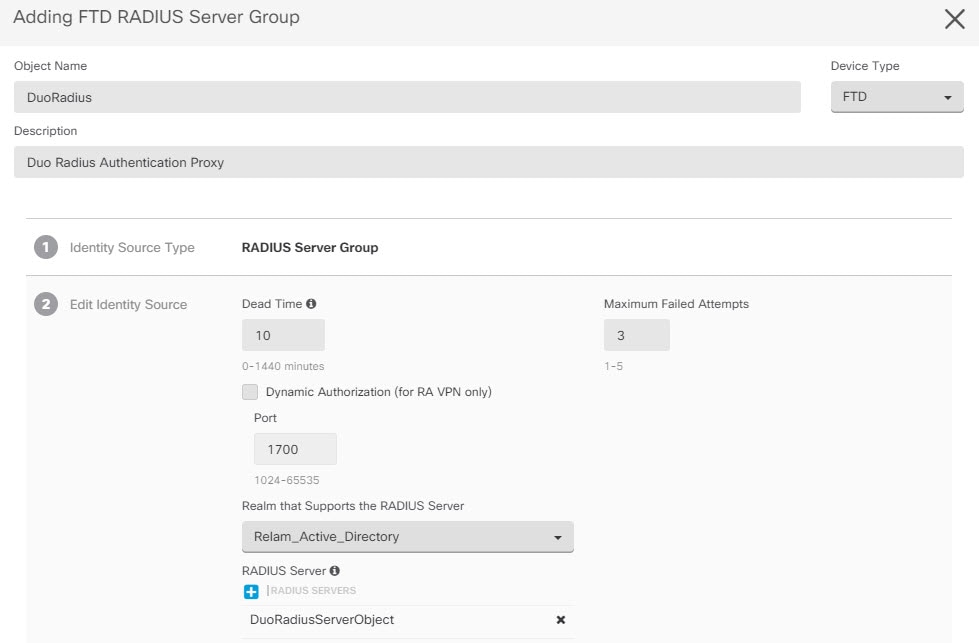
Configure FTD Radius Server Object.

  1. In the left pane, click Objects.

  2. Click > RA VPN Objects (ASA & FTD) > Identity Source.

  3. Provide a name and set the Device Type as FTD.

  4. Select Radius Server Group and click Continue.

  5. In the Radius Server section, click the Add button and click Create New Radius Server.

    In the Server Name or IP Address field, enter your Duo Authentication Proxy server's fully-qualified hostname or IP address.

  6. Once you have added the Duo RADIUS server to the group, click Add to create the new Duo RADIUS server group.

3.

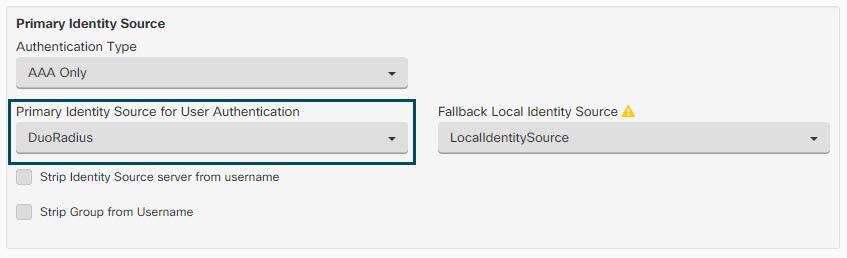
Change the Remote Access VPN Authentication Method to Duo RADIUS.

  1. In the left pane, click Secure Connections > End User Connections > Remote Access VPN > ASA & FDM.

  2. Expand the VPN configuration and click on the connection profile to which you want to add Duo.

  3. In the Actions pane on the right, click Edit.

  4. Select the Authentication Type can be AAA or AAA and Client Certificate.

  5. In the Primary Identity Source for User Authentication list, select the server group you created earlier.

  6. You typically do not need to select an "Authorization Server" or "Accounting Server".

  7. Click Continue.

  8. In the Summary and Instructions step, click Done to save the configuration.

4.

Review and deploy now the changes you made, or wait and deploy multiple changes at once.


Duo Two-Factor Authentication using LDAP

You can use the Duo LDAP server as the secondary authentication source along with a Microsoft Active Directory (AD) or RADIUS server as the primary source. With Duo LDAP, the secondary authentication validates the primary authentication with a Duo passcode, push notification, or phone call.

Note
The Duo two-factor authentication feature is available in Security Cloud Control for devices running Firepower Threat version 6.5 or later.

The FDM-managed device communicates with Duo LDAP using LDAPS over port TCP/636.

When using this approach, the user must authenticate using a username that is configured on both the AD/RADIUS server and the Duo LDAP server. When prompted to log in by AnyConnect, the user provides the AD/RADIUS password in the primary Password field, and for the Secondary Password, provides one of the following to authenticate with Duo. For more details, see the "Second Password for Factor Selection" section in https://guide.duo.com/anyconnect.

  • Duo passcode—Authenticate using a passcode, either generated with Duo Mobile, sent via SMS, generated by your hardware token, or provided by an administrator. For example, 1234567.

  • push—Push a login request to your phone, if you have installed and activated the Duo Mobile app. Review the request and tap Approve to log in.

  • phone—Authenticate using a phone callback.

  • sms—Request a Duo passcode in a text message. The login attempt will fail. Log in again using the new passcode.

For a detailed explanation, see How to Configure Two-Factor Authentication using Duo LDAP.


How to Configure Two-Factor Authentication using Duo LDAP


System Flow for Duo LDAP Secondary Authentication

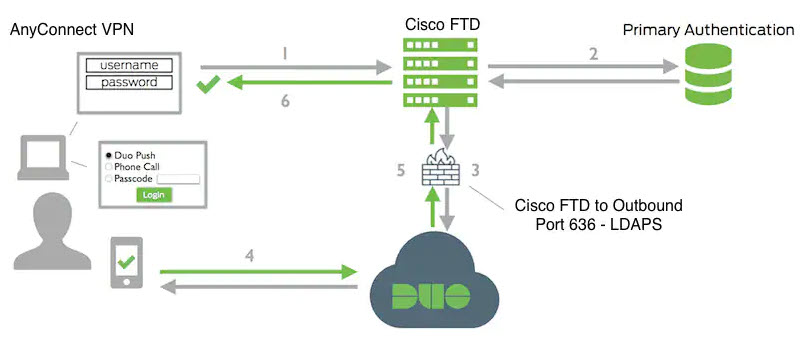
The following graphic shows how Firewall Threat Defense and Duo work together to provide two-factor authentication using LDAP.

Following is an explanation of the system flow:

  1. The user makes a remote access VPN connection to the FDM-managed device and provides username and password.

  2. FDM-managed device authenticates this primary authentication attempt with the primary authentication server, which might be Active Directory or RADIUS.

  3. If the primary authentication works, FDM-managed device sends a request for secondary authentication to the Duo LDAP server.

  4. Duo then authenticates the user separately, through push notification, text message with a passcode, or a telephone call. The user must complete this authentication successfully.

  5. Duo responds to the FDM-managed device to indicate whether the user authenticated successfully.

  6. If the secondary authentication was successful, the FDM-managed device establishes a remote access VPN connection with the user’s AnyConnect client.


Configure Duo LDAP Secondary Authentication

The following procedure explains the end-to-end process of configuring two-factor authentication, using Duo LDAP as the secondary authentication source, for remote access VPN. You must have an account with Duo, and obtain some information from Duo, to complete this configuration.


Create a Duo Account

Create a Duo account and obtain the integration key, secret key, and API hostname.

Following is an overview of the process. For details, please see the Duo web site,

Procedure

1.

Sign up for a Duo account.

2.

Log in to the Duo Admin Panel and navigate to Applications.

3.

Click Protect an Application and locate Cisco Firepower Threat Defense VPN in the applications list.

4.

Click Protect this Application to get your Integration key, Secret key, and API hostname. For help, see the Duo Getting Started guide, https://duo.com/docs/getting-started.

For enrolling new users in Duo, see https://duo.com/docs/enrolling-users.


Upload a Trusted CA Certificate to an FDM-Managed Device

The FDM-managed device must have the trusted CA certificate needed to validate the connection to the Duo LDAP server. You can go directly to https://www.digicert.com/digicert-root-certificates.htm and download either DigiCertSHA2HighAssuranceServerCA or DigiCert High Assurance EV Root CA and upload it using Firewall Device Manager (FDM).

Procedure

1.

Access the Firewall Device Manager page of the FDM-managed device, choose Objects > Certificates.

2.

Click + > Add Trusted CA Certificate.

3.

Enter a name for the certificate, for example, DigiCert_High_Assurance_EV_Root_CA. (Spaces are not allowed.)

4.

Click Upload Certificate and select the file that you downloaded.

5.

Click OK.

6.

Onboard the device to Security Cloud Control if you haven't onboarded it already.

7.

Read Configuration Changes from FTD to Security Cloud Control.


Configure FTD for Duo LDAP in Security Cloud Control

Procedure

1.

From the Security Cloud Control Home page, click Firewall.

2.

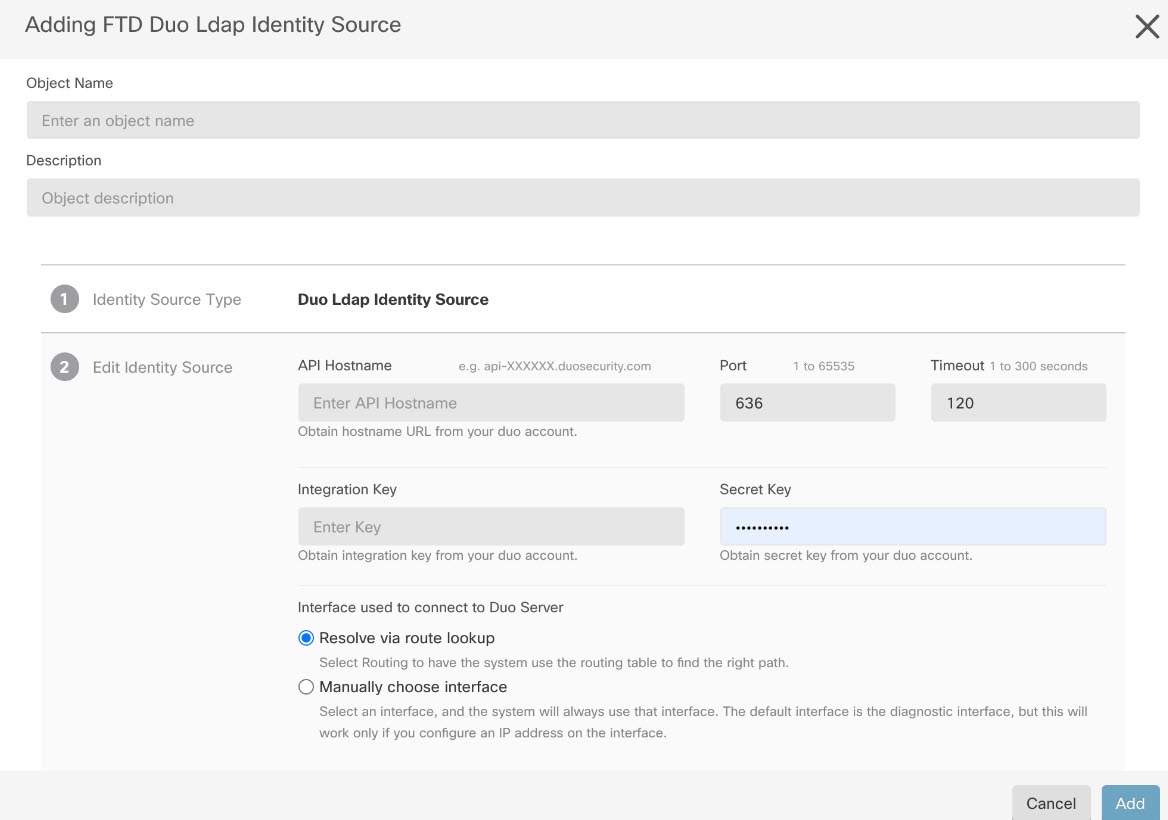
Create a Duo LDAP identity source object for the Duo LDAP server.

  1. In the Security Cloud Control navigation bar on the left, click Objects.

  2. Click the to create an object > RA VPN Objects (ASA & FTD) > Identity Source.

  3. Enter a name for the object, for example, Duo-LDAP-server.

  4. Select the Device Type as FTD.

  5. Click Duo Ldap Identity Source and click Continue.

  6. In the Edit Identity Source area, provide the following details:

    • API Hostname: Enter the API Hostname that you obtained from your Duo account. The hostname should look like the following, with the X’s replaced with your unique value: API-XXXXXXXX.DUOSECURITY.COM. Uppercase is not required.

    • Port: Enter the TCP port to use for LDAPS. This should be 636 unless you have been told by Duo to use a different port. Note that you must ensure that your access control list allows traffic to the Duo LDAP server through this port.

    • Timeout: Enter the timeout, in seconds, to connect to the Duo server. The value can be 1-300 seconds. The default is 120. To use the default, either enter 120 or delete the attribute line.

    • Integration Key: Enter the integration key that you obtained from your Duo account.

    • Secret Key: Enter the secret key that you obtained from your Duo account. This key will subsequently be masked.

    • Interface used to connect to Duo Server: Select the interface that is used for connecting to Duo Server.

      • Resolve via route lookup: Select this option to use the routing table to find the right path. For creating a routing table, see Routing.

      • Manually choose interface: Select this option and choose one of the interfaces from the list. The default interface is the diagnostic interface, but this will work only if you configure an IP address on the interface. Note: Ensure that the selected interface is present on the same device you want to connect to Duo Server.

      • Click Add.

3.

(optional) Use the AnyConnect Profile Editor to create a profile that specifies 60 seconds or more for authentication timeout.

You need to give users extra time to obtain the Duo passcode and complete the secondary authentication. We recommend at least 60 seconds. The following procedure explains how to configure the authentication timeout only and then upload the profile to FDM-managed device. If you want to change other settings, you can do so now.

  1. If you have not already done so, download and install the AnyConnect profile editor package. You can find this in the Cisco Software center (software.cisco.com) in the folder for your AnyConnect version. The base path at the time of this writing is Downloads Home > Security > VPN and Endpoint Security Clients > Cisco VPN Clients > AnyConnect Secure Mobility Client.

  2. Open the AnyConnect VPN Profile Editor.

  3. Select Preferences (Part 2) in the table of contents, scroll to the end of the page, and change Authentication Timeout to 60 (or more). The following image is from the AnyConnect 4.7 VPN Profile Editor; previous or subsequent versions might be different.

  4. Choose File > Save, and save the profile XML file to your workstation with an appropriate name, for example, duo-ldap-profile.xml.

  5. You can now close the VPN Profile Editor application.

  6. In Security Cloud Control, upload RA VPN AnyConnect Client Profile.

4.

Create a group policy and select the AnyConnect profile in the policy.

  1. In the Security Cloud Control navigation bar on the left, click Objects.

  2. To edit an existing group policy, use the RA VPN Group Policy filter to view only the existing group policies and modify the policy that you want and save it.

  3. To create a new group policy, click RA VPN Objects (ASA & FTD) > RA VPN Group Policy.

  4. On the General page, configure the following properties:

    • Name — For a new profile, enter a name. For example, Duo-LDAP-group.

    • AnyConnect Client Profiles — Select the AnyConnect client profile object that you created.

  5. Click Add to save the object.

  6. Click Secure Connections > End User Connections > Remote Access VPN > ASA & FDM.

  7. Click the remote access VPN configuration that you want to update.

  8. In the Actions pane on the right, click Group Policies.

  9. Click + to select the group policies that you want to associate with the VPN configuration.

  10. Click Save to save the group policy.

5.

Create or edit the remote access VPN connection profile to use for Duo-LDAP secondary authentication.

The following procedure just mentions the key changes to enable Duo-LDAP as the secondary authentication source and apply the AnyConnect client profile. For new connection profiles, you must configure the rest of the required fields. For this procedure, we assume you are editing an existing connection profile, and you simply must change these two settings.

  1. On the Security Cloud Control navigation page, click VPN > Remote Access VPN Configuration.

  2. Expand the remote access VPN configuration and click the connection profile that you want to update.

  3. In the Actions pane on the right, click Edit.

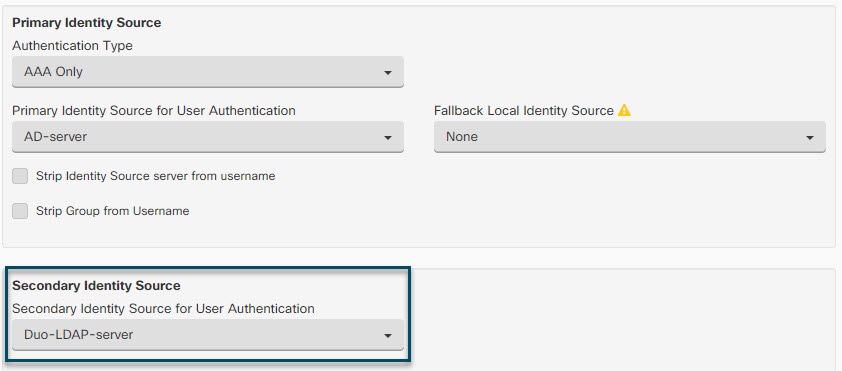
  4. Under Primary Identity Source, configure the following:

    • Authentication Type — Choose either AAA Only or AAA and Client Certificate. You cannot configure two-factor authentication unless you use AAA.

    • Primary Identity Source for User Authentication — Select your primary Active Directory or RADIUS server. Note that you can select a Duo-LDAP identity source as the primary source. However, Duo-LDAP provides authentication services only, not identity services, so if you use it as a primary authentication source, you will not see usernames associated with RA VPN connections in any dashboards, and you will not be able to write access control rules for these users. (You can configure fallback to the local identity source if you want to.)

    • Secondary Identity Source — Select the Duo-LDAP identity source.

      Note

      If username in Primary Identity Source and Secondary Identity Source are the same, we recommend enabling Use Primary username for Secondary login in the Advanced options in the Connection Profile. Configuring this way allows the end-user to use a single username for both primary and secondary identity sources.

  5. Click Continue.

  6. On the Group Policy page, select the group policy that you created or edited.

  7. Click Continue.

  8. Click Done to save your changes to the connection profile.

6.

Preview and deploy configuration changes for all devices.


End-to-End Remote Access VPN Configuration Process for an FDM-Managed Device

This section provides the end-to-end procedure for configuring Remote Access Virtual Private Network (RA VPN) on an FDM-managed device onboarded to Security Cloud Control.

To enable remote access VPN for your clients, you need to configure several separate items. The following procedure provides the end-to-end process.

Procedure

1.

Enable two licenses.

  • When you register the device, you must do so with a Smart Software Manager account that is enabled for export-controlled features. The license must meet export control requirements before you can configure remote access VPN. You also cannot configure the feature using the evaluation license. Your purchase of an FDM-managed device automatically includes an license. The license covers all features not covered by the optional licenses. It is a perpetual license. The device must be registered to Secure Firewall Device Manager. See the Registering the Device section in the Licensing the System chapter of the Cisco Secure Firewall Threat Defense Configuration Guide for the version your device is running.

  • A license. For details, see Licensing Requirements for Remote Access VPN.

2.

Configure Certificates.

Certificates are required to authenticate SSL connections between the clients and the device. You can use the pre-defined DefaultInternalCertificate for the VPN or create your own.

3.

Configure the identity source used for authenticating remote users.

You can use the following sources to authenticate users attempting to connect to your network using RA VPN. Additionally, you can use client certificates for authentication, either alone or in conjunction with an identity source.

  • Local Identity Source (the local user database): As a primary or fallback source. You can define users directly on the device and not use an external server. If you use the local database as a fallback source, ensure that you define the same usernames/passwords as the ones described in the external server.

    Note

    You can create user accounts directly on the FDM-managed device only from Secure Firewall Device Manager. See Configure Local Users.

4.

Create an RA VPN Configuration.

5.

Configure an RA VPN Connection Profile.

6.

Review and deploy configuration changes to the devices.

7.

Allow Traffic Through the Remote Access VPN.

If you change the Remote Access VPN configuration by using a local manager like Secure Firewall Device Manager, the Configuration Status of that device in Security Cloud Control shows "Conflict Detected". See Out-of-Band Changes on an FDM-Managed Device. You can Resolve Configuration Conflicts on this FDM-managed device.

What to do next:

Once the RA VPN configuration is downloaded to the FDM-managed devices, the users can connect to your network from a remote location using a computer or other supported iOS or Android device connected to the Internet. You can monitor live AnyConnect Remote Access Virtual Private Network (RA VPN) sessions from all onboarded RA VPN head-ends in your tenant.


Download AnyConnect Client Software Packages

Before configuring a remote access VPN, you must download the AnyConnect software packages from https://software.cisco.com/download/home/283000185 to your workstation. Ensure that you download the "AnyConnect Headend Deployment Package" for your desired operating systems. Later, you can upload these packages to FDM-managed devices when defining the VPN.

Always download the latest AnyConnect version, to ensure that you have the latest features, bug fixes, and security patches. Regularly update the packages on the device.

Note

You can upload one AnyConnect package per Operating System (OS): Windows, Mac, and Linux. You cannot upload multiple versions for a given OS type.


Upload AnyConnect Software Packages to an FDM-Managed Device Running Version 6.4.0

You can upload the AnyConnect software packages to the FDM-managed devices version 6.4.0 using Firewall Device Manager API explorer. A minimum of one AnyConnect software package must be present on the device to create an RA VPN connection.

The procedure applies only to Firewall Device Manager Version 6.4. If you are using Firewall Device Manager Version 6.5 or later, use the Security Cloud Control interface to upload the AnyConnect package.

Use the following procedure to upload the AnyConnect package to Firewall Device Manager Version 6.4.0:

Procedure

1.

Download the AnyConnect packages from https://software.cisco.com/download/home/283000185.

  • Make sure you accept the EULA and have K9 (encrypted image) privileges.

  • Select the "AnyConnect Headend Deployment Package" package for your operating system. The package name will be similar to, "anyconnect-win-4.7.04056-webdeploy-k9.pkg. There are separate headend Webs Deploy packages for Windows, macOS, and Linux.

2.

Using a browser, open the home page of the system. For example, https://ftd.example.com.

3.

Log into Firewall Device Manager.

4.

Edit the URL to point to /#/api-explorer, for example, https://ftd.example.com/#/api-explorer.

5.

Scroll down and click Upload > /action/uploaddiskfile.

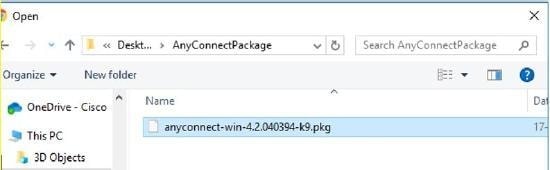
6.

In fileToUpload field, click Choose File and select the required AnyConnect package. You can upload the packages one at a time.

7.

Click Open.

8.

Scroll down and click TRY IT OUT!. Wait until the package uploads completely. In the Response Body, the API response appears in the following format.

{ "version": null, "name": "691f47e1-90c7-11e9-a361-79e2452f0c57.pkg",
"fileName": "691f47e1-90c7-11e9-a361-79e2452f0c57.pkg",
"id": "691f47e1-90c7-11e9-a361-79e2452f0c57.pkg",
"type": "fileuploadstatus",
"links": {
"self":

https://ftd.example.com:972/api/fdm/...90d111e9-a361- cf32937ce0df.pkg

} }

Record the fileName of the package from the response as you must enter the same string when performing the POST operation. In this example, the fileName is 691f47e1-90c7-11e9-a361-79e2452f0c57.pkg.

9.

Scroll up near the top of Firewall Threat Defense REST API page and click AnyConnectPackageFile > POST /object/anyconnectpackagefiles. Perform a POST operation to the API providing the temp staged diskFilename and the OS type of the package file in the payload. This action creates the AnyConnect package file.

10.

In the body field, enter the package details in the following format only:

{ "platformType": "WINDOWS",
"diskFileName": "691f47e1-90c7-11e9-a361-79e2452f0c57.pkg",
"type": "anyconnectpackagefile",
"name": "AnyConnectWindowsBGL" }
  1. In the platformType field, enter the OS platform as WINDOWS, MACOS, or LINUX.

  2. In the diskFileName field, enter the fileName that you have recorded after uploading disk file.

  3. In the name field, enter a name that you want for the package.

  4. Click TRY IT OUT!.

    In the Response Body field, the API response appears in the following format after a successful POST operation.

{ "version": "ni7xeneslft3p",
"name": "AnyConnectWindowsBGL",
"description": null,
"diskFileName": "41d592e3-90ca-11e9-a361-6d05320a165d.pkg",
"md5Checksum": "9bbe53dcf92e515d3ce5423048212488",
"platformType": "WINDOWS",
"id": "c9c9dfe3-9cd8-11e9-a361-23534f081c43",
"type": "anyconnectpackagefile",
"links": { "self":
}
}

The AnyConnect package is created on Firewall Device Manager.

11.

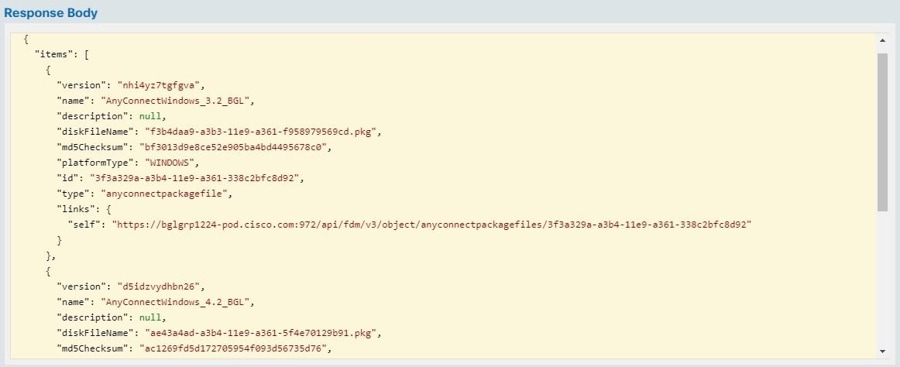
Click AnyConnectPackageFile > GET /object/anyconnectpackagefiles > TRY IT OUT!.

The Response Body shows all AnyConnect package files.

A sample response is shown below.

{
"items": [
{
"version": "la4nwceqk2sg4",
"name": "AnyConnectWindowsBGL",
"description": null,
"diskFileName": "82f1e362-9cd8-11e9-a361-9758ba07962d.pkg",
"md5Checksum": "9bbe53dcf92e515d3ce5423048212488",
"platformType": "WINDOWS",
"id": "c9c9dfe3-9cd8-11e9-a361-23534f081c43",
"type": "anyconnectpackagefile",
"links": {
"self":
}
}
],
12.

Upload other AnyConnect packages for each OS type. Repeat steps from 4 to 10.

13.

Edit the URL to point to the web page, for example, https://ftd.example.com

14.

Click the Deploy Changes icon in the upper right of the web page. The icon is highlighted with a dot when there are undeployed changes.

15.

If you are satisfied with the changes, you can click Deploy Now to start the job immediately. The window will show that the deployment is in progress. You can close the window or wait for the deployment to complete.

Note

To delete a package from the FDM-managed device, click AnyConnectPackageFile > Delete. In the objID field, type the package id and click TRY IT OUT!.

To complete a VPN connection, your users must install the AnyConnect client software on their workstation. For more information, see How Users Can Install the AnyConnect Client Software on FDM-Managed Device.


Upload AnyConnect Software Packages to an FDM-Managed Device Running Version 6.5 or Later

If you're using an FDM-managed device, running version 6.5 or later, for configuring RA VPN, you can use the RA VPN wizard in Security Cloud Control to upload AnyConnect software packages to the device. In the RA VPN wizard, you must provide the URL of the remote HTTP or HTTPS server where the AnyConnect packages are preloaded.

Note

You can upload the AnyConnect package using the FDM API procedure as well.


Upload an AnyConnect Package from Security Cloud Control Repository

The remote access VPN Configuration wizard presents AnyConnect packages per operating system from the Security Cloud Control repository, which you can select and upload to device. Make sure that the device has access to the internet and proper DNS configuration.

Note

If the desired package is unavailable in the presented list or the device has no access to the internet, you can upload the package using the server where the AnyConnect packages are preloaded.

Procedure

1.

Click on the field that corresponds to an operating system and select an AnyConnect package.

2.

Click to upload the package. If the checksum doesn't match, the AnyConnect package upload fails. You can see the device's workflow tab for more details about the failure.


Before you Begin

Make sure that you download the "AnyConnect Headend Deployment Package" for your desired operating systems. Always download the latest AnyConnect version, to ensure that you have the latest features, bug fixes, and security patches. Regularly update the packages on the device.

Note

You can upload one AnyConnect package per Operating System (OS): Windows, Mac, and Linux. You cannot upload multiple versions for a given OS type.

Procedure

1.

Download the AnyConnect packages from https://software.cisco.com/download/home/283000185.

  • Make sure you accept the EULA and have K9 (encrypted image) privileges.

  • Select the "AnyConnect Headend Deployment Package" package for your operating system. The package name will be similar to "anyconnect-win-4.7.04056-webdeploy-k9.pkg." There are separate headend packages for Windows, macOS, and Linux.

2.

Upload the AnyConnect packages to a remote HTTP or HTTPS server. Ensure that there is a network route from the FDM-managed device to the HTTP or HTTPS server.

Note

If you are uploading the AnyConnect package to an HTTPS server, ensure that the following steps are performed:

3.

The remote server's URL must be a direct link without prompting for authentication. If the URL is pre-authenticated, the file can be downloaded by specifying the RA VPN wizard's URL.

4.

If the remote server IP address is NATed, you have to provide the NATed public IP address of the remote server location.


Upload new AnyConnect Packages

Use the following procedure to upload a new AnyConnect packages to an FDM-managed device running Version 6.5.0:

Procedure

1.

Create an RA VPN Configuration from steps 1-4.

2.

In the AnyConnect Package Detected, you can upload separate packages for Windows, Mac, and Linux endpoints.

3.

In the corresponding platform field, specify the server's paths where the AnyConnect packages compatible for Windows, Mac, and Linux are pre-uploaded. Examples of server paths: 'http://<ip_address>:port_number/<folder_name>/anyconnect-win-4.8.01090-webdeploy-k9.pkg', 'https://<ip_address>:port_number/<folder_name>/anyconnect-linux64-4.7.03052-webdeploy-k9.pkg'.

4.

Click to upload the package. Security Cloud Control validates if the path is reachable, and the specified filename is a valid package. When the validation is successful, the names of the AnyConnect packages appear. As you add more FDM-managed devices to the RA VPN configuration, you can upload the AnyConnect packages to them.

5.

Click OK. The AnyConnect packages are added to the RA VPN configuration.

6.

Continue to perform procedure in Create an RA VPN Configuration from here onwards.

To complete a VPN connection, users must install the AnyConnect client software on their workstation. For more information, see How Users Can Install the AnyConnect Client Software on FTD.


Replace an Existing AnyConnect Package

If the AnyConnect packages are already present on the devices, you can see them in the RA VPN wizard. You can see all the available AnyConnect packages for an operating system in a drop-down list. You can select an existing package from the list and replace it with a new one but can't add a new package to the list.

Note

If you want to replace an existing package with a new one, ensure that the new AnyConnect package is uploaded already to a server on the network that the FDM-managed device can reach.

Procedure

1.

From the Security Cloud Control Home page, click Firewall.

2.

In the left pane, click Secure Connections > End User Connections > Remote Access VPN > ASA & FDM.

3.

Select the RA VPN configuration to be modified, and under Actions, click Edit.

4.

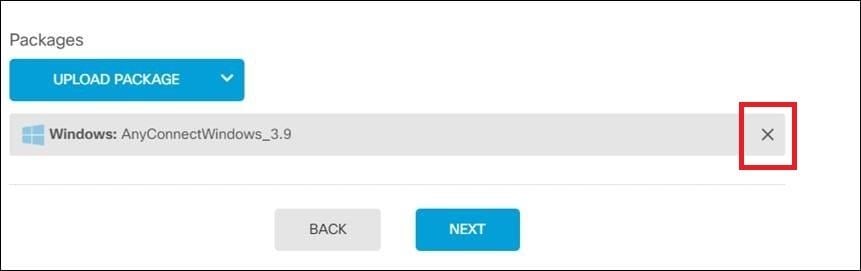
In AnyConnect Packages Detected, click icon appearing beside the existing AnyConnect package. If there are multiple versions of AnyConnect package for an operating system, select the package you want to replace from the list and click Edit. The existing package disappears from the corresponding field.

5.

Specify the server's path where the new AnyConnect package is preloaded and click to upload the package.

6.

Click OK. The new AnyConnect package is added to the RA VPN configuration.

7.

Continue to Create an RA VPN Configuration from step 6 onwards.


Delete the AnyConnect Package

Procedure

1.

From the Security Cloud Control Home page, click Firewall.

2.

In the left pane, click Secure Connections > End User Connections > Remote Access VPN > ASA & FDM.

3.

Select the RA VPN configuration to be modified, and under Actions, click Edit.

4.

In AnyConnect Packages Detected, click icon appearing beside the AnyConnect package that you want to delete. If there are multiple versions of AnyConnect package for an operating system, select the package you want to delete from the list. The existing package disappears from the corresponding field.

Note

Click Cancel to stop the delete operation and retain the existing package.

5.

Click OK. The device's Configuration Status is in 'Not Synced' state.

Note

If you want to undo the delete action at this stage, click Security Devices page and click Discard Changes to retain the existing AnyConnect package.

6.

Review and deploy configuration changes to the devices.


Create a new RA VPN group policy

A group policy is a set of user-oriented attribute/value pairs for remote access VPN connections. The connection profile uses a group policy that sets terms for user connections after the tunnel is established. Group policies let you apply whole sets of attributes to a user or a group of users, rather than having to specify each attribute individually for each user.

The system includes a default group policy named "DfltGrpPolicy". You can create additional group policies to provide the services you require.

Note

You cannot add inconsistent group policy objects to RA VPN configuration. Resolve all inconsistencies before adding the group policy to the RA VPN Configuration.

Procedure

1.

From the Security Cloud Control Home page, click Firewall.

2.

In the left pane, click Objects.

3.

Click > RA VPN Objects (ASA & FTD) > RA VPN Group Policy.

4.

Enter a name for the group policy. The name can be up to 64 characters and spaces are allowed.

5.

In the Device Type drop-down, select FTD.

6.

Do any of the following:

7.

Click Save to create the group policy.


RA VPN group policy attributes

The general attributes of a group policy define the name of the group and some other basic settings. The Name attribute is the only required attribute.

  • DNS Server: Select the DNS server group that defines the DNS servers clients should use for domain name resolution when connected to the VPN. If the group you need is not yet defined, click Create DNS Group and create it now.

  • Banner: The banner text, or welcome message, to present to users at login. The default is no banner. The length can be up to 496 characters. The AnyConnect client supports partial HTML. To ensure that the banner displays properly to remote users, use the <BR> tag to indicate line breaks.

  • Default Domain: The default domain name for users in the RA VPN. For example, example.com. This domain is added to hostnames that are not fully-qualified, for example, serverA instead of serverA.example.com.

  • AnyConnect Client Profiles: Click + and select the AnyConnect Client Profiles to use for this group. See Configure and Upload AnyConnect Client Profiles. If you configure a fully-qualified domain name for the outside interface (in the connection profile), a default profile will be created for you. Alternatively, you can upload your client profile. Create these profiles using the Standalone AnyConnect Profile Editor, which you can download and install from software.cisco.com. If you do not select a client profile, the AnyConnect client uses default values for all options. The items in this list are AnyConnect Client Profile objects rather than the profiles themselves. You can create (and upload) new profiles by clicking Create New AnyConnect Client Profile in the drop-down list.

AnyConnect Client profiles

This feature is supported on Firewall Device Manager running software version 6.7 or later versions.

Cisco AnyConnect VPN client offers enhanced security through various built-in modules. These modules provide services such as web security, network visibility into endpoint flows, and off-network roaming protection. Each client module includes a client profile that includes a group of custom configurations as per your requirement.

You can select the AnyConnect VPN profile object and AnyConnect modules to be downloaded to clients when the VPN user downloads the VPN AnyConnect client software.

  1. Choose or create an AnyConnect VPN profile object. See Upload RA VPN AnyConnect Client Profile. Except for DART and Start Before Login modules, the AnyConnect VPN profile object must be selected.

  2. Click Add Any Connect Client Module.

    The following AnyConnect modules are optional and you can configure these modules to be downloaded with VPN AnyConnect client software:

    • AMP Enabler — Deploys advanced malware protection (AMP) for endpoints.

    • DART — Captures a snapshot of system logs and other diagnostic information and creates a .zip file on your desktop so you can conveniently send troubleshooting information to Cisco TAC.

    • Feedback — Provides information about the features and modules customers have enabled and used.

    • ISE Posture — Uses the OPSWAT library to perform posture checks to assess an endpoint's compliance.

    • Network Access Manager — Provides 802.1X (Layer 2) and device authentication to access both wired and wireless networks.

    • Network Visibility — Enhances the enterprise administrator's ability to do capacity and service planning, auditing, compliance, and security analytics.

    • Start Before Login — Forces the user to connect to the enterprise infrastructure over a VPN connection before logging on to Windows by starting AnyConnect before the Windows login dialog box appears.

    • Umbrella Roaming Security — Provides DNS-layer security when no VPN is active.

    • Web Security — Analyzes the elements of a web page, allows acceptable content, and blocks malicious or unacceptable content based on a defined security policy.

  3. In the Client Module list, select an AnyConnect module.

  4. In the Profile list, choose or create a profile object containing an AnyConnect Client Profile.

  5. Select Enable Module Download to enable endpoints to download the client module along with the profile. If not selected, the endpoints can download only the client profile.

Session setting attributes

The session settings of a group policy control how long users can connect through the VPN and how many separate connections they can establish.

  • Maximum Connection Time: The maximum length of time, in minutes, that users can stay connected to the VPN without logging out and reconnecting, from 1- 4473924 or blank. The default is unlimited (blank), but the idle timeout still applies.

  • Connection Time Alert Interval: If you specify a maximum connection time, the alert interval defines the amount of time before the maximum time is reached to display a warning to the user about the upcoming automatic disconnect. The user can choose to end the connection and reconnect to restart the timer. The default is 1 minute. You can specify 1 to 30 minutes.

  • Idle Time: The length of time, in minutes, that the VPN connection can be idle before it is automatically closed, from 1-35791394. If there is no communication activity on the connection for this consecutive number of minutes, the system stops the connection. The default is 30 minutes.

  • Idle Time Alert Interval: The amount of time before the idle time is reached to display a warning to the user about the upcoming automatic disconnect due to an idle session. Any activity resets the timer. The default is 1 minute. You can specify 1 to 30 minutes.

  • Simultaneous Login Per User: The maximum number of simultaneous connections allowed for a user. The default is 3. You can specify 1 to 2147483647 connections. Allowing many simultaneous connections might compromise security and affect performance.

Address assignment attributes

The address assignment attributes of a group policy define the IP address pool for the group. The pool defined here overrides the pool defined in any connection profile that uses this group. Leave these settings blank if you want to use the pool defined in the connection profile.

  • IPv4 Address Pool, IPv6 Address Pool: These options define the address pools for the remote endpoints. Clients are assigned an address from these pools based on the IP version they use to make the VPN connection. Select a network object that defines a subnet for each IP type you want to support. Leave the list empty if you do not want to support that IP version. For example, you could define an IPv4 pool as 10.100.10.0/24. The address pool cannot be on the same subnet as the IP address for the outside interface. You can specify a list of up to six address pools to use for local address allocation. The order in which you specify the pools is significant. The system allocates addresses from these pools in the order in which the pools appear.

  • DHCP Scope: If you configure DHCP servers for the address pool in the connection profile, the DHCP scope identifies the subnets to use for the pool for this group. The DHCP server must also have addresses in the same pool identified by the scope. The scope allows you to select a subset of the address pools defined in the DHCP server to use for this specific group. If you do not define a network scope, the DHCP server assigns IP addresses in the order of the address pools configured. It goes through the pools until it identifies an unassigned address. To specify a scope, select the network object that contains the network number host address. Click Create New Network if the object does not yet exist. For example, to tell the DHCP server to use addresses from the 192.168.5.0/24 subnet pool, select a network object that specifies 192.168.5.0 as a host address. You can use DHCP for IPv4 addressing only.

Split tunneling attributes

The split tunneling attributes of a group policy define how the system should handle traffic meant for the internal network vs. externally-directed traffic. Split tunneling directs some network traffic through the VPN tunnel (encrypted) and the remaining network traffic outside the VPN tunnel (unencrypted or in clear text).

  • IPv4 Split Tunneling, IPv6 Split Tunneling: You can specify different options based on whether the traffic uses IPv4 or IPv6 addresses, but the options for each are the same. If you want to enable split tunneling, specify one of the options that require you to select network objects.

    • Allow all traffic over tunnel: Do no split tunneling. Once the user makes an RA VPN connection, all the user's traffic goes through the protected tunnel. This is the default. It is also considered the most secure option.

    • Allow specified traffic over the tunnel: Select the network objects that define destination network and host addresses. Any traffic to these destinations goes through the protected tunnel. The client routes traffic to any other destination to connections outside the tunnel (such as a local Wi-Fi or network connection).

    • Exclude networks specified below: Select the network objects that define destination network or host addresses. The client routes any traffic to these destinations to connections outside the tunnel. Traffic to any other destination goes through the tunnel.

  • Split DNS - You can configure the system to send some DNS requests through the secure connection while allowing the client to send other DNS requests to the DNS servers configured on the client. You can configure the following DNS behavior:

    • Send DNS Request as per split tunnel policy: With this option, DNS requests are handled the same way as the split tunnel options are defined. If you enable split tunneling, DNS requests are sent based on the destination addresses. If you do not enable split tunneling, all DNS requests go over the protected connection.

    • Always send DNS requests over tunnel: Select this option if you enable split tunneling, but you want all DNS requests sent through the protected connection to the DNS servers defined for the group.

    • Send only specified domains over tunnel: Select this option if you want your protected DNS servers to resolve addresses for certain domains only. Then, specify those domains, separating domain names with commas. For example, example.com, example1.com. Use this option if you want your internal DNS servers to resolve names for internal domains, while external DNS servers handle all other Internet traffic.

AnyConnect attributes

The AnyConnect attributes of a group policy define some SSL and connection settings used by the AnyConnect client for a remote access VPN connection.

  • SSL Settings

    • Enable Datagram Transport Layer Security (DTLS): Whether to allow the AnyConnect client to use two simultaneous tunnels: an SSL tunnel and a DTLS tunnel. Using DTLS avoids latency and bandwidth problems associated with some SSL connections and improves the performance of real-time applications that are sensitive to packet delays. If you do not enable DTLS, AnyConnect client users establishing SSL VPN connections connect with an SSL tunnel only.

    • DTLS Compression: Whether to compress Datagram Transport Layer Security (DTLS) connections for this group using LZS. DTLS Compression is disabled by default.

    • SSL Compression: Whether to enable data compression, and if so, the method of data compression to use, Deflate, or LZS. SSL Compression is Disabled by default. Data compression speeds up transmission rates but also increases the memory requirement and CPU usage for each user session. Therefore, SSL compression decreases the overall throughput of the device.

    • SSL Rekey Method, SSL Rekey Interval: The client can rekey the VPN connection, renegotiating the crypto keys and initialization vectors, to increase the security of the connection. Disable rekeying by selecting None. To enable rekey, select New Tunnel to create a new tunnel each time. (The Existing Tunnel option results in the same action as New Tunnel.) If you enable rekeying, also set the rekey interval, which is 4 minutes by default. You can set the interval to 4-10080 minutes (1 week).

  • Connection Settings

    • Ignore the DF (Don't Fragment) bit: Whether to ignore the Don't Fragment (DF) bit in packets that need fragmentation. Select this option to allow the forced fragmentation of packets that have the DF bit set, so that these packets can pass through the tunnel.

    • Client Bypass Protocol - Allows you to configure how the secure gateway manages IPv4 traffic (when it is expecting only IPv6 traffic), or how it manages IPv6 traffic (when it is expecting only IPv4 traffic).

      When the AnyConnect client makes a VPN connection to the headend, the headend assigns it an IPv4, IPv6, or both an IPv4 and IPv6 address. If the headend assigns the AnyConnect connection only an IPv4 address or only an IPv6 address, you can configure the Client Bypass Protocol to drop network traffic for which the headend did not assign an IP address (default, disabled, not checked), or allow that traffic to bypass the headend and be sent from the client unencrypted or "in the clear" (enabled, checked).

      For example, assume that the secure gateway assigns only an IPv4 address to an AnyConnect connection and the endpoint is dual-stacked. When the endpoint attempts to reach an IPv6 address, if Client Bypass Protocol is disabled, the IPv6 traffic is dropped; however, if Client Bypass Protocol is enabled, the IPv6 traffic is sent from the client in the clear.

    • MTU: The maximum transmission unit (MTU) size for SSL VPN connections established by the Cisco AnyConnect VPN Client. The default is 1406 bytes. The range is 576 to 1462 bytes.

      • Keepalive Messages Between AnyConnect and VPN Gateway: Whether to exchange keepalive messages between peers to demonstrate that they are available to send and receive data in the tunnel. Keepalive messages transmit at set intervals. The default interval is 20 seconds, and the valid range is 15 to 600 seconds.

      • DPD on Gateway Side Interval, DPD on Client Side Interval: Enable Dead Peer Detection (DPD) to ensure that the VPN gateway or VPN client quickly detects when the peer is no longer responding. You can separately enable gateway or client DPD. The default interval is 30 seconds for sending DPD messages. The interval can be 5-3600 seconds.

Traffic filters attributes

The traffic filter attributes of a group policy define restrictions you want to place on users assigned to the group. You can use these attributes instead of creating access control policy rules to restrict RA VPN users to specific resources, based on host or subnet address and protocol, or VLAN. By default, RA VPN users are not restricted by the group policy from accessing any destination on your protected network.

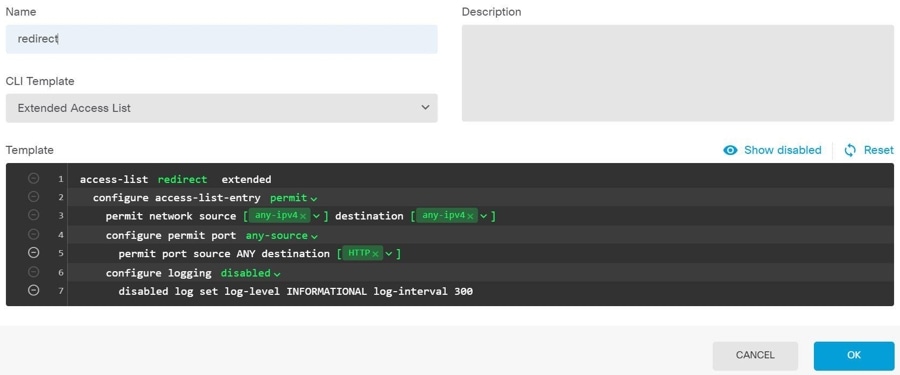
  • Access List Filter: Restrict access using an extended access control list (ACL). Select the Smart CLI Extended ACL object. The extended ACL lets you filter based on source address, a destination address, and protocol (such as IP or TCP). ACLs are evaluated on a top-down, first-match basis, so ensure that you place specific rules before more general rules. There is an implicit "deny any" at the end of the ACL, so if you intend to deny access to a few subnets while allowing all other access, ensure that you include a "permit any" rule at the end of the ACL. Because you cannot create network objects while editing an extended ACL Smart CLI object, you should create the ACL before editing the group policy. Otherwise, you might need to simply create the object, then go back later to create the network objects and then all the access control entries that you need. To create the ACL, log in to Firewall Device Manager, go to Device > Advanced Configuration > Smart CLI > Objects, create an object, and select Extended Access List as the object type.

  • Restrict VPN to VLAN: Also called "VLAN mapping," this attribute specifies the egress VLAN interface for sessions to which this group policy applies. The system forwards all traffic from this group to the selected VLAN. Use this attribute to assign a VLAN to the group policy to simplify access control. Assigning a value to this attribute is an alternative to using an ACL to filter traffic on a session. Ensure that you specify a VLAN number that is defined on a subinterface on the device. Values range from 1 to 4094.

Windows browser proxy attributes

The Windows browser proxy attributes of a group policy determine how, and whether, a proxy defined on the user's browser operates.

You can select one of the following values for Browser Proxy During VPN Session:

  • No change in endpoint settings: Allow the user to configure (or not configure) a browser proxy for HTTP and use the proxy if it is configured.

  • Disable browser proxy: Do not use the proxy defined for the browser, if any. No browser connections will go through the proxy.

  • Auto detect settings: Enable the use of automatic proxy server detection in the browser for the client device.

  • Use custom settings: Define a proxy that should be used by all client devices for HTTP traffic. Configure the following settings:

    • Proxy Server IP or Hostname, Port: The IP address, or hostname, of the proxy server, and the port used for proxy connections by the proxy server. The host and port combined cannot exceed 100 characters.

    • Browser Proxy Exemption List: Connections to the hosts/ports in the exemption list do not go through the proxy. Add all the host/port values for destinations that should not use the proxy. For example, www.example.com port 80. Click Add proxy exemption to add items to the list. Click the trash can icon to delete items. The entire proxy exception list, combining all addresses and ports, cannot be longer than 255 characters.


Create an RA VPN Configuration

Security Cloud Control allows you to add one or more FDM-managed devices to the RA VPN configuration wizard and configure the VPN interfaces, access control, and NAT exemption settings associated with the devices. Therefore, each RA VPN configuration can have connection profiles and group policies shared across multiple FDM-managed devices that are associated with the RA VPN configuration. Further, you can enhance the configuration by creating connection profiles and group policies.

You can either onboard an FDM-managed device that has already been configured with RA VPN settings or a new device without RA VPN settings. When you onboard an FDM-managed device that already has RA VPN settings, Security Cloud Control automatically creates a "Default RA VPN Configuration" and associates the FDM-managed device with this configuration. Also, this default configuration can contain all the connection profile objects that are defined on the device.

  • You are not allowed to add ASA and FDM-managed device in the same Remote Access VPN Configuration.

  • An FDM-managed device can't have more than one RA VPN Configuration.

Prerequisites

Before adding the FDM-managed devices to RA VPN configuration, the following prerequisites must be met:

  • Make sure that the FDM-managed devices have the following:

  • FDM changes are synchronized to Security Cloud Control.

    1. In the left pane, click Security Devices and search for one or more FDM-managed devices to be synchronized.

    2. Select one or more devices and then click Check for changes. Security Cloud Control communicates with one or more FDM-managed devices to synchronize the changes.

  • RA VPN configuration group policy objects are consistent.

  • RA VPN group policies of the FDM-managed device match RA VPN configuration group policies.


Procedure

Procedure

1.

From the Security Cloud Control Home page, click Firewall.

2.

In the left pane, click Secure Connections > End User Connections > Remote Access VPN > ASA & FDM.

3.

Click the blue plus button to create a new RA VPN configuration.

4.

Enter a name for the Remote Access VPN configuration.

5.

Click the blue plus button to add FDM-managed devices to the configuration. You can add the device details and configure network traffic-related permissions that are associated with the device.

  1. Provide the following device details:

    • Device: Select an FDM-managed device that you want to add and click Select.

      You are not allowed to add ASA and FDM-managed device in the same Remote Access VPN Configuration.

    • Outside Interface: The interface to which users connect when making the remote access VPN connection. Although this is normally the outside (internet-facing) interface, choose whichever interface is between the device and the end-users you are supporting with this connection profile.

    • Fully Qualified Domain Name or IP for the Outside Interface: The name of the interface, for example, ravpn.example.com or the IP address must be provided. If you specify a name, the system can create a client profile for you. Note: You are responsible for ensuring that the DNS servers used in the VPN and by clients can resolve this name to the outside interface's IP address. Add the FQDN to the relevant DNS servers.

  2. Click Continue to configure the traffic permissions.

    • Bypass Access Control policy for decrypted traffic (sysopt permit-vpn): Decrypted traffic is subjected to Access Control Policy inspection by default. Enabling this option bypasses the decrypted traffic option bypasses the access control policy inspection, but the VPN Filter ACL and the authorization ACL downloaded from the AAA server are still applied to VPN traffic. Note that if you select this option, the system configures the sysopt connection permit-vpn command, which is a global setting. This will also impact the behavior of site-to-site VPN connections. If you do not select this option, it might be possible for external users to spoof IP addresses in your remote access VPN address pool, and thus gain access to your network. This can happen because you will need to create access control rules that allow your address pool to have access to internal resources. If you use access control rules, consider using user specifications to control access, rather than source IP address alone. The downside of selecting this option is that the VPN traffic will not be inspected, which means that intrusion and file protection, URL filtering, or other advanced features will not be applied to the traffic. This also means that no connection events will be generated for the traffic, and thus statistical dashboards will not reflect VPN connections.

    • NAT Exempt: Enable NAT Exempt to exempt traffic to and from the remote access VPN endpoints from NAT translation. If you do not exempt VPN traffic from NAT, ensure that the existing NAT rules for the outside and inside interfaces do not apply to the RA VPN pool of addresses. NAT exempt rules are manual static identity NAT rules for a given source/destination interface and network combination, but they are not reflected in the NAT policy, they are hidden. If you enable NAT Exempt, you must also configure the following.

      • Inside Interfaces: Select the interfaces for the internal networks remote users will be accessing. NAT rules are created for these interfaces.

      • Inside Networks: Select the network objects that represent internal networks remote users will be accessing. The networks list must contain the same IP types as the address pools you are supporting.

6.

Click OK.

  • If you have onboarded an Firewall Device Manager Version 6.4.0 device, the AnyConnect Packages Detected shows the AnyConnect packages available in the device.

  • If you have onboarded an Firewall Device Manager Version 6.5.0 or later device, you must add the AnyConnect packages from the server where the AnyConnect packages are pre-uploaded. See Upload AnyConnect Software Packages to an FDM-Managed Device Running Version 6.5.0 for instructions.

7.

Click OK. The device is added to the configuration.

Note

Select a configuration and under Actions, click the appropriate action:

  • Group Policies to add or remove group policies.

  • Remove to delete the selected RA VPN configuration.


Modify RA VPN Configuration

You can modify the name and the device details of an existing RA VPN configuration.

Procedure

Select the configuration to be modified and under Actions, click Edit.

  • Modify the name if required.

  • Click the blue plus button to add a new device

  • Click to perform the following on the FDM-managed device.

    • Click Edit to modify the existing RA VPN configuration.

    • Click Remove to remove the FDM-managed device from the RA VPN configuration. All connection profiles and RA VPN settings associated with that device except the group policies are deleted. You can remove the group policies explicitly from the objects page. Note: You cannot remove the FDM-managed device if that is the only device using the configuration. Alternatively, you can remove the RA VPN configuration.

You can also search for remote access VPN configuration by typing the name of the configuration or device.


Configure an RA VPN Connection Profile

An RA VPN connection profile defines the characteristics that allow external users to create a VPN connection to the system using the AnyConnect client. Each profile defines the AAA servers and certificates used for authenticating users, the address pool for assigning users IP addresses, and the group policies that define various user-oriented attributes.

You can create multiple profiles within the RA VPN configuration if you need to provide variable services to different user groups, or if you have various authentication sources. For example, if your organization merges with a different organization that uses different authentication servers, you can create a profile for the new group that uses those authentication servers.

An RA VPN connection profile allows your users to connect to your inside networks when they are on external networks, such as their home network. Create separate profiles to accommodate different authentication methods.

Before you begin

Before configuring the remote access (RA) VPN connection:


Procedure

Procedure

1.

From the Security Cloud Control Home page, click Firewall.

2.

In the left pane, click Secure Connections > End User Connections > Remote Access VPN > ASA & FDM. You can click a VPN configuration to view the summary information on how many connection profiles and group policies are currently configured.

3.

Click the connection profile and under Actions in the sidebar at the right, click Add Connection Profile.

4.

Configure the basic connection attributes.

  • Connection Profile Name: The name for this connection, up to 50 characters without spaces. For example, MainOffice.

    Note

    The name you enter here is what users will see in the connection list in the AnyConnect client. Choose a name that will make sense to your users.

  • Group Alias, Group URL: Aliases contain alternate names or URLs for a specific connection profile. VPN users can choose an alias name in the AnyConnect client in the list of connections when they connect to the FDM-managed device. The connection profile name is automatically added as a group alias. You can also configure the list of group URLs, which your endpoints can select while initiating the Remote Access VPN connection. If users connect using the group URL, the system will automatically use the connection profile that matches the URL. This URL would be used by clients who do not yet have the AnyConnect client installed. Add as many group aliases and URLs as required. These aliases and URLs must be unique across all connection profiles defined on the device. Group URLs must start with https://.

  • For example, you might have the alias Contractor and the group URL https://ravpn.example.com/contractor. Once the AnyConnect client is installed, the user would simply select the group alias in the AnyConnect VPN drop-down list of connections.

5.

Configure the primary and optionally, secondary identity sources. These options determine how remote users authenticate to the device to enable the remote access VPN connection. The simplest approach is to use AAA only and then select an AD realm or use the LocalIdentitySource. You can use the following approaches for Authentication Type:

6.

Configure the address pool for clients. The address pool defines the IP addresses that the system can assign to remote clients when they establish a VPN connection. For more information, see Configure Client Address Pool Assignment.

7.

Click Continue.

8.

Select the Group Policy to use for this profile from the list and click Select. The group policy sets terms for user connections after the tunnel is established. The system includes a default group policy named DfltGrpPolicy. You can create additional group policies to provide the services you require.

9.

Click Continue.

10.

Review the summary. First, verify that the summary is correct. You can see what end-users need to do to initially install the AnyConnect software and test that they can complete a VPN connection. Click to copy the instructions to the clipboard, and then distribute them to your users.

11.

Click Done.

Ensure that traffic is allowed in the VPN tunnel, as explained in Allow Traffic Through the Remote Access VPN.


Configure AAA for a Connection Profile

Authentication, Authorization, and Accounting (AAA) servers use username and password to determine if a user is allowed access to the remote access VPN. If you use RADIUS servers, you can distinguish authorization levels among authenticated users, to provide differential access to protected resources. You can also use RADIUS accounting services to keep track of usage.

When configuring AAA, you must configure a primary identity source. Secondary and fallback sources are optional. Use a secondary source if you want to implement dual authentication, for example, using RSA tokens or DUO.

Primary Identity Source Options

  • Primary Identity Source for User Authentication: The primary identity source used for authenticating remote users. End users must be defined in this source or the optional fallback source to complete a VPN connection. Select one of the following:

    • An Active Directory (AD) identity realm. If the realm you need does not yet exist, click Create New Identity Realm.

    • A RADIUS server group.

    • LocalIdentitySource (the local user database): You can define users directly on the device and not use an external server.

  • Fallback Local Identity Source: If the primary source is an external server, you can select the LocalIdentitySource as a fallback in case the primary server is unavailable. If you use the local database as a fallback source, ensure that you define the same local usernames/passwords as the ones defined in the external server.

  • Strip options: A realm is an administrative domain. Enabling the following options allows the authentication to be based on the username alone. You can enable any combination of these options. However, you must select both check boxes if your server cannot parse delimiters.

    • Strip Identity Source Server from Username: Whether to remove the identity source name from the username before passing the username on to the AAA server. For example, if you select this option and the user enters domain\username as the username, the domain is stripped off from the username and sent to AAA server for authentication. By default, this option is unchecked.

    • Strip Group from Username: Whether to remove the group name from the username before passing the username on to the AAA server. This option applies to names given in the username@domain format; the option strips the domain and @ sign. By default, this option is unchecked.

Secondary Identity Source

  • Secondary Identity Source for User Authorization: The optional second identity source. If the user successfully authenticates with the primary source, the user is prompted to authenticate with the secondary source. You can select an AD realm, RADIUS server group, or the local identity source.

  • Advanced options: Click the Advanced link and configure the following options:

    • Fallback Local Identity Source for Secondary: If the secondary source is an external server, you can select the LocalIdentitySource as a fallback in case the secondary server is unavailable. If you use the local database as a fallback source, ensure that you define the same local usernames/passwords as the ones defined in the secondary external server.

    • Use Primary Username for Secondary Login: By default, when using a secondary identity source, the system will prompt for both username and password for the secondary source. If you select this option, the system prompts for the secondary password only and uses the same username for the secondary source that was authenticated against the primary identity source. Select this option if you configure the same usernames in both the primary and secondary identity sources.

      • Username for Session Server: After successful authentication, the username is shown in events and statistical dashboards, is used for determining matches for a user- or group-based SSL decryption and access control rules and is used for accounting. Because you are using two authentication sources, you need to tell the system whether to use the Primary or Secondary username as the user identity. By default, the primary name is used.

      • Password Type: How to obtain the password for the secondary server. The default is Prompt, which means the user is asked to enter the password. Select Primary Identity Source Password to automatically use the password entered when the user authenticated to the primary server. Select Common Password to use the same password for every user, then enter that password in the Common Password field.

    • Authorization Server: The RADIUS server group that has been configured to authorize remote access, VPN users. After authentication is complete, authorization controls the services and commands available to each authenticated user. Authorization works by assembling a set of attributes that describe what the user is authorized to perform, their actual capabilities, and restrictions. Were you not to use authorization, authentication alone would provide the same access to all authenticated users. For information on configuring RADIUS for authorization, see Control User Permissions and Attributes Using RADIUS and Group Policies. Note that if the system obtains authorization attributes from the RADIUS server that overlap those defined in the group policy, the RADIUS attributes override the group policy attributes.

    • Accounting Server: (Optional.) The RADIUS server group to use to account for the remote access VPN session. Accounting tracks the services users are accessing as well as the number of network resources they are consuming. The FDM-managed device reports user activity to the RADIUS server. Accounting information includes when sessions start and stop, usernames, the number of bytes that pass through the device for each session, the service used, and the duration of each session. You can then analyze the data for network management, client billing, or auditing. You can use accounting alone or together with authentication and authorization.

Configure Certificate Authentication for a Connection Profile

Note

This section is not applicable for Authentication Type as AAA Only.

You can use certificates installed on the client device to authenticate remote access VPN connections.

When using client certificates, you can still configure a secondary identity source, fallback source, and authorization and accounting servers. These are AAA options; for details, see Configure an RA VPN Connection Profile.

Following are the certificate-specific attributes. You can configure these attributes separately for primary and secondary identity sources. Configuring a secondary source is optional.

  • Username from Certificate: Select one of the following:

    • Map Specific Field: Use the certificate elements in the order of Primary Field and Secondary Field. The defaults are CN (Common Name) and OU (Organizational Unit). Select the options that work for your organization. The fields are combined to provide the username, and this is the name used in events, dashboards, and for matching purposes in SSL decryption and access control rules.

    • Use entire DN (distinguished name) as username: The system automatically derives the username from the DN fields. •

  • Advanced options (not applicable for Authentication Type as Client Certificate Only): Click the Advanced link and configure the following options:

    • Prefill username from certificate on user login window: Whether to fill in the username field with the retrieved username when prompting the user to authenticate.

    • Hide username in login window: If you select the Prefill option, you can hide the username, which means the user cannot edit the username in the password prompt.

Configure Client Address Pool Assignment

There must be a way for the system to provide an IP address to endpoints that connect to the remote access VPN. The AAA server can provide these addresses, a DHCP server, an IP address pool configured in the group policy, or an IP address pool configured in the connection profile. The system tries these resources in that order and stops when it obtains an available address, which it then assigns to the client. Thus, you can configure multiple options to create a failsafe in case of an unusual number of concurrent connections.

Use one or more of the following methods to configure the address pool for a connection profile.

  • IPv4 Address Pool and IPv4 Address Pool: First, create up to six network objects that specify subnets. You can configure separate pools for IPv4 and IPv6. Then, select these objects in the IPv4 Address Pool and IPv6 Address Pool options, either in the group policy or in the connection profile. You do not need to configure both IPv4 and IPv6, configure the addressing scheme you want to support. You also do not need to configure the pool in both the group policy and the connection profile. The group policy overrides the connection profile settings, so if you configure the pools in the group policy, leave the options empty in the connection profile. Note that the pools are used in the order in which you list them.

  • DHCP Servers: First, configure a DHCP server with one or more IPv4 address ranges for the RA VPN (you cannot configure IPv6 pools using DHCP). Then, create a host network object with the IP address of the DHCP server. You can then select this object in the DHCP Servers attribute of the connection profile. You can configure more than one DHCP server. If the DHCP server has multiple address pools, you can use the DHCP Scope attribute in the group policy that you attach to the connection profile to select which pool to use. Create a host network object with the network address of the pool. For example, if the DHCP pool contains 192.168.15.0/24 and 192.168.16.0/24, setting the DHCP scope to 192.168.16.0 will ensure that an address from the 192.168.16.0/24 subnet will be selected.


Allow Traffic Through the Remote Access VPN

You can use one of the following techniques to enable traffic flow in the remote access VPN tunnel.

  • Configure the sysopt connection permit-vpn command, which exempts traffic that matches the VPN connection from the access control policy. The default for this command is no sysopt connection permit-vpn, which means VPN traffic must also be allowed by the access control policy. This is the more secure method to allow traffic in the VPN because external users cannot spoof IP addresses in the remote access VPN address pool. The downside is that the VPN traffic will not be inspected, which means that intrusion and file protection, URL filtering, or other advanced features will not be applied to the traffic. This also means that no connection events will be generated for the traffic, and thus statistical dashboards will not reflect VPN connections. To configure this command, select the Bypass Access Control policy for decrypted traffic option in your RA VPN Configuration. See Create an RA VPN Configuration.

  • Create access control rules to allow connections from the remote access VPN address pool. This method ensures that VPN traffic is inspected, and advanced services can be applied to the connections. The downside is that it opens the possibility for external users to spoof IP addresses and thus gain access to your internal network.


Upgrade AnyConnect Package on an FDM-Managed Device Running Version 6.4.0

You can use Security Cloud Control to upgrade the AnyConnect package available on an FDM-managed device so that it can be distributed to RA VPN users.

The following are the major steps that are involved in upgrading the AnyConnect package:

Procedure

1.

Use Firewall Device Manager to remove the AnyConnect package and upload a later version of the package. Use one of these methods to accomplish this task.

  • Remove the old package and upload the new package from the Firewall Device Manager UI.

  • Remove the old package and upload the new package from the Firewall Device Manager API explorer.

2.

Deploy Firewall Device Manager changes to device.

3.

Read the new configuration information into Security Cloud Control.

4.

Verify the new package in the RA VPN connection profile.


Prerequisites

  • A minimum of one RA VPN configuration with connection profile is already deployed to FDM-managed device.

  • Download the AnyConnect package that you want from https://software.cisco.com/download/home/283000185. Cisco recommends upgrading to the latest available package.


Upload your desired AnyConnect Package to Secure Firewall Threat Defense using Firewall Device Manager

Procedure

1.

Using a browser, open the home page of the system. For example, https://ftd.example.com.

2.

Log into Firewall Device Manager.

3.

Click View Configuration in the Device > Remote Access VPN group. The group shows summary information on how many connection profiles and group policies are currently configured.

4.

Click the view () button (View configuration button.) to open a summary of the connection profile and connection instructions.

Note

You can edit any one of the connection profiles to upload the AnyConnect package to the FDM-managed device.

5.

Click the Edit button to make changes.

6.

Click Next until the Global Settings screen appears. The AnyConnect Package shows AnyConnect packages available on the FDM-managed device.

7.

Click 'X' button to remove the AnyConnect package which you want to replace.

8.

Click Upload Package and then click the OS that you want for uploading the compatible package.

9.

Select the package and click Open. You can see the package being uploaded on the Firewall Device Manager UI.

10.

Click Finish. The configuration is saved.

Note

Alternatively, you can use the Firewall Device Manager API explorer to remove and upload a new AnyConnect package.

  1. Edit the URL to point to /#/api-explorer, for example, https://ftd.example.com/#/api-explorer.

  2. Delete a package from the FDM-managed device, click AnyConnectPackageFile > Delete. In the objID field, type the package id and click TRY IT OUT!.

  3. Upload a new package by performing the steps that are described in the Upload AnyConnect Software Packages to Firepower Threat Defense Devices section.

11.

Click the Deploy Changes icon in the upper right of the web page. The icon is highlighted with a dot when there are undeployed changes.

12.

If you are satisfied with the changes, you can click Deploy Now to start the job immediately. The window shows that the deployment is in progress. You can close the window, or wait for the deployment to complete.


Verify the new package is referenced in the RA VPN connection profile

Procedure

1.

From the Security Cloud Control Home page, click Firewall.

2.

In the left pane, click Secure Connections > End User Connections > Remote Access VPN > ASA & FDM.

3.

Click the Devices tab.

4.

Click the FTD tab and select the FDM-managed device which has the upgraded AnyConnect package. This device would be reporting conflict.

5.

Accept the Out-of-band changes to overwrite the configuration and any pending changes stored on Security Cloud Control with the device's running configuration. For more information, see Resolve "Conflict Detected Status."

6.

View the new AnyConnect package by performing the following:

  • Click VPN > Remote Access VPN.

  • Click the RA VPN configuration that is associated with this FDM-managed device.

  • Click Edit under Actions. The new package is displayed under Devices.


Upload RA VPN AnyConnect Client Profile

The Remote Access VPN AnyConnect Client Profile is a group of configuration parameters stored in a file. There are different AnyConnect client profiles containing configuration settings for the core client VPN functionality and for the optional client modules Network Access Manager, AMP Enabler, ISE posture, Network Visibility, Customer Feedback Experience profiles, Umbrella roaming security, and Web Security.

Security Cloud Control allows uploading of these profiles as objects which can be used in the group policy later.

  • AnyConnect VPN Profile — AnyConnect client profiles are downloaded to clients along with the VPN AnyConnect client software. These profiles define many client-related options, such as auto-connect on startup and auto-reconnect, and whether the end-user can change the option from the AnyConnect client preferences and advanced settings. Security Cloud Control supports the XML file format.

  • AMP Enabler Service Profile — The profile is used for the AnyConnect AMP Enabler. The AMP Enabler and this profile are pushed to the endpoints from FDM-managed device when a remote access VPN user connects to the VPN. Security Cloud Control supports XML and ASP file formats.

  • Feedback Profile — You can add a Customer Experience Feedback profile and select this type to receive information about the features and modules customers have enabled and used. Security Cloud Control supports the FSP file format.

  • ISE Posture Profile — Choose this option if you add a profile file for the AnyConnect ISE Posture module. Security Cloud Control supports XML and ISP file formats.

  • Network Access Manager Service Profile — Configure and add the NAM profile file using the Network Access Manager profile editor. Security Cloud Control supports XML and NSP file formats.

  • Network Visibility Service Profile — Profile file for AnyConnect Network Visibility module. You can create the profile using the NVM profile editor. Security Cloud Control supports XML and NVMSP file formats.

  • Umbrella Roaming Security Profile — You must select this file type if you deploy the Umbrella Roaming Security module. Security Cloud Control supports XML and JSON file formats.

  • Web Security Service Profile — Select this file type when you add a profile file for the Web security module. Security Cloud Control supports XML, WSO, and WSP file formats.

Before you begin

Use the suitable GUI-based AnyConnect profile editors to create the profiles you need. You can download the profile editors from Cisco Software Download Center in the AnyConnect Secure Mobility Client category and install the AnyConnect “Profile Editor - Windows / Standalone installer (MSI).” The profile editor installer contains stand-alone versions of the profile editors. The installation file is for Windows only and has the file name anyconnect-profileeditor-win-<version>-k9.msi, where <version> is the AnyConnect version. For example, anyconnect-profileeditor-win-4.3.04027-k9.msi. You must also install Java JRE 1.6 (or higher) before installing the profile editor.

Except for the Umbrella Roaming Security profile editor, this package contains all the profile editors required for creating the modules. For detailed information, see the AnyConnect Profile Editor chapter in the appropriate release of the Cisco AnyConnect Secure Mobility Client Administrator Guide for details. Download the Umbrella Roaming Security profile separately from the Umbrella dashboard. For detailed information, see the "Download the AnyConnect Roaming Security Profile from the Umbrella Dashboard" section of the "Umbrella Roaming Security" chapter in the Cisco Umbrella User Guide.

Procedure

1.

From the Security Cloud Control Home page, click Firewall.

2.

In the left pane, choose Objects.

3.

Click the blue plus button.

4.

Click RA VPN Objects (ASA & FDM) > AnyConnect Client Profile.

5.

In the Object Name field, enter a name for the AnyConnect client profile.

6.

Click Browse and select the file you created using the Profile Editor.

7.

Click Open to upload the profile.

8.

Click Add to add the object.


Guidelines and Limitations of Remote Access VPN for FDM-Managed Device

Keep the following guidelines and limitations in mind when configuring RA VPN.

  • AnyConnect packages must be pre-loaded to FDM-Managed devices running Version 6.4.0 using Firewall Device Manager.

Note

Upload AnyConnect package separately to the FDM-Managed device running Version 6.5.0 using the Remote Access VPN Configuration wizard in Security Cloud Control.

  • Before configuring RA VPN from Security Cloud Control:

    • Register the license for the FDM-managed devices from Firewall Device Manager.

    • Enable the license from Firewall Device Manager with export-control.

  • Security Cloud Control does not support the Extended Access List object. Configure the object using the Smart CLI in Firewall Device Manager and then use in VPN filter and Change of Authorization (CoA) redirect ACL.

  • The template you create from an FDM-managed device will not contain the RA VPN configuration.

  • Device-specific overrides are required for IP pool objects and RADIUS identity sources.

  • You cannot configure both Firewall Device Manager access (HTTPS access in the management access-list) and AnyConnect remote access SSL VPN on the same interface for the same TCP port. For example, if you configure remote access SSL VPN on the outside interface, you cannot also open the outside interface for HTTPS connections on port 443. Because you cannot configure the port used by these features in Firewall Device Manager, you cannot configure both features on the same interface.

  • If you configure two-factor authentication using RADIUS and RSA tokens, the default authentication timeout of 12 seconds is too quick to allow successful authentication in most cases. Increase the authentication timeout value by creating a custom AnyConnect client profile and applying it to the RA VPN connection profile, as described in Upload RA VPN AnyConnect Client Profile. We recommend an authentication timeout of at least 60 seconds so that users have enough time to authenticate and then paste the RSA token and for the round-trip verification of the token.


How Users Can Install the AnyConnect Client Software on FDM-Managed Device

Use Firewall Device Manager APIs to upload the AnyConnect Client Software package to FDM-managed device to distribute to your users. See Upload AnyConnect Software Packages to Firepower Threat Defense Devices.

To complete a VPN connection, your users must install the AnyConnect client software. You can use your existing software distribution methods to install the software directly. Or, you can have users install the AnyConnect client directly from the FDM-managed device.

Note

Users must have Administrator rights on their workstations to install the software.

If you decide to have users initially install the software from the FDM-managed device, inform users to perform the following steps:

Note

Android and iOS users should download AnyConnect from the appropriate App Store.

Procedure

1.

Using a web browser, open https://ravpn-address, where ravpn-address is the IP address or hostname of the outside interface on which you are allowing VPN connections. You identify this interface when you configure the remote access VPN. The system prompts the user to log in.

2.

Log into the site. Users are authenticated using the directory server configured for the remote access VPN. Log in must be successful to continue. If the login is successful, the system determines if the user already has the required version of the AnyConnect client. If the AnyConnect client is absent from the user's computer or is down-level, the system automatically starts installing the AnyConnect software. When the installation is finished, AnyConnect completes the remote access VPN connection.


Distribute new AnyConnect Client Software version

You can distribute the new version of AnyConnect client software to your users by uploading them to FDM-managed device without removing the old version. Once the AnyConnect client is uploaded successfully, you can remove the old version.

The AnyConnect client detects the new version on the next VPN connection the user makes. The system will automatically prompt the user to download and install the updated client software. This automation simplifies software distribution for you and your clients.

The following figure shows an example of an FDM-managed device with two versions of AnyConnect client software (AnyConnectWindows_3.2_BGL and AnyConnectWindows_4.2_BGL) for Windows OS.


Licensing Requirements for Remote Access VPN

Enable (register) the license for the FDM-managed devices from Firewall Device Manager to configure RA VPN connection. When you register the device, you must do so with a Smart Software Manager (SSM) account that is enabled for export-controlled features. You also cannot configure the feature using the evaluation license.

Also, you must purchase and enable a license; it can be any of the following: . These licenses are treated the same for FDM-managed devices, although they are designed to allow different feature sets when used with ASA Software-based headends.

For more information about enabling license from Firewall Device Manager, see the Licensing Requirements for Remote Access VPN section of the Remote Access VPN chapter of the Cisco Firepower Threat Defense Configuration Guide for Firepower Device Manager for the version your device is running.

For more information, see the Cisco AnyConnect Ordering Guide. There are also other data sheets available on http://www.cisco.com/c/en/us/product...t-listing.html.

To view the license status, perform the following:

Procedure

1.

In the left pane, click Security Devices.

2.

Click the Devices device.

3.

Click the FTD tab and select a device that you want.

4.

In the Device Actions pane on the right, click Manage Licenses. If the license is valid, the Status shows Enabled.


Maximum Concurrent VPN Sessions By Device Model

There is a maximum limit to the number of concurrent remote access VPN sessions allowed on a device based on the device model. This limit is designed, so that system performance does not degrade to unacceptable levels. Use these limits for capacity planning.

Device Model

Maximum Concurrent Remote Access VPN Sessions

Firepower 2110 1,500
Firepower 2120 3,500
Firepower 2130 7,500
Firepower 2140 10,000
Firepower Threat Defense Virtual 250

RADIUS Change of Authorization

The RADIUS Change of Authorization (CoA) feature provides a mechanism to change the attributes of authentication, authorization, and accounting (AAA) session after it is authenticated. A key challenge for RA VPNs is to secure the internal network against compromised endpoints and to secure the endpoint itself when it is affected by viruses or malware, by remediating the attack on the endpoint. There is a need to secure the endpoint and the internal network in all phases, that is, before, during, and after the RA VPN session. The RADIUS CoA feature helps in achieving this goal.

If you use Cisco Identity Services Engine (ISE) RADIUS servers, you can configure Change of Authorization policy enforcement. When a policy changes for a user or user group in AAA, ISE sends CoA messages to the FDM-managed device to reinitialize authentication and apply the new policy. An Inline Posture Enforcement Point (IPEP) is not required to apply access control lists (ACLs) for each VPN session established with the FDM-managed device.


Configure Change of Authorization on the FDM-Managed Device

Most of the Change of Authorization policy is configured in the ISE server. However, you must configure the FDM-managed device to connect to ISE correctly.

Before you begin

If you use hostnames in any object, ensure that you configure DNS servers for use with the data interfaces, as explained in Configuring DNS for Data and Management Interfaces section of the System Settings chapter of the Cisco Firepower Threat Defense Configuration Guide for Firepower Device Manager for the version your device is running.You typically need to configure DNS anyway to have a fully-functional system.


Procedure

Procedure

1.

Log in to the Firewall Device Manager for your FDM-managed device.

2.

Configure the extended access control list (ACL) for redirecting initial connections to ISE. The purpose of the redirect ACL is to send initial traffic to ISE so that ISE can assess the client posture. The ACL should send HTTPS traffic to ISE, but not traffic that is already destined for ISE, or traffic that is directed to a DNS server for name resolution. A sample redirect ACL might look like the following:

access-list redirect extended deny ip any host <ISE server IP>
access-list redirect extended deny ip any host <DNS server IP>
access-list redirect extended deny icmp any any
access-list redirect extended permit tcp any any eq www

However, note that ACLs have an implicit "deny any any" as the last access control entry (ACE). In this example, the last ACE, which matches TCP port www (that is, port 80), will not match any traffic that matches the first 3 ACEs, so those are redundant. You could simply create an ACL with the last ACE and get the same results. Note that in a redirect ACL, the permit and deny actions simply determine which traffic matches the ACL, with permit matching and deny not matching. No traffic is actually dropped, denied traffic is simply not redirected to ISE. To create the redirect ACL, you need to configure a Smart CLI object.

  1. Choose Device > Advanced Configuration > Smart CLI > Objects.

  2. Click + to create a new object.

  3. Enter a name for the ACL. For example, redirect.

  4. For CLI Template, select Extended Access List.

  5. Configure the following in the Template body:

    • configure access-list-entry action = permit

    • source-network = any-ipv4

    • destination-network = any-ipv4

    • configure permit port = any-source

    • destination-port = HTTP

    • configure logging = disabled

      The ACE should look like the following:

  6. Click OK.

    This ACL will be configured the next time you deploy changes. You do not need to use the object in any other policy to force deployment.

    Note

    This ACL applies to IPv4 only. If you also want to support IPv6, simply add a second ACE with all the same attributes, except select any-ipv6 for the source and destination networks. You can also add the other ACEs to ensure traffic to the ISE or DNS server is not redirected. You will first need to create host network objects to hold the IP addresses of those servers.

3.

Configure a RADIUS server group for dynamic authorization.

4.

Create a connection profile that uses this RADIUS server group. See Configure an RA VPN Connection Profile. Use AAA Authentication (either only or with certificates), and select the server group in the Primary Identity Source for User Authentication, Authorization, and Accounting options.


Verify Remote Access VPN Configuration of FDM-Managed Device

After you configure the remote access VPN and deploy the configuration to the device, verify that you can make remote connections.

Procedure

1.

From an external network, establish a VPN connection using the AnyConnect client. Using a web browser, open https://ravpn-address, where ravpn-address is the IP address or hostname of the outside interface on which you are allowing VPN connections. If necessary, install the client software and complete the connection. See How Users Can Install the AnyConnect Client Software on FTD. If you configured group URLs, also try those URLs.

2.

In the Security Devices page, select the device you want to verify and click Command Line Interface under Device Actions.

3.

Use the show vpn-sessiondb command to view summary information about current VPN sessions.

4.

The statistics should show your active AnyConnect Client session, and information on cumulative sessions, the peak concurrent number of sessions, and inactive sessions. Following is sample output from the command.

5.

Use the show vpn-sessiondb anyconnect command to view detailed information about current AnyConnect VPN sessions. Detailed information includes encryption used, bytes transmitted and received, and other statistics. If you use your VPN connection, you should see the bytes transmitted/received numbers change as you re-issue this command.


View Remote Access VPN Configuration Details of FDM-Managed Device

Procedure

1.

From the Security Cloud Control Home page, click Firewall.

2.

In the left pane, choose Secure Connections > End User Connections > Remote Access VPN > ASA & FDM

3.

Click on a VPN configuration object present.

The group shows summary information on how many connection profiles and group policies are currently configured.

  • Expand the RA VPN configuration to view all connection profiles associated with them.

    • Click the add + button to add a new connection profile.

    • Click the view button ( ) to open a summary of the connection profile and connection instructions. Under Actions, you can click Edit to modify the changes.

  • You can click one of the following options under Actions to perform additional tasks:

    • Click Group Policies to assign/add group policies.

    • Click a configuration object or connection profile that you no longer need and click Remove to delete.