Migrate from Snort 2 to Snort 3

Starting with Version 7.0, Snort 3 is the default inspection engine for new Firewall Threat Defense deployments with Cloud-Delivered Firewall Management Center. If you are still using the Snort 2 inspection engine, switch to Snort 3 now for improved detection and performance.

Upgrading Firewall Threat Defense to Version 7.2 through 7.6 also upgrades eligible Snort 2 devices to Snort 3. For devices that are ineligible because they use custom intrusion or network analysis policies, manually upgrade to Snort 3 as described here.

Although you can switch individual devices back, you should not. Snort 2 will be deprecated in a future release and will eventually prevent Firewall Threat Defense upgrade.

Snort 3 inspection engine

Snort 3 is a network inspection engine that

  • serves as the default inspection engine for newly registered Firewall Threat Defense devices on version 7.0 or later,

  • requires explicit enablement after upgrading Firewall Threat Defense devices to version 7.0 or later, and

  • activates the Snort 3 version of the intrusion policy, which is applied through access control policies, for all traffic passing through the device.

For Firewall Threat Defense devices on version 6.x or earlier, Snort 2 is the default inspection engine.

Version switching and rule mapping

You can switch Snort versions when required. Snort 2 and Snort 3 intrusion rules are mapped and the mapping is system-provided. However, you may not find a one-to-one mapping of all the intrusion rules in Snort 2 and Snort 3. If you change the rule action for one rule in Snort 2, that change will not be retained if you switch to Snort 3 without first synchronizing Snort 2 with Snort 3. For more information on synchronization, see Synchronize Snort 2 rules with Snort 3.

Snort 2 versus Snort 3

Snort 3 has been architecturally redesigned to inspect more traffic with equivalent resources when compared to Snort 2. Snort 3 provides simplified and flexible insertion of traffic parsers. Snort 3 also provides new rule syntax that makes rule writing easier and shared object rule equivalents visible.

This table lists the differences between the Snort 2 and the Snort 3 versions in terms of the inspection engine capabilities.

Feature

Snort 2

Snort 3

Packet threads

One per process

Any number per process

Configuration memory use

Number of processes * x GB

x gigabytes (GB) in total; more memory available for packets

Configuration reload

Slower

Faster; one thread can be pinned to separate cores

Rule syntax

Inconsistent and requires line escapes

Uniform system with arbitrary whitespace

Rule comments

Comments only

#, #begin and #end marks; C language style

Additional reference: Differences between Snort 2 and Snort 3 in Firepower.

Migrating from Snort 2 to Snort 3

Migrating from Snort 2 to Snort 3 requires you to switch the inspection engine of the Firewall Threat Defense device from Snort 2 to Snort 3.

Summary

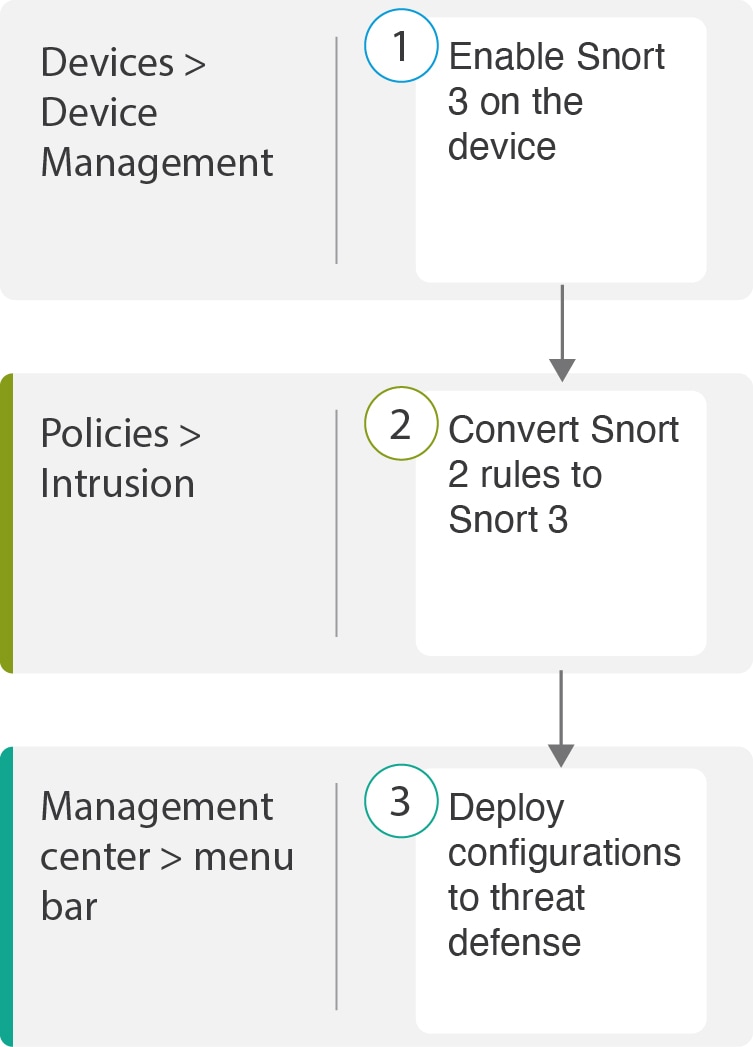
Depending on your requirements, go through the stages listed in the workflow to complete the migration of your device from Snort 2 to Snort 3.

Workflow

These are the stages of migrating from Snort 2 to Snort 3:

  1. Enable Snort 3 on the device.
  2. Convert Snort 2 custom rules to Snort 3.
  3. Synchronize Snort 2 rules with Snort 3.

Prerequisites for migrating from Snort 2 to Snort 3

Consider the recommended prerequisites before migrating your device from Snort 2 to Snort 3.

  • Have a working knowledge of Snort. To learn about the Snort 3 architecture, see Snort 3 Adoption.

  • Back up your management center. See Backup the Management Center.

  • Back up your intrusion policy. See Exporting Configurations.

  • Clone your intrusion policy. To do this, you can use an existing policy as the base policy to create a copy of your intrusion policy. In the Intrusion Policies page, click Create Policy and choose an existing intrusion policy from the Base Policy dropdown list.

Enable Snort 3 on an individual device

Enable Snort 3 on an individual device to take advantage of enhanced security capabilities.

Use this procedure when you need to upgrade a specific device from Snort 2 to Snort 3 inspection engine. The system will automatically convert policy configurations during deployment to ensure compatibility with the selected Snort version.


Important


During the deployment process, there could be a momentary traffic loss because the current inspection engine needs to be shut down.

Procedure


Step 1

Choose Devices > Device Management.

Step 2

Click the device to go to the device home page.

Note


The device is marked as Snort 2 or Snort 3, showing the current version on the device.

Step 3

Click the Device tab.

Step 4

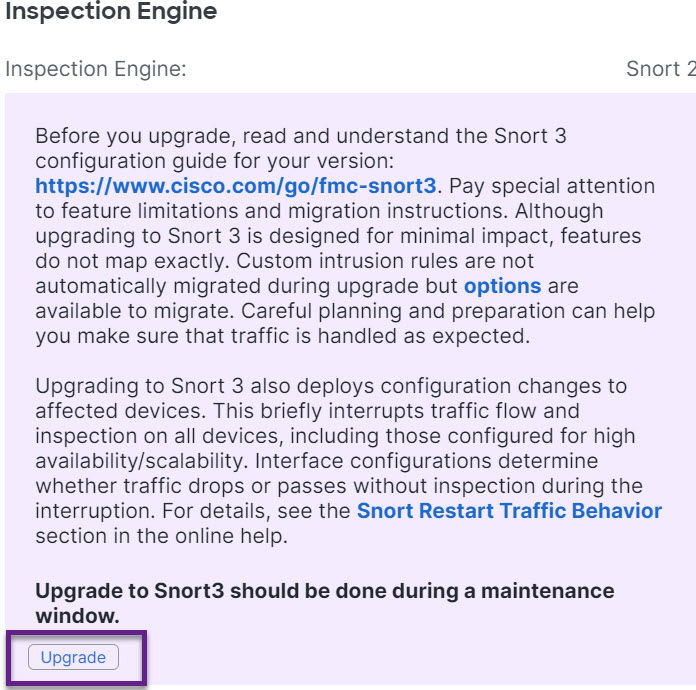
In the Inspection Engine section, click Upgrade.

Note


In case you want to disable Snort 3, click Revert to Snort 2 in the Inspection Engine section.

Step 5

Click Yes.


What to do next

Deploy the changes on the device. See Deploy configuration changes.

The system converts your policy configurations during the deployment process to make them compatible with the selected Snort version.

Enable Snort 3 on multiple devices

This task enables Snort 3 on multiple devices to provide enhanced intrusion detection capabilities.

To enable Snort 3 on multiple devices, ensure all the required Firewall Threat Defense devices are on version 7.0 or later.


Important


During the deployment process, there could be a momentary traffic loss because the current inspection engine needs to be shut down.

Procedure


Step 1

Choose Devices > Device Management.

Step 2

Select all the devices on which you want to enable or disable Snort 3.

Note


The devices are marked as Snort 2 or Snort 3, showing the current version on the device.

Step 3

Click the Select Bulk Action dropdown list and choose Upgrade to Snort 3.

Step 4

Click Yes.


What to do next

Deploy the changes on the device. See Deploy configuration changes.

Convert Snort 2 Custom IPS Rules to Snort 3

Snort 2 to Snort 3 custom IPS rule conversion is a migration process that transforms custom intrusion prevention system rules from Snort 2 format to Snort 3 format.

Conversion requirements and resources

If you are using a rule set from a third-party vendor, contact that vendor to confirm that their rules successfully convert to Snort 3 or to obtain a replacement rule set written natively for Snort 3. If you have custom rules that you have written yourself, familiarize yourself with writing Snort 3 rules prior to conversion so that you can update your rules to optimize Snort 3 detection after conversion. See the links to learn more about writing rules in Snort 3.

You can refer to other blogs at https://blog.snort.org/ to learn more about Snort 3 rules.

See these procedures to convert Snort 2 rules to Snort 3 rules using the system-provided tool.


Important


Snort 2 network analysis policy (NAP) settings cannot be copied to Snort 3 automatically. NAP settings have to be manually replicated in Snort 3.


Convert all Snort 2 custom rules across all intrusion policies to Snort 3

Convert legacy Snort 2 custom rules to the updated Snort 3 format to ensure compatibility with current intrusion detection systems.

This task migrates existing Snort 2 custom rules to Snort 3 format, allowing you to maintain your custom rule configurations while upgrading to the latest intrusion detection engine. You can either import the converted rules directly or download them for review before importing.

Procedure

Step 1

Choose Objects > Intrusion Rules.

Step 2

Click Snort 3 All Rules tab.

Step 3

Ensure All Rules is selected in the left pane.

Step 4

Click the Tasks drop-down list and choose:

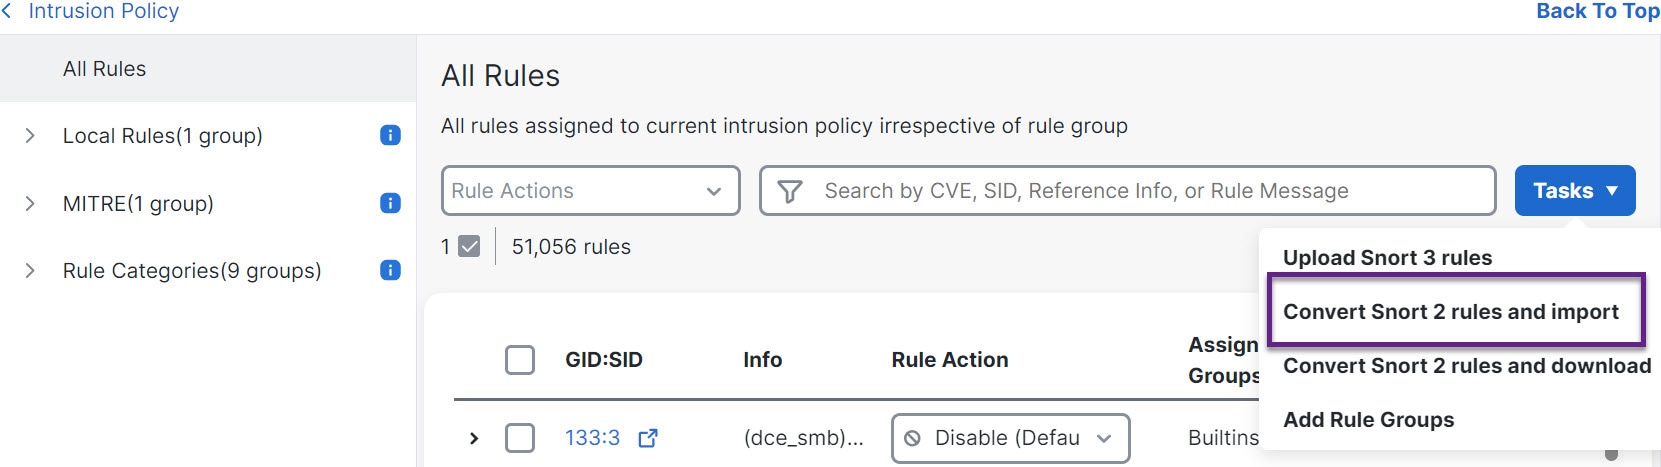
  • Convert Snort 2 rules and import—To automatically convert all the Snort 2 custom rules across all the intrusion policies to Snort 3 and import them into Firewall Management Center as Snort 3 custom rules.

  • Convert Snort 2 rules and download—To automatically convert all the Snort 2 custom rules across all the intrusion policies to Snort 3 and download them into your local system.

Step 5

Click OK.

Note

 
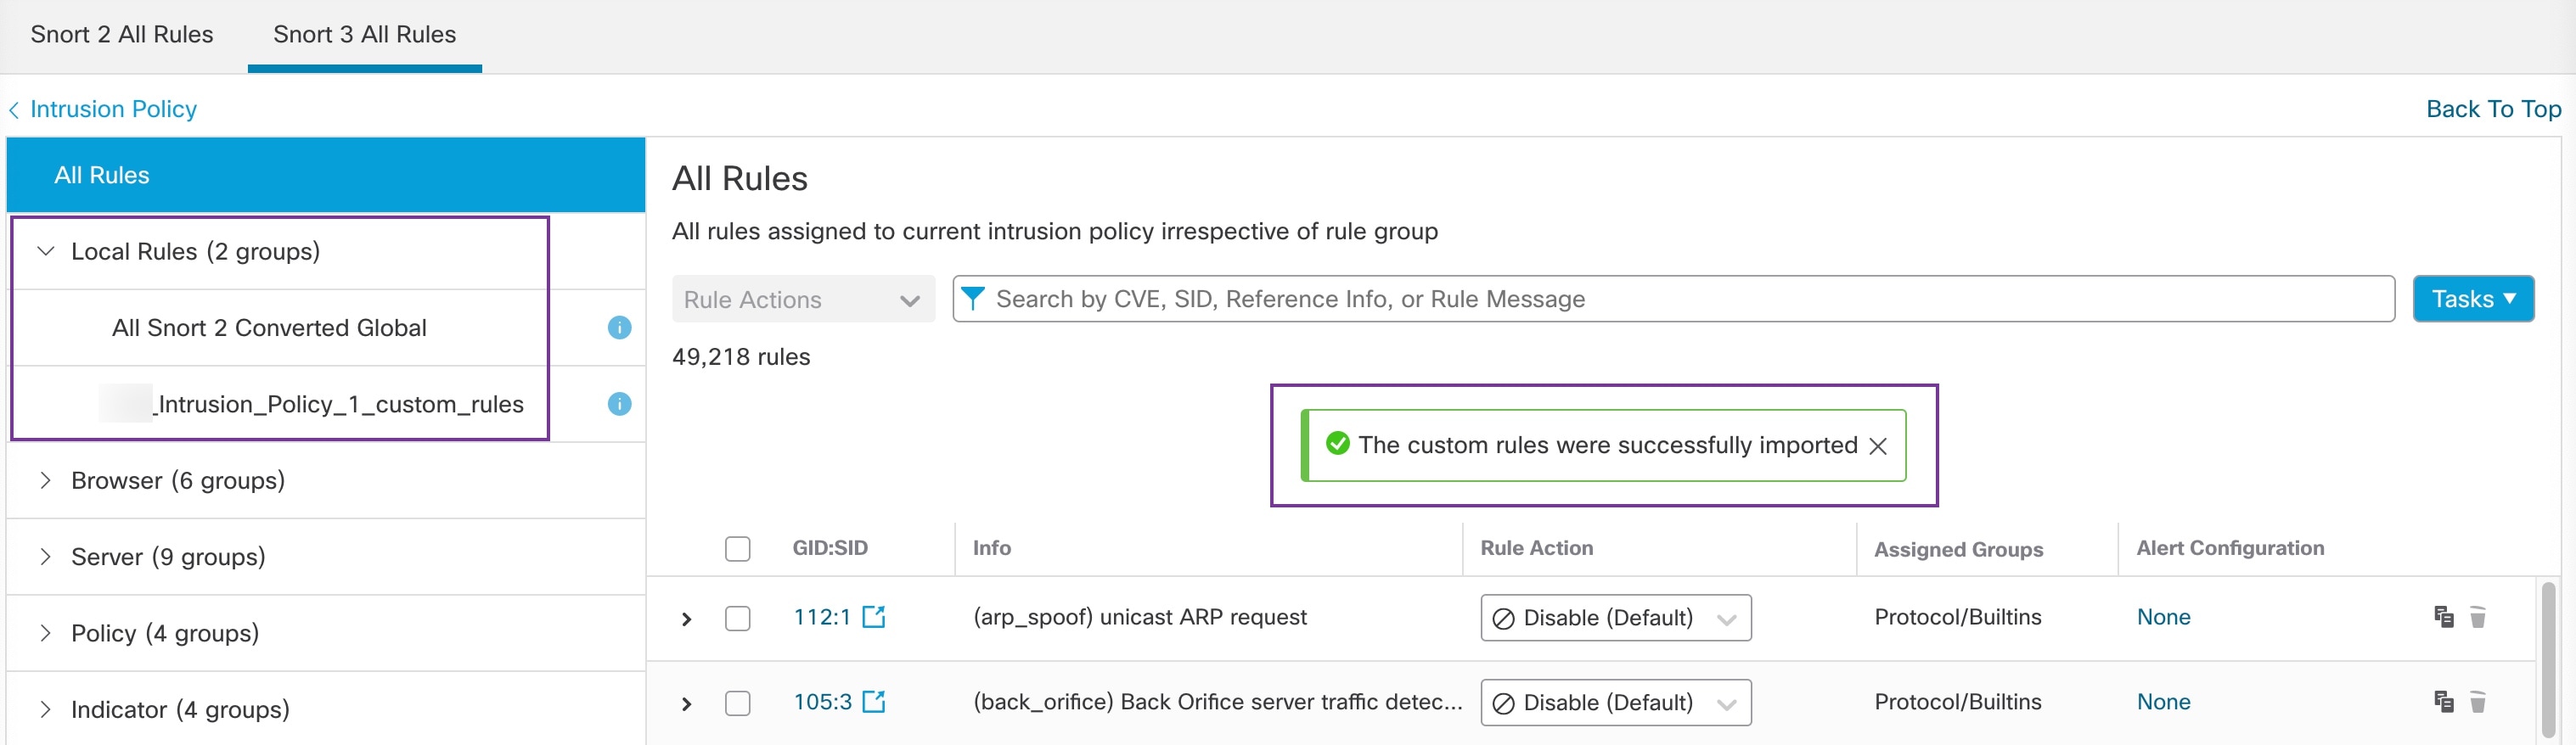
  • If you selected Convert and import in the previous step, then all the converted rules are saved under a newly created rule group All Snort 2 Converted Global under Local Rules.

  • If you selected Convert and download in the previous step, then save the rules file locally. You can review the converted rules in the downloaded file and later upload them by following the steps in Add custom rules to rule groups.

Refer to the video Converting Snort 2 Rules to Snort 3 for additional support and information.


What to do next

Deploy configuration changes. See Deploy configuration changes.

Convert Snort 2 custom rules of a single intrusion policy to Snort 3

Convert Snort 2 custom rules in an intrusion policy to Snort 3 format to maintain compatibility with Snort 3 environments.

When migrating to Snort 3, existing Snort 2 custom rules need to be converted to maintain their functionality. This task allows you to convert custom rules for a specific intrusion policy.

Procedure

Step 1

Choose Policies > Access Control heading > Intrusion.

Step 2

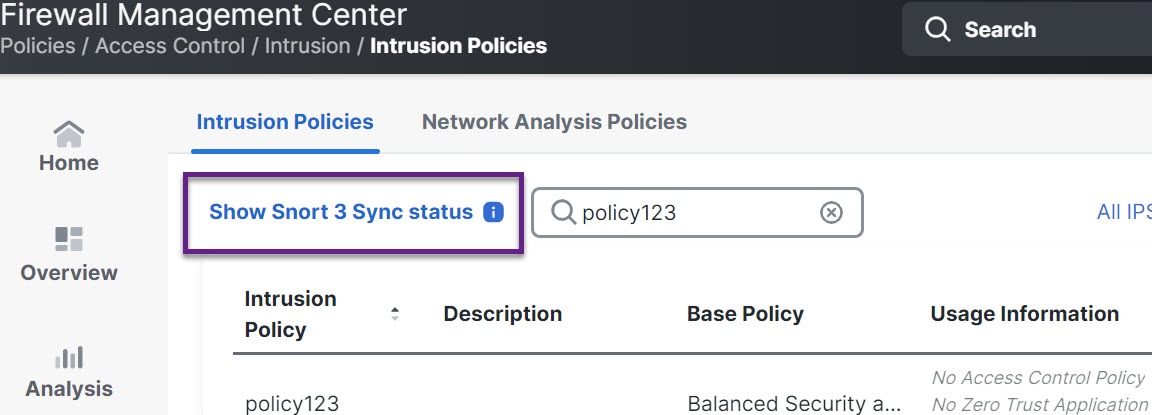
In the Intrusion Policies tab, click Show Snort 3 Sync status.

Step 3

Click the Sync icon Snort out-of-Sync (snort versions out-of-sync) of the intrusion policy.

Note


If the Snort 2 and the Snort 3 versions of the intrusion policy are synchronized, then the Sync icon is in greenSnort in-Sync (snort versions in-sync). It indicates that there are no custom rules to be converted.

Step 4

Read the summary and click the Custom Rules tab.

Step 5

Choose:

  • Import converted rules to this policy: To convert the Snort 2 custom rules in the intrusion policy to Snort 3 and import them into Firewall Management Center as Snort 3 custom rules.

  • Download converted rules: To convert the Snort 2 custom rules in the intrusion policy to Snort 3 and download them into your local system. You can review the converted rules in the downloaded file and later upload the file by clicking the upload icon.

Step 6

Click Re-Sync.


What to do next

Deploy configuration changes. See Deploy configuration changes.

View Snort 2 and Snort 3 base policy mapping

This task allows you to view the mapping between Snort 3 and Snort 2 intrusion policies.


Note


Snort 2 is not supported on threat defense version 7.7. For information on Snort 2 features that are supported in versions earlier than 7.7, refer to the Cloud-Delivered Firewall Management Center guide that matches your Firewall Threat Defense version.


Procedure


Step 1

Choose Policies > Access Control heading > Intrusion.

Step 2

Ensure the Intrusion Policies tab is selected.

Step 3

Click IPS Mapping.

Step 4

In the IPS Policy Mapping dialog box, click View Mappings to view the Snort 3 to Snort 2 intrusion policy mapping.

Step 5

Click OK.


Synchronize Snort 2 rules with Snort 3

This task helps ensure that Snort 2 rule override settings and custom rules are replicated on Snort 3, allowing you to start with similar coverage when transitioning between versions.

To ensure that the Snort 2 version settings and custom rules are retained and carried over to Snort 3, the Firewall Management Center provides the synchronization functionality. Synchronization helps Snort 2 rule override settings and custom rules, which you may have altered and added over the last few months or years, to be replicated on the Snort 3 version. This utility helps to synchronize Snort 2 version policy configuration with Snort 3 version to start with similar coverage.


Note


Snort 2 is not supported on threat defense Version 7.7. For information on Snort 2 features that are supported in versions earlier than 7.7, refer to the Cloud-Delivered Firewall Management Center guide that matches your Firewall Threat Defense version.


If the Firewall Management Center is upgraded from 6.7 or earlier to 7.0 or later version, the system synchronizes the configuration. If the Firewall Management Center is a fresh 7.0 or later version, you can upgrade to a higher version, and the system will not synchronize any content during upgrade.

Before upgrading a device to Snort 3, if changes are made in Snort 2 version, you can use this utility to have the latest synchronization from Snort 2 version to Snort 3 version so that you start with a similar coverage.


Note


When you move to Snort 3, manage the Snort 3 version of the policy independently. Do not use this utility as a regular operation.


Important


  • Only the Snort 2 rule overrides and custom rules are copied to Snort 3 and not the other way around. You may not find a one-to-one mapping of all the intrusion rules in Snort 2 and Snort 3. Your changes to rule actions for rules that exist in both versions are synchronized when you perform the following procedure.

  • Synchronization does not migrate the threshold and suppression settings of any custom or system-provided rules from Snort 2 to Snort 3.


Procedure


Step 1

Choose Policies > Access Control heading > Intrusion.

Step 2

Ensure the Intrusion Policies tab is selected.

Step 3

Click Show Snort 3 Sync status.

Step 4

Identify the intrusion policy that is out-of-sync.

Step 5

Click the Sync icon Snort out-of-Sync (snort versions out-of-sync).

Note


If the Snort 2 and the Snort 3 versions of the intrusion policy are synchronized, then the Sync icon is in greenSnort in-Sync (snort versions in-sync).

Step 6

Read the summary. Download a copy of the summary if required.

Step 7

Click Re-Sync.

Note

 
  • The synchronized settings will be applicable on the Snort 3 intrusion engine only if it is applied on a device, and after a successful deployment.

  • Snort 2 custom rules can be converted to Snort 3 with the system-provided tool. If you have any Snort 2 custom rules, click the Custom Rules tab and follow the on-screen instructions to convert the rules. For more information, see Convert Snort 2 custom rules of a single intrusion policy to Snort 3.


What to do next

Deploy configuration changes. See Deploy configuration changes.

Deploy configuration changes

Deploy configuration changes to ensure that modifications made to device configurations take effect on the affected devices.

After you change configurations, deploy them to the affected devices.


Note


This topic covers the basic steps involved in deploying configuration changes. We strongly recommend that you refer to the Deploy Configuration Changes topic in the latest version of the Cisco Secure Firewall Management Center Device Configuration Guide to understand the prerequisites and implications of deploying the changes before proceeding with the steps.


Caution


When you deploy, resource demands may result in a small number of packets dropping without inspection. Additionally, deploying some configurations restarts the Snort process, which interrupts traffic inspection. Whether traffic drops during this interruption or passes without further inspection depends on how the target device handles traffic.

Procedure


Step 1

On the Cloud-Delivered Firewall Management Center menu bar, click Deploy and choose Deployment.

The GUI page lists the devices with out-of-date configurations having Pending status.

  • The Modified By column lists the users who have modified the policies or objects. Expand the device listing to view the users who have modified the policies for each policy listing.

    Note


    Usernames are not provided for deleted policies and objects.

  • The Inspect Interruption column indicates if traffic inspection interruption might occur in the device during deployment.

    If this column is blank for a device, it indicates that there will be no traffic inspection interruptions on that device during deployment.

  • The Last Modified Time column specifies the last time you made configuration changes.

  • The Preview column allows you to preview the changes for the next deployment.

  • The Status column provides the status for each deployment.

Step 2

Identify and choose the devices on which you want to deploy configuration changes.

  • Search: Search for the device name, type, domain, group, or status in the search box.
  • Expand: Click Expand Arrow (expand arrow icon) to view device-specific configuration changes to be deployed.

    If you select a checkbox next to a device, all changes made to that device and listed for the device, are included in the deployment. However, you can use Policy selection ( policy selection icon) to select individual policies or specific configurations to deploy while withholding the remaining changes without deploying them.

    Note

     
    • When the status in the Inspect Interruption column indicates (Yes) that deploying will interrupt inspection, and perhaps traffic, on a Firewall Threat Defense device, the expanded list indicates the specific configurations causing the interruption with the Inspect Interruption (inspect interruption icon).

    • When there are changes to interface groups, security zones, or objects, the impacted devices are shown as out-of-date on the Firewall Management Center. To ensure that these changes take effect, the policies with these interface groups, security zones, or objects, also need to be deployed along with these changes. The impacted policies are shown as out-of-date on the Previewpage on the Firewall Management Center.

Step 3

Click Deploy.

Step 4

If the system identifies errors or warnings in the changes to be deployed, it displays them in the Validation Messages window. To view complete details, click the arrow icon before the warnings or errors.

You have the following choices:

  • Deploy: Continue deploying without resolving warning conditions. You cannot proceed if the system identifies errors.
  • Close: Exit without deploying. Resolve the error and warning conditions, and attempt to deploy the configuration again.

Configuration changes are deployed to the selected devices and take effect according to the deployment settings.

What to do next

During deployment, if there is a deployment failure, there is a possibility that the failure may impact traffic. However, it depends on certain conditions. If there are specific configuration changes in the deployment, the deployment failure may lead to traffic being interrupted. For details, see the Deploy Configuration Changes topic in the latest version of the Cisco Secure Firewall Management Center Device Configuration Guide.

Examples for migration

Migrate from Snort 2 to Snort 3

Migrating from Snort 2 to Snort 3

  • involves converting and adapting the Snort 2 rules to the Snort 3 rule syntax,

  • optimizes the rules for improved detection and performance, and

  • allows organizations to leverage the enhanced features and capabilities of Snort 3.

Organizations with Threat Defense devices managed by the Secure Firewall Management Center can opt for a hybrid deployment approach during the migration from Snort 2 to Snort 3. This approach allows for a gradual transition and minimizes potential disruptions, if any.

Benefits of migrating to snort 3

Snort 3 provides

  • Enhanced protocol support: Snort 3 provides improved protocol support, allowing you to detect and monitor threats across a wide range of modern protocols, including encrypted traffic.

  • Streamlined rule management: Snort 3 offers a more user-friendly rule language and rule management system, making it easier to create, modify, and manage rules effectively.

  • Improved performance: Snort 3 has been optimized to handle higher traffic volumes more efficiently, ensuring timely threat detection and reducing the risk of performance bottlenecks.

Sample business scenario

This sample business scenario is an illustrative situation that

  • demonstrates how organizations evaluate network security inspection engine migrations,

  • shows the roles and motivations of security analysts and network administrators in technology decisions, and

  • highlights the benefits of upgrading from legacy to modern security monitoring solutions.

Organizational migration scenario

Alice works as a security analyst in a large organization that heavily relies on the Snort inspection engine to monitor and protect their network infrastructure. The organization has been using Snort Version 2 for several years, but they have encountered some limitations and challenges.

Bob, the network administrator, is looking to migrate from Snort 2 to Snort 3 to overcome these issues and enhance his organization's network security capabilities.

This migration will also improve network security monitoring, enhance performance, and streamline rule management.

Best practices for migrating from Snort 2 to Snort 3

Follow these best practices when migrating from Snort 2 to Snort 3 to ensure data integrity and maintain security coverage.

Prerequisites for migration

Complete these prerequisites before starting the migration process to ensure system readiness and data protection.

Enable Snort 3 on Threat Defense device

Enable Snort 3 on your Threat Defense device for enhanced security capabilities.

Use this procedure to upgrade from Snort 2 to Snort 3 on your Threat Defense device.


Attention


During the deployment process, there could be a momentary traffic loss because the current inspection engine needs to be shut down.

Procedure


Step 1

Choose Devices > Device Management.

Step 2

Click the corresponding device to go to the device home page.

Step 3

Click the Device tab.

Step 4

In the Inspection Engine section, click Upgrade.

The image illustrates the process of enabling Snort 3 on a threat defense system, highlighting the conversion of policy configurations during deployment for compatibility with the selected Snort version.

Step 5

Click Yes.


What to do next

Deploy the changes on the device. See Deploy configuration changes.

The system converts your policy configurations during the deployment process to make them compatible with the selected Snort version.

Convert Snort 2 rules of a single intrusion policy to Snort 3

This task synchronizes and converts Snort 2 intrusion policy rules to Snort 3 format, ensuring that custom rules, thresholds, and suppressions are properly migrated to maintain security policy effectiveness when using Snort 3 engines.

When intrusion policies display an orange arrow indicator, the Snort 2 and Snort 3 versions are not synchronized. The synchronization process uses the snort2Lua tool to convert rules and may require manual intervention for custom rules, thresholds, and suppressions that cannot be automatically migrated.

Before you begin

Follow these steps to convert Snort 2 rules of a single intrusion policy to Snort 3:

Procedure


Step 1

Choose Policies > Access Control heading > Intrusion > Intrusion Policies.

  1. In the Intrusion Policies tab, click Show Snort 3 Sync status.

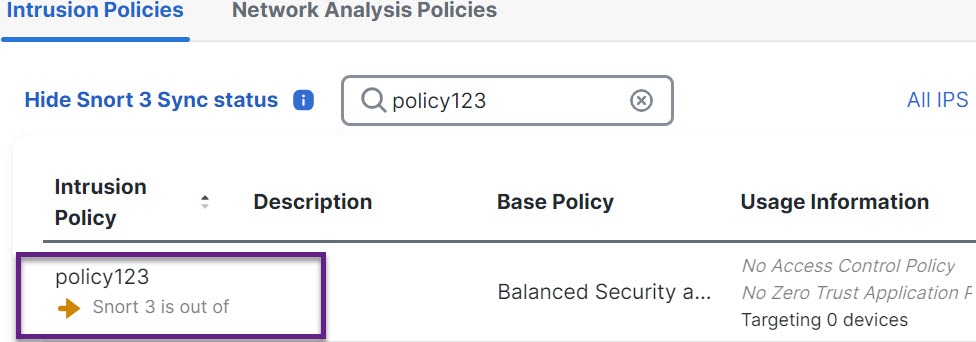
    The image illustrates the synchronization status of Snort 2 and Snort 3 intrusion policies, highlighting an orange arrow that indicates a lack of synchronization between the two versions.

    If your policy displays an orange arrow, it indicates that the Snort 2 and the Snort 3 versions of the intrusion policy are not synchronized.

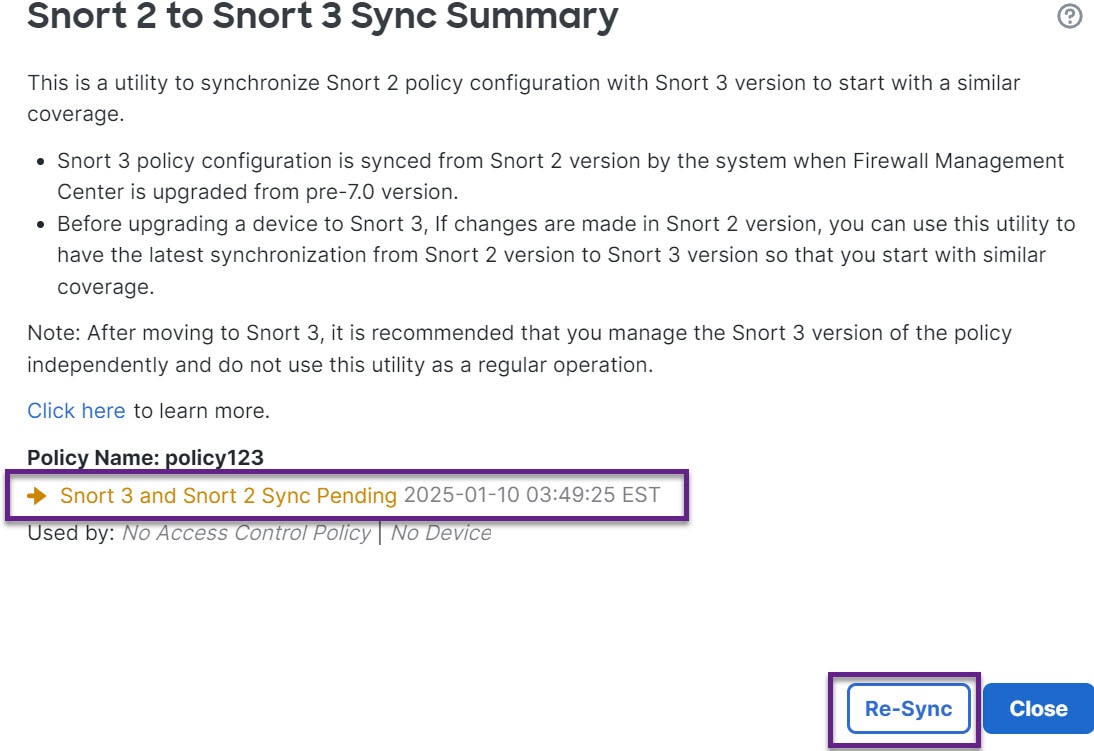
    The Snort 2 to Snort 3 Sync Summary page shows an orange arrow indicating that the Snort 2 and Snort 3 versions of the intrusion policy are not synchronized, with the sync status marked as pending.
  2. Click the orange arrow.

    The Snort 2 to Snort 3 Sync Summary page displays that the Snort 2 to Snort 3 sync is pending.

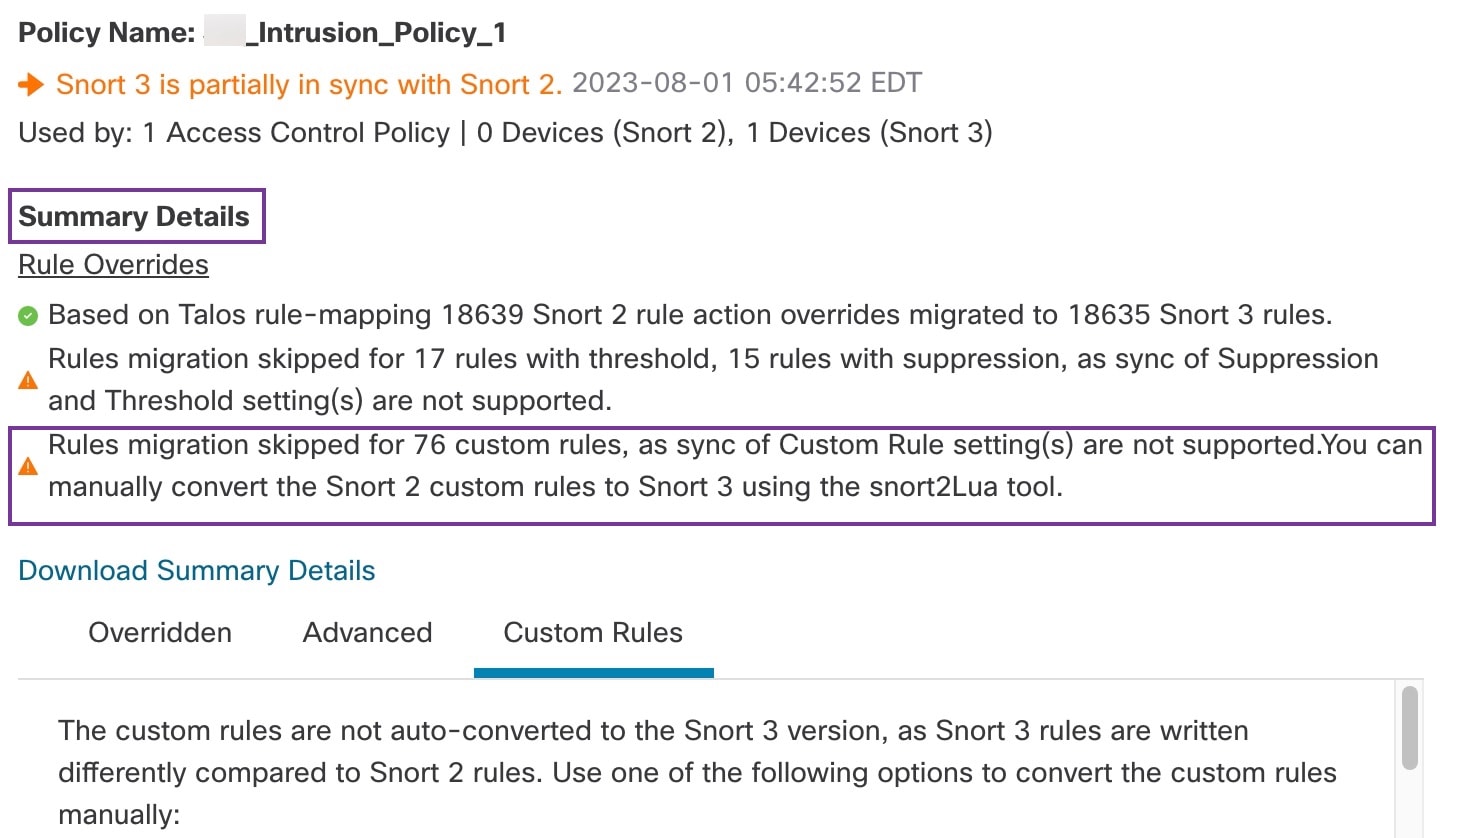
    The Snort 2 to Snort 3 Sync Summary page shows the status of the sync process, indicating that it is pending and detailing the number of rules migrated or skipped during the conversion.
  3. Click Re-Sync to start the synchronization.

    Note

     
    When you click Re-Sync, the snort2Lua tool converts the rules from Snort 2 to Snort 3.

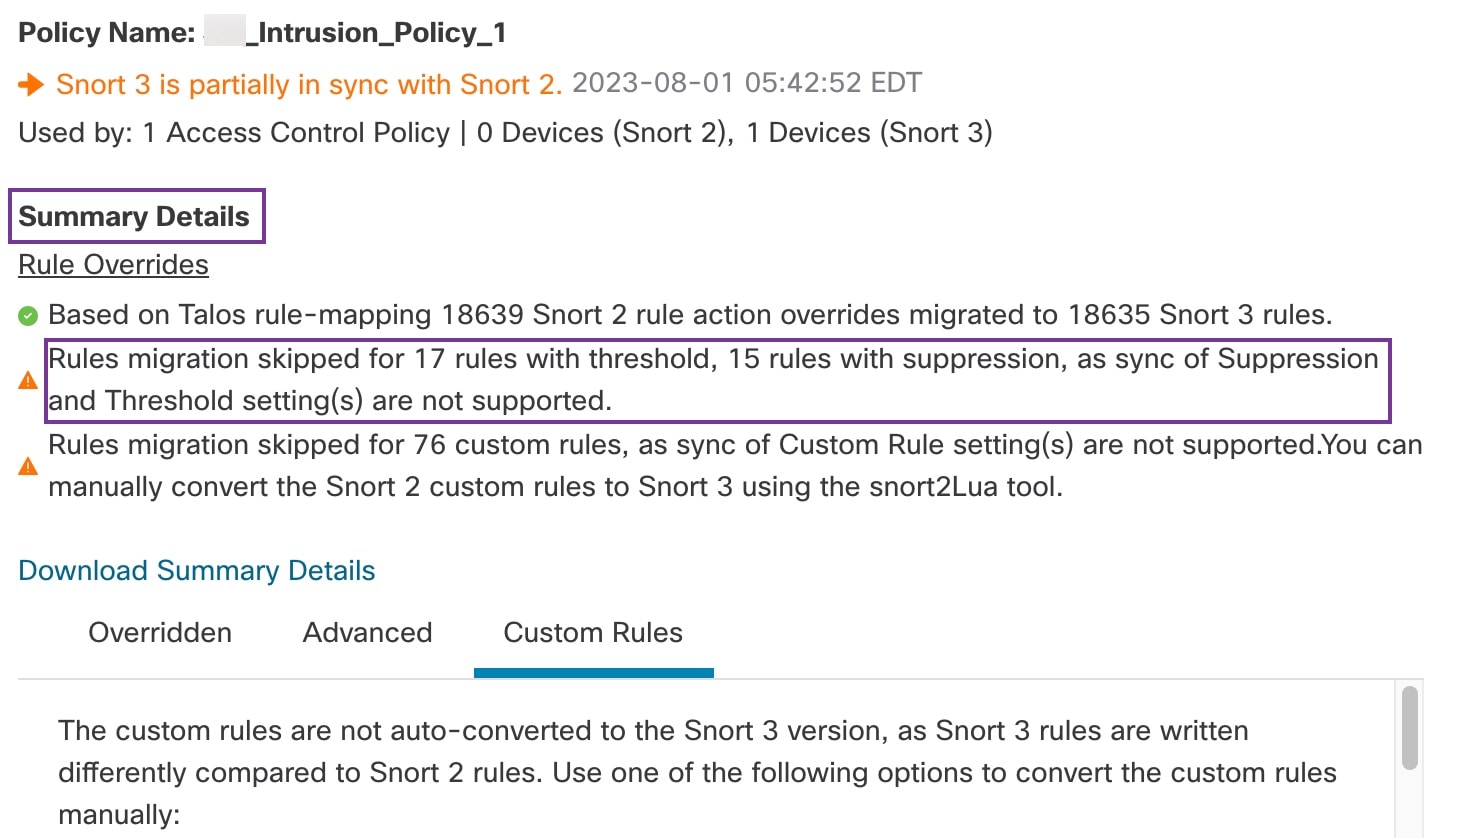
    The Summary Details section lists the rules that were migrated or skipped. In our use case, there are 76 custom Snort 2 rules, 17 rules with thresholds, and 15 rules with suppression that were skipped during the sync process. To migrate the custom rules, go to the next step.

    The snort2Lua tool interface displays the conversion process from Snort 2 rules to Snort 3, highlighting the number of rules migrated, skipped, and their respective categories.

    To migrate rules with thresholds and suppressions, go to Step 6.

    The Summary Details section shows the migration status of Snort 2 rules, indicating which rules were migrated, skipped, or had thresholds and suppressions during the sync process.

Step 2

To migrate the 76 custom rules, perform either one of these steps:

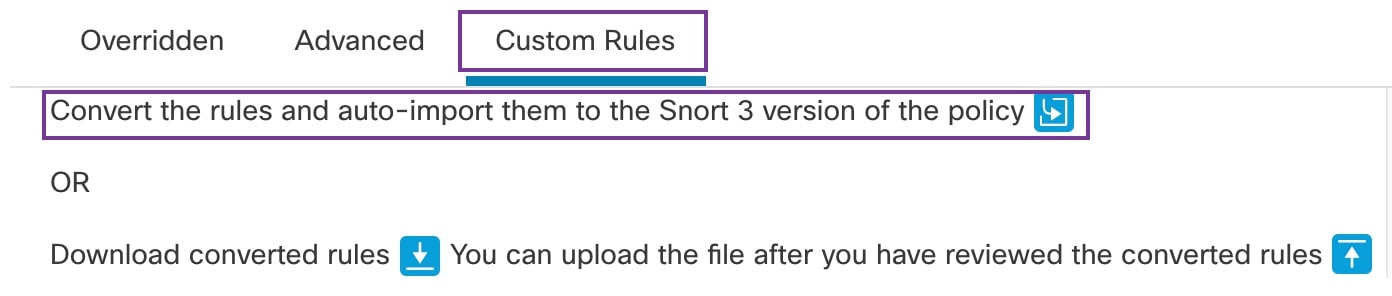
  • In the Custom Rules tab, click the Import icon to convert and auto-import the local rules to the Snort 3 version of the policy.

    The Custom Rules tab in Snort 3 shows the Import icon used to convert and auto-import local Snort 2 rules, with a confirmation message indicating successful import.

    A confirmation message is displayed after the rules are successfully imported.

  • Choose Objects > Intrusion Rules and click Snort 3 All Rules.

    1. Click Local Rules in the left panel to check if any rules have been migrated. Notice that no custom rules from Snort 2 have been migrated.

    2. From the Tasks drop-down list, choose Convert Snort 2 rules and import.

      The figure illustrates the successful migration of 76 custom Snort 2 rules to Snort 3, highlighting the newly created rule group labeled "All Snort 2 Converted Global" under Local Rules.
    3. Click OK.

      The figure illustrates the successful migration of 76 custom Snort 2 rules to Snort 3, highlighting the newly created rule group named "All Snort 2 Converted Global" under Local Rules.

      A rule group named (All Snort 2 Converted Global) is now created under Local Rules in the left panel.

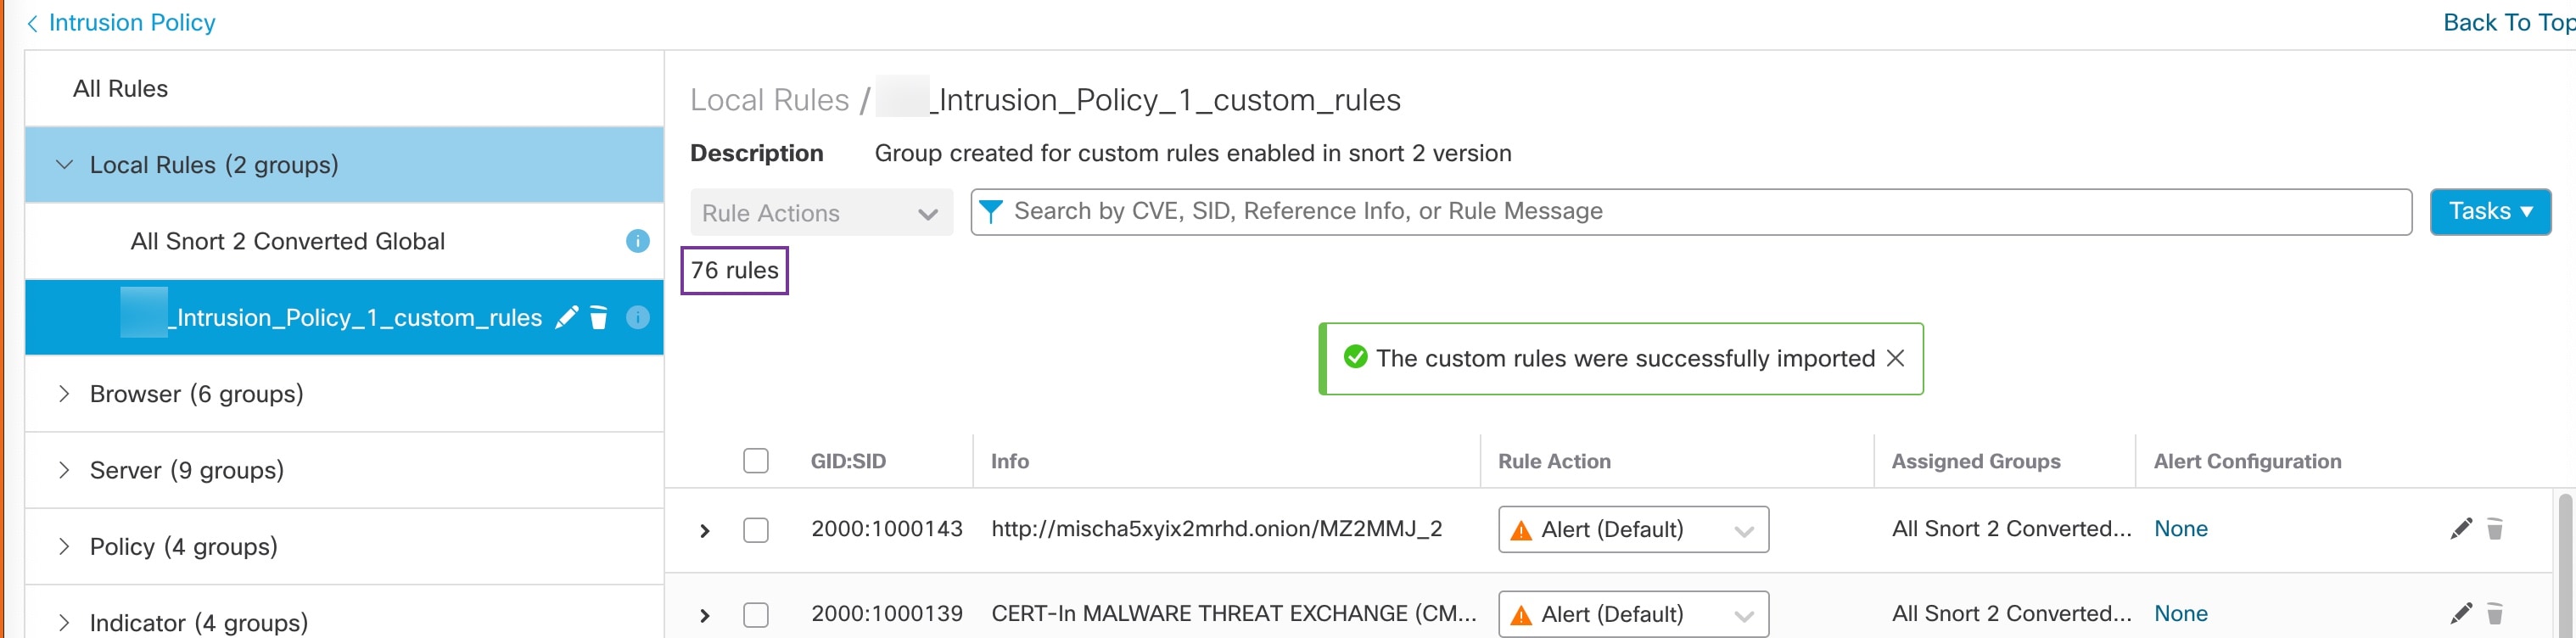
      Notice that all 76 custom rules have been migrated, as shown in the following figure.

      The figure displays a summary of the converted Snort 2 rules, highlighting the successful migration of 76 custom rules into the newly created rule group under Local Rules.

    Alternatively, you can select the Convert Snort 2 rules and download in the previous step to save the rules file locally. You can review the converted rules in the downloaded file and later upload them using the Upload Snort 3 rules option.

Step 3

Click the Download Summary Details link to download the rules in .txt format.

This is a sample of the summary that is displayed.

Example:

  "id": "00505691-15DC-0ed3-0000-004294988561",
  "name": "_Intrusion_Policy_1",
  "type": "IntrusionPolicy",
  "syncStatus": {
    "source": {
      "id": "bdce2d6a-1ebe-11ee-8e88-220032eb1fb5",
      "type": "IntrusionPolicy"
    },
    "status": "WARN",
    "description": "Migration is partially successful. Some of the rules are not copied to Snort3.",
    "timestamp": 1690883954814,
    "lastUser": {
      "name": "admin"
    },
    "details": [
      {
        "type": "Summary",
        "status": "INFO",
        "description": "Based on Talos rule-mapping 18639 Snort 2 rule action overrides migrated to 18635 Snort 3 rules."
      },
      {
        "id": "1:1000156=alert,1:1000114=alert,1:1000160=alert,1:1000135=alert,1:1000115=alert,1:1000118=alert,
         1:1000092=alert,1:1000139=alert,1:1000123=alert,1:1000159=alert,1:1000149=disabled,1:1000167=alert,
         1:1000133=alert,1:1000095=alert,1:1000143=alert,1:1000106=alert,1:1000153=alert,1:1000097=alert,1:1000141=alert,
         1:1000148=alert,1:1000090=alert,1:1000119=alert,1:1000112=alert,1:1000138=alert,1:1000128=alert,1:1000132=alert,
         1:1000134=alert,1:1000145=disabled,1:1000110=disabled,1:1000107=alert,1:1000163=alert,1:1000124=alert,1:1000125=alert,
         1:1000094=alert,1:1000113=disabled,1:1000147=alert,1:1000161=alert,1:1000105=disabled,1:1000140=alert,1:1000111=alert,
         1:1000102=alert,1:1000129=disabled,1:1000108=alert,1:1000144=disabled,1:1000088=alert,1:1000091=alert,1:1000131=alert,
         1:1000157=alert,1:1000120=alert,1:1000126=alert,1:1000165=alert,1:1000146=alert,1:1000162=alert,1:1000116=alert,1:1000142=alert,
         1:1000170=disabled,1:1000169=alert,1:1000104=alert,1:1000099=disabled,1:1000171=alert,1:1000093=alert,1:1000087=alert,1:1000100=alert,
         1:1000137=alert,1:1000158=alert,1:1000103=alert,1:1000098=alert,1:1000127=disabled,1:1000130=alert,1:1000164=alert,1:1000089=alert,
         1:1000109=alert,1:1000136=alert,1:1000117=alert,1:1000166=alert,1:1000168=alert",
        "type": "PolicyInfo",
        "description": "Corresponding Snort 2 policy overridden custom (local) rules."
      },
      {
        "type": "AssignedDevices",
        "status": "INFO",
        "description": "Snort3:0 , Snort2:0"
      },
      {
        "id": "122:6",
        "type": "Threshold",
        "status": "ERROR",
        "description": "PSNG_TCP_FILTERED_DECOY_PORTSCAN"
      },
      {
        "id": "122:15",
        "type": "Threshold",
        "status": "ERROR",
        "description": "PSNG_IP_PORTSWEEP_FILTERED"
       },
      {
        "id": "122:1",
        "type": "Threshold",
        "status": "ERROR",
        "description": "PSNG_TCP_PORTSCAN"
      },

Step 4

Click Close to close the Sync Summary dialog box.

Step 5

To check the rules with status: ERROR, choose Policies > Access Control heading > Intrusion and click the Snort 2 version of the intrusion policy.

Step 6

Under Policy Information, click Rules and filter for the rule. For example, enter PSNG_TCP_PORTSCAN in the Filterfield to find the rule.

Step 7

Click Show Details to view the detailed version of the rule.

Step 8

Create the rule again in Snort 3 using Snort 3 rule guidelines and save the file as a .txt or .rules file. For more information, see www.snort3.org.

Step 9

Upload the custom rule that you just created locally to the list of all the Snort 3 rules. See Add Custom Rules to Rule Groups.


What to do next

Deploy configuration changes. See Deploy configuration changes.