Licenses

This chapter provides in-depth information about the different license types, service subscriptions, licensing requirements and more.

Licenses

Cisco Smart Licensing is a flexible licensing model that provides you with an easier, faster, and more consistent way to purchase and manage software across the Cisco portfolio and across your organization. And it’s secure—you control what users can access. With Smart Licensing you get:

  • Easy Activation: Smart Licensing establishes a pool of software licenses that can be used across the entire organization—no more PAKs (Product Activation Keys).

  • Unified Management: Cisco License Central provides a complete view into all of your Cisco products and services in an easy-to-use portal, so you always know what you have and what you are using.

  • License Flexibility: Your software is not node-locked to your hardware, so you can easily use and transfer licenses as needed.

To use Smart Licensing, you must first set up a Smart Account on Cisco Software Central (software.cisco.com).

For a more detailed overview on Cisco Licensing, refer to cisco.com/go/licensingguide

Smart Software Manager and accounts

When you purchase one or more licenses, you manage them in the Smart Software Manager: https://software.cisco.com/#module/SmartLicensing. The Smart Software Manager lets you create a primary account for your organization. If you do not yet have an account, click the link to set up a new account. For instructions, refer to Create a Cisco Account.

By default, your licenses are assigned to the Default Virtual Account under your primary account. As the account administrator, you can create additional virtual accounts; for example, for regions, departments, or subsidiaries. Multiple virtual accounts help you manage large numbers of licenses and devices.

You manage licenses by virtual account. Only that virtual account's devices can use the licenses assigned to the account. If you need additional licenses, you can transfer an unused license from another virtual account. You can also transfer devices between virtual accounts.

Licensing for Management Center and devices

The Cloud-Delivered Firewall Management Center registers with the Smart Software Manager, and then assigns licenses for each managed device. Devices do not register directly with the Smart Software Manager.

A physical Cloud-Delivered Firewall Management Center does not require a license for its own use.

Periodic communications with the Smart Software Manager

You use a Product Instance Registration Token to register the Cloud-Delivered Firewall Management Center with the Smart Software Manager. The Smart Software Manager issues an ID certificate for communication between the Cloud-Delivered Firewall Management Center and the Smart Software Manager. This certificate is valid for one year, although it will be renewed every six months. If an ID certificate expires (after a year with no communication), the Cloud-Delivered Firewall Management Center may be removed from your account.

The Cloud-Delivered Firewall Management Center communicates with the Smart Software Manager on a periodic basis. If you make changes in the Smart Software Manager, you can refresh the authorization on the Cloud-Delivered Firewall Management Center so the changes immediately take effect. You also can wait for the Cloud-Delivered Firewall Management Center to communicate as scheduled. Your Cloud-Delivered Firewall Management Center must either have direct internet access to the Smart Software Manager.

In non-airgapped deployments, normal license communication occurs every 30 days. With the grace period, your Cloud-Delivered Firewall Management Center will operate for up to 90 days without contacting the Smart Software Manager. Ensure that the Cloud-Delivered Firewall Management Center contacts the Smart Software Manager within 90 days, or the Cloud-Delivered Firewall Management Center will revert to an unregistered state.

If your device is unable to communicate due to network issues, it continues working for up to 90 days. Once communication resumes and the ID certificate is validated, license entitlement is restored.

Cloud-Delivered Firewall Management Center licensing and registration

Register Cloud-Delivered Firewall Management Center with Cisco Smart Licensing the same way you would for On-Premises Firewall Management Center.

Overview

Cloud-Delivered Firewall Management Center is included with the base subscription and trial for Security Cloud Control Firewall Management. You do not need to purchase a separate license for Cloud-Delivered Firewall Management Center. The base subscription or trial covers Cloud-Delivered Firewall Management Center, enabling you to manage Firewall Threat Defense devices through the cloud.

Cloud-Delivered Firewall Management Center is provisioned with a 90-day evaluation license upon deployment.


Important


We strongly recommend registering Cloud-Delivered Firewall Management Center with Cisco Smart Software Manager immediately after deployment to access all features, including those requiring export encryption such as RAVPN and SSL VPN. Early registration prevents feature limitations and deployment interruptions.


Evaluation license

  • Features requiring export encryption, such as Remote Access VPN, SSL VPN, and other encryption-dependent options, remain disabled until you register Cloud-Delivered Firewall Management Center with Cisco Smart Software Manager (CSSM).

  • After the 90-day evaluation period ends, you can continue onboarding Firewall Threat Defense devices, but manually triggered or scheduled deployments are blocked until registration with CSSM is completed.

  • Security Cloud Control Firewall Management sends alert notifications as the evaluation license nears expiration.


    Note


    The Smart license field displays a warning when the evaluation license is expiration.
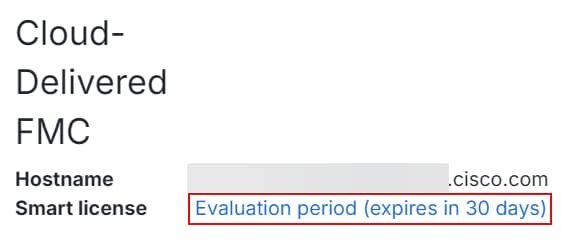
    Cloud-delivered FMC Smart license warning message: Evaluation period (expires in 89 days)

    When the evaluation period ends, Cloud-Delivered Firewall Management Center is unregistered. Registering Cloud-Delivered Firewall Management Center with Cisco Smart Software Manager converts from evaluation mode to a fully licensed state.

    Click the evaluation warning link to open the smart licensing registration page and register Cloud-Delivered Firewall Management Center with Cisco Smart Software Manager.


Registration with Cisco Smart Software Manager (CSSM)

  • Connect Cloud-Delivered Firewall Management Center to your smart licensing account, following the same process as On-Premises Firewall Management Center. The high-level procedure is provided in this section.

  • No separate license purchase is needed for Cloud-Delivered Firewall Management Center; the license is automatically applied upon registration.

  • Registering with smart licensing enables encryption export features.

  • Registration ensures compliance and prevents deployment issues.

To learn how to get a Cloud-Delivered Firewall Management Center provisioned on your Security Cloud Control tenant, see Request a Cloud-Delivered Firewall Management Center for your Security Cloud Control Tenant.

Licensing for Firewall Threat Defense devices

  • No separate license purchase is needed for Cloud-Delivered Firewall Management Center.

  • Each Firewall Threat Defense device managed by Cloud-Delivered Firewall Management Center requires an individual license.

  • After registering Cloud-Delivered Firewall Management Center with CSSM, an administrator may apply feature licenses to security devices.

Step-by-step registration

A high-level procedure is provided here. For detailed steps, see Register the Management Center with the Smart Software Manager.

  1. Create or Access Your Smart Account:

    Ensure you have a Cisco Smart Software Manager account. If you do not have one, create it at Smart Software Manager.

  2. Generate a Registration Token or Use a Registration Token:

    In the Smart Software Manager, use an existing valid registration token or generate a registration token for the virtual account to which you want to register the Cloud-Delivered Firewall Management Center.

    1. Navigate to Inventory > New Token.

    2. Enter a description and set an expiration (Cisco recommends 30 days).

    3. Create and copy the token.

  3. Register Cloud-Delivered Firewall Management Center with the Token:

    1. Log in to the Cloud-Delivered Firewall Management Center interface.

    2. Navigate to System > Licenses > Smart Licenses.

    3. Click Register and paste the registration token into the Product Instance Registration Token field.

    4. Ensure there are no extra spaces or blank lines before or after the token.

    5. Click Apply Changes.

  4. Verify Registration:

    After registration, verify the license status under System > Licenses > Smart Licenses to confirm successful registration, license application, and that “Export-Controlled Features” are enabled.

Out-of-compliance state

The Cloud-Delivered Firewall Management Center can become out of compliance in these situations:

  • License expiration—When a managed device term-based license expires.

In an out-of-compliance state, these effects occur:

  • All managed device licenses—Operation is not affected.

After you resolve the licensing problem, the Cloud-Delivered Firewall Management Center will show that it is now in compliance after its regularly scheduled authorization with the Smart Software Manager. To force an authorization, click Re-Authorize on the Administration > Licenses > Smart Licenses page.

Unregistered state

The Cloud-Delivered Firewall Management Center can become unregistered in these situations:

The Cloud-Delivered Firewall Management Center can become unregistered in these situations:

  • Evaluation mode expiration—Evaluation mode expires after 90 days.

  • Manual deregistration of the Cloud-Delivered Firewall Management Center

  • Lack of communication with the Smart Software Manager—The Cloud-Delivered Firewall Management Center does not communicate with the Smart Software Manager for 1 year. Note: After 90 days, the Cloud-Delivered Firewall Management Center authorization expires, but it can successfully resume communication within one year to automatically re-authorize. After a year, the ID certificate expires, and the Cloud-Delivered Firewall Management Center is removed from your account so you will have to manually re-register the Cloud-Delivered Firewall Management Center.

In an unregistered state, the Cloud-Delivered Firewall Management Center cannot deploy any configuration changes to devices for features that require licenses.

End-user license agreement

The Cisco end-user license agreement (EULA) and any applicable supplemental agreement (SEULA) that governs your use of this product are available from http://www.cisco.com/go/softwareterms.

License types and restrictions

This section describes the types of licenses available for Secure Firewall.

Table 1. Smart Licenses

License You Assign

Duration

Granted Capabilities

Essentials

Perpetual or Subscription

Note


Essentials subscription licenses are supported only on Firewall Threat Defense Virtual .

Except for Specific License Reservation and the Secure Firewall 1200/ 3100 /4200 , Essentials perpetual licenses are automatically assigned with all Firewall Threat Defense s.

User and application control

Switching and routing

NAT

For details, see Essentials licenses .

IPS

Subscription

Intrusion detection and prevention

File control

Security Intelligence filtering

For details, see IPS licenses

Malware defense

Subscription

Malware defense

Secure Malware Analytics

File storage

( IPS license is a prerequisite for a Malware defense license.)

For details, see Malware Defense Licenses and License Requirements for File and Malware Policies in the Cisco Secure Firewall Management Center Device Configuration Guide .

Carrier

Subscription for Firepower 4100/9300, Secure Firewall 3100 /4200 , and Firewall Threat Defense Virtual

Diameter, GTP/GPRS, M3UA, and SCTP inspection

For details, see Carrier license .

URL Filtering

Subscription

Category and reputation-based URL filtering

For details, see URL Filtering licenses .

( IPS license is a prerequisite for a URL Filtering license.)

Export-Controlled Features

Perpetual

Features that are subject to national security, foreign policy, and anti-terrorism laws and regulations; see License for export-controlled functionality .

Remote Access VPN:

  • Secure Client Premier

  • Secure Client Advantage

  • Secure Client VPN Only

Subscription or perpetual

Remote access VPN configuration. Your account must allow export-controlled functionality to configure remote access VPN. You select whether you meet export requirements when you register the device. The Firewall Threat Defense can use any valid Secure Client license. The available features do not differ based on license type.

For more information, see Secure Client licenses and VPN Licensing in the Cisco Secure Firewall Management Center Device Configuration Guide .


Note


Subscription licenses are term-based licenses.


Essentials licenses

The Essentials license allows you to configure and manage firewall devices with essential networking and security capabilities, including switching, routing, high availability, clustering, user control, application control, and database updates.

The Essentials license allows you to:

  • Configure your devices to perform switching and routing (including DHCP relay and NAT)

  • Configure devices as a high availability pair

  • Configure clustering

  • Implement user and application control by adding user and application conditions to access control rules

  • Update the Vulnerability database (VDB) and geolocation database (GeoDB).

  • Download intrusion rules such as SRU/LSP. However, you cannot deploy access control policy or rules that have intrusion policy to the device unless IPS license is enabled.

Secure Firewall 1200/3100/4200/6100

You obtain a Essentials license when you purchase the Secure Firewall 1200/3100/4200/6100.

Other Models

Except in deployments using Specific License Reservation, a Essentials license is automatically added to your account when you register a device to the Cloud-Delivered Firewall Management Center. For Specific License Reservation, you need to add the Essentials license to your account.

Malware Defense Licenses

A Malware defense license lets you perform Malware Defense and Secure Malware Analytics. With this feature, you can use devices to detect and block malware in files transmitted over your network.

To support this feature license, you can purchase the Malware defense (AMP) service subscription as a stand-alone subscription or in combination with IPS (TM) or IPS and URL Filtering (TMC) subscriptions. IPS license is a prerequisite for a Malware defense license.


Note


Managed devices with Malware defense licenses enabled periodically attempt to connect to the Secure Malware Analytics Cloud even if you have not configured dynamic analysis. Because of this, the device's Interface Traffic dashboard widget shows transmitted traffic; this is expected behavior.


You configure Malware Defense as part of a file policy, which you then associate with one or more access control rules. File policies can detect your users uploading or downloading files of specific types over specific application protocols. Malware Defense allows you to use local malware analysis and file preclassification to inspect a restricted set of those file types for malware. You can also download and submit specific file types to the Secure Malware Analytics Cloud for dynamic and Spero analysis to determine whether they contain malware. For these files, you can view the network file trajectory, which details the path the file has taken through your network. The Malware Defense license also allows you to add specific files to a file list and enable the file list within a file policy, allowing those files to be automatically allowed or blocked on detection.

Note that a Malware defense license is required only if you deploy Malware Defense and Secure Malware Analytics. Without a Malware defense license, the Cloud-Delivered Firewall Management Center can receive Secure Endpoint malware events and indications of compromise (IOC) from the Secure Malware Analytics Cloud.

Refer to important information at License Requirements for File and Malware Policies in the Cisco Secure Firewall Management Center Device Configuration Guide.

When you disable this license:

  • The system stops querying the Secure Malware Analytics Cloud, and also stops acknowledging retrospective events sent from the Secure Malware Analytics Cloud.

  • You cannot re-deploy existing access control policies if they include Malware Defense configurations.

  • For a very brief time after a Malware defense license is disabled, the system can use existing cached file dispositions. After the time window expires, the system assigns a disposition of Unavailable to those files.

If the license expires, your entitlement for the above capabilities ceases and the Cloud-Delivered Firewall Management Center moves to the out-of-compliance state.

IPS licenses

A IPS license allows you to perform intrusion detection and prevention, file control, and Security Intelligence filtering.

License capabilities
  • Intrusion detection and prevention allows you to analyze network traffic for intrusions and exploits and, optionally, drop offending packets.

  • File control allows you to detect and, optionally, block users from uploading (sending) or downloading (receiving) files of specific types over specific application protocols. Malware defense, which requires a Malware defense license, allows you to inspect and block a restricted set of those file types based on their dispositions.

  • Security Intelligence filtering allows you to block —deny traffic to and from—specific IP addresses, URLs, and DNS domain names, before the traffic is subjected to analysis by access control rules. Dynamic feeds allow you to immediately block connections based on the latest intelligence. Optionally, you can use a "monitor-only" setting for Security Intelligence filtering.

License purchase options

You can purchase a IPS license as a stand-alone subscription (T) or in combination with URL Filtering (TC), Malware defense (TM), or both (TMC).

Disabled license behavior

When you disable this license:

  • The Cloud-Delivered Firewall Management Center stops acknowledging intrusion and file events from the affected devices. As a consequence, correlation rules that use those events as a trigger criteria stop firing.

  • The Cloud-Delivered Firewall Management Center does not contact the internet for either Cisco-provided or third-party Security Intelligence information.

  • You cannot re-deploy existing intrusion policies until you re-enable IPS.

Expired license behavior

If the license expires, your entitlement for the above capabilities ceases and the Cloud-Delivered Firewall Management Center moves to the out-of-compliance state.

Carrier license

The Carrier license enables the inspection of specific protocols used in next-generation mobile and telecom networks. This license supports protocol inspection for Diameter, GTP/GPRS, M3UA, and SCTP protocols across supported devices.

Enabled protocols
  • Diameter—Diameter is an Authentication, Authorization, and Accounting (AAA) protocol used in next-generation mobile and fixed telecom networks such as EPS (Evolved Packet System) for LTE (Long Term Evolution) and IMS (IP Multimedia Subsystem). It replaces RADIUS and TACACS in these networks.

  • GTP/GPRS—GPRS Tunneling Protocol (GTP) is used in GSM, UMTS, and LTE networks for general packet radio service (GPRS) traffic. GTP provides a tunnel control and management protocol to provide GPRS network access for a mobile station by creating, modifying, and deleting tunnels. GTP also uses a tunneling mechanism for carrying user data packets.

  • M3UA—MTP3 User Adaptation (M3UA) is a client/server protocol that provides a gateway to the Signaling System 7 (SS7) network for IP-based applications that interface with the SS7 Message Transfer Part 3 (MTP3) layer. M3UA makes it possible to run the SS7 User Parts (such as ISUP) over an IP network.

  • SCTP—Stream Control Transmission Protocol (SCTP) is a transport-layer protocol that supports the SS7 protocol over IP networks. It supports the 4G LTE mobile network architecture. SCTP can handle multiple simultaneous streams, multiplexed streams, and provides more security features.


Note


After you enable this license on a device, use a FlexConfig policy to enable the protocol inspection.


The Carrier license PIDs are available per family and not per device model. You can enable this license for each device either in the evaluation mode or with a Smart License.

The Carrier license for Firepower 4100/9300, Secure Firewall 3100/4200/6100, and Firewall Threat Defense Virtual is term-based. This license also supports Specific License Reservation.

Supported devices
  • Cisco Secure Firewall 3100 Series

    • Secure Firewall 3110

    • Secure Firewall 3120

    • Secure Firewall 3130

    • Secure Firewall 3140

  • Cisco Secure Firewall 4100 Series

    • Firepower 4112

    • Firepower 4115

    • Firepower 4125

    • Firepower 4145

  • Cisco Secure Firewall 4200 Series

    • Secure Firewall 4215

    • Secure Firewall 4225

    • Secure Firewall 4245

  • Cisco Secure Firewall 6100 Series

    • Secure Firewall 6160

    • Secure Firewall 6170

  • Firepower 9300

  • Firewall Threat Defense Virtual

URL Filtering licenses

The URL Filtering license allows you to write access control rules that determine the traffic that can traverse your network based on URLs requested by monitored hosts, correlated with information about those URLs. To support this feature license, you can purchase the URL Filtering service subscription as a stand-alone subscription or in combination with IPS (TC) or Threat and Malware defense (TMC) subscriptions. IPS license is a prerequisite for this license.


Tip


Without a URL Filtering license, you can specify individual URLs or groups of URLs to allow or block. This option gives you granular, custom control over web traffic, but does not allow you to use URL category and reputation data to filter network traffic.


Although you can add category and reputation-based URL conditions to access control rules without a URL Filtering license, the Cloud-Delivered Firewall Management Center will not download URL information. You cannot deploy the access control policy until you first add a URL Filtering license to the Cloud-Delivered Firewall Management Center, then enable it on the devices targeted by the policy.

When you disable this license:

  • You may lose access to filtering network traffic based on the URL category and reputation ACP rules. The manual URL filtering options will continue to be supported.

  • Access control rules with URL conditions immediately stop filtering URLs.

  • Your Cloud-Delivered Firewall Management Center can no longer download updates to URL data.

  • You cannot re-deploy existing access control policies if they include rules with category and reputation-based URL conditions.

If the license expires, your entitlement for the above capabilities ceases and the Cloud-Delivered Firewall Management Center moves to the out-of-compliance state.

Secure Client licenses

You can configure remote access VPN using the Secure Client and standards-based IPSec/IKEv2.

To enable remote access VPN, you must purchase and enable one of these licenses: Secure Client Advantage, Secure Client Premier, or Secure Client VPN Only. You can select Secure Client Advantage and Secure Client Premier if you have both licenses and you want to use them both. The Secure Client VPN Onlylicense cannot be used with Apex or Plus. The Secure Client license must be shared with the Smart Account. For more instructions, refer to http://www.cisco.com/c/dam/en/us/products/collateral/security/anyconnect-og.pdf.

You cannot deploy the remote access VPN configuration to the device if the specified device does not have the entitlement for a minimum of one of the specified Secure Client license types. If the registered license moves out of compliance or entitlements expire, the system displays licensing alerts and health events.

While using remote access VPN, your Smart Account must have the export controlled features (strong encryption) enabled. The Firewall Threat Defense requires strong encryption (which is higher than DES) for successfully establishing remote access VPN connections with Secure Clients.

You cannot deploy remote access VPN if these conditions are true:

  • Smart Licensing on the Cloud-Delivered Firewall Management Center is running in evaluation mode.

  • Your Smart Account is not configured to use export-controlled features (strong encryption).

License for export-controlled functionality

This topic provides information about software features that are subject to export control laws and regulations, and describes how to determine and enable export-controlled functionality for your system.

Features that require export-controlled functionality

Certain software features are subject to national security, foreign policy, and anti-terrorism laws and regulations. These export-controlled features include:

  • Security certifications compliance

  • Remote access VPN

  • Site-to-site VPN with strong encryption

  • SSH platform policy with strong encryption

  • SSL policy with strong encryption

  • Functionality such as SNMPv3 with strong encryption

Verify export-controlled functionality in your system

To determine whether export-controlled functionality is currently enabled for your system: Choose Administration > Licenses > Smart Licenses and see if Export-Controlled Features displays Enabled.

Enable export-controlled functionality

If Export-Controlled Features shows Disabled and you want to use features that require strong encryption, there are two ways to enable strong cryptographic features. Your organization may be eligible for one or the other (or neither), but not both.

  • If there is no option to enable export-controlled functionality when you generate a new Product Instance Registration Token in the Smart Software Manager, contact your account representative.

  • If the option "Allow export-controlled functionality on the products registered with this token" appears when you generate a new Product Instance Registration Token in the Smart Software Manager, make sure you check it before generating the token.

    If you did not enable export-controlled functionality for the Product Instance Registration Token that you used to register the Cloud-Delivered Firewall Management Center, then you must deregister and then re-register the Cloud-Delivered Firewall Management Center using a new Product Instance Registration Token with export-controlled functionality enabled.

If you registered devices to the Cloud-Delivered Firewall Management Center in evaluation mode or before you enabled strong encryption on the Cloud-Delivered Firewall Management Center, reboot each managed device to make strong encryption available. In a high availability deployment, the active and standby devices must be rebooted together to avoid an Active-Active condition.

The entitlement is perpetual and does not require a subscription.

More information

For general information about export controls, see https://www.cisco.com/c/en/us/about/legal/global-export-trade.html.

Firewall Threat Defense Virtual Licenses

Learn about the performance-tiered license entitlements for Firewall Threat Defense Virtual, including supported vCPU and memory configurations, compatible VM resource footprints, and RA VPN session limits by entitlement tier.

Any Firewall Threat Defense Virtual license can be used on any supported Firewall Threat Defense Virtual vCPU/memory configuration. This allows Firewall Threat Defense Virtual customers to run on a wide variety of VM resource footprints. This also increases the number of supported AWS and Azure instances types. When configuring the Firewall Threat Defense Virtual VM, the maximum supported number of cores (vCPUs) is 16 ; and the maximum supported memory is 32 GB RAM .

Performance Tiers for Firewall Threat Defense Virtual Smart Licensing

Session limits for RA VPNs are determined by the installed Firewall Threat Defense Virtual platform entitlement tier, and enforced via a rate limiter. The following table summarizes the session limits based on the entitlement tier and rate limiter.

Table 2. Firewall Threat Defense Virtual Licensed Feature Limits Based on Entitlement

Performance Tier

Device Specifications (Core/RAM)

Rate Limit

RA VPN Session Limit

FTDv5, 100Mbps

4 core/8 GB

100Mbps

50

FTDv10, 1Gbps

4 core/8 GB

1Gbps

250

FTDv20, 3Gbps

4 core/8 GB

3Gbps

250

FTDv30, 5Gbps

8 core/16 GB

5Gbps

250

FTDv50, 10Gbps

12 core/24 GB

10Gbps

750

FTDv100, 16Gbps

16 core/32 GB

16Gbps

10,000

FTDvU

32 core/64 GB

Not limited

20,000

FTDvU

64 core/128 GB

Not limited

32,000

Firewall Threat Defense Virtual Performance Tier Licensing Guidelines and Limitations

Review and follow these guidelines and limitations when licensing your Firewall Threat Defense Virtual device.

  • The Firewall Threat Defense Virtual supports performance-tiered licensing that provides different throughput levels and VPN connection limits based on deployment requirements.

  • Any Firewall Threat Defense Virtual license can be used on any supported Firewall Threat Defense Virtual core/memory configuration. This allows the Firewall Threat Defense Virtual customers to run on a wide variety of VM resource footprints.

  • You can select a performance tier when you deploy the Firewall Threat Defense Virtual , whether your device is in evaluation mode or is already registered with Smart Software Manager


    Note


    Make sure your Smart Licensing account contains the available licenses you need. It’s important to choose the tier that matches the license you have in your account. If you are upgrading your Firewall Threat Defense Virtual to Version 7.0 and later, you can choose FTDv - Variable to maintain your current license compliance. Your Firewall Threat Defense Virtual continues to perform with session limits based on your device capabilities (number of cores/RAM).


  • The default performance tier is FTDv50 when deploying a new Firewall Threat Defense Virtual device, or when provisioning the Firewall Threat Defense Virtual using the REST API.

  • Essentials licenses are subscription-based and mapped to performance tiers. Your virtual account needs to have the Essentials license entitlements for the Firewall Threat Defense Virtual devices, as well as for IPS , Malware Defense , and URL Filtering licenses.

  • Each HA peer consumes one entitlement, and the entitlements on each HA peer must match, including Essentials license.

  • A change in performance tier for an HA pair should be applied to the primary peer.

  • You assign feature licenses to the cluster as a whole, not to individual nodes. However, each node of the cluster consumes a separate license for each feature. The clustering feature itself does not require any licenses.

  • Universal PLR licensing is applied to each device in an HA pair separately. The secondary device will not automatically mirror the performance tier of the primary device. It must be updated manually.

Edit performance tier of Firewall Threat Defense Virtual

The Firewall Threat Defense Virtual supports performance-tiered licensing that provides different throughput levels and VPN connection limits based on deployment requirements. You can edit the performance tier using this procedure.

Before you begin

Ensure that you review Firewall Threat Defense Virtual Performance Tier Licensing Guidelines and Limitations.

Procedure

Step 1

Choose Administration > Licenses > Smart Licenses.

Step 2

Click Edit Performance Tier.

Step 3

Choose a tier from the Target Performance Tier drop-down list.

Step 4

From the Available Devices list, select the required devices and click Add.

Step 5

Click Apply.


Prerequisites for licensing

This topic lists the prerequisites, supported domains, and user roles required for licensing.

General prerequisites

  • Make sure NTP is configured on the Cloud-Delivered Firewall Management Center and managed devices. Time must be synchronized for registration to succeed.

  • For a Firepower 4100/9300, you must configure NTP on the chassis using the same NTP server for the chassis as for the Cloud-Delivered Firewall Management Center.

Supported domains

Global, except where indicated.

User roles

Admin

Prerequisites for licensing in high availability, clustering, and multi-instance

This section describes the licensing requirements for device High Availability.

FTD Services does not support clustering or multi-instance deployments.

License requirements for Firewall Threat Defense device high availability

Both Firewall Threat Defense units in a high availability configuration must have the same licenses.

High availability configurations require two license entitlements: one for each device in the pair.

Before high availability is established, it does not matter which licenses are assigned to the secondary/standby device. During high availability configuration, the Cloud-Delivered Firewall Management Center releases any unnecessary licenses assigned to the standby unit and replaces them with identical licenses assigned to the primary/active unit.

For example, if the active unit has a Essentials license and a IPS license, and the standby unit has only a Essentials license, the Cloud-Delivered Firewall Management Center communicates with the Smart Software Manager to obtain an available IPS license from your account for the standby unit. If your license account does not include enough purchased entitlements, your account becomes Out-of-Compliance until you purchase the correct number of licenses.

License for device clusters

Device clusters require specific licensing considerations for proper operation and feature functionality.

Performance tier license requirements

Each Firewall Threat Defense Virtual cluster node requires the same performance tier license. We recommend using the same number of CPUs and memory for all members, or else performance will be limited on all nodes to match the least capable member. The throughput level will be replicated from the control node to each data node so they match.

Feature license assignment

You assign feature licenses to the cluster as a whole, not to individual nodes. However, each node of the cluster consumes a separate license for each feature. The clustering feature itself does not require any licenses.

When you add the control node to the Cloud-Delivered Firewall Management Center, you can specify the feature licenses you want to use for the cluster. Before you create the cluster, it doesn't matter which licenses are assigned to the data nodes; the license settings for the control node are replicated to each of the data nodes. You can modify licenses for the cluster by clicking Edit Licenses in Administration > Licenses > Smart Licenses or choosing Devices > Device Management, clicking Edit (edit icon) for the cluster, and then in the License area, clicking Edit (edit icon).


Note


If you add the cluster before the Cloud-Delivered Firewall Management Center is licensed (and running in Evaluation mode), then when you license the Cloud-Delivered Firewall Management Center, you can experience traffic disruption when you deploy policy changes to the cluster. Changing to licensed mode causes all data units to leave the cluster and then rejoin.


Create a Cisco account

You need a Cisco account to access Smart Account functionality and license any Cisco products.

You must have a Cisco account to request a Smart Account and license any Cisco products.

Procedure


Step 1

Open the URL https://id.cisco.com/signin/register to create a new account.

Step 2

Enter all the required fields to create an account.

Step 3

Click Register.

An email with an activation code is sent to verify your email address.

Note


If you haven't received an email yet, send an email to the registration support team at web-help@cisco.com.

Step 4

In the Verify with your email page, enter the activation code to complete the registration process and click Verify.

After successful registration, you will be redirected to the login page.


What to do next

Enter the newly created account details on the login page to request a Smart Account. Refer to Create a smart account and add licenses.

Create a smart account and add licenses

Create a Smart Account to centrally manage and track your Cisco software licenses across your organization.

You should set up this account before you purchase licenses. Your account representative or reseller may have set up a Smart Account on your behalf. If so, obtain the necessary information to access the account from that person instead of using this procedure, then verify that you can access the account.

Before you begin

You must create a new Cisco account if you don't already have one. For instructions, refer to Create a Cisco Account.

For general information about Smart Accounts, refer to http://www.cisco.com/go/smartaccounts.

Procedure


Step 1

Go to the Create a Smart Account page.

You are prompted to log in with your Cisco account. In the Create a Smart Account page, your basic account information is displayed.

Step 2

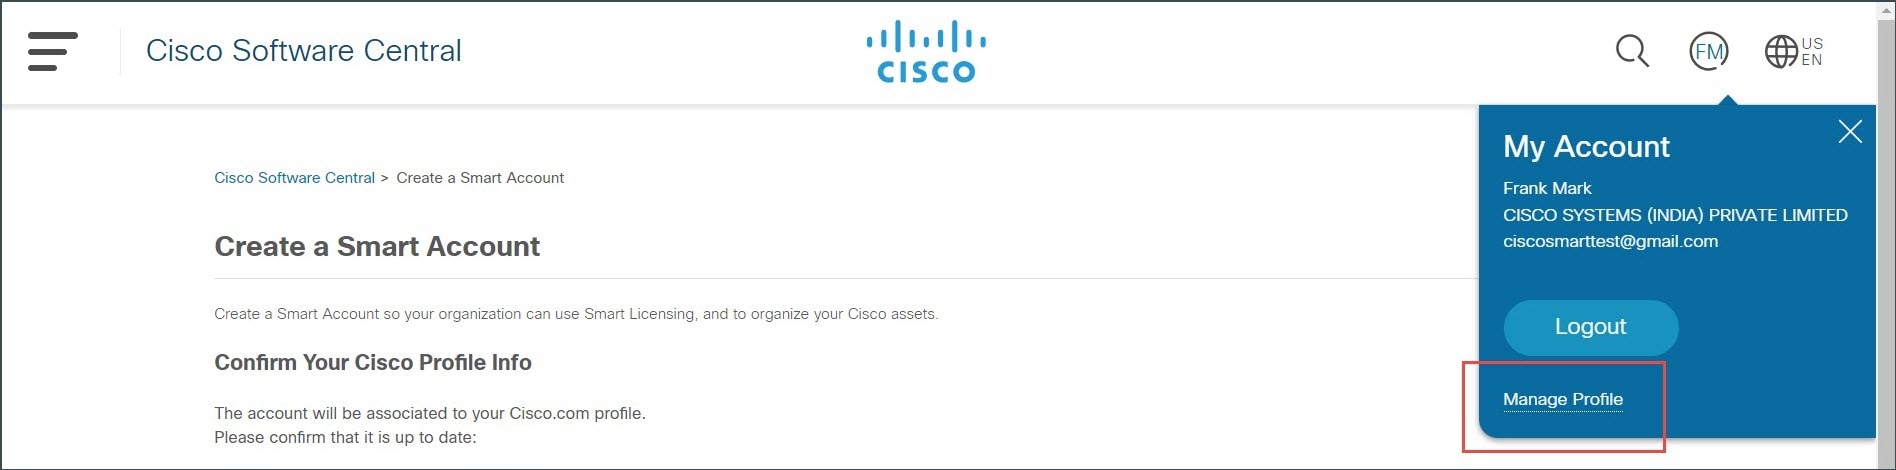
Click the My Account icon appearing in the top right corner and click Manage Profile.

Manage Profile option in My Account

Step 3

Click Personal and configure these parameters:

  1. In the Your Company Details section, click Edit.

  2. In the Company or organization field, type your organization name.

  3. If your company information is already present in our database, it will appear in the list. You can select your company.

    In the Address drop-down list, select the address of your company.

  4. If your company is not listed in our database, you can continue to enter your company information in the Company or organization field.

    1. In the Address drop-down list, click the drop-down arrow and click Add New Address.

    2. You can select one of the following Address Type options:

      • Company/Organization: To provide your organization's address. Cisco verifies this address. If the address and company name cannot be validated with the country, you may not be able to proceed. Therefore, you must ensure that the correct address is provided.

      • Personal: To provide your personal address.

  5. Enter all the mandatory fields associated with your company and click Update.

    The Your Company Details section displays the company details you entered.

    A success message appears if your company details are validated.

Step 4

Click Update.

A success message appears if your company details are validated.

Step 5

Open the Create a Smart Account page, which was opened in the previous tab. Refresh the page if changes are not reflecting.

Alternatively, you can open this page using the https://software.cisco.com/software/company/smartaccounts/home?route=module/accountcreation URL and login using your credentials.

Step 6

Click Create Account.

The Account Summary page displays your account details.

Step 7

Click Done.

Step 8

Wait for an email telling you that your Smart Account is ready to set up. When it arrives, click the link it contains, as directed.

Step 9

Make sure your Smart Licensing account contains the available licenses you need.


What to do next

To configure Smart License using the Smart Software Manager, refer to Configure Smart Licensing.

Configure Smart Licensing

This section describes how to use Smart Licensing using the Smart Software Manager or the Smart Software Manager On-Prem.

Register the Cloud-Delivered Firewall Management Center for Smart Licensing

You can register the Cloud-Delivered Firewall Management Center directly to the Smart Software Manager over the internet, or when using an air-gapped network, with the Smart Software Manager On-Prem.

Register the Cloud-Delivered Firewall Management Center with the Smart Software Manager

Register the Cloud-Delivered Firewall Management Center with the Smart Software Manager to enable Smart Licensing functionality and proper license management.

Before you begin

  • Make sure your Smart Licensing account contains the available licenses you need.

    When you bought your device from Cisco or a reseller, your licenses should have been linked to your Smart Account. However, if you need to add licenses yourself, see Cisco Commerce Workspace.

  • Ensure that the Cloud-Delivered Firewall Management Center can reach the Smart Software Manager at smartreceiver.cisco.com.

  • Configure NTP. During registration, a key exchange occurs between the Smart Agent and the Smart Software Manager, so time must be in sync for proper registration.

    For the Firepower 4100/9300, configure NTP on the chassis using the same NTP server as the Cloud-Delivered Firewall Management Center.

  • If your organization has multiple Cloud-Delivered Firewall Management Centers, make sure each one has a unique name that clearly identifies and distinguishes it from others that may be registered to the same virtual account. This name is critical for managing your Smart License entitlements and ambiguous names will lead to problems later.

Procedure

Step 1

In the Smart Software Manager, request and copy a registration token for the virtual account to which you want to add this device.

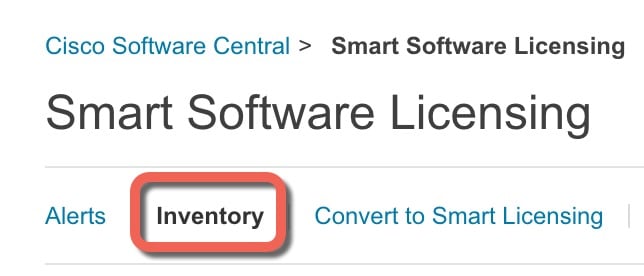
  1. Click Inventory.

    Inventory tab of the Smart Software Licensing site
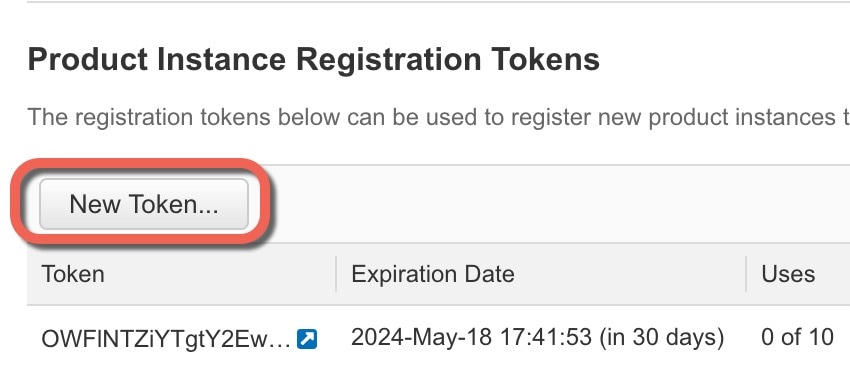
  2. On the General tab, click New Token.

    New token option in the product instance registration token dialog box
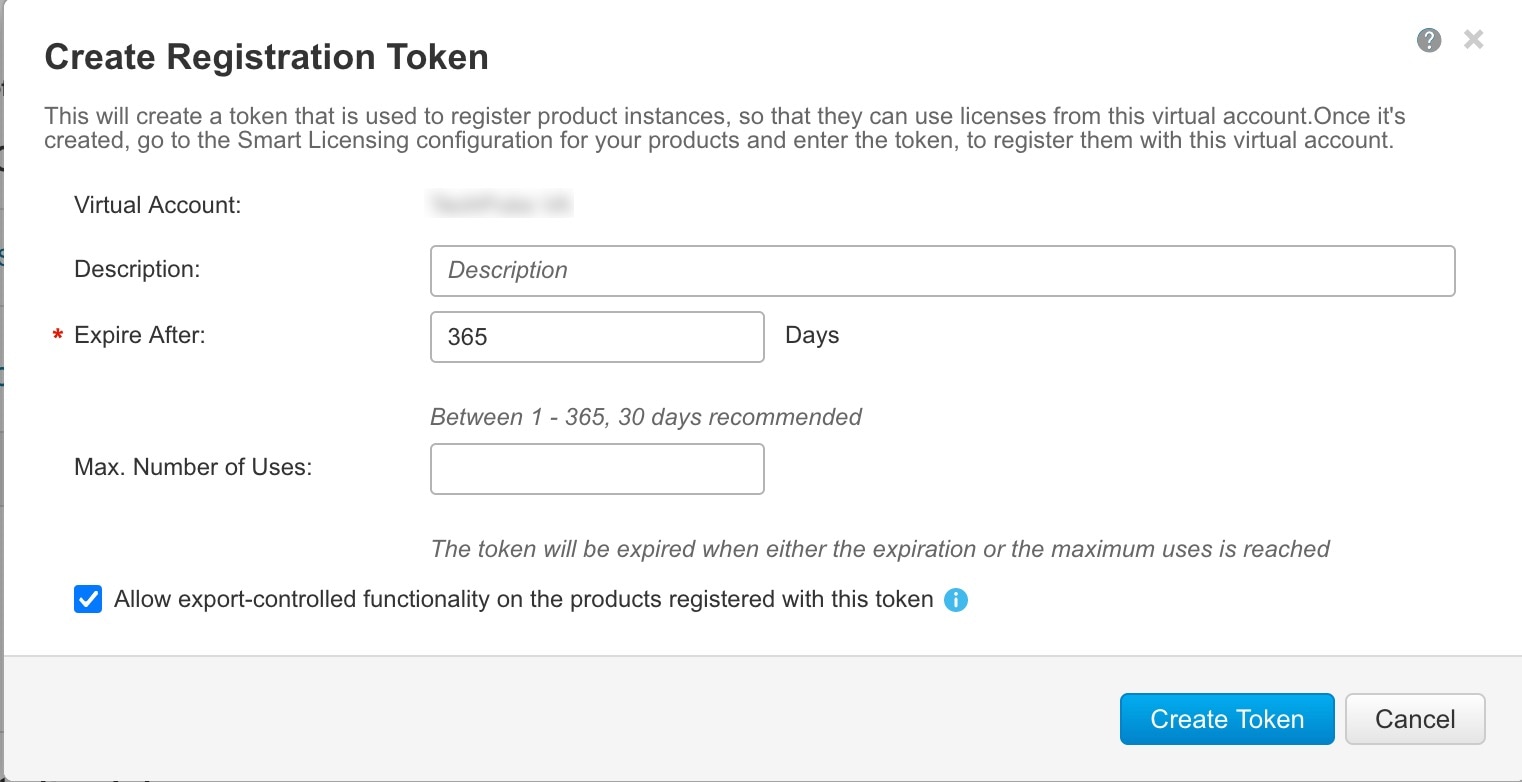
  3. In the Create Registration Token dialog box enter these settings, and then click Create Token:

    Create Registration Token dialog box
    • Description

    • Expire After—Cisco recommends 30 days.

    • Max. Number of Uses

    • Allow export-controlled functionality on the products registered with this token—Enables the export-compliance flag if you are in a country that allows for strong encryption. You must select this option now if you plan to use this functionality. If you enable this functionality later, you will need to re-register your device with a new product key and reload the device. If you do not see this option, your account does not support export-controlled functionality.

    The token is added to your inventory.

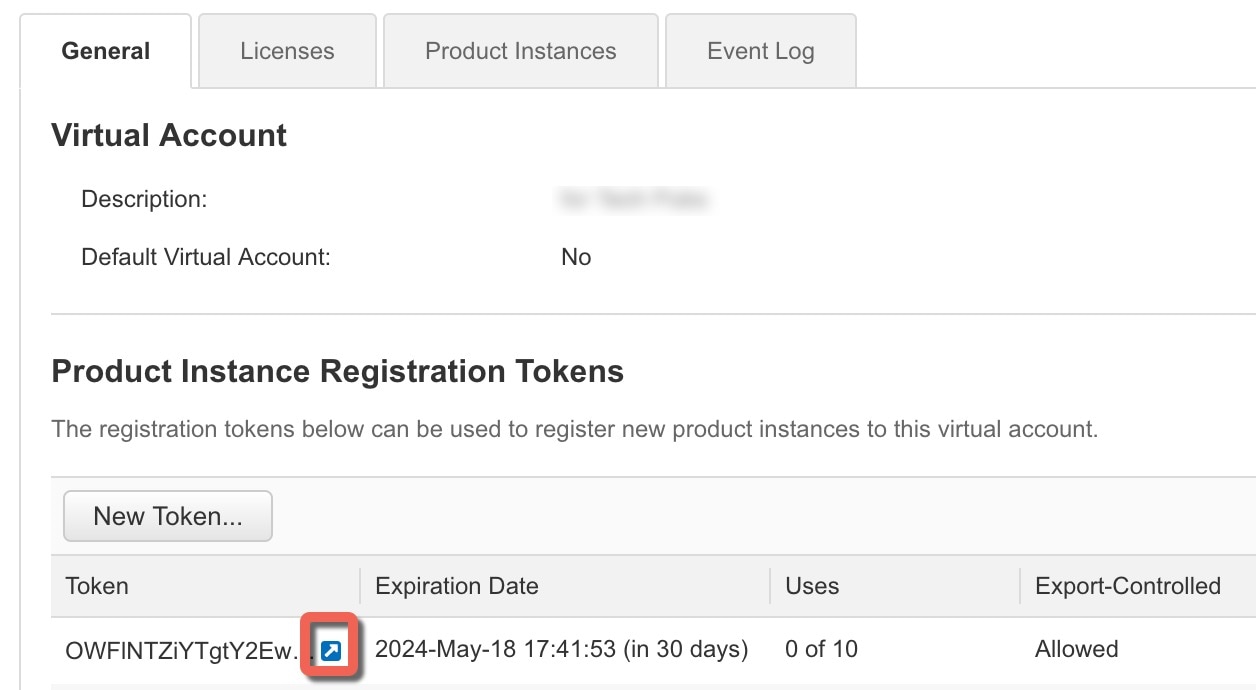
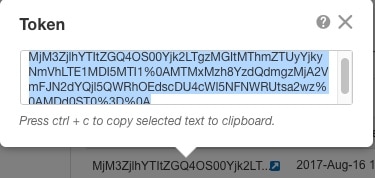
  4. Click the arrow icon to the right of the token to open the Token dialog box so you can copy the token ID to your clipboard. Keep this token ready for later in the procedure when you need to register the Firewall Threat Defense.

    Figure 1. View token
    View token option
    Figure 2. Copy token
    Copy token dialog box

Step 2

In the Cloud-Delivered Firewall Management Center, choose Administration > Licenses > Smart Licenses.

Step 3

Click Register.

Step 4

Paste the token you generated from Smart Software Manager into the Product Instance Registration Token field.

Make sure there are no empty spaces or blank lines at the beginning or end of the text.

Step 5

Click Apply Changes.


What to do next

Assign licenses to devices

You can assign most licenses when you register a device to the Cloud-Delivered Firewall Management Center. You can also assign licenses per device, or for multiple devices.

Assign licenses to a single device

This task allows you to enable or disable specific licensed features on a managed device by assigning or removing licenses as needed.

You can enable or disable specific licensed features on a managed device by assigning or removing licenses as needed. Although there are some exceptions, you cannot use the features associated with a license if you disable it on a managed device.


Note


For container instances on the same security module/engine, you apply the license to each instance; note that the security module/engine consumes only one license per feature for all instances on the security module/engine.


Note


For the Firewall Threat Defense cluster, you apply the licenses to the cluster as a whole; note that each unit in the cluster consumes a separate license per feature.


Before you begin

You must have Admin or Network Admin privileges to perform this task. When operating with multiple domains, you must do this task in leaf domains.

Procedure

Step 1

Choose Devices > Device Management.

Step 2

Next to the device where you want to assign or disable a license, click Edit (edit icon).

Step 3

Click Device.

Step 4

Next to the License section, click Edit (edit icon).

Step 5

Check or clear the appropriate check boxes to assign or disable licenses for the device.

Step 6

Click Save.

Step 7

Deploy configuration changes.


What to do next

Verify license status:

  1. Choose Administration > Licenses > Smart Licenses.

  2. Enter the hostname or IP address of the device into the filter at the top of the Smart Licenses table

  3. Verify that only a green circle with a Check Mark (check mark icon) appears for each device, for each license type.

    If you see any other icon, hover over the icon for more information.

Assign licenses to multiple managed devices

Devices managed by the Cloud-Delivered Firewall Management Center obtain their licenses via the Cloud-Delivered Firewall Management Center, not directly from the Smart Software Manager.


Note


For container instances on the same security module/engine, you apply the license to each instance; note that the security module/engine consumes only one license per feature for all instances on the security module/engine.


Note


For the Firewall Threat Defense cluster, you apply the licenses to the cluster as a whole; note that each unit in the cluster consumes a separate license per feature.

Use this procedure to enable licensing on multiple devices at once.


Procedure

Step 1

Choose Administration > Licenses > Smart Licenses or Specific Licenses.

Step 2

Click Edit Licenses.

Step 3

For each type of license you want to add to a device:

  1. Click the tab for that type of license.

  2. Click a device in the list on the left.

  3. Click Add to move that device to the list on the right.

  4. Repeat for each device to receive that type of license.

    For now, don't worry about whether you have licenses for all of the devices you want to add.

  5. Repeat this subprocedure for each type of license you want to add.

  6. To remove a license, click the Delete (delete icon) next to the device.

  7. Click Apply.

You can select a cluster and assign any license to all nodes of a cluster.


What to do next

Verify that your licenses are correctly installed. Follow the procedure in Monitor Smart Licensing.

Manage Smart Licensing

This section describes how to manage Smart Licensing.

Deregister the Cloud-Delivered Firewall Management Center

Deregister your Cloud-Delivered Firewall Management Center from the Smart Software Manager to release all of the license entitlements back to your Smart Account so they can be used for other devices.

Deregister if you need to decommission the Cloud-Delivered Firewall Management Center or reimage it.

Refer to Unregistered state for more information about license enforcement in an unregistered state.

Procedure

Step 1

Choose Administration > Licenses > Smart Licenses.

Step 2

Click Deregister (deregister icon).


Monitor Smart License status

The Smart License Status section of the Administration > Licenses > Smart Licenses page provides an overview of license usage on the Cloud-Delivered Firewall Management Center.

Usage authorization

Possible status values are:

  • In-compliance (in-compliance icon) — All licenses assigned to managed devices are in compliance and the Cloud-Delivered Firewall Management Center is communicating successfully with the Smart Software Manager.

  • License is in compliance but communication with licensing authority has failed— Device licenses are in compliance, but the Cloud-Delivered Firewall Management Center is not able to communicate with the Cisco licensing authority.

  • Out-of-compliance icon or unable to communicate with License Authority— One or more managed devices is using a license that is out of compliance, or the Cloud-Delivered Firewall Management Center has not communicated with the Smart Software Manager in more than 90 days.

Product registration

Specifies the last date when the Cloud-Delivered Firewall Management Center contacted the Smart Software Manager and registered.

Assigned virtual account

Specifies the Virtual Account under the Smart Account that you used to generate the Product Instance Registration Token and register the Cloud-Delivered Firewall Management Center. If this deployment is not associated with a particular virtual account within your Smart Account, this information is not displayed.

Export-Controlled features

If this option is enabled, you can deploy restricted features. For details, see License for export-controlled functionality.

Cisco success network

Specifies whether you have enabled Cisco Success Network for the Cloud-Delivered Firewall Management Center. If this option is enabled, you provide usage information and statistics to Cisco which are essential to provide you with technical support. This information also allows Cisco to improve the product and make you aware of unused available features so that you can maximize the value of the product in your network.

Monitor Smart Licensing

To view the license status for the Cloud-Delivered Firewall Management Center and its managed devices, use the Smart Licenses page.

For each type of license in your deployment, the page lists the total number of licenses consumed, whether the license is in compliance or out of compliance, the device type, and the domain and group where the device is deployed. You can also view the Cloud-Delivered Firewall Management Center's Smart License Status. Container instances on the same security module/engine only consume one license per security module/engine. Therefore, even though the Cloud-Delivered Firewall Management Center lists each container instance separately under each license type, the number of licenses consumed for feature license types will only be one.

Other than the Smart Licenses page, there are a few other ways you can view licenses:

  • The Product Licensing dashboard widget provides an at-a-glance overview of your licenses.

  • The Device Management page (Devices > Device Management) lists the licenses applied to each of your managed devices.

  • The Smart License Monitor health module communicates license status when used in a health policy.

Procedure

Step 1

Choose Administration > Licenses > Smart Licenses.

Step 2

In the Smart Licenses table, click the arrow at the left side of each License Type folder to expand that folder.

Step 3

In each folder, verify that each device has a green circle with a Check Mark (check mark icon) in the License Status column.

If all devices show a green circle with a Check Mark (check mark icon), your devices are properly licensed and ready to use.

If you see any License Status other than a green circle with a Check Mark (check mark icon), hover over the status icon to view the message.


What to do next

  • If you had any devices that did not have a green circle with a Check Mark (check mark icon), you may need to purchase more licenses.

Troubleshoot Smart Licensing

This topic lists some common Smart Licensing issues and provides troubleshooting steps.

Expected licenses do not appear in my smart account

If the licenses you expect to see are not in your Smart Account, try the following:

  • Make sure they are not in a different Virtual Account. Your organization's license administrator may need to assist you with this.

  • Check with the person who sold you the licenses to be sure that transfer to your account is complete.

Unable to connect to smart license server

Check the obvious causes first. For example, make sure your Cloud-Delivered Firewall Management Center has outside connectivity. See Internet resources accessed by managed devices.

Unexpected out-of-compliance notification or other error
  • If a device is already registered to a different Cloud-Delivered Firewall Management Center, you need to deregister the original Cloud-Delivered Firewall Management Center before you can license the device under a new Cloud-Delivered Firewall Management Center. See Deregister the Cloud-Delivered Firewall Management Center.

  • Check if the term of the subscription license has expired.

Troubleshoot other issues

For solutions to other common issues, see https://www.cisco.com/c/en/us/support/docs/security/firepower-management-center/215838-fmc-and-ftd-smart-license-registration-a.html

Configure Legacy Cloud-Delivered Firewall Management Center PAK-Based Licenses

The Cloud-Delivered Firewall Management Center supports either a Smart license or a legacy PAK (Product Activation Key) license for its platform license. This procedure describes how to apply a PAK-based license.

After re-registration of your Smart Account, you must manually add the classic licenses for all classic devices.

Before you begin

  • Make sure you have the product activation key (PAK) from the Software Claim Certificate that Cisco provided when you purchased the license. If you have a legacy, pre-Cisco license, contact Support.

Procedure


Step 1

Note the license key for the Cloud-Delivered Firewall Management Center.

The license key uniquely identifies the Cloud-Delivered Firewall Management Center in the Smart Software Manager. It is composed of a product code (for example, 66) and the MAC address of the management port (eth0) of the Cloud-Delivered Firewall Management Center; for example, 66:00:00:77:FF:CC:88.

  1. Choose > Licenses > Classic Licenses.

  2. Click Add New license.

  3. Note the value in the license Key field at the top of the Add Feature license dialog.

Step 2

Choose > Licenses > Classic Licenses.

Step 3

Click Add New license.

Step 4

Continue as appropriate:

  • If you have already obtained the license text, skip to Step 8.
  • If you still need to obtain the license text, go to the next step.

Step 5

Click Get license to open the License Registration Portal.

Note


If you cannot access the Internet using your current computer, switch to a computer that can, and browse to http://cisco.com/go/license.

Step 6

Generate a license from the PAK in the License Registration Portal: https://cisco.com/go/license.

This step requires the PAK you received during the purchase process, as well as the LICENSE key for the Cloud-Delivered Firewall Management Center.

For more information on using this portal, see:

https://slexui.cloudapps.cisco.com/SWIFT/LicensingUI/Quickstart

You will need your account credentials in order to access these links.

Step 7

Copy the license text from either the License Registration Portal display, or the email the License Registration Portal sends you.

Important


The licensing text block in the portal or email message may include more than one license. Each license is bounded by a BEGIN LICENSE line and an END LICENSE line. Make sure that you copy and paste only one license at a time.

Step 8

Return to the Add Feature License page in the management center virtual's web interface.

Step 9

Paste the license text into the License field, click Verify License, and click Submit License.

If the license is invalid, make sure that you correctly copied the license text.


Additional information about licensing

For additional information to help resolve common licensing questions, see these documents:

Overview

Some secure deployment environments may restrict or disable access to the Internet. In such environments, the Firepower Management Center is unable to communicate with the License Authority either through the Cisco Smart Software Manager (CSSM) or Smart Software Satellite Server. These deployments can use Universal Permanent License Reservation (UPLR). Permanent licenses do not require access to the internet or the Cisco licensing authority.

The Universal Permanent License permits perpetual, unlimited use of supported Firepower products, if your account on Cisco Smart Software Manager is authorized.

Features that require access to the internet, such as URL Lookups or contextual cross-launch to public web sites, will not work.

Cisco does not collect web analytics or telemetry data for deployments that use Universal Permanent Licensing.


Note


Various names are used at Cisco for this functionality, including: Universal Permanent License Reservation, Universal License Reservation, Permanent License Reservation, UPLR, ULR, and PLR. These terms may also be used at Cisco to refer to similar but not necessarily identical licensing models. In this document, PLR and UPLR both mean Universal Permanent License Reservation.


Requirements

Usage of Universal Permanent License Reservation requires approval and authorization from Cisco.

Work with your account representative to determine whether you qualify for this licensing option.

Cisco TAC cannot assist with obtaining approval for this licensing; please do not contact TAC about obtaining approval.

Supported Platforms and Versions

Product

Version

Platform/Hosting Environment

Firepower Management Center

6.3 or later

All

Firepower Management Center Virtual

6.3 or later

All

Firepower Threat Defense

6.1.0 or later

All

Classic devices:

ASA with FirePOWER Services

NGIPSv

7000- and 8000-Series

Not supported.

How to Implement Universal Permanent Licensing

Do This

More Information

Step 1

Meet the prerequisites for this feature.

Prerequisites

Step 2

Verify that your Smart Account is ready to deploy Universal Permanent License Reservation.

Verify that your Smart Account is Ready to Deploy Universal Permanent License Reservation

Step 3

Enable Universal Permanent License Reservation using the Firepower Management Center shell

Enable the Permanent Licensing Menu Option

Step 4

Generate a Reservation Request Code from the Firepower Management Center

Generate a Reservation Request Code from the Firepower Management Center

Step 5

Use the Reservation Request Code to generate a Reservation Authorization Code from Cisco Smart Software Manager

Generate a Reservation Authorization Code from Cisco Smart Software Manager

Step 6

Enter the Reservation Authorization Code into the Firepower Management Center

Enter the Reservation Authorization Code into the Firepower Management Center

Step 7

Apply Permanent Licenses to managed Firepower Threat Devices

Apply Permanent Licenses to Managed Firepower Threat Devices

Step 8

(Outside of your Firepower Management Center) Schedule reminders for ongoing maintenance tasks

See the "Maintain Your Air-Gapped Deployment" topic in the Firepower Management Center online help.

Prerequisites

Before you can begin implementing a Universal Permanent License Reservation, you must complete the following:

  • If you have not already done so, create your Smart Account.

    For more information, see Create a smart account and add licenses.

  • Work with your account representative to obtain approval for Universal Permanent License Reservation for your Firepower products.

  • Purchase standard licenses and service subscriptions for your products, sufficient to cover all devices and features you will deploy.

    For descriptions of standard Firepower licenses and service subscriptions, see License types and restrictions.

  • Arrange for export-controlled strong cryptographic functionality, if required and if your organization is eligible, and confirm that your account is enabled to use it. Your account representative can assist you with this.

  • Confirm with your account representative that the Universal Permanent License is ready for use and reflected in your Smart Account.

  • Make sure NTP is configured on the Firepower Management Center and managed devices. Time must be synchronized for registration to succeed. For more information, see the online help in FMC.

    If you are deploying FTD on a Firepower 4100/9300 chassis, you must configure NTP on the Firepower chassis using the same NTP server for the chassis as for the Firepower Management Center.

  • If you are currently using standard Smart Licensing on your Secure Firewall Management Center, de-register the Secure Firewall Management Center to release the licenses back to your account. For information, see Deregister the Cloud-Delivered Firewall Management Center.

  • (Recommended) Add managed devices to your Secure Firewall Management Center. For instructions, see Register with a new management center. (You can add managed devices at any time, but adding them now simplifes this process.) You will need to enable the evaluation license in order to do this (under System > Licenses > Smart Licenses). Evaluation licensing does not require a connection to the License Authority.

  • (Recommended) If you will deploy a Secure Firewall Management Center pair in a high availability configuration, configure that before you assign licenses. (FMCs in a high availability configuration require the same number of licenses as a single FMC.) If you have already deployed licenses to the secondary appliance, de-register licensing from that appliance.

Verify that your Smart Account is Ready to Deploy Universal Permanent License Reservation

In order to prevent problems with deploying your permanent license, complete this procedure before you make any changes in your Cisco Smart Software Manager.

Before you begin

  • Complete all Prerequisites.

  • Make sure you have your Secure Firewall Management Center credentials.

Procedure


Step 1

Sign in to the Secure Firewall Management Center:

https://software.cisco.com/#SmartLicensing-Inventory

Step 2

If applicable, select the correct account from the top right corner of the page.

Step 3

Click Manage licenses under the Smart Software Manager tile.

Step 4

Click the Inventory tab.

Step 5

Click the Licenses tab.

Step 6

Verify the following:

  • There is a License Reservation button.

  • In the License column, there is a Cisco FMC Universal License Feature license.

  • In the Purchased column for this Cisco FMC Universal License Feature, the number of available licenses matches the number of Secure Firewall Management Center instances (hardware or virtual) that you will deploy.

  • There are enough platform and feature licenses for the devices and features you will deploy, including Base licenses and Secure Firewall Management Center Virtual entitlements for your devices.

Step 7

If any of these items is missing or incorrect, contact your account representative to resolve the problem.

Important


Do not continue with this process until all the problems are corrected!


Enable the Permanent Licensing Menu Option

Universal License

Supported Devices

Supported Domains

Access

Any

Secure Firewall Management Center

Global only

Admin

Workflow to enable permanent licensing menu option.

Procedure


Step 1

Access the Firepower Management Center console using a USB keyboard and VGA monitor, or use SSH to access the management interface.

Step 2

Log into the Firepower Management Center admin account.

FMC versions 6.3 and 6.4: By default, this gives you access to the Linux shell. If the Firepower Management Center CLI is enabled, this gives you access to the command line interface.

FMC versions 6.5 and later: By default, this gives you access to the command line interface.

Step 3

If you are in the command line interface, enter the expert command to access the Linux shell.

Step 4

Enable Universal Permanent Licensing by executing the following command:

sudo manage_plr.pl

Example:

admin@fmc63betaplr: ~$ sudo manage_plr.pl
Password:
**************** Configuration Utility ************** 

1 Show PLR Status 
2 Enable PLR 
3 Disable PLR 
0 Exit *************************************************************
Enter choice:

Step 5

Enable Permanent License Reservation by selecting option 2.

Step 6

Select option 0 to exit the manage_plr utility.

Step 7

Type exit to exit the Linux shell.

Step 8

If applicable, exit the command line interface.

Versions 6.3 and 6.4: If the CLI is enabled, enter exit .

Version 6.5 and later: Enter the exit command.

Step 9

Verify that you can access the Permanent License Reservation page in the Secure Firewall Management Center web interface:

  • If the System > Licenses > Smart Licenses page is currently displayed, refresh the page.

  • Otherwise, choose System > Licenses > Universal Licenses.


Generate a Reservation Request Code from the Firepower Management Center

Universal License

Supported Devices

Supported Domains

Access

Any

Secure Firewall Management Center

Global only

Admin

Procedure


Step 1

If you are not already viewing the Universal License Reservation page in the Firepower Management Center, choose System > Licenses > Universal Licenses.

Step 2

Click Generate.

Step 3

Make a note of the Reservation Request Code.


Generate a Reservation Authorization Code from Cisco Smart Software Manager

Procedure


Step 1

Go to the Cisco Smart Software Manager:

https://software.cisco.com/#SmartLicensing-Inventory

Step 2

If necessary, select the correct account from the top right of the page.

Step 3

If necessary, click Inventory.

(This page may display automatically.)

Step 4

Click the Licenses tab.

Step 5

Click License Reservation.

Step 6

Enter the code that you generated from Firepower Management Center into the Reservation Request Code box.

Step 7

Click Next.

Step 8

Select Cisco FMC Universal License Feature.

Step 9

Click Next.

Step 10

Click Generate Authorization Code.

At this point, the license is now in use according to the Smart Software Manager.

Step 11

Copy, download, or note down the Authorization Code in preparation for entering it into the Secure Firewall Management Center.


Enter the Reservation Authorization Code into the Firepower Management Center

Universal License

Supported Devices

Supported Domains

Access

Any

Secure Firewall Management Center

Global only

Admin

Procedure


Step 1

If you are not already viewing the Permanent License Reservation page in the Firepower Management Center web interface, choose System > Licenses > Universal Licenses.

Step 2

Enter the generated authorization code in the Authorization Code text box.

Step 3

Click Install.

Step 4

Verify that the Permanent License Reservation page shows the Usage Authorization status as authorized.


Apply Permanent Licenses to Managed Firepower Threat Devices

Universal License

Supported Devices

Supported Domains

Access

Any

Secure Firewall Management Center

Global only

Admin

Procedure


Step 1

Choose System > Licenses > Universal Licenses.

Step 2

Click Edit Licenses.

Step 3

For each type of license you want to add to a device:

  1. Click the tab for that type of license.

  2. Click a device in the list on the left.

  3. Click Add to move that device to the list on the right.

  4. Repeat for each device to receive that type of license.

    Ensure you have licenses for all of the devices you want to add.

  5. Repeat this sub procedure for each type of license you want to add.

  6. Click Apply.

Step 4

Verify that your licenses are assigned as you expect them, and that each feature for each managed device shows a green circle with a Check Mark (check mark icon).

If necessary, see Universal Permanent License Status for information.


What to do next

  • If you applied a license with export-controlled functionality enabled, reboot each managed device.

    If devices are configured in a high-availability pair, reboot both devices at the same time to avoid an Active-Active condition.

  • Deploy configuration changes to managed devices; see the "Deploy Configuration Changes" topic in the Secure Firewall Management Center online help.

Universal Permanent License Status

Usage Authorization

Universal License Status (on the System > Licenses > Universal Licenses page) provides an overview of license usage on the Firepower Management Center, as described below.

Authorized— The product is successfully registered and in compliance after successful installation of the authorization code.

Product Registration

Specifies the date when the Authorization Code was installed for Universal Permanent License.

Export-Controlled Features

Specifies whether export-controlled functionality is enabled for your deployment. If it is not, and you expect it to be, contact Cisco TAC.

Product Instance

The Universally Unique Identifier (UUID) of this Firepower Management Center. This identifies the Firepower Management Center in Cisco Smart Software Manager.

Maintain Your UPLR Deployment

To ensure that your deployment remains effective, you must manually obtain and install updates. For more information, see Maintain your air-gapped deployment.

Deactivate and Return a Universal Permanent License

Universal License

Supported Devices

Supported Domains

Access

Any

Secure Firewall Management Center

Global only

Admin

If you no longer need a permanent license, you must return it to your Smart Account.


Important


If you do not follow all of the steps in this procedure, the license remains in an in-use state in Cisco Smart Software Manager and cannot be re-used.


Procedure


Step 1

In the Secure Firewall Management Center web interface, choose System > Licenses > Universal Licenses.

Step 2

Make a note of the Product Instance identifier for this Secure Firewall Management Center.

Important


You cannot complete this procedure without this identifier.

Step 3

Generate a return code from Firepower Management Center:

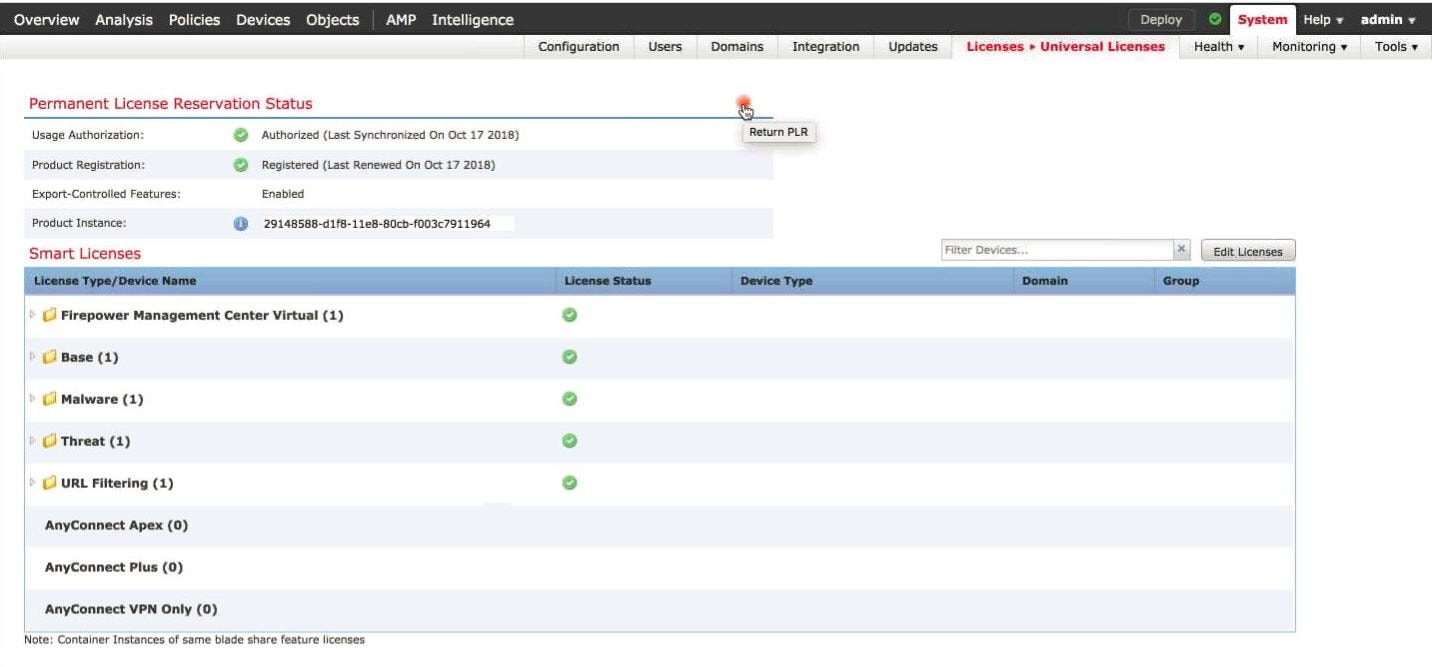
  1. Click the Return PLR button.

    The following figure shows the Return PLR button.

    Firepower Threat Defense becomes unlicensed and Firepower Management Center moves to the de-registered state.

  2. Make a note of the Return Code.

Step 4

In Cisco Smart Software Manager, identify the Firepower Management Center appliance to deregister:

  1. Go to the Cisco Smart Software Manager:

    https://software.cisco.com/#SmartLicensing-Inventory

  2. If necessary, click Inventory.

    (This page may display automatically.)

  3. Click Product Instances.

  4. Look for a product instance that has FP in the Type column and a generic SKU (not a hostname) in the Name column. You may also be able to use the values in other table columns to help determine which Firepower Management Center is the correct Firepower Management Center. Click the name.

  5. Look at the UUID and see if it is the UUID of the Firepower Management Center that you are trying to modify.

    If not, you must repeat these steps until you find the correct Firepower Management Center.

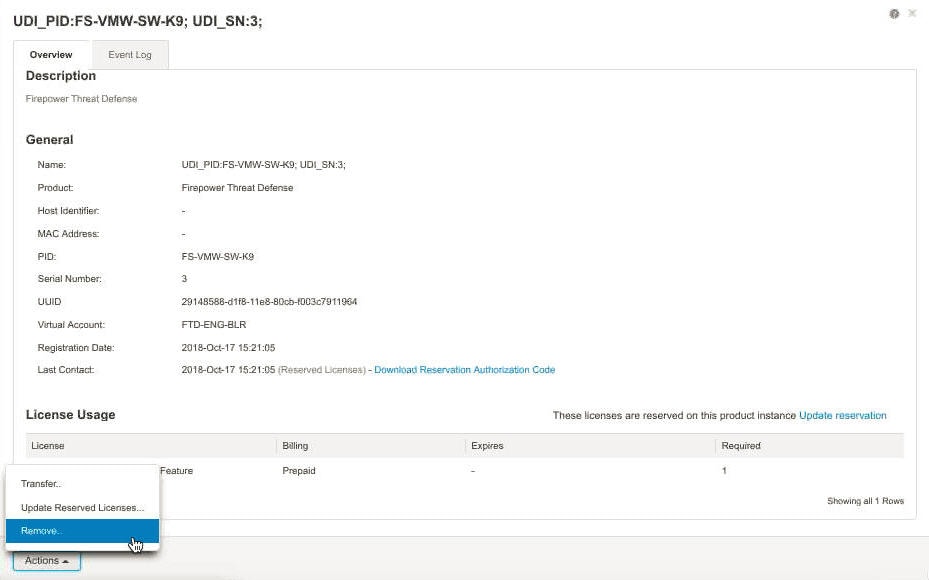
Step 5

When you have identified the correct Firepower Management Center, return the license to your Smart Account:

  1. On the device page, choose Actions > Remove.

  2. Enter the reservation return code that you generated from Secure Firewall Management Center into the Remove Product Instance dialog box.

  3. Click Remove Product Instance.

    The Permanent License is returned to the pool of available licenses in the Smart Account.

Step 6

Disable the Universal Permanent License in the Secure Firewall Management Center CLI:

  1. Access the Firepower Management Center console using a USB keyboard and VGA monitor, or use SSH to access the management interface.

  2. Log in to the Firepower Management Center admin account.

    FMC versions 6.3 and 6.4: By default, this gives you access to the Linux shell. If the Firepower Management Center CLI is enabled, this gives you access to the command line interface.

    FMC versions 6.5 and later: By default, this gives you access to the command line interface.

  3. If you are in the command line interface, enter the expert command to access the Linux shell.

  4. Execute the following command:

    sudo manage_plr.pl

    Example:

    admin@fmc63betaplr: ~$ sudo manage_plr.plnp
    Password:
    **************** Configuration Utility ************** 
    1 Show PLR Status 
    2 Enable PLR
    3 Disable PLR 
    0 Exit *************************************************************
    Enter choice:
  5. Select menu option 3 to disable the Universal Permanent License.

  6. Select option 0 to exit the manage_plr utility.

  7. Type exit to exit the shell.

  8. If applicable, exit the command line interface:

    Versions 6.3 and 6.4: If the CLI is enabled, enter the exit command.

    Version 6.5 and later: Enter the exit command.


What to do next

(Optional) If you wish to use the system with standard, connected Smart Licensing, see information about Smart Licensing in the Secure Firewall Management Center online help.

Troubleshooting

How do I identify a particular Firepower Management Center in the Product Instance list in Cisco Smart Software Manager?

On the Product Instances page in Cisco Smart Software Manager, if you cannot identify the product instance based on a value in one of the columns in the table, you must click the name of each generic product instance of type FP to view the product instance details page. The UUID value on this page uniquely identifies one Firepower Management Center.

In the Firepower Management Center web interface, the UUID for a Firepower Management Center is the Product Instance value displayed on the System > Licenses > Universal Licenses page.

I have enabled Universal Permanent Licensing, but now I do not see a Smart License page.

This is the expected behavior. When you enable Universal Permanent Licensing, Smart Licensing is disabled. You can use the Universal Permanent License page to perform licensing operations.

If you want to use Smart Licensing, you must return the Universal Permanent License. For more information, see Deactivate and Return a Universal Permanent License.

I was interrupted in the middle of the licensing process. How can I pick up where I left off?

If you have generated but not yet downloaded an Authorization code from Cisco Smart Software Manager, you can go to the Product Instance page in Cisco Smart Software Manager, click the product instance, then click Download Reservation Authorization Code.

I have disabled Universal Permanent Licensing, but forgot to copy the Return Code. What should I do?

The Return Code is saved in Firepower Management Center. You must re-enable the Universal Permanent License from the shell (see Enable the Permanent Licensing Menu Option.) Then refresh the Firepower Management Center web interface. Your Return Code will be displayed.

What do I do in case of a re-image?

Return the Permanent License, add the Return Code in Cisco Smart Software Manager to release the Permanent License, and re-image the Firepower Management Center box.

What do I do in case of a Return Materials Authorization (RMA)?

Contact Cisco TAC to release the reserved licenses.

For Assistance

If you have any questions about installing or using Firepower feature licenses, contact TAC Support:

.

Copyright © 2018-2020

Cisco and the Cisco logo are trademarks or registered trademarks of Cisco and/or its affiliates in the U.S. and other countries. To view a list of Cisco trademarks, go to this URL: https://www.cisco.com/c/en/us/about/legal/trademarks.html. Third-party trademarks mentioned are the property of their respective owners. The use of the word partner does not imply a partnership relationship between Cisco and any other company. (1721R)