Scheduling
Available Languages
Table Of Contents
Scheduling Tasks At Creation Time
Scheduling Tasks After Creation Time
Scheduling
This chapter explains the scheduling choices available when creating tasks and when scheduling tasks that have already been created.
Scheduling Tasks At Creation Time
The tasks that have the scheduling capability at the time of creation are:
•
Collect Router Configuration Files
•
•
•
•
•
•
•
•
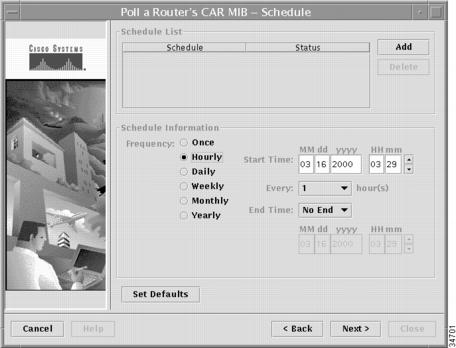
Figure 13-1, "Sample Schedule Window—When Creating a Task," shows a sample of a window that appears in the previously listed tasks.
Figure 13-1 Sample Schedule Window—When Creating a Task
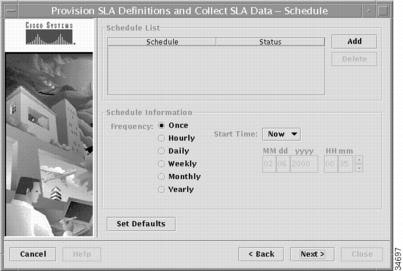
The items in the Schedule window are explained in the following sections:
The bottom action buttons are the same as for most wizard screens.
Scheduling Tasks After Creation Time
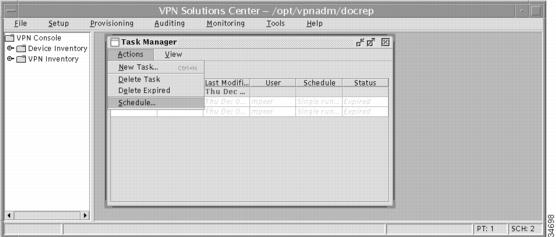
Once a task has been created, the scheduler can be invoked from Tools > Tasks. In the Task Manager window that appears, select the specific task that you wish to schedule in the table of tasks and then select Actions > Schedule from the Task Manager task bar, as shown in Figure 13-2, "Scheduling a Task from the Tools Menu Task Bar."
Figure 13-2 Scheduling a Task from the Tools Menu Task Bar
Select one of the two tabs in the Scheduler window that appears:
•
Scheduler Window—General Tab
In the Scheduler window, select General and you will get information as shown in Figure 13-3, "Sample General Window—When Scheduling a Previously Created Task."
Figure 13-3 Sample General Window—When Scheduling a Previously Created Task
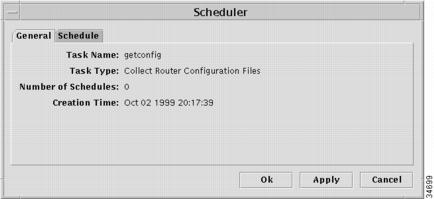
The information in the General tab is:
•
•
•
•
Scheduler Window—Schedule Tab
In the Scheduler window, select Schedule and you will get a window almost identical to the Schedule window when creating a task. The difference besides the title is the bottom action buttons. Figure 13-4, "Sample Schedule Window—When Scheduling from Tools > Tasks," shows the bottom action buttons when scheduling a task from Tools > Tasks and Bottom Action Buttons, explains each of the bottom action buttons.
Figure 13-4 Sample Schedule Window—When Scheduling from Tools > Tasks
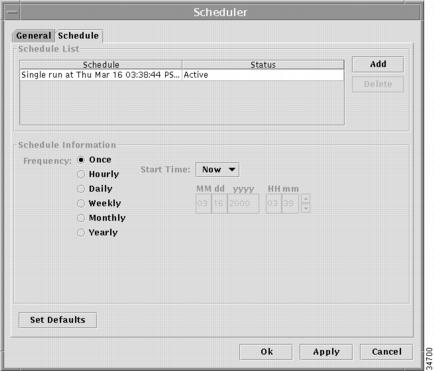
The items in the Schedule window are explained in the following sections:
Schedule List
The Schedule List area in the Schedule window, as shown in Figure 13-1, "Sample Schedule Window—When Creating a Task," is explained in the following components:
Schedule/Status Area
This area has two column headings, Schedule and Status. This area gives the scheduling information and the status. The scheduling information is the type of run and the date and time it is scheduled to run. The statuses are specified in Table 13-1, "Meanings of Statuses."
Table 13-1 Meanings of Statuses
Active
Available for scheduling
Inactive
Temporarily disabled
Expired
Finished execution
When you have the information that you want to schedule in this area, continue by clicking Next from the bottom action buttons.
Add Button
After the Frequency and related information are added in the Schedule Information area, you must click the Add button to place the scheduling information in the Schedule List.
Delete Button
Initially, the Delete button is disabled. When you have information in the Schedule/Status area, select one or more of the items and click Delete to delete this scheduling instruction.
Schedule Information
The Schedule Information area in the Schedule window, as shown in Figure 13-1, "Sample Schedule Window—When Creating a Task," varies depending on the Frequency chosen from among the following choices:
•
The MM, dd, yyyy, HH, and mm fields are defined in the "Date Information" section.
Once
When you select Once, the Schedule Information area appears as in Figure 13-5, "Sample Schedule Window—Frequency: Once." This selection indicates to schedule the task once.
Figure 13-5 Sample Schedule Window—Frequency: Once
Step 1
When you want to schedule the task once and you want to schedule it starting now, set the Start Time drop-down menu to Now. When you want to schedule once and you want to do it later, set the Start Time drop-down menu to Later.
Step 2
Hourly
When you select Hourly, the Schedule Information area appears as in Figure 13-6, "Sample Schedule Window—Frequency: Hourly.
Figure 13-6 Sample Schedule Window—Frequency: Hourly
Step 1
Step 2
Step 3
No End indicates to schedule hourly starting at the Start Time and continue forever. End On activates the End Time date and time information, as explained in the "Date Information" section.
Daily
When you select Daily, the Schedule Information area appears as in Figure 13-7, "Sample Schedule Window—Frequency: Daily."
Figure 13-7 Sample Schedule Window—Frequency: Daily

Step 1
Step 2
Step 3
No End indicates to schedule hourly starting at the Start Time and continue forever. End On activates the End Time date and time information, as explained in the "Date Information" section.
Weekly
When you select Weekly, the Schedule Information area appears as in Figure 13-8, "Sample Schedule Window—Frequency: Weekly."
Figure 13-8 Sample Schedule Window—Frequency: Weekly

Step 1
Step 2
Step 3
No End indicates to schedule hourly starting at the Start Time and continue forever. End On activates the End Time date and time information, as explained in the "Date Information" section.
Monthly
When you select Monthly, the Schedule Information area appears as in Figure 13-9, "Sample Schedule Window—Frequency: Monthly."
Figure 13-9 Sample Schedule Window—Frequency: Monthly

Step 1
Step 2
Step 3
No End indicates to schedule hourly starting at the Start Time and continue forever. End On activates the End Time date and time information, as explained in the "Date Information" section.
Yearly
When you select Yearly, the Schedule Information area appears as in Figure 13-10, "Sample Schedule Window—Frequency: Yearly."
Figure 13-10 Sample Schedule Window—Frequency: Yearly
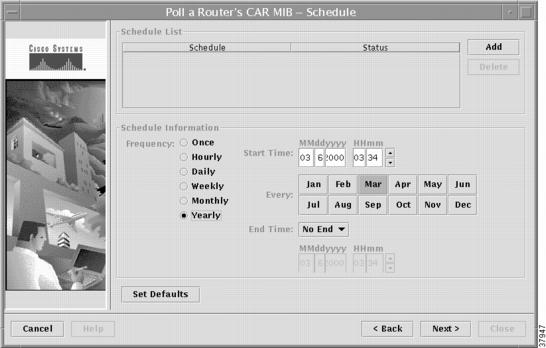
Step 1
Step 2
Step 3
No End indicates to schedule hourly starting at the Start Time and continue forever. End On activates the End Time date and time information, as explained in the "Date Information" section.
Set Defaults
Click the Set Defaults button to return information to its original state based on the selection you made in the "Schedule Information" section.
Bottom Action Buttons
The bottom action buttons, as shown in Figure 13-1, "Sample Schedule Window—When Creating a Task," are the same buttons as in all Wizard screens, Cancel, Help, Back, Next, and Close. The bottom action buttons, as shown in Figure 13-4, "Sample Schedule Window—When Scheduling from Tools > Tasks," are the following buttons:
•
OK
Click the OK button when you want to schedule all tasks in the Schedule List and then immediately exit from the scheduling interface.
If you got to this Schedule window, for example, through Tools > Tasks in the VPN Console window and then selected a task and selected Actions > Schedule in the Task Manager window, when you click OK, you will return to the Task Manager window after scheduling all the tasks in the Schedule List.
Apply
Click the Apply button when you want to schedule all tasks in the Schedule List and remain in this window with the capability to do more scheduling.
Cancel
Click the Cancel button when you want to cancel and not schedule the tasks in the Schedule List.
If you got to this Schedule window, for example, through Tools > Tasks in the VPN Console window and then selected a task and selected Actions > Schedule in the Task Manager window, when you click Cancel, you will return to the Task Manager window without scheduling any tasks.
Date Information
In the Schedule Information area, the date and time is initially set to the current date and time. To change any month (MM), day (dd), year (yyyy), hour (HH), or minute (mm), position the cursor within that specific field and enter the correct information or click the up or down arrow until you indicate the date and time that you choose to schedule the task.
The valid values for the date and time are provided in the following sections:
Month (MM)
The valid months are specified in Table 13-2, "Month Identifiers."
Table 13-2 Month Identifiers
01
January
02
February
03
March
04
April
05
May
06
June
07
July
08
August
09
September
10
October
11
November
12
December
Day (dd)
This field indicates the day of the month, 01 through 31.
Year (yyyy)
This field indicates the four-digit year, for example 1999 or 2000.
Hour (HH)
The valid hours, in your time zone, are specified in Table 13-3, "Hour Identifiers."
Minute (mm)
This field indicates the minute of the hour, 00 through 59.
 Feedback
Contact Cisco
- Open a Support Case

- (Requires a Cisco Service Contract)
This Document Applies to These Products
- Collaboration Endpoints - Retired Products
- Conferencing - Retired Products
- Contact Center - Retired Products
- Optical Networking - Retired Products
- Routers - Retired Products
- Security - Retired Products
- Servers - Unified Computing (UCS) Retired Products
- Storage Networking Retired Products
- Switches - Retired Products
- Video - Retired Products
- Wireless - Retired Products