Table Of Contents
Configuring SGM for Your Network
Importing SNMP Community Names from CiscoWorks2000 (Solaris Only)
Retaining Unknown Objects (Solaris Only)
Modifying Overall Preference Settings
Modifying Node Table Column Settings
Modifying Linkset Table Column Settings
Modifying Event Table Column Settings
Changing the Location of SGM Message Log Files
Changing the Size of the SGM Message Log File
Changing the Time Mode for Dates in Log Files
Changing the Age of the SGM Message Log Files
Setting the Point Code Format (Solaris Only)
Enabling SNMP Traps (Solaris Only)
Modifying the SGM Event Configuration File (Solaris Only)
Editing the SGM Event Configuration File
Modifying the Size of the Event Database
Modifying the Maximum Age for Events
Modifying the Event Database Maintenance Interval
Modifying the Event Automation Timeout Interval
Enabling SGM to Process Events from Undiscovered Nodes
Modifying Event Categories, Severities, Colors, and Message Text
Modifying Event Severities and Colors
Setting Sounds for Events at the SGM Server
Adding New Event Categories and Severities
Validating the Modified SGM Event Configuration File
Setting Sounds for Events at an SGM Client
Limiting Traps by IP Address (Solaris Only)
Setting the DISPLAY Variable (Solaris Only)
Backing Up or Restoring SGM Files (Solaris Only)
Removing SGM Data from the SGM Server
Configuring a Backup SGM Server (Solaris Only)
Configuring an SGM Client Connection Timer
Configuring SGM for Your Network
This chapter provides the following information about configuring SGM to better suit your needs:
•
Importing SNMP Community Names from CiscoWorks2000 (Solaris Only)
•
Retaining Unknown Objects (Solaris Only)
•
Modifying Preference Settings
•
Modifying the Message Display
•
Setting the Point Code Format (Solaris Only)
•
Enabling SNMP Traps (Solaris Only)
•
Modifying the SGM Event Configuration File (Solaris Only)
•
Setting Sounds for Events at an SGM Client
•
Limiting Traps by IP Address (Solaris Only)
•
Setting the DISPLAY Variable (Solaris Only)
•
Backing Up or Restoring SGM Files (Solaris Only)
•
Removing SGM Data from the SGM Server
•
Configuring a Backup SGM Server (Solaris Only)
Importing SNMP Community Names from CiscoWorks2000 (Solaris Only)
SGM enables you to store all SNMP community names in a single database in CiscoWorks2000 Resource Manager Essentials (RME), and to export those names for use by SGM.
To export the database from CiscoWorks2000 RME to SGM, use the following procedure:
Step 1
Log in to CiscoWorks2000 and select Resource Manager Essentials > Administration > Inventory > Export to File.
Step 2
At the prompt, choose the following settings:
Filename Field = sgm
Comma Separated Value Format
Version 3.0
CiscoWorks2000 creates the /var/adm/CSCOpx/files/inventory/sgm file in the default export directory.
Step 3
When you start the SGM server, SGM looks for this file. If the file exists, SGM merges the file with its own community name database, the /opt/CSCOsgm/etc/communities.conf file.
For more information about SNMP, refer to "Configuring SNMP Support" in the Cisco IOS Release 12.2 Configuration Fundamentals Configuration Guide, Part 3, Cisco IOS System Management.
Retaining Unknown Objects (Solaris Only)
By default, SGM deletes all Unknown nodes, signaling points, linksets, and links from the SGM database after 7 days. To change the length of time unknown objects stay in the SGM database, use the sgm unknownage command. See the "SGM Command Reference" section for more information on the use of this command.
Each method requires you to be logged in as the root user or as a super user. See the "Becoming the Root User (Solaris Only)" section and the "Specifying a Super User (Solaris Only)" section for more information.
Modifying Preference Settings
When a user changes some aspect of the SGM client, such as the size of a window or the order of columns in a window, SGM makes note of the user's preferences on the SGM client and server. SGM saves the user's preferences to the SGM server when the SGM client exits successfully.
Thereafter, whenever the user launches the SGM client, SGM searches for the user's SGM preferences. If SGM finds the user's preferences on the SGM server, SGM launches the SGM client with those preferences. Otherwise, SGM launches the SGM client with the default SGM preferences file.
In addition to the user preferences that are automatically saved, SGM enables you to modify many GUI, data, topology, and table settings that affect the way SGM presents its information.
![]()
Note
Anyone who uses this SGM client can modify its preference settings, and the changes affect all views running on this client.
The GTT preferences file is separate from the SGM preferences file. For information on modifying GTT preferences, see the "Editing a Global Title Translation Table" section.
This section includes the following information:
•
Modifying Overall Preference Settings
•
Modifying Node Table Column Settings
•
Modifying Linkset Table Column Settings
Related Topics:
•
Viewing the Topology of the Network
Modifying Overall Preference Settings
To modify overall preference settings, use the following procedure:
Step 1
Select Edit > Preferences from the SGM Main Menu. SGM displays the Preferences window (Figure 5-1).
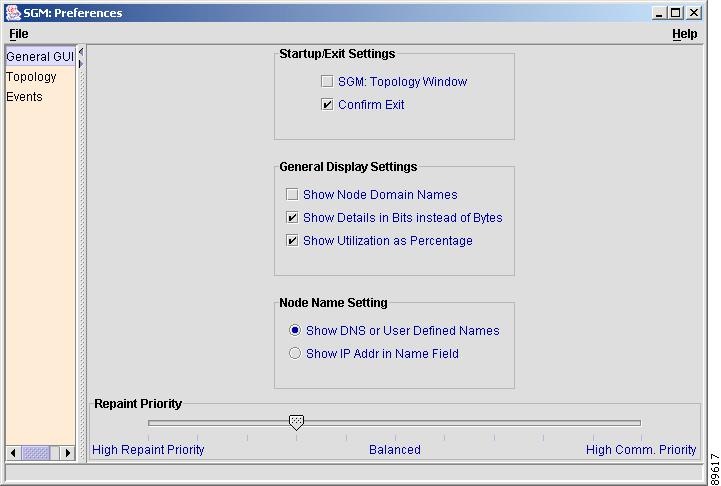
Figure 5-1 Preferences Window
![]()
Step 2
(Optional) To restore all preference settings to the original system default settings, select the File > Load System Default menu option.
Step 3
(Optional) To load an existing preference settings file, select the File > Load menu option. SGM displays the Load File Dialog: Preferences File List dialog (Figure 5-2).
Figure 5-2 Load File Dialog: Preferences File List Dialog
![]()
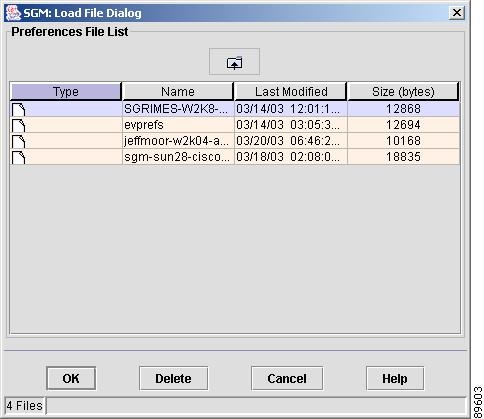
The Load File Dialog: Preferences File List dialog contains the following fields:
•
Type—Icon indicating whether the item in the table is a file or a folder.
•
Name—Name of the preference settings file or folder.
•
Last Modified—Date and time the preference settings file or folder was last modified.
•
Size (bytes)—Size of the preference settings file or folder, in bytes.
•
Number of Files—Total number of preference settings files and folders (displayed in bottom left corner).
To load a preference settings file, enter the name of the file or select it in the list and click OK. SGM loads the preference settings file, closes the Load File Dialog: Preferences File List dialog, and returns to the Preferences window.
To delete a preference settings file from the preference settings file list, select a file and click Delete. SGM issues an informational message containing the name and location of the deleted file.
To save any changes you made to the list of files, click OK. SGM saves the changes and closes the Load File Dialog: Preferences File List dialog.
To close the Load File Dialog: Preferences File List dialog without loading a preference settings file or saving any changes to the preference settings file list, click Cancel.
Step 4
(Optional) The General GUI settings enable you to change general display settings for SGM, including which window to display first when starting SGM, and whether to display values in bits or bytes.
To display the General GUI settings, select General GUI in the left pane of the Preferences window. SGM displays the Startup/Exit Settings, General Display Settings, Node Name Setting, and Repaint Priority sections:
a.
The Startup/Exit Settings section specifies whether you want to display the Topology Window when you launch the SGM client, and whether you want SGM to prompt you for confirmation when you exit the client.
–
Select the SGM: Topology Window checkbox to display the Topology window when SGM is started. The default setting for this checkbox is cleared.
–
Select the Confirm Exit checkbox if you want SGM to prompt you for confirmation when you exit the SGM client. The default setting for this checkbox is selected.
b.
The General Display Settings section specifies the following settings:
–
Select Show Node Domain Names if you want SGM is to show node domain names in its displays. The default setting for this checkbox is cleared (do not show node domain names).
–
Select Show Details in Bits Instead of Bytes to specify whether SGM is to display data and data rates in bits or bytes:
- If you want SGM to display data in bits, and data rates in bits per second, select this checkbox. This is the default setting.
- If you want SGM to display data in bytes, and data rates in bytes per second, clear this checkbox.
–
Select Show Utilization as Percentage to specify whether SGM is to display receive and send utilization for linksets and links as a percentage or in Erlangs:
- If you want SGM to display utilization as a percentage, select this checkbox. This is the default setting.
- If you want SGM to display utilization in Erlangs, clear this checkbox.
c.
Use the Node Name setting in the Data Display settings to specify how SGM is to display node names:
–
If you want SGM to identify nodes by their DNS or user-defined names, select the Show DNS or User-Defined Names radio button. The default setting for this radio button is selected.
–
If you want SGM to identify nodes by their IP addresses, select the Show IP Addr in Name Field radio button. The default setting for this radio button is cleared.
d.
The Repaint Priority section balances the responsiveness versus efficiency of the SGM client, controlling how quickly the SGM client repaints its displays:
–
Slide the selector toward High Repaint Priority if you want to maximize repainting (responsiveness) over communication (efficiency).
–
Slide the selector toward High Comm. Priority if you want to maximize communication (efficiency) over repainting (responsiveness).
–
The default setting is 3 (the fourth mark from the left).
Step 5
(Optional) The Topology settings enable you to change default settings for the Topology window.
To display the Topology settings, select Topology in the left pane of the Preferences window.
SGM displays the Topology settings:
a.
Select Spring Layout Spacing Factor (1-10) to specify how far apart nodes are to be spaced when SGM draws the Spring Layout topology map. Valid values are 1 through 10, with 1 being closer together and 10 being farther apart. The default spacing factor is 5.
Even if you apply preferences and close the Preferences window, the new spacing factor is not reflected in the topology map until you select Topology Tools > Layout > Spring, or click the Spring Layout button.
b.
Select Show Mouse Overs to enable mouse over popups in topology maps. The default setting for this checkbox is selected.
c.
Select Auto Save Icon Positions to specify how SGM is to save topology map changes:
–
If you want SGM to ask you for confirmation before saving topology map changes when you close the Topology window, clear this checkbox. This is the default setting
–
If you want SGM to save topology map changes automatically when you close the Topology window, without asking you for confirmation, select this checkbox.
d.
Select Draw Linksets When Dragging Node to specify whether SGM is to draw linkset lines in the topology map as you move nodes:
–
If you want SGM to draw the associated linkset lines dynamically as you move a node, select this checkbox.
–
If you do not want SGM to draw the associated linkset lines until after you have finished moved a node, clear this checkbox. This is the default setting.
e.
Select Show Small SS7 Icons to specify the size of the SS7 icons displayed in the topology map:
–
If you want SGM to display large SS7 icons, clear this checkbox. This is the default setting.
–
If you want SGM to display small SS7 icons, select this checkbox. This setting can save space in the topology map, making it easier to read.
f.
Select Show Non-ITP Devices to specify whether SGM is to display non-ITP nodes and linksets in the topology map:
–
If you want SGM to display non-ITP nodes and linksets in the topology map, select this checkbox. This is the default setting.
–
If you want SGM to hide non-ITP nodes and linksets in the topology map, clear this checkbox. (Hidden signaling points and linksets are still shown in the left pane.)
g.
Select Show Point Code and Node Name to specify whether SGM is to display point codes as well as node names in the topology map:
–
If you want SGM to display point codes but not node names, clear this checkbox. This is the default setting.
–
If you want SGM to display both point codes and node names, select this checkbox.
Step 6
(Optional) The Event settings enable you to change the default background color for each type of event in the Event window, to specify whether to display acknowledged events, and to specify the types of event SGM is to display in the Event Window, including the category and severity of event, whether the event is acknowledged, and other properties.
To display the Event settings, select Events in the left pane of the Preferences window. SGM displays the Event settings.
Step 7
(Optional) SGM displays the current event background color settings in the Event Colors section of the Event settings:
•
The default background color for None events is white.
•
The default background color for Normal events is green.
•
The default background color for Admin events is cyan.
•
The default background color for Warning events is yellow.
•
The default background color for Error events is coral.
To change the background color for any of the event types, click Set Color. SGM displays the Select a Color dialog, which contains the same information as the Pick Grid Color dialog (Figure 3-61).
The Select a Color dialog provides the following options:
•
To select an event color from a set of color swatches (the recommended method), click the Swatches tab and select a swatch.
•
To select an event color based on color hue, saturation, and brightness (HSB), click the HSB tab, then use one of the following procedures:
–
Select a color range on the vertical color bar, then select a specific color by moving the cursor around on the color square.
–
Enter specific values in the hue (H), saturation (S), and brightness (B) fields.
•
To select an event color based on the red, green, and blue (RGB) content of the color, click the RGB tab, then select values for the Red, Green, and Blue fields.
•
To reset the event color to its initial setting, click Reset.
Whichever method you choose, the selected color is displayed in the Preview field. When you are satisfied with the color, click OK. SGM saves the event color settings and closes the Select a Color dialog.
Step 8
(Optional) The Categories section of the Event settings enables you to specify which event categories you want to display in the Event Window:
Step 9
(Optional) To specify which event categories you want to display in the Event Window, select the Categories section of the Event settings and modify the following settings:
•
Status—Checkbox used to indicate whether Status events are to be displayed in the Event Window. The default setting for this checkbox is selected.
•
Edit—Checkbox used to indicate whether Edit events are to be displayed in the Event Window. The default setting for this checkbox is selected.
•
OverWrite—Checkbox used to indicate whether OverWrite events are to be displayed in the Event Window. The default setting for this checkbox is selected.
•
Trap—Checkbox used to indicate whether Trap events are to be displayed in the Event Window. The default setting for this checkbox is selected.
•
Ignore—Checkbox used to indicate whether Ignore events are to be displayed in the Event Window. The default setting for this checkbox is selected.
•
Poll—Checkbox used to indicate whether Poll events are to be displayed in the Event Window. The default setting for this checkbox is selected.
•
Create—Checkbox used to indicate whether Create events are to be displayed in the Event Window. The default setting for this checkbox is selected.
•
Login—Checkbox used to indicate whether Login events are to be displayed in the Event Window. The default setting for this checkbox is selected.
•
Purge—Checkbox used to indicate whether Purge events are to be displayed in the Event Window. The default setting for this checkbox is selected.
•
Delete—Checkbox used to indicate whether Delete events are to be displayed in the Event Window. The default setting for this checkbox is selected.
•
LoginDisable—Checkbox used to indicate whether LoginDisable events are to be displayed in the Event Window. The default setting for this checkbox is selected.
•
Discover—Checkbox used to indicate whether Discover events are to be displayed in the Event Window. The default setting for this checkbox is selected.
•
LoginFail—Checkbox used to indicate whether LoginFail events are to be displayed in the Event Window. The default setting for this checkbox is selected.
To select all event category checkboxes. click Select All.
To clear all event category checkboxes, click Deselect All.
![]()
Note
These are the default categories; there might be additional categories, as defined by the SGM system administrator. For information about custom categories, see the "Modifying the SGM Event Configuration File (Solaris Only)" section.
Step 10
(Optional) To specify which event severities you want to display in the Event Window, select the Severities section of the Event settings and modify the following settings:
•
None—Checkbox used to indicate whether events of severity None are to be displayed in the Event Window. The default setting for this checkbox is selected.
•
Normal—Checkbox used to indicate whether events of severity Normal are to be displayed in the Event Window. The default setting for this checkbox is selected.
•
Admin—Checkbox used to indicate whether events of severity Admin are to be displayed in the Event Window. The default setting for this checkbox is selected.
•
Warning—Checkbox used to indicate whether events of severity Warning are to be displayed in the Event Window. The default setting for this checkbox is selected.
•
Error—Checkbox used to indicate whether events of severity Error are to be displayed in the Event Window. The default setting for this checkbox is selected.
![]()
Note
There might be additional custom severities, as defined by your SGM System Administrator. For information, see the "Modifying the SGM Event Configuration File (Solaris Only)" section.
Step 11
(Optional) To further define the event filter for the Event Window, select the Other section of the Event settings and modify the following settings:
•
Acknowledged—Checkbox used to indicate whether only acknowledged events are to be displayed in the Event Window. The default setting for this checkbox is cleared.
•
Unacknowledged—Checkbox used to indicate whether only unacknowledged events are to be displayed in the Event Window. The default setting for this checkbox is selected.
•
Time Before—Checkbox used to indicate whether only events logged by SGM prior to a specified date and time are to be displayed in the Event Window. The default setting for this checkbox is cleared.
•
Time Before Field—Specifies the date and time prior to which events logged by SGM are to be displayed in the Event Window. This field is grayed-out unless the Time Before checkbox is selected.
•
Time After—Checkbox used to indicate whether only events logged by SGM after a specified date and time are to be displayed in the Event Window. The default setting for this checkbox is cleared.
•
Time After Field—Specifies the date and time after which events logged by SGM are to be displayed in the Event Window. This field is grayed-out unless the Time After checkbox is selected.
•
Message Contains—Checkbox used to indicate whether only events that contain the specified message text are to be displayed in the Event Window. The default setting for this checkbox is cleared.
•
Match Case—Checkbox used to indicate whether only events that match the case of the text in the Message Contains field are to be displayed in the Event Window. This field is grayed-out unless the Message Contains checkbox is selected. If the Message Contains checkbox is selected, the default setting for this checkbox is cleared.
These settings are applied to all event displays in the current view.
Step 12
(Optional) To close the Preferences window at any time, click File > Close. If you have changed any preferences, SGM asks if you want to apply the changes before leaving the window:
•
Click Yes to apply the changes and close the prompt window and the Preferences window.
•
Click No to close the prompt window and the Preferences window without applying or saving any changes.
•
Click Cancel to close the prompt window without applying any changes. The Preferences window remains open.
Step 13
When you are satisfied with the preference settings, click Save. SGM displays the Save File Dialog: Preferences File List dialog (Figure 5-3).
Figure 5-3 Save File Dialog: Preferences File List Dialog
![]()
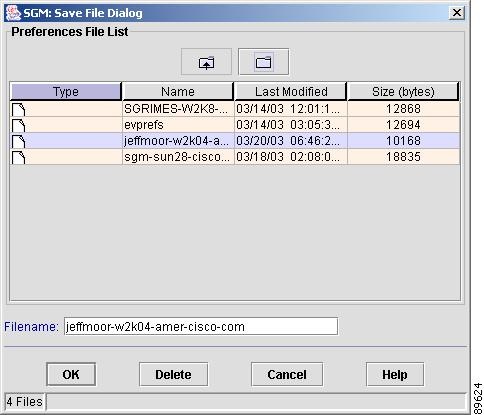
The Save File Dialog: Preferences File List dialog contains the following fields:
•
Type—Icon indicating whether the item in the table is a file or a folder.
•
Name—Name of the preference settings file or folder.
•
Last Modified—Date and time the preference settings file or folder was last modified.
•
Size (bytes)—Size of the preference settings file or folder, in bytes.
•
Filename—Name by which you want to save the preference settings file.
If you create a new preference settings file name, you can use any letters, numbers, or characters in the name that are allowed by your operating system. However, if you include any spaces in the new name, SGM converts those spaces to dashes. For example, SGM saves file "a b c" as "a-b-c".
•
Number of Files—Total number of preference settings files and folders (displayed in bottom left corner).
To save the preference settings file with a new name, use one of the following procedures:
•
To save the file with a completely new name, enter the new name and click OK.
•
To save the file with an existing name, overwriting an old preference settings file, select the name in the list and click OK.
SGM saves the preference settings file with the new name, closes the Save File Dialog: Preferences File List dialog, and returns to the Preferences window.
To delete a preference settings file from the preference settings file list, select a file and click Delete. SGM issues an informational message containing the name and location of the deleted file.
To save any changes you made to the list of files, click OK. SGM saves the changes and closes the Load File Dialog: Preferences File List dialog.
To close the Save File Dialog: Preferences File List dialog without saving the preference settings file or saving any changes to the preference settings file list, click Cancel.
Modifying Node Table Column Settings
To specify the columns that SGM displays in node tables, right-click in the header of the node table in one of the following windows:
•
Node Window
•
Discovery panel of the Discovery Dialog
•
Nodes Excluded from View table of the Network View Editor window
•
Nodes In Current View table of the Network View Editor window
•
Topology signaling point table in the left pane of the Topology Window
SGM displays the Node Table Preferences checkboxes:
•
Select Internal ID to display the internal ID of the node. The default setting for this checkbox is cleared.
•
Select Name to display the name of the node. The default setting for this checkbox is selected.
•
Select Primary SNMP Addr to display the IP address used by SNMP to poll the node. The default setting for this checkbox is selected in the Node Window, Discovery panel, and Network View Editor window. The default setting for this checkbox is cleared in the Topology Window.
•
Select CLLI Code to display the CLLI code of the node. The default setting for this checkbox is cleared.
•
Select Device Type to display the device type. The default setting for this checkbox is selected. The default setting for this checkbox is selected in the Node Window and Discovery panel. The default setting for this checkbox is cleared in the Network View Editor window and Topology Window.
•
Select ITP MIB Level to display the MIB conformance level used by the ITP, such as ITP MB5. The default setting for this checkbox is selected.
•
Select ITP Uptime to display the time the ITP has been up, in weeks, days, hours, minutes, and seconds. The default setting for this checkbox is cleared.
•
Select Reboot Reason to display the reason for the last reboot of the ITP. The default setting for this checkbox is cleared.
•
Select Notes to display the Notes column. The default setting for this checkbox is cleared.
•
Select Events to display the Events column. The default setting for this checkbox is selected. The default setting for this checkbox is selected in the Node Window and Discovery panel. The default setting for this checkbox is cleared in the Network View Editor window and Topology Window.
•
Select Last Status Change to display the date and time that the status of the node last changed. The default setting for this checkbox is cleared.
•
You cannot edit the Status checkbox.
•
Select Status Reason to display the reason for the current status of the node. The default setting for this checkbox is selected.
You can resize each column, or sort the table based on the information in one of the columns. See the "Resizing, Sorting, and Hiding Table Columns" section for more details.
Modifying Linkset Table Column Settings
To specify the columns that SGM displays in linkset tables, right-click in the header of the linkset table in one of the following windows:
•
Linkset Window
•
Topology linkset table in the left pane of the Topology Window
SGM displays the Linkset Table Preferences checkboxes:
•
Select Internal ID to display the internal ID of the linkset. The default setting for this checkbox is cleared.
•
Select Name to display the name of the linkset. The default setting for this checkbox is cleared in the Linkset Window. The default setting for this checkbox is selected in the Topology Window.
•
Select Local Point Code to display the point code of the primary node for the linkset. The default setting for this checkbox is cleared.
•
Select Adj Point Code to display the point code of the adjacent node for the linkset. The default setting for this checkbox is cleared.
•
Select Linkset Type to display the type of the linkset. The default setting for this checkbox is selected in the Linkset Window. The default setting for this checkbox is cleared in the Topology Window.
•
Select Links to display the total number of links in the linkset. The default setting for this checkbox is selected in the Linkset Window. The default setting for this checkbox is cleared in the Topology Window.
•
Select Active Links to display the number of links in the linkset that are Active. The default setting for this checkbox is selected in the Linkset Window. The default setting for this checkbox is cleared in the Topology Window.
•
Select Congested Links to display the number of links in the linkset that are Congested. The default setting for this checkbox is selected in the Linkset Window. The default setting for this checkbox is cleared in the Topology Window.
•
Select Ignored to display the Ignored column. The default setting for this checkbox is selected.
•
Select Notes to display the Notes column. The default setting for this checkbox is cleared.
•
Select Events to display the Events column. The default setting for this checkbox is selected in the Linkset Window. The default setting for this checkbox is cleared in the Topology Window.
•
Select Last Status Change to display the date and time that the status of the linkset last changed. The default setting for this checkbox is cleared.
•
You cannot edit the Status checkbox.
•
Select Status Reason to display the reason for the current status of the linkset. The default setting for this checkbox is selected.
You can resize each column, or sort the table based on the information in one of the columns. See the "Resizing, Sorting, and Hiding Table Columns" section for more details.
Modifying Event Table Column Settings
To specify the columns that SGM displays in event tables, right-click in the header of the event table in the Event Window. SGM displays the Event Table Preferences checkboxes:
•
Select Internal ID to display the internal ID of the event. The default setting for this checkbox is cleared.
•
Select Ack to display the acknowledged/unacknowledged setting for the event. The default setting for this checkbox is selected.
•
Select Category to display the category of the event. The default setting for this checkbox is selected.
•
Select Severity to display the severity of the event. The default setting for this checkbox is selected.
•
Select Note to display the Notes column. The default setting for this checkbox is cleared.
•
Select Time to display the date and time the event was logged. The default setting for this checkbox is selected.
•
Select Ack By to display the SGM client that acknowledged the event. The default setting for this checkbox is selected.
•
Select Ack Time to display the date and time the event was last acknowledged or unacknowledged. The default setting for this checkbox is cleared.
•
Select Node to display the node associated with the event. The default setting for this checkbox is selected.
•
Select SP to display the signaling point associated with the event. The default setting for this checkbox is selected.
•
Select Linkset to display the linkset associated with the event. The default setting for this checkbox is selected.
•
Select Link to display the link associated with the event. The default setting for this checkbox is selected.
•
Select Message to display the event message. The default setting for this checkbox is selected.
You can resize each column, or sort the table based on the information in one of the columns. See the "Resizing, Sorting, and Hiding Table Columns" section for more details.
Modifying the Message Display
The following sections provide information about modifying the way SGM displays and stores messages:
•
Changing the Location of SGM Message Log Files
•
Changing the Size of the SGM Message Log File
•
Changing the Time Mode for Dates in Log Files
•
Changing the Age of the SGM Message Log Files
Related Topics:
•
Viewing Network Status and Statistics Information for SGM
•
Viewing System Status Information for SGM
Changing the Location of SGM Message Log Files
By default, all SGM system message log files are located on the SGM server at /opt/CSCOsgm/logs. To change the location of the system message log directory, use the sgm msglogdir command. See the "SGM Command Reference" section for more information on the use of this command.
Changing the Size of the SGM Message Log File
To change the size of the message log file, use the sgm msglogsize command. See the "SGM Command Reference" section for more information on the use of this command.
Changing the Time Mode for Dates in Log Files
To change the time mode for dates in log files, use the sgm logtimemode command. See the "SGM Command Reference" section for more information on the use of this command.
Changing the Age of the SGM Message Log Files
To change the number of days SGM archives system message log files before deleting them from the SGM server, use the sgm msglogage command. See the "SGM Command Reference" section for more information on the use of this command.
Setting the Point Code Format (Solaris Only)
SGM enables you to set a new point code format for an SGM server. The new point code format is used by the SGM server, and by all associated SGM clients. Normally, you need to do this only once, after installation.
The point code format configuration is contained in the PointCodeFormat.xml file.
To set the new point code format:
Step 1
Log in as the root user, as described in the "Becoming the Root User (Solaris Only)" section, or as a super user, as described in the "Specifying a Super User (Solaris Only)" section.
Step 2
Enter the following commands:
# cd /opt/CSCOsgm/bin
# ./sgm pcformat {edit | list | master | restore}
Where:
•
edit—Opens the PointCodeFormat.xml file for editing.
•
list—Displays the current contents of the PointCodeFormat.xml file.
•
master—Restores the PointCodeFormat.xml file to the default settings.
•
restore—Restores the PointCodeFormat.xml file to the last saved copy.
The PointCodeFormat.xml file provides the following default point code formats:
•
<Variant value="ANSI" format="8.8.8"/>—Formats point codes using the 24-bit format American National Standards Institute (ANSI) standard, xxx.yyy.zzz format, where:
–
xxx is the 8-bit network identification
–
yyy is the 8-bit network cluster
–
zzz is the 8-bit network cluster member
•
<Variant value="China" format="8.8.8"/>—Formats point codes using the 24-bit format China standard, xxx.yyy.zzz format, where:
–
xxx is the 8-bit network identification
–
yyy is the 8-bit network cluster
–
zzz is the 8-bit network cluster member
•
<Variant value="ITU" format="3.8.3"/>—Formats point codes using the 14-bit format International Telecommunication Union (ITU) standards, x.yyy.z format, where:
–
x is the 3-bit zone identification
–
yyy is the 8-bit region identification
–
z is the 3-bit signal-point
For information about customizing the point code formats, see the detailed instructions in the PointCodeFormat.xml file.
Any changes you make take effect when you restart the SGM server.
Enabling SNMP Traps (Solaris Only)
By default, SGM cannot receive SNMP traps. To use SNMP traps with SGM, you must first configure SGM to receive traps.
Related Topics:
•
Integrating SGM with Other Products
•
Viewing Network Status and Statistics Information for SGM
To view the current trap reception configuration for SGM, use the following procedure:
Step 1
Log in as the root user, as described in the "Becoming the Root User (Solaris Only)" section, or as a super user, as described in the "Specifying a Super User (Solaris Only)" section.
Step 2
Enter the following commands:
# cd /opt/CSCOsgm/bin
# ./sgm trapstatus
SGM displays the current trap reception configuration for SGM, including:
•
SNMP trap integration type:
–
native—SGM receives traps natively on a UDP port.
–
hpov—SGM receives traps using HP OpenView.
•
For native, SGM also displays the UDP port number on which SGM receives traps natively.
•
For hpov, SGM also displays the location of the HP OpenView home directory.
•
Status for the sgmTrapReceiver (such as Running or Stopped).
To configure SGM to receive traps, using the following procedure:
Step 1
Log in as the root user, as described in the "Becoming the Root User (Solaris Only)" section, or as a super user, as described in the "Specifying a Super User (Solaris Only)" section.
Step 2
Enter the following commands:
# cd /opt/CSCOsgm/bin
# ./sgm trapsetup
SGM displays the following message and prompt:
The SGM server must also be stopped to perform this operation.
Do you wish to continue? [n]
Step 3
Type y and press Enter. SGM stops the SGM Process Manager and all managed processes and displays the following prompt:
Would you like to configure SGM to receive SNMP traps? [yes]
Step 4
Press Enter. SGM displays the following message and prompt:
SGM can receive traps natively on a UDP port or receive traps via integration with HP OpenView.
Enter SNMP trap integration type: native or hpov? [native]
•
If you want SGM to receive traps natively, press Enter. The SGM installation program displays the following messages and prompt:
SGM can receive traps natively on the standard UDP port number 162 or on any other UDP port chosen. If another application is already bound to the SNMP standard trap reception port of 162, an alternate port number for SGM must be specified.
UDP port number 44750 is the default alternate port.
Enter trap port number? [162]
By default, ITPs send traps to port 162. To accept the default value, press Enter.
If your ITPs have been configured to send traps to a different port, type that port number and press Enter.
By default, SGM listens for traps from trap multiplexing devices and NMS applications on port 44750. If you want SGM to monitor that port, and port 162 is not available on the SGM server device, type 44750 and press Enter.
If trap multiplexing devices and NMS applications in your network have been configured to send traps to a different port, type that port number and press Enter.
If you are a super user, you must specify a port number that is greater than 1024, then press Enter.
Do not enter a non-numeric port number. If you do, you are prompted to enter a numeric port number.
When you select an SNMP trap port number for the SGM server, make sure your ITPs use the same SNMP trap port number. See the description of the snmp-server host command in the "ITP Requirements" section of the Cisco Signaling Gateway Manager Installation Guide for more information.
•
If you want SGM to receive traps using HP OpenView, type hpov and press Enter. The SGM installation program displays the following prompt:
Please enter location of HP OpenView home directory: [/opt/OV]
To accept the default value, press Enter; or type a different location and press Enter.
Step 5
SGM confirms your choices and restarts the SGM Process Manager and all managed processes.
SGM filters traps based on the contents of the SgmEvent.conf file. If a new trap becomes available that is of interest to SGM, you can modify the SgmEvent.conf file to enable SGM to recognize and process the new trap. For more information about modifying the SgmEvent.conf file, see the "Modifying the SGM Event Configuration File (Solaris Only)" section.
Modifying the SGM Event Configuration File (Solaris Only)
SGM processes events based on the contents of the SGM event configuration file, SgmEvent.conf. This file determines the size of the SGM event database, the maximum length of time SGM is to retain events, the default severity and color associated with each type of event, and all other aspects of SGM event processing.
If you want to change the way SGM processes events, you can modify the SgmEvent.conf file. After you save your changes and restart the SGM server, SGM reflects the changes on the SGM server and on all SGM clients that connect to that server, and reflects any new or changed categories and severities in its Web display navigation bars.
When you modify the SgmEvent.conf file, keep the following considerations in mind:
•
Changes you make to the SgmEvent.conf file can adversely affect your operating environment. In most environments, SGM recommends that you use the default file without modification.
•
To view the current SgmEvent.conf file, enter the sgm eventconfig view command.
SGM creates a backup copy of the SgmEvent.conf file during installation. At any time, if you are unsatisfied with the changes you have made to the file, you can use the sgm restoreprops command to restore the backup copy of the SgmEvent.conf file.
To restore the SgmEvent.conf file from the previous version that was used, enter the sgm eventconfig restore command.
To restore the SgmEvent.conf file to the default SGM settings, enter the sgm eventconfig master command.
See the "SGM Commands and Descriptions" section for more information on the use of these commands.
•
After you save your modified SgmEvent.conf file, always validate it before restarting the SGM server. When you validate the file, you can detect errors before they negatively impact SGM. See the "Validating the Modified SGM Event Configuration File" section for more information.
This section provides the following information:
•
Editing the SGM Event Configuration File
•
Modifying Event Categories, Severities, Colors, and Message Text
•
Setting Sounds for Events at the SGM Server
•
Adding New Event Categories and Severities
•
Validating the Modified SGM Event Configuration File
Editing the SGM Event Configuration File
To edit the SgmEvent.conf file, use the following procedure:
Step 1
Log in as the root user, as described in the "Becoming the Root User (Solaris Only)" section, or as a super user, as described in the "Specifying a Super User (Solaris Only)" section.
Step 2
Enter the following commands:
# cd /opt/CSCOsgm/bin
# sgm eventconfig edit
Step 3
Modify the file as desired, then save the file.
Step 4
Validate the file. See the "Validating the Modified SGM Event Configuration File" section for details.
The new configuration becomes effective when you restart the SGM server.
Modifying Basic Settings
SGM enables you to modify the following basic settings for the event database:
•
Modifying the Size of the Event Database
•
Modifying the Maximum Age for Events
•
Modifying the Event Database Maintenance Interval
•
Modifying the Event Automation Timeout Interval
•
Enabling SGM to Process Events from Undiscovered Nodes
Modifying the Size of the Event Database
By default, the SGM event database can hold a maximum of 5000 events. If the database exceeds 5000 events, SGM deletes the oldest events until the database is reduced to 5000 events.
To change the size of the SGM event database, modify the following line in the SgmEvent.conf file:
<MaxEventDbRecords value="events" />
where events is the maximum number of events the database can hold.
![]()
Note
The larger the event database, the greater the impact on the performance of the SGM server and clients.
Modifying the Maximum Age for Events
By default, the SGM event database retains events a maximum of 7 days. SGM deletes events that are older than 7 days.
To change the maximum age for events, modify the following line in the SgmEvent.conf file:
<MaxEventTimeToLive value="days" />
where days is the maximum length of time, in days, SGM is to retain an event in the database.
Modifying the Event Database Maintenance Interval
By default, SGM performs maintenance on the event database every 60 minutes, deleting all events in excess of 5000 and all events older than 7 days.
To change the maintenance interval, modify the following line in the SgmEvent.conf file:
<CompressEventDbInterval value="minutes" />
where minutes is the length of time, in minutes, between maintenance checks of the database.
![]()
Note
The shorter the maintenance interval, the greater the impact on the performance of the SGM server and clients.
Modifying the Event Automation Timeout Interval
By default, the SGM event database allows an event automation script to run for 300 seconds (5 minutes) before canceling the script and moving on.
To change the event automation timeout interval, modify the following line in the SgmEvent.conf file:
<AutomationTimeout value="seconds" />
where seconds is the maximum length of time, in seconds, SGM is to allow an event automation script to run.
Enabling SGM to Process Events from Undiscovered Nodes
By default, SGM does not process events from undiscovered nodes.
To begin processing events from undiscovered nodes, change the following line in the SgmEvent.conf file:
<ProcessUndiscovered value="False" />
to:
<ProcessUndiscovered value="True" />
Modifying Event Categories, Severities, Colors, and Message Text
There are three main types of events in SGM:
•
Trap events, which are incoming events that are not solicited by SGM.
•
Status events, which are status changes detected by SGM.
•
User Action events, which are events triggered by user actions.
Within those broad types, there are many subordinate types of events, each with a default associated category, severity, color, message text, and event help file. SGM enables you to modify the default characteristics of each type of event, tailoring them to meet your needs.
This section provides the following information to help you modify event characteristics:
•
Modifying Event Severities and Colors
Modifying Event Categories
By default, SGM provides the following event categories:
•
Create—Creation event, such as the creation of a seed file.
•
Delete—Deletion event, such as the deletion of a node, signaling point, linkset, or file.
•
Discover—Discovery event, such as Discovery beginning.
•
Edit—Edit event. A user has edited an event, linkset, or node.
•
Ignore—Ignore event. A user has Ignored a link or linkset.
•
Login—Login event. A user has logged in to SGM.
•
LoginDisable—LoginDisable event. SGM has disabled a user's User-Based Access authentication as a result of too many failed attempts to log in to SGM.
•
LoginFail—LoginFail event. An attempt by a user to log in to SGM has failed.
•
OverWrite—OverWrite event. An existing file, such as a seed file or route file, has been overwritten.
•
Poll—Poll event, such as an SNMP poll.
•
Purge—Purge event. A user has requested Discovery with Delete Existing Data selected, and SGM has deleted the existing SGM database.
•
Status—Status change message generated.
•
Trap—SNMP trap message generated.
To change the name of an existing event category, find the category name in the SgmEvent.conf file and replace every occurrence with your new category name. For example, you could replace every occurrence of LoginFail with BadLogin.
Modifying Event Severities and Colors
By default, SGM provides the following event severities and colors:
•
Admin—The default color is cyan.
•
Error—The default color is coral.
•
None—The default color is white.
•
Normal—The default color is light green.
•
Warning—The default color is yellow.
To change the name of an existing event severity, find the severity name in the SgmEvent.conf file and replace every occurrence with your new severity name. For example, you could replace every occurrence of Error with Problem.
To change the color associated with an existing severity, find the line that defines the severity's color in the SgmEvent.conf file and change the color. For example, to display Warning events in maroon instead of yellow, change the following line:
<SeverityName value="Warning" /> <SeverityColor value="yellow" />
to:
<SeverityName value="Warning" /> <SeverityColor value="maroon" />
You can assign any of the standard HTML/Web colors to SGM events. For a list of all supported HTML/Web colors, see the /opt/CSCOsgm/etc/SgmEvent.colors file.
Modifying Event Message Text
SGM provides default message text for each event defined in the SgmEvent.conf file.
To modify the message text for an event, find the line that defines the event's message text in the SgmEvent.conf file and change the text. For example, the default message text for a Poll event is:
<Message value="Poll for $NodeDisplayName requested by user $User." />
If you care more about the user than about the polled node, you could change that message text to:
<Message value="User $User requested a poll for $NodeDisplayName." />
Automating Events
SGM enables you to automate events. That is, you can configure SGM to call a UNIX script to drive automatic paging or e-mail, for example, whenever SGM logs an event for which you have defined an automation script.
To configure automation for an event, use the following procedure:
Step 1
Find the event in the SgmEvent.conf file.
Step 2
Find the event's Help element, <HelpFile value="" />.
Step 3
Before the Help element, add an Action element. The Action element has the following format:
<Action Poll="[True|False]" Run="UNIXCommand EventParameters" />
where:
•
Poll indicates whether SGM is to poll the associated nodes immediately (True) or not poll the nodes (False).
•
Run spawns a UNIX process to execute the specified command or script.
•
UnixCommand specifies either a binary command name or a shell script.
•
EventParameters are information from the event that SGM sends to UnixCommand as parameters. The set of EventParameters is the same as the set of Message element parameters, and they are specified the same way.
For example, the following Action element:
<Action Poll="True" Run="/users/sgrimes/auto-inhibit.exp $NodeDisplayName $LinksetName $User" />
causes the following automatic actions whenever SGM logs the associated event:
•
SGM polls the associated nodes.
•
SGM spawns a UNIX process to execute the /users/sgrimes/auto-inhibit.exp script.
•
SGM passes the $NodeDisplayName, $LinksetName, and $User parameters to the script.
Step 4
When you are satisfied with the event automation changes you have made to the SgmEvent.conf file, validate your changes using the sgm testeventconfig command. See the "Validating the Modified SGM Event Configuration File" section for more information.
Step 5
Restart the SGM server. Thereafter, the specified event causes the automation script to run.
When you are working with automated events, keep in mind the following considerations:
•
Detailed information about event automation scripts, including the times they start and stop and any output produced by the scripts, is recorded in the SGM system event automation log file. For more information, see the "Viewing the SGM System Event Automation Log" section.
•
SGM event automation scripts run separately from all other SGM processing.
•
If SGM logs more than one automated event in rapid succession, SGM runs each automation script sequentially, not in parallel. SGM spawns a new UNIX process for each script, and waits for it to complete before running the next script.
•
By default, SGM allows an event automation script to run for 300 seconds (5 minutes) before canceling the script and moving on to the next script. To change the maximum run-time for event automation scripts, see the "Modifying the Event Automation Timeout Interval" section.
Setting Sounds for Events at the SGM Server
You can configure the SGM server to play specific sounds when specific events are logged. (To configure sounds on the SGM client, see the "Setting Sounds for Events at an SGM Client" section.)
To configure event sounds on the SGM server, create a script to call the Solaris audioplay command, then configure automation for an event, with the script specified in place of the UnixCommand argument.
The audioplay command has the following basic format:
/usr/bin/audioplay soundfile
where soundfile is the full path and name of a sound file stored in the SGM server's sounds directory:
•
If you installed SGM in the default directory, /opt, then the sound file directory is /opt/CSCOsgm/sounds.
•
If you installed SGM in a different directory, then the sound file directory is located in that directory.
See the audioplay command man page for more information about this command.
See the "Automating Events" section for more information about configuring automation for an event.
To see the list of event automation sound files that are stored in the sounds directory, select Sounds from the Web page menu bar, if shown. SGM displays the SGM System Files: Server Event Automation Sounds page. The SGM server can play sound files with the formats that are supported by its audio system.
Adding New Event Categories and Severities
SGM also enables you to add entirely new categories and severities to the SgmEvent.conf file. This is useful if you want to group different events into logical groups for filtering.
For example, you might want to create a new Trap category, LinkUtilization, that combines the cItpSpLinkRcvdUtilChange and cItpSpLinkSentUtilChange traps for easier filtering in the SGM GUI. To do so, find the following line in the SgmEvent.conf file:
<Categories>
and add the following line to the list of category definitions:
<CategoryName value="LinkUtilization" />
Now find each occurrence of the cItpSpLinkRcvdUtilChange and cItpSpLinkSentUtilChange trap, and change each category definition from Trap:
<CategoryName value="Trap" />
to LinkUtilization:
<CategoryName value="LinkUtilization" />
You can also change the severity, color, message text, or event help file generated by the cItpSpLinkRcvdUtilChange and cItpSpLinkSentUtilChange traps.
Now, after you save the SgmEvent.conf file, validate your changes, and restart the SGM server, whenever SGM processes a cItpSpLinkRcvdUtilChange or cItpSpLinkSentUtilChange trap, the SGM GUI and Web displays show the events with the new LinkUtilization category.
When processing events, SGM searches for the best match in the SgmEvent.conf file. For example, by default, NodeStateAdded has event definitions for the following NodeStates:
•
Active—Generates a Normal event
•
Unknown—Generates an Error event
•
Unmanaged—Generates an Admin event
•
Warning—Generates a Warning event
•
<Blank>—Generates a None event
If a node is added to the SGM database with a status of Unknown, SGM generates an Error event, as defined for NodeState value="Unknown".
However, if a node is added with a status of Waiting, SGM generates a None event, because that is the best match in the NodeStateAdded event definitions.
Modifying Help for Events
SGM provides extensive type-specific help for events. To see help for an event, right-click the event in the Event Window and select Help for Event. SGM displays context-sensitive help for the selected event in a separate Web browser.
However, you might prefer to provide your own enterprise-specific instructions to operators in the event help, and SGM enables you to do so.
To modify the help for an event, use the following procedure:
Step 1
Create a new HTML help file for the event.
You can use the default SGM event help file as a basis for your help file:
•
If you installed SGM in the default directory, /opt, then the event help files are in the /opt/CSCOsgm/apache/share/htdocs/eventHelp directory.
•
If you installed SGM in a different directory, then the event help directory and files are located in that directory.
If you use an SGM event help file as a basis for your event help file, rename it when you save it. Do not use the existing SGM name. If you do so, then the next time you install SGM, SGM overwrites the file and you lose your changes.
For example, the default SGM help file for cItpSpLinkRcvdUtilChange and cItpSpLinkSentUtilChange traps is cItpSpLinkRcvdUtilChange.html. If you use that file as the basis for your new help file, which covers all link utilization events, you might name your new file cMyLinkUtilChange.html.
Step 2
Store your new help file in the /opt/CSCOsgm/apache/share/htdocs/eventHelp directory.
Step 3
In the SgmEvent.conf file, replace each occurrence of the SGM default event help file name with the name of your file. For example, given the preceding example, you would replace each occurrence of the following line:
<HelpFile value="/eventHelp/cItpSpLinkRcvdUtilChange.html" />
with this line:
<HelpFile value="/eventHelp/cMyLinkUtilChange.html" />
Step 4
Save the the SgmEvent.conf file.
Step 5
Validate the file. See the "Validating the Modified SGM Event Configuration File" section for details.
Step 6
Restart the SGM server. Now, whenever you display help for a cItpSpLinkRcvdUtilChange or cItpSpLinkSentUtilChange trap event, SGM displays your custom event help.
Validating the Modified SGM Event Configuration File
Always validate the SgmEvent.conf file after you save your changes and before you restart the SGM server. When you validate the file, you can detect errors before they negatively impact SGM.
To validate the SgmEvent.conf file, use the following procedure:
Step 1
Log in as the root user, as described in the "Becoming the Root User (Solaris Only)" section, or as a super user, as described in the "Specifying a Super User (Solaris Only)" section.
Step 2
Enter the following commands:
# cd /opt/CSCOsgm/bin
# ./sgm testeventconfig
SGM parses the SgmEvent.conf file and generates a list of all found XML and non-XML errors:
•
For XML errors, SGM points to the line that contains the error. The following is a sample XML error:
SgmEventConfig: Element "Parms" does not allow "SeverityNamex" here.SgmEventConfig: Unable to parse event configuration file.•
For non-XML errors, SGM points to the bottom of the Trap, Status, or User Action definition block that contains the error. The following is a sample XML error:
SgmEventConfig: Severity 'Normalx' is not contained in the valid severities list.SgmEventConfig: Unable to parse event configuration file.If you prefer to dump the event configuration to STDOUT for visual validation, enter the following commands:
# cd /opt/CSCOsgm/bin
# ./sgm testeventconfig -print
Step 3
Correct the errors and continue to validate the file until SGM detects no further errors. SGM displays the following messages:
SgmEventConfig: Loaded xx categories, xx severities, and xx events definitions.Finished loading /opt/CSCOsgm/etc/SgmEvent.confStep 4
Restart the SGM server to begin processing events using the modified file.
Setting Sounds for Events at an SGM Client
SGM enables you to create and modify event sound filters for the SGM client. Event sound filters determine the sounds that the SGM client plays when specific events are logged. The SGM client plays the sounds even if the Event Window is not currently displayed. (To configure sounds on the SGM server, see the "Setting Sounds for Events at the SGM Server" section.)
Related Topics:
To work with event sound filters:
Step 1
Select Edit > Event Sounds from the SGM Main Menu. SGM displays the Event Sound Filters List dialog (Figure 5-1).
Figure 5-4 Event Sound Filters List Dialog
![]()
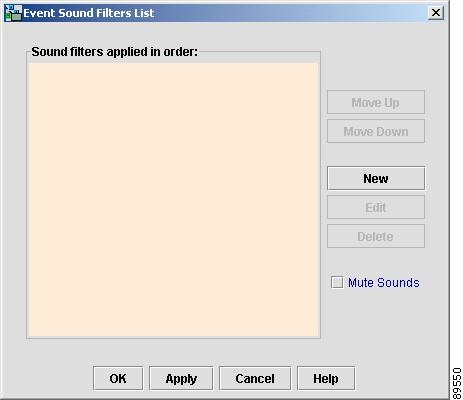
The Event Sound Filters List dialog lists all event sound filters that have been defined.
The Sound filters applied in order: list indicates the order in which sound filters are to be applied, from top to bottom. That is, if an event matches two or more filters in the list, the top-most filter determines the sound that the SGM client plays. (The Sound filters applied in order: list is blank until you have created at least one new sound filter for events.)
•
To move an event sound filter up in the list, select the filter, then click Move Up.
•
To move an event sound filter down in the list, select the filter, then click Move Down.
Step 2
(Optional) To create a new event sound filter, click New. SGM displays the Event Sound Filters dialog (Figure 5-1).
Figure 5-5 Event Sound Filters Dialog
![]()
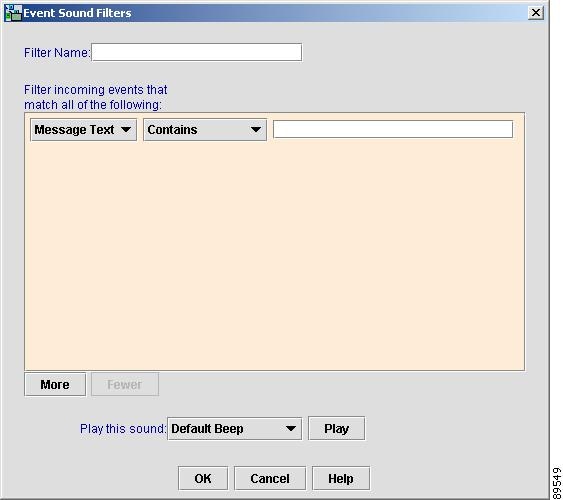
Enter a name for the filter, then specify filter criteria for this event sound filter:
•
(Optional) To add a filter based on message text:
a.
Select Message Text from the first drop-down list box.
b.
Select Contains, Equals, Does Not Contain, or Does Not Equal from the second drop-down list box.
c.
Enter the message text in the character string field.
•
(Optional) To add a filter based on event severity:
a.
Select Severity from the first drop-down list box.
b.
Select Equals or Does Not Equal from the second drop-down list box.
c.
Select a severity, such as Normal or Error, from the third drop-down list box.the message text.
•
(Optional) To add a filter based on event category:
a.
Select Category from the first drop-down list box.
b.
Select Equals or Does Not Equal from the second drop-down list box.
c.
Select a category, such as Status or Purge, from the third drop-down list box.the message text.
•
(Optional) To add a filter based on the name of the node associated with the event:
a.
Select Node from the first drop-down list box.
b.
Select Equals or Does Not Equal from the second drop-down list box.
c.
Select a node from the third drop-down list box. SGM lists all nodes that have been discovered in the drop-down list box.
•
(Optional) To add a filter criteria to the event sound filter, click More. SGM adds a new criteria to the bottom of the list.
•
(Optional) To remove a filter criteria from the event sound filter, click Fewer. SGM deletes the last criteria in the list.
•
(Optional) To specify the sound to be played when an event matches this event sound filter, select a sound file from the Play this sound: drop-down list box.
SGM client sound files are stored in the sounds directory:
–
If you installed the SGM client for Solaris in the default directory, /opt, then the sound file directory is /opt/CSCOsgmClient/sounds.
–
If you installed the SGM client for Windows in the default directory, /Program Files, then the sound file directory is C:\Program Files\SGMClient\sounds.
–
If you installed the SGM client in a different directory, then the sound file directory is located in that directory.
You can add sound files to the sounds directory. SGM can play the following sound file formats: AIFC, AIFF, AU, SND, and WAV.
If for some reason SGM cannot play a specified sound file, SGM plays a default beep. For example, SGM cannot play a sound file if one of the following conditions exists:
–
The file has been moved or deleted from the sounds directory
–
The sounds directory has been deleted or cannot be found
–
Some other application is using all of the sound resources
–
There is no sound card present
•
(Optional) To play a sample of the sound selected in the Play this sound: drop-down list box, click Play.
•
(Optional) To close the Event Sound Filters dialog at any time without applying any changes to the event sound filter criteria, click Cancel.
When you are satisfied with the changes you have made to the event sound filter criteria, click OK. SGM applies your changes and closes the Event Sound Filters dialog.
Step 3
(Optional) To modify an existing event sound filter, select the filter in the Sound filters applied in order: list, then click Edit. SGM displays the Event Sound Filters dialog (Figure 5-1), populated with the selected filter's settings. Modify the settings as desired, then click OK. SGM applies your changes and closes the Event Sound Filters dialog.
Step 4
(Optional) To delete an event sound filter from the Sound filters applied in order: list, select the filter, then click Delete.
Step 5
(Optional) You can specify whether you want the SGM client to play event sounds:
•
To play event sounds, clear the Mute Sounds checkbox. This is the default setting.
•
To not play event sounds, select the Mute Sounds checkbox.
Step 6
(Optional) To apply any changes you made to the event sound filters list without closing the Event Sound Filters List dialog, click Apply.
Step 7
(Optional) To close the Event Sound Filters List dialog at any time without applying any changes to the event sound filters list, click Cancel.
Step 8
When you are satisfied with the changes you have made to the event sound filters list, click OK. SGM applies your changes and closes the Event Sound Filters List dialog.
On Solaris, the root user can access the sound feature from a local or remote device. However, users other than the root user must use a local device, and must use a local client, not a remote Solaris SGM client accessed using the xhost + UNIX command.
Limiting Traps by IP Address (Solaris Only)
By default, when you first install SGM, all IP addresses are allowed to send traps to the SGM server. However, SGM enables you to limit the IP addresses that can send traps to the server by creating and maintaining the trapaccess.conf file.
You can create the trapaccess.conf file and populate it with a list of IP addresses that can send traps to the SGM server. SGM receives traps from only those IP addresses, plus the local host. If the file exists but is empty, SGM receives traps only from the local host. (SGM always receives traps from the local host.)
When you first install SGM, the trapaccess.conf file does not exist and SGM allows all IP addresses to send traps to the SGM server.
To create the trapaccess.conf file and work with the list of allowed IP addresses, use the following procedure:
Step 1
Log in as the root user, as described in the "Becoming the Root User (Solaris Only)" section, or as a super user, as described in the "Specifying a Super User (Solaris Only)" section.
Step 2
Enter the following command:
# cd /opt/CSCOsgm/bin
Step 3
Create the trapaccess.conf file:
•
To create the trapaccess.conf file and add a client IP address to the list, enter the following command:
# ./sgm trapaccess add
•
To create the trapaccess.conf file and open the file to edit it directly, enter the following command:
# ./sgm trapaccess edit
The default directory for the file is located in the SGM installation directory:
•
If you installed SGM in the default directory, /opt, then the default directory is /opt/CSCOsgm/etc.
•
If you installed SGM in a different directory, then the default directory is located in that directory.
In the trapaccess.conf file, begin all comment lines with a pound sign (#).
All other lines in the file are SGM client IP addresses, with one address per line.
Wildcards (*) are allowed, as are ranges (for example, 1-100). For example, the address *.*.*.* allows all clients to send traps to the SGM server.
After you create the trapaccess.conf file, you can use the full set of sgm trapaccess keywords to work with the file. See the description of the sgm trapaccess command in the See the "SGM Command Reference" section for more details.
Any changes you make to the trapaccess.conf file take effect when you restart the SGM server.
Setting the DISPLAY Variable (Solaris Only)
The DISPLAY variable is set as part of your login environment on Solaris. However, if you Telnet into a remote workstation, you must set the DISPLAY variable to local display. To do so, enter the following command:
# setenv DISPLAY local_ws:0.0
where local_ws is your local workstation.
If your shell does not support the setenv command, enter the following command:
# export DISPLAY=local_ws:0.0
Backing Up or Restoring SGM Files (Solaris Only)
SGM automatically backs up all SGM data files to the SGM installation directory at 11:59 PM each night.
To change the time at which SGM automatically backs up files, log in as the root user and modify the root crontab file.
To manually back up the SGM data files at any time, log in as the root user, as described in the "Becoming the Root User (Solaris Only)" section, and enter the following commands:
# cd /opt/CSCOsgm/bin
# ./sgm backup
SGM backs up the data files in the installation directory.
If you installed SGM in the default directory, /opt, then the default backup directory is also /opt. If you installed SGM in a different directory, then the default backup directory is that directory.
To change the directory in which SGM stores its nightly backup files, use the following procedure:
Step 1
Log in as the root user, as described in the "Becoming the Root User (Solaris Only)" section, or as a super user, as described in the "Specifying a Super User (Solaris Only)" section.
Step 2
Enter the following commands:
# cd /opt/CSCOsgm/bin
# ./sgm backupdir directory
where directory is the new backup directory. If the new directory does not exist, SGM does not change the directory, and issues an appropriate message.
To restore the SGM data files from the previous night's backup, log in as the root user, as described in the "Becoming the Root User (Solaris Only)" section, and enter the following commands:
# cd /opt/CSCOsgm/bin
# ./sgm restore
SGM restores the data files.
![]()
Warning
Do not interrupt this command. Doing so can corrupt your SGM data files.
Removing SGM Data from the SGM Server
There might be times when you want to remove all SGM data from the SGM server, without uninstalling the product. There are two ways to do this, both of which restore the SGM server to a "clean" state, such as would exist after a new installation of SGM.
To remove all SGM data from the SGM server, excluding message log files, backup files, and report files, use the following procedure:
Step 1
Log in as the root user, as described in the "Becoming the Root User (Solaris Only)" section.
Step 2
Enter the following commands:
# cd /opt/CSCOsgm/bin
# ./sgm clean
Data removed includes all SGM data, notes, preferences, route files, and views, as well as any user-created files stored in SGM directories.
To remove all SGM data from the SGM server, including message log files, backup files, and report files, use the following procedure:
Step 1
Log in as the root user, as described in the "Becoming the Root User (Solaris Only)" section.
Step 2
Enter the following commands:
# cd /opt/CSCOsgm/bin
# ./sgm cleanall
Data removed includes all SGM data, notes, preferences, route files, views, message log files, backup files, and report files, as well as any user-created files stored in SGM directories.
Configuring a Backup SGM Server (Solaris Only)
SGM enables you to configure a secondary SGM server as a backup for the primary SGM server. For best results, Cisco recommends that you configure the primary server and the secondary server as secondaries for each other.
To configure a secondary SGM server, use the following procedure:
Step 1
Log in as the root user, as described in the "Becoming the Root User (Solaris Only)" section, or as a super user, as described in the "Specifying a Super User (Solaris Only)" section.
Step 2
Enter the following commands:
# cd /opt/CSCOsgm/bin
# ./sgm secondaryserver hostname naming-port
where:
•
hostname is the optional name of the host on which the secondary SGM server is installed.
•
naming-port is the optional SGM Naming Server port number for the secondary SGM server. The default port number is 44742.
![]()
Note
If you use the sgm secondaryserver command to configure a secondary SGM server, but the primary SGM server fails before you launch the SGM client, then the SGM client has no knowledge of the secondary server.
Step 3
(Optional) To list the secondary SGM server that has been configured for this primary SGM server, enter the following commands:
# cd /opt/CSCOsgm/bin
# ./sgm secondaryserver list
Configuring an SGM Client Connection Timer
SGM enables you to specify how long an SGM client is to wait for the SGM server before exiting.
To configure an SGM client connection timer, use the following procedure:
Step 1
Log in as the root user, as described in the "Becoming the Root User (Solaris Only)" section, or as a super user, as described in the "Specifying a Super User (Solaris Only)" section.
Step 2
Enter the following commands:
# cd /opt/CSCOsgm/bin
# ./sgm cliconntimer number-of-seconds
where number-of-seconds is the time the SGM client is to wait for a message from the SGM server before exiting. The valid range is 10 seconds to an unlimited number of seconds. The default value is 60 seconds.
If the timer expires, the client pings the server and takes the following action:
•
If the server responds to the ping, the client reconnects to the server.
•
If the server does not respond to the ping, but there is a backup server configured, the client connects to the backup server.
•
If the server does not respond to the ping, and there is no backup server configured, the client stops.
The timer takes effect when you restart the SGM server.
Step 3
(Optional) To restore the default timeout of 60 seconds, enter the following command:
# ./sgm cliconntimer clear
The timer is reset to 60 seconds when you restart the SGM server.
Telnetting to an ITP
SGM enables you to link to an ITP using Telnet.
To Telnet to an ITP, right-click a node in a window, then select ITP > Telnet to from the right-click menu.
![]()
Note
If your client workstation does not have network access to the IP address of the ITP (that is, if the ITP is behind a firewall or NAT device), you might be unable to Telnet to the ITP.