- Preface
- Scheduler Concepts
- Understanding Offset Concepts
- Creating your first job
- Using Scheduler Calendars
- Setting Up a Job Dependency
- Scheduling Jobs in Groups
- Creating a File Dependency
- Detecting Job Event Conditions
- Creating Variable Dependencies
- Managing Jobs in the Production Schedule
- Managing Command Parameters
- Setting Up Queues
- Using Scheduler Agents
Overview
This chapter describes how to:
- Pass command parameters to an executable
- Determine the job completion status based on the jobs output
- Define command parameters and enable alternative tracking methods
In this chapter, you will create two jobs ( Report Writer 1 and Report Writer 2 ) that use the same batch file but with different command parameters. The command is coded to echo the command parameters to the output. You use the echoed value to determine the success or failure of the job. This example serves to demonstrate two important features: passing input and determining the jobs success by examining the output.

Note To complete the exercises in this tutorial, you need to:
- Install Enteprise Scheduler in the default directory Scheduler (or the examples in this tutorial will not work properly)
- Select the Super User option in your User definition
- Configure a default agent
- Create and have available the work day calendar
Passing Command Parameters
The command parameters feature allows you to pass information to a command when it is launched by Enteprise Scheduler. You can alter parameters such as dates or other data at runtime, rather than hard-coding the command file itself. You can also use parameters to add flexibility to the same command.
For example, you may have a batch file that can process several files. By specifying its file name as a command parameter, the batch file knows which file to process at any given time.
Enteprise Scheduler uses the standard MS-DOS or command prompt syntax for command parameters. The command parameters are substituted into a command file containing the variable names %1 , %2 , etc. Through the DOS prompt, parameters are passed as a list of values separated by spaces after the command. In Enteprise Scheduler, the command parameters are displayed in a list below the command. The first value replaces %1 , the second value replaces %2 , and so on, when the batch file is executed.
Specifying Command Parameters and Viewing the Batch File
After specifying command parameters in the Job Definition dialog, sometimes it is useful to view or edit the batch file to which the command parameters apply.
To view or edit the batch file to which the command parameters apply:
1.![]() From the Navigator pane, select Definitions>Jobs to display the
Jobs
pane.
From the Navigator pane, select Definitions>Jobs to display the
Jobs
pane.
2.![]() Click the
Add Job
button in the Enteprise Scheduler toolbar or right-click and selecting
Add Job
from the context menu to display the
Job Definition
dialog.
Click the
Add Job
button in the Enteprise Scheduler toolbar or right-click and selecting
Add Job
from the context menu to display the
Job Definition
dialog.
You specify command parameters from the Command Parameters section in the Program tab.
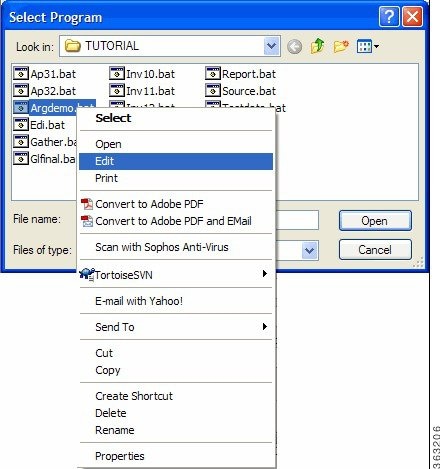
3.![]() From the
Tutorial
directory, right-click the
Argdemo
batch file and select
Edit
from the context menu.
From the
Tutorial
directory, right-click the
Argdemo
batch file and select
Edit
from the context menu.
Figure 11-1 Editing a Script or Batch File
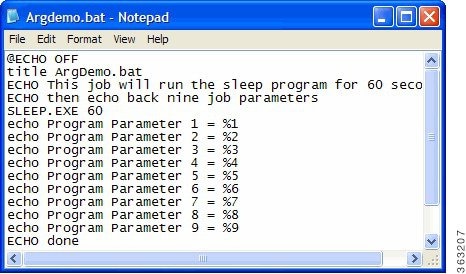
The Microsoft Notepad text editor opens the batch file and you see the batch file text as shown below. The command parameters specified in the Job Definition dialog will be entered into the batch file in the locations %1 , %2 , etc.
Figure 11-2 Argdemo.bat in Notepad Editor
4.![]() Exit
Notepad
and click
Cancel
twice to return to the
Jobs
pane.
Exit
Notepad
and click
Cancel
twice to return to the
Jobs
pane.
Note For more information on batch processing, please refer to your Windows or DOS documentation.
Tracking Methods
A job’s completion status is determined by its exit code. The exit code can be set by using the ocsexit command at the end of a batch file. Using ocsexit to facilitate job tracking, the completion status of a job can be:
- Completed Normally indicated by an exit code of 0 to notify that the job succeeded
- Completed Abnormally indicated by an exit code ≠ 0 to notify that the job ran, but failed.
Note Completion statuses of Skipped, Orphaned, Error Occurred and Externally Defined are also possible but are not determined by the exit code.
The completion status is frequently used to control dependencies. For example, you can set up jobs that run if its predecessor completes with a Completed Normally status.
Enteprise Scheduler supports four other tracking methods:
- External – You can use this option if you need to inspect the job before determining how the job completed. Enteprise Scheduler sets the status to Set Externally when the job completes.
- Exit Code of cmd pipe – You can use this option to pipe the output of your job as an input to a command, such as the Windows Find command or other output analysis tool. Enteprise Scheduler then uses that command’s exit code as the job’s exit code. You must type the command that invokes the associated tool.
- Scan Output: Normal String – Select this option to use a particular text string in the job output to determine if the job completed normally. Enter the exact text that determines “normal” in the text box below.
- Scan Output: Abnormal String – Select this option to use a particular text string in the job output to determine if the job completed abnormally. Enter the exact text that determines “abnormal” in the text box below.
The tracking selections are located in the Tracking section of the Run tab in the Job Definition dialog.
Using the Exit Code
In this section, you will create a Reporting job group with two jobs, Report Writer 1 and Report Writer 2. Each job will use the same command, but will pass a different command parameter. The command parameter is then echoed in the output of both jobs after they complete.
To determine whether the jobs completed successfully or not, both jobs will use the Exit code of cmd pipe tracking method using the Windows Find command to search for the saved output. The result of the Find command will determine the job’s final status.
You will set up Report Writer 1 to succeed, and Report Writer 2 to fail. You do this by setting the command parameter for job Report Writer 1 to OK and the parameter for Report Writer 2 to FAILED.
Creating the Reporting Job Group
To create the reporting job group:
1.![]() From the Navigator pane, select Definitions>Jobs to display the Jobs pane.
From the Navigator pane, select Definitions>Jobs to display the Jobs pane.
2.![]() Right-click and select Add Job Group from the context menu.
Right-click and select Add Job Group from the context menu.
3.![]() In the Job Group Name field, enter Reporting.
In the Job Group Name field, enter Reporting.
4.![]() Click the Schedule tab, if not already selected.
Click the Schedule tab, if not already selected.
5.![]() From the Calendar Name list, select work day.
From the Calendar Name list, select work day.
6.![]() Click OK to save the job group.
Click OK to save the job group.
7.![]() Click Cancel at the Effective Date dialog.
Click Cancel at the Effective Date dialog.
Note If you click OK at this dialog, the job group enters the production schedule, but nothing will run because there are no jobs associated with the job group yet. Clicking Cancel means the job group will be added to the schedule manually.
Setting the Report Writer 1 Job to Succeed
To set the Report Writer 1 job to succeed:
1.![]() Right-click the
Reporting
job group and select
Add>Job
from the context menu.
Right-click the
Reporting
job group and select
Add>Job
from the context menu.
2.![]() In the Job Name field, enter Report Writer 1.
In the Job Name field, enter Report Writer 1.
3.![]() In the Command field, enter the full path to the Argdemo batch file.
In the Command field, enter the full path to the Argdemo batch file.
4.![]() Enter OK in the Command Parameters field. This passes as Argument 1 (%1) to the batch file.
Enter OK in the Command Parameters field. This passes as Argument 1 (%1) to the batch file.
6.![]() In the Tracking section, select the Exit code of cmd pipe option.
In the Tracking section, select the Exit code of cmd pipe option.
7.![]() In the text field below, type Find “OK”. This tells Enteprise Scheduler to search through the output of the job for the string “OK”. Since “OK” is passed as a command parameter, it will appear in the output.
In the text field below, type Find “OK”. This tells Enteprise Scheduler to search through the output of the job for the string “OK”. Since “OK” is passed as a command parameter, it will appear in the output.
Figure 11-3 Specifying Exit Code of cmd pipe in Tracking Section

9.![]() Click Cancel in the Effective Date dialog. This job will enter the schedule when manually submit its job group.
Click Cancel in the Effective Date dialog. This job will enter the schedule when manually submit its job group.
Setting the Report Writer 2 Job to Fail
To set the Report Writer 2 job to fail:
1.![]() Right-click the Report Writer 1 job in the jobs view.
Right-click the Report Writer 1 job in the jobs view.
2.![]() Select Copy Job/Group from the context menu.
Select Copy Job/Group from the context menu.
3.![]() Double-click the Copy of Report Writer 1 job to open its definition for editing.
Double-click the Copy of Report Writer 1 job to open its definition for editing.
4.![]() In the Job Name field, change Copy of Report Writer 1 to Report Writer 2.
In the Job Name field, change Copy of Report Writer 1 to Report Writer 2.
5.![]() In the Command Parameters field, change OK to FAILED.
In the Command Parameters field, change OK to FAILED.
6.![]() The Run tab should contain Find OK in the Tracking section. This was inherited when you copied the job.
The Run tab should contain Find OK in the Tracking section. This was inherited when you copied the job.
Adding the Reporting Job Group to the Production Schedule
To add the Reporting job group to the production schedule:
1.![]() Right-click the Reporting job group.
Right-click the Reporting job group.
2.![]() Select Insert Job into Schedule from the context menu.
Select Insert Job into Schedule from the context menu.
3.![]() Click OK in the Insert Job Into Schedule dialog.
Click OK in the Insert Job Into Schedule dialog.
4.![]() Click OK in the Information dialog.
Click OK in the Information dialog.
The jobs start with one completing normally and the other completing abnormally. The job group results in a Completed Abnormally status because one of its jobs completed abnormally.
Setting Report Writer 2 to Complete Normally
To set Report Writer 2 to Complete Normally:
1.![]() In the Job Definition dialog, double-click the Report Writer 2 job.
In the Job Definition dialog, double-click the Report Writer 2 job.
2.![]() In the Job Definition dialog, change the Command Parameter value from FAILED to OK.
In the Job Definition dialog, change the Command Parameter value from FAILED to OK.
4.![]() Click OK at the Effective Date dialog.
Click OK at the Effective Date dialog.
5.![]() Re-submit the jobs by adding the Reporting job group using the Insert into Schedule option, from the right-click context menu or selecting the option from the Actions main menu.
Re-submit the jobs by adding the Reporting job group using the Insert into Schedule option, from the right-click context menu or selecting the option from the Actions main menu.
6.![]() Click OK when the Insert Job Into Schedule dialog displays.
Click OK when the Insert Job Into Schedule dialog displays.
7.![]() Click OK in the Information dialog.
Click OK in the Information dialog.
Both Report Writer 1 and Report Writer 2 complete successfully.
 Feedback