- Preface
- Scheduler Concepts
- Understanding Offset Concepts
- Creating your first job
- Using Scheduler Calendars
- Setting Up a Job Dependency
- Scheduling Jobs in Groups
- Creating a File Dependency
- Detecting Job Event Conditions
- Creating Variable Dependencies
- Managing Jobs in the Production Schedule
- Managing Command Parameters
- Setting Up Queues
- Using Scheduler Agents
Overview
In the previous exercise, you created an unscheduled job. In this chapter you will create a scheduled job by creating a calendar, and adding it to the job. Scheduled jobs run on a regular basis according to the dates in their calendar. Some schedules are simple with jobs running every day from Monday through Friday, or on the first day of every month. Others are more involved, with jobs running on irregular accounting periods, holidays or fiscal period offsets.
Enteprise Scheduler uses calendars to define the set of dates on which jobs run. Enteprise Scheduler contains five different methods for creating calendars, depending on the period in which you need your job to repeat. For example, you may need your job to run as needed on a, daily, weekly or monthly basis. Each method addresses a particular period.
This chapter describes how to build four calendars:
- first wkdy – A list calendar (as needed) representing the first workday of each week.
- work day – A daily calendar representing Monday through Friday.
- Fiscal Week End – A calendar to use when your work week ends on a Thursday.
- Fiscal Quarter End – A calendar for scheduling on the last business day of a quarter
You will then schedule a job using the work day calendar, and confirm that it is scheduled properly.

Note To complete the exercises in this tutorial, you need to:
- Install Enteprise Scheduler in the default directory Scheduler (or the examples in this tutorial will not work properly)
- Select the Super User option in your User definition
- Configure a default agent
- Create and have available the work day calendar
Building the First Workday Calendar
In this exercise, you will build a list calendar called first wkdy which refers to the first workday in every week. In the List Calendar dialog, you choose each day that the job is to be scheduled.
1.![]() From the
Navigator
pane, select
Definitions>Calendars
to display the
Calendars
pane.
From the
Navigator
pane, select
Definitions>Calendars
to display the
Calendars
pane.
2.![]() Click the
Add
button on the Scheduler toolbar or right-click a calendar and select
Add Calendar>List
from the context menu to display the
List Calendar Definition
dialog.
Click the
Add
button on the Scheduler toolbar or right-click a calendar and select
Add Calendar>List
from the context menu to display the
List Calendar Definition
dialog.
3.![]() In the
Calendar Name
field, type
first wkdy
.
In the
Calendar Name
field, type
first wkdy
.
4.![]() In the calendar view, double-click the dates that represent Monday of each week for the current month.
In the calendar view, double-click the dates that represent Monday of each week for the current month.
Figure 4-1 Entered Dates in the Detail Tab of the List Calendar
All selected dates appear under the Selected Dates section to the right of the calendar.
Note To add scheduling dates to other months, use the inner right arrow buttons. To add scheduling dates to other years, use the outer right arrow buttons.
5.![]() Click
OK
after you have completed your selections.
Click
OK
after you have completed your selections.
Figure 4-2 Calendars View Showing First Wkdy
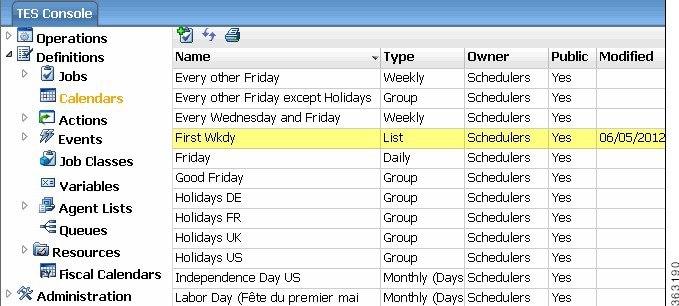
Congratulations, you just created your first list calendar!
You can create a calendar for any dates you specify. This calendar can be associated with a job from within the
Job Definition
dialog, but will not be used in any future tutorial exercises.
Building the Work Day Calendar
Now you will create the work day daily calendar to use for scheduling a job. The work day daily calendar schedules your job to run on each weekday.
1.![]() From the
Navigator
pane, select
Definitions>Calendars
to display the
Calendars
pane.
From the
Navigator
pane, select
Definitions>Calendars
to display the
Calendars
pane.
2.![]() Click the
Add
button on the Enterprise Scheduler toolbar or right-click a calendar and select
Add Calendar>Daily
from the context menu to display the
List Calendar Definition
dialog.
Click the
Add
button on the Enterprise Scheduler toolbar or right-click a calendar and select
Add Calendar>Daily
from the context menu to display the
List Calendar Definition
dialog.
3.![]() In the
Calendar Name
field, type
Work Day
.
In the
Calendar Name
field, type
Work Day
.
Notice the Public option in the lower left corner of the dialog. Selecting this option makes the calendar available to all Enteprise Scheduler users.
We will be accepting the defaults in the Details tab. The defaults automatically set the calendar to generate dates for Monday through Friday of each week.
4.![]() Click the
Forecast
tab to generate the calendar.
Click the
Forecast
tab to generate the calendar.
This tab displays all the dates calculated from the Details tab. The Forecast tab is viewed the same way as in the List Calendar dialog, when the calendar first wkday was entered. You can add individual dates from this tab by double-clicking in the calendar view on the dates you want to change. You can delete dates by selecting the date in Selected Dates and either right-clicking the date to select Delete or clicking the Delete button. The forecast displays a four-year time window, but the calendar extends indefinitely.
Note This step can take from a few seconds to a minute, depending on your system’s configuration.
The Calendars view displays the two calendars you created. By default, the rows of the display are sorted alphabetically according to calendar name (the Name column). You can also sort by other columns by clicking the column name. For example, if you click the Owner name at the top of the Owner column, calendars are grouped by their creator. If you click the Modified label at the top of the Modified column, your newest calendars are grouped together
Building the Fiscal Week End Calendar
We will create the Fiscal Week End calendar to use for scheduling a job to run when your fiscal week ends on Thursday evening. If Thursday is a holiday, the job will execute on Wednesday evening, through the use of a condition definition.
To build a Fiscal Week End calendar:
1.![]() From the
Activities
menu, select the
System Configuration
option.
From the
Activities
menu, select the
System Configuration
option.
2.![]() In the
Week Begins
list, select
Friday
. This sets your fiscal week to start on Friday and end on Thursday.
In the
Week Begins
list, select
Friday
. This sets your fiscal week to start on Friday and end on Thursday.
4.![]() Click
OK
when the
Warning
dialog displays. This warning displays whenever you change the calendar week starting day.
Click
OK
when the
Warning
dialog displays. This warning displays whenever you change the calendar week starting day.
Note The Recalculate Calendars option, available from the Calendars pane context menu, will change all calendars to begin on the new Week Begins day. If you do not recalculate calendars, existing calendars are not changed; only those calendars created selecting the new Week Begins day are affected.
5.![]() From the
Navigator
pane, select
Definitions>Calendars
to display the
Calendars
pane.
From the
Navigator
pane, select
Definitions>Calendars
to display the
Calendars
pane.
6.![]() Click the
Add
button on the Enterprise Scheduler toolbar or right-click a calendar and select
Add Calendar>Subset
from the context menu to display the
Calendar Subset Definition
dialog.
Click the
Add
button on the Enterprise Scheduler toolbar or right-click a calendar and select
Add Calendar>Subset
from the context menu to display the
Calendar Subset Definition
dialog.
7.![]() In the
Calendar Name
field, enter
Fiscal Week End
.
In the
Calendar Name
field, enter
Fiscal Week End
.
8.![]() In the
Occurrence
list, select
Every
.
In the
Occurrence
list, select
Every
.
9.![]() In the
Calendar
list, select
Friday
.
In the
Calendar
list, select
Friday
.
10.![]() In the
Time Frame
list, select
Week
.
In the
Time Frame
list, select
Week
.
11.![]() (Optional) Multiple fiscal calendars can be defined for Enteprise Scheduler. You can choose to base a calendar definition on a fiscal year, rather than a standard January- through-December calendar year.
(Optional) Multiple fiscal calendars can be defined for Enteprise Scheduler. You can choose to base a calendar definition on a fiscal year, rather than a standard January- through-December calendar year.
Making no selection in the Based on Fiscal list results in the use of a standard calendar. For this exercise, leave the field empty.
12.![]() Now, we need to set a condition to let Enteprise Scheduler know what to do if a holiday occurs on Thursday. Click the
Conditions
tab.
Now, we need to set a condition to let Enteprise Scheduler know what to do if a holiday occurs on Thursday. Click the
Conditions
tab.
13.![]() Click
Add
to display the
Condition
dialog.
Click
Add
to display the
Condition
dialog.
14.![]() From the
If conflicts with calendar
list, select the
Holidays
calendar.
From the
If conflicts with calendar
list, select the
Holidays
calendar.
15.![]() From the
Take action
list, select
Previous Calendar
.
From the
Take action
list, select
Previous Calendar
.
16.![]() The
Calendar
field defines which calendar to use and how many days in the past to go. The default is
0
days. Select a value of
1
, and in the adjacent list, select
Workdays
.
The
Calendar
field defines which calendar to use and how many days in the past to go. The default is
0
days. Select a value of
1
, and in the adjacent list, select
Workdays
.
The condition now displays in the Conditions view.
Now if a holiday falls on Friday of the Fiscal Week End , Enteprise Scheduler will schedule the Fiscal Week End calendar for Wednesday.
18.![]() Click the
Forecast
tab to verify the dates Enteprise Scheduler has set.
Click the
Forecast
tab to verify the dates Enteprise Scheduler has set.
19.![]() Click
OK
. The
Fiscal Week End
calendar now appears in the
Calendars
view.
Click
OK
. The
Fiscal Week End
calendar now appears in the
Calendars
view.
Alternate Method of Creating a Calendar
In most cases, there is more than one way to define a calendar such as our Fiscal Week End . The following is an example of another way to create the Fiscal Week End calendar. We will call this calendar Fiscal Week Ending , so that the results of both exercises will be visible.
1.![]() From the
Navigator
pane, select
Definitions>Calendars
to display the
Calendars
pane.
From the
Navigator
pane, select
Definitions>Calendars
to display the
Calendars
pane.
2.![]() Click the
Add
button on the Enterprise Scheduler toolbar or right-click a calendar and select
Add Calendar>Weekly
from the context menu to display the
Weekly Calendar Definition
dialog.
Click the
Add
button on the Enterprise Scheduler toolbar or right-click a calendar and select
Add Calendar>Weekly
from the context menu to display the
Weekly Calendar Definition
dialog.
3.![]() In the
Calendar Name
field, enter
Fiscal Week Ending
.
In the
Calendar Name
field, enter
Fiscal Week Ending
.
4.![]() Click the
Details
tab. In the
Include the following days
section, de-select
Monday
,
Tuesday
,
Wednesday
and
Thursday
options.
Click the
Details
tab. In the
Include the following days
section, de-select
Monday
,
Tuesday
,
Wednesday
and
Thursday
options.
5.![]() Click the
Conditions
tab, and then click
Add
.
Click the
Conditions
tab, and then click
Add
.
6.![]() In the
If conflicts with calendar
list, select the
Holidays US
calendar.
In the
If conflicts with calendar
list, select the
Holidays US
calendar.
7.![]() In the
Take action
list, select
Previous Calendar
.
In the
Take action
list, select
Previous Calendar
.
8.![]() The
Calendar
field defines which calendar to use and how many days in the past to go. The default is
0
days. Select a value of
1
, and in the adjacent list, select
Workdays
.
The
Calendar
field defines which calendar to use and how many days in the past to go. The default is
0
days. Select a value of
1
, and in the adjacent list, select
Workdays
.
10.![]() Click
Forecast
to verify the dates that Enteprise Scheduler has chosen.
Click
Forecast
to verify the dates that Enteprise Scheduler has chosen.
11.![]() Click
OK
in the
Weekly Calendar Definition
dialog.
Click
OK
in the
Weekly Calendar Definition
dialog.
Now, both the Fiscal Week End and the Fiscal Week Ending calendars are visible in the Calendars view.
Building the Quarter End Calendars
We will create the Fiscal Quarter End and Calendar Quarter End calendars to use for scheduling jobs to run when your fiscal quarter ends on the last work day of the quarter. If the quarter ends on a holiday, the calendar should execute on the previous work day. For this exercise, we will consider the fiscal year to run from November to October.
Fiscal Quarter End
We first have to define a fiscal calendar period, to be used in documenting the Fiscal Quarter End calendar. Many companies run production from more than one fiscal calendar period.
To define a Fiscal calendar period:
1.![]() From the
Navigator
pane, select
Definitions>Fiscal Calendars
to display the
Fiscal
Calendars
pane.
From the
Navigator
pane, select
Definitions>Fiscal Calendars
to display the
Fiscal
Calendars
pane.
2.![]() Click the
Add
button on the Enterprise Scheduler toolbar or right-click a calendar and select
Add Fiscal Calendar
from the context menu to display the
Fiscal Calendar Definition
dialog.
Click the
Add
button on the Enterprise Scheduler toolbar or right-click a calendar and select
Add Fiscal Calendar
from the context menu to display the
Fiscal Calendar Definition
dialog.
Figure 4-3 Fiscal Calendar Definition Dialog
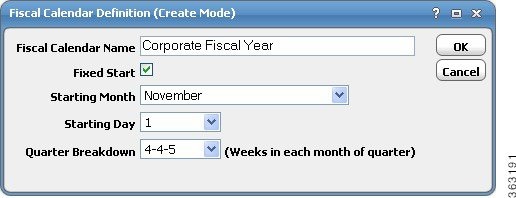
3.![]() In the
Fiscal Calendar Name
field, enter
Corporate Fiscal Year
.
In the
Fiscal Calendar Name
field, enter
Corporate Fiscal Year
.
4.![]() In the
Starting Month
list, select
November
. Keep the default values for the remaining text fields.
In the
Starting Month
list, select
November
. Keep the default values for the remaining text fields.
6.![]() From the
Navigator
pane, select
Definitions>Calendars
to display the
Calendars
pane.
From the
Navigator
pane, select
Definitions>Calendars
to display the
Calendars
pane.
7.![]() Click the
Add
button on the Enterprise Scheduler toolbar or right-click a calendar and select
Add Calendar>Subset
from the context menu to display the
Calendar Subset Definition
dialog.
Click the
Add
button on the Enterprise Scheduler toolbar or right-click a calendar and select
Add Calendar>Subset
from the context menu to display the
Calendar Subset Definition
dialog.
Figure 4-4 Calendar Subset Definition Dialog

8.![]() In the
Calendar Name
field, enter
Fiscal Quarter End
.
In the
Calendar Name
field, enter
Fiscal Quarter End
.
9.![]() If not already selected, click the
Details
tab.
If not already selected, click the
Details
tab.
10.![]() From the
Occurrence
list, select
Last
.
From the
Occurrence
list, select
Last
.
11.![]() From the
Calendar
list, select
Workdays US
.
From the
Calendar
list, select
Workdays US
.
12.![]() From the
Time Frame
list, select
Quarter
.
From the
Time Frame
list, select
Quarter
.
13.![]() In the
Based on Fiscal
list, select
Corporate Fiscal Year
.
Leave the
Adjust by ... days
field at
0
.
In the
Based on Fiscal
list, select
Corporate Fiscal Year
.
Leave the
Adjust by ... days
field at
0
.
14.![]() We have completed the definition for the
Fiscal Quarter End
calendar. Click the
Forecast
tab to verify the dates that will be selected for production execution and then click
OK
.
We have completed the definition for the
Fiscal Quarter End
calendar. Click the
Forecast
tab to verify the dates that will be selected for production execution and then click
OK
.
The calendar definitions are ready to be used in production.
Calendar Quarter End
To create a quarter end calendar that will work on the last business day of the calendar quarter, where the fiscal year starts in January, just repeat Steps 6 through 12 above with the following exceptions:
- In Step 8 , change the Calendar Name to Calendar Quarter End .
- In Step 12 , leave the Based on Fiscal field blank.
You have created two quarterly calendars, one based on a fiscal year calendar and one based on a standard calendar year starting in January.
Scheduling the Report Job with a Calendar
Now, return to the Report job and schedule it using the work day calendar.
To schedule the Report job using the word day calendar:
1.![]() From the
Navigator
pane, select
Definitions>Jobs
to display the
Jobs
pane.
From the
Navigator
pane, select
Definitions>Jobs
to display the
Jobs
pane.
2.![]() Right-click the
Report
job and select
Edit Job/Group
from the context menu to display the
Job Definition
dialog.
Right-click the
Report
job and select
Edit Job/Group
from the context menu to display the
Job Definition
dialog.
3.![]() Click the
Schedule
tab on the
Job Definition
dialog.
Click the
Schedule
tab on the
Job Definition
dialog.
4.![]() In the
Calendar Name
list, select
Work Day
.
In the
Calendar Name
list, select
Work Day
.
5.![]() To view the dates in the calendar, click the
Forecast
button and then click
OK
.
To view the dates in the calendar, click the
Forecast
button and then click
OK
.
Figure 4-5 Calendar Forecast Dialog
6.![]() Click
OK
again on the
Job Definition
dialog to display the
Effective Date
dialog.
Click
OK
again on the
Job Definition
dialog to display the
Effective Date
dialog.
Figure 4-6 Effective Date Dialog
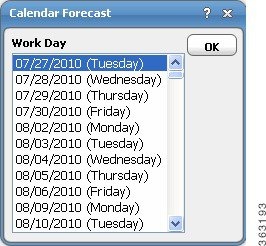
The Effective Date dialog displays asking you when the job should enter the production schedule. The dates represent the current span of the production schedule.
7.![]() Click
OK
to accept the default (today).
Click
OK
to accept the default (today).
Another occurrence of the Report job enters the production schedule.
8.![]() From the
Navigator
pane, select
Operations>Job Activity
to display the
Job Activity
pane.
From the
Navigator
pane, select
Operations>Job Activity
to display the
Job Activity
pane.
The job runs according to the work day calendar. It will run today (unless you are running this tutorial on a weekend). Your window may appear slightly different.
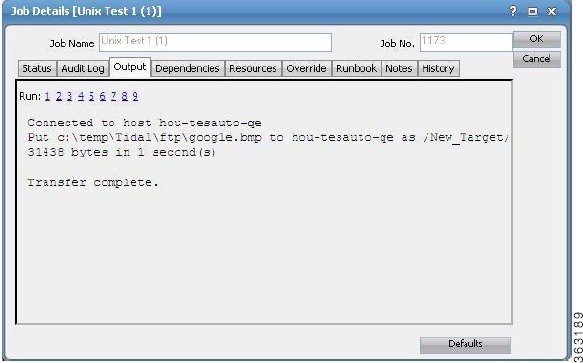
You will also see the previous occurrence of the Report job that was added to the schedule manually in the previous chapter. The job occurrence has been renamed Report(2) to reflect the first occurrence of the same job (Report) that ran earlier.
 Feedback