- Preface
- Scheduler Concepts
- Understanding Offset Concepts
- Creating your first job
- Using Scheduler Calendars
- Setting Up a Job Dependency
- Scheduling Jobs in Groups
- Creating a File Dependency
- Detecting Job Event Conditions
- Creating Variable Dependencies
- Managing Jobs in the Production Schedule
- Managing Command Parameters
- Setting Up Queues
- Using Scheduler Agents
Overview
Using Enterprise Scheduler job events allows you to automatically trigger actions whenever certain event triggers (job conditions) arise. Actions include user notification via email, console alert messages, launching new jobs, job control commands, variable updates, log message posting and SNMP traps to HP OpenView or other network managers. This chapter describes how to:
- Define an operator alert action
- Add the action to the job by using the Job Events dialog
- Submit the job to production and watch the operator alert action occur

Note To complete the exercises in this tutorial, you need to:
- Install Scheduler in the default directory Scheduler (or the examples in this tutorial will not work properly)
- Select the Super User option in your User definition
- Configure a default agent
- Create and have available the work day calendar
Understanding Actions
An action is a predefined response to a job event that is triggered by a job in the production schedule. You define event triggers for jobs in the Job Events dialog and associate them to actions. Actions can be linked to multiple jobs and job groups.
There are different types of actions that can be defined within Scheduler. Each type of action can be triggered based on any job’s status, job control by an operator and/or an event triggered by the system. Furthermore, you can personalize actions from a set of included variables such as system, job, job event, action and user-defined information.
- Email – An email action is a standard format email message that issues each time the associated job event is triggered. Email can be sent to any user on your network.
- Alert – An alert action is an alert sent to the Job Activity Console, with one of four separate levels of severity: Critical , Error , Warning and Information . This is the type of action used in this exercise
- SNMP – An SNMP message action can be sent to any SNMP-compliant manager.
- SAP Event (SAP only) – Notifies an SAP instance that a specified event occurred in Scheduler. Can be used to trigger an event-based job in SAP.
- Job – Scheduler can initiate automated job recovery procedures with a job action. The new job action also allows you to override certain command parameter values at submission time.
- Variable – This variable update action updates user-defined variables. Since jobs can be dependent on variable values, this action can be used to start a job based on a wide selection of events experienced by another job which sets the variable.
- Log – The log message action posts a user-defined message to the Enterprise Scheduler logging facility and optionally to the NT Application Events log, viewable from the Logs window and the NT Event Viewer (respectively).
Creating an Alert Action
In the following exercise, you define an action that sends an alert to the Job Activity window when the job EDI_Download (created in the previous chapter) ends with a Completed Abnormally status.
1.![]() In the
Navigator
pane, select
Definitions>Actions
.
In the
Navigator
pane, select
Definitions>Actions
.
2.![]() Double-click
Alert
to display the
Alert
window.
Double-click
Alert
to display the
Alert
window.
3.![]() In the Enterprise Scheduler toolbar, click the
Add
In the Enterprise Scheduler toolbar, click the
Add
 button.
Right-click the Alert window to display the Alert window context menu, then select Add Alert Action .
The Action Definition:Alert dialog displays.
4.![]() Type the following message and select the variables shown in angle brackets from the
Variables
list. The variables appear between the brackets as <variable>.
Type the following message and select the variables shown in angle brackets from the
Variables
list. The variables appear between the brackets as <variable>.
The Job <Jobname>, owned by <JobOwner> went to <JobStatus> status on <SysDate.M/d/yy>. <JobOwner>’s pager number is <JobPager>.
When this action is triggered, an alert record is sent to the Job Activity console for the operator to take action.
Table 8-1 Variables Used in Step 4
Associating the Action to the Job
You can assign the action to the EDI_Download job through the Job Events dialog.
To associate the action to the job:
1.![]() In the
Navigator
pane, select
Definitions>Events
.
In the
Navigator
pane, select
Definitions>Events
.
2.![]() Double-click
Job Events
to display the
Job Events
window.
Double-click
Job Events
to display the
Job Events
window.
3.![]() In the Scheduler toolbar, click the
Add
In the Scheduler toolbar, click the
Add
 button.
Right-click the Job Events window to display the Job Events window context menu, then select Add Job Events .
The Job Event Definition dialog displays.
Figure 8-1 Job Event Definition Dialog
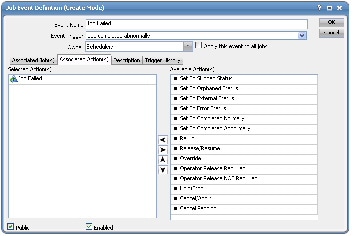
4.![]() In the
Event Name
field, enter
Job Failed
.
In the
Event Name
field, enter
Job Failed
.
5.![]() From the
Event Trigger
list, select
Job Completed Abnormally
.
From the
Event Trigger
list, select
Job Completed Abnormally
.
6.![]() In the
Available Action(s)
list, highlight
Job Failed
and click the left arrow button or drag-and-drop the
Job Failed
action to the
Selected Action(s)
section.
In the
Available Action(s)
list, highlight
Job Failed
and click the left arrow button or drag-and-drop the
Job Failed
action to the
Selected Action(s)
section.
7.![]() Click the
Associated Job(s)
tab to associate the
EDI_Download
job to the job event.
Click the
Associated Job(s)
tab to associate the
EDI_Download
job to the job event.
8.![]() Select
EDI_Download
from the list, then click
Add
.
Select
EDI_Download
from the list, then click
Add
.
9.![]() Select the
Public
option, if not already selected.
Select the
Public
option, if not already selected.
This makes your event available to other Scheduler users.
The EDI_Download job is now linked to the Job Failed alert action through the Job Failed job event.
Changing the edi.bat file to Fail
1.![]() Right-click the
Edi
batch file and select
Edit
from the context menu.
Right-click the
Edi
batch file and select
Edit
from the context menu.
The Edi.bat file opens in Microsoft Notepad.
2.![]() Change the last line of the file
ocsexit 0
to
ocsexit 1
.
Change the last line of the file
ocsexit 0
to
ocsexit 1
.
3.![]() From Notepad’s
File
menu, select
Exit
.
From Notepad’s
File
menu, select
Exit
.
4.![]() Click
Yes
to save your changes.
Click
Yes
to save your changes.
5.![]() Insert the job into the schedule by right-clicking the
EDI_Download
job and selecting
Insert Job into Schedule
from the context menu.
Insert the job into the schedule by right-clicking the
EDI_Download
job and selecting
Insert Job into Schedule
from the context menu.
The Insert Job Into Schedule dialog displays.
7.![]() On the
Navigator
pane, select
Operations>Job Activity
to display the
Job Activity
window.
On the
Navigator
pane, select
Operations>Job Activity
to display the
Job Activity
window.
Watch as the job goes into the Active state and runs. The job eventually terminates with an Completed Abnormally status, initiating the action you defined and changing the Alerts status light at the bottom of the console to red.
Changing the Status of the Alert
To change the status of the alert:
1.![]() In the
Navigator
pane, select
Operations>Alerts
to display the
Alerts
window.
In the
Navigator
pane, select
Operations>Alerts
to display the
Alerts
window.
2.![]() Double-click the alert to display the
Alert Detail
dialog.
Double-click the alert to display the
Alert Detail
dialog.
3.![]() Select the
Acknowledged
option.
Select the
Acknowledged
option.
 Feedback