- Preface
- Scheduler Concepts
- Understanding Offset Concepts
- Creating your first job
- Using Scheduler Calendars
- Setting Up a Job Dependency
- Scheduling Jobs in Groups
- Creating a File Dependency
- Detecting Job Event Conditions
- Creating Variable Dependencies
- Managing Jobs in the Production Schedule
- Managing Command Parameters
- Setting Up Queues
- Using Scheduler Agents
Overview
This chapter describes how to use the Tidal Web client to create, run and view the results of a job.

Note To complete the exercises in this tutorial, you need to:
- Install Enteprise Scheduler in the default directory Scheduler (or the examples in this tutorial will not work properly)
- Select the Super User option in your User definition
- Configure a default agent
- Create and have available the work day calendar
Before you begin the tutorial, you must install at least two agent instances and define connections to them. Refer to the chapters on installing agents in the Installation and Configuration Guide for more information. These two agents must be installed and running to perform the exercises in this tutorial.
Launching the Tidal Web client
To launch the Tidal Web client:
Enterprise Scheduler 6.1 Web-based. To launch the Tidal Web client you must go to http://<servername>:8080 , where <servername> is network name or address of Client Manager host, and log on using valid user credentials. For a list of browsers that are supported, see your Enterprise Scheduler Reference Guide .
Setting Default Job Parameters
Many parameters can be set from the System Configuration dialog. We will use the Enteprise Scheduler defaults throughout most of this tutorial.
To check, and if necessary, to change the default agent:
1.![]() From the
Activities
menu, select
System Configuration
to display the
System Configuration
dialog.
From the
Activities
menu, select
System Configuration
to display the
System Configuration
dialog.
Figure 3-1 System Configuration Dialog Box, Defaults Tab
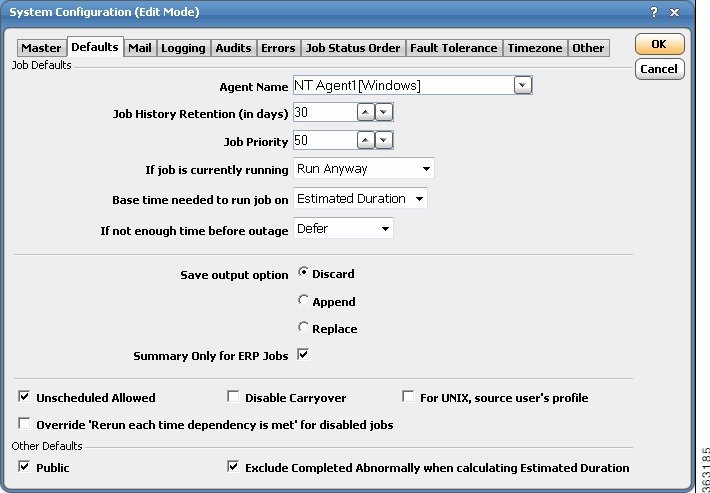
To change the default agent, select a valid agent from the Agent Name list.
Creating the Report Job Definition
To create the Report Job definition:
1.![]() Launch the Tidal Web client.
Launch the Tidal Web client.
2.![]() From the
Navigator
pane, select
Definitions>Jobs
to display the
Jobs
pane.
From the
Navigator
pane, select
Definitions>Jobs
to display the
Jobs
pane.
Unless other users have already created job definitions, the display does not show any data at this time.
3.![]() Right-click in the
Jobs
pane of the console and select
Add Job
from the context menu, or click the
Add Job
button on the toolbar.
Right-click in the
Jobs
pane of the console and select
Add Job
from the context menu, or click the
Add Job
button on the toolbar.
The Job Definition dialog displays.
Figure 3-2 Job Definition Dialog
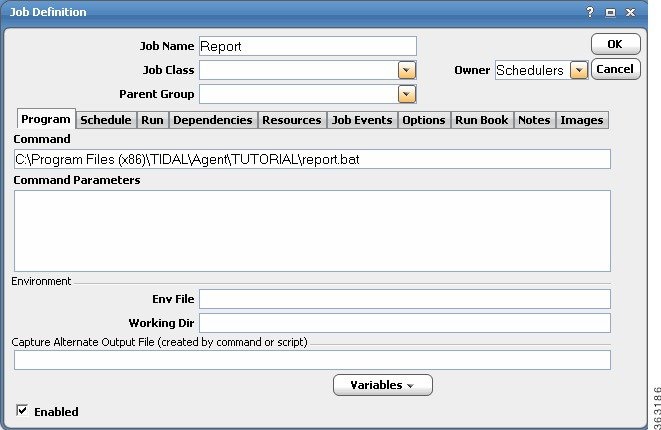
4.![]() In the
Job Name
field, enter
Report
as the name of your new job.
In the
Job Name
field, enter
Report
as the name of your new job.
5.![]() In the
Command
field, enter
C:\Program Files\TIDAL\Agent\TUTORIAL\
In the
Command
field, enter
C:\Program Files\TIDAL\Agent\TUTORIAL\
report.bat
.
C:\Program Files (x86)\TIDAL\Agent\TUTORIAL\report.bat , if your agent was installed on 64-bit Windows machine, using default installation path.
Note Report.bat is a batch file which executes the sleep.exe program for 30 seconds.
A confirmation dialog displays.
This confirmation dialog reminds you that since a calendar is not associated with the job, it will not be scheduled to run automatically. We did not select a calendar because we are going to submit the job manually.
The Report job displays in the Jobs pane with your user name as the owner.
Adding Your Job to the Production Schedule
You can now add the job to the production schedule.
To add the job to the production schedule:
1.![]() Right-click the
Reports
job and select
Insert Job Into Schedule
from the context menu.
Right-click the
Reports
job and select
Insert Job Into Schedule
from the context menu.
The Insert Job Into Schedule dialog displays.
3.![]() In the
Navigator
pane, select
Operations>Job Activity
to monitor your job.
In the
Navigator
pane, select
Operations>Job Activity
to monitor your job.
Monitoring Your Job
The Job Activity pane is a key component in monitoring your production schedule with Enteprise Scheduler. All crucial job scheduling information is available at a glance from the Job Activity pane. The easy-to-read layout allows you to focus on the area of the display that is of interest to you. The columns and panes are resizable. Scrollbars facilitate access to the data you need.
From the Job Activity pane, you can:
- see when jobs are added or scheduled
- remove jobs (if you have sufficient security privileges)
- monitor the progress of a job from a scheduled state through execution of the job
- control job execution
Some of the job statistics available from the Job Activity pane are:
- the job owner
- the Enteprise Scheduler agent assigned to run the job
- estimated duration of the job
- the exit code of the completed job
- the actual command that the job represents
- the next date on which the job will run
- the calendar associated with the job (if any)
- the queue associated with the job (if any)
- the job’s priority level
- the job group associated with the job (if any)
When jobs are scheduled, the Jobs pane in the center of the console shows one job per line, plus the job number, job name, job status, etc.
Job Output Options
There are three job output options:
- Discard – Discards all job outputs. There will be no output log available for review.
- Append – Saves job outputs by appending the current output to a single log.
- Replace – Creates a new output file each time the job runs, replacing the previous log.
Note Enteprise Scheduler’s default is to discard output.
Specifying the Disposition of Job Output
To specify the disposition of job output:
1.![]() From the
Activities
main
menu, select
System Configuration
.
From the
Activities
main
menu, select
System Configuration
.
3.![]() In the
Save Output Option
section, check
Discard
,
Append
or
Replace
. For the exercises in this tutorial, check
Replace
.
In the
Save Output Option
section, check
Discard
,
Append
or
Replace
. For the exercises in this tutorial, check
Replace
.
Note To be able to view the output of a job, the Append or Replace option for job output must be selected prior to running the job.
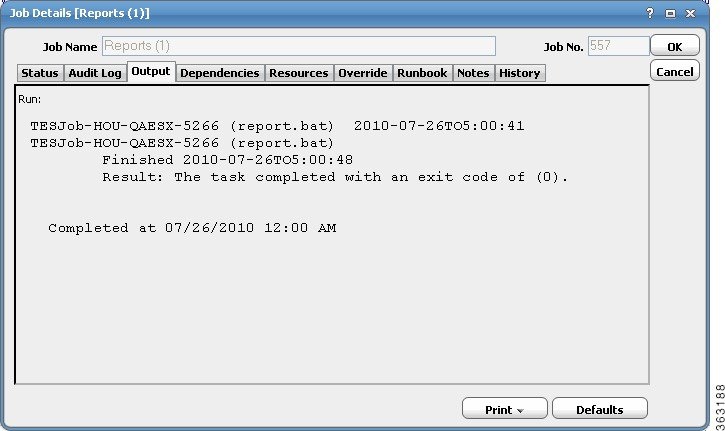
Viewing Job Output
You can view the output of a job at any time if you selected the Append or Replace option for job output prior to running the job.
1.![]() Go to the
Job Activity
pane.
Go to the
Job Activity
pane.
2.![]() To display the
Job Detail
dialog, either double-click the
Report
job or right-click the
Report
job and select
Details
from the context menu.
To display the
Job Detail
dialog, either double-click the
Report
job or right-click the
Report
job and select
Details
from the context menu.
3.![]() Click the
Output
tab. If you do not select the
Save Output
option before running a job, you will see a Enteprise Scheduler message rather than actual job output.
Click the
Output
tab. If you do not select the
Save Output
option before running a job, you will see a Enteprise Scheduler message rather than actual job output.
Figure 3-4 Job Detail Dialog, Output Tab
 Feedback