Cisco Crosswork Planning 7.2 Collection Setup and Administration

PDF

Cisco Crosswork Planning 7.2 Collection Setup and Administration

Setting up user authentication through external servers

Want to summarize with AI?

Log in

Provides an overview of supported external authentication options, essential configuration principles, and the procedures required to control and monitor user sign-on through centralized authentication and authorization services.


Summary

In addition to supporting local users, Cisco Crosswork Planning supports external authentication through integration with the TACACS+, LDAP, and RADIUS servers.

The key components involved in the process are:

  • TACACS+, LDAP, and RADIUS servers: External servers that provide user authentication.

  • User roles: Access privileges assigned to users authenticated via TACACS+, LDAP, or RADIUS.

  • Single Sign-on (SSO): An authentication method that allows logging in with a single ID and password to multiple related but independent software systems.

Workflow

These are the stages of setting up user authentication through external servers.

  1. Configure the TACACS+, LDAP, and RADIUS servers.
  2. Create the roles that are referenced by the TACACS+, LDAP, and RADIUS users.
  3. Configure AAA settings.
  4. Enable SSO for authentication of TACACS+, LDAP, and RADIUS users. For more information, see Enable SSO authentication.

Caution: Authentication changes interrupt all new logins

Any operations performed according to the instructions in subsequent sections on external authentication servers affect all new logins to the Crosswork UI. To minimize session interruption, perform and submit all your external server authentication changes in a single session.


Note: Permissions for the AAA server page

  • The AAA server page operates in bulk update mode, updating all the servers are updated in a single request. Grant write permission for "Remote Authentication Servers Integration API" only to users authorized to delete servers.

  • A user with only Read and Write permissions (without "Delete" permission) can still delete the AAA server details from Cisco Crosswork because delete operations are part of "Write" permissions. For more information, see Create a user role.

  • While adding, editing, or deleting AAA servers, wait a few minutes between changes. Making frequent AAA changes without adequate intervals may cause external login failures.


Configure TACACS+ servers

This topic describes how to add, update, or remove TACACS+ authentication servers to control user and device authentication in Cisco Crosswork Planning.

Cisco Crosswork Planning supports authentication of users via TACACS+ servers. You can integrate Crosswork with a standalone server (such as Open TACACS+) or with an application like Cisco ISE (Identity Services Engine). Integrating with TACACS+ servers helps centralize and control access to network resources.

Before you begin

In the TACACS+ server (standalone or Cisco ISE), configure relevant parameters such as user role, device access group attribute, shared secret format, shared secret value before adding the server to Cisco Crosswork Planning. For more information on Cisco ISE procedures, see the latest Cisco Identity Services Engine Administrator Guide.

Procedure

1.

From the main menu, choose Administration> AAA > Servers > TACACS+.

2.

To add a TACACS+ server:

  1. Click Add icon.

  2. Enter the required TACACS+ server details. For a description of the fields, see TACACS+ server configuration options.

  3. Click Add.

  4. Click Save.

    A warning message prompts you to restart the server to update the changes. Click Save changes to confirm.
3.

To edit a TACACS+ server:

  1. Select the TACACS+ server and click Edit icon.

  2. After making the desired changes, click Update.

4.

To delete a TACACS+ server:

  1. Select the TACACS+ server and click Delete icon.

    The Delete server-IP-address dialog box opens.

  2. Click Delete to confirm.

The TACACS+ server settings are saved and authentication via TACACS+ is enabled.

TACACS+ server configuration options

This section describes TACACS+ server configuration fields.

Table 1. Field descriptions

Field

Description

Authentication order

Specify a unique priority value to set precedence in the authentication request. The order can be any number from 10 to 99. Numbers below 10 are system reserved.

By default, 10 is selected.

IP address

Enter the IP address of the TACACS+ server (if IP address is selected).

DNS name

Enter the DNS name (if DNS name is selected). Only IPv4 DNS names are supported.

Port

The default TACACS+ port number is 49.

Shared secret format

Shared secret for the active TACACS+ server. Select ASCII or Hexadecimal.

Shared secret and

Confirm shared secret

Enter the plain text shared secret for the active TACACS+ server. The format of the text you enter must match the selected format (ASCII or Hexadecimal).

For Crosswork to communicate with the external authentication server, ensure the Shared Secret parameter you enter on this page matches the shared secret value configured on the TACACS+ server.

Service

Enter the value of the service you are attempting to gain access to. For example, "raccess".

This field is verified only for standalone TACACS+. In case of Cisco ISE, you can enter a junk value. Do not leave the field blank.

Policy ID

Enter the user role that you created in the TACACS+ server.

Note

If you try to log in to Cisco Crosswork Planning as a TACACS+ user before creating the required user role, you will get the error message: "Key not authorized: no matching policy".

If this occurs, follow these steps.

  1. Close the browser.

  2. Log in as a local admin user and create the missing user roles in the TACACS+ server.

  3. Log back in to Cisco Crosswork Planning using the TACACS+ user credentials.

Device access group attribute

Enter the device access group attribute value based on the key used for the device access group in the (ISE/Standalone) TACACS+ server attributes. These values can be one or more comma-separated entries.

In the TACACS+ context, the Device Access Group attribute is typically a custom or authorization attribute that the TACACS+ server sends back to the network device. This attribute specifies which group of network devices or which level of device access policy applies to the authenticated user. The Device Access Group attribute works in sync with the policy ID to define user permissions across devices.

Retransmit timeout

Enter the timeout value. The maximum timeout is 30 seconds.

Retries

Specify the number of authentication retries allowed.

Authentication type

Select the authentication type for TACACS+:

  • PAP: Password Authentication Protocol, a protocol where two entities share a password in advance and use the password as the basis of authentication.

  • CHAP: Challenge-Handshake Authentication Protocol, which requires both the client and server to know the plain text of the secret, although it is never sent over the network. CHAP provides greater security than PAP.


Configure LDAP servers

This topic describes how to configure the LDAP server settings in Cisco Crosswork Planning to enable user authentication via LDAP servers.

LDAP servers, including OpenLDAP, Active Directory, and secure LDAP, are used to authenticate users for network management. Cisco Crosswork Planning can use these servers to centralize directory management and enforce access policies. Secure LDAP requires a certificate to enable encrypted communication.

Before you begin

  • Configure relevant parameters, such as Bind DN, Policy baseDN, Policy ID, and so on in the LDAP server.

  • For secure LDAP, you must add a "Secure LDAP Communication "certificate before adding the LDAP server. For more details on adding certificates, see Add a new certificate.

Procedure

1.

From the main menu, choose Administration > AAA > Servers > LDAP.

2.

To add an LDAP server:

  1. Click Add icon.

  2. Enter the required LDAP server details. For a description of the fields, see LDAP server configuration options.

  3. Click Add.

  4. Click Save.

    A warning message prompts you to restart the server to update the changes. Click Save changes to confirm.
3.

To edit an LDAP server:

  1. Select the LDAP server and click Edit icon.

  2. After making the desired changes, click Update.

4.

To delete an LDAP server:

  1. Select the LDAP server and click Delete icon.

  2. Click Delete to confirm.

The LDAP server settings are saved and authentication via LDAP is enabled.

LDAP server configuration options

This section describes LDAP server configuration fields.

Table 2. Field descriptions

Field

Description

Authentication order

Specify a unique priority value to assign precedence in the authentication request. The order can be any number from 10 to 99. Values below 10 are reserved for system use.

By default, 10 is selected.

Name

Enter the name of the LDAP handler.

IP address/Host name

Enter the LDAP server IP address or host name.

Secure connection

Enable this if you want to connect to the LDAP server via the SSL communication. When enabled, select the secure LDAP certificate from the Certificate drop-down list.

Note

You must add the secure LDAP certificate in the Certificate Management screen before configuring the secure LDAP server.

This field is disabled by default.

Port

The default LDAP port number is 389. If Secure Connection SSL is enabled, the default LDAP port number is 636.

Bind DN

Enter the database login access details. Bind DN allows users to log in to the LDAP server.

Bind credential and

Confirm bind credential

Enter the username and password to login to the LDAP server.

Base DN

Base DN is the starting point used by the LDAP server to search for user authentication within your directory.

User filter

This filter is used for searching users.

DN format

Enter the format used to identify the user in base DN.

Principal attribute ID

This value represents the UID attribute in the LDAP server user profile under which a particular username is organized.

Policy baseDN

This value represents the role mapping for user roles within your directory.

Policy map attribute

This identifies the user under the policy base DN.

This value maps to the userFilter parameter in your LDAP server attributes.

Policy ID

Specify the user role you created in the LDAP server. The Policy ID is a unique key that the LDAP server uses to identify and retrieve the user role assigned to an authenticated user. This value must match the user role configured on the LDAP server.

In Cisco Crosswork Planning, this field corresponds to the policy_id.

Note

If you try to log in to Cisco Crosswork Planning as a LDAP user before creating the required user role, you will get the error message: "Login failed, policy not found. Please contact the Network Administrator for assistance.". To avoid this error, ensure to create the relevant user roles in the LDAP server, before setting up a new LDAP server in Cisco Crosswork Planning.

Device access group attribute

Enter the device access group attribute value based on the key used for the device access group in the LDAP server attributes. These values can be one or more comma-separated entries.

In the LDAP context, the Device Access Group attribute is typically a custom or authorization attribute that the LDAP server sends back to the network device. This attribute specifies which group of network devices or which level of device access policy applies to the authenticated user. The Device Access Group attribute works in sync with the policy ID to define user permissions across devices.

Connection timeout

Enter the timeout value. The maximum timeout is 30 seconds.


Example

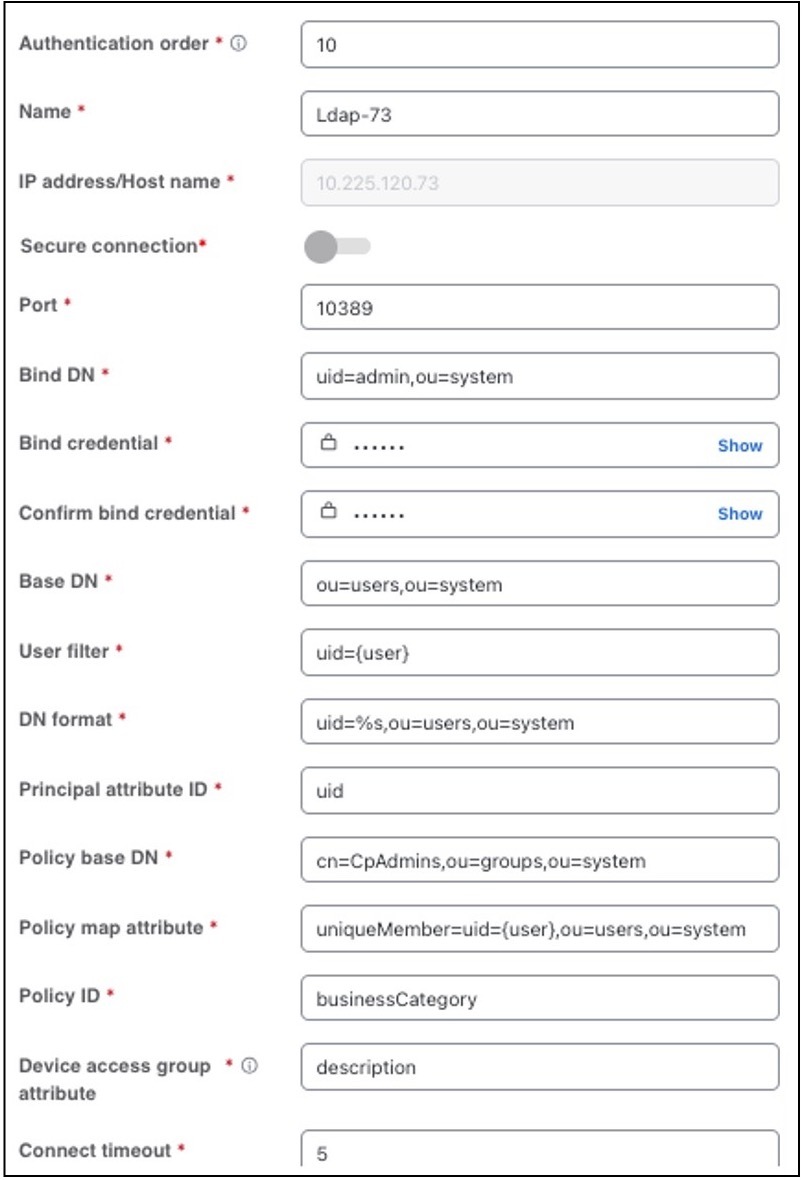
This example shows the parameters that are entered for secure LDAP configuration in Cisco Crosswork Planning. The relevant parameters are configured in the LDAP server.

These are some of the key points:

User settings in the Cisco Crosswork Planning UI

In this example, the existing default user role admin is used. You can find this setting on the Administration > Users and Roles > Users page.

  • The user name, user role, first name, and last name are set to admin.

  • The device access group is configured in the LDAP server as description=’ALL-ACCESS’.

User settings

LDAP server details

This section describes the user's LDAP server configuration details.

  1. System base DN: ou=system

  2. The admin user ‘admin’ has these attributes:

    1. DN: uid=admin,ou=system

    2. password: secret

  3. Users group with DN: ou=users,ou=system

  4. The admin user John belongs to the ‘users’ group and has these attributes:

    1. DN: uid=john,ou=users,ou=system

    2. password: john

    3. mail: John@test.com

    4. display name: John

    5. description: ALL-ACCESS

      The description must be equal to the Device access groups value for the 'admin' user in Cisco Crosswork Planning (see User settings in the Cisco Crosswork Planning UI).

  5. The group ‘CpAdmins’ has these attributes:

    1. DN: cn=CpAdmins,ou=groups,ou=system

    2. uniqueMember=uid=john,ou=users,ou=system

      This indicates the user’s group membership. This value must match with admin user’s DN (see Section 4(a)).

    3. businessCategory: admin

      This indicates the role that needs to be assigned to all users belonging to this group. This value must match with the Role value for the admin user in Cisco Crosswork Planning (see User settings in the Cisco Crosswork Planning UI).

Corresponding LDAP configuration in the UI

This section describes the corresponding LDAP configuration in the Cisco Crosswork Planning UI.

Figure 1. LDAP configuration in the Cisco Crosswork Planning UI
LDAP configuration in UI

Parameter

Value

Authentication order

10 (default)

Name

Ldap-73

Custom name for the LDAP configuration of a server.

IP Address/Host name

10.225.120.73

LDAP server IP address.

Port

10389

LDAP server port.

Bind DN

uid=admin,ou=system

Admin user DN, as described in Section 2(a).

Bind credential

secret

Admin user password, as described in Section 2(b).

Confirm bind credential

secret

Admin user password, as described in Section 2(b).

Base DN

ou=users,ou=system

The user’s group DN for authentication from where the users must be searched, as described in Section 3.

User filter

uid={user}

User search filter attribute ‘uid’, as described in Section 4.

DN format

uid=%s,ou=users,ou=system

User’s DN format, as described in Section 4.

Principal attribute ID

uid

As described in Section 4.

Policy base DN

cn=CpAdmins,ou=groups,ou=system

The group that has the role mapping attribute (admin) and under which the users will have group membership, as described in Section 5(a).

Policy map attribute

uniqueMember=uid={user},ou=users,ou=system

The user’s group membership attribute under the ‘CpAdmins’ user group (Policy base DN), as described in Section 5(b).

Policy ID

businessCategory

The user role attribute (admin) under the ‘CpAdmins’ group (Policy base DN), as described in Section 5(c). This value must match with the CpAdmins group’s attribute having ‘admin’ value.

Device access group attribute

description

The device group attribute under the user DN, as described in Section 4(e). This value must match with the user DN attribute having value ‘ALL-ACCESS’.


Configure RADIUS servers

This topic describes how to configure the RADIUS server settings in Cisco Crosswork Planning to enable user authentication via RADIUS servers.

Crosswork supports the use of RADIUS servers to authenticate users. You can also integrate Crosswork with an application such as Cisco ISE (Identity Service Engine) to authenticate using the RADIUS protocols.

Before you begin

In the RADIUS server (standalone or Cisco ISE), configure relevant parameters, such as user role, device access group attribute, shared secret format, shared secret value in the RADIUS server before adding the server to Cisco Crosswork Planning. For more information on Cisco ISE procedures, see the latest Cisco Identity Services Engine Administrator Guide.

Procedure

1.

From the main menu, choose Administration > AAA > Servers > RADIUS.

2.

To add a RADIUS server:

  1. Click Add icon.

  2. Enter the required RADIUS server details. For a description of the fields, see RADIUS server configuration options.

  3. Click Add.

  4. Click Save.

    A warning message prompts you to restart the server to update the changes. Click Save changes to confirm.
3.

To edit a RADIUS server:

  1. Select the RADIUS server and click Edit icon.

  2. After making the desired changes, click Update.

4.

To delete a RADIUS server:

  1. Select the RADIUS server and click Delete icon.

    The Delete server-IP-address dialog box opens.

  2. Click Delete to confirm.

The RADIUS server settings are saved and authentication via RADIUS is enabled.

RADIUS server configuration options

This section describes RADIUS server configuration fields.

Table 3. Field descriptions

Field

Description

Authentication order

Specify a unique priority value to assign precedence in the authentication request. The order can be any number from 10 to 99. Numbers below 10 are system reserved.

By default, 10 is selected.

IP address

Enter the IP address of the RADIUS server (if IP address is selected).

DNS name

Enter the DNS name (if DNS name is selected). Only IPv4 DNS names are supported.

Port

The default RADIUS port number is 1645.

Shared secret format

Shared secret for the active RADIUS server. Select ASCII or Hexadecimal.

Shared secret and

Confirm shared secret

Enter the plain text shared secret for the active RADIUS server. The format of the text you enter must match the selected format (ASCII or Hexadecimal).

For Crosswork to communicate with the external authentication server, ensure the Shared Secret you enter on this page matches the shared secret value configured on the RADIUS server.

Service

Enter the value of the service you are attempting to gain access to. For example, "raccess".

Policy ID

Enter the user role that you created in the RADIUS server.

Note

If you try to log in to Cisco Crosswork Planning as a RADIUS user before creating the required user role, you will get the error message: "Key not authorized: no matching policy".

If this occurs, follow these steps.

  1. Close the browser.

  2. Log in as a local admin user and create the missing user roles in the RADIUS server.

  3. Log back in to Cisco Crosswork Planning using the RADIUS user credentials.

Device access group attribute

Enter the device access group attribute value based on the key used for the device access group in the RADIUS server attributes. These values can be one or more comma-separated entries.

In the RADIUS context, the Device Access Group attribute is typically a custom or authorization attribute that the RADIUS server sends back to the network device. This attribute specifies which group of network devices or which level of device access policy applies to the authenticated user. The Device Access Group attribute works in sync with the policy ID to define user permissions across devices.

Retransmit timeout

Enter the timeout value. The maximum timeout is 30 seconds.

Retries

Specify the number of authentication retries allowed.

Authentication type

Select the authentication type for RADIUS:

  • PAP: Password Authentication Protocol, a protocol where two entities share a password in advance and use the password as the basis of authentication.

  • CHAP: Challenge-Handshake Authentication Protocol, which requires both the client and server to know the plain text of the secret, although it is never sent over the network. CHAP provides greater security than PAP.


Single Sign-on (SSO)

Single Sign-on (SSO) is an authentication method that
  • enables you to log in with a single ID and password to any of several related, yet independent, software systems.

  • allows you to log in once and access the services without reentering authentication factors.

  • allows Cisco Crosswork to act as Identity Provider (IDP) and provides authentication support for the relying service providers.

You can also enable SSO for authentication of TACACS+, LDAP, and RADIUS users.

Crosswork supports SSO cross-launch to enable easier navigation with the service provider. Once configured, the URL can be launched using the launch icon () located at the top right corner of the window.


Enable SSO authentication

This topic describes how to enable SSO in Cisco Crosswork Planning so you can access the integrated service provider applications using a single set of credentials, streamlining authentication and simplifying navigation between service providers.

Single sign-on (SSO) is an authentication method that lets users log in once and access multiple independent systems without reentering credentials. Cisco Crosswork Planning acts as an Identity Provider (IdP) and supports SSO integration for service provider applications. You can enable SSO for users authenticated via TACACS+, LDAP, and RADIUS. When SSO is configured, users benefit from seamless access and improved security management.

  • When Cisco Crosswork Planning’s CAS pod is restarting or not running, the login page is not available.

  • The SSO URL from the Identity Provider (IdP) is https://<IP>:30603/crosswork/sso/idp/profile/SAML2/Redirect/SSO, where <IP> represents the Cisco Crosswork Planning's IP address or hostname.

Before you begin

  • Check the Enable source IP for auditing check box on the Administration > AAA > Settings page.

  • Ensure you have the latest service provider metadata to integrate with Cisco Crosswork Planning SSO.

  • Confirm that network connectivity exists between Cisco Crosswork Planning (IdP) and each service provider application.

  • Verify the CAS pod is running and stable.

Procedure

1.

From the main menu, choose Administration > AAA > SSO.

The Identity Provider page opens. On this page, you can add service providers, edit their settings, or delete them.

2.

To add a new service provider:

  1. Click Add icon.

  2. On the Service Provider page, enter the values in these fields:

    • Name: Enter the name of the service provider entity.

      Note

      If you provide a URL, the Service name entry in the Identity Provider page becomes a hyperlink.

    • Evaluation order: Enter a unique number indicating the order in which the service definition should be considered.

    • Metadata: Click the field or click Browse to navigate to the metadata XML document that describes a SAML client deployment. You can also enter the service provider URL here for cross-launch.

  3. Click Add to finish adding the service provider.

3.

Click Save all changes. When prompted, confirm by clicking Save changes.

After you save the settings and log in to the integrated service provider application for the first time, the application redirects to the Cisco Crosswork server. After providing the Crosswork credentials, the service provider application logs in automatically. For all the subsequent application logins, you do not have to enter any authentication details.

4.

To edit a service provider:

  1. Select the service provider and click Edit icon.

  2. Update the Evaluation order or Metadata as required.

  3. Click Update to apply the changes.

5.

To delete a service provider:

  1. Select the check box next to the service provider and click Delete icon.

  2. Click Delete to confirm.

Single sign-on is enabled for selected service provider applications. Users can authenticate once via Cisco Crosswork Planning and seamlessly access associated applications without reentering authentication factors.

What to do next

  • If Cisco Crosswork Planning is reinstalled or migrated, update the Identity Provider (IdP) metadata in all service provider applications to avoid authentication errors due to metadata mismatch.

  • For first-time users, ensure password change is completed before attempting to log in with a different username. To reset an incomplete session, an administrator must terminate it.

Warning: SSO configuration and login requirements

  • When Crosswork is re-installed or migrated, update the latest IDP metadata from Crosswork to the service provider applications. Otherwise, authentication will fail due to mismatched metadata information.

  • Users logging in for the first time must change their password before switching to a different username. The only workaround is for the administrator to terminate the session.

  • The Cisco Crosswork Planning login page is not rendered when the Central Authentication Service (CAS) pod is restarting or not running.


Configure AAA settings

This topic describes how to control user authentication, authorization, and accounting on the system by configuring AAA settings to enforce security policies and manage user sessions.

Users with relevant AAA permissions can configure the AAA settings. Configure these settings when you need to establish or update how users are authenticated, what resources they can access, and how their activities are tracked. Proper AAA settings help safeguard network resources and ensure compliance with organizational access policies.

Before you begin

  • Ensure you have the relevant AAA permissions to configure the AAA settings.

  • Review your organization's authentication and password policy requirements.

  • Gather information about external authentication servers (if applicable).

  • Gather information about external authentication servers (if applicable).

Procedure

1.

From the main menu, choose Administration > AAA > Settings.

2.

Select the relevant setting for Fallback to local. By default, Cisco Crosswork Planning prefers external authentication servers over local database authentication.

Note

Admin users are always authenticated locally.

3.

Under Browser session timeout, select the relevant value for the Log out inactive users after field. Any user who remains idle beyond the specified limit will be automatically logged out.

This timeout is enforced by the system and applies even if the user closes the browser tab without explicitly logging out. If no activity (token usage) is detected after the tab is closed, the session expires after the configured timeout. For example, with a 10-minute timeout, if a user closes the browser tab after five minutes of activity, the user must log in again if they return after 10 minutes.

Note
  • The default timeout value is 30 minutes.

  • Changes to the timeout value take effect immediately, including for active sessions.

  • Session termination can take upto a minute more than the configured timeout due to backend scheduling.

  • This setting applies only to browser-based UI sessions. API-based sessions continue to follow the existing 8-hour validity behavior.

4.

Under Parallel session, enter relevant values for the Number of parallel sessions and Number of parallel sessions per user fields.

Note
  • The system supports between 5 and 400 parallel sessions for concurrent users. If the number of parallel sessions is exceeded, an error is displayed during login to Cisco Crosswork Planning.

  • Cisco Crosswork Planning supports 50 simultaneous NBI sessions up to 400 sessions..

5.

Under Source IP, enable auditing of user source IP addresses.

  1. Check the Enable source IP for auditing check box to log the IP address of the user (source IP) for auditing and accounting. This check box is disabled by default.

  2. Log out, wait a few minutes, then log back in. This pause ensures the change is applied and the actual client IP address is accurately captured.

    During this transition, audit logs may temporarily display the Cisco Crosswork Planning node IP instead of the client IP. The correct client IP will appear in new audit log entries created after you log in again. Previous log entries will continue to show the node IP. Once enabled and you have logged in again, the Source IP column will appear on both the Audit Log and Active sessions pages.

6.

Select the relevant settings for the Local password policy. Certain password settings are enabled by default and cannot be disabled (for example, Change password on first login).

Note
  • Local password policy allows administrators to configure the number of unsuccessful login attempts a user can make before they are locked out of Cisco Crosswork Planning, and the lockout duration. Users can attempt to login with the correct credentials once the wait time is over.

  • Any changes to the password policy are enforced only the next time when the users change their password. Existing passwords are not checked for compliance during login.