Cisco Crosswork Planning 7.2 Collection Setup and Administration

PDF

Cisco Crosswork Planning 7.2 Collection Setup and Administration

Certificates

Want to summarize with AI?

Log in

Outlines how Cisco Crosswork Planning uses certificates for secure TLS communication, and provides instructions for managing certificates, including adding, editing, downloading, and updating web certificates using CSRs.


A certificate is an electronic document that

  • identifies an individual, a server, a company, or an entity

  • associates the entity with a unique key, and

  • is digitally signed by an issuer (Certificate Authority or self-signed) to enable secure communication.

When a certificate is created with a public key, a matching private key is also generated. In TLS, the public key is used to encrypt data being sent to the entity and the private key is used to decrypt.

In a TLS exchange, a hierarchy of certificates is used to verify the validity of the certificate's issuer. This hierarchy is called a trust-chain and consists of three types of entities: a root CA certificate (self-signed), possibly multiple levels of intermediate CA certificates, and a server (or client) certificate (end-entity). The intermediate certificates act as a “link of trust” linking the server certificates to the CA’s root certificate and providing additional layers of security. The root certificate's private key signs and issues the next certificate in the chain. Subsequently, the private key for each certificate in the trust chain signs and issues the following certificate, continuing until the end-entity certificate is signed. The end-entity certificate is the last certificate in the chain. It is used as a client or server certificate.

How are certificates used in Cisco Crosswork Planning

Cisco Crosswork Planning uses the TLS protocol for secure communication between devices and components. TLS uses X.509 certificates to securely authenticate devices and encrypt data to ensure its integrity from source to destination. Cisco Crosswork Planning uses both generated certificates and certificates uploaded by clients. Uploaded certificates can be purchased from Certificate Authorities (CA) or be self-signed. For example, the system's VM-hosted web server and the client browser-based user interface communicate with each other using the system-generated X.509 certificates exchanged over TLS.

The Certificate Management page (Administration > Certificate Management) allows you to view, upload, and modify certificates. Certificate management page displays the default certificates provided by Cisco Crosswork Planning.

Figure 1. Certificate management page
Certificate management page

Certificate types and usage

Certificates in Cisco Crosswork Planning are classified into various roles with different properties depending on their use case as shown in this table.

Role

UI name

Description

Server

Client

Allowed operations

Default expiry

Allowed expiry

Crosswork Internal TLS

Crosswork-Internal- Communication

  • Generated and provided by Crosswork.

  • This trust-chain is available in the UI (including the server and client leaf certificates) and is created by Crosswork during initialization.

  • Allows mutual and server authentication.

Crosswork

Crosswork

Download

5 years

Crosswork Web Server

Crosswork-Web-Cert

Server Authentication

  • Generated and provided by Crosswork.

  • Provides communication between the user browser and Crosswork.

  • Allows server authentication.

Crosswork Web Server

User Browser or API Client

  • Upload

  • Download

5 years

30 days to 5 years

Crosswork Device Syslog

Crosswork-Device-Syslog
  • Generated and provided by Crosswork.

  • Allows server authentication.

Device

Download

5 years

There are two category roles in Crosswork:

  • Roles that allow you to upload or download trust chains only

  • Roles that allow you to upload or download both the trust chain and an intermediate certificate and key


Add a new certificate

This topic describes how to add a new certificate for the Secure LDAP communication role.

In this process, you upload the trust chain of the secure LDAP certificate. This trust chain is used by Crosswork to authenticate the secure LDAP server. Once this trust chain is uploaded and propagated within Crosswork, you can add the LDAP server (see Configure LDAP servers) and associate the certificate.

Note

Cisco Crosswork does not receive a web certificate directly. It accepts an intermediate CA and intermediate key to create a new web certificate, and apply it to the Web Gateway.

Before you begin

  • Ensure that the certificate file is in Privacy Enhanced Mail (PEM) format and easily accessible.

  • Uploaded Trust chain files may contain the entire hierarchy (root CA and intermediate certificates) in the same file. In some cases, multiple chains are also allowed in the same file..

  • Ensure the intermediate keys are either in the PKCS1 or PKCS8 format.

  • Ensure that the tyk service is in a healthy state.

  • For information on certificate types and usage, see Certificate types and usage.

Procedure

1.

From the main menu, choose Administration > Certificate Management and click Add icon.

2.

In the Certificate name field, enter a unique name for the certificate.

3.

From the Certificate role drop-down list, select Secure LDAP communication..

Note

Even though UI displays several other options, only Secure LDAP communication is applicable for Cisco Crosswork Planning.

4.

Click Browse and navigate to the certificate trustchain.

5.

Click Save.

After you upload the certificate, the Crosswork Cert manager accepts, validates, and generates the server certificate. Upon successful validation, an alarm ("Crosswork Web Server Restart") indicates that the certificate will be applied. The Certificate Management UI then logs out automatically and applies the certificate to the Web Gateway. The new certificate can be checked by clicking the lock <Not Secure>/<secure> icon next to https://<crosswork_ip>:30603 in the URL.


Edit a certificate

This topic describes how to edit a certificate in Cisco Crosswork Planning.

You can edit a certificate to

  • add or remove connection destinations

  • upload certificates, or

  • replace expired or misconfigured certificates.

You can edit only the user-provided certificates and web certificates. You cannot modify the other system certificates provided by Cisco Crosswork, and they will not be available for selection.

Before you begin

  • Updating the certificate can disrupt the existing trust chain of certificates used for client authentication if enabled, so proceed with caution.

  • Restart the Crosswork server during this process. The restart will take several minutes to complete.

  • Set the AAA mode to Local to enable client authentication.

Procedure

1.

From the main menu, choose Administration > Certificate Management.

The Certificate Management page opens.

2.

To update a certificate:

  1. In the Actions column, click on the certificate you want to modify, and select Update certificate.

  2. Enter the appropriate values in the fields based on the certificate you wish to update. Click the icon next to the field for more information.

  3. Click Save to save the changes.

3.

To enable the client certificate authentication of a web certificate:

  1. In the Actions column, click on the Crosswork web certificate you want to modify, and select Configure client certificate authentication.

    The Configure Client Authentication page opens.

  2. Check the Enable check box.

    The Certificate schema and OCSP settings appear.

    The OCSP settings are enabled by default, but you can disable it if required. If enabled, you can check the certificate revocation status using the Online Certificate Status Protocol (OCSP).

  3. Select the Certificate schema value.

    • Automatic: Searches for the user principal name (UPN) in the alternate subject name area. If a UPN is not found, the system will use the common name value. This is the default selection.

    • Manual: Searches for the username in the subject area based on the user identity source and the specified regular expression.

  4. (Optional) Select the OCSP value:

    • Automatic: Extracts the responder URL from the certificate and uses it to perform OCSP validation.

    • Manual: You must provide the OCSP responder URL.

  5. Click Save to save the changes.

4.

To update certificate and configure client authentication in a single step:

  1. In the Actions column, click on the Crosswork web certificate you want to modify, and select Update certificate & configure client certificate authentication.

    The Update Certificate and Configure Client Authentication page opens.

    Note

    Choosing the combined option to update the certificate and configure client authentication minimizes downtime during the Crosswork server restart, as it occurs only once instead of twice if these actions are performed separately.

  2. Provide the required data according to the instructions in step 2 and step 3.

  3. Click Save to save the changes.

The selected certificate is updated or reconfigured as specified.

Download a certificate

This topic describes how to download a certificate to your local system.

Procedure

1.

From the main menu, choose Administration > Certificate Management.

The Certificate Management page opens.

2.

Click for the certificate you want to download.

3.

To download the root certificate or the intermediate certificate separately, click next to the certificate.

4.

To download all the certificates at once, click Export all.

The selected certificate is downloaded to your local system.

Update a web certificate using Certificate Signing Request (CSR)

Starting with version 7.0.1, Cisco Crosswork Planning enables updating web certificates via a Certificate Signing Request (CSR) to enhance trust and security. This approach allows you to obtain a certificate signed by an Enterprise or Commercial CA without exposing the private key outside of Cisco Crosswork Planning.

Before you begin

  • Updating the certificate may disrupt the existing trust chain of certificates used for client authentication if enabled.

  • As part of this process, you need to restart the Crosswork server, which can take several minutes to complete.

  • Set the AAA mode to Local to enable client authentication.

Procedure

1.

From the main menu, choose Administration > Certificate Management.

2.

Click on the web certificate (Crosswork-Web-Cert) and select Update certificate.

3.

Create a CSR to submit to the CA.

  1. Select Create a certificate signing request (CSR) and click Update certificate.

  2. Click Create CSR.

  3. Enter relevant values in the fields. Click next to the field for more information.

    These are the mandatory fields.

    • Common name (CN): By default, this is the Fully Qualified Domain Name (FQDN) of the server, but it can be any unique name that identifies the server. The length should not exceed 64 characters.

    • IP address: This is the Crosswork VIP address utilized in this deployment. Additional IP addresses should only be added if necessary for certificate validation.

    • Key Type: The options are RSA and ECDSA. By default, RSA is selected.

    • Key Size (in bits): The options are 2048, 3072, and 4096. By default, 2048 is selected.

    • Key Digest: The options are SHA-256, SHA-384, SHA-224, and SHA-512. By default, SHA-256 is selected.

  4. Click Create CSR to complete the action.

4.

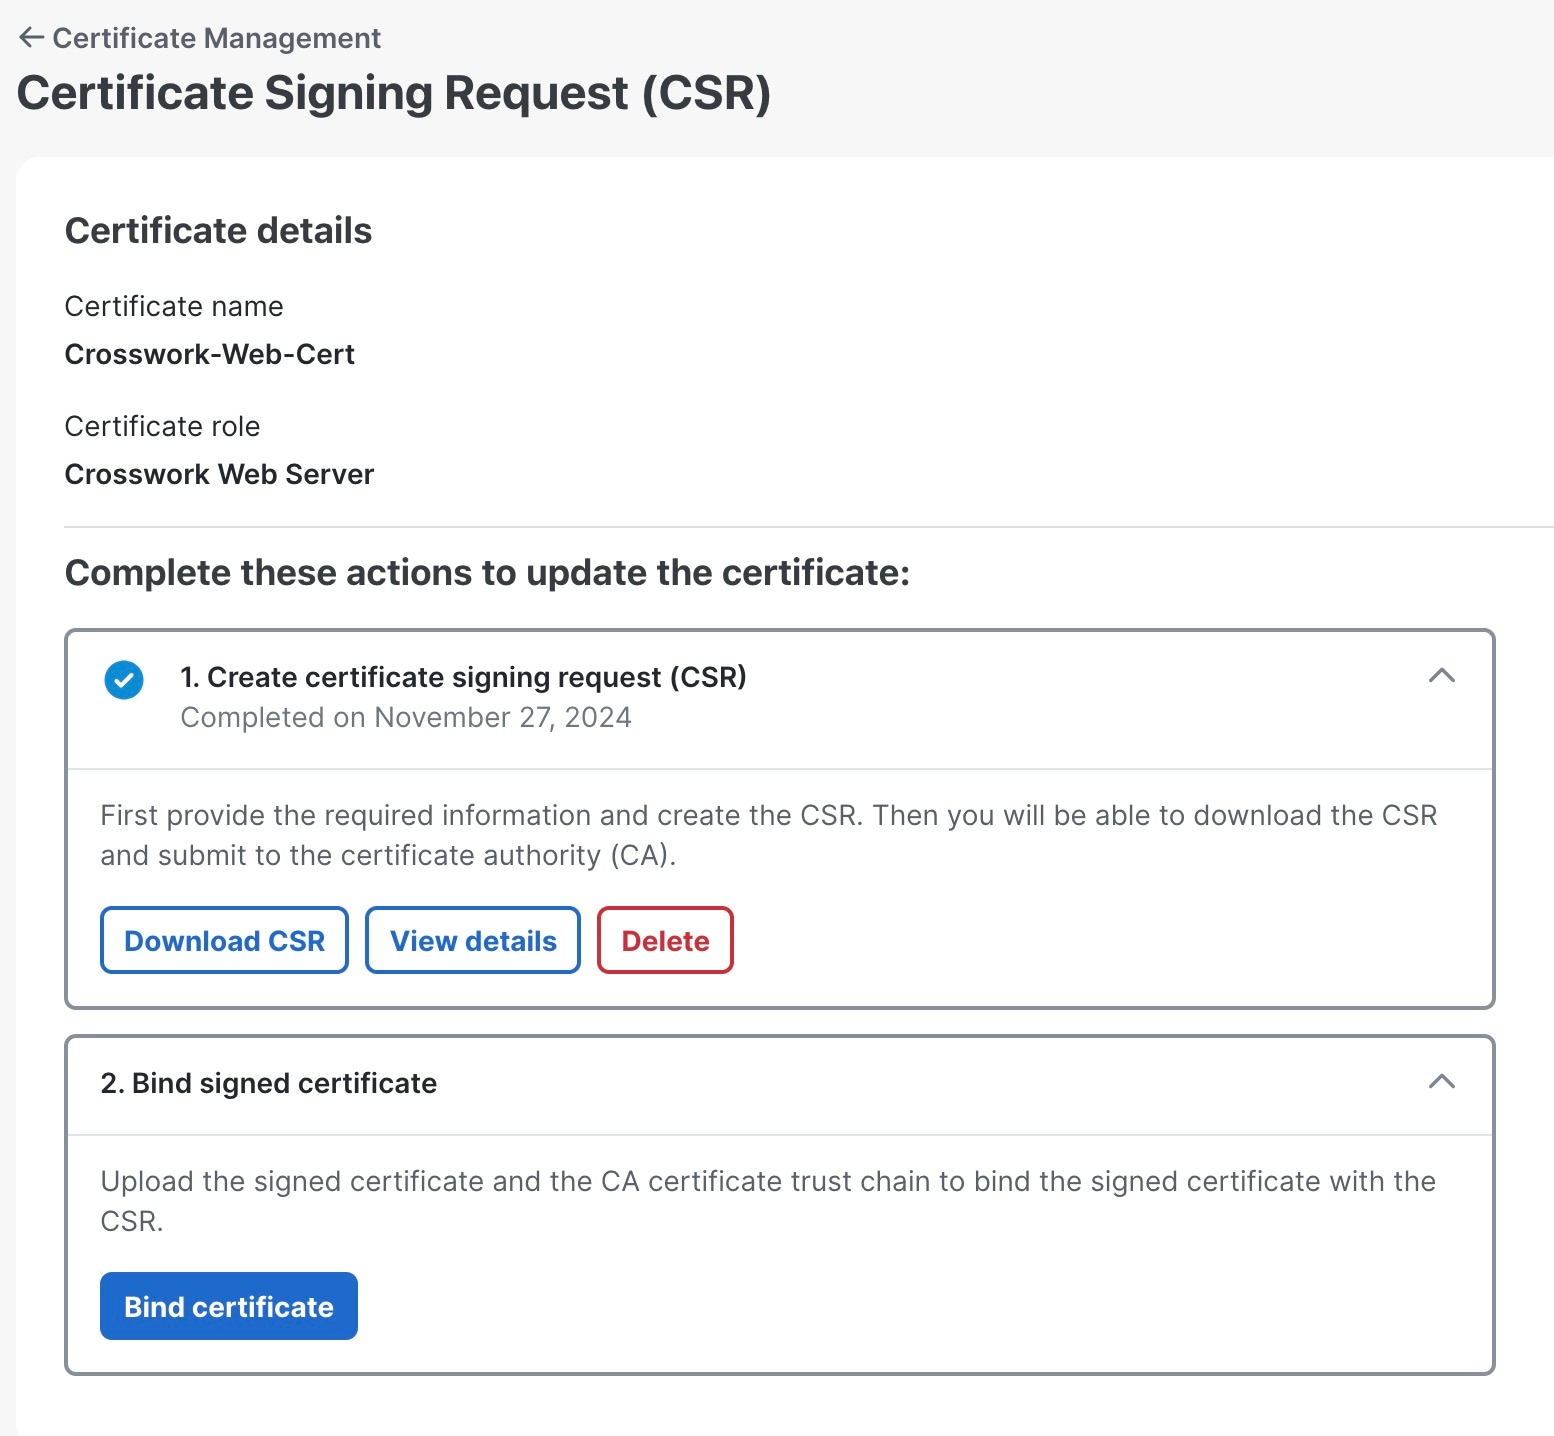
After generating the CSR, click Download to download it. Then, use the CSR to get a signed certificate from your CA.

Figure 2. Certificate Signing Request (CSR) page
Certificate Signing Request (CSR) page
5.

Upload the CA-signed certificate and the CA certificate trust chain to bind the certificate.

  1. In the Certificate Signing Request (CSR) page, click Bind certificate.

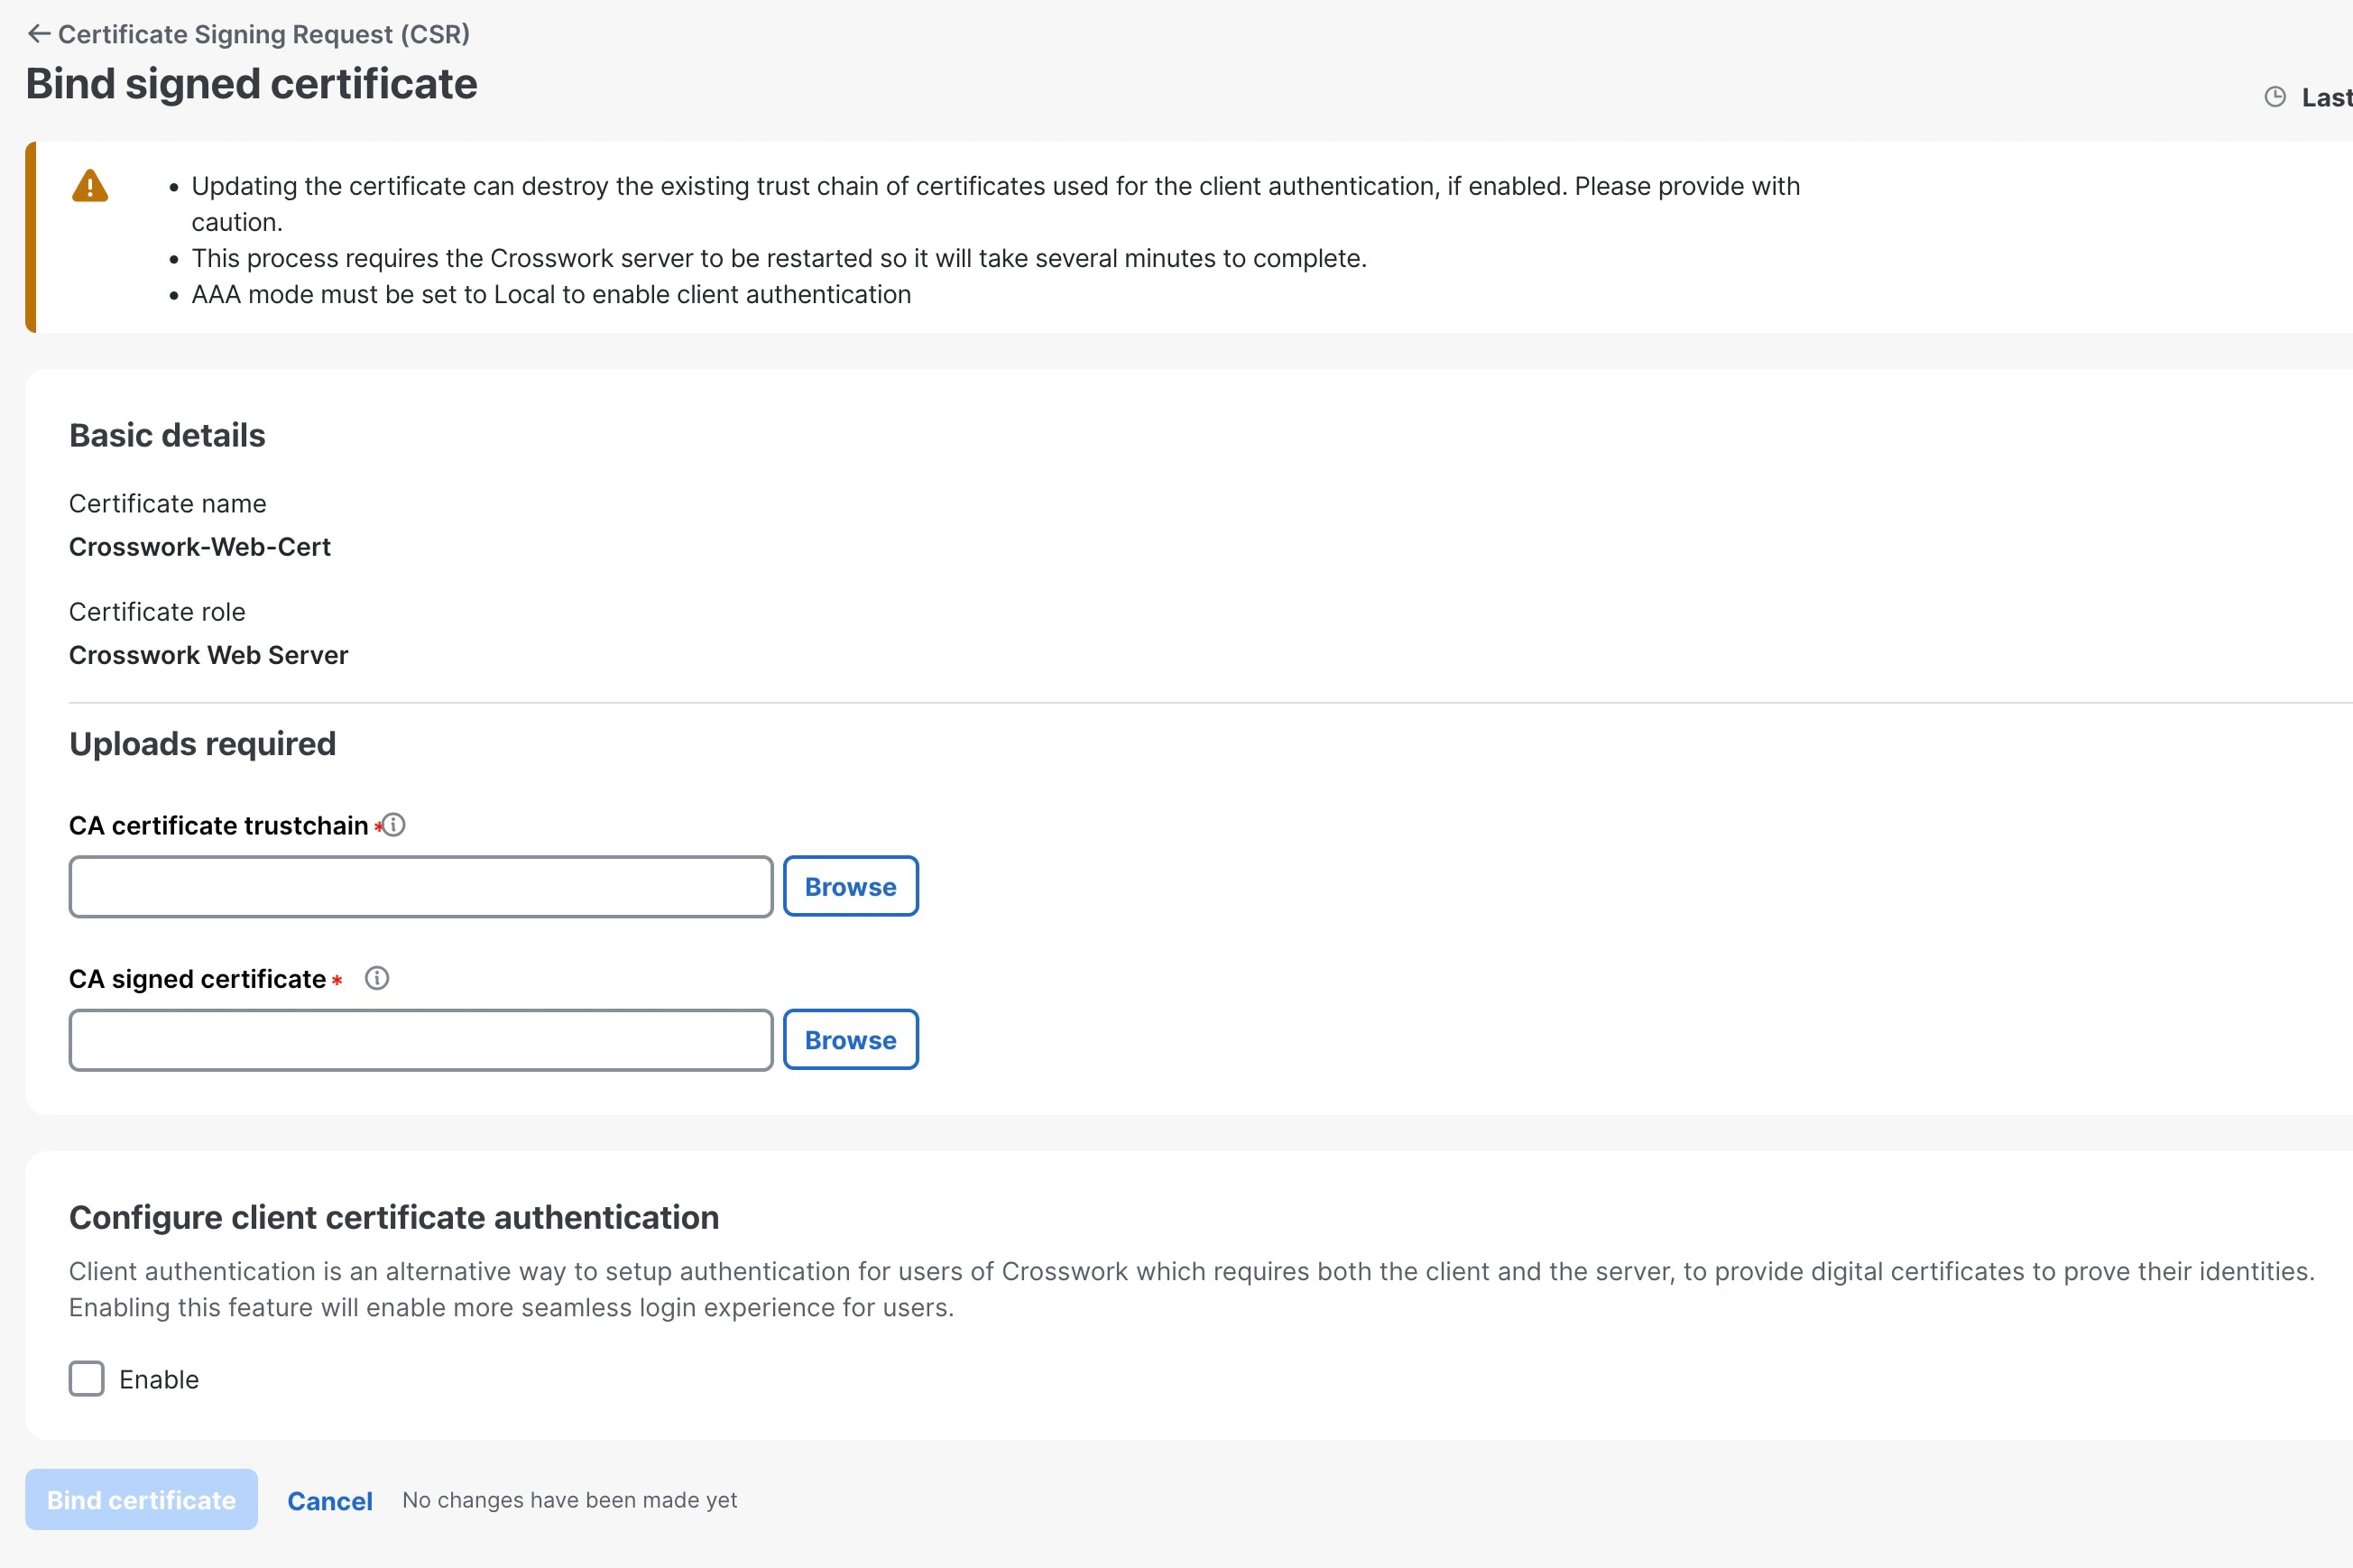
    Figure 3. Bind signed certificate
    Bind signed certificate page
  2. Upload the relevant data in the fields provided. Click next to the field for more information.

    • CA certificate trust chain: This is the certificate trust chain for the web server certificate obtained from the CA.

    • CA signed certificate: This is the final signed certificate for the web server obtained from the CA.

  3. (Optional) Check the Enable check box to configure client certificate authentication.

  4. Click Bind certificate to complete the operation.

    After the bind action is completed, the web certificate is updated. Tyk will then restart with the new web certificate.

The Cisco Crosswork Planning's web certificate is updated with the CA-signed certificate and trust chain after server restart.