Converged Policy Software Upgrade

Software Upgrade Qualification

For high availability and fault tolerance, a minimum of two K8s worker nodes are required for each tier. You can have multiple replicas for each worker node. Kubernetes orchestrates the pods using the StatefulSets controller. The pods require a minimum of two replicas for fault tolerance.

This figure depicts a CPC K8s Cluster with 12 nodes – 3 Master nodes, 3 Operations, and Management (OAM) worker nodes, 2 Protocol worker nodes, 2 Service worker nodes, 2 Session (data store) worker nodes.
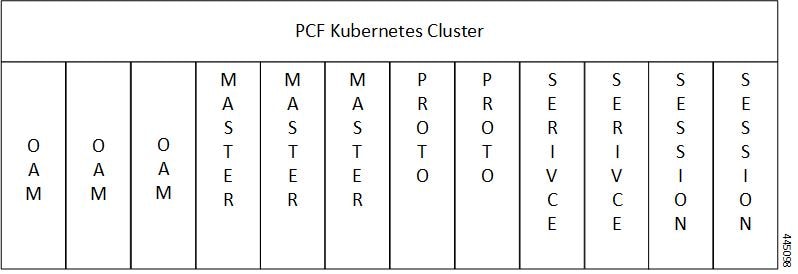
Figure 1. CPC Kubernetes Cluster

Note


  • OAM worker nodes - These nodes host the Ops Center pods for configuration management and metrics pods for statistics and Key Performance Indicators (KPIs).

  • Protocol worker nodes - These nodes host the CPC protocol-related pods for service-based interfaces (N5, N7, N28, N36, and NRF) and Diameter Rx Endpoint.

  • Service worker nodes - These nodes host the CPC application-related pods that perform session management processing.

  • Session worker nodes - These nodes host the database-related pods that store subscriber session data.


Update CPC

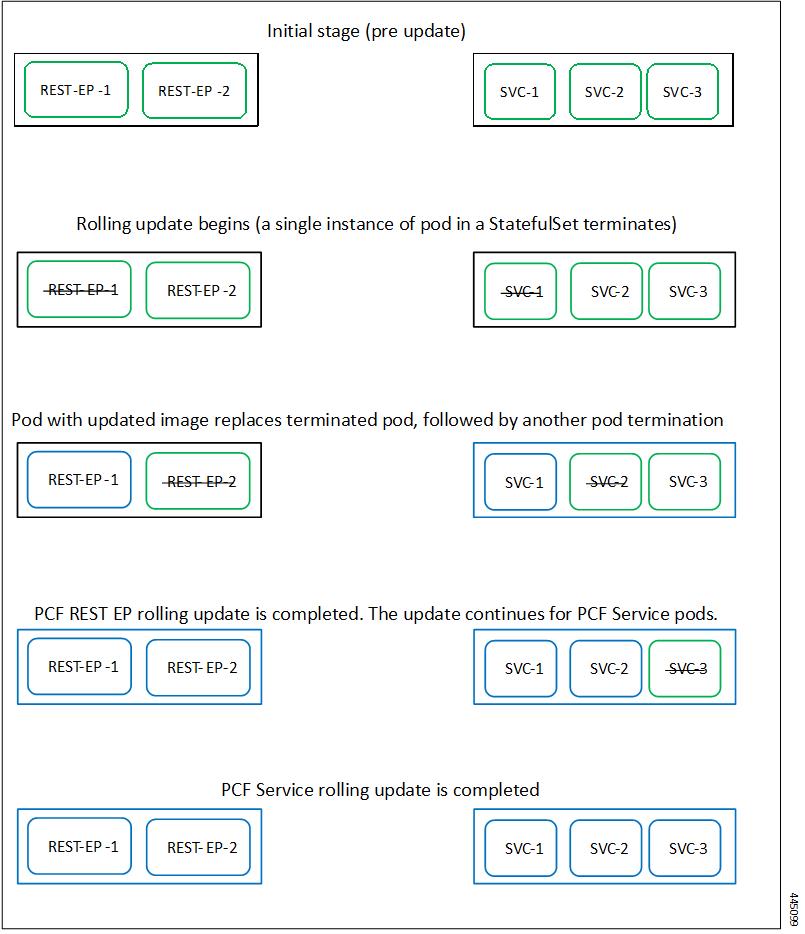
The CPC software update or in-service update procedure utilizes the K8s rolling strategy to update the pod images. In K8s rolling update strategy, the pods of a StatefulSet are updates sequentially to ensure that the ongoing process remains unaffected. Initially, a rolling update on a StatefulSet causes a single pod instance to terminate. A pod with an updated image replaces the terminated pod. This process continues until all the replicas of the StatefulSet are updated. The terminating pods exit gracefully after competing all the ongoing processes. Other in-service pods continue to receive and process the traffic to provide a seamless software update. You can control the software update process through the Ops Center CLI.


Note


Each pod needs a minimum of two replicas for high availability. For example, Policy Engine must have 2 Engine replicas. In a worst-case scenario, the processing capacity of the pod may briefly reduce to 50% while the software update is in-progress.


The following figure illustrates a CPC rolling update for CPC REST endpoint pods (two replicas) on Protocol worker nodes along with CPC Service pods (three replicas) on Service worker nodes.

Summary

These are the three stages of deploying and validating CPC converged policy software:

Workflow

Figure 2. CPC Rolling Update
  1. Stage 1 — Pod termination: the rolling update on a StatefulSet causes a single pod instance to terminate. The terminating pod exits gracefully after completing all ongoing processes.
  2. Stage 2 — Sequential update: after the first pod is updated and healthy, the next pod in the StatefulSet terminates and updates. This process continues until all replicas of the StatefulSet are updated.
  3. Stage 3 — Completion: once all replicas across all tiers are updated, the cluster sync is complete and the new software version is active. The figure illustrates a converged policy rolling update for Diameter endpoint pods (two replicas) on Protocol worker nodes and CPC converged policy Service pods (three replicas) on Service worker nodes.

Upgrade prerequisites

System readiness requirements

Ensure that all nodes, including all the pods in each node, are up and running before starting the upgrade. Also ensure that a patch version of the CPC Converged Policy software is available.

  • Only patch upgrades support the rolling update strategy. Major version upgrades do not support rolling upgrades.

  • CPC Converged Policy uses the versioning format YYYY.RN.MN, where YYYY is the release year, RN is the release number, and MN is the maintenance number.

Applies to all rolling software upgrades.

Starting the upgrade with nodes or pods in a non-running state increases the risk of traffic disruption and upgrade failure. Major version upgrades require a different upgrade procedure that is not covered by the rolling update strategy.

The upgrade proceeds without disruption to ongoing traffic, and all replicas update sequentially as expected.

CPU usage threshold

Trigger the rolling upgrade only when the CPU usage of all nodes is less than 50%.

  • High CPU usage during an upgrade increases the risk of pod restart failures and prolonged upgrade duration.

  • Monitor node CPU usage before initiating the upgrade and defer the upgrade if usage exceeds 50%.

Applies at the time the cluster sync command is issued to trigger the rolling upgrade.

The rolling update terminates and restarts pods sequentially. High CPU usage at that moment can prevent new pods from becoming healthy in time, stalling the upgrade.

The rolling upgrade completes within the expected time window without pod restart failures.

If CPU usage exceeds 50%, defer the upgrade until usage returns to an acceptable level. Investigate and resolve the cause of high CPU usage before proceeding.

Perform a health check

Use this procedure to verify the health of the CPC Converged Policy cluster before starting the upgrade.

Procedure


Step 1

Log in to the master node.

Step 2

Run the following commands to view pod and node configurations.

View pods in the SMI namespace:

Example:

kubectl get pods -n smi

View Kubernetes nodes:

Example:

kubectl get nodes

View pods in all namespaces with wide output:

Example:

kubectl get pod --all-namespaces -o wide

View pods in the CPC namespace with wide output:

Example:

kubectl get pods -n <cpc namespace> -o wide

View pods in the CEE namespace with wide output:

Example:

kubectl get pods -n <cee namespace> -o wide

List Helm releases:

Example:

helm list

Count all pods across all namespaces:

Example:

kubectl get pods -A | wc -l

Note

 
  • If any pod is not in a running state, verify the status of the nodes using this command:
    kubectl get nodes --show-labels
  • Start the CPC Ops Center with 100% functionality before starting traffic on it.

Step 3

Check the CPC Ops Center status.

Use this command to view the system status:

Example:

[m13-cpc/m13] cpc# show system
Tue Apr  15 13:13:03.130 UTC+00:00
system uuid 6301d096-a1d7-442d-8b6b-9577143dd47f
system status deployed true
system status percent-ready 100.0
system ops-center repository https://charts.<Master_VIP>.nip.io/cpc.2025.02.0.i64
system ops-center-debug status true
system synch running true
system synch pending false

Step 4

Verify that no pods are in a non-running state.

Use this command to list all pods and filter for those not in a running status:

Example:

kubectl get pods -A | grep -iv running

Sample output showing a pod in a non-running state:

NAMESPACE    NAME                                                              READY   STATUS             RESTARTS         AGE
<namespace>  crd-api-<namespace>-engine-app-production-rjio-7689c94786-kvd26   1/2     CrashLoopBackOff   17 (4m28s ago)   76m

If the output lists any pods, investigate and resolve the issue before proceeding with the upgrade.


All nodes are in the ready state and all services are running. The cluster is healthy and ready for the upgrade.

What to do next

Ensure that all nodes are in the ready state before proceeding. Use kubectl get nodes to display node states.

Prepare for upgrade

Use this procedure to back up the CPC Converged Policy configuration and deployment files and to prepare the deployment directory before initiating the upgrade.

Before you begin

Ensure that all nodes and pods are running and healthy. For more information, refer to the Perform a health check section.

Procedure


Step 1

Log in to the SMI Cluster Manager node as an ubuntu user.

Step 2

Create a new directory for the deployment files.

Example:

test@smicpc-cm01:~$ mkdir -p "temp_$(date +'%m%d%Y_T%H%M')" && cd "$_"

Step 3

Move all the CPC Converged Policy deployment files into the newly created deployment directory.

Step 4

Untar the CPC Converged Policy deployment file.

Example:

test@smi1cpc01-cm01:~/temp_08072019_T1651$ tar -xzvf cpc.2025.01.SPA.tgZ
./
./cpc_REL_KEY-CCO_RELEASE.cer
./cisco_x509_verify_release.py
./cpc.2020.01.0-1.tar
./cpc.2020.01.0-1.tar.signature.SPA
./cpc.2020.01.0-1.tar.SPA.README

Step 5

Verify the downloaded image.

Example:

test@smi1CPC Converged Policy01-cm01:~/temp_08072019_T1651$ cat cpc.2025.01.SPA.tgZ

Important


Follow the procedure in the SPA.README file to verify the build before proceeding to the next step.

These are the mandatory options for backup configuration:

Table 1. Mandatory options for backup configuration

Option

Description

backup-type

Specifies the type of backup to perform (all, PB, CRD, Ops-center).

password

Password for authentication of PB or CRD.

scp-server-dest-backup-path

Destination path for backup files on the SCP server.

scp-server-user-ip

Host IP address of the SCP server.

scp-server-user-name

Username for the SCP server.

scp-server-user-password

Password for the SCP server user.

svn-url

SVN URL for Policy Builder export — for example, http://svn/repos//configuration .

username

Username for authentication of PB or CRD.

schedule-backup-daily

Specifies the hour of the day when the backup runs (values range from 00 to 23).

schedule-backup-weekly

Specifies the day of the week when the backup runs (values range from 1 to 7, starting with 1 for Monday).


The deployment directory is ready and the downloaded image is verified. You can now proceed with staging the new CPC Converged Policy image.

Auto-backup of PB, CRD, and Ops Center configurations

The auto-backup utility is an Ops Center command-line tool that consolidates the backup of critical configurations within the CPC system into

  • a single-command backup for Ops Center, Policy Builder, and CRD configurations — replacing the separate API commands previously required for each,

  • remote storage support through Secure Copy Protocol (SCP) for off-system backup, and

  • scheduled automated backups that reduce the risk of data loss and eliminate manual backup tasks.

The utility was introduced in release 2025.03.0. It improves backup management, helps prevent data loss, and enables restoring critical configuration when needed.

Backup types supported by the auto-backup utility

Configure the backup-type parameter to specify what the utility backs up:

  • all : backs up PB, CRD, and Ops Center configurations in a single operation.

  • PB : backs up only the Policy Builder configuration.

  • CRD : backs up only the Custom Reference Data.

  • Ops-center : backs up only the Ops Center configuration.

Back up CEE and CPC Ops Center configuration

Create manual backups of the CEE Ops Center and CPC Ops Center configuration files so you can restore them if the upgrade fails.

Procedure


Step 1

Log in to the master node as an ubuntu user.

Step 2

Create a directory to store the backup files.

Example:

ubuntu@master01:~$ mkdir backups_$(date +'%m%d%Y_T%H%M') && cd "$_"

Step 3

Back up the CPC Ops Center configuration and verify the line count.

Example:

ubuntu@master01:~/backups_08072019_T1651$ ssh -p 2024 admin@$(kubectl get svc -n $(kubectl get namespaces | \
grep -oP 'cpc-[^ ]+') | grep ops-center | awk '{print $3}') \
"show running-config" | tee cpcops.txt | wc -l

Sample output:

3422

Step 4

Back up the CEE Ops Center configuration and verify the line count.

Example:

ubuntu@master01:~/backups_08072019_T1651$ ssh -p 2024 admin@$(kubectl get svc -n $(kubectl get namespaces | \
grep cee) | grep ops-center | awk '{print $3}') \
"show running-config" | tee ceeops.txt | wc -l

Sample output:

874

Step 5

Move the SMI Ops Center backup file into the backups directory.

Example:

ubuntu@master01:~/backups_08072019_T1651$ scp ubuntu@$(kubectl get nodes \
-o jsonpath='{.items[0].status.addresses[?(@.type=="InternalIP")].address}'):/data/smi-backups/* .

Step 6

Verify the line count of the backup files.

Example:

ubuntu@master01:~/backups_08072019_T1651$ wc -l *

Sample output:

   874 ceeops.txt
  3422 cpcops.txt
     1 popcf-cfg-backup_110219-053530.tar.gz

The CEE Ops Center and CPC Ops Center configuration files are backed up in the backups directory on the master node. These files can be used to restore configuration if the upgrade fails.

Back up SVN, Policy, and CRD data

Back up SVN, Policy Builder, and CRD data to preserve critical configuration before the upgrade.

Procedure


Step 1

Log in to the master node as an ubuntu user.

Step 2

Retrieve the Policy Builder URL.

Example:

kubectl get ing -n $( kubectl get namespaces | grep -oP 'cpc-(\d+|\w+)' | cut -d\  -f1) | grep policy-builder | awk '{ print $2 }'

Sample output:

pb.cpc-02-cpc-engine-app-blv02.<ipv4address>.nip.io

Step 3

Navigate to the Policy Builder home page using the URL from the previous step.

Step 4

Click Import/Export.

Step 5

Click All Data and provide the following details:

  • Export URL: specify the export URL.

  • Export File Prefix: specify an appropriate name for the export file.

Step 6

Click Export.

Important


The exported file is saved to your local Downloads directory.

Step 7

Navigate to the Policy Builder home page to back up the CRD data.

Step 8

Click Custom Reference Data.

Step 9

Click Import/Export CRD data and then click Export.

Important


The CRD data is saved to your web browser's Downloads directory.


SVN, Policy Builder, and CRD data are backed up and available for restoration if the upgrade fails.

Configure auto-backup

Use this procedure to configure the auto-backup utility parameters from the Ops Center CLI.

Procedure


Step 1

Enter configuration mode and configure the backup parameters under debug backup-config .

Use the following mandatory options to configure the backup:

Table 2. Mandatory options for debug backup-config

Option

Description

backup-type

Specifies the type of backup to perform (all, PB, CRD, Ops-center).

password

Password for authentication of PB or CRD.

scp-server-dest-backup-path

Destination path for backup files on the SCP server.

scp-server-user-ip

Host IP address of the SCP server.

scp-server-user-name

Username for the SCP server.

scp-server-user-password

Password for the SCP server user.

svn-url

SVN URL for Policy Builder export — for example, http://svn/repos//configuration .

username

Username for authentication of PB or CRD.

schedule-backup-daily

Specifies the hour of the day when the backup runs (values range from 00 to 23).

schedule-backup-weekly

Specifies the day of the week when the backup runs (values range from 1 to 7, starting with 1 for Monday).

Sample configuration command:

Example:

[cpc_ops_center/cpc] cpc# config
[cpc_ops_center/cpc] cpc(config)# debug backup-config
[cpc_ops_center/cpc] cpc(config-backup-config)# backup-type all
[cpc_ops_center/cpc] cpc(config-backup-config)# username admin
[cpc_ops_center/cpc] cpc(config-backup-config)# password <pb_crd_password>
[cpc_ops_center/cpc] cpc(config-backup-config)# svn-url http://svn/repos/configuration
[cpc_ops_center/cpc] cpc(config-backup-config)# scp-server-user-ip <scp_ip_address>
[cpc_ops_center/cpc] cpc(config-backup-config)# scp-server-user-name <scp_username>
[cpc_ops_center/cpc] cpc(config-backup-config)# scp-server-user-password <scp_password>
[cpc_ops_center/cpc] cpc(config-backup-config)# scp-server-dest-backup-path /home/<scp_username>/backup
[cpc_ops_center/cpc] cpc(config-backup-config)# schedule-backup-daily 00
[cpc_ops_center/cpc] cpc(config-backup-config)# commit
[cpc_ops_center/cpc] cpc(config-backup-config)# end

Step 2

Verify the configuration using show running-config debug backup-config .

Example:

[cpc_ops_center/cpc] cpc# show running-config debug backup-config

Sample output:

debug backup-config
 backup-type    all
 username       admin
 password       $8$<encrypted_password>
 svn-url        http://svn/repos/configuration
 scp-server-user-ip        <scp_ip_address>
 scp-server-user-name      <scp_username>
 scp-server-user-password  $8$<encrypted_password>
 scp-server-dest-backup-path /home/<scp_username>/backup
 schedule-backup-daily  00
!

The auto-backup utility is configured. Backups run automatically at the scheduled time and can also be triggered manually.

Trigger an on-demand backup

To trigger a manual backup immediately from the Ops Center CLI, run this command:

[cpc_ops_center/cpc] cpc# debug backup now

You can also trigger a backup using the REST API. For more information, see the cpc Ops Center API reference.

Deploy CPC Converged Policy

Stage a new CPC image

Use this procedure to download, verify, and stage the new CPC software image on the SMI Cluster Manager node.

Procedure


Step 1

Download and verify the new CPC software image from the Cisco software download site.

Verify the SHA-256 hash of the downloaded image to confirm it has not been corrupted:

Example:

sha256sum cpc.<new_version>.SPA.tgZ

Step 2

Log in to the SMI Cluster Manager node as an ubuntu user.

Step 3

Copy the new CPC image to the SMI Uploads directory.

Example:

sudo mv cpc.<new_version>.SPA.tgZ /data/software/uploads

Note


The SMI Cluster Manager polls the /data/software/uploads directory and automatically processes new image files.

Step 4

Wait 30 seconds and verify that the image has been picked up from the Uploads directory.

Example:

sleep 30; ls /data/software/uploads

The Uploads directory should be empty after the SMI processes the image. If the file still appears, wait an additional 30 seconds and check again.

Step 5

Verify that the image has been processed and is available in the packages directory.

Example:

sudo du -sh /data/software/packages/*

Sample output:

1.5G  /data/software/packages/cpc.<previous_version>
1.6G  /data/software/packages/cpc.<new_version>

Confirm that the new version directory is present. The SMI Cluster Manager unpacks the image tarball into the packages directory.


The new CPC software image is staged and available in the SMI packages directory. You can now trigger the rolling software upgrade.

Trigger the rolling software upgrade

Trigger the rolling upgrade through the SMI Cluster Manager Ops Center to update all pod replicas sequentially to the new software version.

Before you begin

  • The new CPC image is staged in the SMI packages directory. For more information, refer to the Stage a new CPC image section

  • CPU usage on all nodes is below 50%.

Procedure


Step 1

Log in to the SMI Cluster Manager console.

Step 2

Log in to the SMI Ops Center.

Example:

ssh -p 2024 admin@<SMI_Cluster_Manager_IP>

Sample output:

SMI Cluster Manager
Copyright 2019-2023 Cisco Systems, Inc.
All rights reserved.
[SMI Cluster Manager] smi#

Step 3

Download the latest software package using the software-packages download command.

Specify the URL of the new CPC software tarball:

Example:

[SMI Cluster Manager] smi# software-packages download url <URL_of_new_cpc_image>

Note


The software-packages download url command downloads software packages from the specified HTTP or HTTPS location to the SMI Cluster Manager node.

Step 4

Verify that the tarball packages are loaded.

Example:

[SMI Cluster Manager] smi# software-packages list

Note

 
The software-packages list command lists all available software packages with their versions and current status.

Sample output:

NAME                    VERSION         STATUS
cpc                     2025.01.0       Active
cpc                     2025.02.0       Inactive

Step 5

Update the product repository URL with the latest CPC Converged Policy version in the cluster configuration.

Replace cluster_name and app_name with the values for your environment, and replace new_version with the new software version string:

Example:

[SMI Cluster Manager] smi# config
[SMI Cluster Manager] smi(config)# clusters <cluster_name> ops-centers <app_name> <instance_name> repository <new_repository_url>
[SMI Cluster Manager] smi(config-ops-centers-<app_name>/<instance_name>)# commit
[SMI Cluster Manager] smi(config-ops-centers-<app_name>/<instance_name>)# end
  • clusters cluster_name: name of the cluster whose nodes and configurations you want to deploy.

  • ops-centers app_name instance_name: the Ops Center application name and instance name for which the repository is updated.

  • repository url: the Helm chart repository URL pointing to the new CPC Converged Policy version.

Step 6

Run the cluster sync command to trigger the rolling upgrade.

Example:

[SMI Cluster Manager] smi# clusters <cluster_name> actions sync run

Important


The cluster sync command triggers the rolling upgrade immediately. Ensure all prerequisites are met and all configuration changes are committed before running this command.

  • clusters cluster_name: specifies the cluster that contains the nodes to deploy.

  • actions : configures the actions to perform on the specified cluster.

  • sync run : triggers the cluster synchronization and initiates the rolling upgrade.

The SMI Cluster Manager begins the rolling upgrade. Monitor the upgrade progress. For more information, refer to the Monitor the upgrade section.

Note


If the node type is not identified during the sync, SMI may display a warning about deprecated node-type parameter usage. This warning does not affect the upgrade and can be disregarded.


The cluster sync is initiated and the rolling upgrade is underway. The SMI Cluster Manager updates pod replicas sequentially across all tiers.

Monitor the upgrade

Monitor the rolling upgrade from the SMI Cluster Manager Ops Center to confirm that the cluster sync is progressing and to detect any issues.

Procedure


Step 1

Log in to the SMI Cluster Manager Ops Center and run the cluster sync command with debug output enabled.

Example:

[SMI Cluster Manager] smi# clusters <cluster_name> actions sync run upgrade-strategy concurrent debug true
  • clusters cluster_name: specifies the cluster whose nodes are being deployed.

  • actions : configures the actions to be run on the cluster.

  • sync run : triggers the cluster synchronization.

  • debug true : enables debug mode to display detailed sync log output.

Step 2

View the current sync logs to monitor the upgrade in real time.

Example:

[SMI Cluster Manager] smi# clusters <cluster_name> actions sync logs

Note


The sync logs parameter displays the current synchronization logs for the specified cluster.

Step 3

Monitor the sync logs continuously using the monitor sync-logs command.

Example:

[SMI Cluster Manager] smi# monitor sync-logs <cluster_name>

Sample output showing a successful cluster sync:

2025-02-14 09:43:22,973 p=9829 u=ubuntu n=ansible | PLAY RECAP
2025-02-14 09:43:22,973 p=9829 u=ubuntu n=ansible | master01  : ok=243  changed=2    unreachable=0    failed=0    skipped=115  rescued=0    ignored=1
2025-02-14 09:43:22,973 p=9829 u=ubuntu n=ansible | master02  : ok=190  changed=2    unreachable=0    failed=0    skipped=139  rescued=0    ignored=0
2025-02-14 09:43:22,973 p=9829 u=ubuntu n=ansible | master03  : ok=191  changed=2    unreachable=0    failed=0    skipped=139  rescued=0    ignored=0
Cluster sync successful

Note


The monitor sync-logs parameter continuously streams the cluster sync process for the specified cluster. Press Ctrl+C to stop monitoring.

Step 4

Check the overall sync status after the upgrade completes.

Example:

[SMI Cluster Manager] smi# clusters <cluster_name> actions sync status

Note


The sync status parameter displays the current synchronization status for the specified cluster.

Step 5

Exit the Ops Center.

Example:

[SMI Cluster Manager] smi# end

The cluster sync logs confirm that the rolling upgrade has completed successfully across all nodes.

What to do next

View detailed pod information after the upgrade through the CEE Ops Center UI. Verify the Helm status and pod health after the upgrade. See Verify the Helm status.

Verify the Helm status

Confirm that all Helm charts are running at the new version and that none are in a failed or pending state.

Procedure


Step 1

Run the following command on the master node to view the list of all deployed Helm charts.

Example:

helm list -A

Sample output (filtered for cpc namespace):

NAME                             NAMESPACE                        REVISION  UPDATED                               STATUS    CHART                                    APP VERSION
cpc-engine-app                 cpc-02-cpc-engine-app-blv02   5         2025-02-14 12:04:17.898 +0000 UTC     deployed  cpc-engine-app-2025.02.0.BUILD_2025021409290   2025.02.0.BUILD_20250214092901
cpc-network-policy             cpc-02-cpc-engine-app-blv02   2         2025-02-14 11:48:23.422 +0000 UTC     deployed  cpc-network-policy-1.0.0                       1.0.0
crd-api-cpc-engine-app         cpc-02-cpc-engine-app-blv02   5         2025-02-14 12:04:17.896 +0000 UTC     deployed  crd-api-2025.02.0.BUILD_20250214092901           2025.02.0.BUILD_20250214092901
policy-builder-cpc-engine-app  cpc-02-cpc-engine-app-blv02   5         2025-02-14 12:04:17.897 +0000 UTC     deployed  policy-builder-2025.02.0.BUILD_20250214092901    2025.02.0.BUILD_20250214092901
svn-cpc-engine-app             cpc-02-cpc-engine-app-blv02   5         2025-02-14 12:04:17.897 +0000 UTC     deployed  svn-2025.02.0.BUILD_20250214092901              2025.02.0.BUILD_20250214092901

Confirm that all relevant Helm releases show a status of deployed and that the chart version and app version match the new software version.

Step 2

If the Helm chart is not found in the output, log in to the Ops Center and run the show helm charts command in operational mode.

Example:

show helm charts

Sample output for version:

NAME                             VERSION
cpc-engine-app                 2025.02.0.BUILD_20250214092901
cpc-network-policy             1.0.0
crd-api-cpc-engine-app         2025.02.0.BUILD_20250214092901
policy-builder-cpc-engine-app  2025.02.0.BUILD_20250214092901
svn-cpc-engine-app             2025.02.0.BUILD_20250214092901

Sample output for status:

NAME                             STATUS
cpc-engine-app                 deployed
cpc-network-policy             deployed
crd-api-cpc-engine-app         deployed
policy-builder-cpc-engine-app  deployed
svn-cpc-engine-app             deployed

Confirm that all Helm charts show a status of deployed and that the version matches the upgraded software version.


All Helm charts are deployed at the new software version. The upgrade is confirmed at the Helm level.

Verify the pods

Verify the status of all CPC Converged Policy pods to confirm that the upgrade completed without leaving any pods in a non-running state.

Procedure


Step 1

View detailed information about a specific pod to investigate its status.

Example:

kubectl describe pod <pod_name> -n <namespace>

Step 2

List all pods that are not in a running state across all namespaces.

Example:

kubectl get pods -A | grep -v Running

If the output is empty, all pods are running. If any pods are listed, investigate them using kubectl describe pod .

Note


A pod is healthy when the Status column shows Running and the Ready column shows the same number on both sides of the forward slash — for example, 3/3 .


All CPC Converged Policy pods are confirmed to be in a running and ready state. The upgrade is complete.

Rolling back the upgrade

Rolling back the upgrade is the process of reversing a CPC Converged Policy upgrade by restoring the previously backed-up Ops Center, CEE, Policy Builder, and CRD configurations when

  • one or more pods fail to reach a running state after the upgrade,

  • the Helm chart status shows errors after the cluster sync completes, or

  • critical services are unavailable and cannot be restored through standard troubleshooting.

The rollback procedure consists of three tasks performed in sequence: reload the Ops Center configuration from the backup file, update the Ops Center with the corrected configuration, and restore the Policy Builder and CRD data.

Reload Ops Center configuration

Restore the Ops Center configuration from a backup file as the first step in rolling back the upgrade.

Before you begin

Ensure that the backup files created before the upgrade are available on the master node in the ~/backups_<timestamp> directory.

Procedure


Step 1

Log in to the master node as an ubuntu user.

Step 2

Extract the SMI backup tarball and navigate to the extracted directory.

Example:

cd ~/backups_<timestamp> && tar -zxf popcf-cfg-backup_<timestamp>.tar.gz

Step 3

Navigate to the extracted backup directory.

Example:

cd popcf-cfg-backup_<timestamp>

Step 4

Convert the exported Ops Center configuration into a clean file ready for import.

This command strips the leading path from the configuration entries so the file can be pasted directly into the Ops Center CLI:

Example:

perl -ne 'next if /^!|^$/; s/^\s*//; s/\s*$//; print "$_\n"' cpcops.txt > cpcops_clean.txt

The file cpcops_clean.txt is created in the current directory and is ready to be pasted into the Ops Center CLI in the next task.


The Ops Center backup is extracted and converted to a clean configuration file. Proceed to update the Ops Center configuration.

Update the Ops Center configuration

Apply the restored configuration file to the Ops Center and update the Helm repository URL to point to the previous software version.

Before you begin

Complete the Reload Ops Center configuration task. The cpcops_clean.txt file must be available on the master node.

Procedure


Step 1

Log in to the master node as an ubuntu user.

Step 2

Log in to the Ops Center CLI.

Example:

ssh -p 2024 admin@$(kubectl get svc -n $(kubectl get namespaces | grep -oP 'cpc-[^ ]+') | grep ops-center | awk '{print $3}')

Step 3

Enter configuration mode and paste the contents of cpcops_clean.txt into the CLI session.

Important


Review the pasted configuration and verify that all sections are correctly imported. If any sections are not properly imported, manually re-enter the affected configuration lines and commit again.

Example:

[cpc_ops_center/cpc] cpc# config
[cpc_ops_center/cpc] cpc(config)# <paste contents of cpcops_clean.txt here>
[cpc_ops_center/cpc] cpc(config)# commit
[cpc_ops_center/cpc] cpc(config)# end

Step 4

Update the Helm repository URL to point to the previous CPC Converged Polcy software version.

Replace cluster_name, app_name, instance_name, and previous_version with the values from your environment:

Example:

[SMI Cluster Manager] smi# config
[SMI Cluster Manager] smi(config)# clusters <cluster_name> ops-centers <app_name> <instance_name> repository https://charts.<Master_VIP>.nip.io/cpc.<previous_version>
[SMI Cluster Manager] smi(config-ops-centers-<app_name>/<instance_name>)# commit
[SMI Cluster Manager] smi(config-ops-centers-<app_name>/<instance_name>)# end

The Helm repository URL is updated to reference the previous software version. Run a cluster sync to apply the rollback. For more information, refer to the Trigger the rolling software upgrade section for the cluster sync command.


The Ops Center is updated with the restored configuration and the Helm repository URL points to the previous software version. Proceed to restore the Policy Builder and CRD data.

Restore the configuration from backup

Restore the Policy Builder policy data and CRD data from backup to return the CPC Converged Policy system to its pre-upgrade configuration state.

Before you begin

The Policy Builder and CRD backup files must be available in your local Downloads directory from the backup task performed before the upgrade.

Procedure


Step 1

Log in to the master node as an ubuntu user.

Step 2

Retrieve the Cisco Policy Suite Central URL.

Example:

kubectl get ing -n $(kubectl get namespaces | grep -oP 'cpc-[^ ]+') | grep cps-central | awk '{print $3}'

Sample output:

cps.cpc-02-cpc-engine-app-blv02.<ipv4address>.nip.io

Step 3

Navigate to the Cisco Policy Suite Central URL in a web browser and log in.

Step 4

Click Import/Export and select the Import tab.

Step 5

Select the exported policy data file from the backup.

Step 6

In the Import URL field, specify the SVN repository URL:

Example:

http://svn/repos/configuration

Step 7

Enter a description in the Commit Message field and click Import.

Step 8

Log in to the master node as an ubuntu user.

Step 9

Retrieve the Policy Builder URL.

Example:

kubectl get ing -n $(kubectl get namespaces | grep -oP 'cpc-[^ ]+') | grep policy-builder | awk '{print $3}'

Sample output:

pb.cpc-02-cpc-engine-app-blv02.<ipv4address>.nip.io

Step 10

Navigate to the Policy Builder URL and click Build Policies using version controlled data.

Step 11

Select the repository from the drop-down list and click OK.

Step 12

Click Publish to Runtime Environment, enter a description in the Commit Message field, and click OK.

The Policy Builder configuration is restored and published to the runtime environment.

Step 13

Restore the CRD data: in the Cisco Policy Suite Central home page, click Custom Reference Data.

Step 14

Select the Export CRD to Golden Repository checkbox and specify the SVN host name in the text field.

Note


For CPC Converged Policy, the SVN host name value is svn .

Step 15

Click + to add the entry, then click Export.

A success message confirms that the CRD data has been exported to the golden repository.


The Policy Builder policy data and CRD data are restored from backup. The CPC Converged Policy system is returned to its pre-upgrade configuration state.