Manage Custom Reference Data

Custom Reference Data

Custom Reference Data (CRD) is reference data specific to a service provider—such as network names or cell site characteristics—that the policy engine requires to operate but does not use when evaluating policies. CRD includes:

  • table-based storage that lets service providers create and manage custom data tables according to their requirements, and

  • a pagination component that controls the number of data rows displayed per page, which you can change at any time; the configured value persists across the Central interface until you change it.


    Note


    Restart all policy servers after modifying a CRD table schema—for example, after adding or removing a column.
Configuration support for importing CRD

This topic provides the steps required to import CRD when the CRD schema is modified. Importing of CRD involves these steps:

  • Backing up the existing SVN repository

  • Backing up the existing CRD

  • Removing the existing CRD from MongoDB

  • Importing and publishing the new CRD Schema

  • Importing the new CRD table

Back up the SVN repository

Use this task to preserve the existing Policy Builder configuration and SVN data in a safe location before you modify the CRD schema.

Procedure


Step 1

Log in to the CPC Central GUI.

Step 2

On the Converged Policy & Charging Central page, navigate to Policy Builder and click the Import/Export link.

The Import/Export form opens.

Step 3

In the Export tab, select the All data option to configure the export type.

The export and import options are described in the table.

Table 1. Export and import options

Parameter

Description

All data

Exports service configuration with environment data, providing a complete backup of both service configuration and environment data.

Exclude Environment

Exports without environment data, allowing you to export configuration from a lab environment without overwriting environment-specific data in the target system.

Only Environment

Exports only environment data, providing a way to back up system-specific environment information.

Export URL

The URL that you can access from Policy Builder or view directly in Subversion.

Export File Prefix

A name prefix for the export file.

Note


The exported filename automatically includes the date and time of the export.

Step 4

To export in compressed format, select the Use 'zip' file extension check box.

Step 5

Click Export.

Step 6

Navigate to the exported file and save it to your local machine. Include the cluster name and date in the filename.


Back up the existing CRD

Use this task to preserve existing CRD data in a safe location before you modify the CRD schema. This backup allows you to restore the data if the schema update fails.

Procedure


Step 1

Log in to the CPC Central GUI.

Step 2

On the Converged Policy & Charging Central page, navigate to Custom Reference Data and click the Custom Reference Data link.

The Import/Export CRD data form opens.

Step 3

Under Export Custom Reference Data, configure the export options as needed.

Table 2. Export Custom Reference Data options

Option

Description

Use 'zip' file extension

Enables easier viewing of exported contents for advanced users.

Export CRD to Golden Repository

When the system is in a bad state, the CRD cache is rebuilt using the golden CRD data.

Step 4

Click Export.


Remove the existing CRD from MongoDB

Use this task to clear the affected CRD table data from MongoDB so the updated schema can be imported without conflicts caused by the old data structure.

Before you begin

Complete the CRD backup tasks before performing this task. Removing data without a backup may result in unrecoverable data loss.

Procedure


Step 1

Log in to the admin-db pod that contains the CRD (cust_ref_data ) database.

Step 2

Access the cust_ref_data database.

Example:

use cust_ref_data

Step 3

Delete the data from the CRD table or tables that have schema changes.

Example:

db.table_name.remove({})

Replace table_name with the name of each CRD table you want to clear. Repeat this command for each affected table.

Step 4

Exit the admin-db pod.


MongoDB replica sets

MongoDB replica set configurations support both IPv4 and Internet Protocol version 6 (IPv6) addresses for replica member hosts, which ensures that initialization, replication, and initial synchronization work correctly regardless of the IP version in use. This dual support allows flexible network configurations and simplifies transitions to IPv6 while maintaining compatibility with existing IPv4 infrastructure.


Note


Configure each replica subscriber with either IPv4 or IPv6 addresses. Do not mix IP versions within a single subscriber configuration.


Configure IPv6 in MongoDB replica sets

Use this task to configure the database, replica set name, port, interface, memory limits, node labels, and member hosts when deploying MongoDB replica sets that use IPv6 addresses.

Procedure


Step 1

In Ops-Center, configure the database and replica set initialization parameters.

Example:

Database: db scdb
Replica Set Name: replica-name mongo-spr1
Port: 27018
Interface: interface db1.mdb.2564
Resource Memory Limit: 112000

Step 2

Configure the replica set labels and member hosts.

Example:

Replica Set Label Key: smi.cisco.com/node-type-5
Replica Set Label Value: db-spr

Member Configurations:
Member: sprdb-rs1-arbiter
Host: 2001:DB8::8
Arbiter: true
Site: remote

Member: sprdb-rs1-s1-m1
Host: 2001:DB8::9
Arbiter: false
Priority: 166
Site: remote

Member: sprdb-rs1-s1-m2
Host: 2001:DB8::10
Arbiter: false
Priority: 155
Site: remote

Member: sprdb-rs1-s2-m1
Host: 2001:DB8::11
Arbiter: false
Priority: 66
Site: local

Member: sprdb-rs1-s2-m2
Host: 2001:DB8::12
Arbiter: false
Priority: 55
Site: local

Importing CRD when the schema changes

Perform this process when a CRD table schema is modified—for example, when a column is added or removed. Skipping or reordering the stages can cause data loss or import failures.

Summary

The importing CRD process involves the operator working across the CPC Central GUI and the MongoDB admin-db pod to replace the old schema and data with the new version.

Workflow

These are the stages of importing CRD when the schema changes:

  1. Stage 1 — Back up the SVN repository: Export the current Policy Builder configuration from the CPC Central GUI to preserve a fallback copy.
  2. Stage 2 — Back up the existing CRD: Export the CRD data to a file so you can restore it if needed.
  3. Stage 3 — Remove the existing CRD from MongoDB: Delete the affected CRD table data from the MongoDB cust_ref_data database to clear the stale schema.
  4. Stage 4 — Import and publish the new CRD schema: Import the updated schema file into Policy Builder and publish it to the runtime environment.
  5. Stage 5 — Import the new CRD table: Load the new CRD data archive into CPC Central and verify successful import.

Result

After completing all five stages, the CRD tables reflect the new schema and the system operates with the updated reference data.

CPC table evaluation optimization

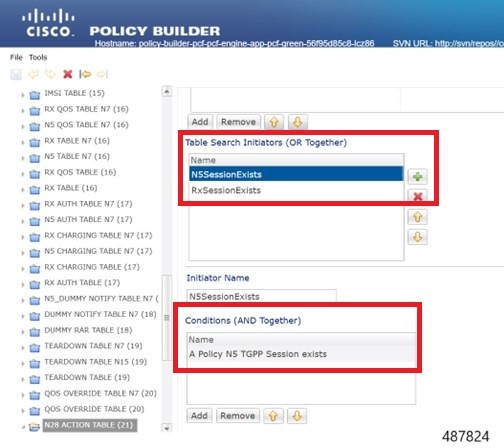
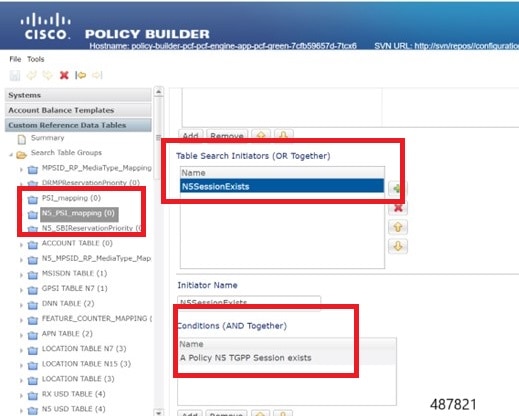
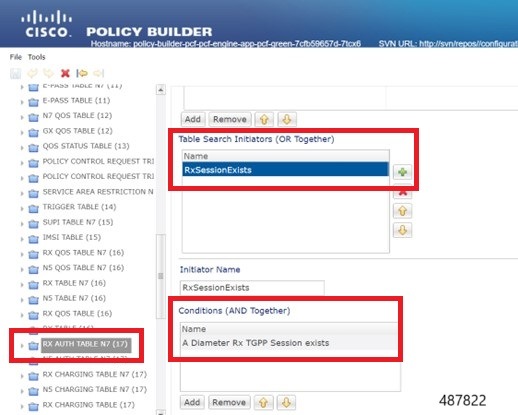
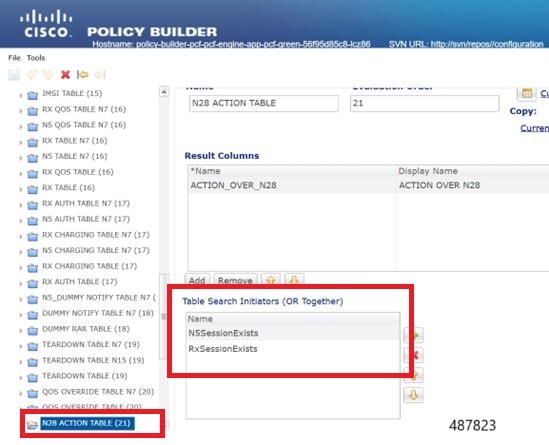
The CPC currently evaluates all the configured CRD tables for every incoming message. This comprehensive evaluation complicates troubleshooting because it is difficult to determine the source of specific values. Therefore, CPC allows the use of Table Search Initiator conditions, which activate only the required tables, depending on specific conditions.

You can add initiator conditions for N5, Rx, and non-N5/Rx tables.

Initiator Conditions

The Table Search Initiator conditions are included for the respective tables for evaluation:

  • For N5 Tables, use the A Policy N5 TGPP Session exists condition.

  • For Rx Tables, use the A Diameter Rx TGPP Session exists condition.

  • Use a A Policy N5 TGPP Session exists or A Diameter Rx TGPP Session exists condition for the tables to avoid evaluation for messages other than N5 or Rx message:

Import the new CRD table

Use this task after publishing the new CRD schema to load the updated CRD table data into the system.

Before you begin

Ensure the CRD data archive is saved as a .crd or .zip file before you begin.

Procedure


Step 1

Log in to CPC Converged Policy Central.

Step 2

Click Custom Reference Data.

Step 3

Click Import/Export CRD Data.

Step 4

Under Export Custom Reference Data, configure export options as required.

  • Select the Use 'zip' file extension check box to enable easier viewing of exported contents for advanced users.

  • Select the Export CRD to Golden Repository check box to export CRD to the golden repository, which is used to restore cust_ref_data in error scenarios. A text box appears for you to enter the golden repository hostname.

Step 5

Add a valid SVN server hostname or IP address to push the CRD to the repository.

To add multiple hostnames or IP addresses, click the plus (+) icon.

Step 6

Click Export.


To verify the export to the golden repository was successful:

  1. Log in to CPC Converged Policy Central.

  2. Click Custom Reference Data.

  3. Click Import/Export CRD Data.

  4. In Import Custom Reference Data, click Field to Import field and browse for the CRD archive.

  5. Click Import to import the CRD data.

  6. Verify that a "Data imported" message appears on the CPC Converged Policy Central GUI.

  7. Review the crd-api pod logs for any exception or error related to a duplicate key or duplicate index. If no errors appear, the CRD is successfully imported.