Event and System logs

Feature Description

CPC provides a centralized view of the application logs that are consolidated from different containers. The unified view improves the efficiency as you can determine the issue faster instead of accessing the individual containers to view the logs. Collection of logs from the containers is enabled by default.

You can view the logs in the real time and offline mode. The real-time mode captures the current event activity that is performed on the container. In the offline mode, you have the flexibility to access the logs from a remote machine.

Logs are listed based on the timestamp at which they are generated.

How it Works

This section describes how this feature works.

The OAM node hosts the logs which different application containers generate. These containers include the CPC (engine), cpc-rest-ep, policy-builder, diameter-ep, ldap-ep, crd, and unifiedapi.

View the logs

This section describes how to view the consolidated application logs.

To view the consolidated logs, use this command:

kubectl logs -n namespace consolidated-logging-0 

NOTES:

  • namespace – Specifies the namespace under which CPC is deployed.

Troubleshoot Information

This section provides information for troubleshooting any issues that may arise during the feature operation.

If the logs are not generated in the consolidated-logging-0 pod, then one of the following conditions may be causing the failure. To resolve the issue, make sure that you do the following:

  • Verify the status of <namespace>-cpc-oam-app helm deployment. To view the configured helm charts and their status, use this command:

    helm list 
  • Ensure that the gRPC stream appender is enabled by verifying the contents of cps-logback configMap. To verify the contents, use this command:

    kubectl describe configmap -n  namespace cps-logback 
  • Ensure that the consolidated-logging-0 pod is up and running. To check the pod status, use the following command:

    kubectl describe pod consolidated-logging-0 -n namespace 
  • Verify that the consolidated-logging-0 pod is accessible through the consolidated-logging service. To verify the connection, use the nc command.

Configure Centralized CDR Export

Feature description

The Centralized CDR Export feature exporting Call Detail Records (CDRs) in CPC. This feature centralizes the log-based CDR replication and export by forwarding engine-generated CDR logs to the dedicated pcf-cdr-log pod. CDR processing and generation remain within the CPC engine, the pcf-cdr-log pod manages the subsequent CSV normalization, local file persistence, rotation, compression, and optional secure remote export through FTP.

This design replaces legacy engine-side replication, improving reliability through centralized management, configurable retention policies, and automated retry logic for failed FTP transfers.

CDR Policy Builder configuration

Before the pcf-cdr-log pod exports CDRs, configure the CPC engine to identify, process, and structure the data. This configuration establishes the source of truth for CDR generation. The engine handles processing, record calculation, and internal message queue management.


Note


If the configuration phase is incomplete or contains errors, the export pod will not receive any data to process.


This section describes the process of preparing the Policy Builder to generate CDRs.

Install the required features on the target engine (pcf-green) to enable the reporting plugin.

  1. Access the Ops-Center CLI.

  2. Execute these commands:

    engine pcf-green
    install-features policy-builder [ com.broadhop.client.feature.policyintel ]
    install-features policy-server [ com.broadhop.policyintel.service.feature ]
    exit

Policy Reporting Field types

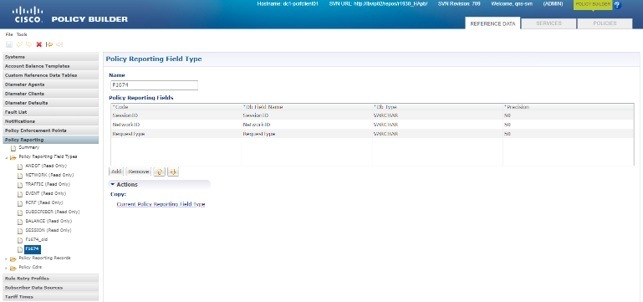
Specify the structure for each data attribute you plan to gather.

  1. Navigate to Reference Data > Policy Reporting > Policy Reporting Field Types.

  2. Create a new field type for required attributes.

  3. Specify the Code, DB field name, and Data type (e.g., VARCHAR) for each.

Figure 1. Policy Reporting Field Types configuration

Custom Policy Logic

Define the logic that triggers CDR generation.

  1. Add the sendoutboundmessages extension point to the Initial Blueprint.

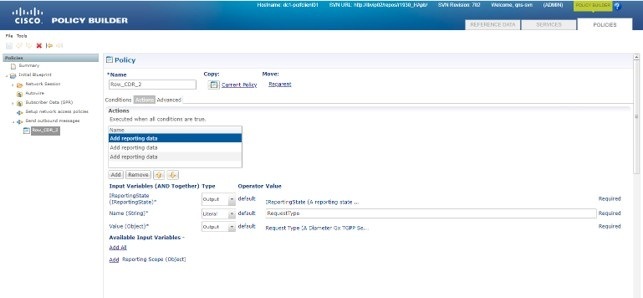
  2. Create a custom policy (example: Row_CDR_2) under Policies > Initial Blueprint > Send outbound messages.

  3. Configure the policy Conditions (example: verify that a Diameter Gx TGPP session exists).

  4. Use the Add reporting data action to map session variables to the reporting state.

Figure 2. Add reporting data action

CDR Record Structure

Define the template for the exported records.

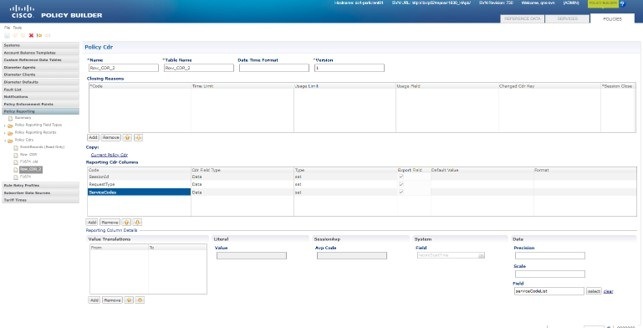
  1. Navigate to Reference Data > Policy Reporting > Policy CDRs.

  2. Create the CDR definition.

  3. Enable the Export field for each column required in the output. Confirm that these fields correspond to the reporting state variables defined in the custom policy.

Figure 3. Policy CDR record structure

Reporting Server and Plugin Configuration

Link the PB configuration to the reporting engine.

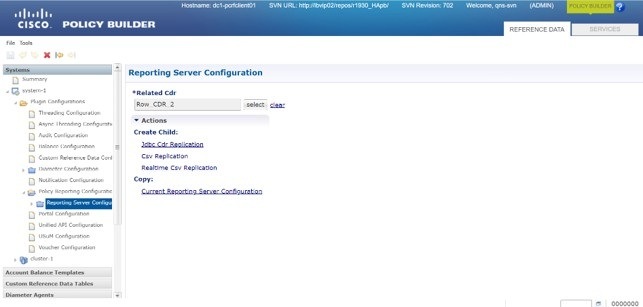
  1. Navigate to Reference Data > Systems > system-1 > Plugin Configurations > Policy Reporting Configuration.

  2. Set the DB hosts to match your environment (example: primary db: admin-db-0.admi-db, secondary db: admin-db-1.admi-db, port: 27017).

  3. Under Reporting Server Configuration, set the Related CDR to the definition created in CDR Record Structure.

  4. Configure the replication child (CSV or Realtime CSV).

    • Constraint: Only one CSV configuration should be active per reporting server.

Figure 4. Reporting Server Configuration

Configure centralized CDR export

Before you begin

Ensure that you meet these requirements:

  • Access: Ensure the CPC Ops-Center is accessible.

  • Enable Policy Intelligence support in Policy Builder and the Policy Server by running this commands:

    engine pcf-green
    install-features policy-builder [ com.broadhop.client.feature.policyintel ]
    install-features policy-server [ com.broadhop.policyintel.service.feature ]
    exit
  • Verify that the CPC engine is configured with the Java Virtual Machine (JVM) property.

    properties log.cdr.csv
    value true
    exit
    properties disableCdrReplication
    value true
    exit

Use this procedure to enable the CDR export service, manage log rotation, and configure secure remote backups.

Procedure


Step 1

Log in to the CPC Ops-Center CLI.

Step 2

Enable the CDR export service.

pcf-cdr enabled true

Step 3

Configure the log rotation parameters to manage local storage usage:

pcf-cdr log-rotation roll-interval-seconds <seconds>
pcf-cdr log-rotation max-file-size-mb <size_in_mb>
pcf-cdr log-rotation max-final-files <number_of_files>
pcf-cdr log-rotation gzip-final-files true

Note


roll-interval-seconds: Set to a value greater than 0 to enable time-based rolling; set to 0 to enable size-only rolling ( max-file-size-mb).

Step 4

Enable and configure the FTP backup settings:

pcf-cdr log-backup enabled true
pcf-cdr log-backup ftp-server-user-name <username>
pcf-cdr log-backup ftp-server-user-ip <ip_address>
pcf-cdr log-backup ftp-server-dest-backup-path <remote_path>
pcf-cdr log-backup ftp-server-port 22
pcf-cdr log-backup ftp-server-user-password <password>
pcf-cdr log-backup connect-timeout-seconds 10
pcf-cdr log-backup strict-host-key-checking false
pcf-cdr log-backup poll-interval-seconds 30
pcf-cdr log-backup interval-seconds 0

pollIntervalSeconds: staging folder scan frequency (staging, retention, cleanup).

intervalSeconds = FTP transfer throttle (0 = no throttle, meaning attempt upload on every poll).

Note


If roll-interval-seconds >0 time based rolling happens otherwise enables size-only

Step 5

Verify the CDR export service

  1. Confirm the pcf-cdr-log stateful set is running.

    kubectl get pod -n pcf pcf-cdr-log-0
  2. Verify that the system populates the active CDR file.

    kubectl exec -n pcf pcf-cdr-log-0 -- tail -f /data/pcf-cdr/cdr.csv
  3. Confirm that the system moves rolled files to the final directory.

    kubectl exec -n pcf pcf-cdr-log-0 -- ls -ltr /data/pcf-cdr/final

Log file management

The pcf-cdr-log pod manages log files through active recording, archiving, and remote transfer.

  • Active logs: The pcf-cdr-log pod writes formatted CSV records to /data/pcf-cdr/cdr.csv.

  • Archived logs: Once the file size or interval limit is reached, the system moves the rolled file to /data/pcf-cdr/final. If the gzip-final-files property is set to true, the file is compressed into a gzip format; otherwise, it remains a plain file. The system retains these files based on the max-final-files setting.

  • FTP transfers: If FTP is enabled, the system copies files to /data/pcf-cdr/stagingFTP for transfer. Upon successful upload, the system creates an .uploaded marker in /data/pcf-cdr/uploadedFTP.


    Note


    In the event of persistent FTP transfer failures, the system retains a maximum of 20 files in the stagingFTP directory. Any files exceeding this limit are automatically deleted.


Troubleshoot CDR export

Use this table to identify and resolve common issues encountered during the configuration and operation of the centralized CDR export.

Table 1. Troubleshooting common issues

Issue

Potential cause

Corrective action

No CDR records in cdr.csv

The PCF engine is not configured with
properties log.cdr.csv
value true
exit
.

Verify the engine JVM properties.

FTP transfer fails

Incorrect credentials or network path.

Check the Ops-Center FTP configuration and network connectivity.

High disk usage

max-final-files is set too high.

Adjust log-rotation max-final-files in the Ops-Center.