About First-Hop Security
First-Hop Security (FHS) is a set of features that optimize IPv6 link operation and provide protection from rogue or misconfigured users in large Layer 2 domains.
-
FHS operates on Layer 2 and Layer 3 switches facing end nodes, often referred to as "first hops".
-
FHS features help secure networks by preventing attacks from unauthorized or misconfigured devices.
-
Extended FHS features can be used for different deployment scenarios or attack vectors.
Supported First-Hop Security Features
The following FHS features are supported:
-
IPv6 RA Guard
-
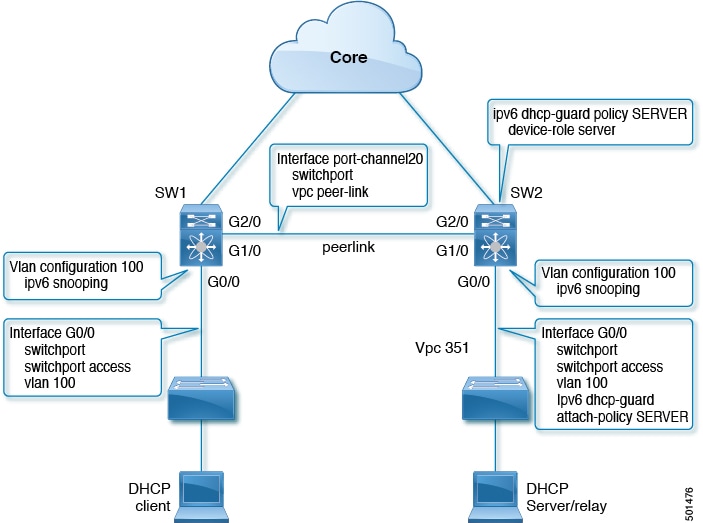
DHCPv6 Guard
-
IPv6 Snooping
 Note |
See Guidelines and Limitations of First-Hop Security for information about enabling this feature. |
Note |
Use the feature dhcp command to enable the FHS features on a switch. |
Example: Enabling First-Hop Security Features
For example, to enable FHS features on a switch, use the feature dhcp command. This ensures that the supported features such as IPv6 RA Guard, DHCPv6 Guard, and IPv6 Snooping are active for end node protection.
IPv6 Global Policies
IPv6 global policies are mechanisms that provide storage and access policy database services for IPv6 features, including IPv6 Snooping, DHCPv6 Guard, and IPv6 RA Guard.
-
Policy attributes are stored in the software policy database each time an IPv6 global policy is configured.
-
When a policy is applied to an interface, the database entry is updated to include the interface.
-
IPv6 global policies support features such as IPv6 Snooping, DHCPv6 Guard, and RA Guard.
Reference Information for IPv6 Global Policies
IPv6 global policies are implemented and managed through specific commands and hardware configurations, and their behavior may vary depending on the platform.
-
All port level FHS policies are programmed in the ifacl region, while VLAN level policies are programmed in the FHS region.
-
Use the hardware profile tcam regionfhs tcam_size command to configure the FHS. The range for the TCAM size is 0-4096.
-
Use the hardware access-list tcam region ing-redirect tcam_size command to configure FHS. You can resize the ing-racl region to allocate space to the ing-redirect region.
-
Cisco Nexus 9300-FX/FX2 platform switches: FHS packets take the copp-s-dhcpreq queue for software processing.
-
Cisco Nexus 9300, 9500 platform switches use the class default.
Note |
When you upgrade the Cisco Nexus Series switch to Cisco NX-OS Release 7.0(3)I7(1) using the In-Service Software Upgrades (ISSU), you must reload the Cisco NX-OS box before configuring the port level FHS policies. |
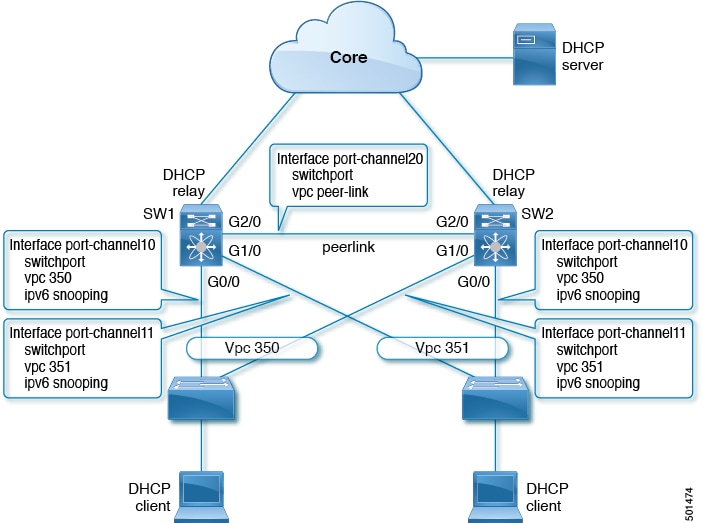
IPv6 First-Hop Security Binding Table
A database table of IPv6 neighbors connected to the device is created from information sources such as IPv6 snooping. This database, or binding table is used by various IPv6 guard features to validate the link-layer address (LLA), the IPv6 address, and prefix binding of the neighbors to prevent spoofing and redirect attacks.

 Feedback