Install Crosswork Data Gateway on KVM

This chapter contains the following topics:

Installation workflow of Crosswork Data Gateway

Crosswork Data Gateway enables seamless data collection and forwards telemetry and operational data from network devices to the Crosswork Network Controller. To activate these data collection capabilities when deploying the Crosswork Network Controller solution on a KVM hypervisor, you must install Crosswork Data Gateway as a critical initial step in your deployment workflow.

Installation workflow

Follow these steps to complete the installation process.

Table 1. Installation workflow

Step

Action

1. Verify that your installation environment meets the prerequisites.

2. Install Crosswork Data Gateway on the bare metal server.

Install Crosswork Data Gateway using a CLI-based approach. See Install Crosswork Data Gateway using the CLI.

Important


If you plan to install multiple Data Gateway VMs due to load or scale requirements, or you wish to leverage Crosswork Data Gateway High Availability, we recommended to install all the Data Gateway VMs first and then proceed with adding them to a Data Gateway pool.

See the Create a Crosswork Data Gateway Pool section in the Cisco Crosswork Network Controller 7.1 Administration Guide.

3. Monitor the health of the VM.

Once installation is complete, access Cockpit, a web-based management interface to monitor the health and performance of your VM. See Access and manage the Crosswork Data Gateways on KVM.

Parameters required for Crosswork Data Gateway installation

This section outlines the parameters needed for installing Crosswork Data Gateway on KVM. These parameters will be included in the config.txt file used during the installation process.

Table 2. Parameters and description

Key

Description

Additional Information

Deployment

Parameter conveys the VM resource profile. For an on-premise installation, choose Crosswork On-Premise.

Host Information
Description

A detailed description of the Data Gateway.

Label

Label used by Cisco Crosswork to categorize and group multiple Data Gateway VMs.

AllowRFC8190

Choose how to validate interface addresses that fall in a usable RFC 8190 range. Options are: Yes, No, or Ask, where the initial configuration script prompts for confirmation.

The default value is Yes to automatically allow interface addresses in an RFC 8190 range.

DGCertKey

SCP URI to private key file for session key signing. You can retrieve this using SCP (user@host:path/to/file).

Cisco Crosswork uses self-signed certificates for handshake with Crosswork Data Gateway. These certificates are generated at installation.

However, if you want to use third party or your own certificate files, then enter these parameters.

Certificate chains override any preset or generated certificates in the Data Gateway VM and are given as an SCP URI (user:host:/path/to/file).

The host with the URI files must be reachable on the network (from the vNIC0 interface via SCP) and the files must be present at the time of install.
DGCertChainPwd

Passphrase of the SCP user to retrieve the Crosswork Data Gateway PEM formatted certificate file and private key.

DGAppdataDisk

Indicates the size in GB of a second data disk. The default value of this parameter in each profile is:

  • 20 GB for Standard.

  • 520 GB for Extended.

Do not change the default value without consulting a Cisco representative.

HANetworkMode

Indicates the mode for the high-availability network.

Options are:

  • L2

  • L3

The default value is L2.

Passphrase
dg-adminPassword

The password you have chosen for the dg-admin user.

Password must be 8–64 characters.

dg-operPassword

The password you have chosen for the dg-oper user.

Password must be 8–64 characters.

NicDefaultGateway

The interface used as the default Data Gateway for processing the DNS and NTP traffic.

Options are eth0, eth1, or eth2. The default value is eth0.

For information on the type of roles that you must assign to the vNICs, see Table 3.

NicAdministration

The interface used to access the VM through the SSH access.

Options are eth0, eth1, or eth2. The default value is eth0.

NicExternalLogging

The interface used to send logs to an external logging server.

Options are eth0, eth1, or eth2. The default value is eth0.

NicManagement

The interface used to send the enrollment and other management traffic.

Options are eth0, eth1, or eth2. The default value is eth0.

NicControl

The interface used to send the destination, device, and collection configuration.

Options are eth0, eth1, or eth2. The default value is eth1.

NicNBSystemData

The interface used to send collection data to the system destination.

As the system destinations share the same IP as the interface that allows connection to the collection service, the northbound data for system destinations uses the Control role's interface.

Options are eth0, eth1, eth2or eth3.

NicNBExternalData

The interface used to send the collection data to the external destinations configured by the user.

Options are eth0, eth1, or eth2.

In a 2-NIC deployment, the default interface is eth1; in a 3-NIC deployment, it is eth2.

NicSBData

The interface used to collect data from the devices.

If the interface only has the NicSBData role, it doesn't need an IP during the deployment.

Options are eth0, eth1, or eth2. The default value is eth2.

vNIC IPv4 address1

Vnic0IPv4Method

Vnic1IPv4Method

Vnic2IPv4Method

Method in which the interface is assigned an IPv4 address - None or Static.

The default value is None.

  • If you're using IPv4, change the value from none to static, then configure these fields:

    • vNIC IPv4 Address

    • vNIC IPv4 Netmask

    • vNIC IPv4 Skip Gateway

    • vNIC IPv4 Gateway

  • If you are using IPv6, leave the value set to none and retain the default IPv4 settings.

Vnic0IPv4Address

Vnic1IPv4Address

Vnic2IPv4Address

IPv4 address of the interface.

Vnic0IPv4Netmask

Vnic1IPv4Netmask

Vnic2IPv4Netmask

IPv4 netmask of the interface in dotted quad format.

Vnic0IPv4SkipGateway

Vnic1IPv4SkipGateway

Vnic2IPv4SkipGateway

The default value is False.

Setting this to True skips configuring a gateway.

Vnic0IPv4Gateway

Vnic1IPv4Gateway

Vnic2IPv4Gateway

IPv4 address of the vNIC gateway.

vNIC IPv6 address 2

Vnic0IPv6Method

Vnic1IPv6Method

Vnic2IPv6Method

Method in which the vNIC interface is assigned an IPv6 address - None, Static, or SLAAC.

The default value is None.

If you're using IPv6, change the value from none to static, then configure these fields:

  • vNIC IPv6 Address

  • vNIC IPv6 Netmask

  • vNIC IPv6 Skip Gateway

  • vNIC IPv6 Gateway

Vnic0IPv6Address

Vnic1IPv6Address

Vnic2IPv6Address

IPv6 address of the interface.

Vnic0IPv6Netmask

Vnic1IPv6Netmask

Vnic2IPv6Netmask

IPv6 prefix of the interface.

Vnic0IPv6SkipGateway

Vnic1IPv6SkipGateway

Vnic2IPv6SkipGateway

Options are True or False.

Selecting True skips configuring a gateway.

Vnic0IPv6Gateway

Vnic1IPv6Gateway

Vnic2IPv6Gateway

IPv6 address of the vNIC gateway.

DNS servers
DNSSEC

Options are False, True, or Allow-Downgrade.

The default value is False

Select True to use DNS security extensions.

DNSTLS

Options are False, True, and Opportunistic.

The default value is False.

Select True to use DNS over TLS.

mDNS

Options are False, True, and Resolve. Select True to use multicast DNS.

The default value is False.

If you choose Resolve, only resolution support is enabled. Responding is disabled.

LLMNR

Options are False, True, Opportunistic, or Resolve.

The default value is False.

If you choose Resolve, only resolution support is enabled. Responding is disabled.

Select True to use link-local multicast name resolution.

NTPv4 servers
NTPAuth

Select True to use NTPv4 authentication.

The default value is False.

NTPKey

Key IDs to map to the server list. Enter a space-delimited list of Key IDs.

NTPKeyFile

SCP URI to the chrony key file.

NTPKeyFilePwd

Password of SCP URI to the chrony key file.

Remote syslog server
UseRemoteSyslog Options are True and False. Select True to send Syslog messages to a remote host.

The default value is False.

Configuring an external syslog server sends service events (CLI/MDT/SNMP/gNMI) to the external syslog server. Otherwise, they are logged only to the Crosswork Data Gateway VM.

If you want to use an external syslog server, specify the following settings:

  • Use Remote Syslog Server

  • Syslog Server Address

  • Syslog Server Port

  • Syslog Server Protocol

SyslogAddress

Hostname, IPv4, or IPv6 address of a syslog server accessible in the management interface.

SyslogPort

Port number of the syslog server.

The default port number is 514.

SyslogProtocol

Options are UDP, RELP, or TCP to send the syslog.

The default value is UDP.

SyslogMultiserverMode

Multiple servers in the failover or simultaneous mode. This parameter is applicable only when the protocol is set to a non-UDP value. UDP must use the simultaneous mode.

Options are Simultaneous or Failover.

The default value is Simultaneous.

SyslogTLS

Select True to use TLS to encrypt syslog traffic.

The default value is False.

SyslogPeerName

Syslog server hostname exactly as entered in the server certificate SubjectAltName or subject common name.

SyslogCertChain

PEM formatted root cert of syslog server retrieved using SCP.

The host with the URI files must be reachable on the network (from vNIC0 interface via SCP) and the files must be present at the time of install.

SyslogCertChainPwd

Password of SCP user to retrieve Syslog certificate chain.

Remote auditd server
UseRemoteAuditd Options are True and False. The default value is False.Select True to send auditd messages to a remote host.

If desired, you can configure an external Auditd server. Crosswork Data Gateway sends audit notifications to the Auditd server when it is configured and present on the network.

Specify these three settings to use an external Auditd server.

AuditdAddress

Hostname, IPv4, or IPv6 address of an optional Auditd server.

AuditdPort

Port number of an optional Auditd server.

The default port is 60.

Controller and proxy settings
ControllerIP

The Virtual IP address or the hostname of the Cisco Crosswork cluster.

Note


If you are using an IPv6 address, it must be surrounded by square brackets ([1::1]).

If geo redundancy is enabled, use the unified endpoint. For more information, see Unified Endpoint Requirements.

This is required so that the Data Gateway can enroll with the Crosswork server during the installation and initial start up. Excluding this step requires you to manually ingest the certificate. For more information, see Import Controller Signing Certificate File.

ControllerPort

Port of the Cisco Crosswork controller.

The default port is 30607.

ControllerSignCertChain

PEM formatted root cert of Cisco Crosswork to validate signing certs retrieved using SCP. Cisco Crosswork generates the PEM file and is available at the following location: cw-admin@<Crosswork_VM_ Management_VIP_Address>:/home/cw-admin/controller.pem

Note


If you are using an IPv6 address, it must be surrounded by square brackets ([1::1]).

Crosswork Data Gateway requires the Controller Signing Certificate File to enroll automatically with Cisco Crosswork.

If you specify these parameters during the installation, the certificate file is imported once Data Gateway boots up for the first time.

If you do not specify these parameters during installation, then import the certificate file manually by following the procedure Import Controller Signing Certificate File.

ControllerTlsCertChain

Cisco Crosswork Controller PEM formatted SSL/TLS certificate file retrieved using SCP.

ControllerCertChainPwd

Password of SCP user (cw-admin) to retrieve Cisco Crosswork certificate chain.

ProxyURL

URL of the HTTP proxy server.

The proxy parameters apply to the Crosswork Data Gateway cloud deployment.

The Data Gateway must connect to the Internet via TLS, and a proxy server may be required if it is not present in your environment.

If you want to use a proxy server, specify these parameters.

ProxyBypass

Comma-delimited list of addresses and hostnames that will not use the proxy server.

ProxyUsername

Username for authenticated proxy servers.

ProxyPassphrase

Passphrase for authenticated proxy servers.

ProxyCertChain

HTTPS proxy PEM formatted SSL/TLS certificate file retrieved using SCP.

ProxyCertChainPwd

Password of SCP user to retrieve proxy certificate chain.

Geo redundancy settings
az_id

The physical location of Availability Zone 1 and 2.

region_id

The physical location of the Data Gateway VM.

site_location

The location of the primary and second Crosswork sites.

During enrollment, Crosswork sends this value to cdg-manager to preset the cluster affiliation of the instance.

1 vNIC0, vNIC1, and vNIC2 based on the number of interfaces you choose to use.
2 vNIC0, vNIC1, and vNIC2 based on the number of interfaces you choose to use

Note


  • vNIC IPv4 or IPv6 addresses:

    • When using two or three NICs both vNIC0 and vNIC1 must be assigned static IPv4 or IPv6 addresses.

    • All unused vNICs (IPv4 or IPv6) should be left set to Method "None" with the other fields left at the default.

  • Interfaces: In a 3-NIC deployment, you must provide an IP address for Management Traffic (vNIC0) and Control or Data Traffic (vNIC1). The IP address for Device Access Traffic (vNIC2) is assigned during Data Gateway pool creation as explained in the Create a Crosswork Data Gateway Pool section in the Cisco Crosswork Network Controller 7.1 Administration Guide.

  • Although the IP address is assigned when the Data Gateway is added to a pool, you must configure network connectivity for the third interface either during installation or before adding the Data Gateway to the pool.

  • The vNIC role assignment allows you to control the traffic that an interface must handle. If your use case is not supported by the preassigned roles, you can manually assign roles to the interfaces. Each parameter has a predefined role. The parameter accepts the interface value as eth0, eth1, or eth2, which refer to vNIC0, vNIC1, or vNIC2 respectively.


Install Crosswork Data Gateway using the CLI

You must install Crosswork Data Gateway on KVM to enable it to collect and transport network data to the Crosswork Network Controller. Repeat the installation process for each Data Gateway that you must set up.

Before you begin

Ensure you are familiar with the requirements and have the necessary information ready:

Guideline to configure high availability in Crosswork Data Gateway

If you plan to deploy multiple Crosswork Data Gateway VMs either to meet load and scale requirements or to enable HA, follow this sequence:

  1. Install all Data Gateway VMs.

  2. Add the VMs to a Data Gateway pool.

See the Create a Crosswork Data Gateway pool section in the Cisco Crosswork Network Controller 7.1 Administration Guide.

Procedure


Step 1

On the KVM server, create a user directory, such as cdg_deploy, in the /home folder. This directory acts as the central location for storing all deployment-related files.

mkdir -p /home/cdg-deploy

Step 2

Navigate to the newly created directory.

cd /home/cdg-deploy/

Step 3

Download the Crosswork Data Gateway installation file, then extract it.

wget cdg-cloud-deployment-7.1.0-17.bios.qcow2.tar.gz
tar -xf cdg-cloud-deployment-7.1.0-17.bios.qcow2.tar.gz
tar -xf cw-na-dg-7.1.0-17-release-20250528.bios.tar.gz
The first command extracts the release verification file and the QCOW2 tar files. The second command extracts the QCOW2 images and the config.txt file. See Sample configuration file for IPv4 and Sample configuration file for IPv6.

Step 4

Create a folder named $cdg_name.

mkdir -p $cdg_name

Step 5

Copy the config.txt file, extracted in Step 4, to the cdg_deploy folder.

cp cdg-cloud-deployment-7.1.0-17.bios.qcow2 $cdg_name
vi config.txt
  1. If you want to deploy multiple Crosswork Data Gateways in a single deployment, run:

cp cdg-cloud-deployment-7.1.0-17.bios.qcow2 $cdg_name
cp config.txt $cdg_name
cd $cdg_name
vi config.txt

Note


In config.txt, modify only the values required for your deployment. Do not modify the default values provided for the remaining parameters. If changes are necessary, contact the Cisco Customer Experience team for guidance.

Step 6

Create a data disk file with the required size (in GB) to allocate disk space for Crosswork Data Gateway. The required size depends on the deployment profile. See Resource footprint for KVM.

qemu-img create -f qcow2 {cdg_name}-datadisk ${data_disk}

Step 7

Create the ISO file.

mkisofs -R -relaxed-filenames -joliet-long -iso-level 3 -l -o {cdg_name}.iso config.txt

Step 8

Replace the parameter values in the config.txt file as needed.

The parameters include:
  • ram_value: The required RAM for installing Crosswork Data Gateway depends on the deployment profile you select.

  • no_of_cpu: The number of CPUs required for installing Crosswork Data Gateway depends on the deployment profile you choose.

  • qcow2_file_name: The name of the qcow2 file extracted in Step 4.

  • cdg_name: The name of Crosswork Data Gateway you want to install.

For a complete list of parameters, refer to Parameters required for Crosswork Data Gateway installation.

Step 9

Install Crosswork Data Gateway.

  • To use network bridges, perform these steps:

    • 2-NIC deployment:

      virt-install --boot hd,cdrom --connect qemu:///system --virt-type kvm --name cdg33 --ram ${ram_value} --vcpus {no_of_cpu} --cpu host-passthrough --disk path={qcow2_file_name},format=qcow2 --disk path={cdg_name}-datadisk,format=qcow2 --disk={cdg_name}.iso,device=cdrom  --os-variant ubuntu-lts-latest --import --network bridge={intMgmt},model=virtio --network bridge={intData},model=virtio &
    • 3-NIC deployment:

      virt-install --boot hd,cdrom --connect qemu:///system --virt-type kvm --name cdg33 --ram ${ram_value} --vcpus {no_of_cpu} --cpu host-passthrough --disk path={qcow2_file_name},format=qcow2 --disk path={cdg_name}-datadisk,format=qcow2 --disk={cdg_name}.iso,device=cdrom  --os-variant ubuntu-lts-latest --import --network bridge={intMgmt},model=virtio --network bridge={intData},model=virtio --network bridge={intDevices},model=virtio &
  • To use SRIOV, perform these steps:

    • 2-NIC deployment:

      virt-install --boot hd,cdrom --connect qemu:///system --virt-type kvm --name cdg33 --ram
      ${ram_value} --vcpus {no_of_cpu} --cpu host-passthrough --disk
      path={qcow2_file_name},format=qcow2 --disk path={cdg_name}-datadisk,format=qcow2
      --disk={cdg_name}.iso,device=cdrom --os-variant ubuntu-lts-latest --import --os-variant ubuntu-lts-latest –import --host-device=pci_0000_17_0e_1 --host-device=pci_0000_17_06_1 &
    • 3-NIC deployment:

      virt-install --boot hd,cdrom --connect qemu:///system --virt-type kvm --name cdg33 --ram
      ${ram_value} --vcpus {no_of_cpu} --cpu host-passthrough --disk
      path={qcow2_file_name},format=qcow2 --disk path={cdg_name}-datadisk,format=qcow2
      --disk={cdg_name}.iso,device=cdrom --os-variant ubuntu-lts-latest --import --os-variant ubuntu-lts-latest –import --host-device=pci_0000_17_0e_1 --host-device=pci_0000_17_06_1 --host-device=pci_0000_17_02_1 & 

    Note


    If the VNC console for the Data Gateway is not available on the KVM server after deploying Data Gateway, append the following parameters to the end of the command and redeploy the Data Gateway.

    --graphics vnc,listen=0.0.0.0 --video virtio --noautoconsole

    For example,

    virt-install --boot hd,cdrom --connect qemu:///system --virt-type kvm --name railtel-cdg-2 --ram 114688 --vcpus 20 --cpu host-passthrough --disk path=cw-na-dg-7.1.0-17-release-20250528.bios.qcow2,format=qcow2 --disk path=railtel-cdg-2-datadisk,format=qcow2 --disk=railtel-cdg-2.iso,device=cdrom --os-variant ubuntu-lts-latest --import --network bridge=intMgmt,model=virtio --network bridge=intData,model=virtio --network bridge=intSouthbound,model=virtio --graphics vnc,listen=0.0.0.0 --video virtio --noautoconsole

What to do next

Access the Cockpit UI to view the health details of the VM. See Access and manage the Crosswork Data Gateways on KVM.

Sample configuration file for IPv4

The configuration file config.txt contains all parameters required to deploy Crosswork Data Gateway with 3 NICs on KVM.


Note


  • In a 2-NIC deployment, NicSBData is set to eth1. In a 3-NIC deployment, it is set to eth2.

  • Only the mandatory parameteres are prefilled in the config.txt.


AllowRFC8190=Yes
AuditdAddress=
AuditdPort=60
AwsIamRole=
CloudEnrollmentToken=
ControllerCertChainPwd=controller_pwd
ControllerIP=controller_ip
ControllerPort=30607
ControllerSignCertChain=cw-admin@{controller_ip}:/home/cw-admin/controller.pem
ControllerTlsCertChain=
Deployment=Crosswork On-Premise
Description=CDG Base VM for Automation
DGAppdataDisk=5
DGCertChain=
DGCertChainPwd=
DGCertKey=
DNS=dns
DNSSEC=False
DNSTLS=False
Domain=domain
EnrollmentPassphrase=
EnrollmentURI=
HANetworkMode=L2
Hostname=host_name
Label=
LLMNR=False
mDNS=False
NicAdministration=eth0
NicControl=eth0
NicDefaultGateway=eth0
NicExternalLogging=eth0
NicManagement=eth0
NicNBExternalData=eth1
NicNBSystemData=data_interface
NicSBData=eth2
NTP=ntp
NTPAuth=False
NTPKey=
NTPKeyFile=
NTPKeyFilePwd=
Profile=profile
ProxyBypass=
ProxyCertChain=
ProxyCertChainPwd=
ProxyPassphrase=
ProxyURL=
ProxyUsername=
SyslogAddress=
SyslogCertChain=
SyslogCertChainPwd=
SyslogMultiserverMode=simultaneous
SyslogPeerName=
SyslogPort=514
SyslogProtocol=UDP
SyslogTLS=False
UseRemoteAuditd=False
UseRemoteSyslog=False
Vnic0IPv4Address=mgmt_ip
Vnic0IPv4Gateway=mgmt_gateway
Vnic0IPv4Method=Static
Vnic0IPv4Netmask=IPv4_netmask
Vnic0IPv4SkipGateway=False
Vnic0IPv6Address=::0
Vnic0IPv6Gateway=::1
Vnic0IPv6Method=None
Vnic0IPv6Netmask=64
Vnic0IPv6SkipGateway=False
Vnic1IPv4Address=data_ip
Vnic1IPv4Gateway=data_gateway
Vnic1IPv4Method=Static
Vnic1IPv4Netmask=IPv4_netmask
Vnic1IPv4SkipGateway=False
Vnic1IPv6Address=IPv6_address
Vnic1IPv6Gateway=IPv6_gateway_address
Vnic1IPv6Method=None
Vnic1IPv6Netmask=64
Vnic1IPv6SkipGateway=False
Vnic2IPv4Address=IPv4_address
Vnic2IPv4Gateway=IPv4_gateway_address
Vnic2IPv4Method=None
Vnic2IPv4Netmask=IPv4_netmask_address
Vnic2IPv4SkipGateway=False
Vnic2IPv6Address=IPv4_address
Vnic2IPv6Gateway=IPv4_gateway_address
Vnic2IPv6Method=None
Vnic2IPv6Netmask=IPv4_netmask
Vnic2IPv6SkipGateway=False
Vnic3IPv4Address=IPv4_address
Vnic3IPv4Gateway=IPv4_gateway_address
Vnic3IPv4Method=None
Vnic3IPv4Netmask=IPv4_netmask_address
Vnic3IPv4SkipGateway=False
Vnic3IPv6Address=IPv4_address
Vnic3IPv6Gateway=IPv4_gateway_address
Vnic3IPv6Method=None
Vnic3IPv6Netmask=64
Vnic3IPv6SkipGateway=False
dg-adminPassword=admin_password
dg-operPassword=operator_password

Sample configuration file for IPv6

The configuration file config.txt contains all parameters required to deploy Crosswork Data Gateway with 3 NICs on KVM.


Note


  • In a 2-NIC deployment, NicSBData is set to eth1. In a 3-NIC deployment, it is set to eth2.

  • Only the mandatory parameteres are prefilled in the config.txt.


AllowRFC8190=Yes
AuditdAddress=
AuditdPort=60
AwsIamRole=
CloudEnrollmentToken=
ControllerCertChainPwd=controller_pwd
ControllerIP=[controller_ip]
ControllerPort=30607
ControllerSignCertChain=cw-admin@[controller_ip]:/home/cw-admin/controller.pem
ControllerTlsCertChain=
Deployment=Crosswork On-Premise
Description=cdg 165 ipv6 only
DGAppdataDisk=5
DGCertChain=
DGCertChainPwd=
DGCertKey=
DNS=dns
DNSSEC=False
DNSTLS=False
Domain=domain
EnrollmentPassphrase=
EnrollmentURI=
HANetworkMode=L2
Hostname=host_name
Label=
LLMNR=False
mDNS=False
NicAdministration=eth0
NicControl=eth1
NicDefaultGateway=eth0
NicExternalLogging=eth0
NicManagement=eth0
NicNBExternalData=eth1
NicNBSystemData=eth1
NicSBData=eth2
NTP=ntp
NTPAuth=False
NTPKey=
NTPKeyFile=
NTPKeyFilePwd=
Profile=Standard
ProxyBypass=
ProxyCertChain=
ProxyCertChainPwd=
ProxyPassphrase=
ProxyURL=
ProxyUsername=
SyslogAddress=
SyslogCertChain=
SyslogCertChainPwd=
SyslogMultiserverMode=simultaneous
SyslogPeerName=
SyslogPort=514
SyslogProtocol=UDP
SyslogTLS=False
UseRemoteAuditd=False
UseRemoteSyslog=False
Vnic0IPv4Address=IPv4_address
Vnic0IPv4Gateway=IPv4_gateway_address
Vnic0IPv4Method=None
Vnic0IPv4Netmask=IPv4_netmask_address
Vnic0IPv4SkipGateway=False
Vnic0IPv6Address=mgmt_ip
Vnic0IPv6Gateway=mgmt_gateway
Vnic0IPv6Method=Static
Vnic0IPv6Netmask=64
Vnic0IPv6SkipGateway=False
Vnic1IPv4Address=IPv4_address
Vnic1IPv4Gateway=IPv4_gateway_address
Vnic1IPv4Method=None
Vnic1IPv4Netmask=IPv4_netmask_address
Vnic1IPv4SkipGateway=False
Vnic1IPv6Address=data_ip
Vnic1IPv6Gateway=data_gateway
Vnic1IPv6Method=Static
Vnic1IPv6Netmask=64
Vnic1IPv6SkipGateway=False
Vnic2IPv4Address=IPv4_address
Vnic2IPv4Gateway=IPv4_gateway_address
Vnic2IPv4Method=None
Vnic2IPv4Netmask=IPv4_netmask_address
Vnic2IPv4SkipGateway=False
Vnic2IPv6Address=::0
Vnic2IPv6Gateway=::1
Vnic2IPv6Method=None
Vnic2IPv6Netmask=64
Vnic2IPv6SkipGateway=False
Vnic3IPv4Address=IPv4_address
Vnic3IPv4Gateway=IPv4_gateway_address
Vnic3IPv4Method=None
Vnic3IPv4Netmask=IPv4_netmask_address
Vnic3IPv4SkipGateway=False
Vnic3IPv6Address=::0
Vnic3IPv6Gateway=::1
Vnic3IPv6Method=None
Vnic3IPv6Netmask=64
Vnic3IPv6SkipGateway=False
dg-adminPassword=admin_password
dg-operPassword=operator_password

Access and manage the Crosswork Data Gateways on KVM

After installing Crosswork Data Gateway on KVM, monitor the health and performance of your VM from the Cockpit UI. This UI allows you to manage VMs and perform administrative tasks.

Procedure


Step 1

Install Cockpit on the server.

sudo dnf install cockpit

Step 2

Enable the Cockpit socket.

systemctl enable --now cockpit.socket

Step 3

Access the Cockpit UI, using https://<bare-metal-ip>:9090.

Step 4

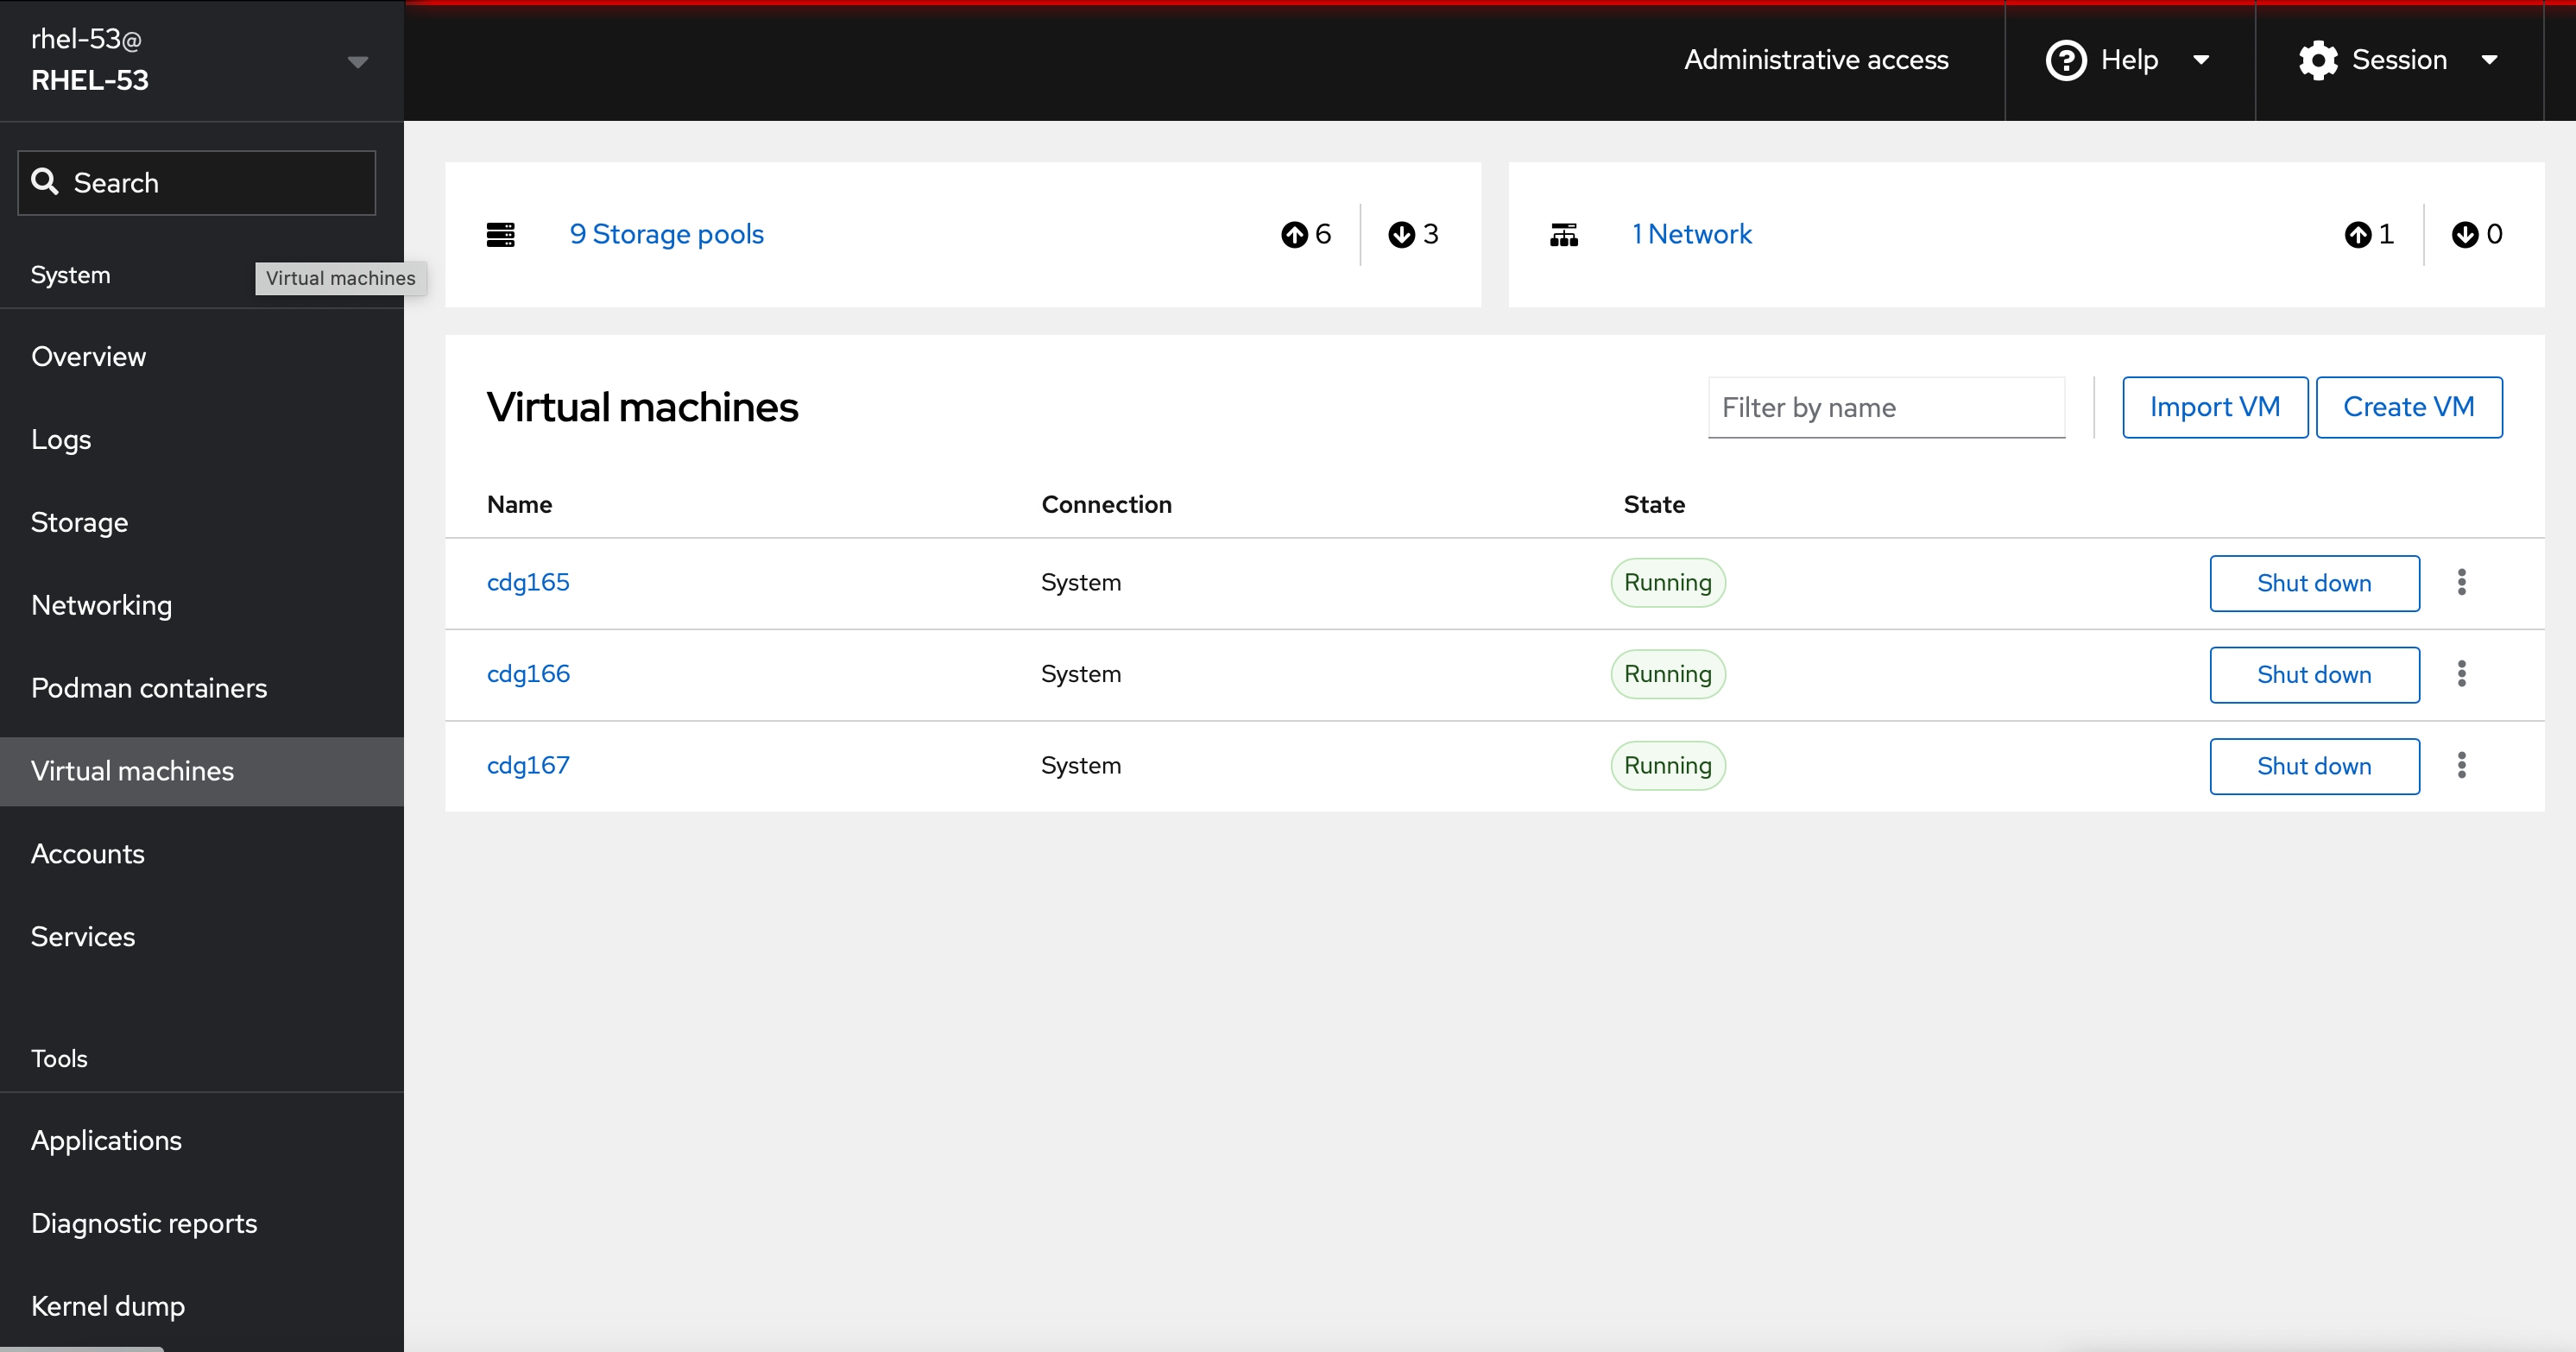
In the Cockpit UI, navigate to Virtual machines on the left menu. The Virtual machines pane displays the virtual machines where Crosswork Data Gateway is installed.

Figure 1. Cockpit UI

Step 5

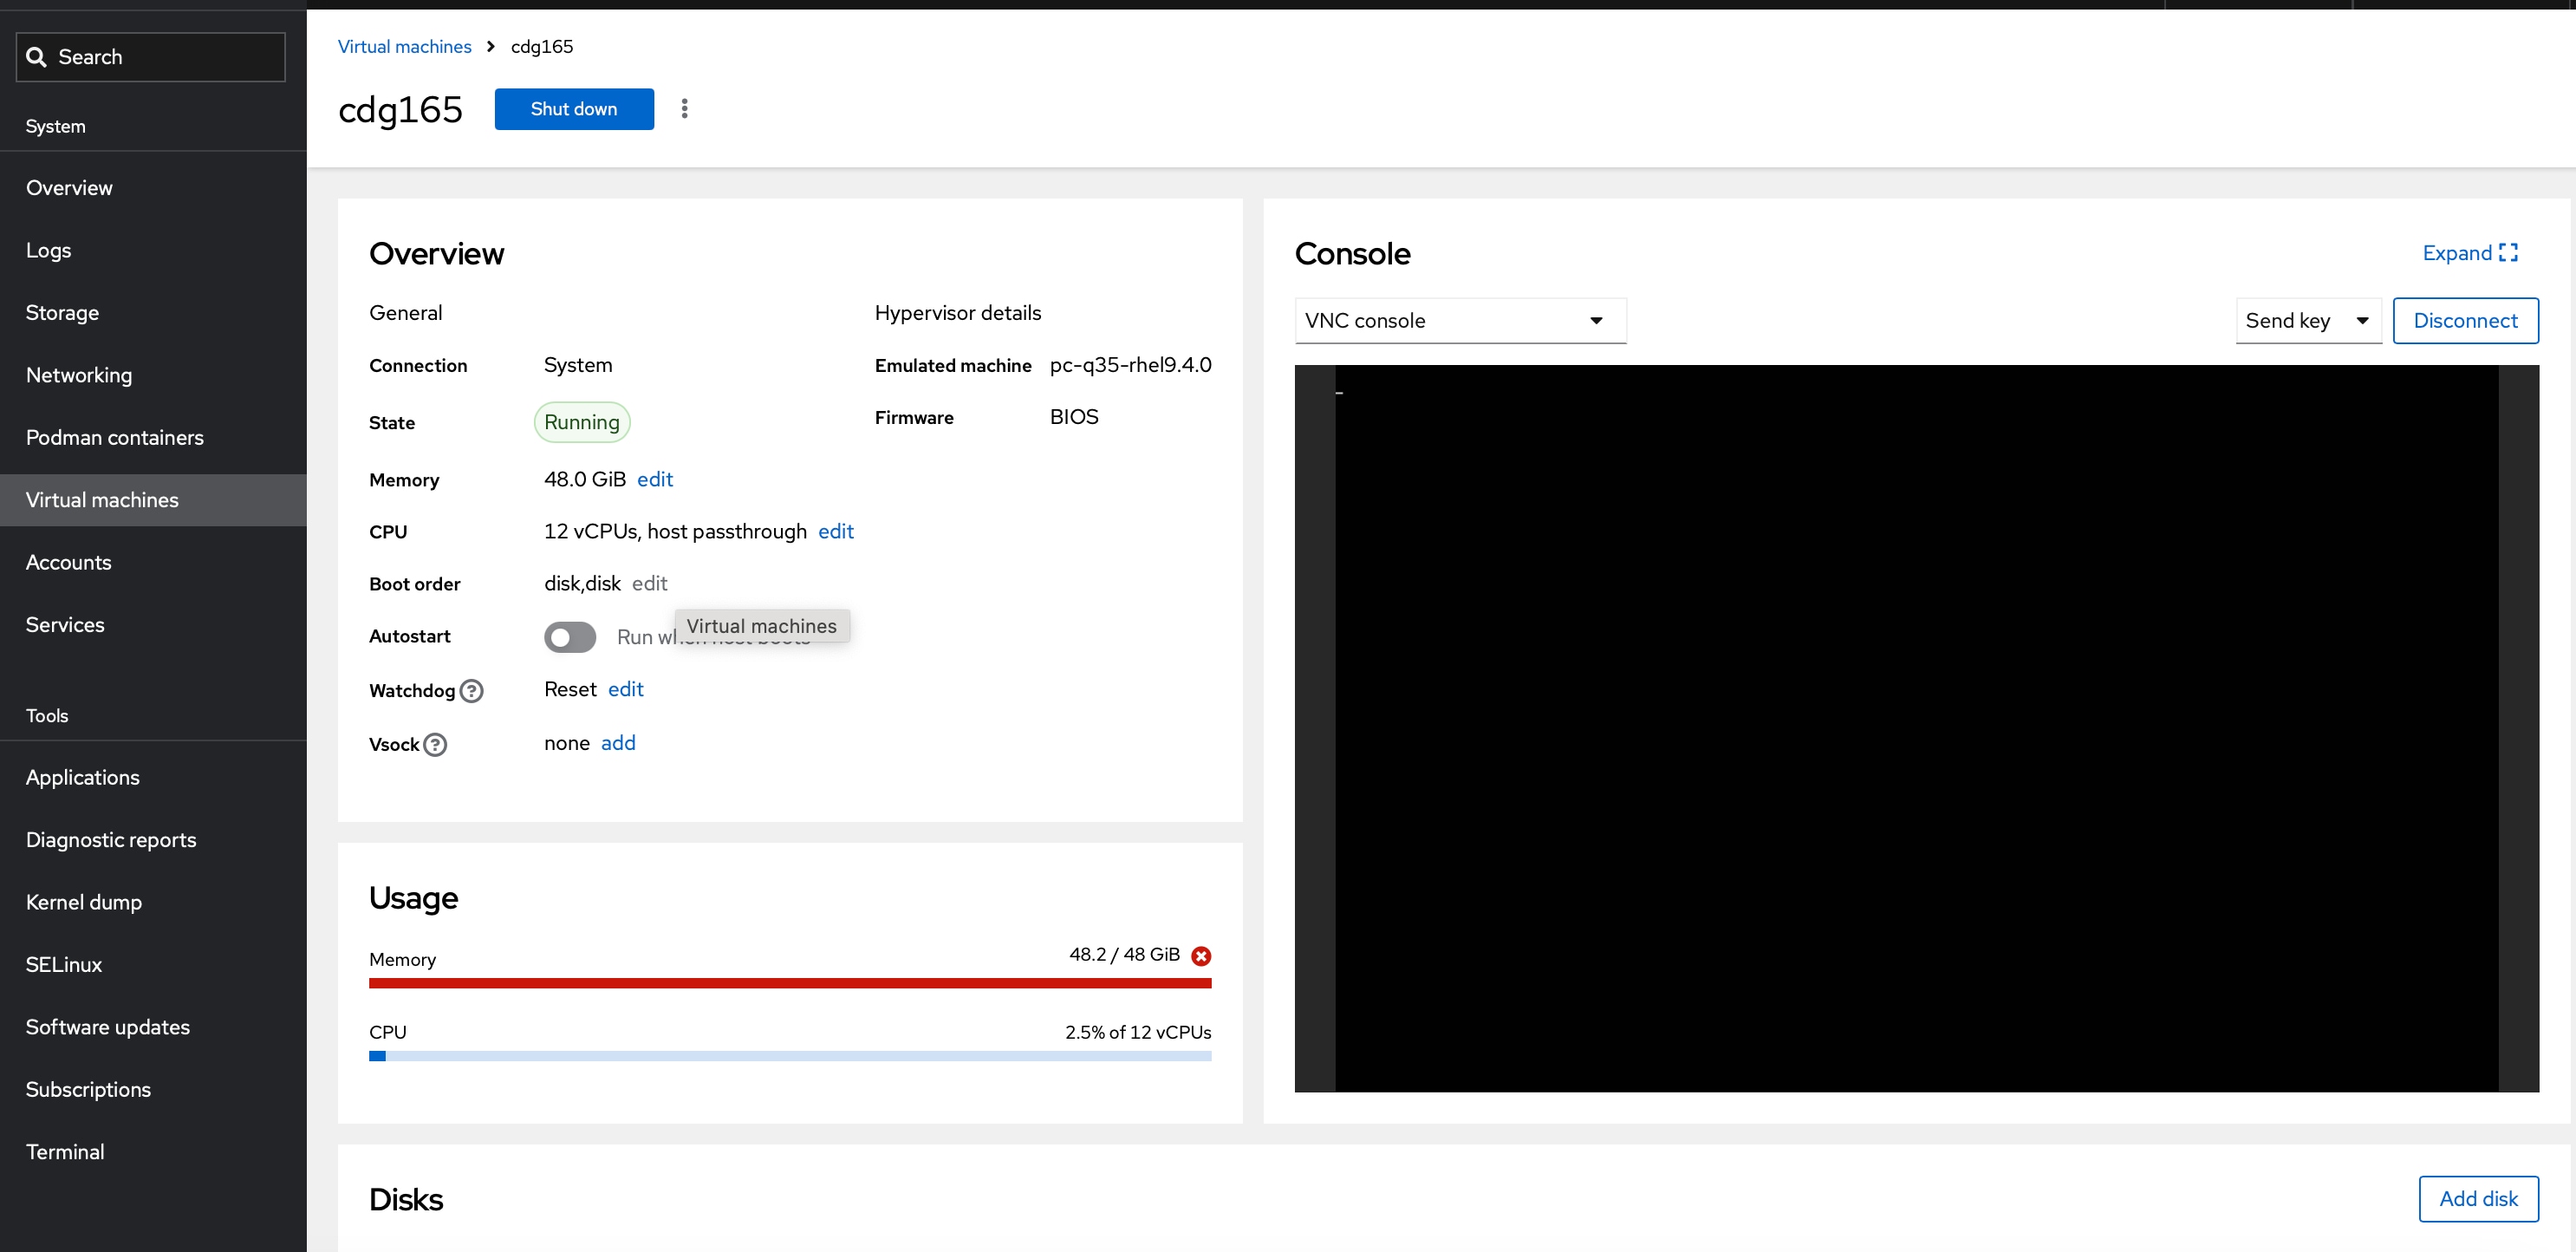
Click the VM name to view the connection, state, memory and other health details.

Figure 2. Virtual machines details

For more information about Cockpit, see the Cockpit documentation.